EHQ Power VPA600MB User manual
VPA600MB
POWERFUL AMPLIFIER - 2 x 600W RMS (19"), BRIDGEABLE
KRACHTIGE VERSTERKER - 2 x 600W RMS (19"), BRUGSCHAKELING MOGELIJK
AMPLIFICATEUR PUISSANT - 2 x 600W RMS (19"), PONTABLE
AMPLIFICADOR DE POTENCIA - 2 x 600W RMS (19"), PUENTE
LEISTUNGSFÄHIGER VERSTÄRKER - 2 x 600W RMS (19"), ÜBERBRÜCKBAR
USER MANUAL
GEBRUIKERSHANDLEIDING
NOTICE D’EMPLOI
MANUAL DEL USUARIO
BEDIENUNGSANLEITUNG

VPA600MB VELLEMAN
2

VPA600MB VELLEMAN
3
VPA600MB – POWERFUL AMPLIFIER - 2 x 600W RMS (19"), BRIDGEABLE
1. Introduction
To all residents of the European Union
Important environmental information about this product
This symbol on the device or the package indicates that disposal of the device after its lifecycle could harm
the environment.
Do not dispose of the unit (or batteries) as unsorted municipal waste; it should be taken to a specialized
company for recycling.
This device should be returned to your distributor or to a local recycling service.
Respect the local environmental rules.
If in doubt, contact your local waste disposal authorities.
Thank you for buying the VPA600MB power amplifier! Please read the manual thoroughly before bringing this device
into service. If the device was damaged in transit, don't install or use it and contact your dealer.
2. Safety Instructions
•Damage caused by disregard of certain guidelines in this manual is not covered by the warranty and the dealer
will not accept responsibility for any ensuing defects or problems.
•A qualified technician should install and service this device.
•Do not switch the device on immediately after it has been exposed to changes in temperature. Protect the device
against damage by leaving it switched off until it has reached room temperature.
•This device falls under protection class I. It is therefore essential that the device be earthed. Have a qualified
person carry out the electric connection.
•Make sure that the available voltage does not exceed the voltage stated in the specifications of this manual.
•Do not crimp the power cord and protect it against damage. Have an authorized dealer replace it if necessary.
•Disconnect the device from the mains to clean it or when it is not in use. Handle the power cord by the plug only.
•There may be a particular smell when the device is activated for the first time. This is normal and any smell will
gradually disappear.
•Note that damage caused by user modifications to the device is not covered by the warranty.
•Keep the device away from children and unauthorized users.
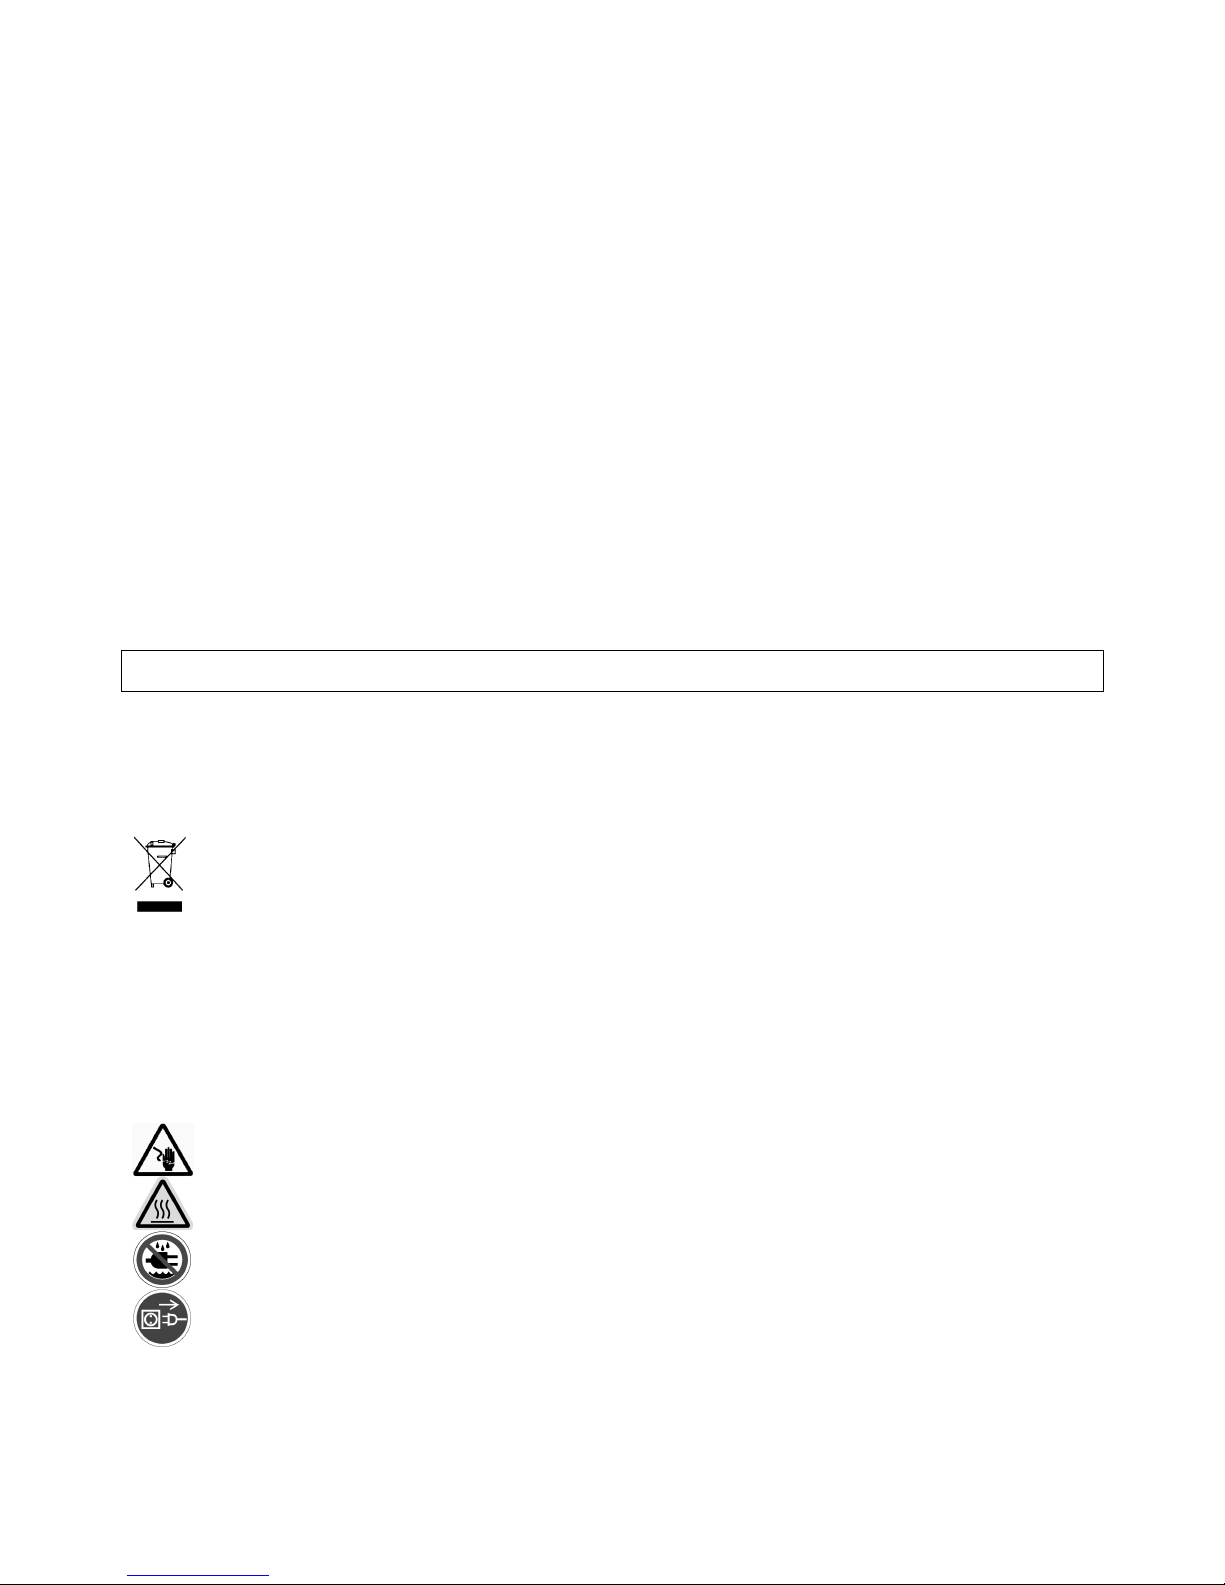
3. Safety Labels
Please respect the prescriptions on the safety labels!
Be very careful during the installation: touching live wires can cause life-threatening electroshocks.
Do not touch the device during operation as the housing heats up.
Keep this device away from rain and moisture.
Unplug the mains lead before opening the housing.
Read the manual attentively before bringing the device into
service.
Only qualified personnel
should use this device.
Have a qualified technician service the device and connect it to the mains. Beware of the high
voltage at the screw connection. Turn off the amplifier before connecting the device.
Loud noise hazard. Protect your ears.

VPA600MB VELLEMAN
4
4. General Guidelines
•This device is a professional audio amplifier for amplifying audio signals. This product is allowed to be operated
with an alternating current of 230VAC / 50Hz or 115VAC / 60Hz and was designed for indoor use only.
•This device is designed for mobile use and permanent transportation.
•Important remark: the operation of an amplification system in public or industrial areas is subject to specific safety
instructions. Contact the proper authorities for more information.
•Do not shake the device. Avoid brute force when installing or operating the device.
•Choose an installation spot where the device will not be exposed to extreme heat, moisture or dust. Don’t leave
cables lying around. They only endanger your own safety and that of others.
•Only use the device in an ambient temperature of -5°C to +45°C. Keep away from direct insulation and heaters.
•The relative humidity must not exceed 50%.
•Always disconnect the device from the mains during thunderstorms as over-voltage could destroy the device.
•Familiarize yourself with the functions of the device before actually using it. Do not allow operation by unqualified
people. Any damage that may occur will most probably be due to unprofessional use of the device.
•Never use solvents or aggressive detergents in order to clean the device. Use a soft and damp cloth.
•Please use the original packaging if the device has to be transported.
•Removing the serial bar code from the device will void the warranty.
•All modifications of the device are forbidden for safety reasons.
•Operate the device in the way described in this manual and only use the device for its intended purpose. All other
uses may lead to short circuits, burns, electroshocks, hearing loss, etc. The warranty automatically becomes void
in case of improper use.
•The figures in this manual describe the VPA600MB. Other models and their features are comparable with the
VPA600MB.
5. Legal Provisions
•Operating an amplification system can produce extremely high noise levels that may cause permanent hearing
loss. The legal instructions for using an amplification system vary from country to country. The user is responsible
for respecting the legal provisions applicable in his country.
•Always monitor the sound pressure level when operating an amplification system in discos, concerts etc. Never
exceed the permissible noise level as specified by the law.
•Hearing damage caused by high noise levels can be regarded as a physical injury and may lead to criminal
prosecution.
•Please note that the organizer is responsible for respecting maximum noise levels.
6. Information on Hearing Loss
•More and more younger people suffer from hearing loss of 25dB or more, mainly caused by listening to loud
music. Every person operating amplification systems should know to what sound pressure levels he is exposed
to. In a discotheque, average levels of 75dB to 105dB are reached. At a rock concert, the sound pressure levels
can rise from 95dB up to 115dB. Individual peaks can exceed the 130dB pain level. Such levels are typical for
e.g. motor chain saws.
An Overview on the Different Noise Levels
10dB – Heartbeat
25dB – Whisper
40dB – Average home
50dB – Light traffic
60dB – Normal conversation
70dB – Vacuum cleaner
VPA600MB VELLEMAN
5
80dB – Telephone ringing
90dB – Pneumatic drill
100dB – Power mower
120dB – Boom box in car
130dB – Pain level
140dB – Jet plane 30m overhead
•It is important to know that a 3dB increase will double the sound level. The human hearing only recognizes a
doubling of the sound level when the noise level is increased by 10dB. Hearing loss does not depend on the
sound level but on the noise level and starts way before than the pain level.
•Many a one deceives himself by thinking that noise is something you can get accustomed to. Nothing is further
form the truth!
•The reason why some people have got accustomed to a certain noise level and are no longer disturbed, is that
they have already suffered hearing loss. The damage makes the hearing insensitive to the frequencies forming
the loudest part of the noise. Getting accustomed to noise does not mean anything other than trying to get along
with hearing loss in everyday life. Hearing loss cannot be recovered and can only be compensated with hearing
aids. Subjectively, hearing loss feels like having dampened ears. This effect weakens with time but loss in hearing
sensitivity is permanent.
•In order to relax your hearing sufficiently, the noise level should not exceed 70dB for 10 hours. Higher noise levels
during this relaxing period can prevent relaxation and promote permanent hearing damage or hearing loss.
WARNING: Protect your ears if you want to prevent hearing damage!
7. Description
Features:
•outstanding tone
•original appearance and precise manufacturing
•protection circuits
•limiter to prevent speaker damage when the amplifier is overloaded
•high audio frequency performance
•amplifier-on time delay and amplifier-off mute protection protect the speaker from transients
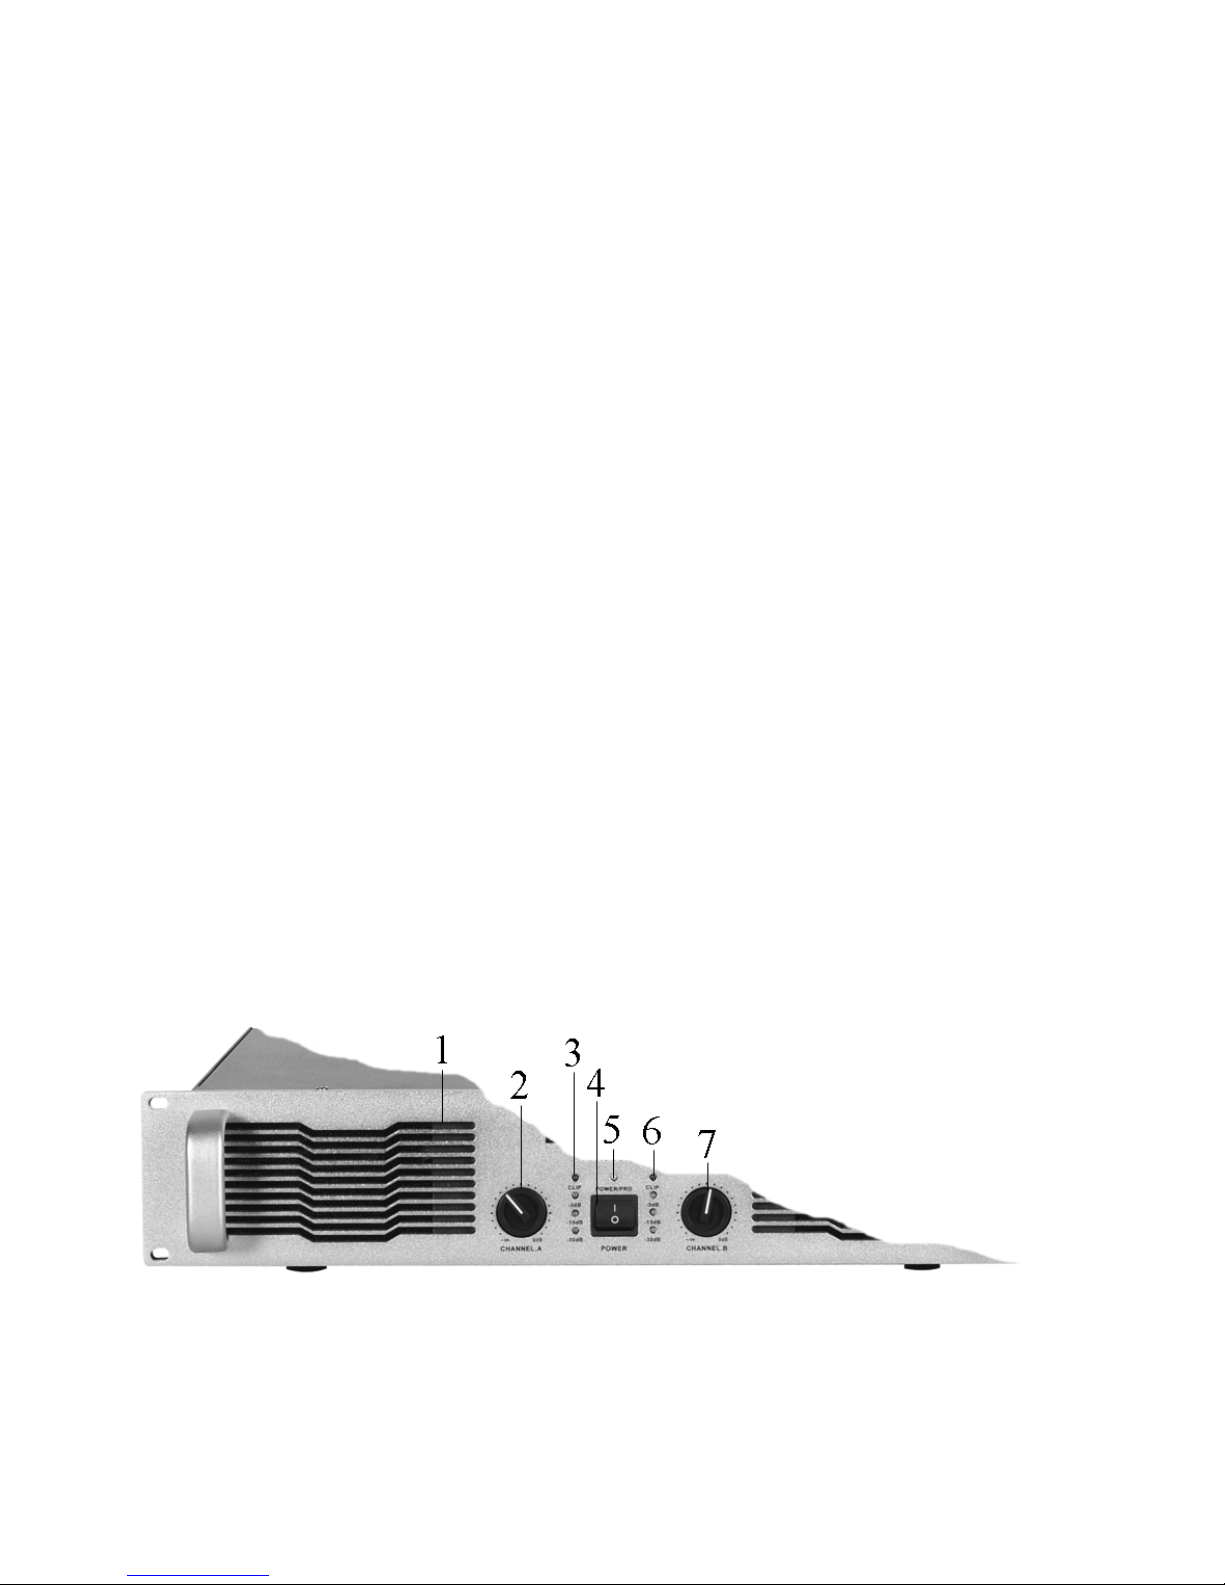
a. Front Panel (fig. 1)
1. Air inlet
Cool air is inhaled from the front and hot air is exhausted from the rear to assure that the amplifier and cabinet
are cool inside.
2. 20-step level control for channel A
In bridged or mono parallel connection mode, only this knob is used.
3. Signal LEDs channel A
The green LED indicator lights to indicate the corresponding level. When the red LED (CLIP) indicator lights, it
means that the amplifier is distorted.
VPA600MB VELLEMAN
6
4. Power switch
Push this switch and the soft-start circuit of the amplifier will be activated. After the soft start, connect with the
speakers. The amplifier will be on standby.
5. LED state indicator
When turning on the VPA600MB, the red/green indicators will both flash. When operating normally, the green
LED will light.
6. Signal LEDs channel B
The green LED indicator lights to indicate the corresponding level. When the red LED (CLIP) indicator lights, it
means that the amplifier is distorted.
7. 20-step level control for channel B
In bridged or mono parallel connection mode, only this knob is used
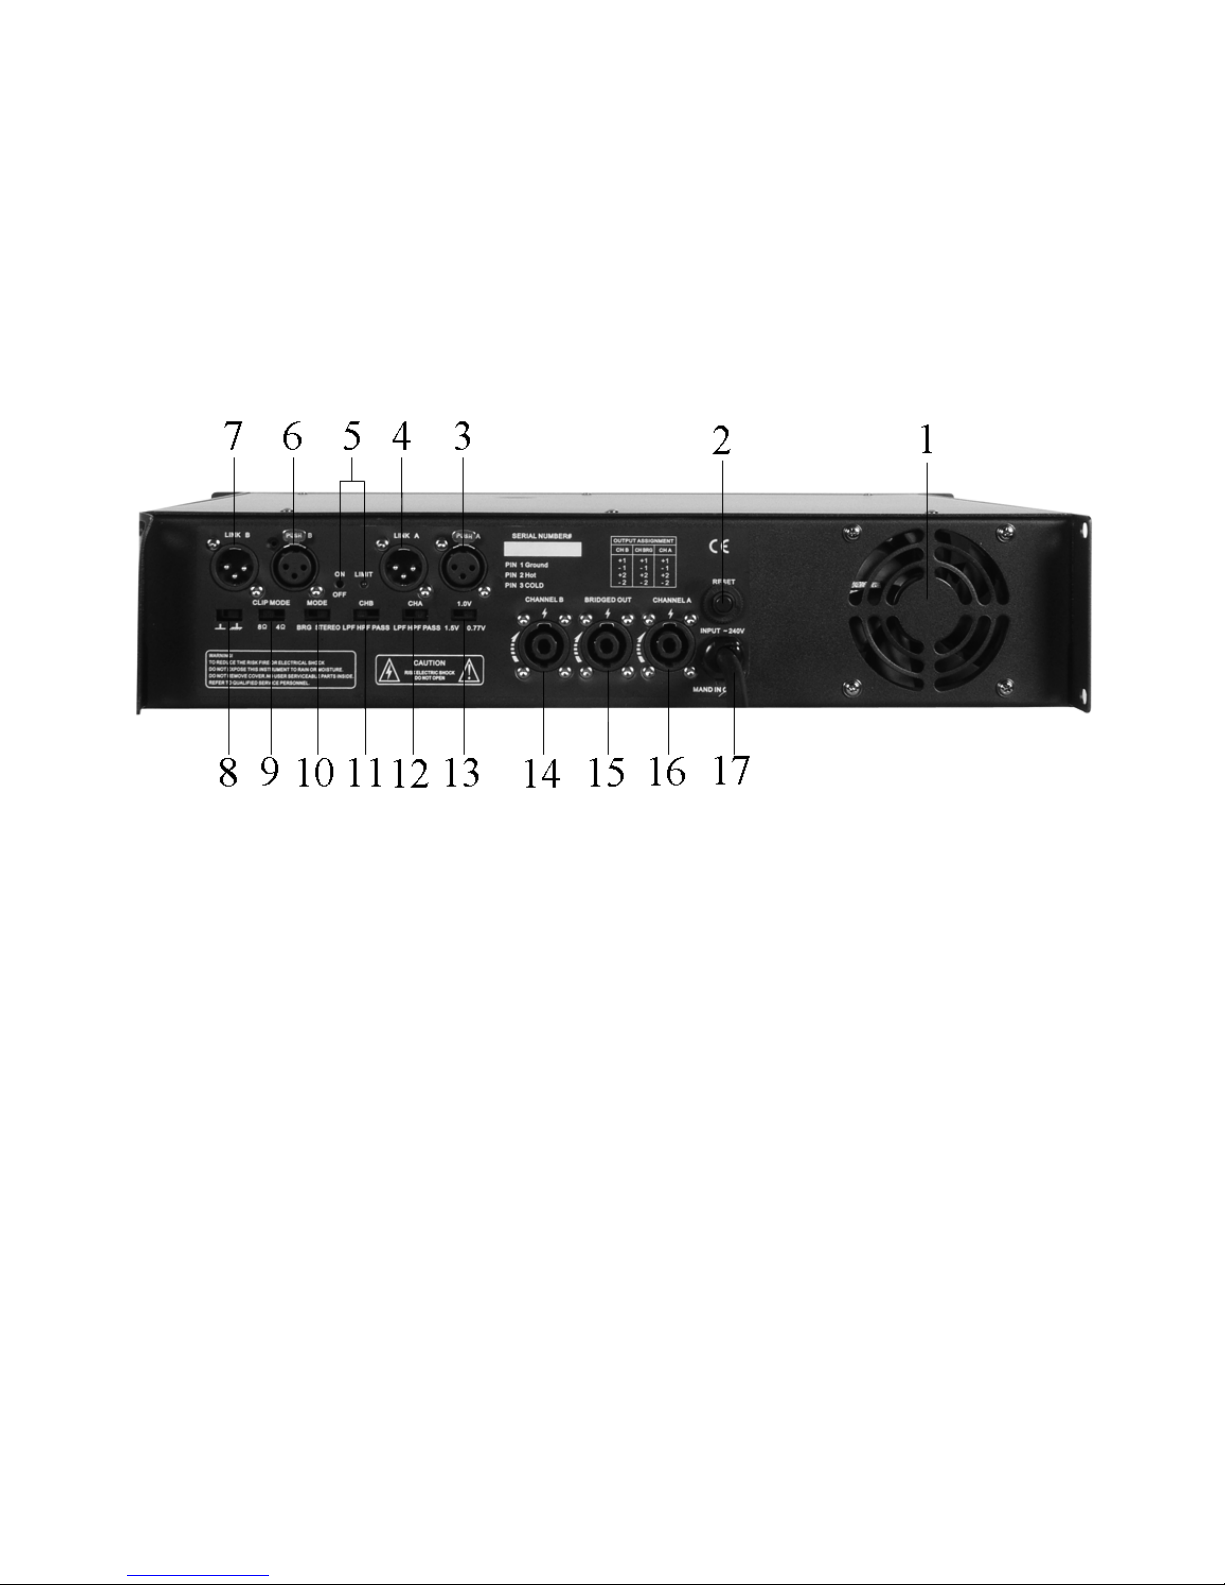
b. Back Panel (fig. 2)
1. Cooling fan with variable speed
Automatically runs when the temperature exceeds 35°C. The speed changes depending on the temperature.
Prevent noise interference when the fan runs.
2. Circuit breaker
Automatically cuts off the power supply in case of over-voltage. The amplifier can easily be reset with this
switch.
3. Channel A XLR input
Wiring: pin 1: signal ground; pin 2: signal + (hot); pin 3: signal – (cold).
4. Channel A XLR input (Link)
Wiring: pin 1: signal ground; pin 2: signal + (hot); pin 3: signal – (cold).
5. Limiter switch and LED indicator
•Turn on/off the limiter switch manually to effectively protect the speaker.
•ON (red light on): the amplifier works within the output rate.
•OFF (red light off): the amplifier output is not controlled.
6. Channel B XLR input
Wiring: pin 1: signal ground; pin 2: signal + (hot); pin 3: signal – (cold).
7. Channel B XLR input (Link)
Wiring: pin 1: signal ground; pin 2: signal + (hot); pin 3: signal – (cold).
8. Suspending / ground switch
When the switch remains suspending, the insulation resistance of the grounding wire and housing exceed 1M
ohms. Otherwise, the grounding wire is connected to the housing.
9. Limiter
4 or 8 ohms limit mode switch (select the appropriate mode according to the impedance).
10.Mode switch (2 possible modes):
•Mono bridged mode: the output voltage is doubled; use 4 ohms or a higher impendence.
•Stereo work mode.

VPA600MB VELLEMAN
7
11.Channel B high / low filter (high: 130-20kHz / low: 20-180Hz).
Cut off the signal outside the channel. Independently use the A / B channel under emergency.
12.Channel A high / low filter (high: 130-20kHz / low: 20-180Hz).
Cut off the signal outside the channel. Independently use the A / B channel under emergency.
13.Input sensitivity selector switch (3 levels):
•0.775V
•1.0V
•1.5V
14.4-points Speakon
®
NL4 output connexion (channel B)
Connection modes: +1-1 or +2-1.
15.4-points Speakon
®
NL4 output connexion (bridge)
Connection modes: +1-1 or +2-1.
16.4-points Speakon
®
NL4 output connexion (channel A)
Connection modes: +1-1 or +2-1.
17.Power cord
8. Installation
Please note: When using an amplified system in public or industrial areas, a series of safety instructions has to be
followed that this manual can only give a part. The operator must inform on the current safety
instructions and consider.
a. Rack Installation
•This amplifier is built for 19” racks. The rack should be fitted with a cooling fan. When mounting the amplifier,
make sure there is enough free space around the device for the evacuation of hot air. Continuous overheating
will damage your device.
•Fix the amplifier with four screws M6.
•Be careful when mounting the amplifier. Put the heaviest device in the lower part of the rack. Note that
fastening the amplifier with four screws on the front panel is not enough. Use additional metal bars to support
the sides and the ground panel of the device.
•Attach the rear bracket to the ground or side bars when the device is to be transported. This keeps the
amplifier from being pushed backwards.
b. Inputs
•A good cable run improves the sound quality remarkably. Input cables should be short and direct, since high
frequencies will mostly be absorbed if the cables are unnecessarily long. Besides that, a longer may lead to
humming and noise trouble. If long cable runs are unavoidable, you should use balanced cables.
•Professionals are recommended to connect the input cables via balanced XLR jacks.
c. Outputs
•The high damping factor of your amplifier ensures a clear sound reproduction. Unnecessarily long and thin
cables will influence the damping factor and thus the low frequencies in a negative way. In order to safeguard
good sound quality, the damping factor should be around 50. The longer a cable, the thicker it should be.
•Connect your speaker systems via the speaker plugs or the banana / screw combination (red+, black-).
Be careful of the high voltage at the screw terminal. Switch off the amplifier before
connecting the device.

VPA600MB VELLEMAN
8
d. Speaker - Socket
•Your amplifier is equipped with 4-pole, lockable speaker sockets. Turn the plug to the right to lock the
connection. To unlock: pull the unlock button, turn to the left and pull the plug out of the socket.
PIN
1 + 2 + +
1 - 2 - -
e. Choosing Appropriate Connection Cables
•Use sufficiently thick cables to connect the speaker system. Thin cables may heat up and cause significant
power loss and loss in sound quality.
•For all speaker systems up to 400W, we recommend a cable diameter of 2.5mm²; for all other speaker cables
it's 4mm².
•The high damping factor of your amplifier ensures a clear sound reproduction. Unnecessarily long and thin
cables will influence the damping factor and thus the low frequencies in a negative way. In order to safeguard
good sound quality, the damping factor should be around 50. The longer a cable, the thicker it should be.
Example: A damping factor of 200 is reduced to 47 (8 ohms) when using a diameter of 2.5mm² speaker cable
of 10m in length. The power loss at 8 ohms is 1.63%, at 4 ohms it’s 3.25% and at 2 ohms it’s as
much as 6.5%.
•The maximum cable length is 30m!
f. Installing the Speaker Cables
•Connect the cable of the first speaker system with speaker outputs CH-1 and output CH-2 of the amplifier. The
signal will be transmitted to the individual speaker systems.
•Always handle the cables with care and protect them from damage in transit.
•Make sure no one can trip over the cables. Always fix them with an appropriate tape.
•Both cables should be of the same type and length.
•Do not loop the cables.
•Always install the cables far away from power cables (never alongside them).
•Never put heavy objects like speaker systems, flight cases etc. on cables.
•Always roll cables loosely round the elbow.
g. Ground Lift Switch
This switch allows the signal ground or chassis ground to be separated in case of a ground conflict. For highest
safety of the equipment, it is recommended to keep the ground lift switch in the GND FLOATING position. In case
of a ground conflict set the ground lift switch to GND LIFT.
h. Connection with the Mains
The wiring of the connection cables is as follows:
Cable PIN International
Brown Live L
Blue Neutral N
Yellow / green Earth
The device must be earthed!
Have a qualified techni
cian carry out the electric connection
!

VPA600MB VELLEMAN
9
9. Operating Modes
Stereo Operation:
This is the normal operation mode of an amplifier, in which every channel gets its own signal. The most commonly
used mode of amplifiers is stereo operation at 4 ohms. Make sure that the operation mode switch is correctly set
(see “7.b.10”).
Remark: The input impedance of the speaker system should at least be the same or even higher than the output
impedance of the amplifier.
Bridged Operation:
Possibility to run the amplifier in mono via one input channel. In bridged operation mode, the voltage is doubled.
Consequently, the output impedance is doubled.
For stereo operation, 2 amplifiers are needed. Connect the input signal to the input CH-1 on the rear panel. Make
sure that the amplifier is disconnected from the mains before you set the operation mode switch on the rear panel
to bridge. Connect your speakers to the red mono bridged speaker socket.
CAUTION! Before switching on your amplifier, please refer to the explanations under “10. Operation”. Adjust the
level with the gain control CH-1 on the front panel.
10.Operation
After connecting your amplifier to the mains, turn both gain controls in an anticlockwise direction to the minimum
position. The last device to be switched on is the amplifier. The ON and PROTECT LED light up now. If not, check if
the amplifier is properly connected to the mains.
After the activation delay the speakers are activated (PROTECT LED is off).
After setting the volume controls of the pre-amplifier in the minimum position, turn the gain controls of your amplifier
to the midway position. If there is any humming, check the connection cables between the pre-amplifier and your
amplifier (switch off components first). Now adjust the volume with gain controls CH-1 and CH-2.
CAUTION! Never set the level of the individual channels so high that the LIMIT LED remains lit continuously. Make
sure the output signal isn’t distorted to avoid damage to your speakers.
All important operating modes of the amplifier can be monitored on the front panel.
SIGNAL output level
LIMIT short circuit or impedance too low or signal distorted
PROTECT activated momentarily when switching on or when one of the protective circuits is activated.
When operating the amplifier system, make sure the sound quality of the loudspeakers is OK. Distortion indicates
that either the amplifier or the loudspeaker is overloaded. Overloads can quickly lead to amplifier or speaker damage.
Reduce the volume immediately to avoid damage. The warranty becomes void when the speaker systems are
damaged by overload.
Always check the sound pressure level with a meter in order not to surpass threshold values.
If you want to switch off the system, switch off the amplifier first and then the pre-amplifiers in order to avoid
transients on the speaker.

VPA600MB VELLEMAN
10
11.Troubleshooting
PROBLEM POSSIBLE CAUSE SOLUTION
No power. •The power cord is not connected. •Check the power cord and any
extension cables.
No sound. •The power cord of the respective
device is not connected properly or
not connected at all.
•The connection socket or the plug
is dirty.
•Check if the power cord and the
plugs are tightly connected with the
sockets.
•Clean the socket and/or the plug.
Noise. •The input signal is too strong. •Reduce the input signal with the
gain control.
Fan does not work; LEDs do not
light. •The power cord is not connected. •Connect the power cord.
PROTECT LED stays lit. •Inputs receive DC voltage.
•Overheating due to clogged fan
grille.
•Impedance of speakers too low.
•Short circuit in speaker connection
or in speaker.
•Technical default of amplifier
•Switch amplifier off and have the
device checked by a service
technician.
•Clean the fan grille.
•Connect other speakers.
•Check speakers.
•Switch amplifier off and have the
device by a service technician.
12.Cleaning and Maintenance
1. All screws should be tightened and free of corrosion.
2. The housing, visible parts, mounting supports and the installation location (e.g. ceiling, suspension, trussing)
should not be deformed, modified or tampered with e.g. do not drill extra holes in mounting supports, do not
change the location of the connections …
3. Moving mechanic parts must not show any signs of wear and tear.
4. The electric power supply cables must not show any damage. Have a qualified technician maintain the device.
5. Disconnect the device from the mains prior to maintenance activities.
6. Wipe the device regularly with a moist, lint-free cloth. Do not use alcohol or solvents.
7. There are no user-serviceable parts.
8. Contact your dealer for spare parts if necessary.
13.Technical Specifications
Power Supply max. 230VAC / 50Hz
Fuse T10A (order code FF10N)
Output Power
Stereo 8 ohms 600W
Stereo 4 ohms 900W
Stereo 2 ohms 1100W
8 ohms bridged 1800W
1KHz 0.1% THD 4 ohms 2000W
Frequency Range 20 ~ 20000Hz, ± 0.1dB
Damping Factor 500:1
S/N Ratio > 105dB
THD (Total Harmonic Distortion) ≤0.01% @ 8 ohms – 1kHz
IMD (Intermodulation Distortion) ≤0.01% @ 8 ohms – 1kHz
Have a qualified technician carry out the electric connection
!
VPA600MB VELLEMAN
11
Slew Rate 80V / sec
Input Sensitivity 0.775V, 1.0V, 1.55V
Input Impedance 10K/20K balanced or unbalanced
Input CMRR ≤-75dB
Cross-talk ≤-70dB
LPF (low-pass filter) 20Hz – 180Hz
HPF (high-pass filter) 130Hz – 20kHz
Input Connectors 2 x XLR
Output connectors 2 x speaker (stereo), 1 x speaker (bridge)
Controls power switch, input attenuators (one / channel), mode switch – stereo/
parallel / bridged, ground switch, input level selection (0.77V / 26dB /
1.44V), limiters
LED indicators
General Stereo, Parallel, Bridged
Channel Signal, Clip / Limit, Protect
Protection Circuits short-circuit, over-voltage, DC-protection circuit, terminal protection
circuit, soft-start, limiter
Dimensions 19" x 145mm x 430mm
Weight 22kg
The information in this manual is subject to change without prior notice.
VPA600MB–KRACHTIGE VERSTERKER - 2 x 600W RMS (19"), BRUGSCHAKELING
1. Inleiding
Aan alle ingezetenen van de Europese Unie
Belangrijke milieu-informatie betreffende dit product
Dit symbool op het toestel of de verpakking geeft aan dat, als het na zijn levenscyclus wordt weggeworpen,
dit toestel schade kan toebrengen aan het milieu.
Gooi dit toestel (en eventuele batterijen) niet bij het gewone huishoudelijke afval; het moet bij een
gespecialiseerd bedrijf terechtkomen voor recyclage.
U moet dit toestel naar uw verdeler of naar een lokaal recyclagepunt brengen.
Respecteer de plaatselijke milieuwetgeving.
Hebt u vragen, contacteer dan de plaatselijke autoriteiten inzake verwijdering.
Dank u voor uw aankoop! Lees deze handleiding grondig voor u het toestel in gebruik neemt. Werd het toestel
beschadigd tijdens het transport, installeer het dan niet en raadpleeg uw dealer.
2. Veiligheidsinstructies
•De garantie geldt niet voor schade door het negeren van bepaalde richtlijnen in deze handleiding en uw dealer zal
de verantwoordelijkheid afwijzen voor defecten of problemen die hier rechtstreeks verband mee houden.
•Laat dit toestel installeren en onderhouden door een geschoolde technicus.
•Om beschadiging te vermijden, zet u het toestel best niet aan onmiddellijk nadat het werd blootgesteld aan
temperatuurschommelingen. Wacht tot het toestel op kamertemperatuur gekomen is.
Wees voorzichtig bij de installatie: raak geen kabels aan die onder stroom staan om
dodelijke elektroshocks
te vermijden.
Raak het toestel niet aan wanneer het in gebruik is: de behuizing wordt warm.
Bescherm dit toestel tegen regen en vochtigheid.
Verzeker u ervan dat het toestel niet aangesloten is op een stroombron alvorens het te openen.
VPA600MB VELLEMAN
12
•Dit toestel valt onder beschermingsklasse I, wat wil zeggen dat het toestel geaard moet zijn. Een geschoolde
technicus moet de elektrische aansluiting verzorgen.
•De beschikbare netspanning mag niet hoger zijn dan de spanning in de specificaties achteraan de handleiding.
•De voedingskabel mag niet omgeplooid of beschadigd zijn. Laat uw dealer zo nodig een nieuwe kabel plaatsen.
•Trek de stekker uit het stopcontact (trek niet aan de kabel!) voordat u het toestel reinigt en als u het niet gebruikt.
•Wanneer u het toestel voor het eerst gebruikt, kan dit gepaard gaan met een bepaalde geur. Dit is normaal en de
eventuele geur zal geleidelijk aan verdwijnen.
•Schade door wijzigingen die de gebruiker heeft aangebracht aan het toestel vallen niet onder de garantie.
•Houd dit toestel uit de buurt van kinderen en onbevoegden.
3. Veiligheidslabels
Respecteer de voorschriften op de veiligheidslabels!
4. Algemene richtlijnen
•Dit toestel is een professionele versterker voor de versterking van audiosignalen. Gebruik het toestel enkel
binnenshuis met een wisselspanning van 230VAC / 50Hz of 115VAC / 60Hz.
•Belangrijke opmerking: het gebruik van een versterkingsinstallatie in het openbaar of in industriële gebieden is
onderworpen aan specifieke veiligheidsinstructies. Neem contact op met de betrokken autoriteiten voor meer
informatie.
•Schud het toestel niet dooreen. Vermijd brute kracht tijdens de installatie en de bediening van dit toestel.
•Installeer het toestel waar het niet wordt blootgesteld aan extreme hitte, vochtigheid of stof. Laat geen kabels
rondslingeren, ze brengen enkel uw veiligheid en die van anderen in gevaar.
•Gebruik het toestel enkel in een omgevingstemperatuur van -5°C tot +45°C. Zorg voor voldoende ventilatie indien
het toestel wordt ingebouwd.
•De relatieve vochtigheid mag niet hoger zijn dan 50%.
•Tijdens onweer moet het toestel worden losgekoppeld van het lichtnet want overspannning kan het toestel
vernielen.
•Leer eerst de functies van het toestel kennen voor u het gaat gebruiken. Ongeschoolde personen mogen dit
toestel niet gebruiken. Meestal is beschadiging het gevolg van onprofessioneel gebruik.
•Gebruik bij het schoonvegen geen solventen of agressieve detergenten. Gebruik een zachte en vochtige doek.
•Gebruik de oorspronkelijke verpakking wanneer u het toestel vervoert.
•Verwijdering van de barcode maakt de garantie ongeldig.
•Om veiligheidsredenen mag de gebruiker geen wijzigingen aanbrengen aan het toestel.
•Gebruik het toestel enkel op de manier en voor de doeleinden die staan beschreven in deze handleiding. Andere
toepassingen kunnen leiden tot kortsluitingen, brandwonden, elektroshocks, gehoorverlies, enz. De garantie
vervalt automatisch indien het toestel voor ongeoorloofde doeleinden wordt gebruikt.
•De figuren in de handleiding beschrijven de VPA600MB. Andere modellen en hun kenmerken zijn vergelijkbaar
met de VPA600MB.
Lees de handleiding aandachtig voor u het toestel gebruikt. Enkel bevoegden mogen dit toestel
gebruiken.
Aansluiting op het lichtnet en onderhoudswerkzaamheden moeten worden uitgevoerd door een
geschoolde technicus. Let op van de hoogspanning op de schroefaansluiting. Schakel de
versterker uit voor u het toest
el aansluit
.
Gevaar voor gehoorschade. Draag oorbeschermers.

VPA600MB VELLEMAN
13
5. Wettelijke voorschriften
•Het werken met versterkingssystemen kan gepaard gaan met zeer hoge geluidsniveaus die kunnen leiden tot
permanent gehoorverlies. De wettelijke voorschriften voor het gebruik van zo een systeem verschillen van land tot
land. Het is de verantwoordelijkheid van de gebruiker om ervoor te zorgen dat de voorschriften worden
gerespecteerd die in zijn land van toepassing zijn.
•Houd het geluidsdrukniveau (SPL) doorlopend in het oog bij gebruik van een versterkingssysteem in disco's,
tijdens concerten, enz. Zorg ervoor dat het wettelijk toegelaten niveau niet wordt overschreden.
•Gehoorverlies veroorzaakt door te hoge decibels kan worden beschouwd als lichamelijk letsel en kan dus
aanleiding geven tot gerechtelijke vervolging.
•Merk op dat de organisator verantwoordelijk is voor het respecteren van het max. geluidsniveau.
6. Informatie omtrent gehoorschade
•Steeds meer jongeren hebben een gehoorverlies van 25dB of meer, te wijten aan te luide muziek. Iedere persoon
die een versterkingssysteem bedient, moet op de hoogte zijn van het geluidsdrukniveau waaraan hij is
blootgesteld. In een discotheek loopt het gemiddelde niveau van 75dB tot 105dB. Op een rockconcert kan het
geluidsdrukniveau oplopen van 95dB tot 115dB. Pieken kunnen de pijngrens van 130dB overschrijden. Dit niveau
is typisch voor bvb. kettingzagen.
Een overzicht van verscheidene geluidsniveaus
10dB – Hartslag
25dB – Fluistergesprek
40dB – Gemiddeld huis
50dB – Licht verkeer
60dB – Normaal gesprek
70dB – Stofzuiger
80dB – Rinkelende telefoon
90dB – Pneumatische boorhamer
100dB – Grasmaaier
120dB – Boom box in een wagen
130dB – Pijngrens
140dB – Straaljager op een hoogte van 30m
•Belangrijk om weten is dat een stijging van 3dB het geluidsniveau verdubbelt. Het menselijke gehoor erkent een
verdubbeling van het geluidsniveau enkel bij een stijging van geluidsdrukniveau met 10dB. Gehoorschade is
echter afhankelijk van het geluidsdrukniveau en niet van het geluidsniveau. Gehoorschade komt al voor onder de
pijngrens.
•Menigeen denkt dat men aan hoge geluidsniveaus kan wennen. Niets is minder waar!
•De reden waarom sommigen aan hoge geluidsdrukniveaus gewend zijn en er niet langer door gestoord zijn, komt
doordat zij al gehoorschade hebben opgelopen. De schade zorgt ervoor dat het gehoor de frequenties die het
luidste gedeelte van het geluidsniveau vormen niet meer kan waarnemen. Aan geluid gewend geraken, wil
zeggen dat men met gehoorschade in het dagelijkse leven overweg kan. Gehoorschade is niet te herstellen en
kan enkel dor gehoorapparaten verholpen worden. Algemeen kan gehoorschade worden ervaren als verstopte
oren. Dit kan met tijd verminderen. Toch is het verlies van het gehoor permanent.
•Om het gehoor voldoende rust te geven, verblijft u best gedurende 10 uur in een omgeving waar het
geluidsdrukniveau 70dB niet overschrijdt. Een hoger geluidsdrukniveau kan het gehoor permanente beschadigen.
WAARSCHUWING: Bescherm uw oren om gehoorverlies te vermijden!

VPA600MB VELLEMAN
14
7. Omschrijving
Eigenschappen:
•schitterende klank
•originele look en precieze constructie
•veiligheidsschakelingen
•begrenzer voorkomt beschadiging van de luidsprekers bij overbelasting van de versterker
•krachtige audiofrequentie
•time-delay bij inschakeling en mute-beveiliging bij uitschakeling van de versterker beschermen de luidsprekers
tegen ploppen
a. Voorpaneel (zie fig. 1)
1. Ventilatiegleuven
Koele lucht komt langs deze gleuven de behuizing binnen terwijl warme lucht door de ventilator wordt
weggeblazen. Dit zorgt ervoor dat de versterker binnen de behuizing zijn ideale temperatuur behoud.
2. 20-schalige volumeregeling voor kanaal A
In bruggeschakelde of parallelle modus gebruikt men enkel deze knop.
3. Signaal-led’s kanaal A
De groene led licht om het niveau aan. Licht de rode led (CLIP) op, dan overstuurt de versterker.
4. Voedingsschakelaar
Druk op deze knop om de soft start-functie in te schakelen. Na de soft start, sluit de luidsprekers aan. De
versterker bevindt zich u in stand-by.
5. LED state indicator
De rode/groene led licht op wanneer u de VPA600MB inschakelt. Bij een normale bediening licht de groene
led op.
6. Signaal-led’s kanaal B
De groene led licht om het niveau aan. Licht de rode led (CLIP) op, dan overstuurt de versterker.
7. 20-schalige volumeregeling voor kanaal B
In bruggeschakelde of parallelle modus gebruikt men enkel deze knop.
b. Achterpaneel (zie fig. 2)
1. Ventilator met variabele snelheid
Schakelt automatisch in wanneer de temperatuur hoger is dan 35°C. De snelheid varieert naargelang de
temperatuur. Voorkom storing tijdens de werking.
2. Stroomverbreker
Verbreekt automatisch de stroom in het geval van een overspanning. Herstel de versterker met dezelfde knop.
3. XLR-ingang kanaal A
Bedrading: pin 1: aarding; pin 2: signaal + (hot); pin 3: signaal – (cold).
4. XLR-ingang kanaal A (Link)
Bedrading: pin 1: aarding; pin 2: signaal + (hot); pin 3: signaal – (cold).
5. Begrenzer en led-aanduiding
•Schakel de begrenzer manueel in/uit om de luidspreker te beschermen.
•ON (rode led aan): de versterker functioneert binnen de waarden.
•OFF (rode led uit): het vermogen van de versterker is ongecontroleerd.
6. XLR-ingang kanaal B
Bedrading: pin 1: aarding; pin 2: signaal + (hot); pin 3: signaal – (cold).
7. XLR-ingang kanaal B (Link)
Bedrading: pin 1: aarding; pin 2: signaal + (hot); pin 3: signaal – (cold).

VPA600MB VELLEMAN
15
8. Suspending / aardingschakelaar
Staat de schakelaar op suspending, dan overschrijdt de weerstand van de aarding en de behuizing 1M ohm.
In het andere geval is de aarding aan de behuizing aangesloten.
9. Begrenzer
Modusschakelaar voor 4 of 8 ohm begrenzer (selecteer de gepaste modus naargelang de impedantie).
10.Modusschakelaar (2 modi):
•Mono bruggeschakelde modus: de uitgangsspanning wordt verdubbeld; gebruik een impedantie van 4 ohm
of meer.
•Stereo modus.
11.High / low-pass filter kanaal B (hoog: 130-20kHz / laag: 20-180Hz).
Uitsluiting van het signaal. Gebruik in noodgevallen kanalen A en B afzonderlijk.
12.High / low-pass filter kanaal A (hoog: 130-20kHz / laag: 20-180Hz).
Uitsluiting van het signaal. Gebruik in noodgevallen kanalen A en B afzonderlijk.
13.Keuzeschakelaar ingangsgevoeligheid (3 niveaus):
•0.775V
•1.0V
•1.5V
14.4-punts Speakon
®
NL4 uitgangsaansluiting (kanaal B)
Aansluitingsmodi: +1-1 of +2-1.
15.4-punts Speakon
®
NL4 uitgangsaansluiting (brugschakeling)
Aansluitingsmodi: +1-1 of +2-1.
16.4-punts Speakon
®
NL4 uitgangsaansluiting (kanaal A)
Aansluitingsmodi: +1-1 of +2-1.
17.Voedingskabel
8. Montage
Opmerking: Wanneer u gebruik maakt van een versterker in openbare plaatsen, dient u bepaalde
veiligheidsinstructies te volgen waarvan er slechts enkele in deze handleiding staan. De bediener van
het toestel wordt geacht zich hierover te informeren en die dan ook na te leven.
a. Montage in een rack-systeem
•Deze versterker is gebouwd voor 19” rack-systemen. Voorzie ook een ventilator. Laat bij de montage van het
toestel voldoende ruimte rond het toestel voor de afvoer van warme lucht. Doorlopende oververhitting
beschadigt het toestel.
•U kunt de versterker bevestigen met de 4 meegeleverde M6-schroeven.
•Wees voorzichtig bij de montage. Plaats het zwaarste toestel in het onderste deel van het rack. Het is niet
voldoende om het toestel te bevestigen met de 4 schroeven op het frontpaneel. U moet het toestel in het rack
ook ondersteunen met metalen staafjes aan de zijkant en de onderkant.
•Bij vervoer moet u de achterste beugel ook vastmaken aan de zij- of bodembeschermers .Zo kan de
versterker niet naar achter worden geduwd.
b. Ingangen
•Goede kabels hebben een positieve invloed op de geluidskwaliteit. Gebruik korte kabels en sluit ze
rechtstreeks aan op het toestel. Hoge frequenties worden grotendeels geabsorbeerd als de kabels te lang zijn.
Lange kabels leiden tot ruis en andere vormen van storing. Gebruik gebalanceerde kabels als u het gebruik
van lange kabels niet kunt vermijden.
•We raden professionals aan om de kabels aan te sluiten via gebalanceerde XLR jacks.

VPA600MB VELLEMAN
16
c. Uitgangen
•De hoge dempingsfactor van uw versterker zorgt voor een duidelijke geluidsweergave. Dunne en te lange
kabels beïnvloeden de dempingsfactor en dus de lage frequenties op een negatieve manier. De
dempingsfactor moet ongeveer 50 zijn om een goede geluidskwaliteit te garanderen. Hoe langer de kabel, hoe
dikker hij moet zijn.
•Sluit uw luidsprekersystemen aan via de luidsprekerpluggen of de banaan-/schroefaansluiting (kabel: rood+,
zwart-).
d. Luidspreker - aansluiting
•Uw luidspreker is uitgerust met 4-polige, vergrendelbare luidsprekeraansluitingen. Draai de plug naar rechts
om te vergrendelen. Om te ontgrendelen: trek aan de ontgrendelknop, draai naar links en trek de plug uit de
aansluiting.
PIN
1 + 2 + +
1 - 2 - -
e. De juiste kabels kiezen
•Zorg ervoor dat de kabels dik genoeg zijn voor het luidsprekersysteem. Dunne kabels kunnen opwarmen en
ze kunnen leiden tot een groot verlies in vermogen en kwaliteit.
•Voor alle luidsprekersystemen tot 400W raden we een kabeldiameter aan van 2.5mm²; voor alle andere
luidsprekerkabels is dat 4mm².
•De hoge dempingsfactor van uw versterker zorgt voor een duidelijke geluidsweergave. Dunne en te lange
kabels beïnvloeden de dempingsfactor en dus de lage frequenties op een negatieve manier. De
dempingsfactor moet ongeveer 50 zijn om een goede geluidskwaliteit te garanderen. Hoe langer de kabel, hoe
dikker hij moet zijn.
Voorbeeld: Een dempingsfactor van 200 wordt gereduceerd tot 47 (8 ohm) bij gebruik van een Ø 2.5mm²
luidsprekerkabel van 10m lang. Het vermogenverlies bij 8 ohm is 1.63%, bij 4 ohm is dat 3.25% en
bij 2 ohm is het zelfs 6.5%.
•De maximale kabellengte bedraagt 30m!
f. Aanbrengen van de luidsprekerkabels
•Verbind de kabel van het eerste luidsprekersysteem met luidsprekeruitgangen CH-1 en CH-2 van de
versterker. Het signaal wordt dan verzonden naar de individuele luidsprekersystemen.
•Zorg ervoor dat niemand over de kabels kan struikelen. Maak ze altijd vast met een geschikte tape.
•Beide kabels moeten van hetzelfde type and even lang zijn.
•Maak geen onnodige lussen in de kabel.
•Houd de kabels van het toestel uit de buurt van stroomkabels (leg ze er niet langs).
•Plaats nooit zware voorwerpen zoals luidsprekersystemen op kabels.
•Rol kabels altijd losjes op rond de elleboog.
Let op van de hoogspanning op de schroefaansluiting. Schakel de verste
rker uit voor u het
toestel aansluit.

VPA600MB VELLEMAN
17
g. Ground lift-schakelaar
Met deze schakelaar kunt u de aarding in het circuit verbreken in geval van lussen. Voor een veilig gebruik is het
aan te raden van de ground lift-schakelaar op GND FLOATING te plaatsen. In geval van lussen gebruikt u toch
maar GND LIFT.
h. Aansluiting op het lichtnet
De bekabeling van de aansluitkabels ziet er als volgt uit:
Kabel PIN Internationaal
Bruin Fase L
Blauw Nulgeleider
N
Geel / groen Aarde
Het toestel moet geaard zijn!
9. Werkingsmodi
Stereo:
Een versterker wordt normaal gezien in deze modus (met een impedantie van 4 ohm) het vaakst gebruikt. Elk
kanaal krijgt een eigen signaal. Zorg dat de modusschakelaar in de juiste stand is geplaatst (zie “7.b.10”).
Opmerking: Zorg dat de ingangsimpedantie van een luidsprekersysteem gelijk is aan of groter is dan de
uitgangsimpedantie van de versterker.
Brugschakeling:
Mono schakeling via een ingangskanaal. Met een brugschakeling wordt de spanning verdubbeld. Bijgevolg dient
de impedantie te worden verdubbeld.
Voor een stereo schakeling zijn 2 versterkers nodig. Verbind het ingangssignaal met de ingang van CH-1 op het
achterpaneel. Ontkoppel eerst de versterker van het lichtnet alvorens de modusschakelaar achteraan het toestel
verplaatst. Sluit de luidsprekers aan de rode mono brugaansluitingen.
OPGELET! Alvorens de versterker in te schakelen, lees de instructies in “10. Bediening” goed door. Regel het
volumeniveau met de gain-knop van CH-1 op het frontpaneel.
10.Bediening
Sluit de versterker aan op het lichtnet en draai de twee versterkingsregelingen dan naar de minimumstand. Schakel
de versterker als laatste in. De ON en PROTECT-led’s gaan nu branden. Als dat niet zo is, moet u nagaan of de
versterker wel goed is aangesloten op het lichtnet.
De luidsprekers worden ingeschakeld na de inschakelvertraging (PROTECT-led dooft).
Nadat u de volumeregelingen van de voorversterker in de minimumstand hebt geplaatst, stelt u de
versterkingsregeling van uw versterker in de middelste stand. Als er brom optreedt, moet u verbindingskabels
controleren tussen de voorversterker en uw versterker (eerst alle componenten uitschakelen!). Stel het volume in
met versterkingsregelingen CH-1 en CH-2.
Laat de aansluiting uitvoeren door een geschoold technicus!
VPA600MB VELLEMAN
18
OPGELET! Stel het niveau van de kanalen nooit zo hoog in dat de LIMIT-led doorlopend brandt. Zorg ervoor dat het
uitgangssignaal niet wordt vervormd om beschadiging van uw luidsprekers te vermijden.
U kunt de belangrijke werkingsmodes van de versterker volgen op het frontpaneel.
SIGNAL uitgangsniveau
LIMIT kortsluiting of te lage impedantie of vervormd signaal
PROTECT treedt kort in werking bij het inschakelen van het toestel of wanneer een van de
beveiligingsschakelingen wordt geactiveerd.
Bij gebruik van het versterkingssysteem moet u ervoor zorgen dat de luidsprekers altijd een goede geluidskwaliteit
geven. Distorsie wijst erop dat de versterker of de luidspreker overbelast is. Overbelasting leidt al snel tot
beschadiging van de versterker of luidspreker.
Verlaag het volume dan onmiddellijk om beschadiging te vermijden. De garantie vervalt wanneer de
luidsprekersystemen worden beschadigd.
Controleer het geluidsdrukniveau altijd met een geijkt meetinstrument zodat u de grenswaarden niet overschrijdt.
Om het systeem uit te schakelen, schakelt u eerst de versterker af en vervolgens de voorversterkers. Zo vermijdt u
plopgeluiden op de luidspreker.
11.Problemen en oplossingen
PROBLEEM MOGELIJKE OORZAAK OPLOSSING
Toestel werkt niet. •Voedingskabel is niet aangesloten. •Controleer de voedingskabel en
mogelijke verlengkabels.
Geen geluid. •De voedingskabel van het
gebruikte toestel is niet goed of
helemaal niet aangesloten.
•De aansluiting en de plug zijn vuil.
•Controleer of de voedingskabel en
de pluggen goed zijn aangesloten.
•Reinig de plug en/of de aansluiting.
Ruis. •Ingangssignaal te sterk. •Verminder het ingangssignaal met
de versterkingsregeling.
Ventilator werkt niet, led’s lichten niet
op. •De voedingskabel is niet
aangesloten. •Sluit de voedingskabel aan.
PROTECT-led blijft branden. •Er zit DC-spanning op de
ingangen.
•Oververhitting door verstopt
ventilatierooster.
•Impedantie van de luidsprekers te
laag.
•Kortsluiting in
luidsprekeraansluiting of in de
luidspreker zelf.
•Technisch probleem met
luidspreker.
•Versterker uitschakelen en laten
nazien door een geschoolde
technicus.
•Veeg de rooster van de ventilator
schoon.
•Sluit andere luidsprekers aan.
•Controleer de luidsprekers.
•Luidspreker uitschakelen en laten
nazien door een geschoolde
technicus.
12.Reiniging en onderhoud
Laat de aansluiting uitvoeren door een geschoold technicus
!

VPA600MB VELLEMAN
19
1. Alle gebruikte schroeven moeten goed zijn aangespannen en mogen geen sporen van roest vertonen.
2. De behuizing, de lenzen, de montagebeugels en de montageplaats (bvb. het plafond of het gebinte) mogen niet
vervormd zijn of aangepast worden (geen extra gaten in montagebeugels, aansluitingen niet verplaatsen etc.)
3. Mechanisch bewegende delen mogen geen sporen van slijtage vertonen en mogen niet onregelmatig bewegen.
4. De voedingskabels mogen niet beschadigd zijn. Laat het toestel onderhouden door een geschoolde technicus.
5. Ontkoppel het toestel van het lichtnet voor u aan onderhoudswerkzaamheden begint.
6. Maak het toestel geregeld schoon met een vochtige, niet pluizende doek. Gebruik geen alcohol of solvent.
7. De gebruiker mag geen onderdelen vervangen.
8. Bestel eventuele reserveonderdelen bij uw dealer.
13.Technische specificaties
Voeding max. 230VAC / 50Hz
Zekering T10A (order code FF10N)
Uitgangsvermogen
Stereo 8 ohm 600W
Stereo 4 ohm 900W
Stereo 2 ohm 1100W
8 ohm met brugschakeling 1800W
1KHz 0.1% THD 4 ohm 2000W
Frequentiebereik 20 ~ 20000Hz, ± 0.1dB
Dempingsfactor 500:1
S/R-verhouding > 105dB
THD ≤0.01% @ 8 ohms – 1kHz
IMD ≤0.01% @ 8 ohms – 1kHz
Stijgtijd 80V / sec
Ingangsgevoeligheid 0.775V, 1.0V, 1.55V
Ingangsimpedantie 10K/20K gebalanceerd of niet-gebalanceerd
CMRR-factor aan de ingang ≤-75dB
Overspraak ≤-70dB
LPF 20Hz – 180Hz
HPF 130Hz – 20kHz
Ingangsaansluiting 2 x XLR
Uitgangsaansluiting 2 x luidspreker (stereo), 1 x luidspreker (brug)
Bedieningsknoppen voedingsschakelaar, signaalverzwakker ingang (één / kanaal),
modusschakelaar – stereo/ parallel / brug, ground lift-schakelaar,
keuzeschakelaar ingangsniveau (0.77V / 26dB / 1.44V), begrenzers
Led-aanduidingen
Algemeen Stereo, Parallel, Bridged
Per kanaal Signal, Clip / Limit, Protect
Veiligheidscircuits kortsluiting, overspanning, beveiliging tegen DC-stroom, beveiliging
van de terminal, soft-start, begrenzer
Afmetingen 19" x 145mm x 430mm
Gewicht 22kg
De informatie in deze handleiding kan te allen tijde worden gewijzigd zonder voorafgaande kennisgeving.
VPA600MB VELLEMAN
20
VPA600MB – AMPLIFICATEUR PUISSANT - 2 x 600W RMS (19"), PONTABLE
1. Introduction
Aux résidents de l'Union européenne
Des informations environnementales importantes concernant ce produit
Ce symbole sur l'appareil ou l'emballage indique que l’élimination d’un appareil en fin de vie peut polluer
l'environnement.
Ne pas jeter un appareil électrique ou électronique (et des piles éventuelles) parmi les déchets municipaux
non sujets au tri sélectif ; une déchèterie traitera l’appareil en question.
Renvoyer les équipements usagés à votre fournisseur ou à un service de recyclage local.
Il convient de respecter la réglementation locale relative à la protection de l’environnement.
En cas de questions, contacter les autorités locales pour élimination.
Nous vous remercions de votre achat ! Lire la présente notice attentivement avant la mise en service de l’appareil. Si
l’appareil a été endommagé pendant le transport, ne pas l’installer et consulter votre revendeur.
2. Prescriptions de sécurité
•La garantie ne s'applique pas aux dommages survenus en négligeant certaines directives de cette notice et votre
revendeur déclinera toute responsabilité pour les problèmes et les défauts qui en résultent.
•Confiez l'installation et l’entretien à un personnel qualifié.
•Ne branchez pas l'appareil après exposition à des variations de température. Afin d’éviter des dommages,
attendez jusqu’à ce que l'appareil ait atteint la température ambiante avant de l'utiliser.
•Cet appareil ressort à la classe de protection I, ce qui implique que l'appareil doit être mis à la terre. Un technicien
qualifié doit établir la connexion électrique.
•La tension réseau ne peut pas dépasser la tension mentionnée dans les spécifications à la fin de cette notice.
•Le câble d'alimentation ne peut pas être replissé ou endommagé. Demandez à votre revendeur de renouveler le
câble d'alimentation si nécessaire.
•Débranchez l’appareil s’il n’est pas utilisé ou pour le nettoyer. Tirez la fiche pour débrancher l'appareil ; non pas le câble.
•La première mise en service peut s’accompagner d’une odeur particulière. C’est normal. Toute odeur disparaîtra
graduellement.
•Les dommages occasionnés par des modifications à l'appareil par le client, ne tombent pas sous la garantie.
•Gardez votre VPA600MB hors de la portée de personnes non qualifiées et de jeunes enfants.
3. Étiquettes de sécurité
Respectez les prescriptions sur les étiquettes de sécurité :
Soyez prudent lors de l'installation : toucher un câble sous tension peut causer des électrochocs mortels.
Ne touchez pas l'appareil lorsqu'il est en service : le boîtier chauffe !
Protégez l'appareil contre la pluie et l'humidité.
Débranchez le câble d'alimentation avant d'ouvrir le boîtier.
Lisez la notice attentivement avant d'utiliser l'appareil.
Seules
les personnes autorisées peuvent
l'opérer.
La connexion au réseau et l'entretien sera effectué par un tech
nicien qualifié.
Faites attention à la
haute tension sur la connexion à visser. Désactivez l'amplificateur avant de connecter l'appareil.
Risque de perte de l’ouïe. Mettez un casque.
Table of contents
Languages:


