EINHELL NEW GENERATION NMK 3500 User manual

Bedienungsanleitung
Klimagerät
Operating Instructions
Air Conditioner
Mode d’emploi
Climatiseur
Gebruiksaanwijzing
Klimatiseringstoestel
Istruzioni per l’uso
Climatizzatore
Instrukcja obsługi
Klimatyzator
Betjeningsvejledning
klimaaggregat
Руководство по эксплуатации
кондиционера
Art.-Nr.: 23.602.10 I.-Nr.: 01015 NMK 3500
Anleitung NMK 3500 SPK1 10.01.2006 16:28 Uhr Seite 1

D
2
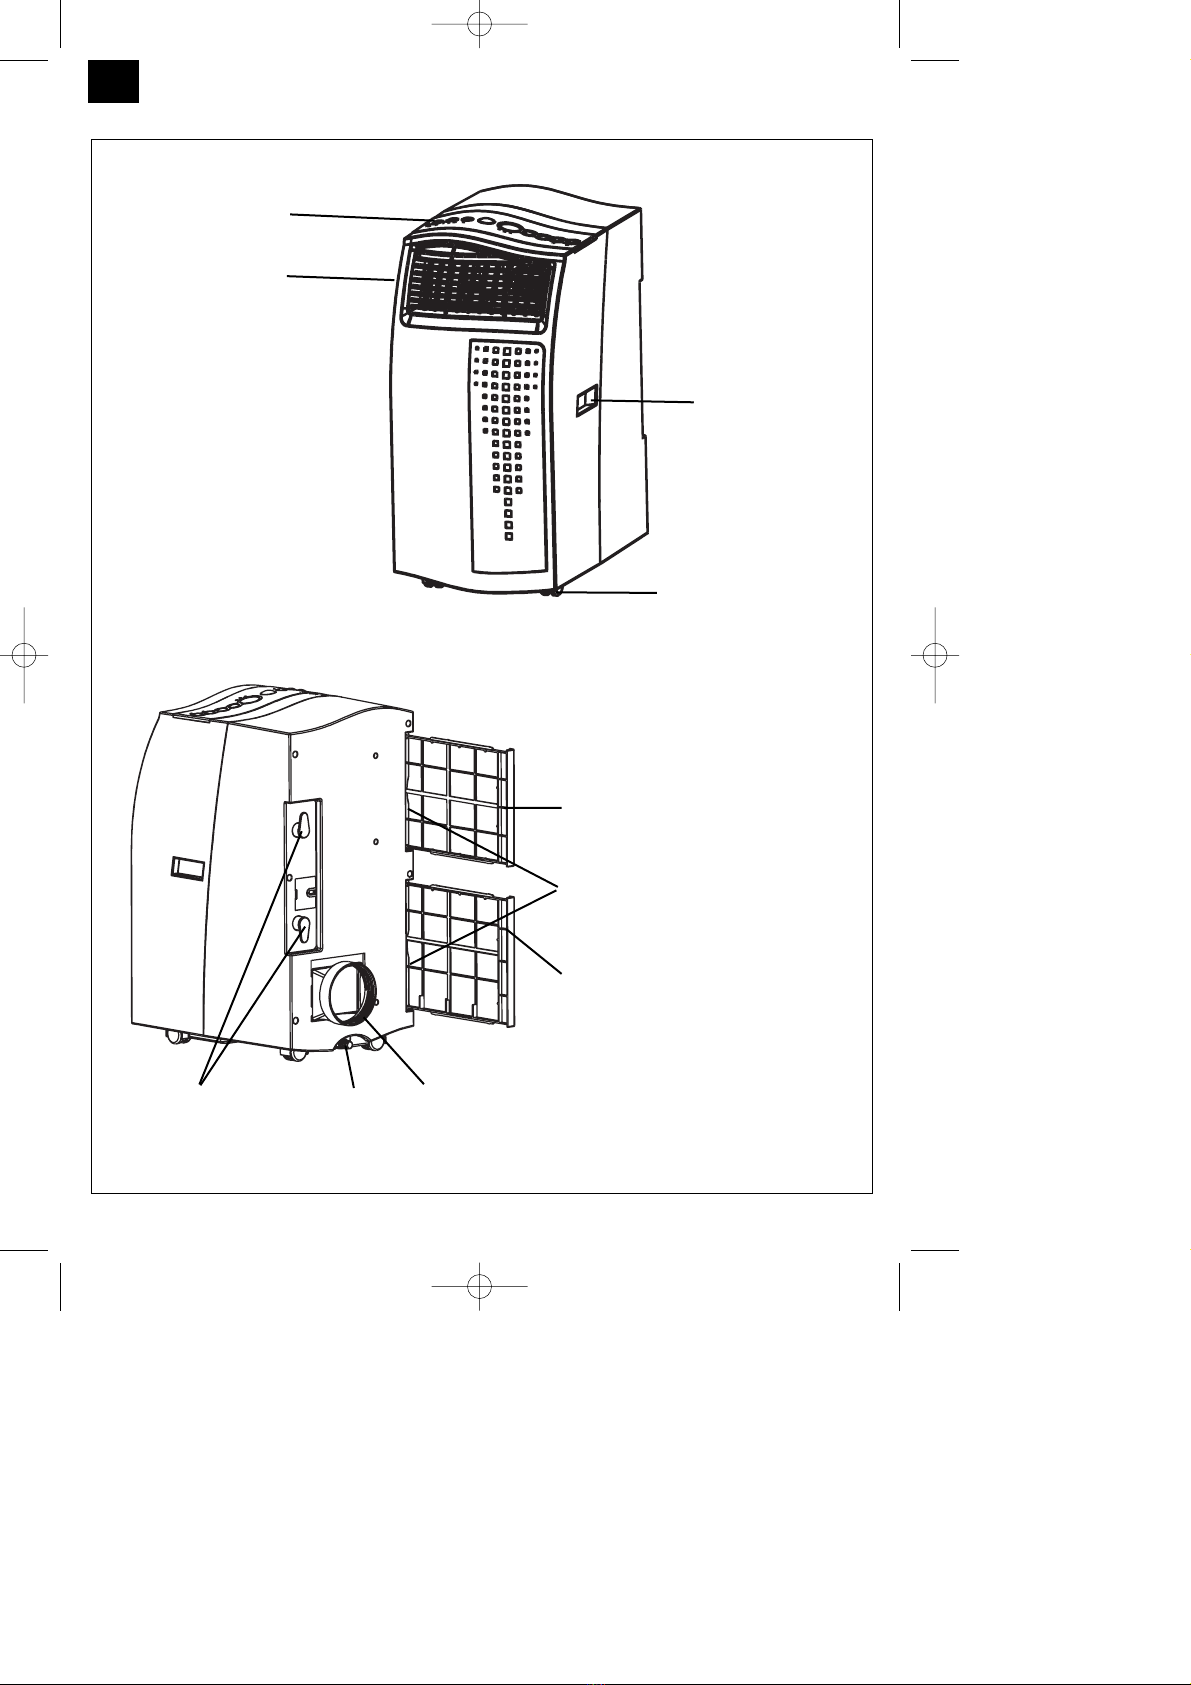
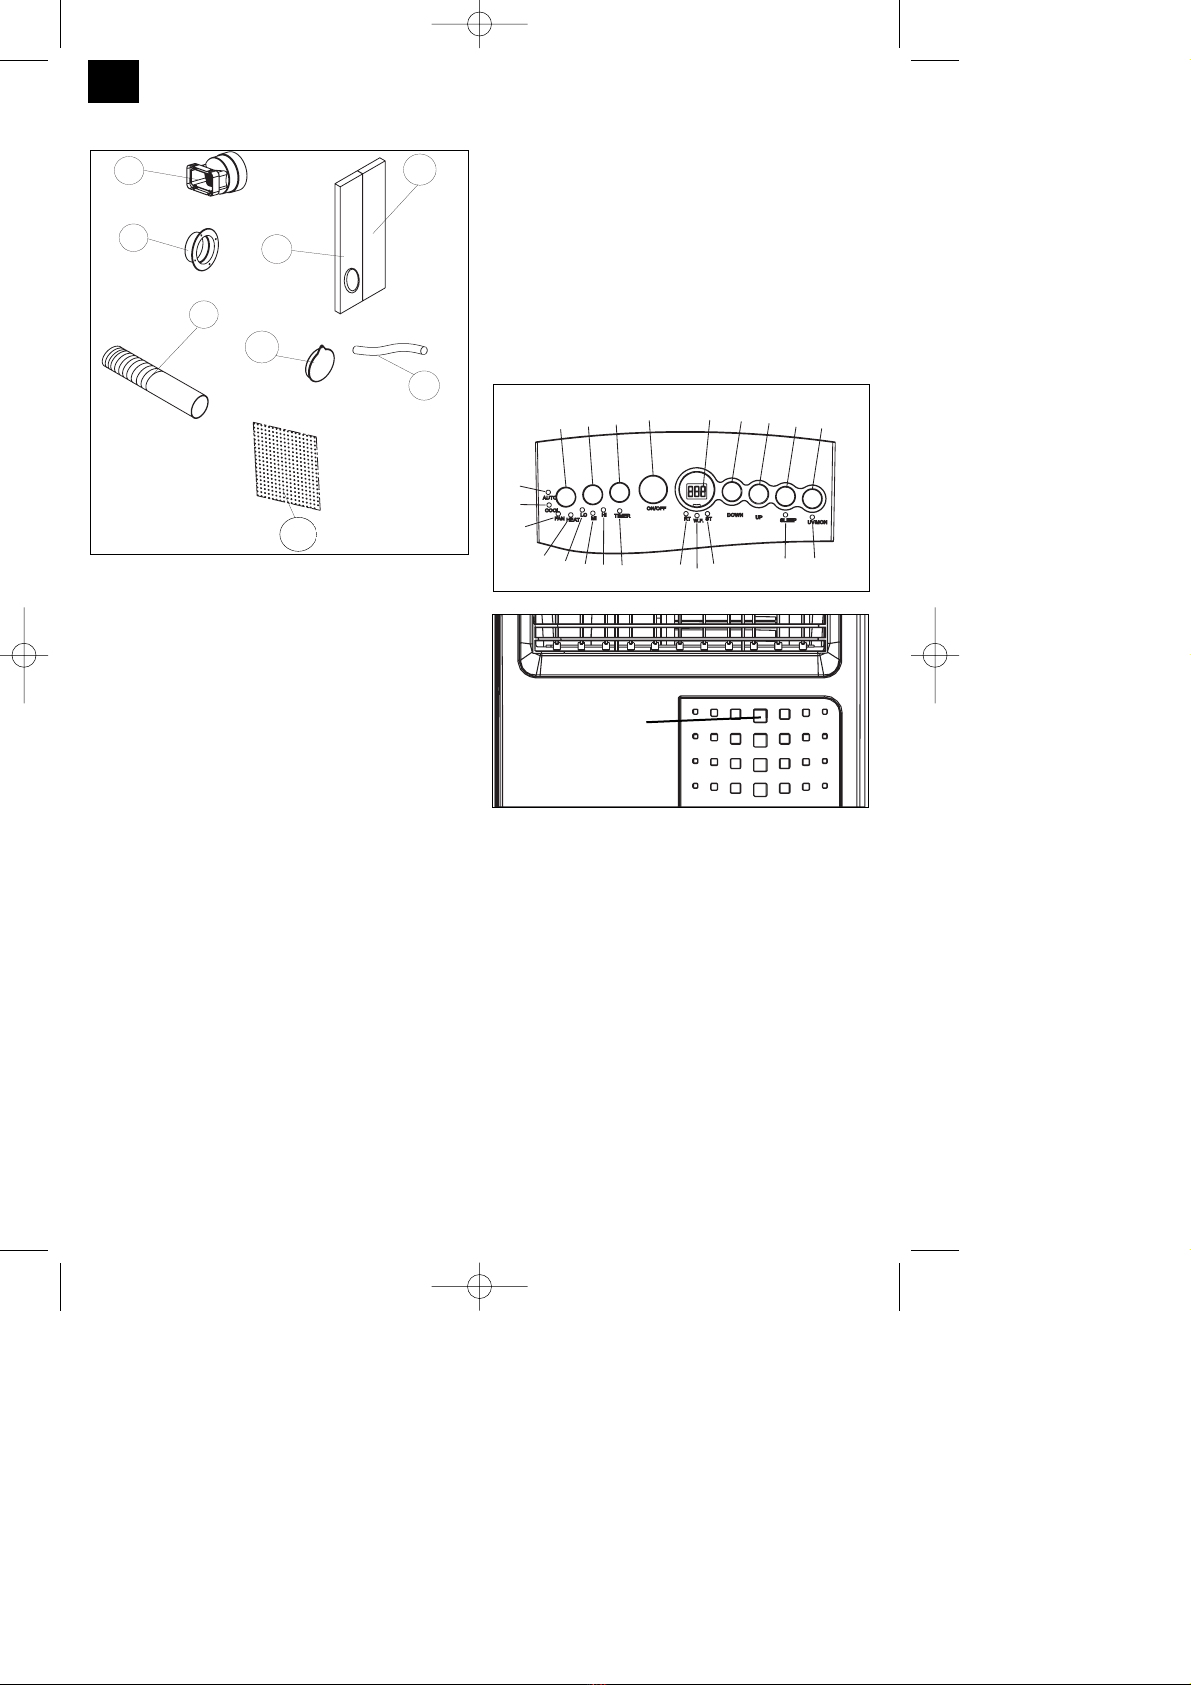
Gerätebeschreibung
1 Luftaustrittsgitter
2 Bedienteil
3 Tragegriff
4 Laufrollen
5 Luftansaugfilter
6 Lufteinlass
7 Öffnung für Anschlussstutzen
Abluftschlauch
8 Netzkabelaufhängung
9 Gummistöpsel für Kondens-
wasserablauf (im Gerät)
Anleitung NMK 3500 SPK1 10.01.2006 16:28 Uhr Seite 2
D
3
* Bitte lesen die Anleitung sorgfältig vor
Inbetriebnahme des Geräts und bewahren Sie
diese Unterlagen gut auf.
Mit dem Kauf dieses transportablen Klimagerätes
haben Sie einen guten Kauf getätigt. Das Gerät ist
sehr professionell konstruiert und bietet ein
Maximum an Komfort für viele Jahre, vorausgesetzt
es wird gemäß der Betriebsanleitung verwendet.
Lesen Sie also die Anleitung sorgfältig durch und
bewahren Sie diese für späteres Nachschlagen gut
auf.
Vor dem Gebrauch
1. Stellen Sie das transportable Gerät stets auf
einen stabilen Untergrund.
2. Schließen Sie das Gerät an der richtigen
Steckdose an.
3. Schließen Sie den Abluftschlauch am
Klimagerät an.
Technische Daten
Kältemittel R410 A
Kältemittelfüllmenge 780 g
Kühlleistung (EN 14511) 3495 Watt / 12000 BTU/h
Netzspannung 230 V ~ 50 Hz
Leistungsaufnahme 1250 W
Energieeffizienzklasse A
Luftdurchsatz max. 580 m3/Std
Raumgröße max. 115 m3
Entfeuchtungsleistung max. 53 l/Tag
Ventilatorgeschwindigkeit 3
Schalldruckpegel ≤54 dB (A)
Einsatzbereich Raumtemperatur 18 - 32°C
Maße (BxTxH) 35,6 x 53,4 x 76,2 cm
Nettogewicht 38 kg
Hinweis: Verbrauchswerte wurden bei 27°C Raum-
temperatur und 60% Luftfeuchtigkeit ermittelt.
Wichtige Sicherheitshinweise
Vermeidung von Unfällen
앬Vergewissern Sie sich, dass der elektrische
Anschluss richtig ist.
앬Vergewissern Sie sich, dass das Gerät gemäß
der Betriebsanleitung richtig installiert ist.
앬Junge, ältere und behinderte Menschen sind
sich oft nicht der möglichen Gefahren bewusst,
die bei der Benützung elektrischer Geräte
auftreten können. Deshalb sollte das Gerät
niemals ohne Aufsicht dieser Personen
betrieben werden.
앬Verwenden Sie dieses Gerät niemals in der
Nähe von Badewannen, Duschen oder
Waschbecken.
앬Keine Gegenstände auf die Luftschlitze legen.
앬Mindestabstand zur Wand beträgt 50 cm.
앬Ziehen Sie Vorhänge oder Gardinen an den
Fenstern während der grössten Sonneneinstrahl-
ung zu oder stellen Sie die Jallousien ent-
sprechend ein.
앬Halten Sie den Luftfilter sauber. Unter normalen
Bedingungen sollte der Filter jeden Monat
gereinigt werden. Da der Luftfilter auch kleine
Staubteilchen zurückhält, kann es unter Um-
ständen notwendig sein, den Filter auch öfters
zu reinigen. Das Gerät darf auf keinen Fall
ohne Filter betrieben werden.
앬Bei Beginn stellen Sie die Ventilatorgeschwindig-
keit auf hohe Stufe und das Thermostat auf die
größte Kühlung ein. Später dann auf NIEDRIGE
KÜHLUNG stellen und das THERMOSTAT auf
die gewünschte Temperatur einstellen.
Weitere Hinweise:
앬Verwenden Sie kein Verlängerungskabel oder
einen Zusatzstecker, an dem noch ein anderes
Gerät mit diesem Klimagerät angesteckt ist.
앬Bei Kühlfunktion muss die warme Abluft über
den Schlauch nach aussen geleitet werden. Eine
Öffnung in der Wand oder im Fenster ist für das
mitgelieferte Abluft-Set erforderlich.
앬Ziehen Sie immer nach Gebrauch oder bei In-
standhaltungsarbeiten den Netzstecker.
앬Vermeiden Sie den Kontakt des Gerätes mit
Chemikalien.
앬Wartungs- und Instandhaltungsarbeiten dürfen
nur durch einen Elektro-bzw. Kältefachbetrieb
durchgeführt werden.
Anleitung NMK 3500 SPK1 10.01.2006 16:28 Uhr Seite 3

D
4
Zubehör
11 Abluft-Anschlussstutzen
12 Durchführungsring
13 Abluftschlauch
14 Schaumstoff (wird bei Abluftaustritt durch das
offene Fenster eingesetzt)
15 Schaumstoff (wird bei Abluftaustritt durch das
offene Fenster in den noch offenen Bereich des
Fensters eingesetzt. Es soll wenn möglich keine
zusätzliche warme Luft von aussen in den Raum
gelangen).
16 Abdeckkappe für Fenster - Mauerdurchführung
18 Wasserablaufschlauch
19 Aktivkohlefilter
o.B.Fernbedienung
Beschreibung der Betriebselemente
1. LED „Automatikfunktion eingestellt“
2. LED „Kühlfunktion eingestellt“
3. LED „Lüfterfunktion eingestellt“
4. nicht belegt
5. LED „Ventilator langsam“
6. LED “Ventilator mittel”
7. LED „Ventilator schnell“
8. LED „Zeitschaltuhr betätigt“
9. LED „Raumtemperatur“
10. LED „Kondenswasserbehäler voll“
11. LED „Temperatur Einstellung“
12. LED “Schlaffunktion eingestellt”
13. nicht belegt
14. nicht belegt
15. Wahlschalter “Schlaffunktion”
16. Wahlschalter „Wärmer“
17. Wahlschalter „Kühler“
18. LCD Anzeigefeld
19. Ein-/Ausschalter
20. Schalter für „Zeitschaltuhr“
21. Wahlschalter „Ventilatorgeschwindigkeit“
22. Wahlschalter „Funktion“
23. Fernbedienungssensor
Gerät Ein- und Ausschalten
Drücken Sie den Ein-/Ausschalter (ON/OFF). Das
Gerät startet automatisch. Ist die
Umgebungstemperatur:
앬Höher als 23°C arbeitet das Gerät in der Kühl-
funktion
앬Zwischen 20°C und 23°C arbeitet das Gerät in
der Lüfterfunktion.
Entsprechend der Funktion in der das Gerät arbeitet,
leuchten die LED´s (s. Bedienfeld).
Hinweis: Das LCD Anzeigefeld zeigt die aktuelle
Raumtemperatur an. (0-50°C)
Um das Gerät auszuschalten, drücken Sie nochmals
den Ein-/Ausschalter.
Funktion auswählen
Drücken Sie den Wahlschalter „Funktion“ (MODE) in
der Reihenfolge „Automatik“, „Kühlen“, „Lüfter“. Die
der gewählten Funktion entsprechende LED leuchtet
(s. Bedienfeld).
Soll-Temperatur einstellen
Drücken Sie den Wahlschalter „Wärmer“ (UP) oder
11
12
13
14
15
16
18
17
19
20
19
22 21 20 19 18 17 16 15 14
13
12
11
10
9
23
8
7
6
5
4
3
2
1
Anleitung NMK 3500 SPK1 10.01.2006 16:28 Uhr Seite 4
5
D
„Kühler“ (DOWN) um die von Ihnen gewünschte
Solltemperatur einzustellen. Beim Drücken des
Wahlschalters „Wärmer“ oder „Kühler“ wird im LCD
Anzeigefeld die von Ihnen gewünschte
Solltemperatur angezeigt. Ansonsten zeigt das LCD
Anzeigefeld immer die aktuelle Raumtemperatur an.
Das Gerät ist in der Kühlfunktion auf 24°C
eingestellt.
Ventilatorgeschwindigkeit auswählen
Drücken Sie den Wahlschalter
„Ventilatorgeschwindigkeit“ um die gewünschte
Ventilatorgeschwindigkeit einzustellen. Die der
gewählten Funktion entsprechende LED leuchtet (s.
Bedienfeld).
Ist das Gerät in „Automatikfunktion“ (AUTO) wird die
Ventilatorgeschwindigkeit abhängig von der
Raumtemperatur automatisch vom Gerät
ausgewählt. Die entsprechende LED leuchtet. Der
Wahlschalter „Ventilatorgeschwindigkeit“ ist
deaktiviert.
Zeitschaltuhr einstellen
Drücken Sie den Schalter für „Zeitschaltuhr“ (TIMER)
um die gewünschte Betriebsdauer (1 – 24 h)
festzulegen. Die LED „Zeitschaltuhr betätigt“
(TIMER) leuchtet. Ist die Zeitschaltuhr eingestellt,
schaltet das Gerät automatisch ab. Beim Drücken
des Schalters „Zeitschaltuhr“ wird im LCD
Anzeigefeld die von Ihnen eingestellte Zeit
angezeigt. Ist die Zeitschaltuhr nicht eingeschaltet,
läuft das Gerät ständig.
Drücken Sie den Schalter für „Zeitschaltuhr“ (TIMER)
ohne dass eine der anderen Funktionen
eingeschaltet ist, können Sie die Einschaltzeit des
Geräts festlegen.
Steht z.B. die Zeitschaltuhr auf „2“ schaltet das Gerät
nach Ablauf von 2 Stunden automatisch ein.
Schlaffunktion einschalten
Drücken Sie die Taste “Sleep” um die Schlaffunktion
einzuschalten. Um eine Unterkühlung zu vermeiden
steigt die eingestellte Raumtemperatur in der ersten
Stunde um 1°C bzw. innerhalb zwei Stunden um
2°C. Beim Ausschalten der Schlaffunktion sinkt die
Raumtemperatur wieder auf den eingestellten Wert.
Nach 12 Stunden Einschaltzeit in der Schlaffunktion
schaltet das Gerät automatisch aus.
Alle Funktionen können auch mit der mitgelieferten
Fernbedienung eingestellt werden.
Die Fernbedienung benötigt 2 Stück MICRO (AAA)
Batterien (nicht im Lieferumfang).
앬Um den Kompressor zu schonen, läuft er erst
nach 3 Minuten nach dem Anschalten an. Das
gleiche gilt beim Ausschalten.
앬Das Kühlsystem schaltet sich aus, wenn die
Zimmertemperatur niedriger als der eingestellte
Wert am Thermostat ist. Die Luftumwälzung -
Ventilation läuft wie eingestellt weiter. Wenn die
Raumtemperatur wieder ansteigt, schaltet sich
die Kühlung wieder ein.
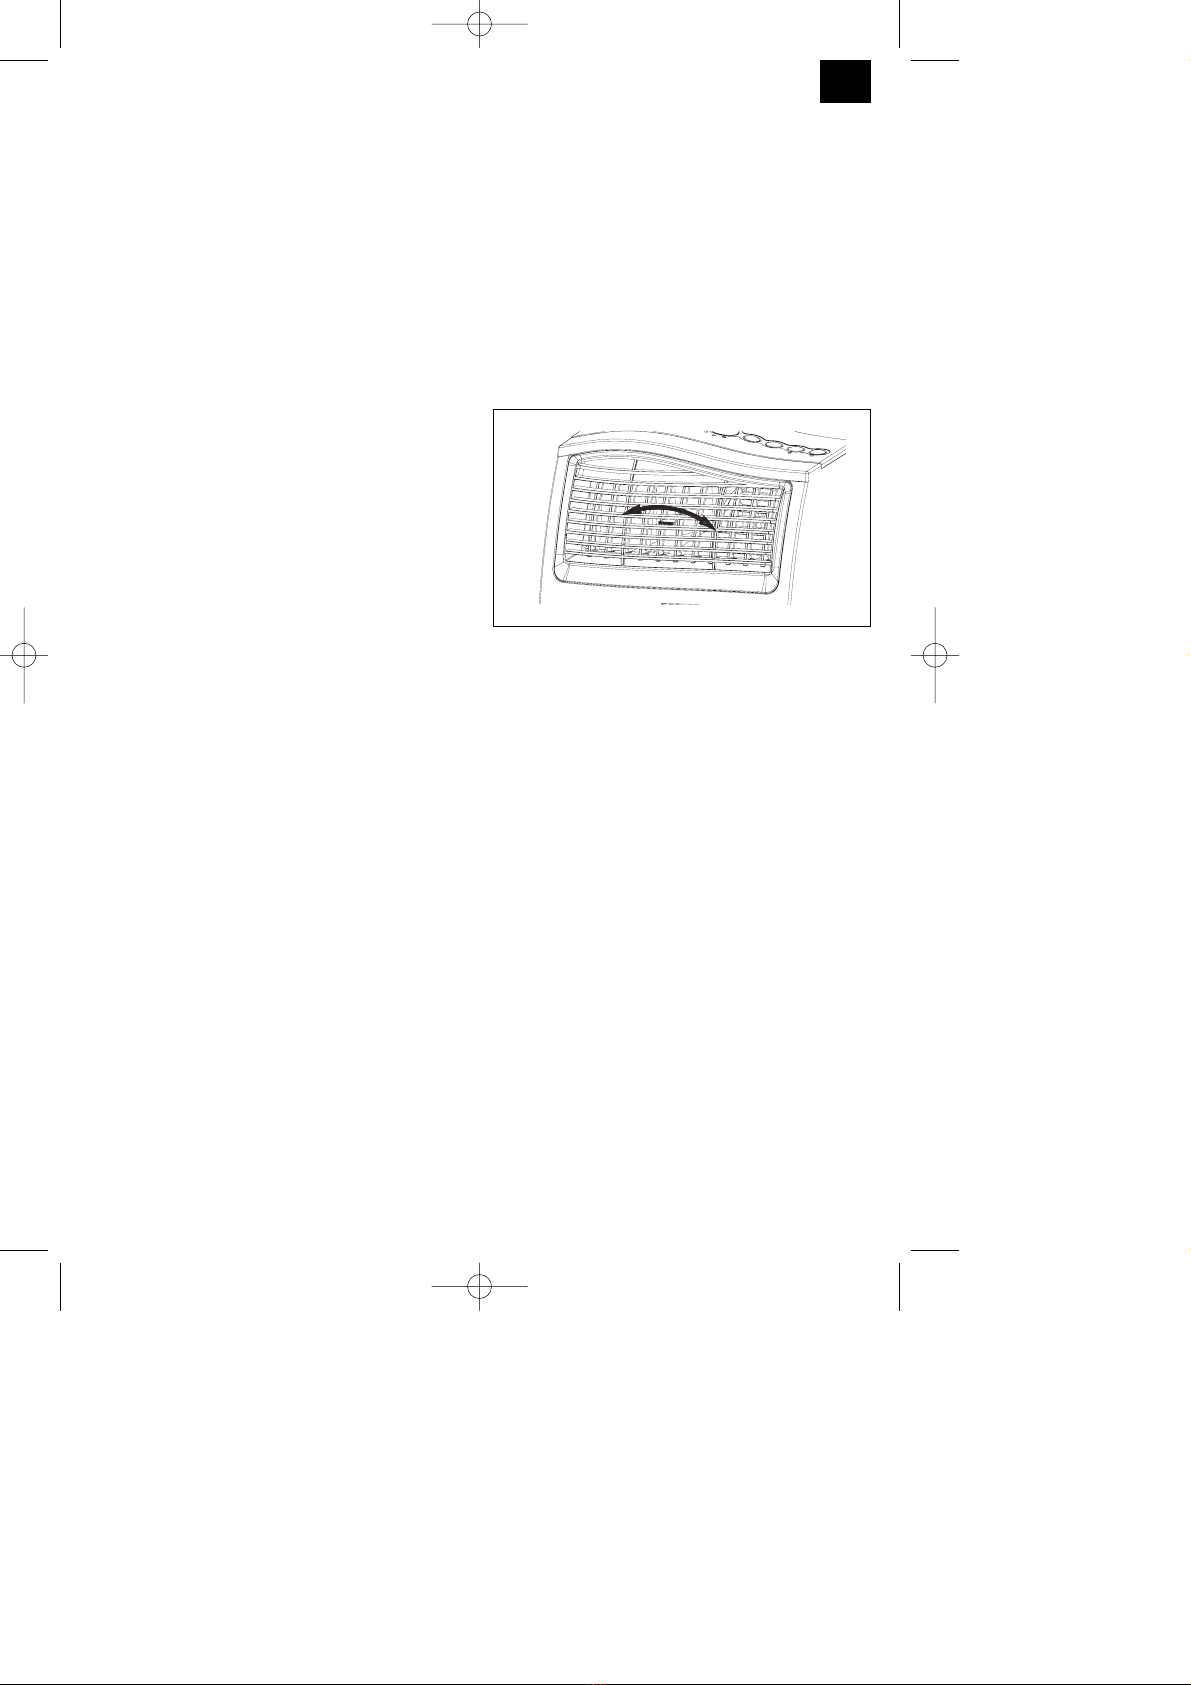
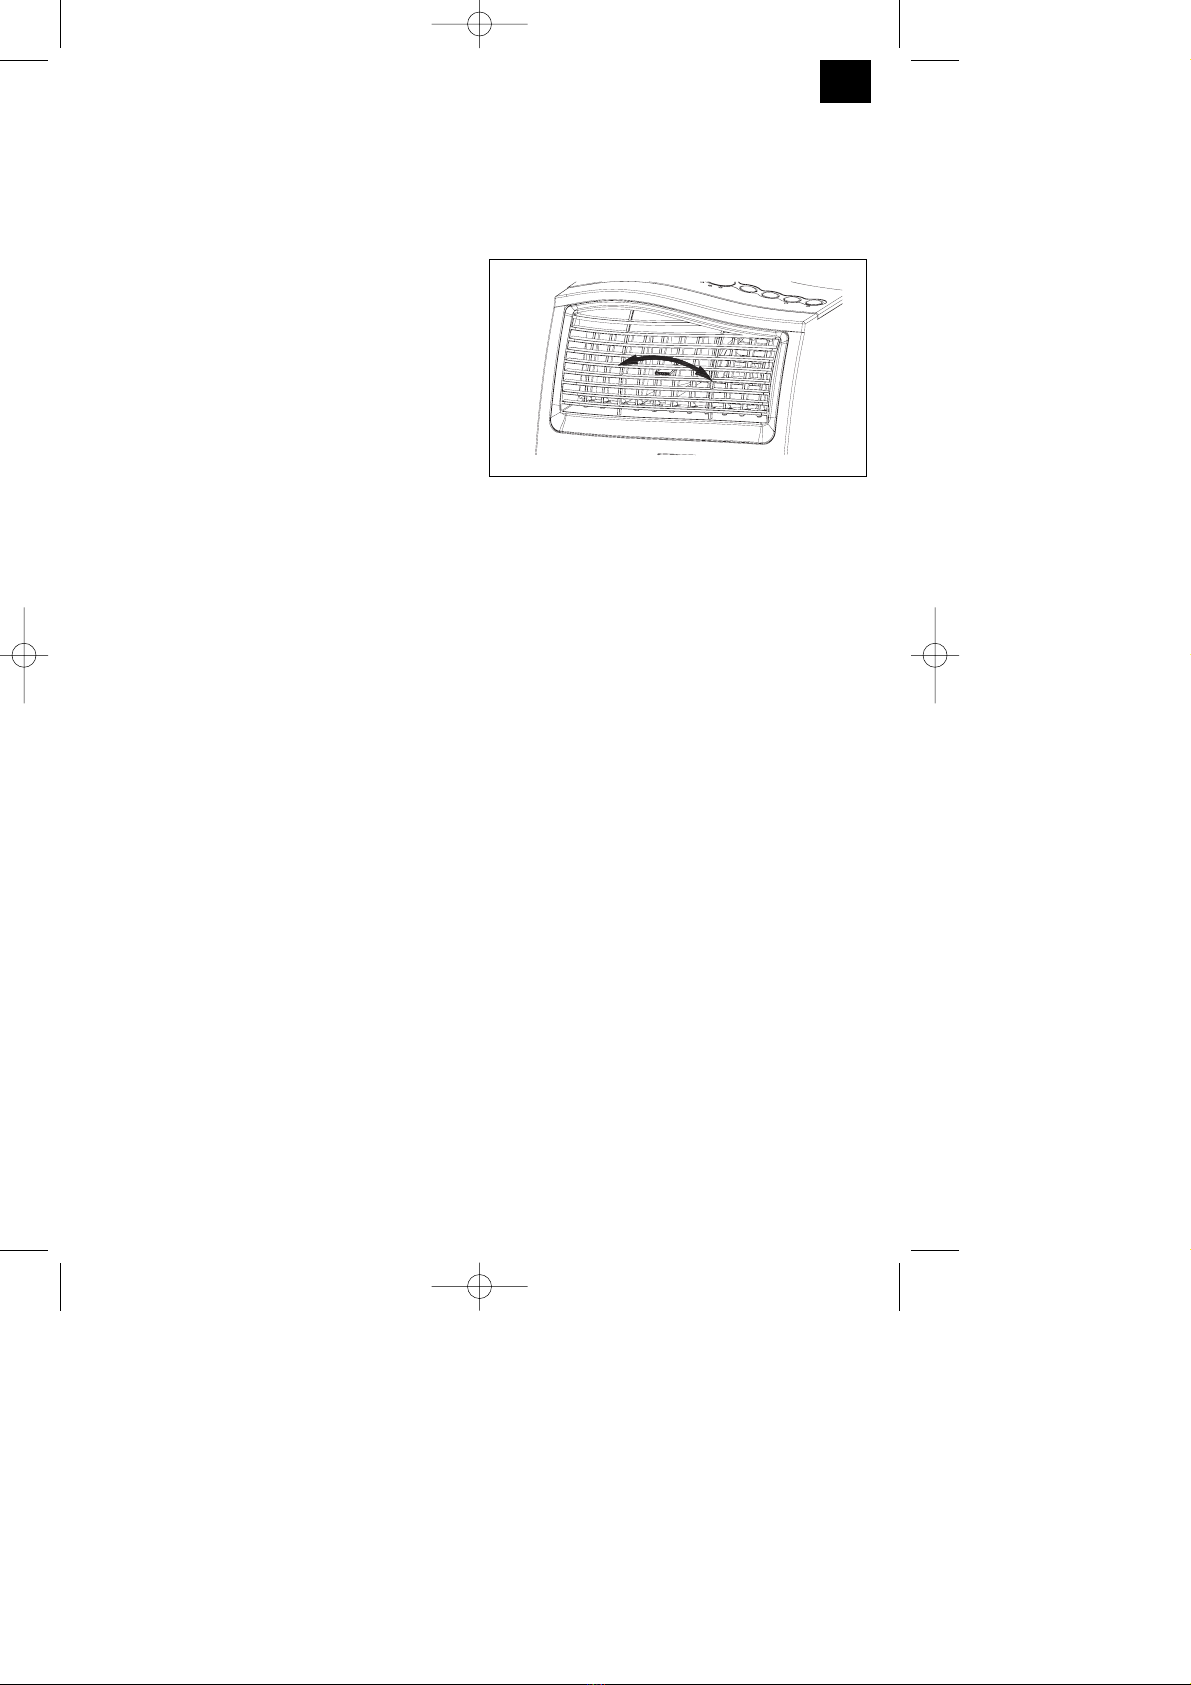
EINSTELLUNG DER LUFTRICHTUNG
Justierung der vertikalen Lüftungsgitter:
Die vertikale Richtung der Luftströmung wird durch
die vertikalen Lüftungsgitter bestimmt. Sie müssen
per Hand eingestellt werden.
MONTAGE DES ABLUFTSCHLAUCHES
Verwenden Sie nur den mitgeieferten Abluftschlauch.
Die Länge des Abluftschlauches kann von 300 mm
bis 1500 mm variiert werden. Die beste Kühlleistung
erhalten Sie mit der kürzesten Abluftschlauchlänge.
Knicke oder starke Krümmungen des Abluft-
schlauches sollten vermieden werden, damit die
Abluft ungehindert nach aussen strömen kann. Wenn
dies nicht beachtet wird, kann es zu Überhitzungen
des ganzen Gerätes kommen und das Gerät
abschalten. Das Gerät könnte dadurch beschädigt
werden.
Warnung!
Die Länge des Abluftschlauches ist auf die
technische Spezifikation des Gerätes abgestimmt.
Verlängern Sie nicht den Schlauch, dies könnte zu
Störungen am Gerät führen.
Anleitung NMK 3500 SPK1 10.01.2006 16:28 Uhr Seite 5

D
6
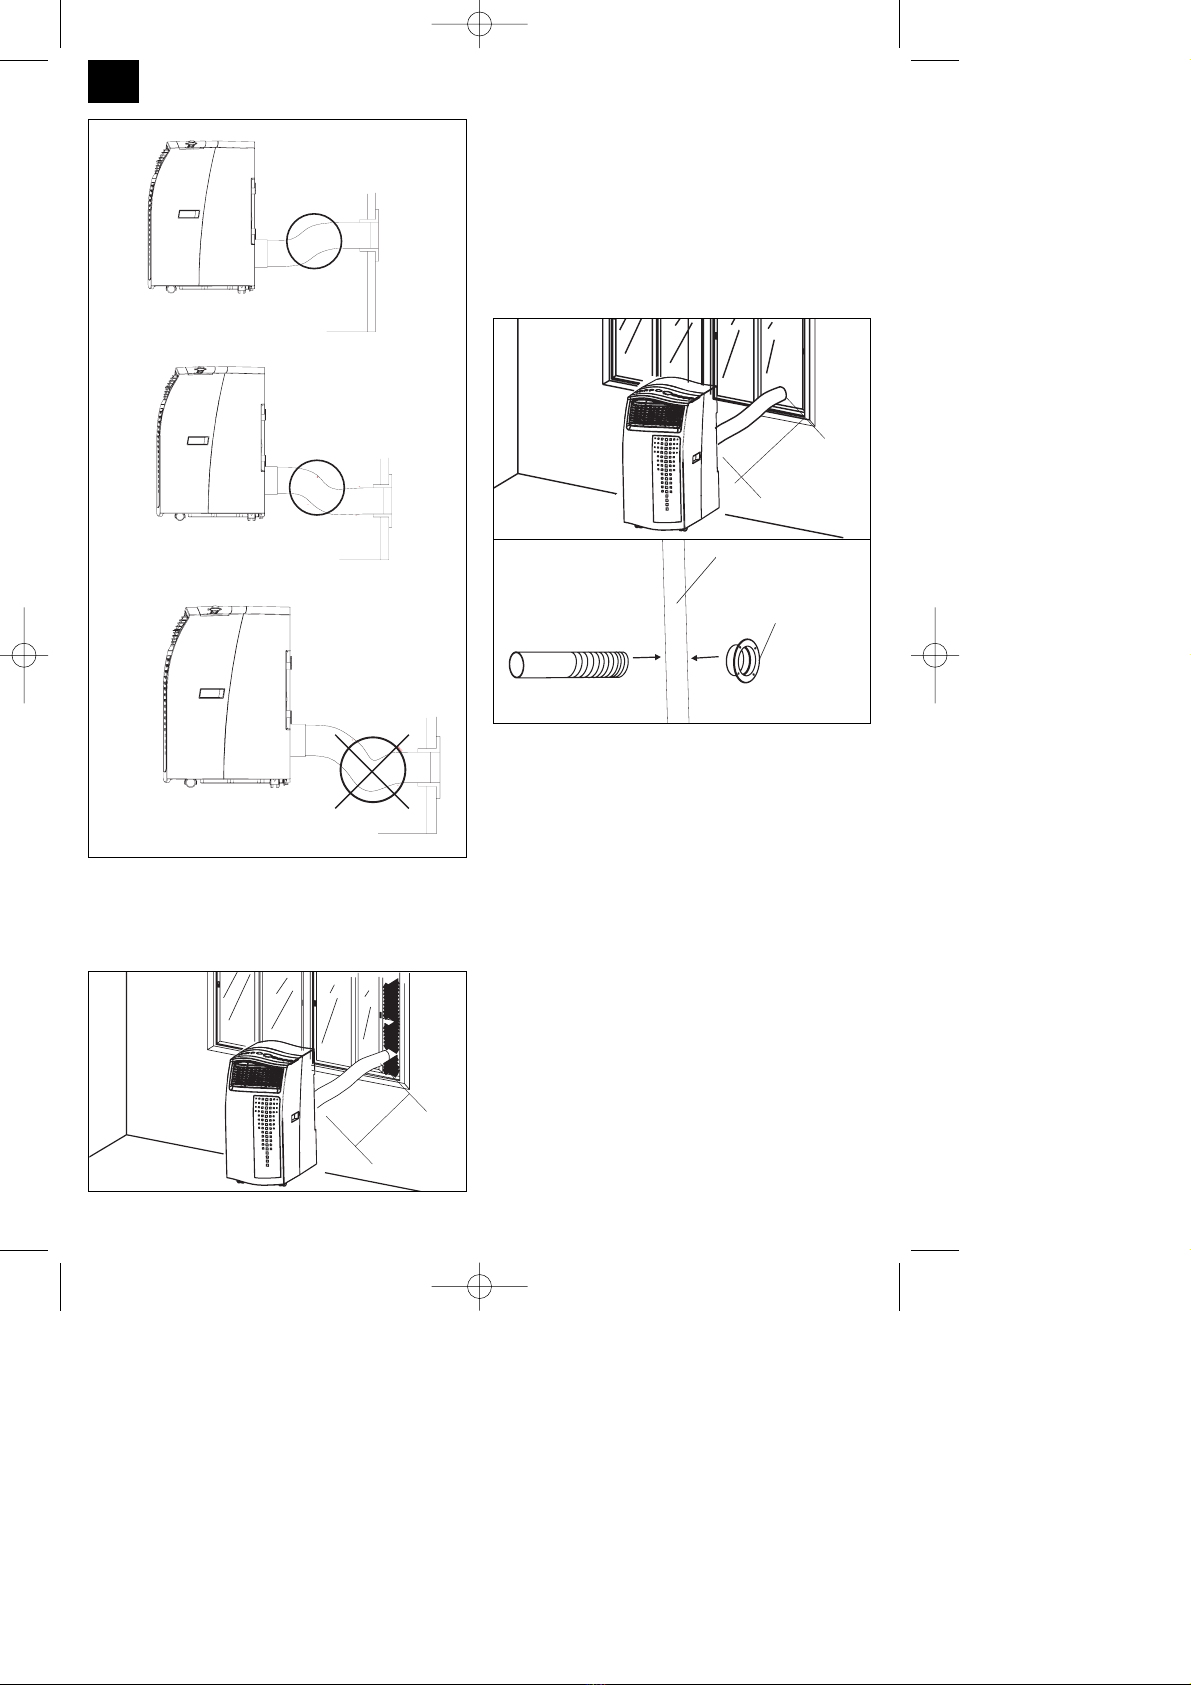
A) Montage des Abluftschlauches
durchs offene Fenster
Verwenden Sie die Schaumstoffteile und kürzen Sie
sie wenn nötig. Führen Sie den Abluftschlauch durch
die Schaumstofföffnung ins Freie. Sichern Sie das
Fenster, sodass der Schaumstoff zuverlässig hält.
Hinweis: Treffen Sie Vorkehrungen gegen
unbefugtes Eindringen durch das Fenster.
B) Montage des Abluftschlauches
durch die Fensterscheibe oder Wand
앬ca. 136 mm Ø Loch in die Scheibe oder Wand
schneiden bzw. bohren.
앬Durchführungsring von aussen nach innen
stecken und befestigen.
앬Abluftschlauch in den Durchführungsring
stecken.
앬Bei Nichtbetrieb der Anlage die Abdeckkappe
von aussen auf den Durchführungsring stecken.
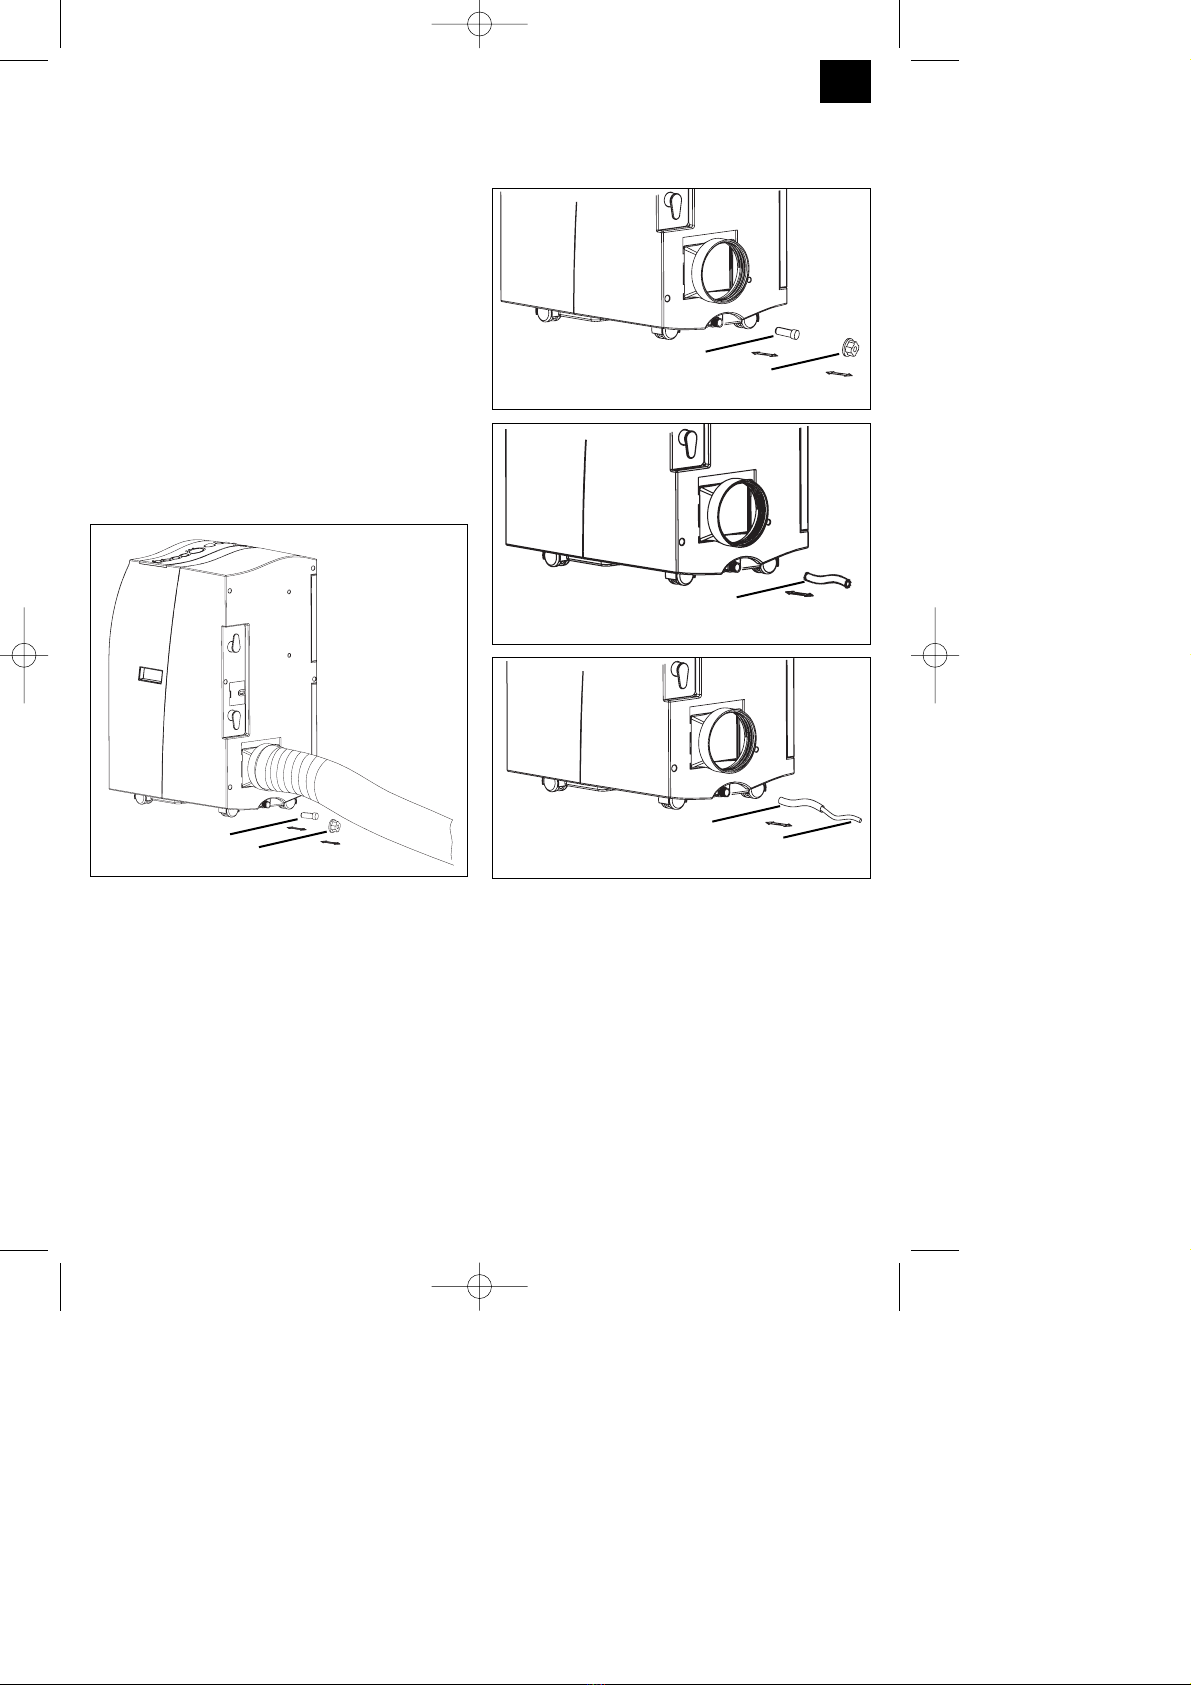
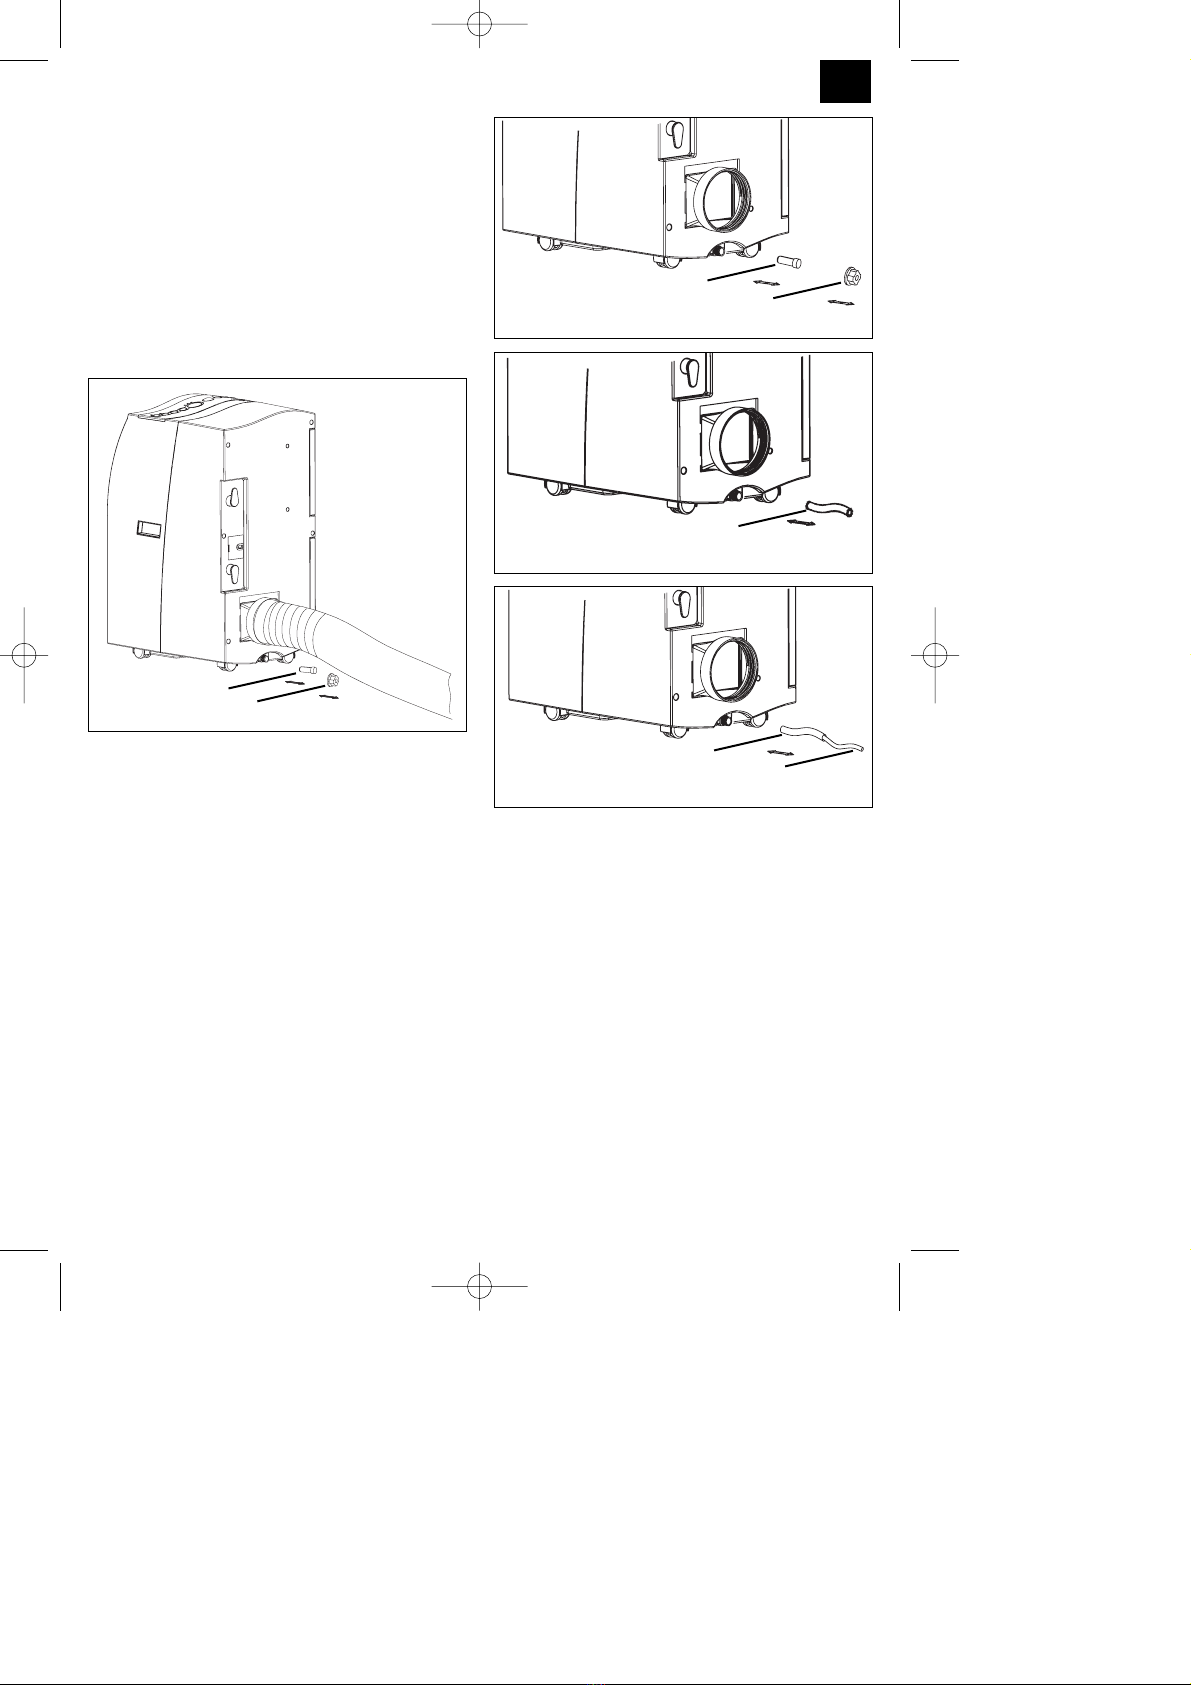
C) Ablassen des Kondenswassers im
Wassertank
DAS GESAMTE KONDENSWASSER MUSS VOR
AUSSERBETRIEBNAHME ODER UMSTELLUNG
ABGELASSEN WERDEN:
50 cm
50 cm
Wand oder Fensterscheibe
Durchführungsring
richtig
richtig
falsch
Anleitung NMK 3500 SPK1 10.01.2006 16:28 Uhr Seite 6
7
D
Hinweis
Wenn der Kondenswasserbehälter voll ist, schalten
Kompressor und Ventilatormotor ab. Die LED „W.F.”
blinkt und ein Signal ertönt kurzzeitig. Anschließend
erlischt das akustische Signal, die LED „W.F.” blinkt
weiter.
In diesem Fall entleeren Sie den Behälter wie unten
beschrieben:
1. Ziehen Sie den Netzstecker.
2. Schieben Sie einen Behälter unter die Ablaß-
schraube
3. Schrauben Sie die Ablaßschraube (1) ab
4. Entfernen Sie den Stopsel (2)
5. Das Kondenswasser läuft in den Behälter.
6. Nachdem der Kondenswasserbehälter komplett
entleert ist, montieren Sie Stopfen (2) und Ablass-
schraube (1) wieder.
7. Das Gerät kann wieder in Betrieb genommen
werden.
D) Ablassen des Kondenswassers mit
Kondenswasserschlauch
1. Ziehen Sie den Netzstecker.
2. Ablaufschraube (1) abschrauben
3. Entfernen Sie den Stopfen (2)
4. Kondenswasserschlauch aufstecken und mit
Schelle sichern
5. Der Ablaufschlauch kann mit einem ø18mm
Schlauch verlängert werden. Verwenden Sie dazu
ein passendes Verbindungsstück.
Hinweis:
Der Ablaufschlauch muss leicht abfallend nach
außen verlaufen.
Die „Kondenswasserbehälter voll“ Anzeige ist außer
Betrieb.
2
1
1
2
Kondenswasserschlauch
Kondenswasserschlauch
reduzierter Wasserschlauch ø 18 mm
Anleitung NMK 3500 SPK1 10.01.2006 16:28 Uhr Seite 7
D
8
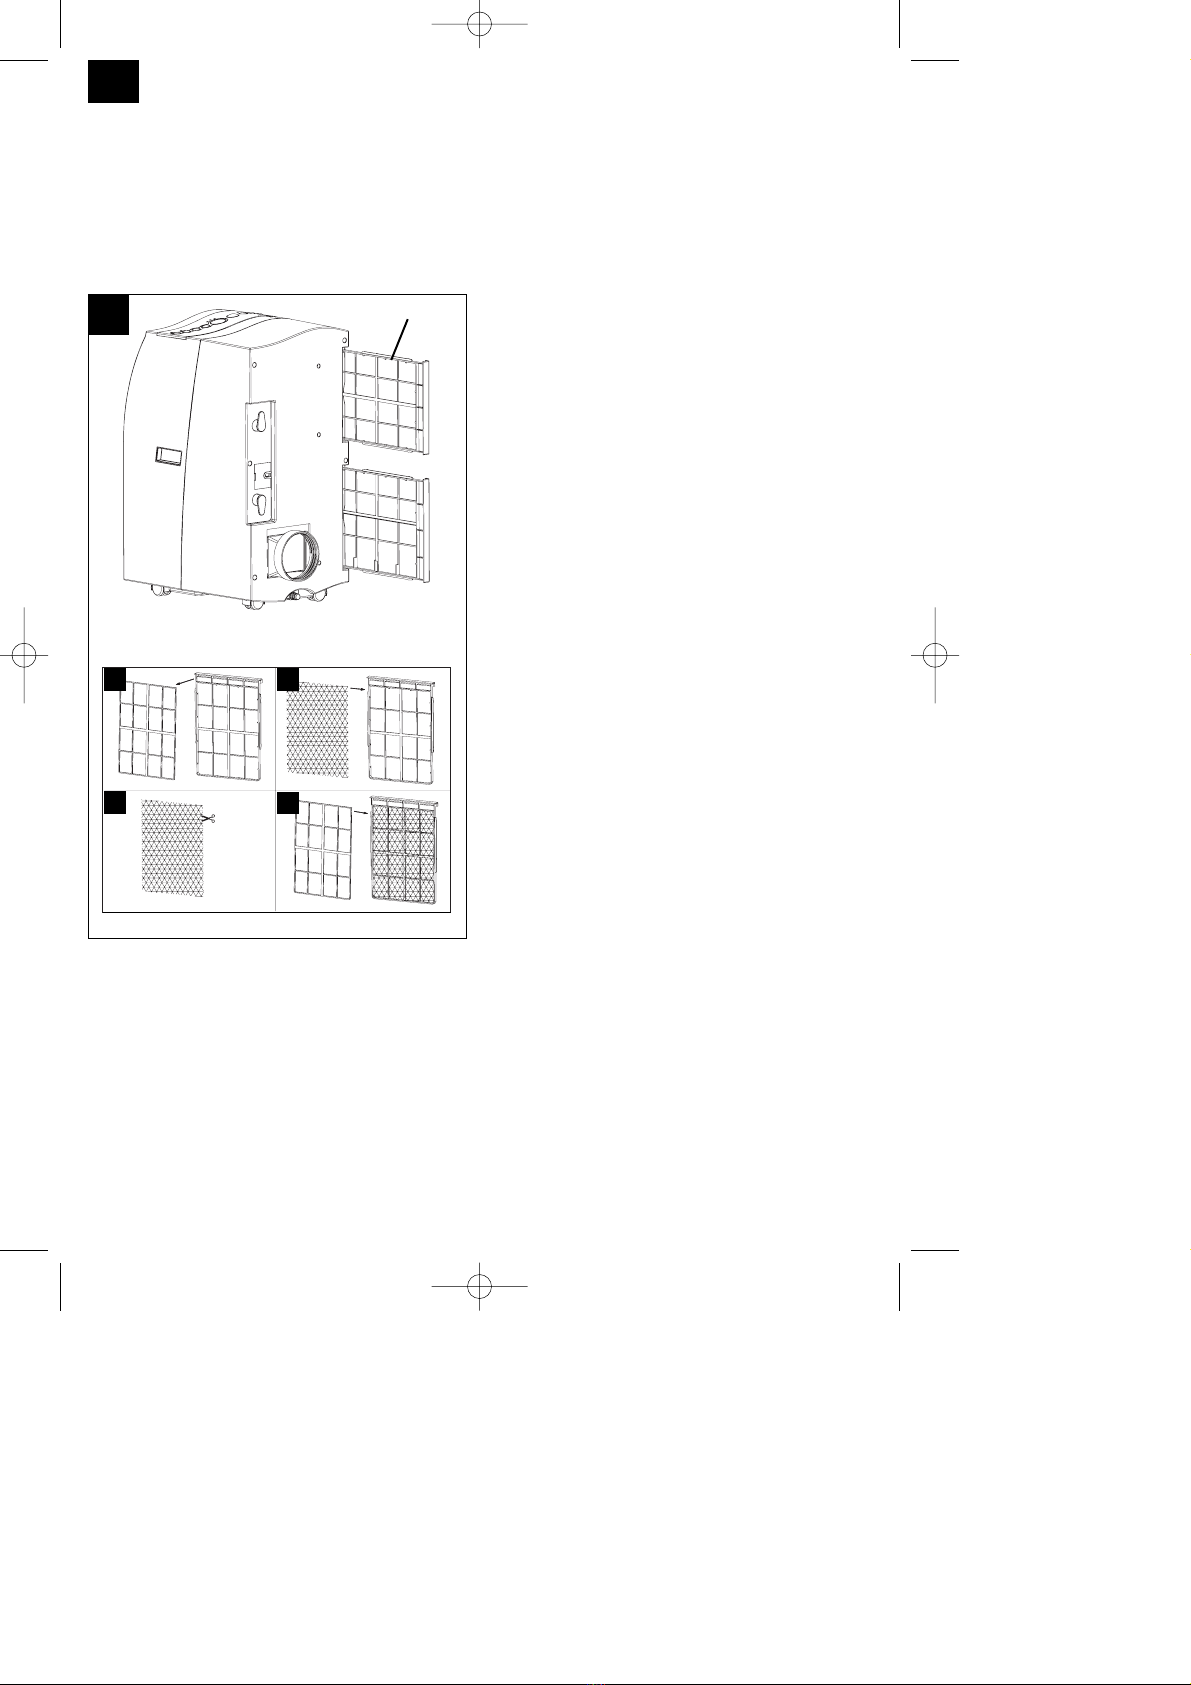
Kohlefilter erneuern
1. Filterrahmen (1) entnehmen
2. Filterhalter von Filterrahmen entfernen
3. Kohlefilter aus der Tüte nehmen
4. Kohlefilter in Filterrahmen legen
5. Filter mit Filterhalter befestigen
6. Filterrahmen einschieben (1)
Instandhaltung
1. Ziehen Sie zuerst den Netzstecker, um einen
Stromschlag oder Feuergefahren zu vermeiden.
2. Verwenden Sie nur milde Reinigungsmittel und ein
weiches Tuch, um den Filter und das Gehäuse zu
reinigen. Verwenden Sie niemals aggressive
Mittel, Benzin, Alkohol oder Verdünnung zur
Reinigung. Setzen Sie den Filter erst wieder ein,
wenn er trocken ist.
3. Am Ende der Saison bitte den Wasserbehälter
entleeren, rollen Sie das Netzkabel auf, reinigen
den Filter und das Gehäuse, setzen den Filter,
wenn trocken, wieder ein und packen das Gerät
am besten in den Originalkarton zur Lagerung.
Legen Sie keine schweren Gegenstände auf das
Gerät.
1
2 4
35
1
Anleitung NMK 3500 SPK1 10.01.2006 16:28 Uhr Seite 8

9
D
PROBLEMLÖSUNG
Wenn das Gerät richtig betrieben wird, dürften keine Störungen auftreten. Bei Störungen prüfen Sie die
folgenden Möglichkeiten, bevor Sie den Kundendienst verständigen.
Problem Möglicher Grund
Gerät arbeitet nicht Ist der Netzstecker richtig eingesteckt?
Ist Spannung an der Netzsteckdose?
Ist die Raumtemperatur unter der eingestellten Temperatur?
Ist der Kondenswasserbehälter voll?
Gerät kühlt nicht zufriedenstellend Ist direkte Sonneneinstrahlung im Raum?
Sind Türen und Fenster geöffnet?
Sind sehr viele Menschen im Raum?
Entsteht durch ein Gerät viel Wärme im Raum?
Schwache Lüftungsleistung Ist der Luftschlauch verstopft?
Ist der Filter verschmutzt?
Ist der Lufteinlass bzw. Luftauslass blockiert?
Gerät ist zu laut Ist das Gerät uneben/schräg aufgestellt?
Kompressor läuft nicht Ist der Kondenswasserbehälter voll?
Ist der Kompressor überhitzt und der Überhitzungsschutz hat den
Kompressor abgeschaltet, warten Sie bis der Kompressor wieder
abgekühlt ist.
Nach längerem Gebrauch sollte das Gerät durch eine Fachfirma überprüft
werden.
Anleitung NMK 3500 SPK1 10.01.2006 16:28 Uhr Seite 9

10
GB
Layout
1 Air outlet grille
2 Control device
3 Handle
4 Castors
5 Air inlet filter
6 Air inlet
7 Opening for connection fittings for
the exhaust air hose
8 Mains cable wraparound brackets
9 Rubber bung for condensation
water drain (in the device)
Anleitung NMK 3500 SPK1 10.01.2006 16:28 Uhr Seite 10

* Please read the Operating Instructions
thoroughly before using the device for the first
time and then keep them in a safe place.
In purchasing this portable air conditioner you have
chosen a high quality product. The device is of a
highly professional design and will offer you
maximum comfort for many years, as long as you
use it in accordance with the Operating Instructions.
You should therefore read the Instructions thoroughly
and keep them in a safe place for future reference.
1. Before using
1. Always place the portable device on a firm footing.
2. Connect the device to the correct socket outlet.
3. Connect the exhaust air hose to the air
conditioner.
2. Technical data
Refrigerant: R410 A
Refrigerant filling capacity: 780 g
Cooling capacity 12,000 BTU/h / 3,495 watts
Mains voltage 230 V ~ 50 Hz
Power input 1,250 W
Energy efficiency class A (EER 2.74)
Max. air throughput 580 cbm/h
Max. room size: 115 m3
Max. dehumidifier performance: 53 l/day
Fan speed 3
Area of application, room temperature: 18 - 32 °C
Sound pressure level ≤ 54 dB (A)
Dimensions (WxDxH) 35,6 x 53,4 x 76,2 cm
Net weight 38 kg
Important note: Consumption values were
measured at a room temperature of 27°C humidity of
60%.
3. Important safety instructions
Prevention of accidents
Check that the electrical connection is correct.
Check that the device is installed correctly in
accordance with the Operating Instructions.
Keep all children and any persons under the
influence of medication or alcohol well away from
the device.
Never use the device in the vicinity of bath tubs,
showers or wash basins.
Never place any objects on the air vents.
Never place closer than 50 cm to the wall.
Close the window curtains whenever there is
strong sunlight or adjust the venetian blinds
accordingly.
Keep the air filter clean. Under normal conditions
the filter requires cleaning once a month. Since
the air filter also catches very small particles of
dust, it may be necessary to clean it more
frequently. Never operate the device without
the air filter.
앬When you start the device, set the fan to a high
speed and the thermostat to the highest cooling
setting. Reduce to LOW COOLING later and set
the THERMOSTAT to the desired temperature.
Additional instructions:
Never use an extension cable or an auxiliary plug
to which another device is connected in addition
to the air conditioner.
In the cooling function the warm exhaust air must
be transferred outside by the hose. An opening in
the wall or window is therefore essential for the
exhaust air set included in delivery.
Always pull out the mains plug after use or before
starting any maintenance work.
Ensure that the device never comes into contact
with any chemicals.
All work of maintenance or repair must be
performed by an electrician or cooling system
specialist onl
11
GB
Anleitung NMK 3500 SPK1 10.01.2006 16:28 Uhr Seite 11

Accessories
11 Exhaust air connection fittings
12 Bushing ring
13 Exhaust air hose
14 Foam material (Used for exhaust air outlet
through the window.)
15 Foam material (Used for exhaust air outlet
through the open window and placed in the open
section of the window. As far as possible, no
additional warm air should come into the room
from outside.)
16 Cap for the hole in the window/wall
18 Drainage water hose
19 Activated carbon filter
Remote control
Description of the operating elements
1. LED “Automatic mode set”
2. LED “Cool mode set”
3. LED “Fan mode set”
4. Not assigned
5. LED “Fan: Slow”
6. LED “Fan: Medium”
7. LED “Fan: Fast”
8. LED “Timer actuated”
9. LED “Room temperature”
10. LED “Condensation water tank full”
11. LED “Set temperature”
12. LED “Sleep function set”
13. Not assigned
14. Not assigned
15. “Sleep function” selector
16. “Warmer” selector
17. “Cooler” selector
18. LCD indicator panel
19. ON/OFF switch
20. “Timer” switch
21. “Fan speed” selector
22. “Mode” selector
23. Remote control sensor
Switching the device on and off
Press the On/Off switch. The device starts up
automatically. If the ambient temperature:
앬is higher than 23°C the device will run in cooling
mode;
앬if it is between 20°C and 23°C the device will run
in fan mode.
The status of the device, or mode in which it is
running, will be shown by the corresponding LEDs
(see indicator panel).
Note: The LCD indicator panel shows the current
room temperature (0 -50°C).
To switch the device off, press the On/Off switch
again.
Selecting the mode
Press the “Mode” selector (MODE) in the sequence
“Automatic”, “Cool”, “Fan”. The LED for the selected
mode lights up (see indicator panel).
12
GB
22 21 20 19 18 17 16 15 14
13
12
11
10
9
23
8
7
6
5
4
3
2
1
11
12
13
14
15
16
18
17
19
20
19
Anleitung NMK 3500 SPK1 10.01.2006 16:28 Uhr Seite 12
Setting the set-point temperature
Press the “Warmer” selector (UP) or “Cooler”
(DOWN) to set your desired set-point temperature. If
you press the “Warmer” or “Cooler” selector, the LCD
indicator panel will show your desired set-point
temperature. Otherwise the LCD indicator panel
always shows the current room temperature. The
device’s cooling mode is set to 24°C.
Selecting the fan speed
Press the “Fan speed” selector to set the desired fan
speed.
The LED for the mode lights up (see indicator panel).
If the device is in “Automatic mode” (AUTO) the fan
speed will be selected automatically by the device in
dependency on the room temperature. The
corresponding LED lights up. The “Fan speed” is
deactivated.
Setting the timer
Press the switch for the “Timer” (TIMER) to set the
desired operating time (1 - 24 h). The “Timer”
(TIMER) LED lights up. If the timer is set, the device
starts automatically. If you press the “Timer” switch,
the time you have set will be shown in the LCD
indicator panel. If the timer has not been switched
on, the device will run continuously.
If you press the switch for the “Timer” (TIMER)
without any of the other modes being switched on
you can set the time that the device is to start up.
If, for example, the timer shows “2”, this means that
the device will start up automatically in 2 hours time.
Activating the sleep function
Press the “Sleep” key to activate the sleep function.
In order to prevent undercooling the set room
temperature increases 1 °C during the first hour and
2 °C within 2 hours. When the sleep function is
switched off the room temperature decreases back to
the set value. After the sleep function has been on
for 12 hours the air conditioner switches off
automatically.
All modes and functions can be set using the
supplied remote control.
The remote control requires two MICRO (AAA)
batteries.
In order to protect the compressor, it only starts up 3
minutes after the device starts up. The same applies
when the device is switched off.
The cooling system switches itself off whenever the
room temperature is below the value set on the
thermostat. The air circulation/ventilation fan
continues to run as set. If the room temperature
increases again, the cooling system switches on
again.
SETTING THE AIR FLOW DIRECTION
Adjusting the vertical ventilation grille:
The vertical direction of the air flow is determined by
the vertical ventilation grille. It has to be adjusted by
hand.
INSTALLING THE EXHAUST AIR HOSE
Use only the supplied exhaust air hose. The length of
the exhaust air hose can be varied from between 300
mm to 1500 mm. For the most effective cooling the
hose should be as short as possible. Avoid kinks are
excessive bends in the hose so that the exhaust air
can be transferred out without hindrance. If you
ignore this advice, the device as a whole may
overheat and shut down. This could result in damage
to the device.
Warning!
The length of the exhaust air hose is matched to the
technical specifications of the device. Never extend
the hose as this could lead to malfunctions or faults
on the device.
13
GB
Anleitung NMK 3500 SPK1 10.01.2006 16:28 Uhr Seite 13
A) Installing the exhaust air hose
through an open window
Use the foam parts and shorten them if required.
Guide the exhaust air hose through the opening in
the foam to the outside. Secure the window so that
the foam is kept firmly in place.
Note: Take appropriate precautions to prevent
unauthorized entry through the window.
B) Installation of the exhaust air hose
through the window pane or the wall
앬Cut or drill a hole of approx. 136 mm diameter
though the window pane or the wall.
앬Insert the bushing ring from the outside to the
inside and fasten.
앬Feed the exhaust air hose through the bushing
ring.
앬When the system is not being used, fit the cap on
the bushing ring on the outside.
C) Draining off the condensation water
with the water tank
ALL OF THE CONDENSATION WATER MUST BE
DRAINED OFF BEFORE YOU EVER RELOCATE
OR STOP USING THE DEVICE:
Note:
When the condensation water tank is full the
compressor and the fan motor shut down. The “W.F.”
LED flashes and a signal sounds temporarily. The
acoustic signal then goes out but the “W.F.” LED
carries on flashing.
14
GB
50 cm
50 cm
Right
Right
Wrong
Wall or window pane
Bushing ring
Anleitung NMK 3500 SPK1 10.01.2006 16:28 Uhr Seite 14
Empty the tank as described below:
1. Pull out the mains plug.
2. Slide tank under the drainage screw.
3. Unscrew the drainage screw (1).
4. Remove the bung (2).
5. The condensation water drains out into the tankl.
6. Once the condensation water has been completely
emptied, fit the bung (2) and the drainage screw
(1) back on again.
7. The device is then ready to be used again.
D) Draining off the condensation water
with the condensation water hose
1. Pull out the mains plug.
2. Unscrew the drainage screw (1).
3. Remove the bung (2).
4. Fit the condensation water hose and secure with
the clamp.
5. The drainage hose can be extended with a hose
with a diameter of 18mm. If you do so, make sure
you use a suitable connector.
Note:
The drainage hose must run to the outside with a
slight fall.
15
GB
1
2
Condensation
water hose
Condensation
water hose
Reduced water hose with
a diameter of 18 mm
2
1
Anleitung NMK 3500 SPK1 10.01.2006 16:28 Uhr Seite 15

Replacing the carbon filter
1. Take out the filter frame (1)
2. Remove the filter fastener from the filter frame
3. Take the carbon filter out of the bag
4. Place the carbon filter in the filter frame
5. Fasten the filter with the filter fastener
6. Slide in the filter frame (1)
Maintenance
1. Always pull out the mains plug first to avoid an
electric shock or risk of fire.
2. Use only gentle cleaner and a soft cloth to clean
the filter and the housing. Never use aggressive
media, petrol, alcohol or thinner. Only fit the filter
back in place when thoroughly dry.
3. At the end of the season, please empty the water
tank, roll up the power cable, clean the filter and
the housing, then fit the filter back in place when
dry, and pack the device back in the original box
for storage. Never place any heavy objects on the
device.
16
GB
1
2 4
35
1
Anleitung NMK 3500 SPK1 10.01.2006 16:28 Uhr Seite 16

17
GB
Problem Possible cause
Device does not work Is the mains plug properly connected?
Is there a voltage supply at the mains socket outlet?
Is the room temperature below the set-point temperature?
Is the condensation water tank full?
The device does not provide
satisfactory cooling
Is the room exposed to direct sunlight?
Are any doors and windows open?
Are there a lot of people in the room?
Is a device in the room generating a lot of heat?
Weak ventilation performance Is the air hose blocked?
Is the filter soiled?
Is the air inlet or air outlet blocked?
The device is too loud Has the device been set up on an uneven surface/at an angle?
The compressor does not work Is the condensation water tank full?
Is the compressor overheated and the overheating cutout has
switched the compressor off? Wait until the compressor cools
down.
Have the device inspected by a specialist firm when you have used it for some time.
TROUBLESHOOTING
If the device is operated properly you should experience no problems with malfunctions or faults. In the event
of any malfunctions or faults, please check the following before you contact your customer services.
Anleitung NMK 3500 SPK1 10.01.2006 16:28 Uhr Seite 17
18
F
Description de l’appareil
1 Grille d’échappement d’air
2 Module de commande
3 Poignée
4 Galets de roulement
5 Filtre d’aspiration d’air
6 Entrée d’air
7 Ouverture pour les tubulures de
raccordement du tuyau d’air
d’échappement
8 Suspension du câble réseau
9 Capuchon en caoutchouc de la
sortie de l’eau de condensation (dans
l’appareil)
Anleitung NMK 3500 SPK1 10.01.2006 16:28 Uhr Seite 18

* Veuillez lire ces instructions
minutieusement avant la mise en
service de l’appareil et bien conserver
cette documentation.
En achetant ce climatiseur transportable, vous avez
fait un bon choix. Cet appareil est très professionnel
et offre un maximum de confort pour de nombreuses
années, à condition qu’il soit employé conformément
à ce mode d’emploi. Veuillez donc lire
minutieusement ces instructions et gardez-les bien
afin de pouvoir les utiliser plus tard.
1. Avant l’utilisation
1. Positionnez toujours l’appareil transportable sur
une base stable.
2. Connectez l’appareil à une prise correcte.
3. Raccordez le tuyau d’air d’échappement au
climatiseur.
2. Caractéristiques techniques
Réfrigérant : R410 A
Quantité de remplissage de réfrigérant : 780 g
Puissance frigorifique 12000 BTU/h / 3495 watts
Tension du secteur 230 V ~ 50 Hz
Puissance absorbée 1250 W
Classe d’efficacité énergétique A
Débit d’air maxi. 580 cbm/h.
Taille de la pièce maxi. : 115 m3
Puissance de déshydratation maxi. : 53 l/jour
Vitesse du ventilateur 3
Température ambiante du site d’application :
18 - 32°C
Niveau de pression acoustique ≤54 dB(A)
Cotes (LaxPrxH) 35,6 x 53,4 x 76,2 cm
Poids net 38 kg
Remarque : Les valeurs de consommation ont été
mesurées à une température ambiante de 27°C et
avec 60% d’humidité de l’air.
3. Consignes de sécurité importantes
Eviter les accidents
Assurez-vous que le raccordement électrique est
correct.
Assurez-vous que l’appareil est installé
conformément au mode d’emploi.
Les enfants et personnes sous prise de
médicaments ou sous l’effet de l’alcool doivent
être maintenues à l’écart de l’appareil.
N’utilisez jamais cet appareil à proximité de
baignoires, douches ou lavabos.
Ne placez aucun objet sur les canaux de
ventilation.
Distance minimale par rapport au mir : 50 cm.
Fermez les rideaux des fenêtres pendant les plus
forts rayons de soleil ou régler les stores en
fonction.
Maintenez le filtre d’air propre. A des conditions
normales, le filtre doit être nettoyé chaque mois.
Puisque le filtre d’air bloque également les
petites particules de poussière, il peut être, le cas
échéant, nécessaire de le nettoyer également
plus souvent. L’appareil ne doit en aucun cas
être mis en service sans filtre.
앬Au début, réglez la vitesse du ventilateur en
position haute et le thermostat sur le plus fort
refroidissement. Ensuite mettez-le
REFROIDISSEMENT LEGER et réglez le
THERMOSTAT à la température désirée.
Autres consignes :
N’utilisez aucun câble de rallonge ni aucune prise
supplémentaire à laquelle un autre appareil serait
connecté en sus de ce climatiseur.
Lors de la fonction de refroidissement, l’air
d’échappement chaud doit être dirigé vers
l’extérieur via le tuyau flexible. Une ouverture
dans le mur ou la fenêtre est nécessaire pour le
kit d’air d’échappement livré avec la fourniture.
Tirez toujours la fiche de contact après utilisation
ou pendant les travaux de réparation.
Evitez le contact de l’appareil avec des produits
chimiques.
Seul une entreprise spécialisée en électricité ou
en technique du froid est autorisée à réaliser les
travaux de maintenance et d’entretien.
19
F
Anleitung NMK 3500 SPK1 10.01.2006 16:28 Uhr Seite 19
Accessoires
11 Tubulures de raccordement de l’air
d’échappement
12 Bague de traversée
13 Tuyau d’air d’échappement
14 Caoutchouc mousse (est employé en cas
d’échappement d’air par la fenêtre ouverte)
15 Caoutchouc mousse (est employé en cas
d’échappement d’air par la fenêtre ouverte dans
la zone encore ouverte de la fenêtre). Il faut éviter
dans la mesure du possible que de l’air chaud ne
s’immisce en sus dans la salle en provenant de
l’extérieur.
16 Capuchon pour la fenêtre - le passage de mur
18 Tuyau de sortie d’eau
19 Filtre à charbon actif
Télécommande
Description des organes de commande
1. DEL “fonctionnement automatique réglé”
2. DEL “fonction de refroidissement réglée”
3. DEL “fonction de ventilateur réglé”
4. non affecté
5. DEL “ventilateur lentement”
6. DEL “ventilateur moyen”
7. DEL “ventilateur rapidement”
8. DEL “minuterie actionnée”
9. DEL “température ambiante”
10. DEL “réservoir d’eau de condensation plein”
11. DEL “réglage de la température”
12. DEL “Fonction sommeil réglée”
13. non affecté
14. non affecté
15. Sélecteur “Fonction sommeil”
16. Sélecteur “plus chaud”
17. Sélecteur “plus froid”
18. Champ d’affichage à cristaux liquides
19. Interrupteur Marche/Arrêt
20 Interrupteur de la “minuterie”
21. Sélecteur “vitesse du ventilateur”
22. Sélecteur “fonction”
23. Capteur de télécommande
Mettre l’appareil en et hors service
Appuyez sur l’interrupteur Marche / Arrêt (ON/OFF)
L’appareil démarre automatiquement Si la
température ambiante :
앬est supérieure à 23°C, l’appareil fonctionne en
mode de refroidissement
앬se trouve entre 20°C et 23°C, l’appareil
fonctionne en mode ventilateur.
Conformément au mode dans lequel l’appareil
fonctionne, les voyants s’allument (cf. tableau de
commande).
Remarque : Le champ d’affichage à cristaux
liquides indique la température ambiante actuelle. (0-
50°C)
Pour mettre l’appareil hors circuit, appuyez encore
une fois sur l’interrupteur Marche / Arrêt.
20
F
22 21 20 19 18 17 16 15 14
13
12
11
10
9
23
8
7
6
5
4
3
2
1
11
12
13
14
15
16
18
17
19
20
19
Anleitung NMK 3500 SPK1 10.01.2006 16:28 Uhr Seite 20
This manual suits for next models
1
Table of contents
Languages:
Popular Air Conditioner manuals by other brands


ABND3A2AI Service manual")

Friedrich
Friedrich WallMaster WS10 Installation and operation manual

AHRI
AHRI SUPERIOR Series Installation, operation & service manual

Admiral
Admiral AW-05CM1FLU use and care manual

Trane
Trane TTK060K4 Product bulletin

Mitsubishi Electric
Mitsubishi Electric NTXFKs15a112a Series manual

Mitsubishi Electric
Mitsubishi Electric MSZ-FA25VA Service manual

Frigicoll
Frigicoll MKD-V300 Installation & owner's manual

Nordyne
Nordyne WARRCOIL01 quick start guide

Daikin
Daikin Comfort Flex CLIV Series Installation, operation and maintenance manual

LG
LG LW1213HR Energy guide

Haier
Haier 1U71S2SS5FA installation manual

GE
GE AGM24DH Owner's manual and installation instructions