ELECTRO BRAND MP4316MO User manual
MODEL MP4316MO
MODEL MP4308CP
User Manual
Digital MP4 Player

1
Precautions
For the correct use and good performance of the player, the user must
fully understand the manual as well as strictly follow the instructions
provided.
Avoid high temperature (above 95ºF) or low temperature (below

2
30ºF).
Avoid dropping the unit.
Avoid unit’s contact with chemicals such as benzene, paint thinner,
etc.
Do not use in the vicinity of strong magnetic fields.
Keep away from direct sunlight or heating appliances.
Never privately dissemble, repair or modify the player.
Using the player and the earpiece during bicycling, car and
motorcycle driving could be dangerous.
Never use an excessively high volume, which may damage your
hearing ability.
Divide packing materials, batteries, and non-working electronic
products and dispose of them properly.
Basic Functions
Top LTPS true wide screen display of 4.3 inches, 480x272 and 16
million colors, providing vivid, fine images, perfectly presenting true
frame as the original.
Full set of cool and super dynamic flash interface design, full
touch-screen, supporting effects of dynamic interface switching
including pan, scale, damp, etc.
Supports hi-definition video playing of all formats including RM,
RMVB, AVI, MKV, WMV, VOB, MOV, FLV, ASF, DAT, MP4, 3GP, MPG,
MPEG; 720P full-code stream without converting, direct playing,
H.264 HP high code rate smooth decoding.
Hi-definition panorama TVOUT and HDMI hi-definition video output.
For video playing, it supports breakpoint continuation. It offers various
display modes and display formats of various width-height ratios.
Supports mainstream plug-in subtitle as SRT, SUB, SSA, ASS, SMI,
etc.; supports synch embedded subtitle display function for VOB and
MKV for the convenience of watching foreign films and learning
foreign languages.
Supports all formats of audio such as MP3, WMA, DRM WMA , OGG,

3
APE, FLAC, WAV, AAC (including AAC-LC, AAC HE, AAC+V1/V2).
Many sound effects, SRS WOW+SRS WOW HD and user-defined
effect adjustment.
Intelligent audio media library management, supporting album art and
real-time dynamic spectrum display.
Supports picture formats JPG, JPEG, BMP, GIF, PNG for displaying;
supports thumbnail viewing, slide display, frame rotation, frame scale,
etc; sliding switching effect supports switching of slide effects such as
Fly-in, Chessboard, Cut, Erase, Shutter, Random Line, and Rotate.
Reads TXT e-book (supports Bookmark, Auto Reading, Font
Change): supports a number of font sizes, colors.
Built-in microphone, ultra long time recording, MIC recording and
MP3, WMA, WAV formats.
Built-in tools such as calendar, stop watch, calculator, etc.
USB2.0 hi-speed transmission interface.
Supports Micro SD card; supports extendable memory space up to
32G.
Built-in speaker.
Supports intelligent file search.
Energy-saving setting, date, time; display of various function
properties such as display brightness, interface background, etc., as
well as free setting.
Supports restoration through USB or upgrading sample machine
software.
4
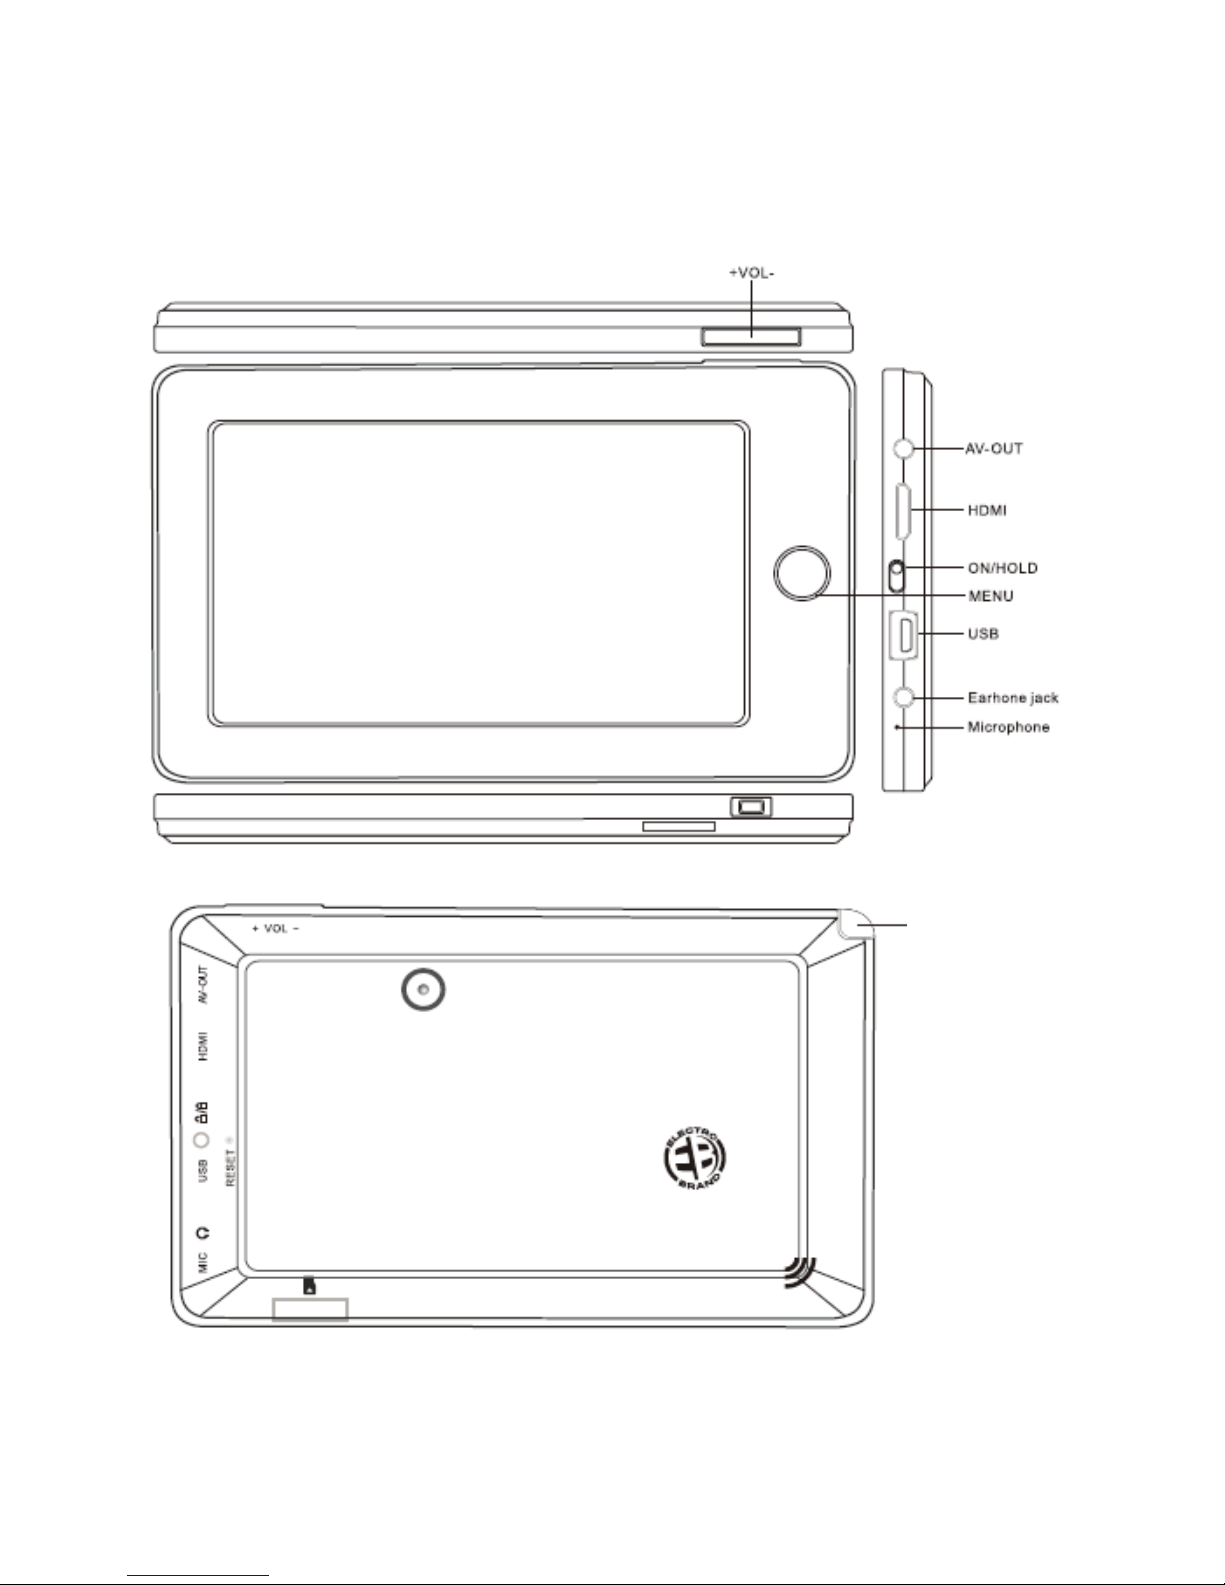
Appearance
Stylus
5
Touch Operations and Key Definitions
1,Keys Definitions
No. Name Function definition
1) Menu
(*) (1) Long press to turn on/turn off the player / (*) (2)
Short press to confirm/play.
2) Vol+
Short-cut key for volume increase; short press to
increase by one segment; long press to increase
continuously
3) Vol-
Short-cut key for volume decrease; short press to
decrease by one segment; long press to decrease
continuously.
4) Hold
Turn the button to the position to lock the screen.
5) On Turn the button to the position to unlock the screen.
(*) 1) “Long press” means that the key is held for over 2 seconds.
(*) 2) “Short press” means that the key is held for less than 2 seconds.
NOTE: Above definitions are applicable when the system is ON.
2. Touch Operation Definitions
No. Name Function definition
1) Short press
Means a single touch less than 2 seconds, mainly for
menu selection and confirmation etc.
2) Long press Means a single touch longer than 2 seconds

6
3) Slide/drag
Means touching to slide or drag direction, mainly for
functions as Picture, Page up/down and Drag etc.
4) Handwriting
identification Mainly for entering characters/symbols
3. Touch icons Definitions
1) Touch to go back to Homepage
2) Touch for volume adjustment bar.
3) Touch for information menu
4) Touch it to return to previous page
Basic Operation
POWER ON/OFF
ON: Long press Menu button to turn on the player.
OFF: Long press Menu button to turn off the player.
Volume Adjustment
Press +, - key in Music or Video state etc. to adjust volume directly; “+”
for volume increase; “-“for volume decrease.
Reset
Press straight pin or needle into RESET hole on back of unit to restart
the system if the player freezes during playback.

7
Charge
A high-capacity lithium battery is included for the player. For charging,
turn off unit and connect it to PC with USB cable provided together with
the player. Turn unit on and you will see three modes: Power & Date,
Charge, Charge & Play.
Click to select desired state.
1) Power & Data:NOTE: When transferring music/video/etc, select
Power & Data mode; it displays as picture below.
Note: do not disconnect USB cable during data transmission, so as to
avoid copy failure or data error.
2) Charge: When charging with USB, display shows as below when
charging is in process:
3) Charge and Play: Enter the main menu. Display shows the battery
charging on the upper right corner of display as picture below: In this
mode the player can be used during charging.
8
Low Power
The player automatically shows a prompt interface when battery is low
(picture below), then it shuts down. You will have to charge the player
instead of restarting it.
How to save the files of Music, Video, Pictures, EBook, etc.
Connect the player to PC with USB cable provided together with the
player, and go to the modes. Select Power & Data, the PC will detect 2
removable disks, then you can save the files to the player.
Different file types should be copied in the corresponding folder shown
as below:
Power situation of
the battery.
Power situation of
the battery.

9
For example: music files should be copied in MUSIC folder, otherwise,
the file will not be found in the music application list.
Using a Micro SD Card
Two removable disks will be found after connecting this unit to a
computer. The first one is the unit’s built-in memory disk, the second one
is Micro SD card disk. The second one cannot be opened if no card is
plugged in. This unit supports up to 32GB Micro SD card expansion.
Micro SD Card Plug-in/out
Plug-in: face the front (the side with prints) of Micro SD card upwards
(the direction in which the machine’s display screen faces) and connect
it to the machine by plugging it in with a slight force into the card slot of
the machine. Now the machine can play the files in the card.
Plug-out: push Micro SD card inwards slightly (it will spring back), and
then take it out.
Note: Plug Micro SD card in or out in shutdown mode; otherwise, files in
the machine may be lost or damaged.
System Configurations
CPU: Pentium-133MHz at least
Memory: 32MB at least
Hard disk free space: 100MB at least
Video card: above 640*480, enhanced color (16 bit) at least
Root directory
EBOOK FLASH MUSIC PICTURES RECORD VIDEO

10
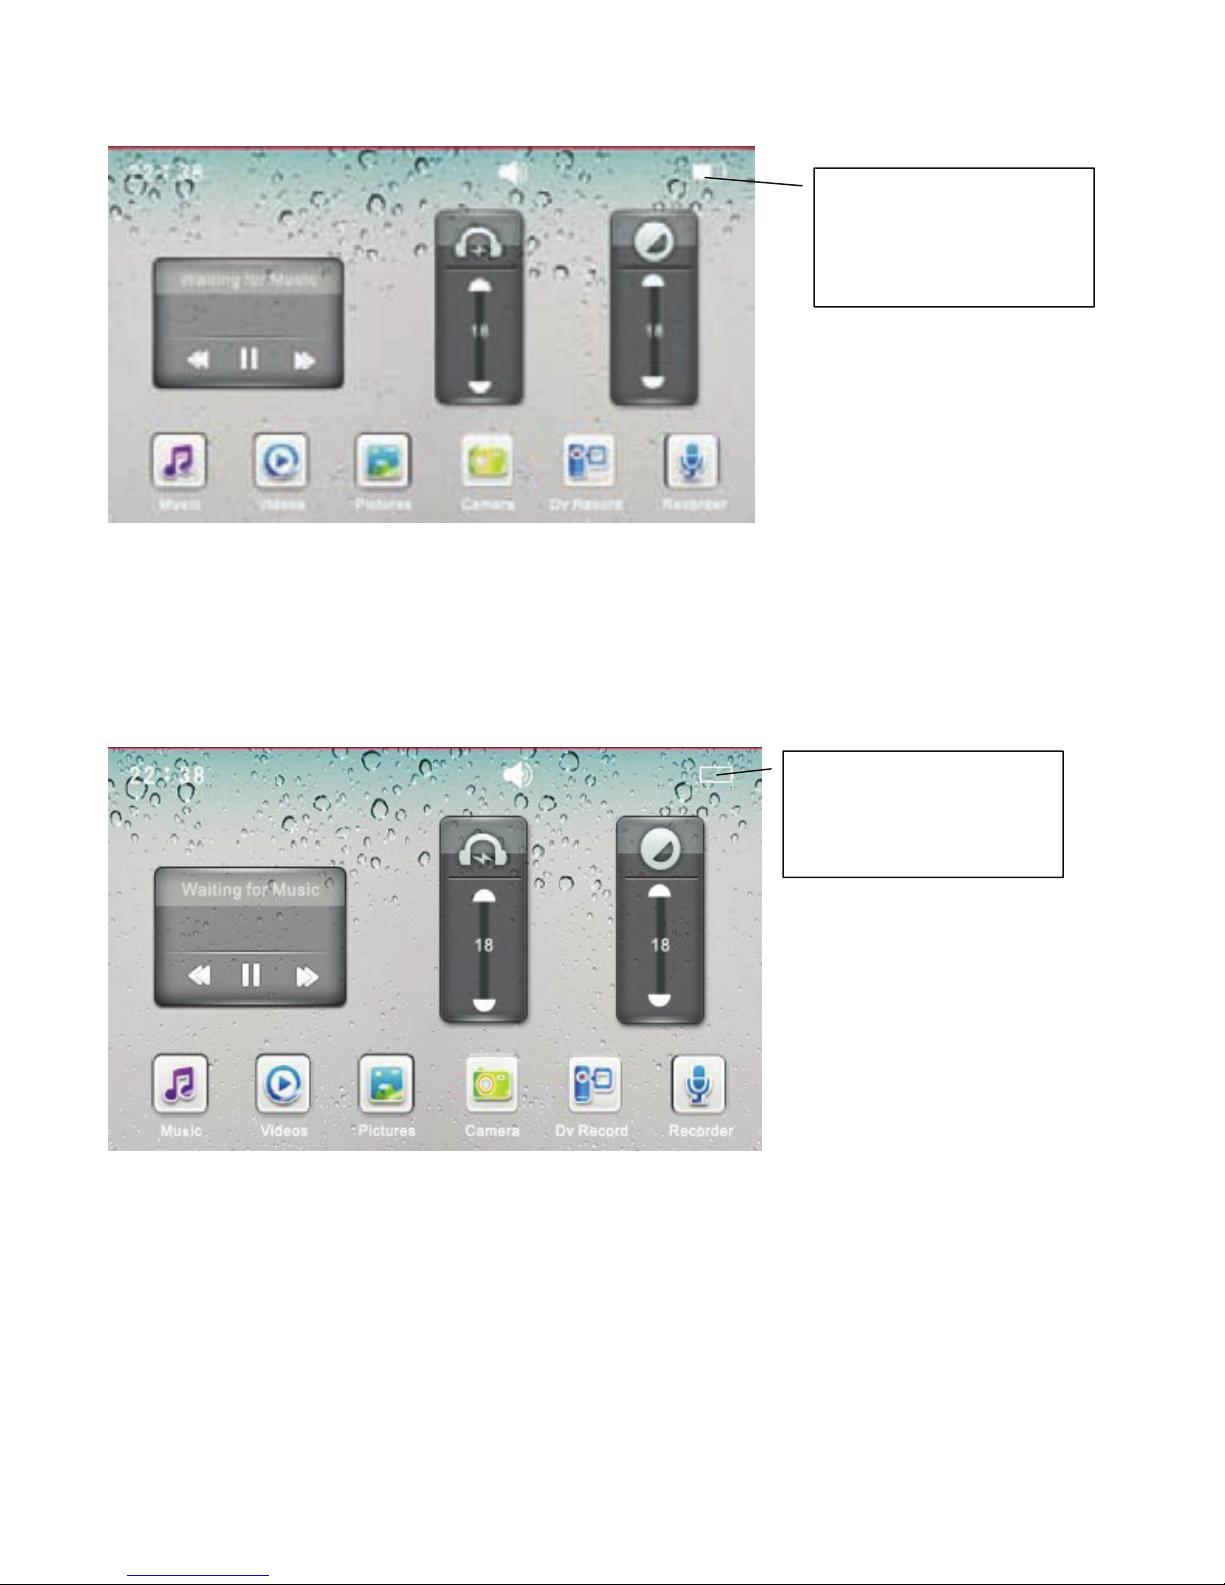
Main menu
It enters the Main menu as below after startup:
Main application area: includes the following application icons: Music/
Videos/ Pictures/ Camera/ DV Recorder/ Recorder/ My EBook/ File Na/
Setting/ Calendar/ Calculator/ Stopwatch
Desktop Background Switch
Touch Desktop Background Switch box on 2nd page. (NOTE: To get to
2nd page drag or slide finger or stylus from right side of screen to left.)
Display shows as above. When you touch the bar in different spots, the
background will change. The system is built in with four desktop
Background
Switch box
11
background pictures. Desktop background can be user defined through
Photo application functions.
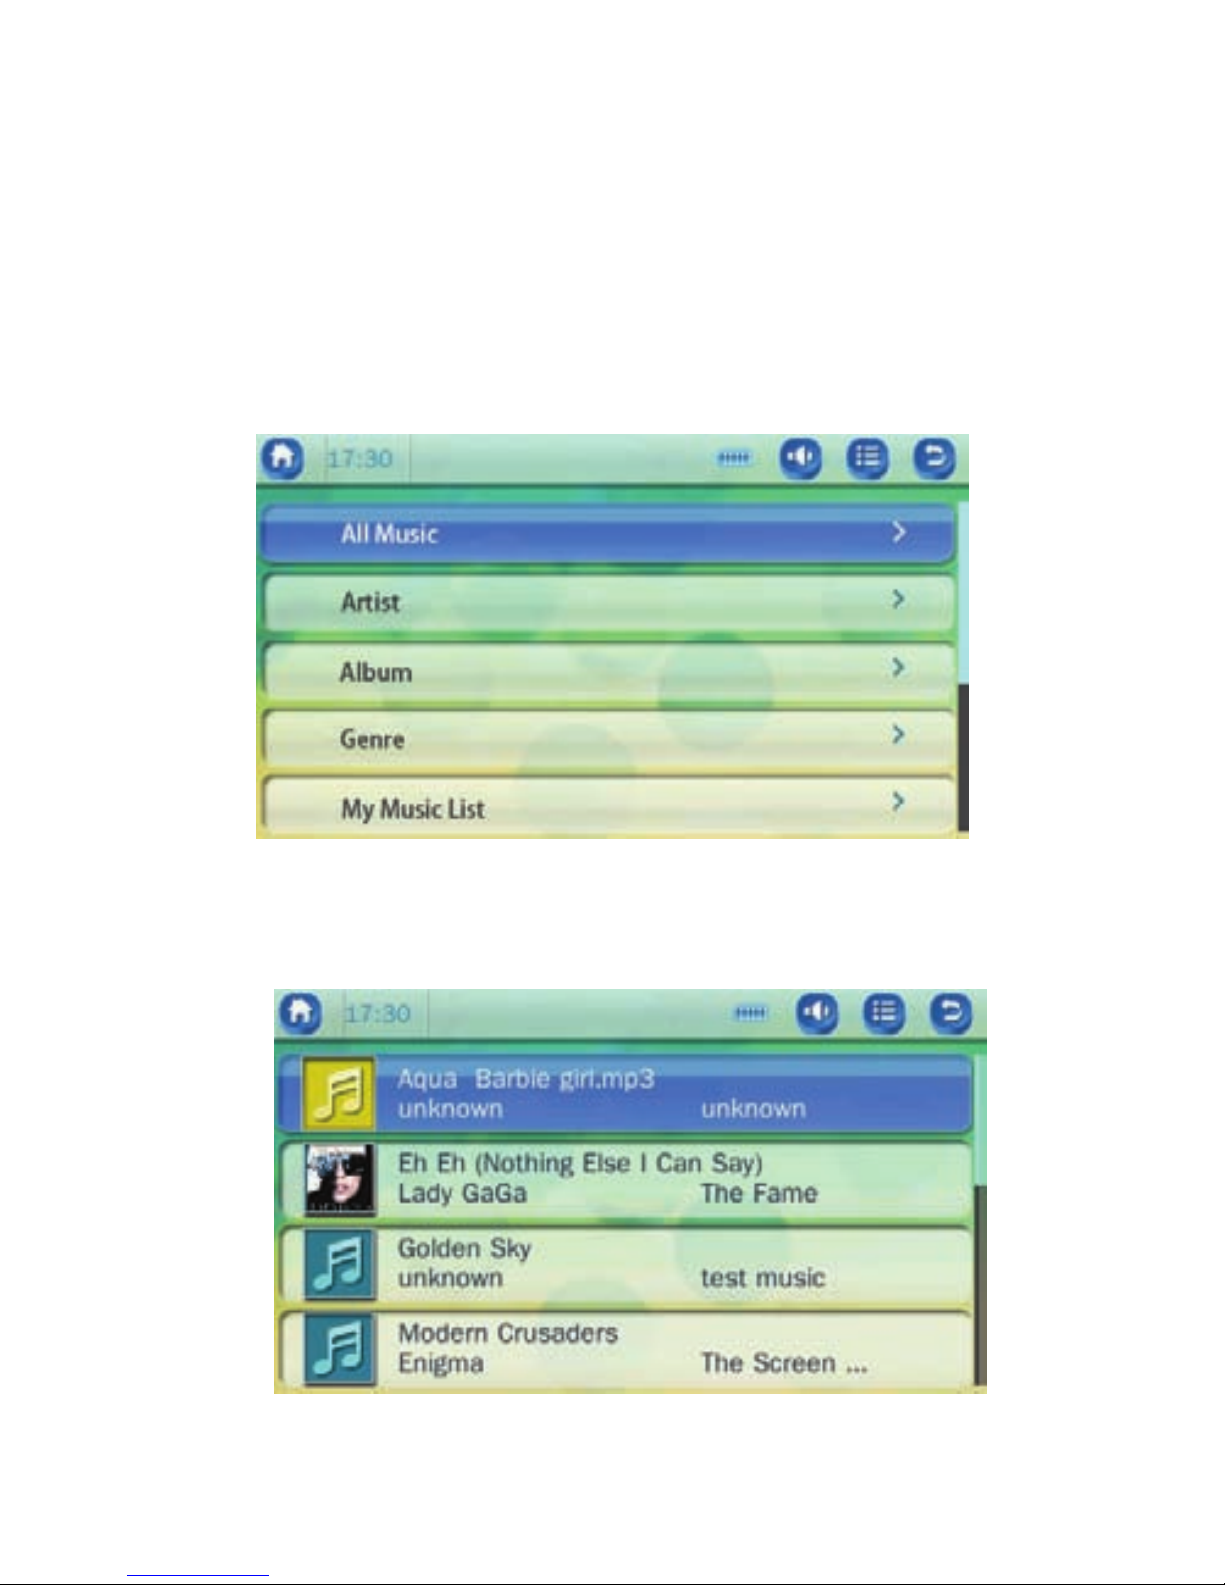
Main menu of Music Playing
Touch “Music” icon in Main Menu interface. The interface includes all
music, artist, album, genre, my music list, dir list, record list, my rating,
tag list. Touch the desired menu to enter.
All Music: It lists out all the music files saved in Music directory in the
player’s built-in memory. Touch the music file name to start playing.
Artist: It displays all the songs by the artist. The item of Unknown
12
Artist is for saving files of songs whose artist is unknown. The same
function is available for files of unknown album and unknown genre.
Album: It shows as follows. Slide/drag to scroll through albums.
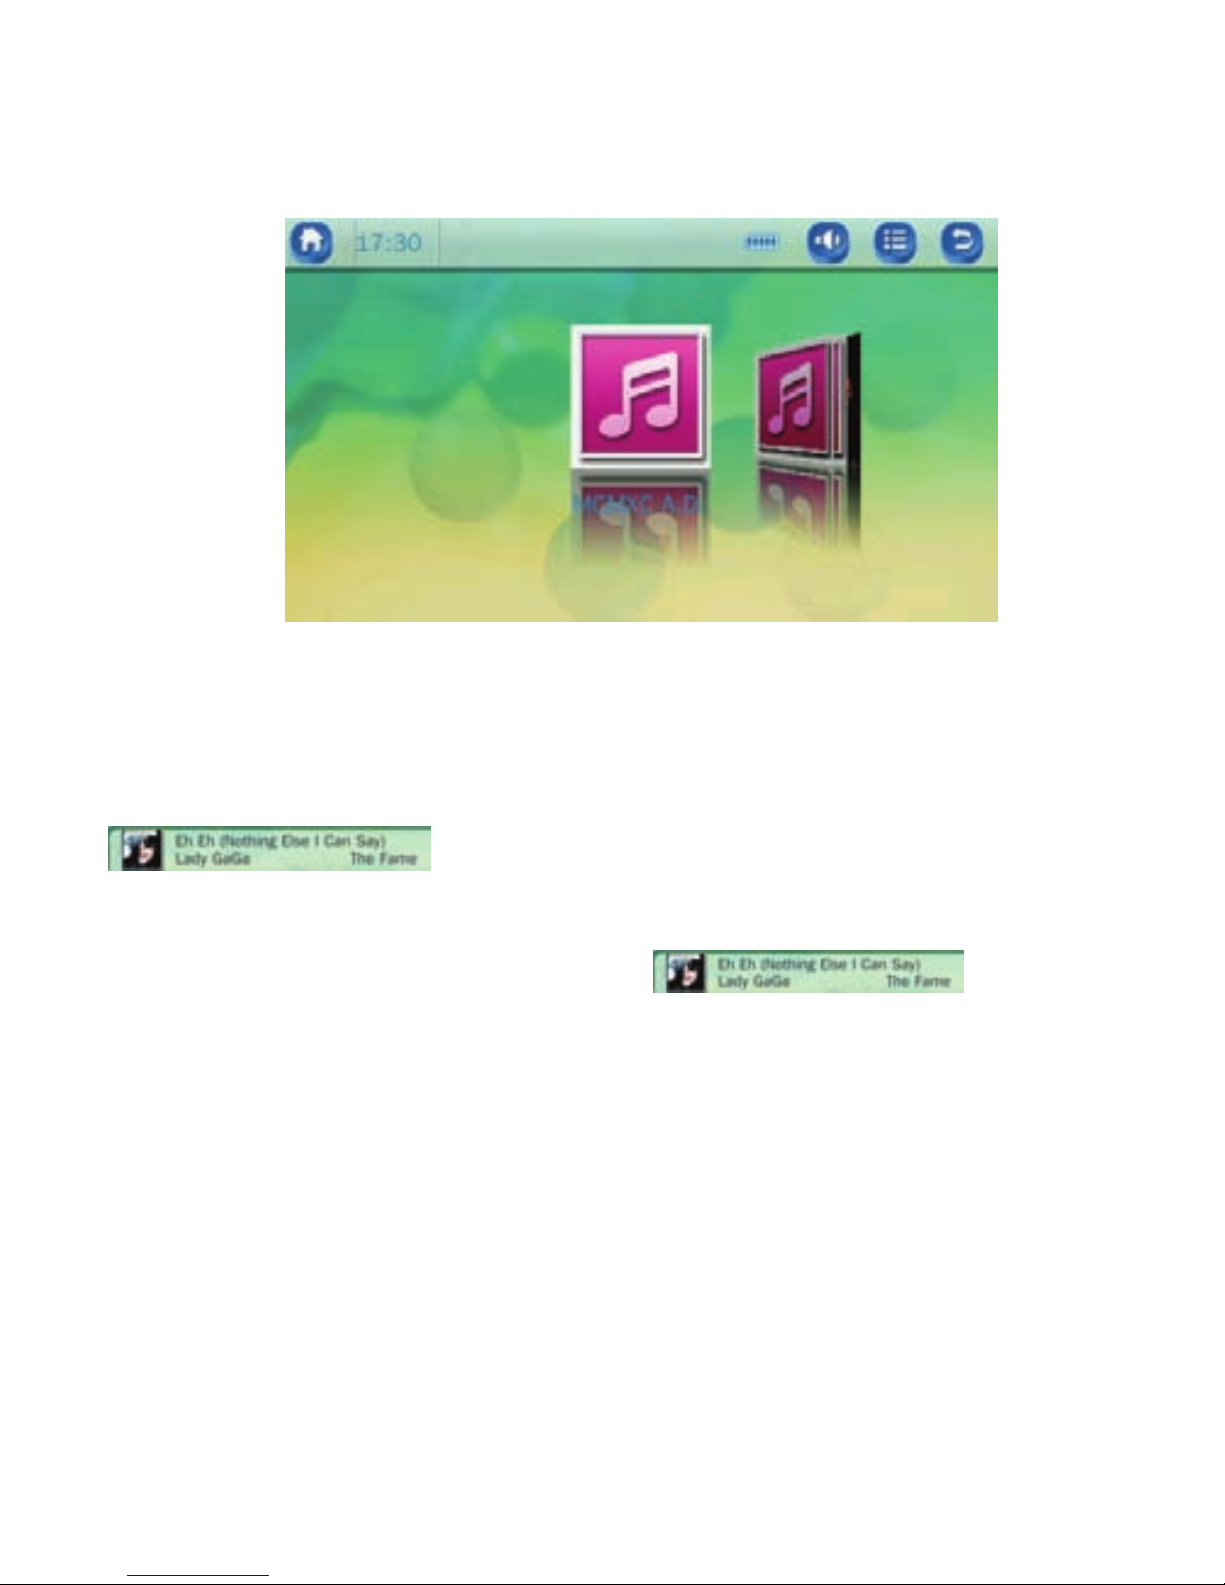
Genre (Type or Category): When one genre is selected from Genre list,
all the music of the genre is listed next. You should first define the genre
of a song on the computer, such as you might define the
as “Popular” music. When you select the Genre
option, it will list all songs you have defined as “Popular” music. When
you touch the popular music, it will list . Then you
can select this song to listen to.
My Music List: 5 lists are available. You can classify the music as
desired. If you enter music playback from My Music List, music is
played in the sequence of music list in default mode.
Note: You can add the song to My Music List from the playing
interface. Touch the “information icon” to find the menu of “Add
to my Playlist”.
Note: Press RETURN icon 2 times to return to the menu.
Dir List: Lists all the music files in the MUSIC folder. You can select

13
other folders by pressing the RETURN icon
Record List: All voice-recorded files are listed from the RECORD
folder.
My rating: There are 5 list ratings from 1 to 5 stars. All the music files
of one rating are listed correspondingly. The user can classify his
favorite music by rating; the system classifies and sorts for music files
according to rating set by the user. Music files not classified by rating
are not displayed in star rating list.
Note: You can set the stars level in the playing interface by
touching the “information icon” to find the menu of “Set
Rating”.
Tag List: All the music files whose tag has been set in the player are
listed. Touch it to start playing from the tagged music file and the time
point. One music file supports more than one tag. Up to 32 tag lists
can be supported.
Note: What is deleted from My Rating, My Music, and Tag List is just a
listed item, and the corresponding file cannot be deleted from the disk
Note: You can set the tags in the playing interface by touching
the “information icon” to find the menu of “Add Tag”.
Now Playing: If you have played the music after the list update, then
you can go to the playing interface from here. Touch the “All Music”
icon, then touch the to enter interface which can search directly.
14
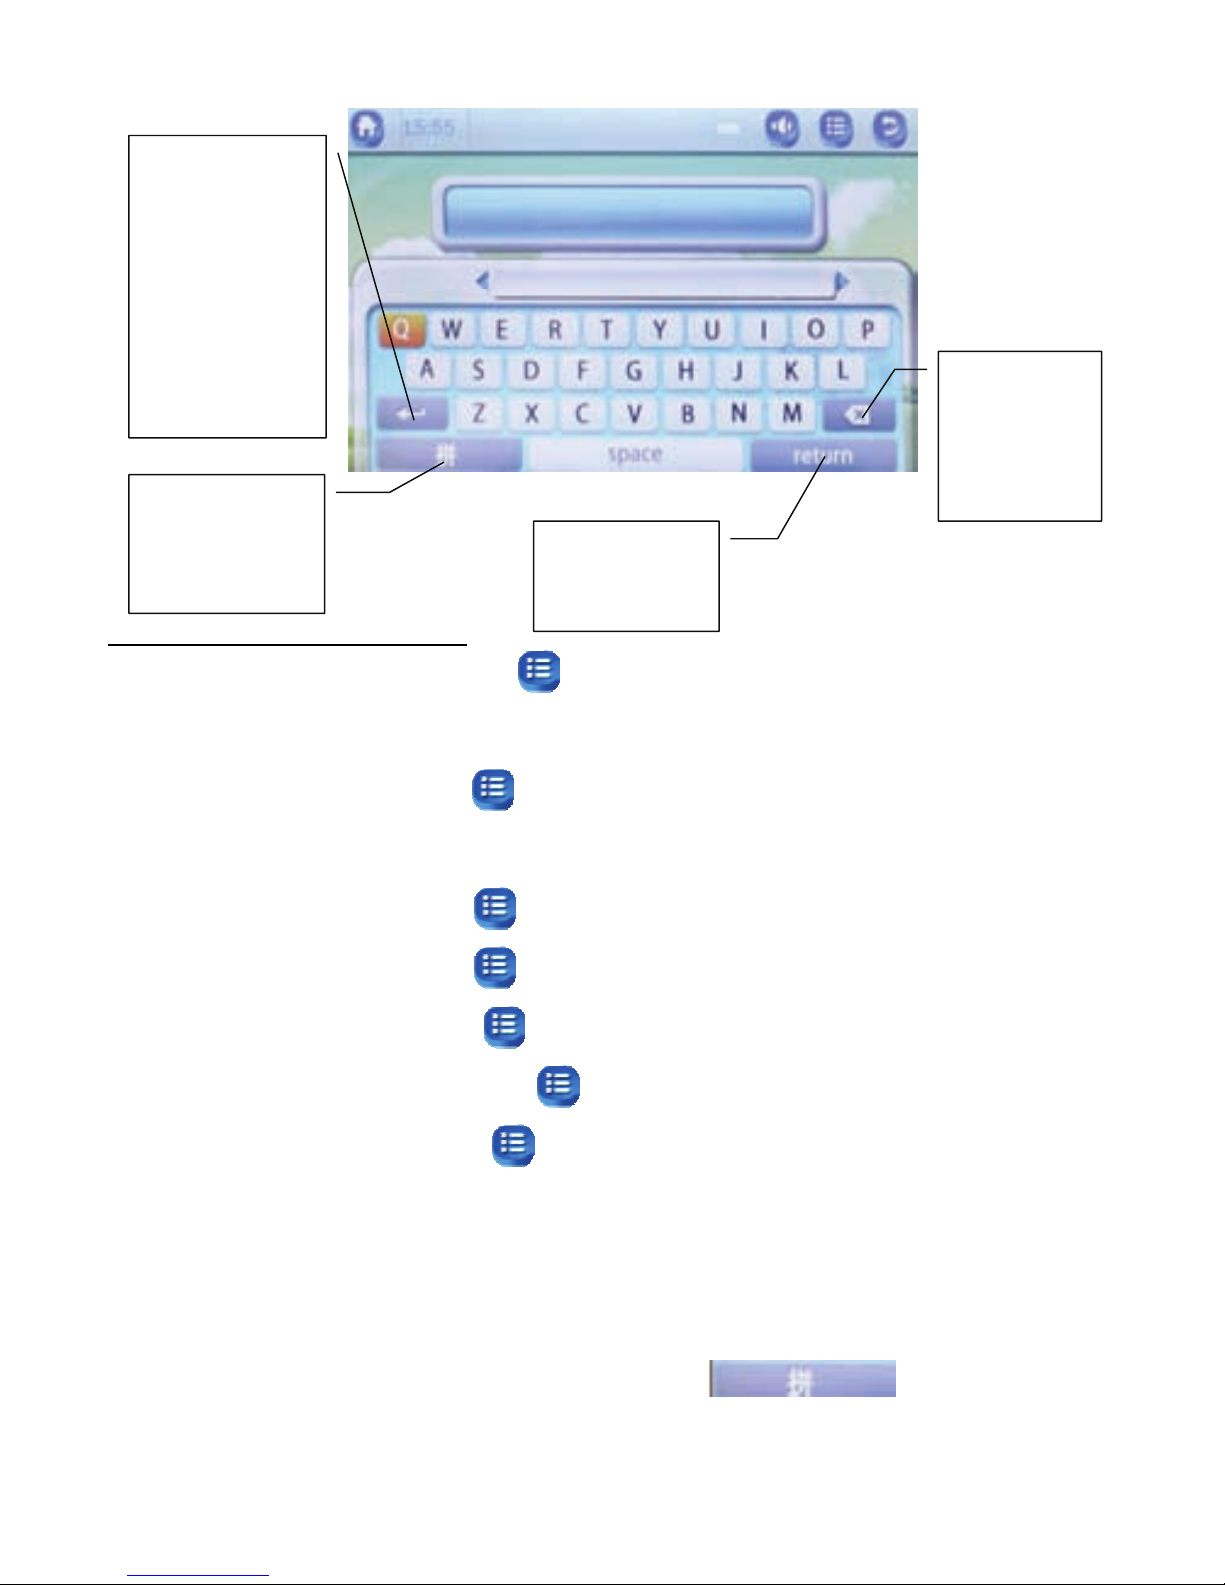
USING ABOVE KEYBOARD:
Select All Music then touch the button (top right, in the middle). Enter (type)
the song’s name to search for the song.
Select Artist then touch the button (top right, in the middle). Enter (type the
artist’s name to search for the artist’s song .
Select Album then touch the button. Enter the album’s name.
Select Genre then touch the button. Enter the genre’s name.
Select Dir List then touch the button. Enter the song’s name.
Select Record List then touch the button. Enter the recording file’s name.
Select Tag List then touch the button. Then you can delete the tag.
My Music List and My Rating don’t apply to searching.
Choose music to enter the playing interface.
Shift input method: Soft keyboard supports simplified Chinese, English, and
Number input. Click Shift Input Method button ( ) to shift between
English, Chinese, and Numbers.
When you have
entered (typed) a
song’s name and
touch this button,
the corresponding
song will appear on
the screen. Then
select the song for
playing.
Touch this button
to return to the
previous page.
Lightly touch
this button to
delete the
previous letter
entered.
Touch this button
to shift between
English, Chinese,
and Numbers.
15
Delete: Lightly touch the button to delete the previous letter or word
entered.
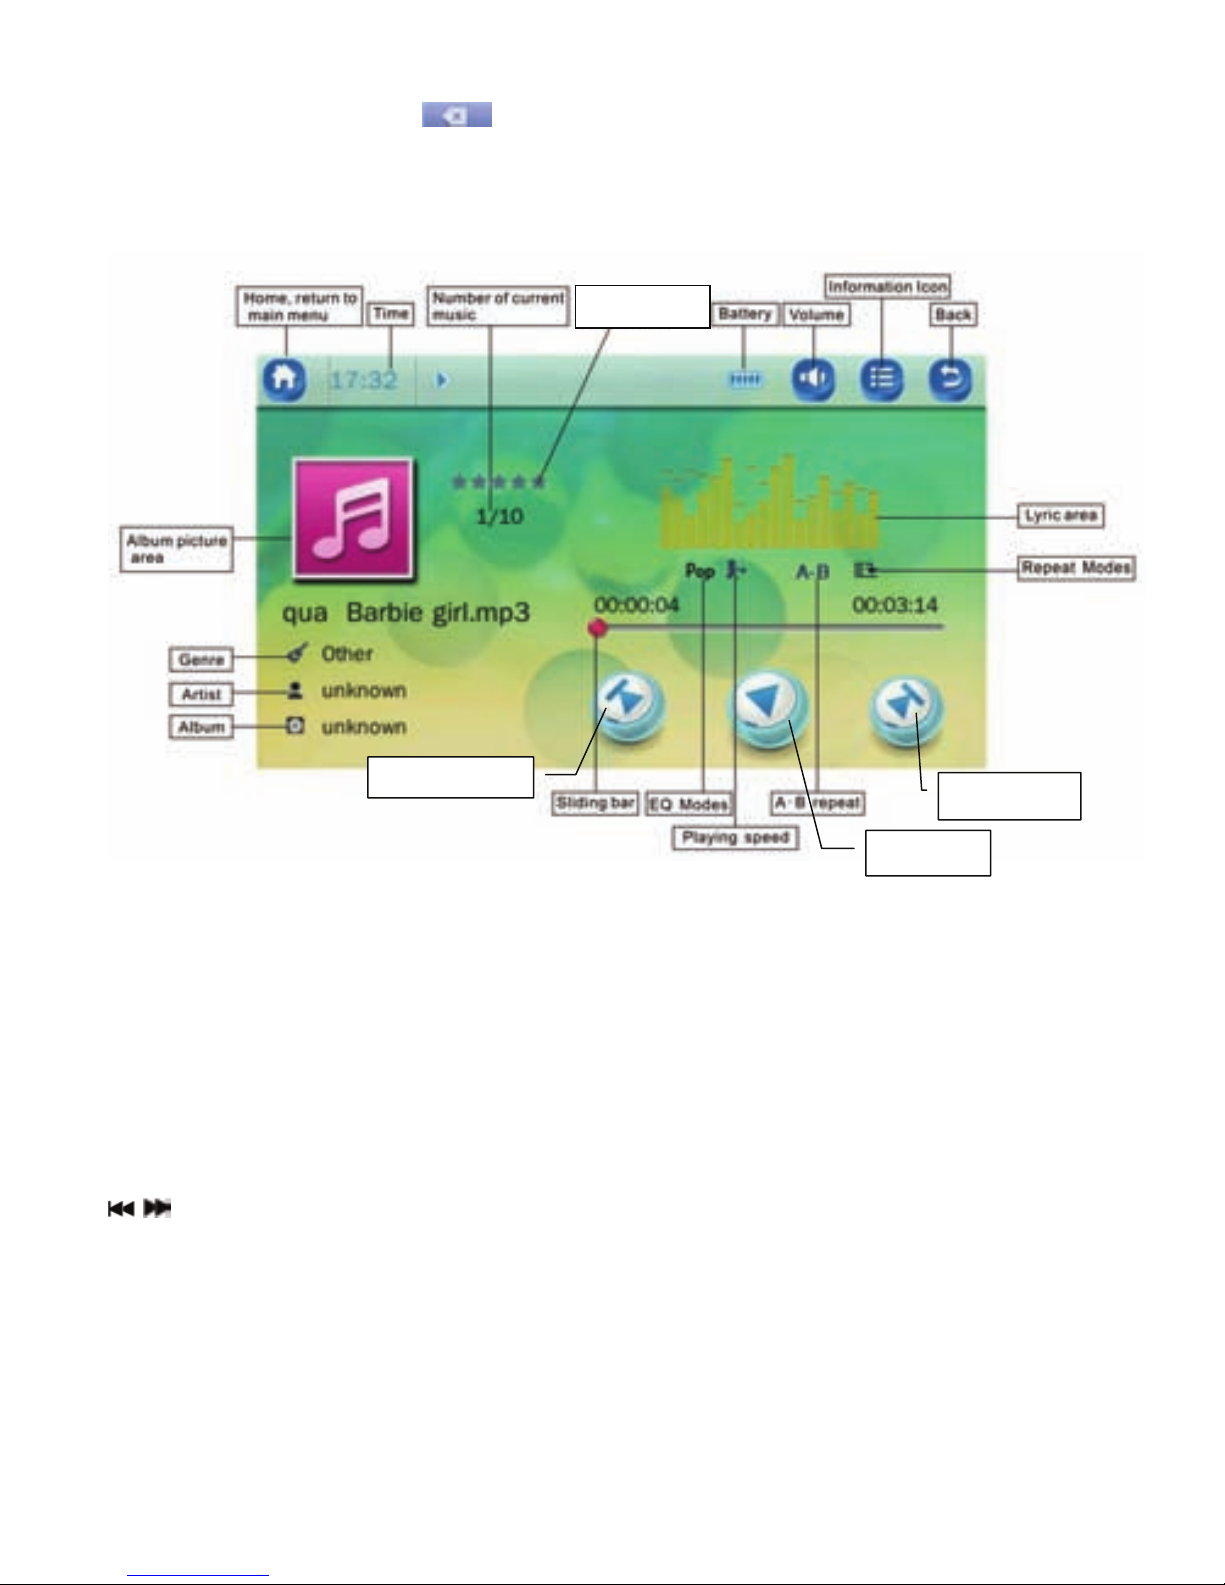
Album Picture Area: If there is album art included in the music file it will
be displayed here.
Spectrum/lyric display area: Supports “*.LRC” lyric files; lyric file name
should correspond with the music name. If a same-named lyric file is in
the directory of the currently-played music, shift between spectrum
display and lyric display by touching this area; it displays the spectrum
when no lyric file exists.
/key: short press to select Previous/Next music file; long press for
REW/FWD; no music playback is heard during REW/FWD.
A–B Repeat: Touch once and A is highlighted; select current playback
time as point A; tough again and B is highlighted and selected as point B;
touch for the third time to highlightA-B and to start A-B repeat (time from
point A to B); touch for the fourth time to cancel playback and restore to
normal playback.
Skip forward
Ski
p
backward
Play/pause
Stars Level

16
Select EQ: Normal, Pop, Classic, Soft, Jazz, Rock, DBB, User EQ,
SRS WOW, SRS WOWHD, SRS Mode
Play mode: Sequence, Repeat One, Repeat All, Shuffle, Shuffle +
Repeat; Intro
Progress Bar: Play the current music from current time point by
dragging or directly touching any position on the sliding bar.
During playback, when you touch the “information icon”, you can
see the menu, and you can edit the setting of this song. Touch the
icon to enter into desired mode and select or adjust the setting.
Select EQ: Normal, Pop, Classic, Soft, Jazz, Rock, DBB, User EQ, SRS
WOW, SRS WOWHD, SRS Mode
Play Mode: Sequence, Repeat One, Repeat All, Shuffle, Shuffle +
Repeat; Intro
Screen Size: spectrum, lyric
Add to My Playlist: Select one from the five music lists and confirm by
touching it; adding the currently played music to the corresponding list.
Now the file can be found in the corresponding music list under music
application <Main menu – My Music List>.
Set Rating: Set rating 0-5 stars.
Add Tag: Add the tag of the playing point, then you can start from this
tag in the future.
Advance: Set the replay times, replay interval, Scan speed.
EQ Setting: User EQ setting; SRS mode

17
A-B repeat setting
Playing speed.
Song’s information
Instructions for Music Download
Note: You must have an MP3 file on your computer. This is an MP3
player. It does not create MP3 files.
The following instructions explain copying and deleting MP3 files from
your computer.
Connect MP3 player to your computer via USB cord.
Turn on your computer.
Double click on “My Computer”.
You will see a drive named “Removable Disk” or “MP3 player”. This is
your MP3 player.
Double click the Removable Disk/MP3 player. This opens the music
folder. It will show all files currently on your player. Double click on Music
Folder then minimize it.
Next locate your MP3 files on your computer. Most people store them
in their “My Music” folder.
Once your Music Folder/MP3 file folder is open, click once to highlight
the song you want to copy to your MP3 player. The following step will
copy the MP3 file:
Right click on the highlighted song. A box will come up. Move cursor to
“Select Copy”. Go back to Music Folder. Right click in the middle of the
window. A box will open. Select “Paste”. This will copy the music to the
Music Folder of your MP3 player
To delete files - repeat steps 3, 4 & 5. All files on the MP3 player will be
listed. Click once and highlight the file you want to delete.
Hit “delete” button or right click on the file. A box will open. Click on the
word “delete”. Click “Yes” to confirm and it will remove the MP3 file from
your MP3 player. Or you can delete files from the player (see Pg. 29).
If you need to learn how to create an MP3 file or download MP3 files,
there are many resources on the Internet.
18
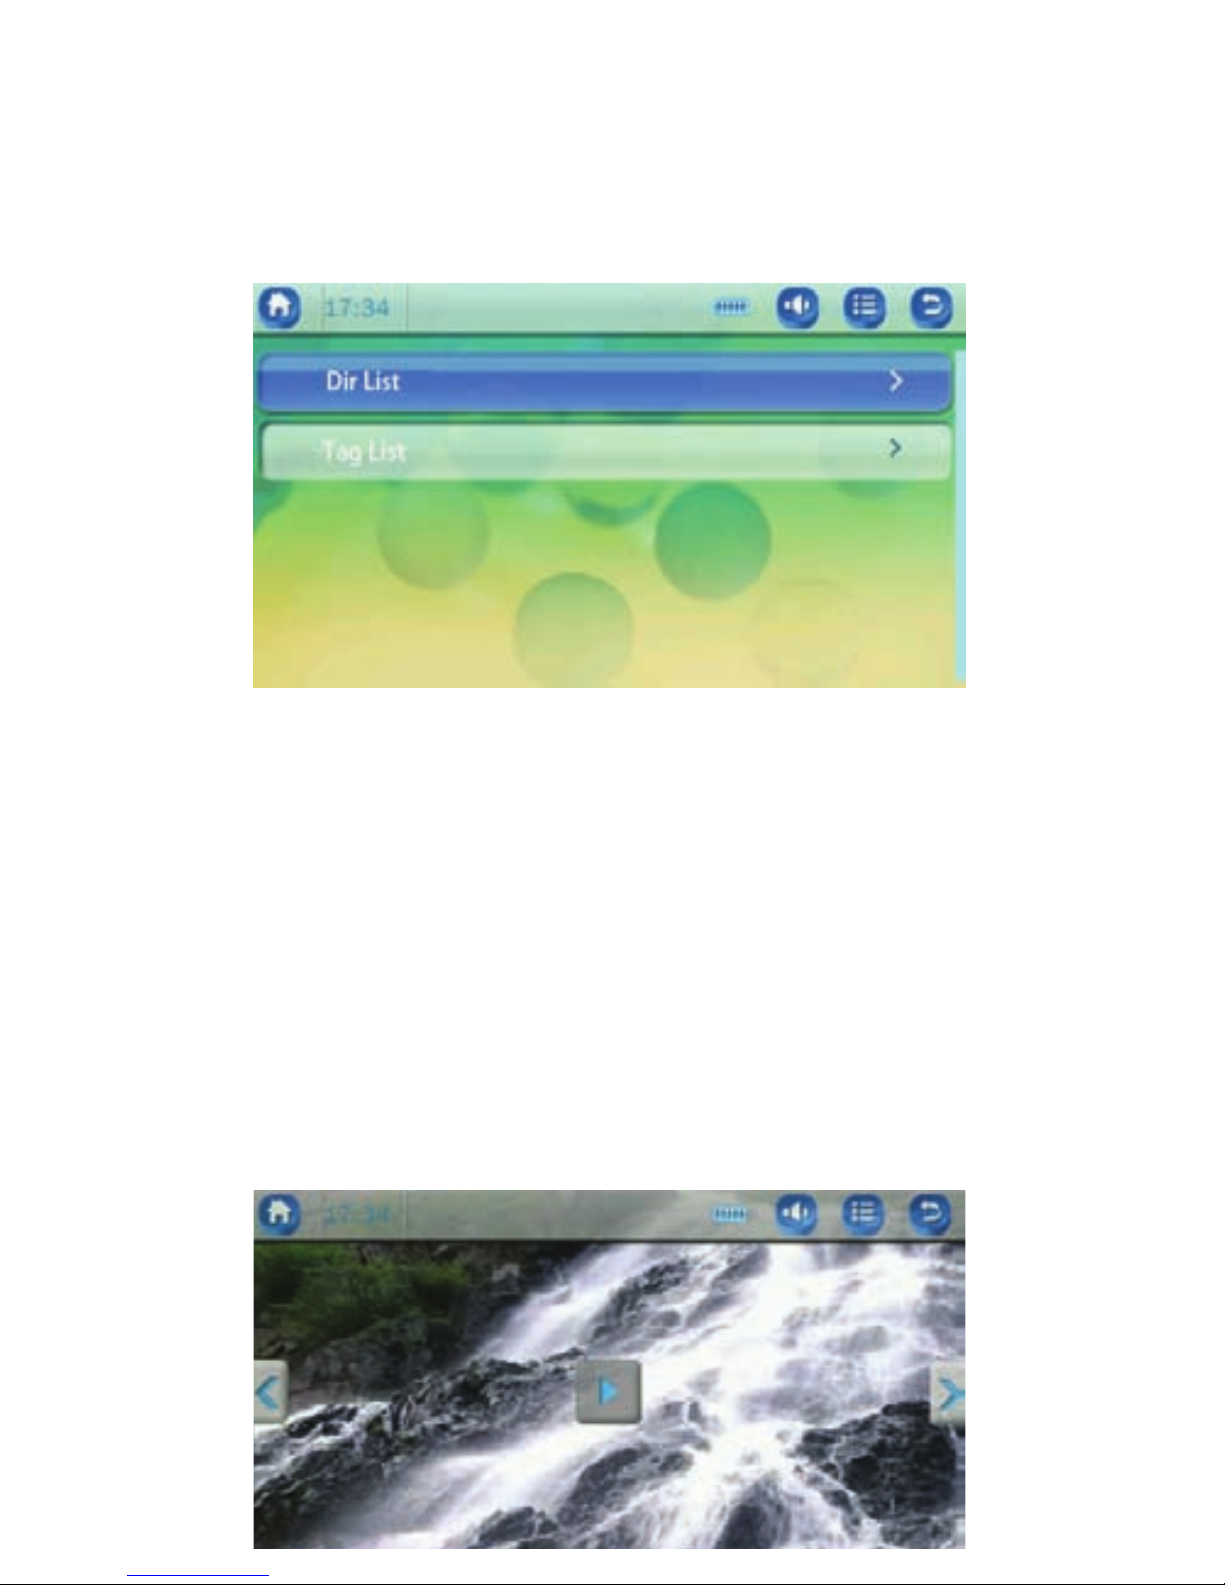
Video Main menu
Touch “Video” in Main Menu Interface and you will enter the “Video” list
option interface as seen below:
• Dir List: for sorting all video files by directory in the folder of VIDEO.
You can view other files by touching the “Return icon” on the top right
hand side.
Tag List: for listing out all the video files which have been set with
tags in the player. Touch to play from the tagged video and the set
time point. One video file supports up to 32 tags. Enter one tagged
video file under Tag List. It returns to Tag List automatically after the
playback is completed.
Touch the screen during video playing and it displays as follows:

19
Touching the video information icon will enter video play mode.
Video play mode: Playback Mode, Scan Speed, Add Tag, Screen Size,
Resume
Play mode: Sequence, Repeat One, Repeat All, Shuffle, Shuffle +
Repeat. (Default play mode is Sequence.)
Scan Speed: set a scan time
Add Tag: for adding the current video and the time point into Tag
List.
Screen Size: (1)Full screen: for displaying the video frame with full
screen.(2) Original size: if both the width and height of the video
frame are smaller than screen width and height, then the video frame
is displayed in the screen center (3) Scale (default option): according
to its original scale, zoom out the video frame width or height to be
smaller than screen width or height; the other direction (height or
width) of the frame is equal to screen height or width.
How to download video:
The following instructions explain copying and deleting video files from
your computer.
1. Connect USB cable between the unit and computer.
2. Turn on your computer.
3. Double click on “My Computer”.
4. You will see a drive named “Removable Disk” or “MP3 player”. This is
your MP3 player.
5. Double click the Removable Disk/MP3 player. This opens the folder. It
will show all files currently on your player. Double click on Video file,
then minimize it.
6. Next locate your video files on your computer.
7. Once you have found your video file, click once to highlight the video
you want to copy to your MP3 player. The following step will copy the
video file into the MP3 player:
This manual suits for next models
1
Table of contents


