Electrovaya Scribbler SC-4000 User manual
SC 4000 Series
2008.02.20
Trademarks
All brand and products names are trademarks or registered trademarks of their respective
companies. For this manual is subject to change without notice
i


i
Preface
©
©Copyright 2007
All Rights Reserved.
The information in this document is subject to change
without prior notice in order to improve reliability, design
and function and does not represent a commitment on
the part of the manufacturer.
In no event will the manufacturer be liable for direct,
indirect, special, incidental, or consequential damages
arising out of the use or inability to use the product or
documentation, even if advised of the possibility of such
damages.
This document contains proprietary information protected
by copyright. All rights are reserved. No part of this
manual may be reproduced by any mechanical,
electronic, or other means in any form without prior
written permission of the manufacturer.
Safety Notices
(1) Please read these safety instructions carefully.
(2) All precautions and warnings on the equipment should
be carefully noted.
(3) Please disconnect the computer from the AC outlet
before cleaning.
(4) Never pour any liquids into any openings or directly
onto the computer unit. This could result in fire or
electrical shock.
(5) Ensure the voltage range of the power outlet is between
100V and 240V before connecting the computer unit.
Exceeding the maximum rated voltage may cause
damage to the AC adapter or to the computer. This
could result in fire or electrical shock.

ii
(6) Do not leave this equipment in a non-temperature
controlled environment; storage temperatures below
4°C (39°F) or above 35°C (95°F) may damage the unit.
To reduce the risk of an
electric shock, which could cause personal injury, please
follow all safety notices. The symbols shown are used in
your documentation and on your equipment to indicate
safety hazards.
Lithium batteries can be
dangerous. Danger of explosion if battery is incorrectly
replaced. Replace only with the same or equivalent type
recommended by the manufacturer. Dispose of used
batteries according to the manufacturer’s instructions.
Under no circumstances
should the user attempt to disassemble the power supply.
The power supply has no user-replaceable parts. Inside
the power supply are hazardous voltages that can cause
serious personal injury. A defective power supply must be
returned to your dealer.
Safety Notices for the Power Cord
This equipment has a 2 or 3-wire power cord. Replace
the power cord if it becomes damaged. Contact your
dealer for an exact replacement.
In the U.S.A. and Canada, the power cord must be a UL-
listed detachable power cord (in Canada, CSA-certified).
2-wire cord SPT-2 18AWG
3-wire cord SVT or SJT, 18 AWG, 3-conductor
Provided with a molded-on cord connector body at the
other end. The cord length must not exceed 3 meters.

iii
Outside the U.S.A. and Canada, the plug must be rated
for 250 VAC, 2.5 amp minimum, and must display an
international agency approval marking. The cord must be
suitable for use in the end-user’s country.
Consult your dealer or the local electrical authorities if
you are unsure of the type of power cord to use in your
country. Voltage changes occur automatically in the
power supply.
Notice of EMC Compliance
This equipment has been tested and found to comply
with the limits for a Class B digital device, pursuant to
Part 15 of the FCC Rules. These limits are designed to
provide reasonable protection against harmful
interference in a residential installation.
This equipment generates, uses, and can radiate radio
frequency energy and if not installed and used in
accordance with the instruction manual may cause
harmful interference to radio communications. However,
there is no guarantee that interference will not occur in a
particular installation. If this equipment does cause
harmful interference to radio or television reception,
which can be determined by turning the equipment off
and on, the user is encouraged to try to correct the
interference by one or more of the following measures:
Reorient or relocate the receiving antenna.
Increase the separation between the equipment and
receiver.
Connect the equipment into an outlet on a circuit
different from that to which the receiver is connected.
Consult the dealer or an experienced technician for
help.

iv
Use only shielded I/O cables to connect I/O devices to
this equipment. You are cautioned the changes or
modifications not expressly approved by the party
responsible for compliance could void your authority to
use the equipment. This device complies with Part 15 of
the FCC Rules.
Operation is subject to the following two conditions: (1)
this device will not cause harmful interference, and (2)
this device must accept any interference it receive
including interference that may cause undesired
operation.
This device and its antenna(s) must not be co-located or
operating in conjunction with any other antenna or
transmitter.
FCC Radiation Exposure Statement
This Transmitter has been demonstrated co-location
compliance requirements with (Bluetooth/Model
No:BTA3130EDR). This transmitter must not be co-
located or operating in conjunction with any other
antenna or transmitter.
(1) This equipment complies with FCC RF radiation
exposure limits set forth for an uncontrolled
environment. To maintain compliance with FCC RF
exposure compliance requirements, avoid direct contact
to the transmitting antenna during transmitting.
(2) Any changes or modifications (including the antennas)
made to this device that are not expressly approved by
the manufacturer may void the user’s authority to
operate the equipment.
Canadian EMI Compliance Statement
This Class B digital apparatus meets all requirements of
the Canadian Interference - Causing Equipment
Regulations.

v
European Union CE Marking Declaration
This product has been tested and found to comply with
the EMC requirement subject to the EU directive for CE
marking.
CE Declaration of Conformity
For the following equipment: Tablet PC
!
0984
Is herewith confirmed to comply with the requirements
set out in the Council Directive on the Approximation of
the Laws of the Member States relating to
Electromagnetic Compatibility (89/336/EEC), Low-voltage
Directive (73/23/EEC) and the Amendment Directive
(93/68/EEC), the procedures given in European Council
Directive 99/5/EC and 89/3360EEC.
The equipment was passed. The test was performed
according to the following European standards:
EN 300 328 V.1.6.1 (2004)
EN 301 489-1 V.1.4.1 (2002) / EN 301 489-17
V.1.2.1 (2002)
EN 50371: 2002
EN 60950-1: 2001
R
Re
eg
gu
ul
la
at
to
or
ry
y
s
st
ta
at
te
em
me
en
nt
t
(
(8
80
02
2.
.1
11
1
b
b/
/g
g)
)
European standards dictate maximum radiated transmit
power of 100mW EIRP and frequency range 2.400-
2.4835GHz; In France, the equipment must be restricted
to the 2.4465-2.4835GHz frequency range and must be
restricted to indoor use.

vi
Inside the buildings with a power (WORSE *)
maximum of 100 MW on all the frequency band
2400-2483,5 MHz,
Outside the buildings with a power (WORSE *)
maximum of 100 MW on the part 2400-2454MHz
and with a power (WORSE *) maximum of 10 MW
on the part 2454-2483MHz

vii
Table of Content
CHAPTER 1: BEFORE YOU START ...........................................................1
WHAT TO DO BEFORE YOU WORK ON YOUR COMPUTER........................1
CHAPTER 2: INTRODUCTION ....................................................................3
INTRODUCING YOUR COMPUTER...........................................................3
GETTING TO KNOW YOUR COMPUTER ..................................................4
CHAPTER 3: GETTING STARTED ............................................................11
SETTING UP THE COMPUTER .............................................................11
INSERTING AND REMOVING THE BATTERY PACK..................................11
CONNECTING THE COMPUTER TO AN EXTERNAL POWER SOURCE........13
USING THE STAND.............................................................................15
CHAPTER 4: USING THE COMPUTER ......................................................17
ADJUSTING THE SCREEN DISPLAY......................................................17
THE BATTERY POWER SYSTEM .........................................................19
AUTOMATIC BATTERY PACK CHARGING FUNCTION..............................20
USING THE MOBILITY CENTER............................................................21
PEN CALIBRATION .............................................................................23
CHAPTER 5: USING THE DOCKING STATION (OPTIONAL).......................27
FRONT VIEW .....................................................................................27
REAR VIEW.......................................................................................28
SIDE VIEW ........................................................................................29
CONNECTING THE TABLET PC TO THE DOCKING STATION....................30
CHAPTER 6: UPGRADING YOUR SYSTEM ...............................................31
UPGRADING THE SYSTEM MEMORY....................................................31
UPGRADING THE WIRELESS MODULE .................................................32
UPGRADING YOUR HARD DISK DRIVE.................................................33
CHAPTER 7: TRUSTED PLATFORM MODULE ...........................................35
BEFORE YOU START..........................................................................35
EFS (ENCRYPT FILE SYSTEM)...........................................................39
PERSONAL SECURE DRIVE ................................................................41
TPM RECOVERY...............................................................................42
CHAPTER 8: FINGER PRINT ...................................................................49
BEFORE YOU START..........................................................................49

viii
CHAPTER 9: TROUBLESHOOTING...........................................................57
GENERAL HARDWARE PROBLEMS /POSSIBLE CAUSE AND SOLUTION ..57
APPENDIX A: SPECIFICATION ................................................................63

1
Before You Start
This manual will help you get the most from your
computer. If you are a less experienced user, you should
read through the manual carefully before using your
computer.
W
Wh
ha
at
t
t
to
o
d
do
o
B
Be
ef
fo
or
re
e
Y
Yo
ou
u
W
Wo
or
rk
k
o
on
n
y
yo
ou
ur
r
C
Co
om
mp
pu
ut
te
er
r
L
Le
et
t
y
yo
ou
ur
r
C
Co
om
mp
pu
ut
te
er
r
a
ac
cc
cl
li
im
ma
at
ti
iz
ze
e
i
it
ts
se
el
lf
f
Rapid changes in temperature such as those from the
cold outdoors to a warm office would not be suitable for
your system.
Do not power up your system
immediately if it has been exposed to hot or cold
conditions. Instead, allow the system to adjust gradually
to room temperature over a three to four hour period.
P
Pl
la
ac
ce
em
me
en
nt
t
o
of
f
y
yo
ou
ur
r
C
Co
om
mp
pu
ut
te
er
r
Choose a suitable place for your system that’s not too hot,
too cold, too dark, or too bright. Glare can make it difficult
to read the screen.

2
Allow sufficient air circulation around the computer
when you are working indoors
Try to keep the system components from being
destroyed if it is over heated
Do not block the ventilation opening
Do not place your computer in direct sunlight
S
Su
ui
it
ta
ab
bl
le
e
p
pl
la
ac
ce
e
t
to
o
w
wo
or
rk
k
Your computer will run well under most conditions but
avoid extreme temperatures and humidity levels.
There are some things you can tolerate that the computer
can’t – things like static electricity, dust, water, steam and
oil.
A lithium-ion battery pack is
included for those who are frequent travelers. When you
are running your computer on battery power for the first
time, remove the battery from the package, install it into
the system and recharge the battery to fully prepare for
service.

3
Introduction
I
In
nt
tr
ro
od
du
uc
ci
in
ng
g
y
yo
ou
ur
r
C
Co
om
mp
pu
ut
te
er
r
Your computer features the latest advances in portable
computing technology. The computer modular design
provides maximum expandability without compromising
portability.
Please never try to
disassemble the Tablet PC and we will not be responsible
for any damage caused by this action.
U
Un
np
pa
ac
ck
ki
in
ng
g
t
th
he
e
C
Co
om
mp
pu
ut
te
er
r
The computer comes securely packaged in a shipping
carton. Please contact your dealer if you find that
anything is missing or damaged after examining the
contents. The shipping carton should contain the
following items:
AC-DC Adapter 19V 65W
Carry Bag
6 cells Li-Ion Battery
Power Cord
Quick Guide
Touch Pen
Clean Cloth
4
Do not throw the packaging materials away. You may
need them later if you have to ship the computer.
Because of customer requirement,
some of the features mentioned in this manual might not
be included on your computer or may differ slightly.
G
Ge
et
tt
ti
in
ng
g
t
to
o
K
Kn
no
ow
w
Y
Yo
ou
ur
r
C
Co
om
mp
pu
ut
te
er
r
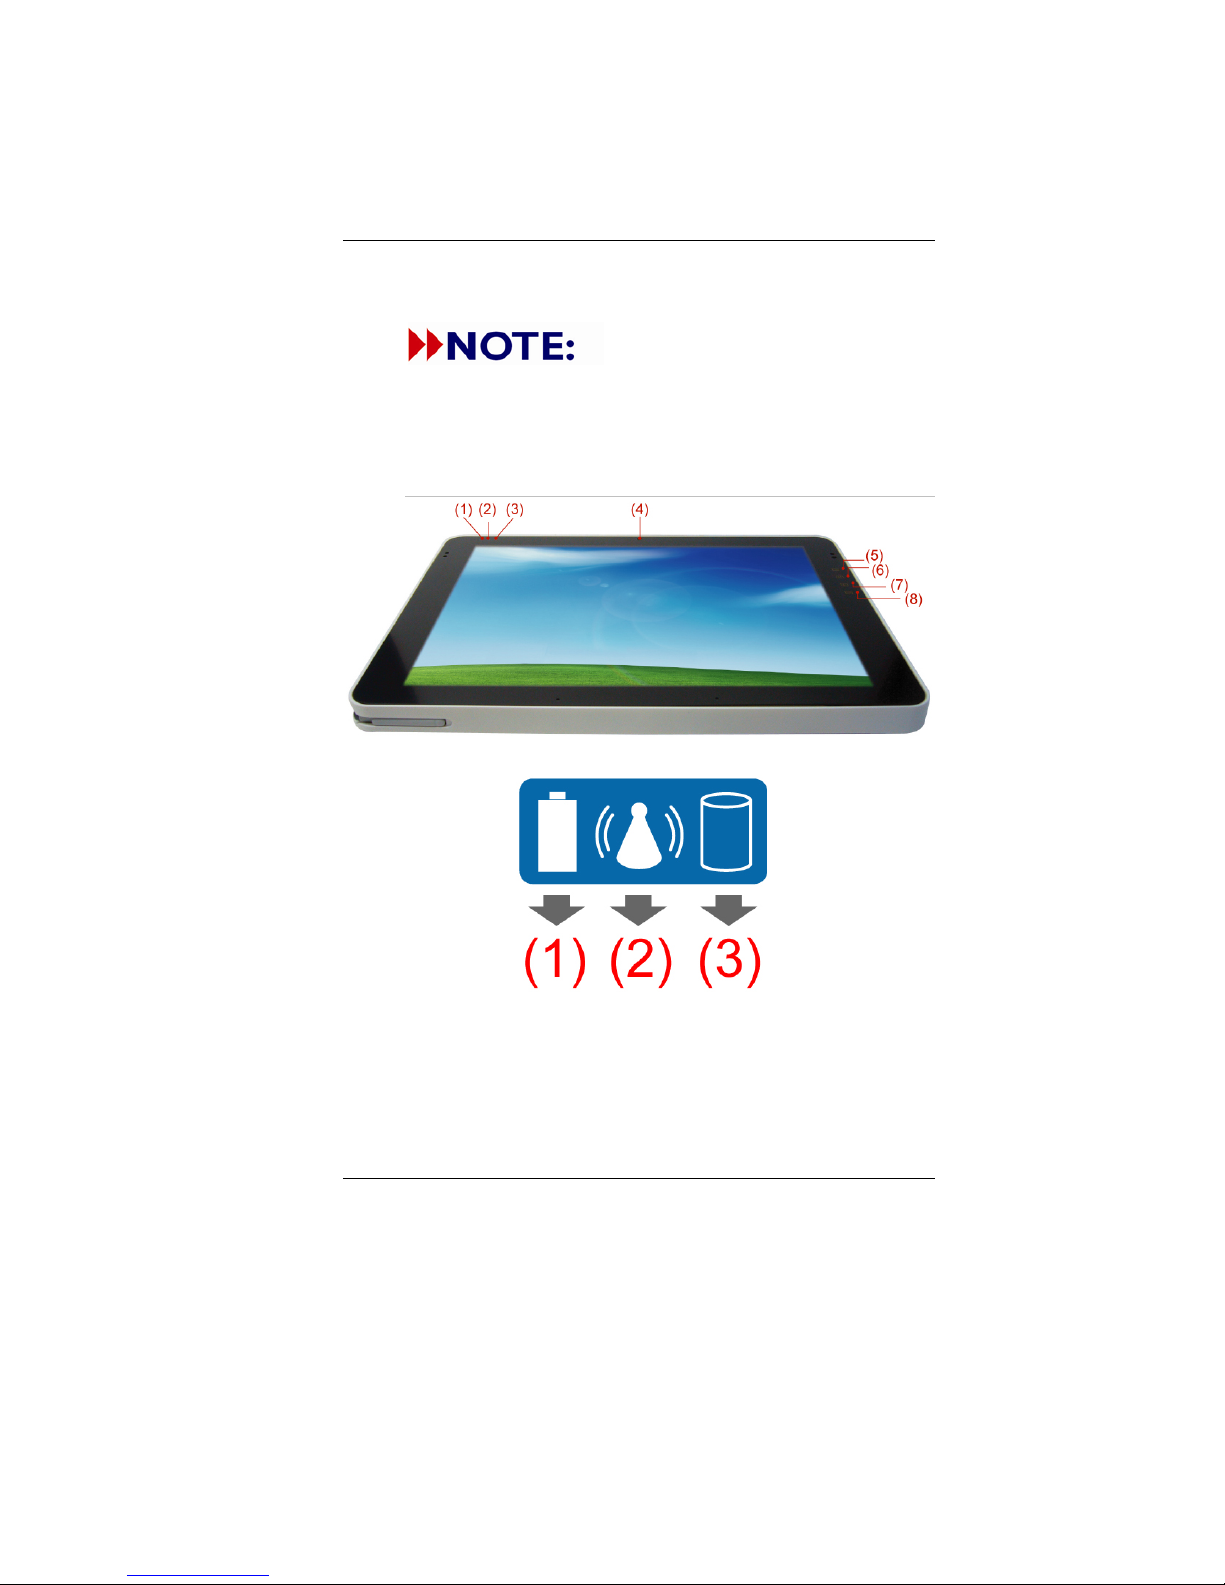
F
Fr
ro
on
nt
t
V
Vi
ie
ew
w
(1) Battery Indicator
Battery Indicator (Charging: Orange, Full w/ DC:
Green, Full w/o DC: OFF)
(2) Wireless Indicator
WLAN ON: (blue color)

5
(3) HDD Indicator
HDD Accessing (Blinking: Green color)
(4) Built-in Camera
This is where the built-in camera located where you can
use for any video conferencing application
(5) Rotation Screen/Vista Flip 3D LED Button
This button will let you execute the Rotation Screen and
Vista Flip 3D application.
(6) Mobility Center/Media Center LED Button
This button will let you execute the Mobility Center and
Media Center application.
(7) Internet Explorer/Email LED Button
This button will let you execute the Internet Explorer
and Email (Outlook) application.
Please refer to Chapter 4 for more
detailed description on these above button.
(8) SAS LED Button
The same function as you often use in an ordinary
keyboard of “Ctrl-Alt-Del” to log off from your Tablet PC.

6
S
Si
id
de
e
1
1

7
(1) Finger Print Application
The Tablet PC is equipped
with the finger print
application for security
reason.
(2) Ventilation Opening
Please don’t block this
opening that serve as
cooling purpose for the
system.
(3) DC IN Jack
Plug the AC adapter into
this jack.
(4) PCMCIA or Express Card
This compartment contains
the system PCMCIA or
Express Card.

8
S
Si
id
de
e
2
2
(1) Scroll Application
Use this dial jog to scroll
up and down just like the
way you use the
application in scrolling up
and down arrow key and
Enter key of an ordinary
keyboard.
(2) Power Slide Latch
Slide this latch to power
on the Tablet PC.
(3) Wireless & Blue Tooth
On/Off Switch
Slide this latch to turn
On/Off the wireless LAN
& Blue Tooth.
(4) Headphone Jack
The stereo headphone
jack (3.5-mm diameter) is
where you connect the
headphones or external
speakers.
(5) Microphone Jack
You can also use this as
an output source by
connecting a speaker.
(6) VGA Out Port
Use this connect to
connect an external
monitor.
(7) USB Port
Your computer includes
two Universal Serial Bus
(USB) 2.0 ports. USB2.0
is the latest development
9
in Plug and Play
technology.
(8) Ethernet / LAN Port
When using a LAN,
please use an EMI
Shielding Cable to
minimize an interference
when transmitting.
S
Si
id
de
e
3
3
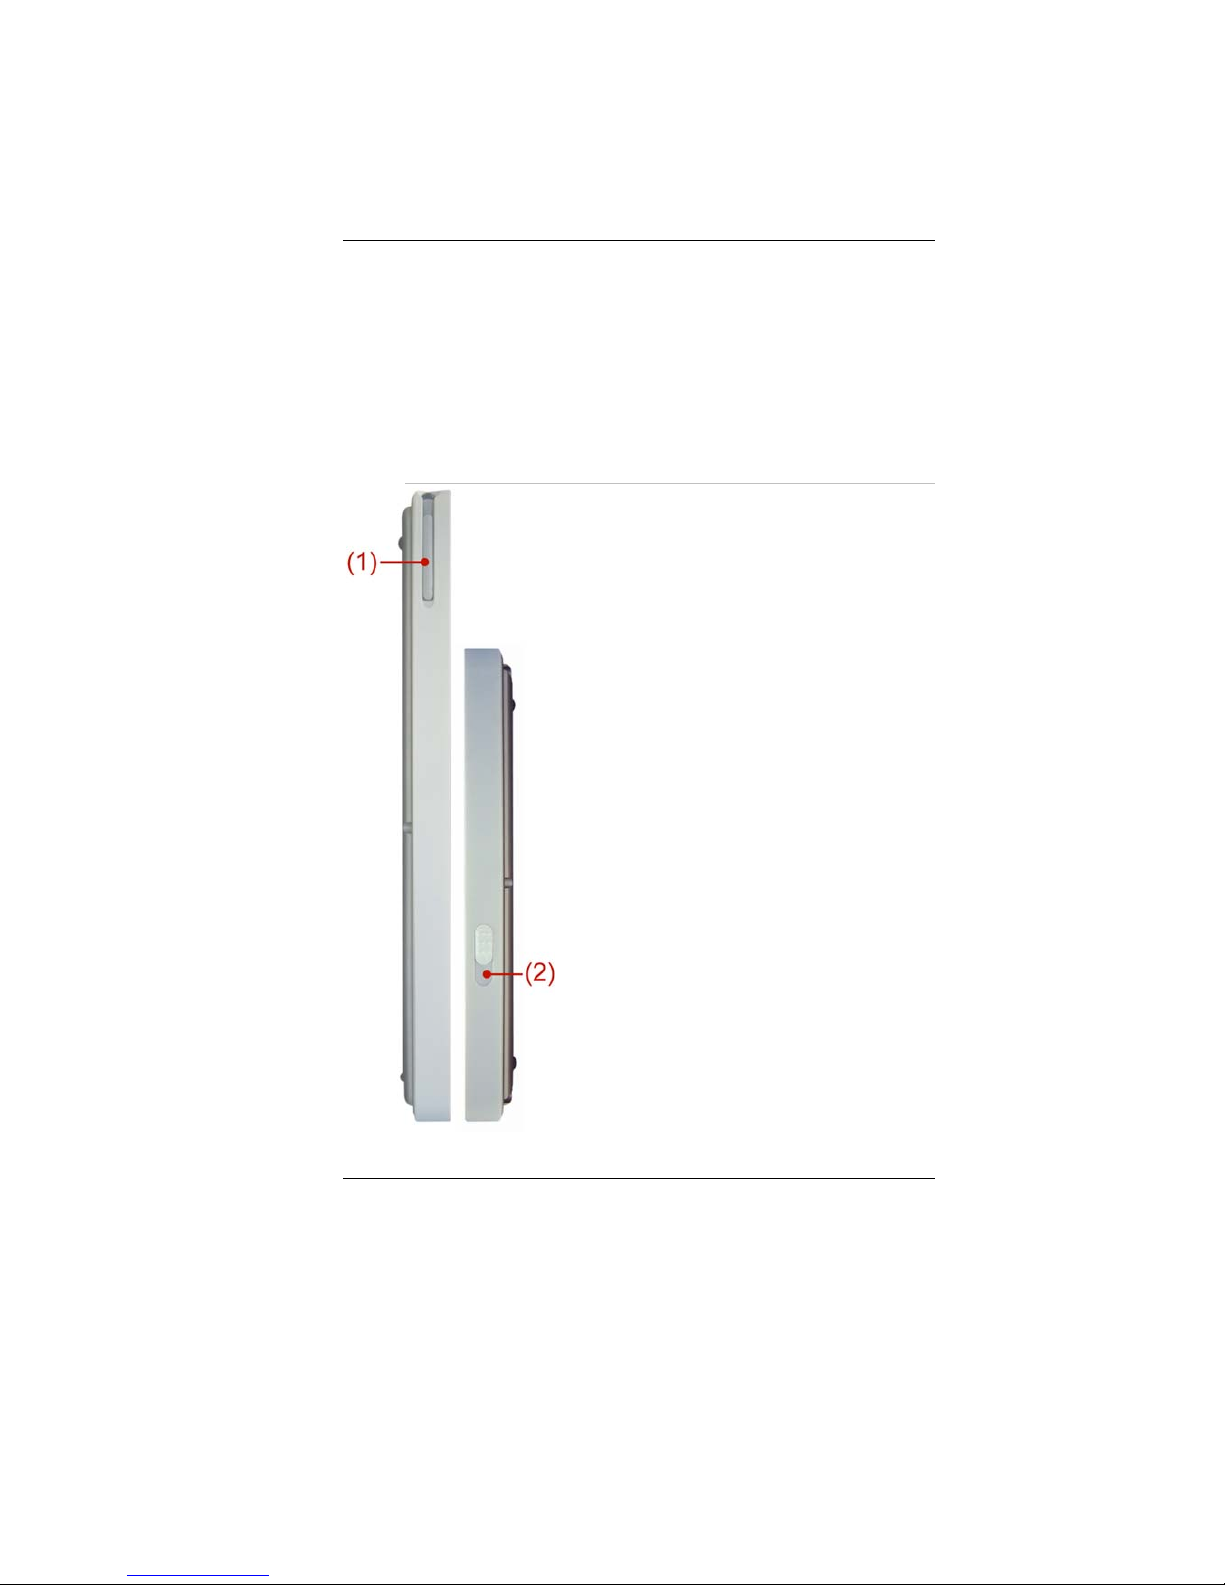
(1) Pen Compartment
Secures the pen to
the system.
(2) Battery Latch
Slide this latch to
release the battery.

10
B
Bo
ot
tt
to
om
m
V
Vi
ie
ew
w
(1) Memory Slot Compartment
This serve as compartment for your system memory.
(2) Docking Port
Use this port to connect to the system docking station.
(3) Wireless Module (MiniPCI-E Slot)
This compartment is for your Wireless Module.
(4) Battery Compartment
This serve as compartment for the battery.
This manual suits for next models
1
Table of contents
Other Electrovaya Tablet manuals


Popular Tablet manuals by other brands


Lenovo
Lenovo Tab M10 HD Safety, warranty & quick start guide

Lightcomm Technology Co
Lightcomm Technology Co MID7003 User Manul

School Zone
School Zone Little Scholar MFC181 instruction manual

Lenovo
Lenovo A3300 Hardware Maintenance Manual

Hisense
Hisense Sero 7 Lite user manual

DT Research
DT Research DT391GS Basic operation guide