Element ERFD19CGCS User manual
18.4 cu.ft. French Door Refrigerator
ERFD19CGCS
ERFD19CGCB
ERFD19CGCW
Product may vary. Refer to the actual product


1
CONTENTS
SAFETY WARNINGS --------------------------------------------
PRODUCT OVERVIEW ----------------------------------------- 3
2
PRODUCT INSTALLATION ------------------------------------ 4
OPERATION INSTRUCTIONS--------------------------------- 8
CLEANING AND MAINTENANCE---------------------------- 11
TROUBLESHOOTING ------------------------------------------- 13
WARRANTY ------------------------------------------------------- 15

SAFETY WARNINGS
2
•This appliance is intended to be used in household and similar applications such as staff
kitchen areas in shops, offices and other working environments; farm houses and by clients
in hotels, motels and other residential type environments; bed and breakfast type
environments; catering and similar non-retail applications.
•This appliance is not intended for use by persons (including children) with reduced physical,
sensory or mental capabilities, or lack of experience and knowledge, unless they have been
given supervision or instruction concerning use of the appliance by a person responsible for
their safety.
•Children should be supervised to ensure that they do not play with the appliance.
If the supply cord is damaged, it must be replaced by the manufacturer, its service agent or
similarly qualified persons in order to avoid a hazard.
•Do not store explosive substances such as aerosol cans with a flammable propellant in this
appliance.
•The appliance has to be unplugged after use and before carrying out user maintenance on
the appliance.
•WARNING: Keep ventilation openings, in the appliance enclosure or in the built-in structure,
clear of obstruction.
•WARNING: Do not use mechanical devices or other means to accelerate the defrosting
process, other than those recommended by the manufacturer.
•WARNING: Do not damage the refrigerant circuit.
•WARNING: Do not use electrical appliances inside the food storage compartments of the
appliance, unless they are of the type recommended by the manufacturer.
•WARNING: Please abandon the refrigerator according to local regulators for it use
flammable blowing gas and refrigerant.
•WARNING: When positioning the appliance, ensure the supply cord is not trapped or
damaged.
•WARNING: Do not locate multiple portable socket-outlets or portable power supplies at the
rear of the appliance.
•Do not use extension cords or ungrounded (two prong) adapters.
•WARNING: Risk of child entrapment. Before you throw away your old refrigerator or freezer:
- Take off the doors.
- Leave the shelves in place so that children may not easily climb inside.
•The refrigerator must be disconnected from the source of electrical supply before
attempting the installation of accessory.
•Refrigerant and cyclopentane foaming material used for the appliance are flammable.
Therefore, when the appliance is scrapped, it shall be kept away from any fire source and be
recovered by a special recovering company with corresponding qualification other than be
disposed by combustion, so as to prevent damage to the environment or any other harm.
•The necessity that, For doors or lids fitted with locks and keys, keep the keys out of the
reach of children and not in the vicinity of the refrigerating appliance, in order to prevent
children from being locked inside.
•WARNING: To avoid a hazard due to instability of the appliance, it must be fixed in
accordance with the instructions.
•WARNING: Connect to potable water supply only. (Suitable for ice making machine)
Warning: risk of fire / flammable materials

PRODUCT OVERVIEW
Names of components
1Door tray 6Quick cold dial block
2Shelf 7Fruit and vegetable box
3Fruit and vegetable box 8Upper freezer drawer
4LED lighting 9Lower freezer drawer
5Control and display panel
ATTENTION
The picture above is only for reference. The actual conguration will depend on the physical
product or statement by the distributor
8
7
6
54
3
2
1
9
3
PRODUCT INSTALLATION
Installation Instructions
4
Installing an Optional Ice Maker
The refrigerator comes set up for ice maker installation, This refrigerator is
compatible with the Element EAIMM19 ice maker. Please refer to individual
ice maker installation instruction manual.
•WARNING: Connect to potable water supply only.
•Minimum/Maximum inlet water pressure: 138/827 kPa (20/120 psig).
Dimensions and Clearances
ATTENTION
The picture above is only for reference. The actual configuration will depend on the physical
product or statement by the distributor.
TTop Vop Vieieww
>4"
>4"
>4"
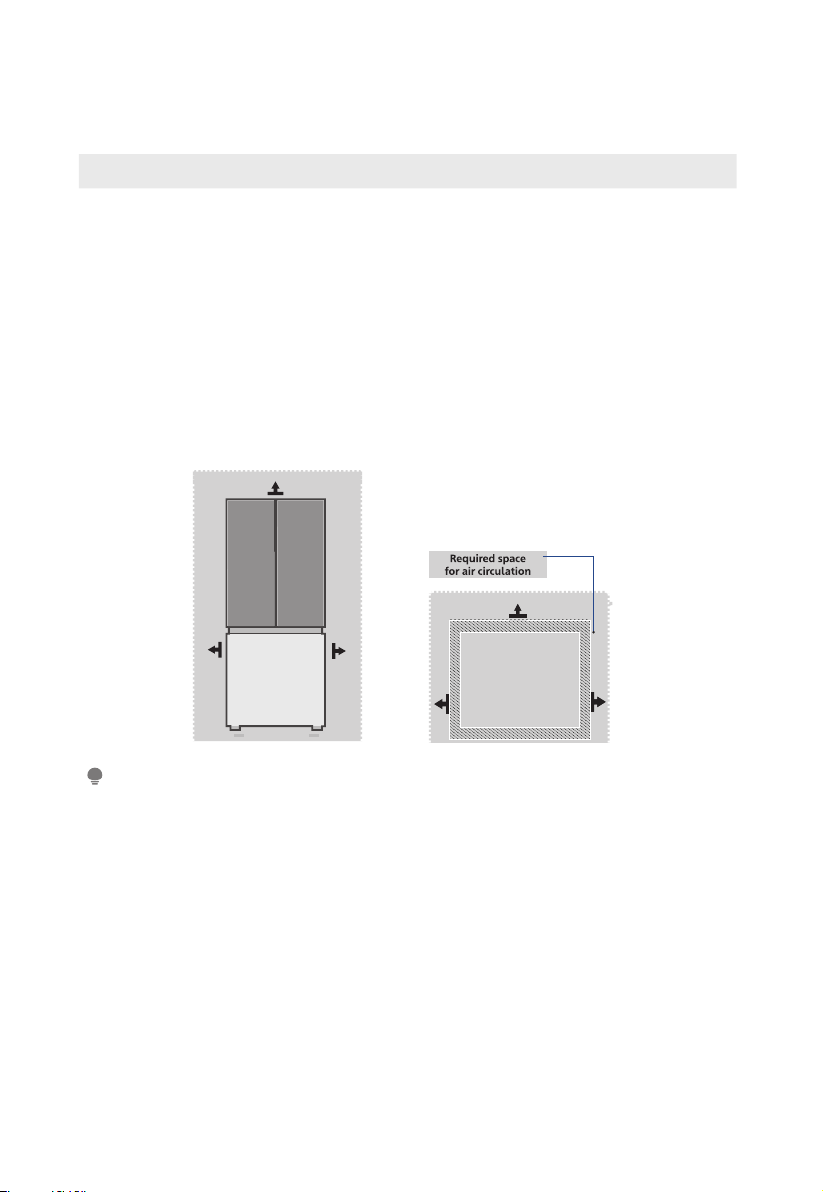
• Too small of a distance from adjacent items may result in the degradation
of freezing capability and increased electricity costs. Allow over 4" of
clearance from each adjacent wall when installing the appliance.
>4"
>4"
>4"

Space requirement diagram (when the door is open and when the door is closed)
Depth Width
Overall Depth
Width Depth doors open doors open
Height Wiht handle 135o135o
A B C C1 D E
29.5 66.6 30.9 27.7 40.9 50.3
Notice: All dimensions in inches
C
E
B
135 °
B
A
C1
D
5

Leveling feet
5. Turn the leveling screws counterclockwise to raise the unit, clockwise
to lower it.
1. To avoid vibration, the unit must be leveled.
2. If required, adjust the leveling screws to compensate for the uneven floor.
3. The front should be slightly higher than the rear to aid in door closing.
4. Leveling screws can be turned easily by tipping the cabinet slightly.
1. Raise the lower door up to the level of the higher door.
2. Insert the supplied fastener-ring by using pliers in the gap between the
hinge-grommet and the lower hinge. The number of fasten-rings you will
need to insert depends on the gap.
Leveling doors
List of tools to be provided by the user
Pliers
Parts included with the kit
Fastener-ring
Moving the appliance
1. Remove all food from inside the appliance.
2. Pull the power plug out, insert and x it into the power plug hook at the rear or
on top of the appliance.
3. Tape parts such as shelves and the door handle to prevent from falling off
while moving the appliance.
4. Move the appliance with more than two people carefully. When transporting
the appliance over a long distance, keep the appliance upright.
5. After installing the appliance, connect the power plug into a socket out to
switch on the appliance.
Hinge
grommet Pliers
Fastener-ring
Lower hinge
6

Changing the light
Connecting the appliance
lights is intended to be made by
the manufacturer, its service agent or similar qualified person.
• Any replacement or maintenance of the LED
• After installing the appliance, connect the power plug into a socket outlet.
ATTENTION
• After connecting the power supply cord (or plug) to the outlet, wait 2 or 3 hours before you
put food into the appliance. If you add food before the appliance has cooled completely,
your food may spoil.
Precautions before operation:
• Before making changes the refrigerator must be disconnected from power.
• precautions should be taken to prevent any personal injury.
Tips for energy saving
• Do not place the appliance near cookers, radiators or other heat sources. If the
ambient temperature is high, the compressor will run more frequently and for longer,
resulting in increased energy consumption.
•Ensure that there is sufficient ventilation at the base of the appliance, on the sides of
the appliance and at the back of the appliance. Never cover ventilation openings.
•Please also observe the spacing dimensions in the chapter "Installation".
•The arrangement of drawers, shelves and racks as shown in the illustration offers the
most efficient use of energy and should therefore be retained as far as possible. All
drawers and shelves should remain in the appliance to keep the temperature stable
and save energy.
• To obtain a larger storage space (e.g. for large refrigerated/frozen goods), the
middle drawers can be removed. The top and bottom drawers and shelves should be
removed last if necessary.
•An evenly filled refrigerator/freezer compartment contributes to optimal energy use.
Therefore, avoid empty or half-empty compartments.
• Allow warm food to cool before placing it in the refrigerator/freezer. Food that has
already cooled down increases energy efficiency.
• Allow frozen food to defrost in the refrigerator. The coldness of the frozen food
reduces the energy consumption in the refrigerator compartment and thus increases
the energy efficiency.
•Open the door only as briefly as necessary to minimise cold loss. Opening the door
briefly and closing it properly reduces energy consumption.
• The door seals of your appliance must be perfectly intact so that the doors close
properly and energy consumption is not increased unnecessarily.
7
OPERATION INSTRUCTIONS
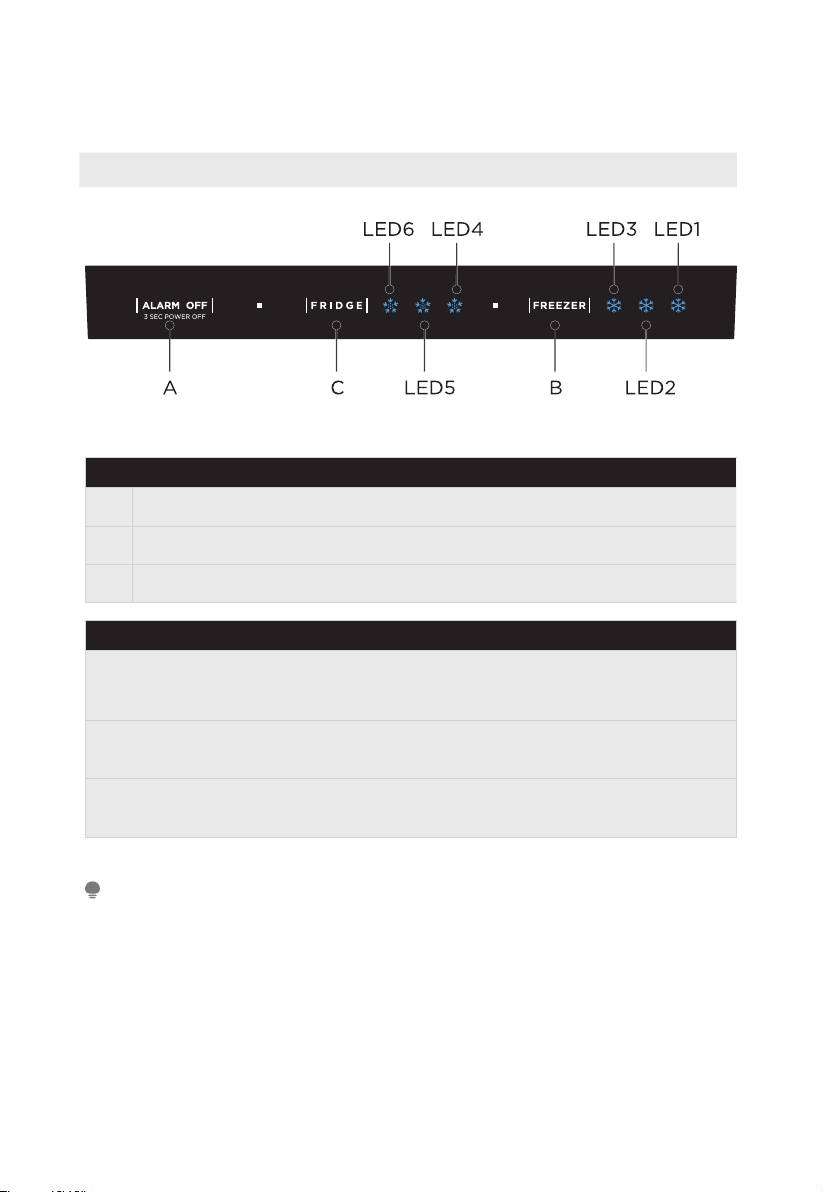
Control panel
Key
AAlarm/power off/power on button
BFreezer button
CFridge button
Display
The initial power up takes 3 seconds while the boot bell rings, While the boot bell
rings, and then goes into normal operation display. (Refrigerator and freezer are
mid-range at the time of first power-up)
Display fault code in the event of a failure (Loop display); display the set gear of the
refrigeration room in the event of trouble-free.
Under normal circumstances, the current set gear is displayed, and when a “fault
code visible” class failure occurs, the fault code is displayed.
ATTENTION
The actual control panel may differ from model to model.
8
This manual suits for next models
2
Table of contents
Other Element Refrigerator manuals


