Enabling Technologies BI-UNIQUE Instructions for use

1
BI-UNIQUE
BI-SKI INSTRUCTION,
MAINTENANCE & PARTS
MANUAL
A BI-SKI/SIT-SKI DESIGNED & BUILT IN USA BY
2226 S. JASON STREET, DENVER, CO 80223-4017 USA
www.superlite.org
TM

2
TABLE OF CONTENTS
I. INTRODUCTION..................................................................................................................................... 3
II. BACKGROUND....................................................................................................................................... 3
III. GENERAL DESCRIPTION.................................................................................................................... 4
IV. INDIVIDUAL COMPONENTS.............................................................................................................. 6
Figure 1: GLOVE SEATING SYSTEM..................................................................................... 6
Figure 2: EVACUATION SYSTEM........................................................................................... 7
PROPER EVACUATION HARNESS USE: ............................................................... 7
EVACUATION PROCEDURE: .................................................................................. 7
Figure 3: SKI AND ARTICULATING MECHANISM............................................................ 9
Figure 4: HYDRAULIC PUMP................................................................................................. 10
Figure 5: OUTRIGGER SUPER LITE (option)...................................................................... 10
V. FREQUENTLY ASKED QUESTIONS.................................................................................................... 11
WHO CAN USE THE BI-UNIQUE?....................................................................................................... 11
CAN I SKI INDEPENDENTLY? ............................................................................................................ 11
WHO ELSE CAN USE THE BI-UNIQUE?............................................................................................ 11
WHERE CAN I SKI THE BI-UNIQUE?................................................................................................. 11
WHAT SKI SHOULD I USE ON THE BI-UNIQUE?............................................................................ 11
WHAT OPTIONAL ACCESSORIES ARE AVAILABLE?................................................................... 12
1. Tether Kit:............................................................................................................................................. 12
2. Fixed outriggers: .................................................................................................................................. 12
3. T-Handle:.............................................................................................................................................. 12
4. High or Lo Roll Bar:............................................................................................................................. 12
5. Shoulder harness: ................................................................................................................................. 12
6. Head/Neck brace: ................................................................................................................................. 12
7. T-Bar Lift kit:........................................................................................................................................ 12
VI. GENERAL INSTRUCTIONS FOR USE............................................................................................. 14
1. GENERAL INSPECTION:.............................................................................................................................. 14
2. BUCKLING UP:........................................................................................................................................... 15
3. PREPARING FOR THE CHAIRLIFT: ............................................................................................................... 15
4. LOADING ON THE CHAIR:........................................................................................................................... 15
5. ON THE CHAIRLIFT:................................................................................................................................... 15
6. PREPARING TO UNLOAD:........................................................................................................................... 15
7. UNLOADING:............................................................................................................................................. 16
8. BALANCING YOUR BI-SKI: ......................................................................................................................... 16
9. FIXED OUTRIGGERS: ................................................................................................................................. 16
10. HYDRAULIC PUMP: ................................................................................................................................. 16
11. T-HANDLE:............................................................................................................................................. 16
12. MOUNTING AND CHANGING SKIS:........................................................................................................... 16
13. T-BAR LIFT LOADING AND RELEASE:..................................................................................................... 17

3
I. INTRODUCTION
Imagine going through a lift line on your own, loading onto the chairlift, then carving turns down your
favorite slope. The Bi-Unique ski, designed and manufactured by Enabling Technologies, is a high
performance unit. It offers more features for less. Suitable for skiers of all ages, skills, and sizes, the
Bi-Unique Ski weighs only 32 pounds (14.5kg). The skier sits only 7 inches (17.7cm) off the ground
which provides better stability, while the hydraulic jack lifts the ski for easy self-loading. No nuts or
bolts are required for adjustment. Instead, flip release pins make adjustments simple. The roll bar and
push bar make for easy ski buddy assistance. It is fitted with the Glove Seat for comfort and control.
The shoulder harness provides upper body support. The Bi-Unique Ski comes with a tether hook and is
available in a variety of colors. For a safer journey on the chair lift, bigger and wider seat glides provide
extra stability and ease at dismounting. A retention strap with carabineer help lock you to the chair lift
and the integrated evacuation harness are always ready for emergency use.
Your 2005 Bi-Unique bi-ski/sit-ski incorporates the latest technology and all upgrades made to these
machines since they were first built in 1991. It is the culmination of user requests and suggestions as
well as our vision and experience. This manual is not intended to teach you how to ski. Learn from a
qualified adaptive ski program/instructor. This manual is to assist you in understanding, maintaining
and utilizing your Bi-Unique.
II. BACKGROUND
Your Bi-Unique was designed and intended to be a versatile, durable ski for ski programs and
individuals. It is an easy to use, confidence building, and skiing device for all who lack the upper body
strength and coordination required to mono-ski. We designed a stable, low to the ground ski that would
be fun to use on beginner and intermediate groomed slopes. It had to be light yet durable, fit a broad
range of skier abilities, be self-loading, easily adjustable, and quick to evacuate in emergencies. From
the start, ski programs could introduce the sport of sit skiing to a broader range of handicapped persons.
Feedback from skiers and instructors has led to broader capabilities for the latest models. We have
added several sizes to accommodate children through extra tall adults, higher roll bar handles to ease
back pain of the ski buddy, tether strap anchors, removable and adjustable fixed outriggers, stronger
frame models, more durable skis, and articulating mechanism. T- handle, t-bar lift capability, quick
release skewers for rapidly adjusting your center of gravity, is among some of the innovations and
upgrades. We have designed most of these items so that you can bring your Bi-Unique up to current
specifications with minimal expenditures.
Future innovations include a warmer, redesigned Glove Seat, a suspension system for the Sport Version
of the Bi-unique, and a joystick controlled bi-ski for high-level injury, independent skiers.

4
III. GENERAL DESCRIPTION
The Bi-Unique consists of the Glove Seating System incorporating our evacuation system mounted on
an aircraft quality aluminum tubular chassis. This chassis mounts to an adjustable articulating
mechanism. The removable skis are clipped to the feet of the mechanism. Various options can be added
to extend the basic capabilities of the Bi-Unique.
Bi-unique Sizes: Measure from A to B
Pump valve lever
Trip wire
Hydraulic jack in
up load position
Knee strap
Foot strap
Articulating
mechanism
Quick release
Skewer
Kid = 33.25” / 84.45cm
Junior =37.5” / 95.25cm
Adult =41.5” / 105.41cm
X-Large Adult=46.5” / 118.11cm
Fore/aft adjustment
4” / 10.16cm
Chair-lift to
ground
clearance
19” / 48.26cm
Skis
A
B

5
Bi-unique frame
No.
Name
Materials
Qty
1
Roll bar
Alum. 6061-T6
1
2
Roll bar support
Alum. 6061-T6
2
3
Roll bar sleeves
Alum. 6061-T6
2
4
Knee rest
Alum. 6061-T6
1
5
Seat pan
Alum. 5062 H32
1
6
Tether anchor
Alum. 6061-T6
2
7
Main frame
Alum. 6061-T6
1
8
Main rail
Alum. 6061-T52
1
9
Main rail wing
Alum. 6061-T6
2
10
Foot rest rear
Alum. 6061-T6
1
11
Front hinge tubes
Alum. 6061-T6
1
1
2
3
3
6
6
4
5
9
8
7
11
10

6
IV. INDIVIDUAL COMPONENTS
Figure 1: GLOVE SEATING SYSTEM
1
Strap loose
Strap tight
Strap connected
Front view
Side view
Seat pad
Retention straps
with carabineer
Upper EVAC
loop
Chest strap
Thigh strap
2
Upper EVAC
loop

7
Figure 2: EVACUATION SYSTEM
The Bi-Unique utilizes a time tested mountaineering evacuation harness that doubles as the seat belt and adds
a retention strap with carabineer to complete the safety package. We chose to mount the evacuation harness
on the outside of the Glove Seat so that both the skier and the unit could easily be evacuated. This distributes
the weight that is applied during evacuation to the seat and not the skier. In an evacuation, the skier would
attach the evacuation line with carabineer from the mountain rescuers to the evacuation loop on his harness
and be scooped to safety.
PLEASE NOTE: The ski is bolted to the Glove Seat. The skier is strapped to the seat. The ski will simply
hang from the seat during evacuation. The retention strap with carabineer provides additional protection from
dropping to the ground should you be dislodged or tossed from the chair while riding up the lift. The strap
should be wrapped around some part of the chairlift seat, preferably around the chairs’ backrest. Making the
retention strap taut minimizes the distance you could fall. Ideally, it should be tight enough to keep you in the
chair.
PROPER EVACUATION HARNESS USE:
It is imperative that you properly thread the seat belt through the evacuation strap loop to maximize your
evacuation system after positioning yourself in the Glove Seat.
1- Pull up the evacuation harness loop between your legs as far as you can.
2-Thread the seat belt through the evacuation loop.
3-Thread the loose end through the seat belt buckle.
4-Pull tight.
5-Push your pelvis to the rear of the seat and retighten seat belt.
6-Finish buckling yourself in. You are now ready to be evacuated should the need arise.
EVACUATION PROCEDURE:
Remain calm and hold onto the chairlift.
Listen to instructions from the rescue team.
Point out that you already are wearing your evacuation system.
Show them the attachment point, the upper loop of your evacuation strap.
Clip evacuation carabineer onto evacuation loop.
Unhook your retention strap/ carabineer from the chairlift.
Hold onto the evacuation line after it is taut.
Ride down with the rescue team.
Chair lift
Retention
strap
Carabineer
EVAC. Line
Upper EVAC
loop

8
Attachment for T-Bar tow lift kit
EVAC line
Retention
strap
EVAC
carabineer
Upper EVAC
loop

9
Figure 3: SKI AND ARTICULATING MECHANISM
A longer sportier ski can go faster and ski more assertively
Very benevolent skiing & turning characteristics
Alternative state of the art carving/shaped ski can be use
Go straight Turn left Turn right
TYPE #2
Current articulating mechanism
*Superior technology
*Low maintenance
Quick release system for skis
*4” / 10cm fore/aft adjustment
*Full flexible ski mounting system
TYPE #1
Original mechanism (discontinued)
*Mechanism permanent mount to ski
*Had 8-pads/feet minimum flex.
*3”/7.6cm fore/aft adjustment
50 ¼” / 128.27cm
TYPE #2
MEGA II
48.25” / 122.55cm
TYPE #1
Blue
42.125” / 107cm
Skewer &
shims

10
Figure 4: HYDRAULIC PUMP
Figure 5: OUTRIGGER SUPER LITE (option)
MAX. Line
Oil level
Use 5wt oil
Trip wire kit
Rubber plug oil
filler
Release valve
lever
Down/Ski position
Competition style
Down/Ski position
Standard style
Up/Push position
Basket
Ice-screws
Basket brake
Pump piston
COMPETITION STYLE
Basket/ice screws
Claw Brake
STANDARD STYLE
Basket/Brake

11
V. FREQUENTLY ASKED QUESTIONS
WHO CAN USE THE BI-UNIQUE?
Our experience is that nearly everybody can safely use the Bi-Unique provided that they or their ski buddy
have the training, skills, physical strength and coordination to get it up and down the ski slope safely.
CAN I SKI INDEPENDENTLY?
The Bi-Unique can be skied independently by anyone with the upper body strength and coordination to
utilize outriggers, that is, most paraplegic, amputees, and some low level quadriplegics. We recommend
taking a certification course, and demonstrating the ability to maneuver and control the ski safely. We
always recommend skiing with a buddy, no matter how expert you are.
WHO ELSE CAN USE THE BI-UNIQUE?
For those individuals that do not have the strength and coordination to ski independently a tether strap is
attached to the ski, which allows the instructor/ski buddy to control the ski. A partial list of disabilities
that may benefit from this ski are: multiple sclerosis, muscular dystrophy, cerebral palsy, spinal bifida,
spinal cord injuries, neuromuscular diseases. These individuals can be safely transported on the lift, and
ski down the slopes with the assistance of their instructor.
WHERE CAN I SKI THE BI-UNIQUE?
Your Bi-Unique was designed to be skied on the groomed beginner and intermediate slopes. We will not
warranty machines used on advanced slopes, mogul fields and/or snowboard parks. The ski is designed to
be chairlift compatible with the majority of chair lifts around the world. An optional kit allows for use at
ski areas with T-bar lifts.
PLEASE NOTE: Facilities and disabled skiers guidelines vary at different ski areas and countries. We
have adapted most of our designs to be compatible with existing technologies. It is your responsibility to
find out the specific requirements of the area that you intend to ski.
WHAT SKI SHOULD I USE ON THE BI-UNIQUE?
For ski programs we recommend the specially designed Mega II skis. They are the most versatile and
maneuverable. With the emergence of the shaped/carving skis, many independent skiers can utilize these
skis to their advantage. We offer either style. It takes less than a minute to switch from one ski to
another. All kids and many junior Bi-Unique skis come with short shaped skis.
PLEASE NOTE: The original Version I Blue skis are no longer in production. Many ski programs
comment on the ski ability and ease of turning for beginners that these skis afforded them. We are
looking at combining the best characteristics of each ski into the next generation.

12
WHAT OPTIONAL ACCESSORIES ARE AVAILABLE?
Ski programs have asked for most of these items to assist them with their wide range of clients.
1. Tether Kit:
Consist of 2 carabineers and a 23 feet x 1-inch flat nylon webbing strap. Clip each carabineer onto the
left and right tether anchors to partially control the student’s moves as well as keeping them from
running away.
2. Fixed outriggers:
Like training wheels on a bicycle. The original version is detachable from the bi-ski with the ability to
adjust the height for the skier’s abilities. The new version allows for independent adjustments of the
left and right sides.
3. T-Handle:
Several styles available depending on your need. Quickly detachable, it provides skiers something
with which to hold on. Some children use it in place of outriggers.
4. High or Lo Roll Bar:
Independent skiers favor the low roll bar. Everyone else appreciates the high roll bar/handle because
they can control the ski from a more upright position, minimizing back pain.
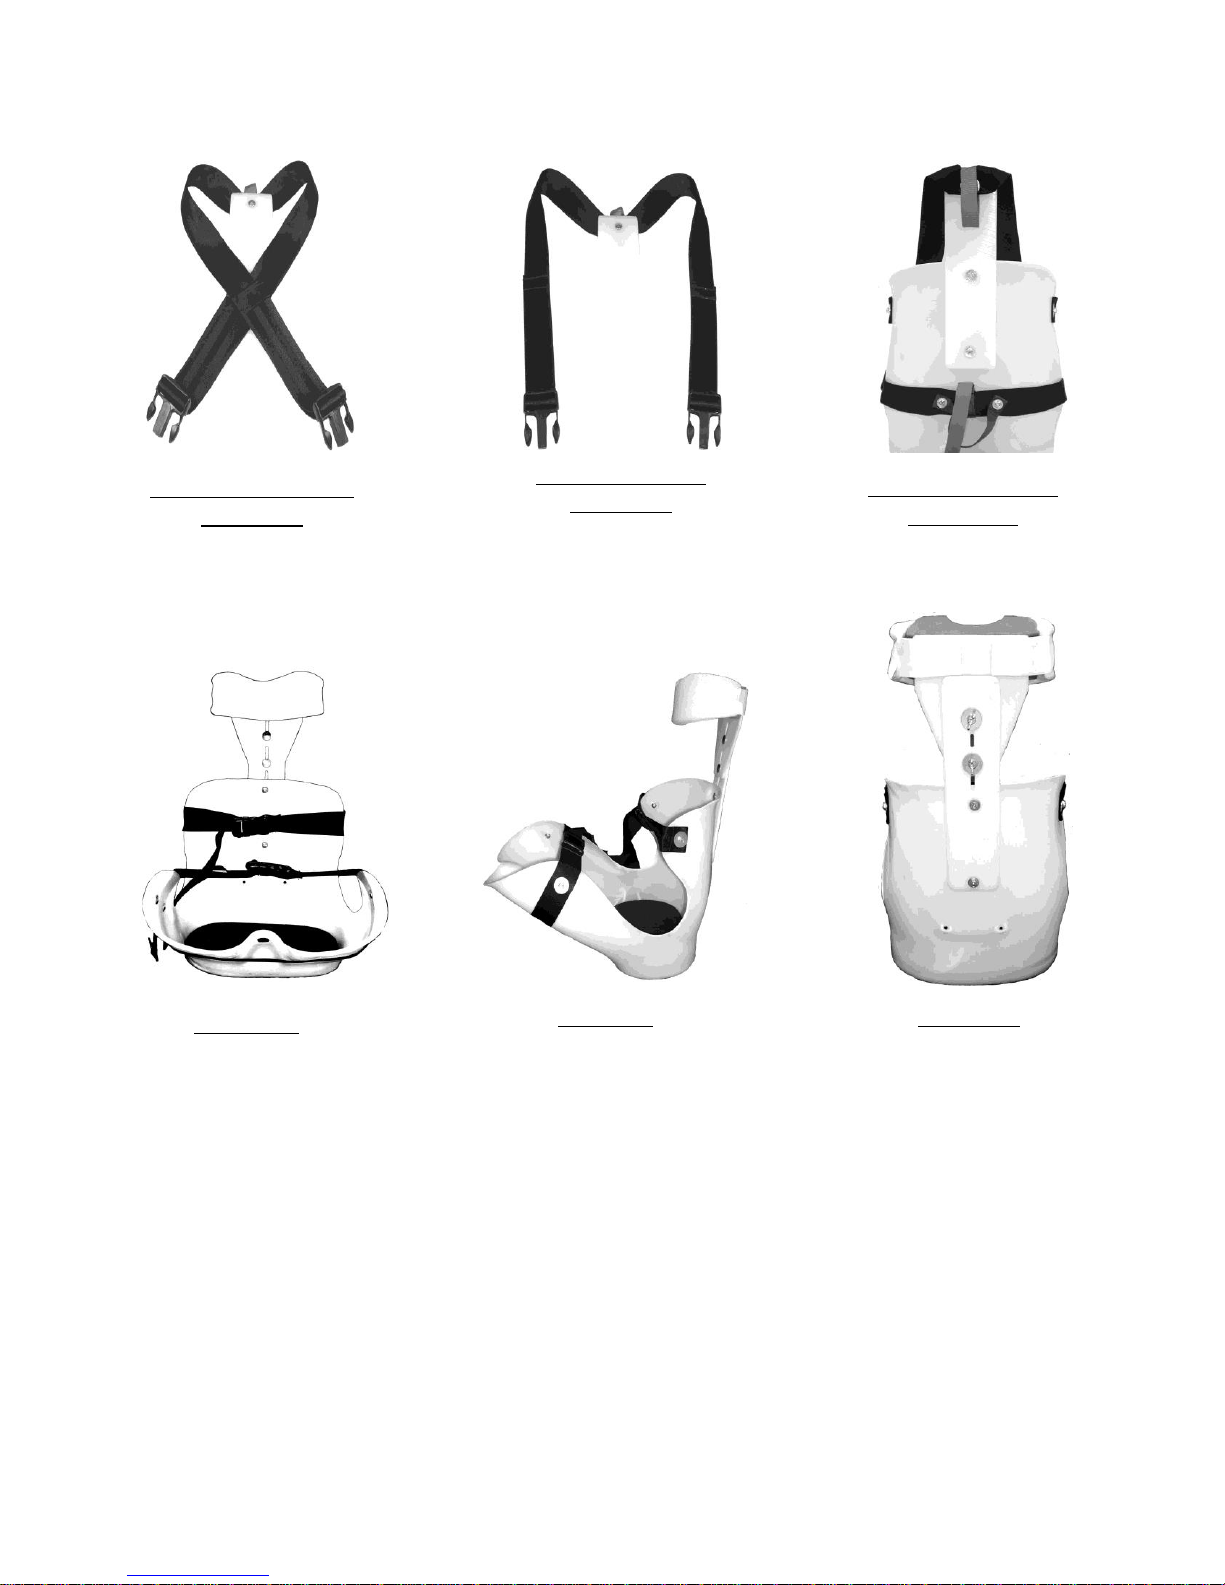
5. Shoulder harness:
Provides upper body support and assists in pulling the skier back into the upright position after leaning
forward.
6. Head/Neck brace:
Provides additional support for the head and neck by gently yet solidly holding them in place.
7. T-Bar Lift kit:
Allow you to get up the slopes that utilize the T-bar lift systems prevalent in Europe. Consists
of two quick release mechanisms mounted on the frame or Glove Seat that can be activated/released
by you or your assistant when needed.
Tether kit (option)
Tether anchor
A
Tether anchor
B
Carabineer
B
A
Tether strap
Retention strap
with carabineer
Back view

13
Fixed outriggers (option)
T-handle (option)
High or Low roll-bar (option)
T-handle
Mounting bracket
Hi roll-bar height
30.25” / 76.83cm
Lo roll-bar height
26.25” / 66.67cm
Two Clamps on
both side
¼ x 1-3/4”
Carriage bolt
¼” washer
Wing nut
3/16” Hex Allen
wrench
6mm Hex Allen
wrench
14
Shoulder harness (option)
Head & Neck support (Option)
VI. GENERAL INSTRUCTIONS FOR USE
Safety is everyone’s top concern. Safe equipment under the control of trained safety conscious users
enhances the experience of all skiers, both able bodied and disabled.
1. General Inspection:
Check your machine for any frayed or cut webbing, leaking pump, loose or broken fasteners, cracked
frame or skis. Check that skis articulate left and right by moving your chassis in both directions. Check
that quick release pins are working and that the chassis slides smoothly fore and aft. Repair as needed
before use. We highly recommend that you have repairs and servicing done by a trained technician or
us if you do not have the skills to safely accomplish them.
X Shoulder Buckling
Technique
Back view shoulder
strap attach
Side view
Front view
Back view
Straight Buckling
Technique

15
2. Buckling up:
We recommend unlocking/opening all seat belts and retaining straps before getting into the unit. After
transferring into the bi-ski,
1- Lean forward and position your pelvis as far to the rear of the seat as possible.
2-Straighten up and make sure your legs are evenly positioned. You may need assistance to do this.
3-Pull up the evacuation harness loop located between your thighs and feed the right end of the seat
belt through this loop and then through the seat belt buckle.
4-Pull tight, wiggle to the rear of the seat and pull tight again. THIS IS THE MOST IMPORTANT
PART OF BUCKLING UP! It prepares your evacuation system for instant use and properly
positions you in your seat.
5-Buckle the foot, knee and thigh straps, then the chest and shoulder straps if you have them.
REMEMBER THE SNUGGER YOU FIT IN YOUR SEAT AND ON THE BISKI, THE MORE
CONTROL YOU WILL HAVE WHEN SKIING. Your Glove Seating System is the equivalent of a
ski boot.
3. Preparing for the chairlift:
The Bi-Unique has two positions, “load” and “skiing”. Get as close to the ski lift as possible in the
“skiing position”. That is, wait as long as possible before pumping the jack to the load position. When
you are close to the chairlift, reach under your right knee and turn the pump valve forward, then pump
the jack handle to the full up position. With your outriggers upright, push yourself toward the loading
spot.
PLEASE NOTE: if your ski buddy is positioning/pushing you, have them lift up under the rear of the
seat and then push forward to minimize putting undue strain on the frame.
4. Loading on the chair:
Bi-Unique users employ numerous techniques for loading depending on their skill levels, the rules of
the ski area, and the specifics of the lift station. It is your responsibility to check out the requirements
of the area you will be skiing. At the lift, inform the attendants of your needs. The lift attendants will
slow down or stop the chair as necessary. It is not their job to physically assist you in getting on the
chair. That is you and your ski buddy’s job!!!
5. On the chairlift:
Once on the chair, the trip wire automatically pulls the pump valve lever to the rear making your ski
ready for unloading. Unclip the carabineer and loop the strap around some part of the chair lift frame.
You want to take as much slack out of the retention strap as possible. This keeps you from falling too
far. Your retention strap protects you from falling off the chair should you lean too far forward or have
sudden jolts be experienced on your ride up. Like seat belts on a car, your retention strap can only help
you if you use it!!!
PLEASE NOTE: We recommend using the retention strap and carabineer provided. We recommend
that you let your ski buddy buckle and release the retention strap.
6. Preparing to Unload:
Wait until you are as close as possible to the off-load ramp before:
1-Unbuckling the carabineer and releasing the retention strap.
2-Clip it back on the either the rear grabs handle or the carabineer loop provided.
3-Hold on to the chairlift. Raise the safety bar if needed.

16
PLEASE NOTE: This is perhaps the most dangerous part of the entire chairlift ride. After the
retention strap is released you could fall off the chair!!! If you forget to unclip the retention strap, you
could be dragged by the chair and dangled from the chair as it heads down the mountain.
PAY ATTENTION!
7. Unloading:
Push off the chair. Once off the chair, the chassis will smoothly settle down to the ski position. Ski
away and enjoy. Again, we emphasize that you adjust your technique to your skill level and
conditions of each chairlift. Some skiers unload with the lift at full speed, some at slower speed, and
some request a stop.
8. Balancing your bi-ski:
Balancing your ski is the process of finding your optimal center of balance. Factors like your upper
body mass, atrophied or amputated limbs affect the center of balance. Some programs have trained
instructors that will balance you on the Bi-Unique before going on the slopes. We recommend that
you first set up the bi-ski by centering the chassis and skiers in the top brackets of the ski mechanism.
Once you are skiing the unit should smoothly respond to your movements. If the front or rear slides
out you will need to shift your weight toward the end that is sliding out. After stopping, release the
skewers and move the upper chassis toward the end that slid out. It may take several runs to find the
correct spot.
9. Fixed Outriggers:
Insert fixed outrigger assembly into rear mainframe rail, align holes, insert bolt and tighten wing nut.
Use the 6 mm Allen wrench provided to adjust skis to the desired height. New individually adjustable
fixed outriggers have 2 clamps per side. Adjust and tighten per your needs. We recommend that they
be used in tethered training sessions. They may get in the way if you try to ski behind holding the
handrail of the bi-ski.
10. Hydraulic Pump:
Flip valve handle forward. Grab pump handle and pump approximately 25-30 times or until ski
doesn’t move any higher. The jack has a release valve that only allows it to go up a prescribed
distance. If the rear of the seat doesn’t rise the full 19 inches, you probably have insufficient oil. The
oil level should be to the height of the oil filler hole with the jack in the down position. Remove
rubber plug, check oil level and add 5-weight hydraulic oil as needed to fill. Routine maintenance
involves making sure there are no leaks and changing the oil at the end of the ski season if moisture is
detected in oil. We highly recommend storing your Bi-Unique upright. Hanging from the ceiling
or storing it upside down have been the main causes of pump oil leakage/ loss. These jacks were
designed to be used in the upright position.
11. T-Handle:
Simply position T-handle in the desired location and tighten the clamp with the 3/16-inch Allen
wrench provided.
12. Mounting and Changing Skis:
To Dismount: Pushdowns on the ski retaining spring and tap/push the ski forward. The ski is released.
To Mount: Line up ski brackets under and in front of front and rear feet. Press down on retaining
spring and tap/slide the ski to rear until the retaining spring snaps in place. Skis are now locked in
place. We offer ski mounting bracket kits so that you can quickly change to different or spare
skis.

17
13. T-Bar Lift Loading and Release:
The basic process involves hooking the towrope into the quick-release hooks on both sides of your
seat or frame. Push or get pushed to the loading area. Have your assistant/instructor or lift operator
hook the T-bar on to your towrope. They will start the lift again and you are on your way. You are
now being towed up the ski slope. If alone, use your outriggers for balance. As you near the top of the
slope and approach the unload area, simply pull either release strap or the towrope will be released on
one side. Gather your towrope, stow it and ski away. Should you require an assistant, the same process
occurs with the exception that your instructor/assistant will hang on to the rear handle of the bi-ski and
be towed up behind you. Upon reaching the unload area they will usually be the ones to activate the
quick-release via an extended release strap.
2226 S. JASON STREET, DENVER, CO 80223-4017 USA
www.superlite.org
Tel 1-866-936-0232 / 303-936-0232 Fax 303-936-1992 e-mail: enablingtech@gmail.com
Retaining spring
Push ski forward
Front
Mounting bracket kits
Table of contents
Popular Offroad Vehicle manuals by other brands

Massimo Motor
Massimo Motor MSU 850-5 owner's manual

Yamaha
Yamaha WOLVERINE YFM45FXX owner's manual

Polaris
Polaris 2004 SPORTSMAN owner's manual

Yamaha
Yamaha MM700H owner's manual

Kolpin
Kolpin CAN-AM Commander 1000 Limited installation instructions

Polaris
Polaris Hawkeye 325 2X4 2016 Owner's manual for maintenance and safety


