Epson Stylus Photo TX720WD Assembly instructions

Basic Operation Guide
- for use without a computer -

2
Contents
About This Guide..................................................................................................................................................... 3
Copyright Notice ..................................................................................................................................................... 3
Important Safety Instructions............................................................................................................................. 4
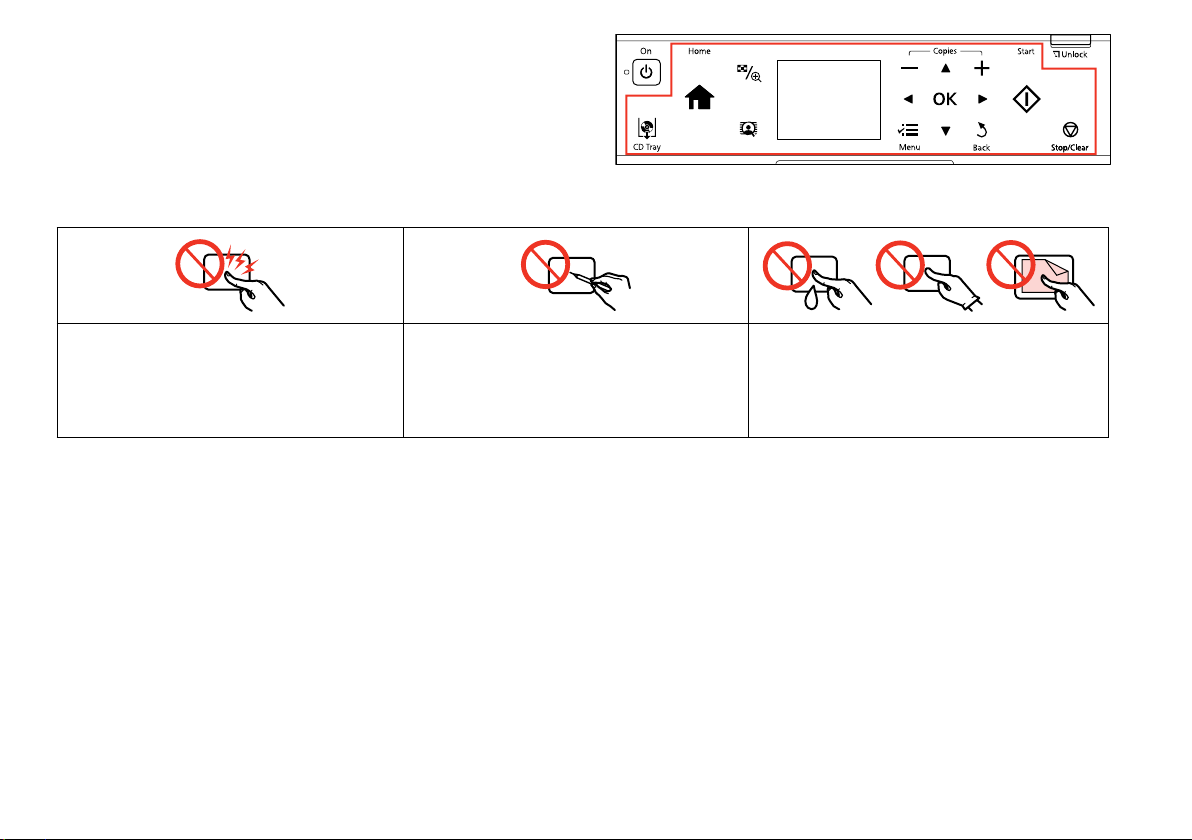
Precautions on the Touchpad.............................................................................................................................5
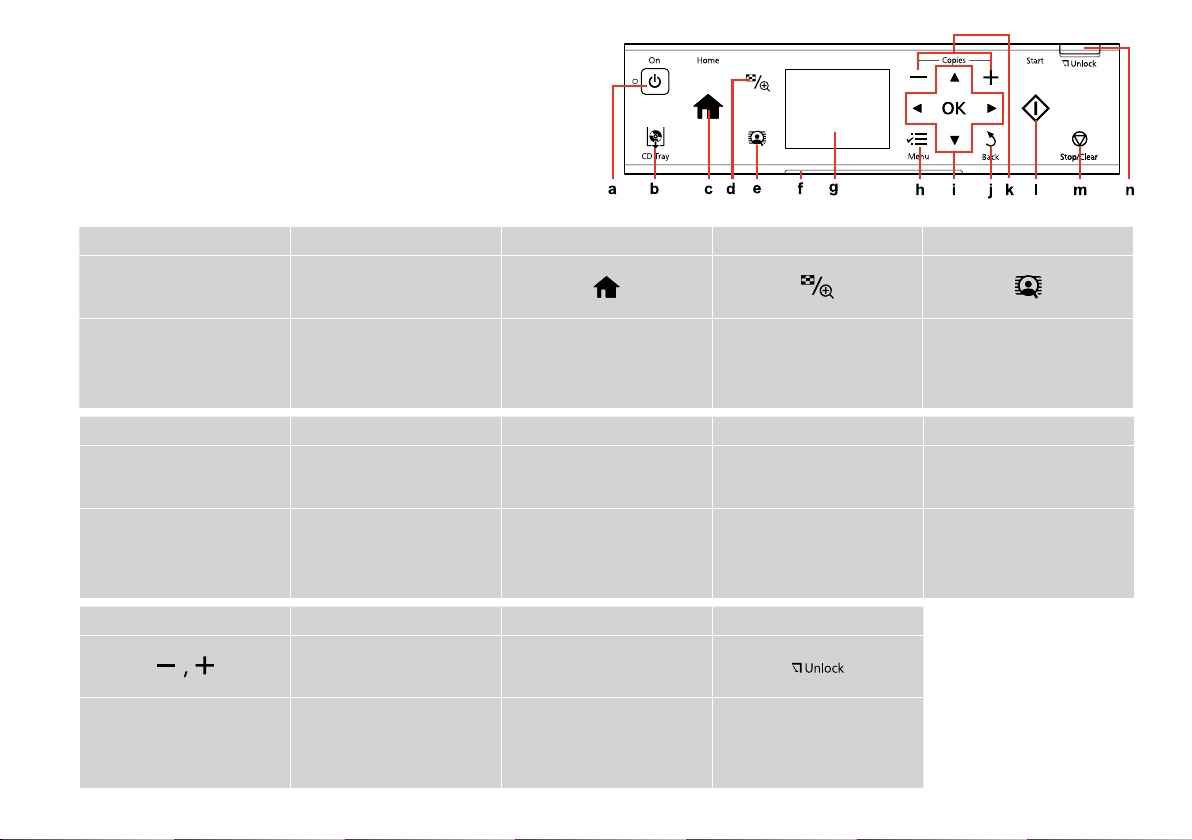
Guide to Control Panel.......................................................................................................................................... 6
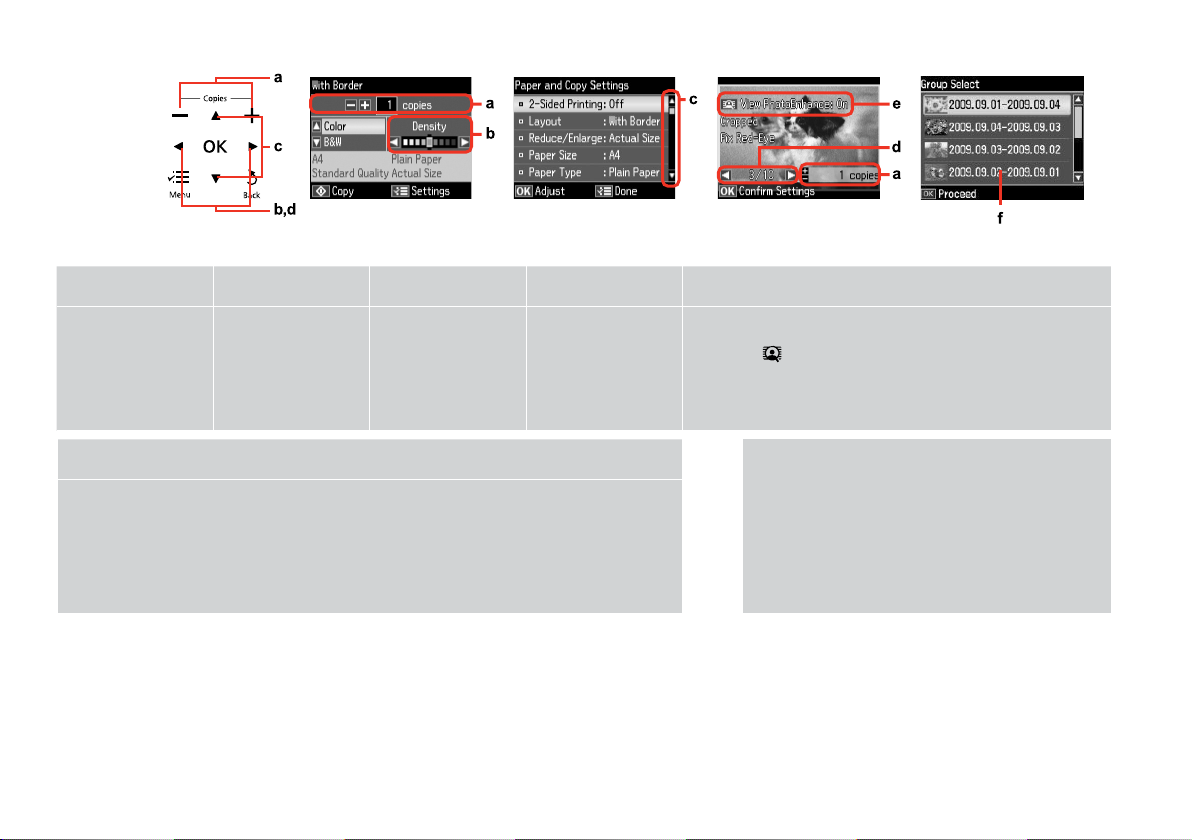
Using the LCD Screen.............................................................................................................................................7
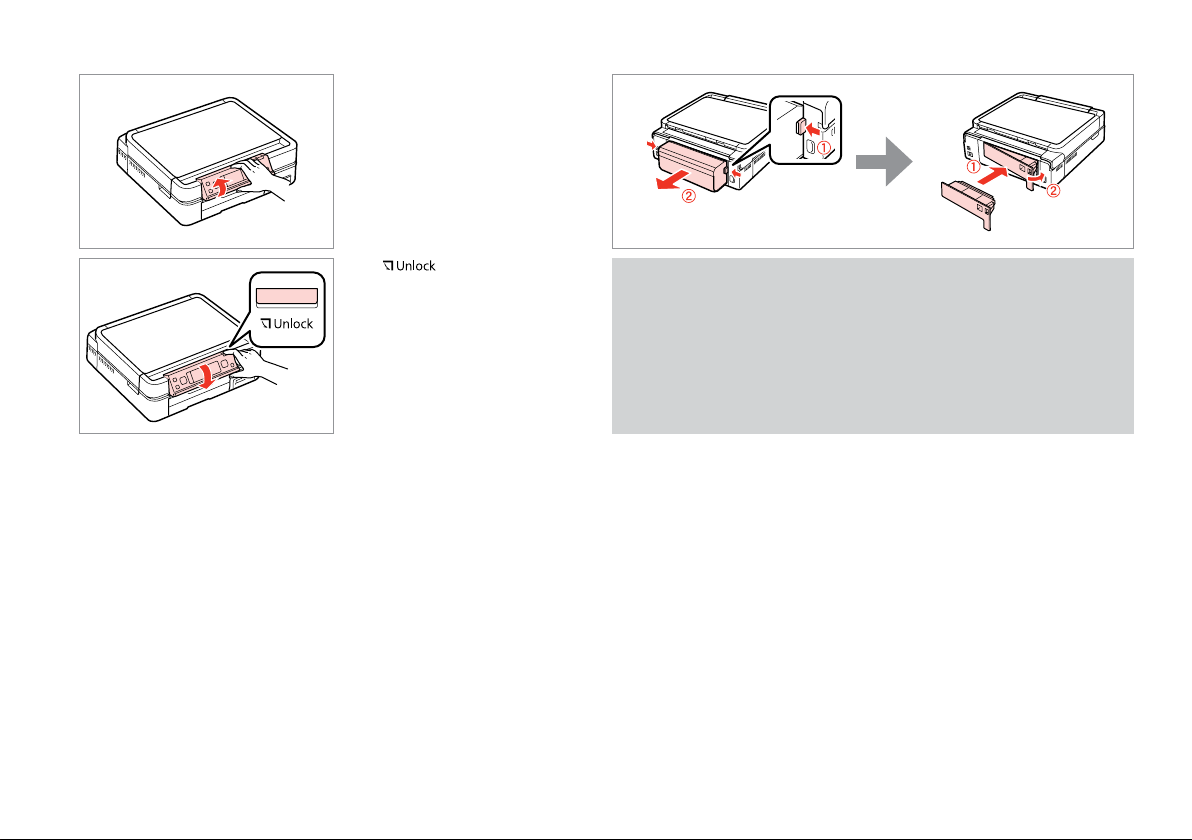
Adjusting Angle of Control Panel......................................................................................................................8
Using the optional rear cover .............................................................................................................................8
Handling Media and Originals
Selecting Paper..................................................................................................................................................10
Loading Paper....................................................................................................................................................11
Loading a CD/DVD ...........................................................................................................................................15
Inserting a Memory Card...............................................................................................................................17
Placing Originals ...............................................................................................................................................19
Copy Mode
Copying Documents........................................................................................................................................22
Copy/Restore Photos.......................................................................................................................................24
Copying a CD/DVD...........................................................................................................................................26
Copy Mode Menu List.....................................................................................................................................28
Print Photos Mode
Printing Photos..................................................................................................................................................30
Printing in Various Layouts............................................................................................................................32
Printing on a CD/DVD .....................................................................................................................................34
Printing Photo Greeting Cards.....................................................................................................................37
Printing from an External USB Device.......................................................................................................40
Print Photos Mode Menu List.......................................................................................................................41
Other Mode
Printing Ruled Paper........................................................................................................................................44
Printing a Coloring Sheet...............................................................................................................................46
Scanning to a Memory Card .........................................................................................................................48
Scanning to a Computer................................................................................................................................49
Backup to an External USB Device..............................................................................................................50
Other Mode Menu List....................................................................................................................................51
Setup Mode (Maintenance)
Checking the Ink Cartridge Status..............................................................................................................54
Checking/Cleaning the Print Head.............................................................................................................55
Aligning the Print Head..................................................................................................................................57
Printing from a Digital Camera ....................................................................................................................58
Setup Mode Menu List....................................................................................................................................60
Solving Problems
Error Messages...................................................................................................................................................62
Replacing Ink Cartridges................................................................................................................................63
Paper Jam ............................................................................................................................................................66
Printer Error.........................................................................................................................................................71
Print Quality/Layout Problems.....................................................................................................................72
Other Problems .................................................................................................................................................73
Contacting Epson Support............................................................................................................................74
Index ..........................................................................................................................................................................75

3
About This Guide
Follow these guidelines as you read your instructions:
wcQR&
Warning:
Warnings must be followed
carefully to avoid bodily injury.
Caution:
Cautions must be observed
to avoid damage to your
equipment.
Must be observed to avoid
bodily injury and damage to
your equipment.
Note:
Notes contain important
information and hints for using
the printer.
Indicates a page number where
additional information can be
found.
Copyright Notice
No part of this publication may be reproduced, stored in a retrieval system, or transmitted in any form or by any means, electronic, mechanical, photocopying, recording, or otherwise, without the prior written
permission of Seiko Epson Corporation. The information contained herein is designed only for use with this product. Epson is not responsible for any use of this information as applied to other printers.
Neither Seiko Epson Corporation nor its aliates shall be liable to the purchaser of this product or third parties for damages, losses, costs, or expenses incurred by the purchaser or third parties as a result of
accident, misuse, or abuse of this product or unauthorized modications, repairs, or alterations to this product, or (excluding the U.S.) failure to strictly comply with Seiko Epson Corporation’s operating and
maintenance instructions.
Seiko Epson Corporation shall not be liable for any damages or problems arising from the use of any options or any consumable products other than those designated as Original Epson Products or Epson
Approved Products by Seiko Epson Corporation.
Seiko Epson Corporation shall not be held liable for any damage resulting from electromagnetic interference that occurs from the use of any interface cables other than those designated as Epson Approved
Products by Seiko Epson Corporation.
EPSON®and EPSON STYLUS®are registered trademarks, and EPSON EXCEED YOUR VISION or EXCEED YOUR VISION and ARTISAN are trademarks of Seiko Epson Corporation.
PRINT Image Matching™and the PRINT Image Matching logo are trademarks of Seiko Epson Corporation. Copyright © 2001 Seiko Epson Corporation. All rights reserved.
SDHC™is a trademark.
Memory Stick, Memory Stick Duo, Memory Stick PRO, Memory Stick PRO Duo, Memory Stick PRO-HG Duo, Memory Stick Micro, MagicGate Memory Stick, and MagicGate Memory Stick Duo are trademarks of Sony
Corporation.
xD-Picture Card™is a trademark of Fuji Photo Film Co., Ltd.
The Bluetooth®word mark is owned by the Bluetooth SIG, Inc. and licensed to Seiko Epson Corporation.
General Notice: Other product names used herein are for identication purposes only and may be trademarks of their respective owners. Epson disclaims any and all rights in those marks.

4
Important Safety Instructions
Make sure the power cord
meets all relevant local safety
standards.
Place the printer near a wall
outlet where the power cord
can be easily unplugged.
Use only the power cord that
comes with the printer. Use of
another cord may cause re or
shock. Do not use the cord with
any other equipment.
Use only the type of power
source indicated on the label.
Do not let the power cord
become damaged or frayed.
Do not open the scanner unit
while copying, printing, or
scanning.
Do not use aerosol products
that contain ammable gases
inside or around the printer.
Doing so may cause re.
Except as specically explained
in your documentation, do not
attempt to service the printer
yourself.
Keep ink cartridges out of the
reach of children and do not
drink the ink.
Do not shake ink cartridges
after opening their packages;
this can cause leakage.
If you remove an ink cartridge
for later use, protect the ink
supply area from dirt and
dust and store it in the same
environment as the printer. Do
not touch the ink supply port
or surrounding area.
If ink gets on your skin, wash
it o with soap and water. If it
gets in your eyes, ush them
immediately with water. If
you still have discomfort or
vision problems, see a doctor
immediately.

5
Precautions on the Touchpad
Press the touchpad gently with the tip of your nger. Do
not press too hard or tap it with your nails.
Do not operate using sharp or pointed objects such as
ball point pen, sharp pencil, stylus pen, and so on.
The touchpad is a capacitive touch panel that only
responds to direct nger touch. The touchpad may not
respond to touch from wet hands, gloved hands, or over
the protective sheet or stickers.

6
Guide to Control Panel
a b c d e
PL
Turns on/o printer. Eject and close the CD/DVD tray. Returns to the top menu. When
on the top menu, switches
between the modes.
Changes the view of photos or
crops the photos.
Switches View PhotoEnhance On
or O. R&7
f g h i j
- - xl, u, r, d, OK y
The status indicator light shows
the printer status.
The LCD screen displays a
preview of the selected images,
or displays settings.
Displays detailed settings for
each mode.
Selects photos and menus. Cancels/returns to the previous
menu.
Control panel design varies by area.
k l m n
x y
Sets the number of copies. Starts copying/printing. Stops copying/printing or reset
settings.
Lowers the control panel. R&8

7
Using the LCD Screen
a b c d e
Use Copies + or - to set
the number of copies for
the selected photo.
Press lor rto set the
density.
Press uor dto select
the menu item. The
highlight moves up or
down.
Press lor rto change
the photo displayed on
the LCD screen.
The PhotoEnhance function automatically corrects color and improves
the quality of your images. You can preview the adjusted images by
pressing the button and changing View PhotoEnhance to On.
The actual screen display may dier slightly from those shown in this guide.
After 13 minutes of inactivity, the screen turns
black to save energy. Touch the screen to return the
screen to its previous state.
Q
f
When you have more than 999 photos on your memory card, the LCD screen displays a message to let
you select a group. Images are sorted by the date they were taken. To select and show images in a group,
press uor dto select a group and then press OK. To re-select a group or folder, select Print Photos,
Select Location, and then select Select Group or Select Folder.

8
Adjusting Angle of Control Panel
Raise manually.
Press to lower.
Using the optional rear cover
If you do not want to use 2-sided printing, remove the auto duplexer and
replace with the supplied rear cover. For more details, see the online User’s
Guide. Depending on the area, the rear cover may not be supplied.
Q

9
Handling Media and Originals

10
Selecting Paper
The availability of special paper
varies by area.
If you want to print
on this paper…
Choose this
Paper Type
on the LCD
screen
Loading
capacity
(sheets)
Tray
a Plain paper *¹ Plain Paper [12 mm]
*² *³
Main
b Epson Premium Ink
Jet Plain Paper *¹
Plain Paper 120 *³ Main
c Epson Bright White
Ink Jet Paper *¹
Plain Paper 100 *³ Main
d Epson Photo
Quality Ink Jet
Paper
Matte 100 Main
e Epson Matte Paper
Heavy -weight
Matte 20 Main
f Epson Premium
Glossy Photo Paper
Prem.
Glossy
20 A4: Main
Other than
A4: Photo
g Epson Premium
Semigloss Photo
Paper
Prem.
Glossy
h Epson Glossy
Photo Paper
Glossy
i Epson Photo Paper Photo
Paper
j Epson Ultra Glossy
Photo Paper
Ultra
Glossy
k Epson Double-
Sided Matte Paper
Matte 1 Main
l Epson Photo
Stickers
Photo
Stickers
1 Photo
*1 You can perform 2-sided printing with this paper.
*2 Paper with a weight of 64 to 90 g/m².
*3 For manual 2-sided printing, 30 sheets.

11
Loading Paper
Flip down.
Pull out.
A
B
Make sure paper is not loaded in
the photo tray.
Q
Close the output tray if it is ejected.
Q
a: Photo tray
b: Main tray

12
Slide and raise. Pinch and slide to the sides.
C D
Slide to the edges of paper.
F
Slide to your paper size.
G
Load printable side DOWN.
ER&10

13
Slide out and raise.
N
Align the edges of the paper
before loading.
Q
Slide to the edges of the paper.
Slide to your paper size.
K
L
Insert keeping the cassette at.
M
Close.
H
Pinch and slide to the sides.
I
Load printable side DOWN.
JR&10

14
Do not use paper with binder
holes.
Q
See the online User’s Guide when
using Legal size paper.
Q
Do not pull out or insert the
paper cassette while the printer is
operating.
Q
When loading a Photo Sticker sheet, place it face DOWN as shown on the
right. Do not use the loading support sheet that came with the Photo
Stickers.
Q

15
Loading a CD/DVD
Close the output tray.
A
Raise as far as it will go.
BR&8
Eject the CD/DVD tray.
C
The CD/DVD tray cannot be
ejected or extended any further.
c
When ejecting/inserting the
CD/DVD tray, make sure nothing is
placed on the output tray.
c
The CD/DVD tray closes
automatically after a certain
period of time. Press Lto eject
again.
Q
To print on 8 cm CDs, see the
online User’s Guide.
Q

16
Place. Do not pull the CD/DVD tray.
D
Close the CD/DVD tray.
F
Press gently.
E
Removing a CD/DVD
Remove horizontally.
A
Close the CD/DVD tray.
B
Lower.
C

17
Do not try to force the card all the
way into the slot. It should not be
fully inserted.
c
Inserting a Memory
Card A B
Insert one card at a time. Check the light stays on.
Removing a memory
card
Check the light stays on.
A B
Remove.
On Flashing
Q

18
*Adapter required
If the memory card needs an adapter then attach it before
inserting the card into the slot, otherwise the card may get stuck.
c
xD-Picture Card
xD-Picture Card Type M
xD-Picture Card Type M+
xD-Picture Card Type H
SD
SDHC
MultiMediaCard
MMCplus
MMCmobile *
MMCmicro *
miniSD *
miniSDHC *
microSD *
microSDHC *
Memory Stick
Memory Stick PRO
MagicGate Memory Stick
Memory Stick Duo *
Memory Stick PRO Duo *
Memory Stick PRO-HG Duo *
MagicGate Memory Stick Duo *
Memory Stick Micro *
CompactFlash
Microdrive

19
Placing Originals A
Place face-down horizontally.
B
Slide to the corner.
Place photos 5 mm apart.
You can copy one photo or multiple photos of dierent sizes at the same
time, as long as they are larger than 30 × 40 mm.
Q
Place in the center.

20
Place the rst page. Place the second page.
You can print two pages of a book on a single side of one sheet. Select
Book/2-up or Book/2-Sided as the layout and place the book as shown on
the left.
Other manuals for Stylus Photo TX720WD
1
Table of contents