Estrima BIRO User manual

USE AND MAINTENANCE
MANUAL


WELCOME ON BOARD BIRÒ
Are you ready for an electrifying experience?
Nature is going to thank you! Thanks to electric propulsion, with Birò
you’ll be able to move around comfortably with no emissions.
In total freedom! Thanks to its reduced size, you won’t be meeting with
any limitations, not even in terms of trafc!
In safety! The highly resistant chassis is going to offer you maximum
protection inside the passenger compartment.
This booklet provides the information that will help you get to know your
new vehicle better and become familiar with its controls.
You will nd many suggestions that will help you ensure that your Birò
remains perfectly efcient, while permitting you to drive around in total
safety and security.
In the manual you are going to nd information preceded by the symbol
! WARNING.
The purpose of such information is to help you prevent the vehicle,
yourself, other people, things and the environment from being damaged
or hurt.
We wish you a happy driving experience and thank you for having
chosen Birò!
All the information provided in this manual was the most recent available at the moment
of printing. Messrs Estrima S.r.l. reserves the right to modify it at any moment, without any
obligation or prior notice.
The translation - albeit partial - of this manual is forbidden unless specically authorised
in writing.

Use and maintenance manual 03.01 – 22/06/20164
PRELIMINARY OPERATIONS TO ACTIVATE
THE VEHICLE
The vehicle has a buffer battery that is placed under the front bonnet.
This battery constantly feeds the RFID reader (Birò Card reader) and has
a life of 15 consecutive days per charge. Recharge is possible by driving
the vehicle or plugging it.
IMPORTANT: IF YOU PLAN TO NOT USE BIRÒ FOR MORE THAN
15 CONSECUTIVE DAYS AND IT IS NOT POSSIBLE TO LEAVE IT
PLUGGED IN, THEN DISCONNECT THE BUFFER BATTERY.
Birò has been delivered with the buffer battery disconnected. In order to
use the vehicle, connect the buffer battery as described in the following
instructions.
Once you open the front bonnet by using the specic key, pull up the
basket as shown in the picture (1).
1

Use and maintenance manual 03.01 – 22/06/2016 5
Connect the battery by inserting the connector with the red cable as
shown in the picture (2).
In order to disconnect the buffer battery, you will have to detach the
connector.
2


Use and maintenance manual 03.01 – 22/06/2016 7
SUMMARY
Page
1. GET TO KNOW YOUR VEHICLE .....................................................8
2. WHILE DRIVING ...........................................................................23
3. LITHIUM BATTERIES ....................................................................30
4. MAINTENANCE ............................................................................40
5. TECHNICAL FEATURES ...............................................................72

Use and maintenance manual 03.01 – 22/06/20168
CHAPTER 1:
GET TO KNOW YOUR VEHICLE
Page
LET’S SPEAK ABOUT SAFETY ..........................................................9
OPENING ..........................................................................................9
CARRYING CHILDREN ....................................................................11
PLACEMENT OF PARTS ..................................................................12
INSTRUMENTATION PANEL ............................................................14
ONBOARD COMPUTER ..................................................................15
LIGHTING AND SIGNALLING DEVICES ...........................................16
WINDSHIELD WIPER / CLEANER ....................................................18
DEFROST GRID WINDSCREEN .......................................................18
ACOUSTIC SIGNAL .........................................................................18
REAR VIEW MIRRORS .....................................................................19
12V FEEDING OUTLET OR USB OUTLET .........................................19
OBJECT CARRIER COMPARTMENTS .............................................20
ACCESSORIES AND MODIFICATIONS ............................................22

Use and maintenance manual 03.01 – 22/06/2016 9
LET’S SPEAK ABOUT SAFETY
Your personal safety and that of other people is the most important thing.
Driving this car is an act of enormous responsibility.
Alcohol over-drinking or drug-taking are incompatible with driving.
Avoid sitting down to drive if you’re not in the suitable state.
The information provided in this manual warns you about certain dangers
relative to the working and maintenance of the vehicle. Indeed, it is surely
not possible, nor is it realistic to indicate all the dangers that may arise.
One must be sensible.
Driving speeds that are incompatible with law restrictions and with the
state of the road reduce your - and other people’s - safety considerably.
If driving is to be safe, it is essential to always keep the vehicle in a
perfect state of efciency.
Failure to comply with limitations and transport rules, and the
employment of spare parts that are not original, may cause safety and
security problems.
This vehicle has been designed for use in cities and towns.
Wending along unpaved roads, or on incompatible ground, may
jeopardise the driving conditions and cause faults and breakdowns.
WARNING Driving this vehicle as envisioned in the legislation in force
does not require the use of crash helmets.
OPENING
Rear window.
The rear window is equipped with
a system that allows for its partial
opening.
By pulling the lever, the window
begins to open up. Once the lever
has been completely turned upside
down, the window shall turn out to
be blocked in the “open” position.
By carrying out the inverse
operation, the window gets closed.

Use and maintenance manual 03.01 – 22/06/201610
Upper window.
The upper window is equipped with
a system that allows for its partial
opening.
By pulling the lever, the window
begins to open up. Once the lever
has been completely turned upside
down, the window appears to be
blocked into the “open” position.
By carrying out the opposite
operation, the window gets closed.
Opening/closing the door
from outside (optional).
To lock the door - which is possible
only with the door shut - insert and
rotate the key anti-clockwise.
To unlock, rotate the key clockwise.
You open the door by pushing the
press button on the handle.
N.B. Per la portiera con
elettroserratura, consultare pag. 26.
Internal locking of the door
(optional).
Locking of the door from inside is
not possible.
Opening - guaranteed even in case
the door is locked from outside -
takes place by pushing the lever
upwards.

Use and maintenance manual 03.01 – 22/06/2016 11
CARRYING CHILDREN
In compliance with legislation in force, on motor-bicycles and on mini-
cars it is forbidden to carry children who are less than 5 years old.
The seats in Birò are not compatible with the mounting of devices
homologated for carrying children.
! WARNING Failure to comply with the regulations is dangerous. Grave
injuries or death may ensue as a result.
!

12
9
10 11
3 6
8
7
4a5
4b
20
Use and maintenance manual 03.01 – 22/06/201612
PLACEMENT OF PARTS

Use and maintenance manual 03.01 – 22/06/2016 13
1. Multi-function lever:
- direction indicator lights
- parking lights
- low-beam lights
- windshield wiper and cleaner switch
2. Steering wheel
3. Boost button
4a. Onboard computer mode switch
4b. Windscreen defrost grid switch
5. Warning horn
6. Multi-function lever:
- ahead drive selector
- low speed ahead drive selector (turtle icon)
- reverse drive selector
7. USB outlet
8. Onboard computer/ speedometer
9. Hand brake lever
10. Brake pedal
11. Acceleration pedal
12. Right-hand side rear-view mirror
13. Brake oil basin
14. Windshield cleaning liquid basin
15. Back seat compartment
16. Left rear view mirror
17. Front bonnet compartment lock
18. Recharge feeder/stocker display
19. Rear lock compartment
20. Recharge feeder outlet
Use and maintenance manual 03.01 – 22/06/201614
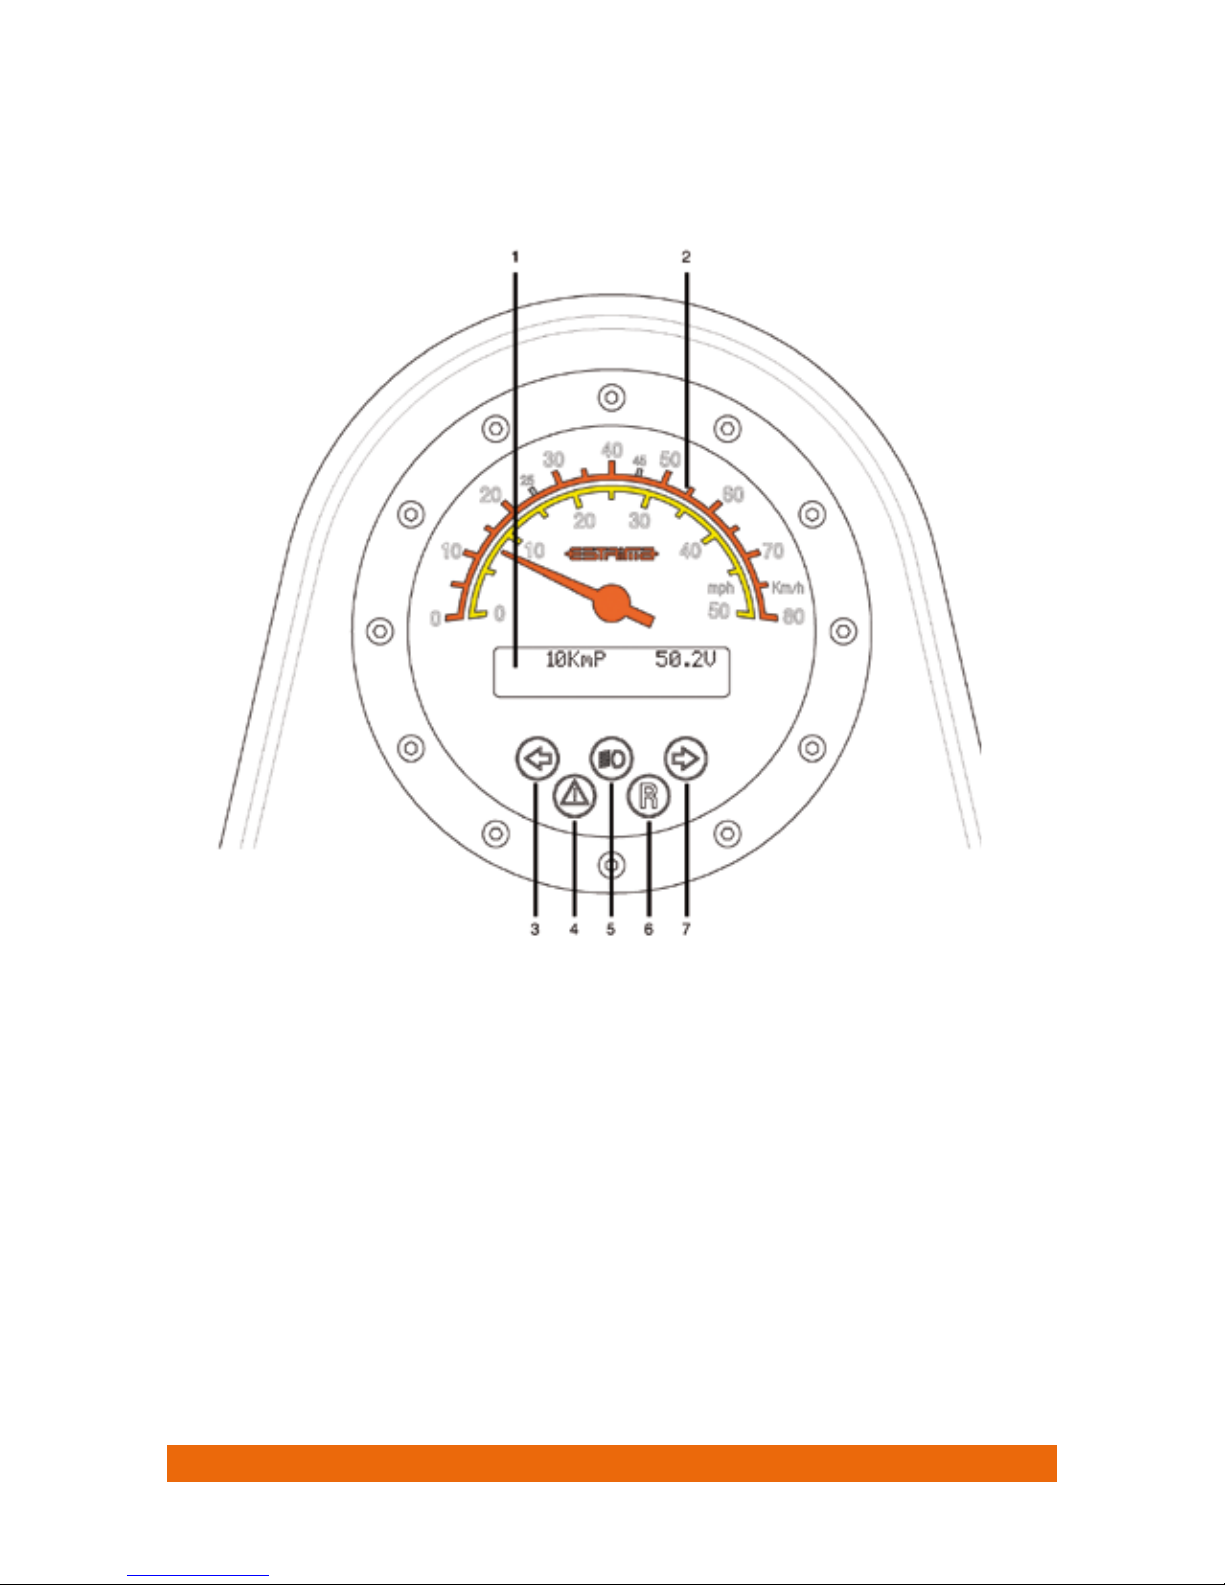
INSTRUMENTATION PANEL
1. Onboard computer
2. Speed indicator (km or miles per hour)
3. Left direction indication lights pilot light
4. Electronic anomaly signalling pilot light
If the anomaly persists, get in touch with the servicing staff.
5. Turned-on low-beam indication pilot light
6. Inserted reverse drive indication pilot light (it turns on/is activated
at the same time with the warning horn)
7. Right-hand side bound drive indication pilot light

Use and maintenance manual 03.01 – 22/06/2016 15
ONBOARD COMPUTER
The display is enabled automatically.
A click on the MODE button enables selection of the display modes.
First visualisation
Second visualisation
Active windscreen defrost grid message
Charging vehicle batteries message
Key:
T= temperature inside battery
I= instant current consumption
SOC = residual battery charge in percentage
kWh = energy consumption
KmT = general kilometre totalizer
KmP = Partial kilometre totalizer (to reset the totalizer hold the MODE
button down until the message “Release MODE To Reset KmP” appe-
ars on the display, after which the button may be released)
V= main battery voltage

Use and maintenance manual 03.01 – 22/06/201616
LIGHTING AND SIGNALLING DEVICES
Turning on parking / side-lights
Turn the end of the lever until the reference mark is placed at the
symbol of the position lights, as shown in the picture.
Turning on low-beam lights
Turn the end of the lever until the reference mark is placed at the
symbol of the low-beam lights, as shown in the picture.

Use and maintenance manual 03.01 – 22/06/2016 17
Turning off the lights
Rotate the extremity of the little lever into the initial position.
Luminous signalling
Turn the lever in the direction of the steering wheel rotation.
After steering, the lever must be brought back to its initial position by
moving it to the opposite direction.

Use and maintenance manual 03.01 – 22/06/201618
WINDSHIELD WIPER / CLEANER
To start the windscreen wiper, pull
the lever in. Pull the lever further
in to start the windscreen cleaner.
Push it out to the opposite direction
to disable the windscreen wiper.
! WARNING In case of freezing temperatures, check and see if the bru-
shes have not be immobilised by ice. There is the risk the little motor
overheats.
To start the windshield defrost grid
function, press the button and
move it to position 1. A message
appears on the screen to warn that
the windshield defrost grid is active.
The system gets automatically
disabled after a few minutes.
Press the button bearing the symbol of the trumpet
to start the horn.
DEFROST GRID WINDSCREEN
ACOUSTIC SIGNAL

Use and maintenance manual 03.01 – 22/06/2016 19
REAR VIEW MIRRORS
The rear view mirrors, placed outside the passenger compartment of
the vehicle, can be orientated into various angulations to reach optimal
vision.
12V FEEDING OUTLET OR USB OUTLET
(depending on the model of Birò)
The outlet can be used to feed
some external devices (e.g.,
the GPS/navigation system, the
mp3 reader, etc. etc.).
! WARNING Maximum applicable load is 40 Watt.
Exceeding such load may damage the electric system/plant of the
vehicle.

Use and maintenance manual 03.01 – 22/06/201620
OBJECT CARRIER COMPARTMENTS
Birò is tted with countless object carrier compartments in several places
of the dashboard and behind the seats.
Besides these more visible ones, there are other ones equipped with a
closure system.
Object carrier compartment in the bonnet
To access it, proceed as follows, to remove the bonnet:
1. Release the lock
2. Lift the front part by levering on the back part.
3. Pull the bonnet towards yourself while paying attention to clear
away the arm of the windshield wiper.
To put it back, proceed inversely.
! WARNING The bonnet must be put back and closed correctly since,
otherwise, it may come away while you are driving.
! WARNING The maximum load in the object carrier compartment of
the bonnet is 2 kg. Exceeding said limit may damage the vehicle.
Table of contents
Popular Electric Vehicle manuals by other brands

Textron Off Road
Textron Off Road PROWLER EV Service & parts manual

Kia
Kia Niro Hybrid owner's manual

ClipperCreek
ClipperCreek ECS user manual

Jiajia Ride-On Co.
Jiajia Ride-On Co. BMW i8 Concept RIDE-ON Owner's manual with assembly instructions

Ezgo
Ezgo RXV Electric 611105 Service & parts manual

Star EV
Star EV Stalker 4x4 Owner's manual, safety guide, and warranty information

