ETNA EPH BM-CM Series Guide

EPH BM-CM, KO, KO-ST, KI, EVS Series
Installation, Operation, Service, Maintenance and
Spare Parts User Manual

2
Dear Customer,
Thank you for choosing our product, to use this booster set in the proper way be sure to read this manual
completely before start-up and keep this manual with the certificate of warranty in a safe place.
INDEX Page
1. Introduction 3
2. Use of a Booster Set 3
3. Schematic Booster Set Connection Method 3
4. Handling 3
5. Applications 3
6. Installations 3
7. Suction and Discharge Pipes 3
8. Start-up 4
9. Pre-Operation Test 4
10. Liquid Level Higher Than the Booster Set or At the Same Level 5
11. Liquid Level Lower Than the Pump (Negative Suction) 5
12. Checking the Rotation Three Phase Motors 5
13. Operation 5
14. Operation Descriptions 5
15. Fire Fighting Booster Sets 5
16. Jockey Pump in a Booster Set 6
17. Maintenance 6
18. Troubleshooting 7
19. Main Components of a Booster Set 8
20. Float Switch Adjustments 9
21. Power Supply Cable Sizes for the Booster Sets 10
22. Electric Panels for Single and Double Pump 11
23. Spare Parts 12

3www.etna.com.tr
01. Introduction
Read this manual carefully before installing and using
the product. Improper use of the product can cause
personal injury and damage to property and may void
the warranty. When ordering spare parts use page 15.
02. Use of Booster Set
Water is usually delivered by public supply systems
and the pressure is generally sufficient for the proper
operation of the user's water and sanitary equipment.
When this pressure is not sufficient, booster sets are
installed to increase water pressure and ensure an
acceptable minimum value at the furthest points.
Therefore, the water supply to a building, group of
buildings or to a system, in general, can be considered
satisfactory when all the user points can deliver the
required quantity of water.
03. Schematic Booster Set Connection
Method
Water is supplied by installing a water storage tank
between the users off take and booster set. (Fig.1)
04. Handling
When the booster unit is delivered, check that it has not
been damaged during shipping. Promptly inform our
nearest dealer, if necessary. Do not use the eyebolts,
expansion tanks, inlet and discharge manifolds etc., as
they are not designed to bear the weight of the booster
set. The product must be handled with care using
suitable hoisting equipment; accidents can damage
the product without being necessarily visible on the
outside; hoisting non-packed products by securely
putting them into a sling from the main chassis. Please,
put the unit on to the floor, gently.
05. Applications
The booster sets are suitable for water handling
systems in the civil, industrial and agricultural sectors,
for pressure boosting water supply for small houses,
buildings, factories, industrial plants, holiday villages
and water treatment plants.
They are not suitable for;
• Liquids containing abrasives
• Liquid with solidand fibrous substances - Flammable
and explosive liquids
06. Installation
For booster unit lifting and moving sling it safely. The
unit should not be exposed to the weather or freezing
temperatures. Make sure that there are no obstacles,
preventing normal flow of the cooling air moved by
the motor fan. The booster set must be put on to a
horizontal concrete base or equivalent structure by the
4 pieces of rubber supports, which are provided with
the unit. The bigger industrial models must be firmly
secured by means of appropriate bolts to a concrete
base.
07. Suction and Discharge Pipes
Use pipes suitable for the maximum booster set
working pressure. The suction pipe must be perfectly
sealed and of suitable size for the suction conditions
(suction pipe Ø ≥min. inlet manifold Ø of the booster
set or pump). When the liquid level is lower than the
booster set, a foot valve must be fitted at the end of the
suction pipe (see Fig.2) (Fig.3)
Mains Water Tank
p min ≥ 1.5 bar
p max ≤ 5 bar
Drainage
Consumption Points
Booster Set
Figure 1

4
08. Start-Up
Expansion vessels are delivered at 4 bars, with pre-
charged factory settings. The pre-charged pressure in
the tank must be adjusted before start-up so that it will
be slightly below the cut-in ( starting ) pressure of the
pump(s). Practical recommended pressure level can
be determined as %10 lower than the cut-in ( starting
) pressure of tank.
08.1 Electrical Connection
The booster sets use single or three-phase motors
sized and powered according to European standards.
The booster set must be connected by a qualified
electrician in compliance with current local electrical
regulations. Ensure that the mains voltage corresponds
to the voltage specified on the booster set rating plate
Before start-up, the grounding of the booster shall be
maintained. The current leakage relay (30 mA) shall
be installed in the pump controller before the energy
supply.
a) Single pump booster sets are supplied as standard
with a thermal magnetic protection switch and float
switch for protection against dry running.
b) Multi-pump booster sets are supplied with control
panels with, main on-off switch, fuse carrier and fuses,
power contactors, overload relays, phase protection
relays over 7,5 KW, electronic change over control
board, float switch for protection against dry running,
automatic-manual switch for each pump power on,
running, reset and no water indicating (warning) lights.
09. Pre-Operation Test
Fill the suction pipe and the pumps with water to test
before the actual operation. Assemble the pipes as
shown in figures 4 and 5 and connect the float switch.
Correct Connection
A - Eccentric reductions
B - Positive gradient
C - Good immersion
D - Large bends
E - Suction pipe diameter ≥ Pump port diameter
F - Difference in lift level referred to pump and
installation. In optimum conditions the
difference in level should not exceed 5-6 m.
G - The pipe should not weigh on the pump
but on independent supports.
A
3
1
4
2
D
G
F
CE
B
Installation
Incorrect Connection
1 - Sharp bend = High head loss
2 - Insufficient immersion = Air
3 - Negative gradient = Air pockets
4 - Pipe diameter < Pump port
Installation
Perpendicular flap or check valve
1 - Valve
2- Check valve
3- Float valve
4- Float switch
5- Service tap
6- Upright valve
7- Strainer
8- Water Tank
1 12
2
5
3
4
* The suction pipe should be at least 15 cm above the tank bottom.
*
To the building
Mains
Operating level
Stoppage
Level
Starting-Stop
Level Setting
7
8
Important:
Check valve should not be installed on
the delivery line of the booster sets
with negative suction level. The upright
valve installed on suction also acts like
a check valve.
# A check valve should not be installed on
the delivery line of the plumbing either.
To the building
1 12
Mains
6
1
3
4
7
Figure 2
Figure 3
Figure 4

5www.etna.com.tr
10. Liquid Level Higher Than the Booster or
At The Same Level
Close the discharge valve, remove the fill/bleed plug and
open the suction valve until the water flows out of the fill/
bleed plug. Then close the plug.
11. Liquid Level Lower Than the Pump
(Negative Suction)
Close the discharge valve, remove the fill/bleed plug
and by means of a funnel fill the water, close the plug.
Note : Adjust the float switch according to the size of
the tank. (Page 9)
12. Checking the Rotation Three-Phase
Motors
After connecting and filling, start the pump with the
discharge valve closed and check that the rotation
direction is correct (shown on the coupling and the
motor) through the coupling protection or fan cover. If
the direction of rotation is not correct, stop the motor,
disconnect from the mains and invert two wires on the
terminal board. B
13. Operation
Start up the booster set with the discharge (delivery) gate
valve closed and fallow pump or pumps reaching to the
switched-off pressure of the unit from the manometer.
Then open the service tap and check the system pressure
is dropping and the pump or the pumps running at
the starting pressure. If everything is okay, open all the
gate valves in the delivery line and let the system under
booster-set pressure.
14. Operations Description
14.1 Example for two-pump sets
The starting and stopping of the pumps are determined
by the pressure values set on the pressure switches.
Each pressure switch is connected to a single pump
with a cyclic pump change over. The differential
pressure is the pressure difference between starting
pressure and switch-off pressure. It is set at the same
value for both pumps.Figure 6 shows the operating
mode with the pumps curves
On demand, water is drawn from the tank
• When the pressure drops to the P1 value the first
pump starts.
• If the water consumption increases and the
pressure drops to the P2 value, the second pump
starts.
• When consumption reduces and the pressure
increases until it reaches the P2s value, one of the
pumps is switched off.
• If consumption keeps reducing, the pump charges
the tank and stops at the P1s value.
3 and 4 pumps booster sets have the same operation
sequence
15. Fire Fighting Booster Sets
15.1 Usage
Fire fighting boosters should not be used for anything
other than fire-fighting. They should not be used for
garden irrigation, building installation, vehicle washing
etc.
1 - Valve
2- Check valve
3- Float valve
4- Float switch
5- Service tap
6- Upright valve
7- Strainer
8- Water Tank
1 12
2
5
3
4
* The suction pipe should be at least 15 cm above the tank bottom.
*
To the building
Mains
Operating level
Stoppage
Level
Starting-Stop
Level Setting
7
8
Important:
Check valve should not be installed on
the delivery line of the booster sets
with negative suction level. The upright
valve installed on suction also acts like
a check valve.
# A check valve should not be installed on
the delivery line of the plumbing either.
To the building
1 12
Mains
6
1
3
4
7
P1s
H
P2s
P1
P2
Figure 5
Figure 6

6
The control panel of a fire fighting booster is different
than the panel of a regular booster. Fire fighting
boosters are designed to work continuously during
a fire. Due to the law, these boosters do not include
thermal protection protecting the electrical engine
against fire.
Fire fighting boosters run only during fire. Thus,
there is a weekly test program aiming to minimize
the possible failures arising from long-term stand-by
and to detect and intervene to any available failure.
Fire fighting fighting booster works for a set period
of time automatically on a set date and time, and
stop. By ensuring the pumps operate one at a time
during the time set on the weekly test program, all
the pumps are operated in order.
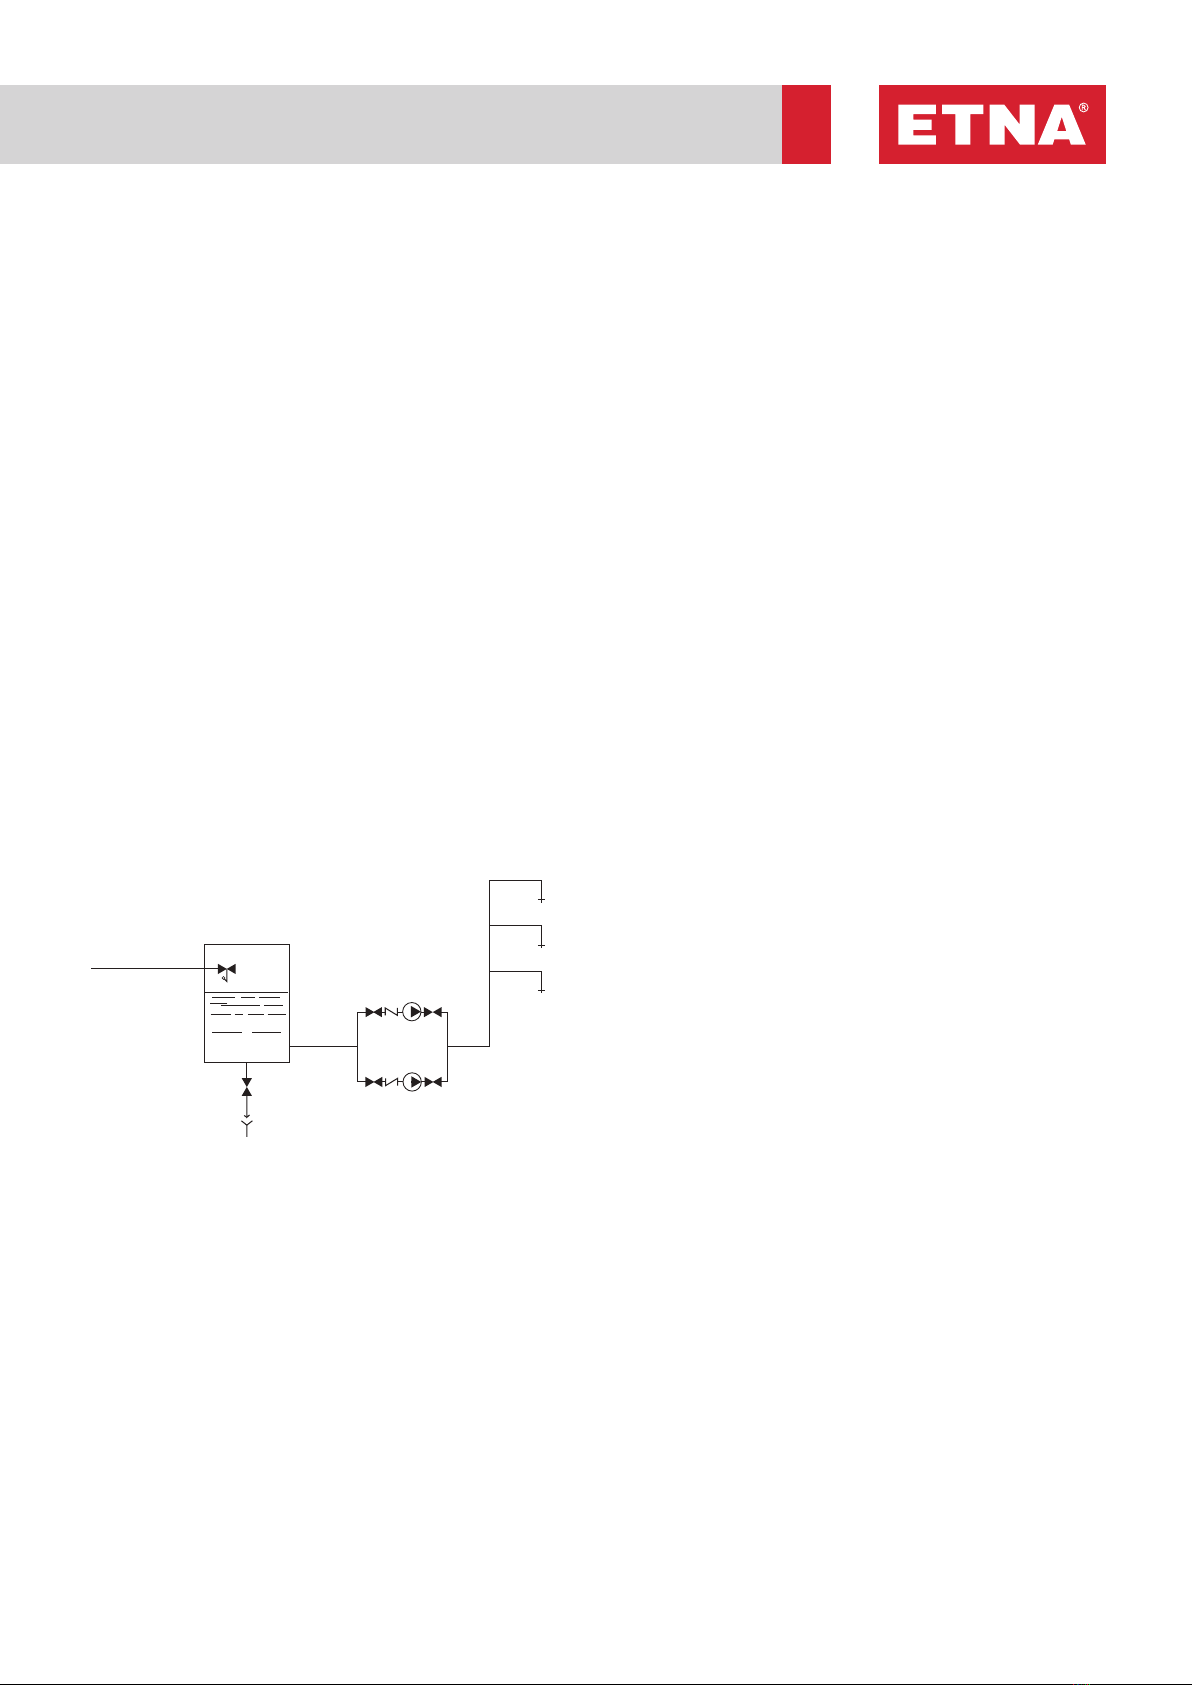
If the water level falls below the minimum level in the
water tank, the device will not be able to supply the
required pressure and falls down to the calibration
set pressure (a value just below the operating
pressure). At this point, an audio and visual alarm
is activated. Thanks to the electronic circuit. If the
system demands water from the system during the
weekly test program, the test ends and the booster
starts working regularly.
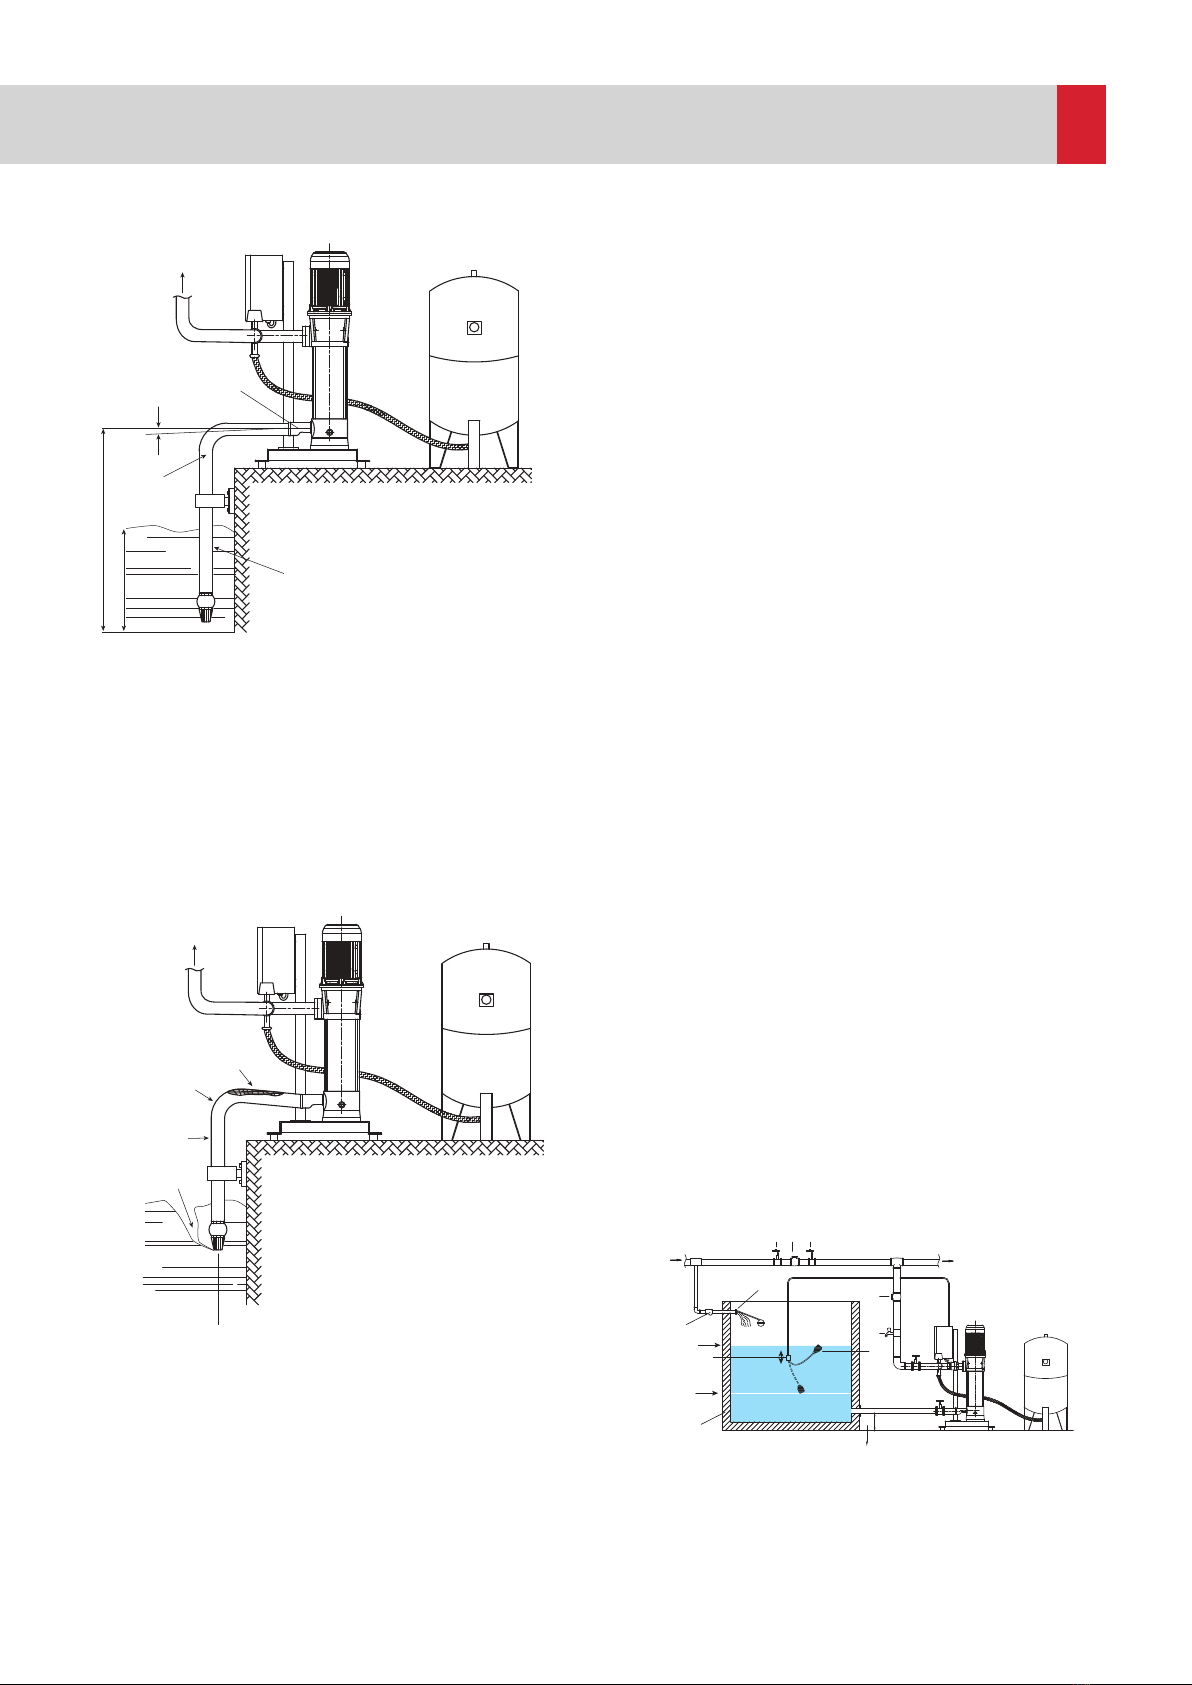
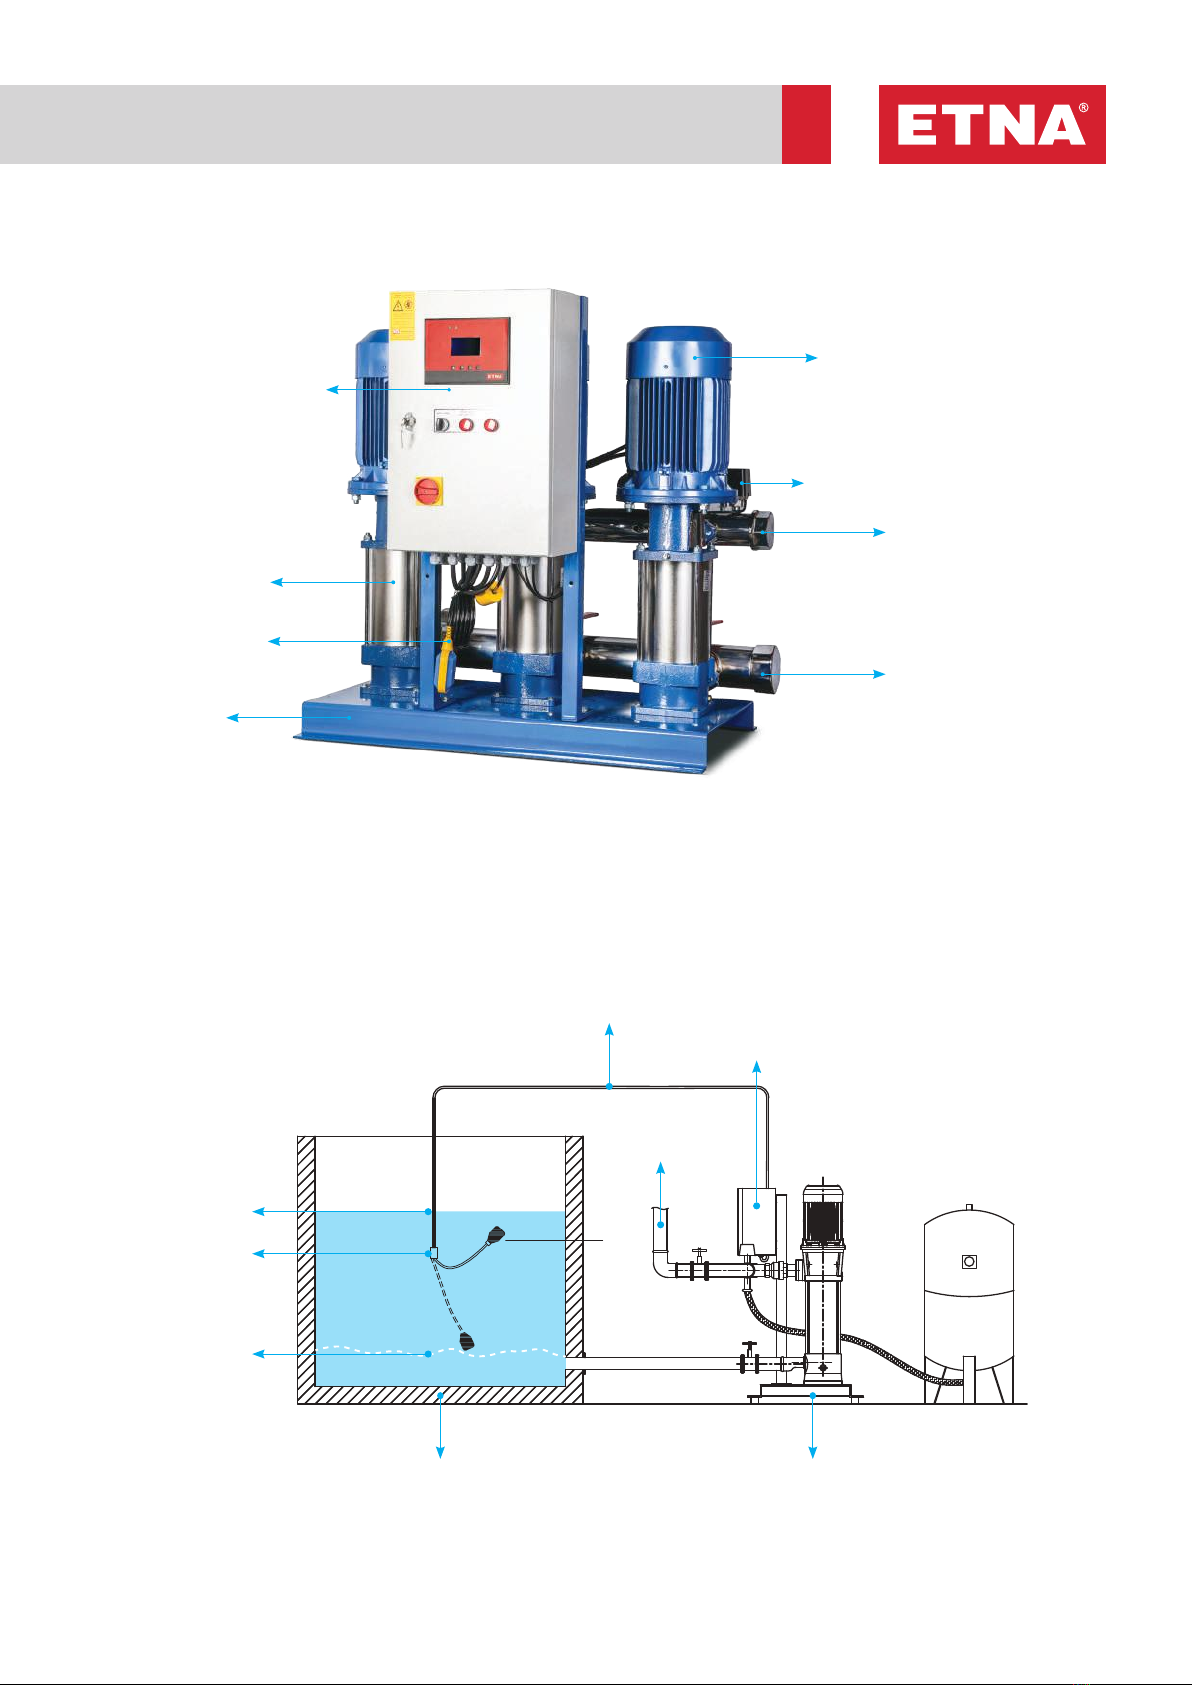
15.2 Installation
• Install the fire fighting pump in a humid-free
environment without the risk of frost and
explosion, and good ventilation.
• To keep the temperature constantly above +4 °C
in the booster room or the booster station, the
appropriate environment and the tools should
be provided.
• The rooms should be large enough to allow
comfortable entry and exit.
• If the chamber is below the surface level, stairs
allowing easy entry and exit should be built.
(Because it is very important to intervene to the
failures in cases of emergency.)
• The room should be well illuminated and the
room should have a sufficient number of plugs.
• The fire fighting booster should be placed near
the water tank or cistern as close as possible. It
is required for the suction pipe to be short and
its diameter to be equal to or larger than the
diameter of the suction pump, and space should
ensure that the assembly will be made using a
minimum amount of curves or brackets.
• Pipe connections (collectors,suction line, delivery
line) should be arranged in a way that their inlets
and outlets do not prevent accessing the parts
required to be accessed during emergencies
and the control panels.,
• While placing the fire fighting boosters, it should
be considered that the engine and/or the pump
group may be required to be disassembled
and taken out of the room. (Pipe and collector
connections should not prevent dismounting
and removing the pump and/or engine that are
the other boiler room equipments.)
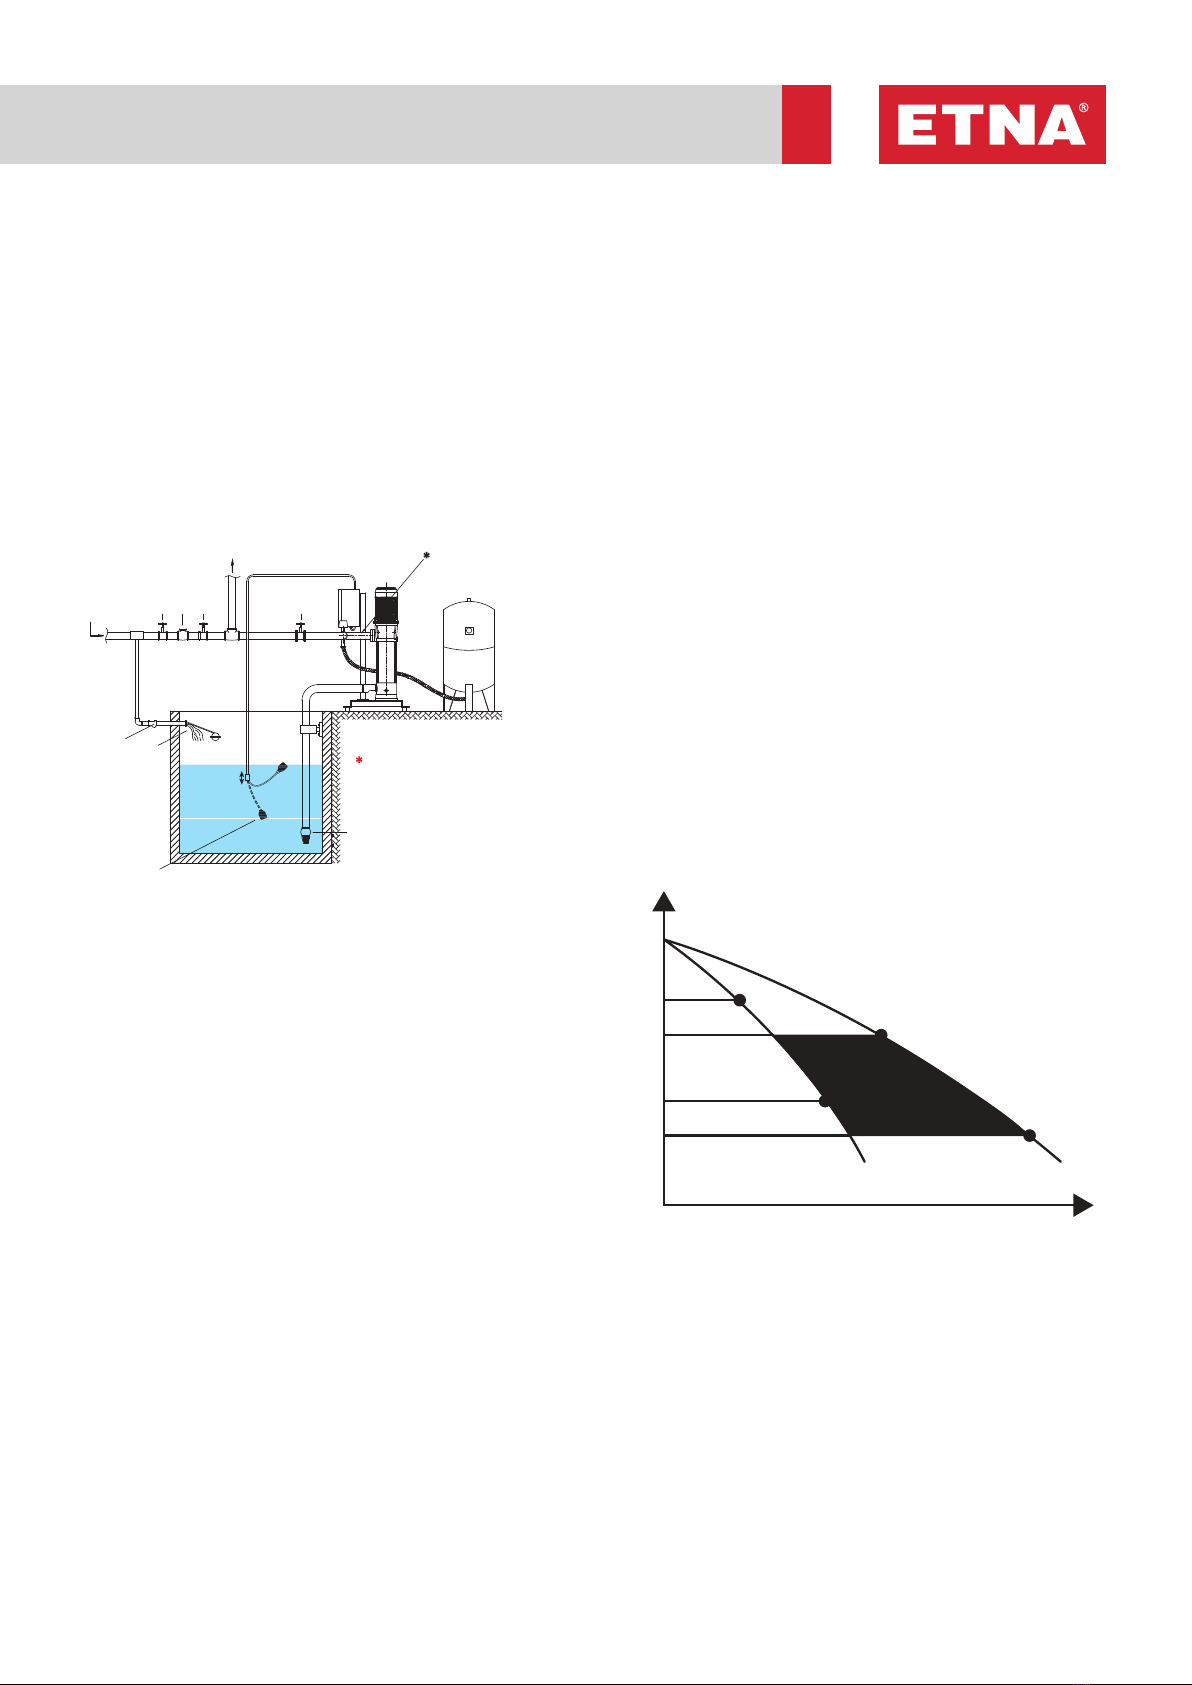
• The floor should be inclined enough to allow
water drainage. If the group chamber is below
the surface level, the accumulated water should
be discharged using submerged pump and the
submerged pump should be backed up.
• If there is a risk of flood in the chamber, electrical
control panels should be mounted as high as
possible. If required, it should be carried to a
section where there is no such risk.
• If the controlpanels are onthechassis of thepump
group, it should be ensured during assembly that
the control panel is easily accessible and its cover
is easily openable (for repair and maintenance).
• If the control panels are separate from the pump
group, it should be ensured during assembly
that the control panel is easily accessible and the
front panel is directly seen when entered into the
room.
• Control panels should be grounded.
16. Jockey Pump in a Booster Unit
The jockey pump in a booster set generally to
maintain the small amount of water demands in
death hours of a day instead of running the main
pump in a huge plant.
17. Maintenance
The booster sets do not require specific inspections
at regular intervals. As a precaution, however, we
recommend that you carry out some or all of the
following checks at varying intervals depending on
the operating conditions;
• Leaks
• Thermal protector activation
• No. of starts per hour
• Noisy operation
If any malfunctions are found, refer to the next
section for possible causes and remedies, Check
membrane tank air pressure regularly every 6
months (page 7). The pump does not require any
scheduled routine maintenance. It may require
extraordinary maintenance which is generally
cleaning the liquid end or replacing the mechanical
seal or other worn parts. In this case, please refer to
the pages 12 - 25.

7www.etna.com.tr
18. Troubleshooting
Making sure the booster set is disconnected from the mains before performing any maintenance operations.
FAILURE REASON SOLUTION
1) The booster set does not start A. No mains voltage
B. Blown fuses because the mo-
tor or the power supply cable are
short-circuited
C. Overload protection previously
activated
A. Supply electric power
B. Repair the motor or replace the
cable
C. Reset the protector (If it repeats
again, see problem 4)
2) The booster set does not deliver
a reduced or irregular flow
A. Piping obstructed or valve
jammed
B. Pump not primed because it has
not been filled, or because of faulty
seal on suction piping or foot valve
(contains the mechanical seal may
have been seriously damaged)
C. Difference in level and/or exces-
sive suction flow resistance
D. Incorrect rotation direction
(3-phase motors only)
E. Air in suction pipe or pump
A. Dismantle and clear or replace.
B. Fill the pump with liquid after
checking the seal on the suction
pipe and foot valve, and the integ-
rity of the mechanical seal.
C. Reduce the difference in level.
Use a large diameter pipe. Clear
the foot valve. Replace the foot
valve with a larger capacity valve.
D. Invert power supply wires on the
terminal board
E. Bleed the air
3) The pumps vibrate and noisy. A. The pump is cavitating
B. Worn motor or support
bearings.
C. Foreign bodies between fixed
and rotating parts of pump
A. Check the flow-see probable
cause 2C
B. Replace the bearings
C. Clean or replace the parts.
4) The overload protector steps in
a. Accidently
b. Systematically
A. See 3C
B. Temporary lack of a phase
C. See 3B
D. To many numbers of start-stops
D. The membrane is blown or les
air in the membrane tank replace
the membrane or charge the air
into the tank %10 less of the start-
ing pressure value when the system
is not under pressure
5) The pump rotates in reverse
when it is stopped
A. Leek in the suction pipe
B. Faulty foot valve or check valve
C. Air in suction pipe
A. Repair or replace
B. Replace faulty foot valve
C. Discharge the air
6)The pumps do not make change
over
A. Wrong pressure switch setting.
B. Damaged electronic card
A. Adjust the pressure switches
B. Replace the electronic card

8
19. Main Components of a Booster Set
Discharge Manifold
Suction Manifold
Base
Pump Body
Valve
Electric Motor
Frequency Inverter
Network Connection Terminal
Pressure Transmitter
Manometer
Discharge Manifold
Suction Manifold
Base
Pump Body
Valve
Electric Control Panel
Electric Motor
Float Switch
Pressure SwitchManometer

9www.etna.com.tr
20. Float Switch Adjustments
Pump Control
Panel
Operating level
setting
Operating Level
Stop Level
Installation
Float switch
Water tank Booster Set
Electric Control Panel
Pump Body
Float Switch
Base
Suction Manifold
Discharge Manifold
Pressure Switch
Electric Motor

10
21. Power Supply Cable Sizes for the Booster Sets
PUMP CONTROL PANEL POWER SUPPLY-CABLE SELECTION TABLE
Power
Voltage
CABLE SECTION 3 x ... mm2
HP KW 1,5 2,5 4 6 10 16
MAXIMUM LENGTH (METER)
0,5 0,37
220 V
80 130
0,75 0,55 55 90 140
0,1 0,75 40 80 105 160
1,5 1,10 30 50 75 115 190
2 1,50 20 35 60 90 145 235
3 2,20 30 50 70 120 185
* The above table can be used for cable selection between pump control panel and motor of the pump.
Power
Voltage
CABLE SECTION 3 x ... mm2
HP KW 2,5 4 6 10 16 25 35 50 70 95 120 150
MAXIMUM LENGTH (METER)
3 2,2
380 V
190 300 460
4 3 150 240 360
5,5 4 110 170 260 450
7,5 5,5 80 130 190 340 540
10 7,5 60 100 150 250 410
12,5 9,2 50 80 120 205 330 510
15 11 60 100 170 280 440
17,5 13 90 150 245 385
20 15 80 130 210 330 460 660
25 18,5 100 170 260 370 530
30 22 90 140 220 310 440
35 26 120 190 270 380 540
40 30 100 170 230 330 460
50 37 130 190 270 380 520
60 45 110 160 230 320 440 550
70 52 140 200 280 385 480
75 55 120 170 240 330 410 530
80 59 115 160 230 310 390 500
90 66 110 150 220 290 370 470
100 75 96 140 190 270 330 425
110 81 125 175 245 300 380
125 92 110 160 220 275 340
150 110 130 180 220 290
180 132 150 190 240
200 150 130 170 220
225 165 125 150 190
250 185 170
275 200 160
* The above table can be used for control panel power supply from network.
* The maximum cable lengths specified in the tables are calculated due to voltage drop of 3% and a ambient temperature of 25 °C.

11 www.etna.com.tr
22. Electric Panels for Single and Double Pump

12
23. Spare Parts
EPH BM-CM SERIES EXPLODED PICTURE
1
2 3 4 5 6
8
9
10
11
11
11
11
11
11
11
12
12
12
12
12
12
13
14
15
16
16
18 19 20
21
22
23
2 3 4
17
7
NO PART NAME EXPLANATION
1 Motor -
2 Upper Head Flange bolt 8,8
3 Upper Head Flange GG22-25
4Upper Head Flange
conta RUBBER SHORE 60A
5 Upper Head GG22-25
6 Nut BRASS
7 O-Ring NBR
8 Mechanical Seal CARBON SERAMIC
9 Washer AISI304
10 Upper Diffuser NORYL
11 Fan NORYL
12 Intermediate Diffuser NORYL
13 Washer AISI304
14 Spring washer AISI304
15 Nuts with nylon inserts AISI304
16 O-Ring NBR
17 Jacket AISI 304
18 Lower Head GG22-25
19 O-ring NBR
20 Plug BRASS
21 Dowel Pin washer 8,8
22 Spring nut 8
23 Dowel Pin ST-37

13 www.etna.com.tr
EPH B-M46 SERIES SPARE PART
NO. CODE
PART NAME
1 011 0046 001 Engine
2 011 0046 002 Bolt
3 011 0046 003 Output flange
4 011 0046 004 Output flange gasket
5 011 0046 005 Pump outlet
6 011 0046 006 Nut
7 011 0046 007 O-ring
8 011 0046 008 Mechanical seal
9 011 0046 009 Fan nut
10 011 0046 010 Top diffuser
11 011 0046 011 Impeller (fan)
12 011 0046 012 Intermediate diffuser
13 011 0046 013 Nut
14 011 0046 014 Spring nut
15 011 0046 015 Self-locking bolt
16 011 0046 016 O-ring
17 011 0046 017 Pump case
18 011 0046 018 Pump input (lower head)
19 011 0046 019 Drainage gasket
20 011 0046 020 Discharge plug
21 011 0046 021 Pivot washer
22 011 0046 022 Spring nut
23 011 0046 023 Dowel
EPH C-M66 SERIES SPARE PART
NO. KOD
PART NAME
1 011 0066 001 Engine
2 011 0066 002 Bolt
3 011 0066 003 Output flange
4 011 0066 004 Output flange gasket
5 011 0066 005 Pump outlet casing (upper head)
6 011 0066 006 Nut
7 011 0066 007 O-ring
8 011 0066 008 Mechanical seal
9 011 0066 009 Fan nut
10 011 0066 010 Top diffuser
11 011 0066 011 Impeller (fan)
12 011 0066 012 Intermediate diffuser
13 011 0066 013 Nut
14 011 0066 014 Spring nut
15 011 0066 015 Self-locking bolt
16 011 0066 016 O-ring
17 011 0066 017 Pump case
18 011 0066 018 Pump input (lower head)
19 011 0066 019 Drainage gasket
20 011 0066 020 Discharge plug
21 011 0066 021 Pivot washer
22 011 0066 022 Spring nut
23 011 0066 023 Dowel
EPH C-M68 SERIES SPARE PART
NO. CODE
PART NAME
1 011 0068 001 Engine
2 011 0068 002 Bolt
3 011 0068 003 Output Flange
4 011 0068 004 4 Output Flange Gasket
5 011 0068 005 Pump Outlet Casing (upper head)
6 011 0068 006 Nut
7 011 0068 007 O-ring
8 011 0068 008 Mechanical seal
9 011 0068 009 Fan nut
10 011 0068 010 Top diffuser
11 011 0068 011 Impeller (fan)
12 011 0068 012 Intermediate diffuser
13 011 0068 013 Nut
14 011 0068 014 Spring nut
15 011 0068 015 Self-locking bolt
16 011 0068 016 O-ring
17 011 0068 017 Pump case
18 011 0068 018 Pump input (lower head)
19 011 0068 019 Drainage gasket
20 011 0068 020 Discharge plug
21 011 0068 021 Pivot washer
22 011 0068 022 Spring nut
23 011 0068 023 Dowel
24 011 0068 024 Shaft
25 011 0068 025 Engine cooling fan cover

14
KO 4-7 SERIES EXPLODED PICTURE
M8x15 cap head
Bolts
M4 Stay Bolt
M5x25 Hexagon Socket
M8 Teflon Nut
M4x10
Hexagon Socket
M8 Washer
M8x25 cap head
Bolts
17-17a
M8x25 cap head
Bolt
Pim
M8 Washer
21
5
19f-19h
19a-19b-19c
19d-19e
19a-19b-19c
19d-19e
19g-19i
32
8
411
13
15
9
14
10
16
8
20
7
6
18
1a-1b
NO PART NAME EXPLANATION
1a Upper Head GG22- GG25
1b Upper Head GG22- GG25
2 Coupling Case Plate AISI304
3Pump Discharge
Casing AISI304
4 Mechanical Seal M106K / CE / EPDM /
SUS304
5 Coupling Zamak
6Retaining Ring Shaft
Spring AISI304
7 SHAFT AISI420
8 O'RING Nbr
9 Jacket AISI304
10 Retaining Ring Shaft AISI304
11 Diffuser Noryl
13 Fan Noryl
14 DOWEL PIN AISI304
15 DISK Noryl
16 Intermediate Bush
Bearing Sinter
17 Lower Head GG22- GG25
18 Plug Brass
19a Pump Flange O-Ring Nbr
19d Pump Flange Pressure Chromium Plated ST37
19e Pump Flange Suction Chromium Plated ST37

15 www.etna.com.tr
N. CODE PART NAME
1a 025 0700 002 Upper Head KO 4-7 Tons 80
1b 025 0700 003 Upper Head KO 4-7 Tons 90
2025 0700 008 Coupling Case Plate KO 4-7 80
025 0700 009 Coupling Case Plate KO 4-7 90
3 019 0000 008 Pump Discharge Casing
4 019 0000 001 Mechanical Seal Q 12 K.
5025 0700 005 Coupling KO Ø19/80 G 0.7-1.1 KW
025 0700 006 Coupling KO Ø24/90G 1.5-2.2 KW
6019 0000 010 Retaining Ring Shaft Spring Q11
019 0000 012 EPB/C Locking Shaft
7
025 0404 001 SHAFT KO 4/4 - 7/4 L=207
025 0406 001 SHAFT KO 4/6 - 7/6 L=255
025 0407 001 SHAFT KO 4/7 - 7/7 L= 279
025 0408 001 SHAFT KO 4/8 - 7/8 L= 303
025 0409 001 SHAFT KO 4/9 - 7/9 L=327
025 0710 001 SHAFT KO 7/10 L=323
8 025 0400 012 113.98x2.62 NBR70 O'RING KO4-7
9
025 0404 002 Jacket KO 4/4 - 7/4 L=118
025 0406 002 Jacket KO 4/6 - 7/6 L=166
025 0407 002 Jacket KO 4/7 - 7/7 L=190
025 0408 002 Jacket 4/8 - 7/8 L=214
025 0409 002 Jacket 4/9 L=238
10 019 0000 009 EPH-KO 4/7 Retaining Ring Shaft
11 025 0400 011 Diffuser KO 4
025 0700 011 Diffuser KO 7
13 025 0400 008 Fan KO 4
025 0400 010 Fan KO 7
14
025 0404 003 DOWEL PIN KO 4/4 7/4 L=167
025 0406 003 DOWEL PIN KO 4/6 - 7/6 L=215
025 0407 003 DOWEL PIN KO 4/7 - 7/7 L=239
025 0408 003 DOWEL PIN KO 4/8 7/8 L=263
025 0409 003 DOWEL PIN KO 4/9 7/9 L=287
026 0710 003 DOWEL PIN KO 7/10 L=311
15
025 0400 904 DISK KO 4
025 0700 910 DISK KO 7
16 001 2000 019 Intermediate Bush Bearing B-C SB-012
17 025 0700 001 Lower Head KO 4-7
18 019 1000 004 Funnel Plug (1/4 Yellow Blind Plug)
001 5950 002 Funnel Plug 3/8 (Blind Plug)
19a 001 5950 001 EPC Pump Flange 1" and O-Ring
001 5950 002 KO 90 Pump Flange 1 1/4" and O-Ring
19d
001 5951 004 Pump Nipple 1 1/4"
19e
001 5951 002 Pump Nipple 1"
KO 4-7 SERIES SPARE PART

16
KO 10-15-25 SERIES EXPLODED PICTURE
M4 Stay Bolt
M5x25 Hexagon Socket
M8 Teflon Nut
M4x10
Hexagon
Socket
M8x15 cap head
Bolts
M8 Pul
M8x25 cap head
Bolts
17-17a
M8x25 cap head
Bolts
Pim
M8 Pul
21
5
19f-19h
19a-19b-19c
19d-19e
19a-19b-19c
19d-19e
19g-19i
32
8
411
13
12
15
9
14
10
16
8
20
7
6
18
1a-1b
NO PART NAME EXPLANATION
1a Upper Head GG22- GG25
1b Upper Head GG22- GG25
2 Coupling Case AISI304
3 Pump Discharge Casing AISI304
4 Mechanical Seal M106K / CE / EPDM / SUS304
5 Coupling Zamak
6 Locking Shaft AISI304
7 Shaft AISI420
8 Pump O-Ring NBR
9 Jacket AISI304
10 Retaining Ring Shaft AISI304
11 Diffuser Noryl
12 Sleeve Noryl
13 Fan Noryl
14 Dowel Pin AISI304
15 Disk Noryl
16 Intermediate Bush
Bearing Sinter
17 Lower Head GG22- GG25
17a Lower Head GG22- GG25
18 Plug Brass
19a Pump Flange and O-Ring NBR
19b Pump Flange and
O-Ring NBR
19c Pump Flange and O-Ring NBR
19d Pump Flange Pressure Chromium Plated ST37
19e Pump Flange Suction Chromium Plated ST37
20 Retaining Wire AISI304

17 www.etna.com.tr
N. CODE PART NAME
1a 025 1005 001 Upper Head KO 10-15 Tons 90
1b 025 1007 001 Upper Head KO 25 Tons 100
2 022 0000 017
Coupling Case Plate KO
3 019 0000 008
Pump Discharge Casing (Air Relief Cock)
4 022 0000 003
Mechanical Seal Q 16 K.
5
025 1005 002
Coupling KO Q22/90 G 2,2-3KW
022 2503 005
Coupling KO Q28/100G 4-5,5-7,5 KW
022 2506 005
Coupling KO Q38/11 KW
6 022 2500 010
Locking Shaft K 10-15-25
7
025 1005 004
Shaft KO 10-15/5 L=309
025 1007 003
Shaft KO 10/7 L=385
025 1009 002
Shaft KO 10-15/9 L= 462
025 1012 002
Shaftl KO 10-15/12 L= 576
025 1015 002
Shaft KO 10/15 L=690
025 1504 002
Shaft KO 15/4 L=271
025 1506 002
Shaft KO 15/6 L=347
025 1508 002
Shaft KO 15/8 L=423
025 2503 002
Shaft KO 25/3 L=233
025 2504 002
Shaft KO 25/4 L=271
025 2506 002
Shaft KO 25/6 L=462
025 2508 002
Shaft KO 25/8 L=423
8 025 1000 002
Pump O-Ring KO 127*2,62 KO 10-15-25
9
025 1005 005
Jacket KO 10-15/5 L=213
025 1007 004
Jacket KO 10/7 L=289
025 1009 003
Jacket KO 10-15/9 - 25/6 L=266
025 1012 003
Jacket 10-15/12 - 25/8 L=480
025 1015 003
Jacket 10/15 L=594
025 1504 003
Jacket KO 15/4 L=174
025 1506 003
Jacket KO 15/6 - 25/4 L=251
025 1508 003
Jacket KO 15/8 L=327
025 2503 003
Jacket KO 25/3 L=137
10 022 1000 007
Retaining Ring Shaft K 10-15
022 2500 011
Retaining Ring Shaft K 25
11
022 1000 002
Diffuser KO 10-15
022 2500 004
Diffuser KO 25
025 3500 002
Diffuser KO 35
12 022 1000 003
Sleeve KO 10-15
022 2500 006
Sleeve KO 25
13
022 1000 001
Fan K 10
Fan K 10/S
022 1500 001
Fan K 15
022 2500 002
Fan K 25
14
025 1005 003
Dowel Pin KO 10-15/5 L=273
025 1007 002
Dowel Pin KO 10/7 L=350
025 1009 001
Dowel Pin KO 10-15/9 - 25/6 L=430
025 1012 001
Dowel Pin KO 10-15/12 - 25/8 L=539
025 1015 001
Dowel Pin KO 10/15 L=653
025 1504 001
Dowel Pin KO 15/4 L=235
025 1506 001
Dowel Pin KO 15/6 - 25/4 L=311
025 1508 004
Dowel Pin 15/8 L=385mm
025 2503 001
Dowel Pin KO 25/3 L=259
15 022 1000 905
Disk K 10-15
022 2500 907
Disk K 25
16 001 2000 017
Intermediate Bush Bearing SB-014 KO
17 025 1000 001
Lower Head KO 90 KO 10/15 25
17a 025 1000 001
Lower Head KO 100 KO 25
18 016 1000 004
Funnel Plug (1/4 Yellow Blind Plug)
022 0000 015
Funnel Plug 3/8 (Blind Plug)
19a 001 5950 002
KO 90 Pump Flange 1 1/4" and O-Ring
19b 001 5950 003
KO 100 Pump Flange 1 1/4" and O-Ring
19c 001 5950 004
KO 100 Pump Flange 1 1/2" and O-Ring
19d 001 5951 004
Pump Nipple 1 1/4"
19e 001 5951 003
Pump Nipple 1 1/2"
20 022 1000 006
Retaining Wire K 10-15
022 2500 019
Retaining Wire K 25
KO 10-15-25 SERIES SPARE PART

18
KO 35-45 SERIES EXPLODED PICTURE
KO 35-45
M4 Stay Bolt
M5x25 Hexagon Socket
M8 Teflon Nut
M4x10
Hexagon
Socket
M8x15 cap head
Bolts
M8 Washer
M8x25 cap head
Bolts
M8x25 cap head
Bolts
Pim
M8 Washer
22
5
19f-19h
19g-19i
32
8
411
13
12
15
9
14
10
16
8
20
7
21
6
18
1b
1a
17
NO PART NAME EXPLANATION
1a Upper Head GG22- GG25
1b Flange GG22- GG25
2 Coupling Case Plate AISI304
3 Air Relief Cock AISI304
4 Mechanical Seal M106K / CE / EPDM
/ SUS304
5 Coupling Zamak
6 Locking Shaft AISI304
7 Shaft AISI420
8 Head O-Ring NBR
9 Jacket AISI304
10 Retaining Ring Shaft AISI304
11 Diffuser Noryl
12 Sleeve Noryl
13 Fan Noryl
14 Dowel Pin AISI304
15 Disk Noryl
16 Intermediate Bush
Bearing Sinter
17 Lower Head GG22- GG25
18 Plug Brass
19f Necked Flange
Pressure
Chromium Plated
ST37
19g Necked Flange Suction Chromium Plated
ST37
19h Necked Flange Pres Chromium Plated
ST37
19i Necked Flange Suction Chromium Plated
ST37
20 Retaining Wire AISI304
21 Teflon Ring Teflon

19 www.etna.com.tr
N. CODE PART NAME
1a 025 4500 007 Upper Head KO 35-45 Tons
1b 025 1000 003 Flange KO 132 (1.1 KW Intermediate Connection)
2 022 0000 017 Coupling Case Plate KO
3 019 0000 008 Air Relief Cock
4 022 0000 003 Mechanical Seal Q 16 K.
5
022 2503 005 Coupling KO Ø28/100G 5.5-7.5 KW
022 2506 005 Coupling KO Q38/11 KW
025 4500 012 Coupling Ø42/160 G 15-18.5-22 KW
025 4500 014 Coupling KO 45 Q48 /22 KW
6 022 2500 010 Locking Shaft K 35-45
7
025 3503 002 Shaft KO 35/3 L=327
025 3504 002 Shaft KO 35/4 L=373
025 3505 003 Shaft KO 35/5 L=419
025 3506 004 Shaft KO 35/6 L=465
025 3507 005 Shaft KO 35/7 L=511
025 3508 005 Shaft KO 35/8 L=557
025 4503 002 Shaft KO 45/3 L=415
025 4504 002 Shaft KO 45/4 L=487
025 4505 002 Shaft KO 45/5 L=559
025 4506 002 Shaft KO 45/6 L=631
8 022 2500 012 KO 35-45 Head O-Ring Q 158.42x2.62
9
025 3503 001 Jacket KO 35/3 L=158
025 3504 001 KJacket KO 35/4 L=204
025 3505 001 Jacket KO 35/5 L=249
025 3506 001 Jacket KO 35/6 L=295
025 3507 001 Jacket KO 35/7 L=341
025 3508 001 Jacket KO 35/8 L=386
025 4503 001 Jacket KO 45/3 L=241
025 4504 001 Jacket KO 45/4 L=313
025 4505 001 Jacket KO 45/5 L=385
025 4506 001 Jacket KO 45/6 L=457
10 025 4500 010 Retaining Ring Shaft K 35-45
11 025 3500 002 Diffuser KO 35
025 4500 002 Diffuser KO 45
12 025 3500 004 Sleeve K0 35
025 4500 004 Sleeve KO 45
13 025 3500 001 Fan K 35
025 4500 001 Fan K 45
14
025 4500 005 Dowel Pin KO 35/3 L=295
025 4500 005 SDowel Pin KO 35/4L=341
025 4500 005 Dowel Pin KO35/5 L=386
025 4500 005 Dowel Pin KO 35/6 L=432
025 4500 005 Dowel Pin KO 35/7 L=478
025 4500 005 Dowel Pin KO 35/8 L=523
025 4500 005 Dowel Pin KO 45/2 L=308
025 4500 005 Dowel Pin KO 45/3 L=381
025 4500 005 Dowel Pin KO 45/4 L=453
025 4500 005 Dowel Pin KO 45/5 L=525
025 4500 005 Dowel Pin KO 45/6 L=597
15 025 3500 003 Disk K 35
025 4500 003 Disk K 45
16 001 2000 017 Intermediate Bush Bearing SB-014 KO
17 025 4500 006 Lower Head KO 35-45
18 016 1000 004 Funnel Plug (1/4 Yellow Blind Plug)
022 0000 015 Funnel Plug 3/8 (Blind Plug)
19f 001 5930 004 KO 35 - Necked Flange Pressure (2 ")
19g 001 5930 005 KO 35 - Necked Flange Suction (2 1/2")
19h 001 5950 006 KO 45 Necked Flange Pressure (2 1/2")
19i 001 5950 007 KO 45 Necked Flange Suction (3")
20 025 4500 009 Retaining Wire KO 35-45
21 025 4500 011 KO 45 Teflon Ring
KO 35-45 SERIES SPARE PART

20
Note: An adapter is used for models with motor power
greater than 4 kW.
KO-ST 5 / KO-ST 8 / KO-ST 12 / KO-ST 16 / KO-ST 20 SERIES EXPLODED PICTURE
NO PART NAME EXPLANATION
1 Base Plate Cast Iron
2 Motor Bracket Cast Iron
3 Pump Outlet Body Stainless Steel AISI 304
4 Pump Inlet Stainless Steel AISI 304
5 Inlet Diffuser Stainless Steel AISI 304
6 Diffuser Stainless Steel AISI 304
7 Impeller Stainless Steel AISI 304
8 Pump Shaft Stainless Steel AISI 420
9 Mechanical Seal (G60/M106K/CE/EPDM/SUS304)
10 Lock Bush Stainless Steel AISI 304
11 Upper Sleeve Stainless Steel AISI 304
12 Intermediate Sleeve Stainless Steel AISI 304
13 Lower Sleeve Stainless Steel AISI 304
14 Impeller Key & Snap Ring Stainless Steel AISI 304
15 Inlet Body Gasket Gasket Klingerit
16 Lower Sleeve Stainless Steel AISI 304
17 Sintered Bushing Sinter Bronze
18 Outlet Body O-Ring Gasket Klingerit
19 Diffuser O-Ring EPDM
20 Coupling & Pin Aluminium
21 Coupling Screw Stainless Steel AISI 304
22 Coupling Guard Stainless Steel AISI 304
23 Stud Galvanized Steel
24 Washer Galvanized Steel
25 Nut Galvanized Steel
26 Adaptor Cast Iron
1
2
5
6
7
9
10
11
13
12
14
16
17
18
15
20
21
22
23
24
25
1- BASE PLATE (CAST IRON)
2- MOTOR BRACKET (CAST IRON)
3- PUMP OUTLET BODY ( STAINLESS STEEL AISI 304)
4- PUMP INLET (STAINLESS STEEL AISI 304)
5- INLET DIFFUSER (STAINLESS STEEL AISI 304)
6- DIFFUSER (STAINLESS STEEL AISI 304)
7- IMPELLER (STAINLESS STEEL AISI 304)
8- PUMP SHAFT (STAINLESS STEEL AISI 420)
9- MECHANICAL SEAL (G60/M106K/CE/EPDM/SUS304)
10- LOCK BUSH (STAINLESS STEEL AISI 304)
11- UPPER SLEEVE (STAINLESS STEEL AISI 304)
12- INTERMEDIATE SLEEVE (STAINLESS STEEL AISI 304)
13- LOWER SLEEVE (STAINLESS STEEL AISI 304)
14- IMPELLER KEY & SNAP RING (STAINLESS STEEL AISI 304)
15- INLET BODY GASKET (GASKET KLINGERIT)
16- LOWER SLEEVE (STAINLESS STEEL AISI 304)
17- SINTERED BUSHING (SINTER BRONZE)
18- OUTLET BODY O-RING (GASKET KLINGERIT)
20- COUPLING & PIN (ALUMINIUM)
21- COUPLING SCREW (STAINLESS STEEL AISI 304)
22- COUPLING GUARD (STAINLESS STEEL AISI 304)
23- STUD (GALVANIZED STEEL)
24- WASHER (GALVANIZED STEEL)
25- NUT (GALVANIZED STEEL)
KO-ST PUMP PART LIST
KO-ST 5 / KO-ST 8 / KO-ST 12 / KO-ST 16 / KO-ST 20
19
8
19- DIFFUSER O-RING (EPDM)
2
3
4
5
6
7
9
10
11
13
12
14
16
17
18
15
20
21
22
23
24
25
KO-ST POMPA PARÇA LİSTESİ
KO-ST 5 / KO-ST 8 / KO-ST 12 / KO-ST 16 / KO-ST 20
19
8
DİFÜZÖR O-RİNG EPDM
26
1
** 132 ve 160 Tipi Motor Gövdesi için
ALT TABLA
MOTOR BRAKETİ
ÜST GÖVDE
ALT GÖVDE ( GİRİŞ-ÇIKIŞ)
GİRİŞ DİFÜZÖR
DİFÜZÖR
ÇARK
ŞAFT
MAKANİK SALMASTRA
KİLİT BURCU
ARA BURÇ
ALT BURÇ
ÇARK BURCU & SEGMAN
ALT GÖVDE CONTASI
ŞAFT YATAKLAMA BURCU
SINTER BURÇ
ÜST GÖVDE CONTASI
KAPLIN - PİM
KAPLİN CİVATA GRUBU
MUHAFAZA SACI
SAPLAMA
PUL
SOMUN
SIRA
NO
1
2
3
4
5
6
7
8
9
10
11
12
13
14
15
16
18
19
20
21
22
23
24
25
PİK DÖKÜM
PİK DÖKÜM
(G60/M106K/CE/EPDM/SUS304)
KLİNGRİT CONTA
SINTER BRONZ
ALÜMİNYUM
GALVANİZ KAPLAMA
PARÇA ADI AÇIKLAMA
PASLANMAZ AISI L 304
PASLANMAZ AISI 420
PASLANMAZ AISI L 304
17
26
GALVANİZ KAPLAMA
GALVANİZ KAPLAMA
ÜST BURÇ
HAVA PÜRJÖRÜ
28
KLİNGRİT CONTA
26
27
26
27
3
4
27 BOŞALTMA TAPASI
28 ADAPTÖR PİK DÖKÜM
GALVANİZ KAPLAMA
GALVANİZ KAPLAMA
27- DRAIN PLUG (GALVANIZED STEEL)
28- MOTOR FLANGE (GALVANIZED STEEL)
26- PLUG (GALVANIZED STEEL)
** Just for 132 and 160 Motor Body
This manual suits for next models
23
Table of contents
Popular Power Pump manuals by other brands

Greenlee
Greenlee 940m3 SERIES Operation, service and parts instruction manual

FTI
FTI DB6 Series Assembly, installation and operation manual

CountyLine
CountyLine CLW750-01 owner's manual

Davey
Davey HM Series Installation and operating instructions

Hayward
Hayward TriStar VS SP3200VSPND owner's manual

Fiamma
Fiamma AQUA 8 Instructions for use

Enerpac
Enerpac XC-Series instruction manual

Waterra
Waterra POWERPUMP 2 owner's manual

Sprague
Sprague SM-3 Operation and maintenance manual

Greenlee
Greenlee 950-M3 Operation, service and parts instruction manual

Hayward
Hayward Ultra-Pro LX Series Installation and operating instructions

Welch
Welch 2567B-01 owner's manual