EURO EFL6KWH User manual
It is essential to read this manual carefully before it is installedand used for the first time.EFL6KWH

This washing machine conforms to current safetyrequirements. Inappropriate use can, however, leadto personal injury and damage to property.To avoid the risk of accidents and damage to thewashing machine, please read this manual carefullybefore using it for the first time. They containimportant information on its installation, safety, useand maintenance.Keep this manual in a safe place for future reference.912141516

This washing machine is not intended for use by persons (includingchildren) with reduced physical, sensory or mental capabilities, or lackof experience and knowledge, unless they are supervised whilst using itor have been shown how to use it by a person responsible for their safety.Read and understand thoroughly these safety instructionsbefore use. The items indicated here are very importantsafety precautions, which must be followed. We cannot beheld liable for damage caused by non-compliance with thewarning and safety instructions or resulting from incorrectuse or operation.Technical safetyBefore setting up the washing machine, check it for any externallyvisible damage. Do not install or use a damaged washing machine.Before connecting the washing machine, ensure that the connectiondata on the data plate (voltage and current) match the electricitysupply. If in any doubt, consult a qualified electrician.The electrical safety of this washing machine can only be guaranteedwhen continuity is complete between it and an effective earthingsystem which complies with current local and national safetyregulations. It is most important that this basic safety requirement ispresent and regularly tested, and where there is any doubt thehousehold wiring system should be inspected by a qualified electrician.The manufacturer cannot be held liable for the consequences of an inadequate earthing system.Do not connect the washing machine to the mains electricity supply by an extension lead.Extension leads do not guarantee the required safety of the appliance.Unauthorized repairs could result in unforeseen dangers for the user, for which manufacturercannot accept liability. Repairs should only be undertaken by an approved service technician.Ensure current is not supplied to the machine until after maintenance or repair work has beencarried out.If the connection cable is damaged or broken it must only be replaced by an approved servicetechnician to protect the user from danger.Faulty components must only be replaced by genuine manufacturer original spare parts. Onlywhen these parts are fitted can the safety standards of the machine be guaranteed.To avoid the risk of personal injury or damage to the washingmachine, do not install it in place where it is damp and whereit suffers from rainfall.Do not install the washing machine in place where it suffers from the sun directly, in which plastic or components will bedamaged. It will be shortened the life of your washing machine.Do not install the washing machine in place where temperaturesbelow freezing may occur. Frozen hoses may burst or split. Thereliability of the electronic control unit may be impaired attemperatures below freezing point.Do not shoot the washing machine with water when you clean it.Keep the washing machine away from fire or heat sources.Before using the washing machine for the first time, check that the transit boltsat the rear of the machine have been removed. During spinning, transit bolts which is still in placemay result in damage to both the machine and adjacent furniture or appliances.Turn off the tap if the machine is to be left for any length of time (e.g. holiday), especially if there isno floor drain (gully) in the immediate vicinity.Take care to ensure that foreign objects (e.g. nails, pins, coins, paper clips) do not find their wayinto the machine with the laundry. These may damage components of the machine (e.g. drum),which in turn can result in damage to the laundry.Do not wash water-repellent things(e.g. raincoats) with washing machine.Only remove laundry from the washing machine once the drum has stopped turning. Reachinginto a moving drum is extremely dangerous and could result in injury.Correct useSafety with childrenKeep children away from the washing machine at all times. To avoidthe risk of injury do not allow children to play on or near it or toplay with its controls. Supervise children whilst you are using it.Older children may only use the washing machine if its operation hasbeen clearly explained to them and they are able to use it safely,recognising the dangers of misuse.For machines with a 'porthole' door, remember that the porthole glasswill be hot when washing at very high temperatures. Do not let childrentouch it.THIS WASHING MACHINE MUST BE EARTHED.

Remove all the transit bolts at the back of the machine with tools.Keep the transit bolts for future transportation. Whenever themachine is transported, the transit bolts must be refitted. Plug the holes with the transit bolts caps .suppliedStrong vibration, noise or failures may occur if the transit bolts are not removed.The drawing of machine in the manual is only used for instruction. It may be vary from the model you buy.It is normal that water drops appear on the packingplastic bag and the door glass, which are resultedfrom the water left in the tub for checking out.Unscrew the drain pump filter to let water run out when themachine is not used for a long time.Remove all the packing ( including the foam base)or the vibration and noise may occur.Dispose all the wrappage safely and keep them outof the reach of children. Danger of suffocation! “U” pieceDoor glassDoor sealHot waterCold waterHot water inlet valvecold water inlet valveConnection Cable

A concrete floor is the most suitable installation surfacefor a washing machine, being far less prone to vibrationduring the spin cycle than wooden floorboards or a carpetedsurface.The machine must be level and securely positioned. The distance between the machine and wall must be more than10 cm.To avoid vibrations during spinning, the machine should notbe installed on soft floor coverings.The machine must stand perfectly level on allfour feet to ensure safe and proper operation.Incorrect installation may increase electricityand water consumption and may cause themachine to move about.To do these when the machine is not level: Using the spanner turn locknut in a clockwise direction. Then turn locknuts together with adjust feet to unscrew. Use a spirit level to check the machine is standing level. Hold adjust feet securely with a pipe wrench. Turn locknut again using the spanner until it sits firmly up against the housing.Vibration and noise may occur if the locknuts donot sit firmly up against the houses.Drainhoseconnection1. Direct into a sink If the outlet spigot has not been used before, remove any blanking plug that may be in place. Push the drain hose onto the spigot and secure with a clip if required, ensure a loop is formed in the drain hose to prevent waste from the sink entering the washing machine. If required, the drain hose can be extended to a length of 4 m.Loop“U” piecesupplied
30cm60cm90cm
Water inlet connectionConnect the inlet hose supplied with the machine to a tap with a 3/4” thread.Do not use previously employed hoses.Installation should comply with local water authority and building regulations’ requirements.inlet hose for cold water with a white nutinlet valve for cold water
inlet valve for hot water with a red grid
inlet hose for hot water with a red nut
When there is a inlet valve at the back of the machine, it must be connected to a cold watersupply. If there are two inlet valve, one is connected to a cold water supply and the otheris connected to a hot water supply. Follow the indication of the picture below to complete theconnection.2. Connected securely to a standpipe. Firstly form a hook in the end of the drain hose using the “U” piece” supplied. Place the drain hose into your standpipe, which should have an internal diameter of approximately 38mm thus ensuring there is an air break between the drain hose and standpipe. When discharging into a standpipe ensure that the top of the standpipe is no more than 90cm and no less than 60cm above floor level.
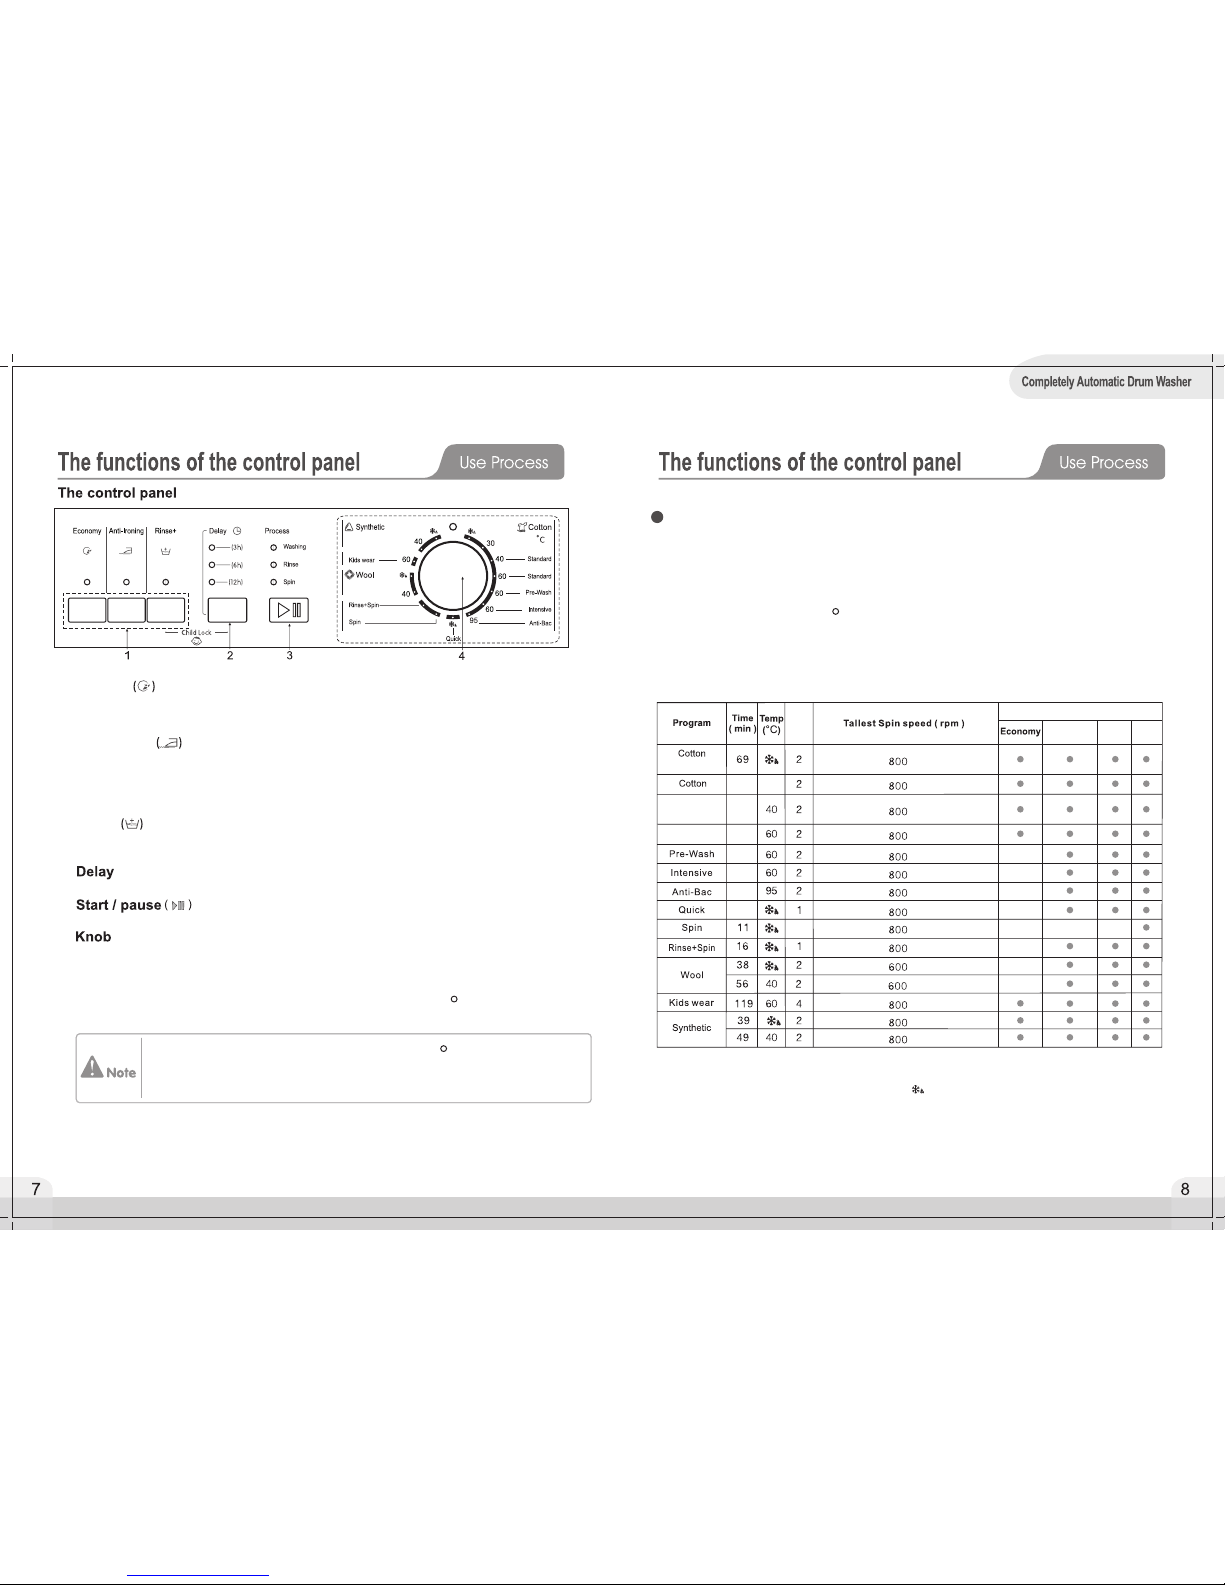
Note: The running time above is only for reference. The running time is different because of different laundries and its weights. The “ ” means the temperature of water is normal. “Economy” and “Rinse+” they can not be selected together.Child lock(“Rinse+” + “Delay”)The function of “Child lock” is to lock the control panel to prevent the misuse by children.How to start this function:1. Press the “Rinse+” and “Delay” buttons at the same time for 3 seconds. When there are three ticks, the function works.2. When this function works, all keys and knob are not available. But when the knob is turned to the position, the power will be off. “ ”3. This function can be selected before or during a wash cycle.How to cancel this function: Press the “Rinse+” and “Delay” buttons at the same time for 3seconds. The function is canceled when there are three ticks again. The contents and functions of different programs1. Function Rinse+ Anti-IroningForm 1 .Select this button to reduce energy and water consumption when washing a smaller load. Once thefunction is selected and the machine is running, it can not be canceled even though it pauses. Thefunction is not available on all programs. The detail is in on page 8Select this button to reduce the wrinkle of clothes during a wash cycle. Once this function is selected,the machine will not execute the last drain unless the “Start/Pause” button is pressed. This functionis available on all programs except spin.(Note: The max running time of this function is 12 hours. If it exceeds 12 hours, the machine will drainand spin automatically)Economy
2.3.4.
For your safety, please not turn the knob to the position “ ” and get clothes while themachine is running. Because the temperature of water may be high and it may scaldyou. The door lock will open automatically at the end of a wash cycle while the tem-perature of the drum is cool down. Select this button to add an extra rinse on the program you selected. This function is available on allprogram but spin.Select this button to delay the starting of a wash cycle. The available options are “3h”, “6h” and “12h”. Press this button to start or pause a wash cycle. The door can not be open when the machine pauses.
Turn this knob clockwise or anticlockwise to select the required wash program. Once the “Start/Pause”button is pressed and the machine is running, the program can not be changed. The details of programsare in Form 1 on page 8.(Note: At the end of a wash cycle, the knob must be turned to the position“ ”)
1508030
Delay
Rinse+
179189214219Function Options
Anti-lroning
RinsetimesForm 1
Standard-60
129
for normal soiled load
Standard-40
For energy label test

Turn the knob to position “30” for A2 seriesIt can remove the water which is left in the tub because of manufacturer’s checking out.these:3. Place the drain hose well.1. Sort the laundry by colour and by care label. Most garments have a textile care label in the collar or side seam.2. Make sure all the pockets are empty, Foreign objects (e.g. nails, coins, paper clips, etc.) can cause damage to garments and components in the machine.3. Close any zips, fasten hooks and eyes etc before washing.4. Dark textiles often contain excess dye and should be washed separately several times before being included in a mixed load. Always wash whites and coloureds separately.5. Badly soiled areas, stains etc. should be pre-treated with liquid detergent, stain removers etc.6. Turn over the clothes which pill easily and is with woolen surface before putting them into the machine.Unfold the laundry and load loosely in the drum. Mixing both large and small itemsgives better wash results and also helps distribute the load evenly during spinning.The most efficient use of energy and water is achieved when a full load is washed.However, do not overload as this causes creases and reduces cleaning efficiency.Make sure that no garments are caught between the door and the seal.1.Turn on the water tap, and connect the power.2.Open the door, and put the garments into the drum one by one.3.Close the door, and put suitable amount of detergent and fabric softener into the dispenser, then close the drawer.4.Choose a programme you need by turning the knob .5.Choose a washing function by pressing the function button.6.Press “ Start/Pause” button to start the washing machine.7.When the cycle is finished, there is a warning tone sounds.It is recommended to use low foaming powder.When washing cycle is finished, the machine will change to a standby mode.And the power will be off after 10 minutes without any control on the control panel.1. Open the drawer and add adequate detergent into main wash compartment marked “ ” or “ ”.2. Add the fabric softener into compartment marked “ ” or “ ” . Do not exceed the maximum level mark.3. Add the detergent into the pre-wash compartment marked “ ” or “ ” according to the programme you select.4. Close the drawer.Main wash compartmentFabric softener compartmentPre-wash compartmentThe right amount to dispenser will depend on the following:The quantity of laundryThe soiling level of the laundry- Lightly soiled No visible dirt or stains. Possibly slight body odour.- Normally soiled Visibly dirty and/or just a few slight stains.- Heavily soiled Visible dirt and stains and/or dried on soiling.The water hardness level.Important:Please ensure the connection data quoted on the data plate match the household mains supply.

Washing programme chartThe machine is fitted with a balance control device, which ensures the machine is stableduring the spin. To protect the machine, it will cut in if the laundry is not evenly distributedin the drum. The laundry is redistributed by reverse rotation of the drum. This may happenseveral times before the unbalance disappears and normal spinning can resume. If, after15 minutes, the laundry is still not evenly distributed in the drum, the machine will not spin.In this case, redistributed the load manually and reselect the spin programme. When the machine is started, the door lock is locked though you press the “Start/Pause” button.Turn the knob to the position “ ”, and the door lock is unlocked in two minutes.When the temperature inside the drum is above 53℃, the door lock is locked.When the water is above a certain level, the door lock is locked. When the washing cycle is finished, the door lock is unlocked in two minutes.Important:Do not try to open the door when the washing cycle is not finished or power supply is cut offduring the washing cycle, because the temperature may be high and you may be scalded.Disconnect the machine from the mains electricity supply and withdraw the plug fromthe socket before cleaning the machine.The washing machine must not be hosed down.Clean the exterior with a mild non-abrasive cleaning agent or soap and water using a well wrung-outcloth. Wipe dry with a soft cloth.Do not use solvents, abrasive cleaners, glass cleaners or all-purpose cleaning agents.These might damage plastic surfaces and other components because of the chemicalstheycontain.Clean the drum every 3 months by using the “Anti-Bac” programme.Cleaning the drawerRemove detergent residues regularly. Clear the drawer following these:Pull out the drawer until a resistance is felt. Press down the release catch and at the same timepull the drawer right out of the machine.Remove the siphon from compartment and clean it.Clean the dispenser using a brush and warm water.Cleaning the drawer housingUse a bottle brush to remove detergent residuesinside the drawer housing.
1. it is secure.Check the connection and ensure
2. Change the temperature sensor.
1. The connection between the temperature sensor and wire is not secure.
2. The temperature sensor is damaged.
1. Check the connection and ensure it is secure.2. Change the heating tube.1. The connection between the heating tube and wire is not secure.2. The heating tube is damaged.1. Check the connection and ensure it is secure.
2. Check if the machine is overloaded. Switch off the machine, and retry when the motor becomes cool.
3. Change the motor.1. The connection between the motor and wire is not secure.2. The motor is protected because of over-heat.3. The motor is damaged.1. Change the water inlet.2. Check the connection and ensure it is secure.3. Change the water sensor.1. The water inlet valve is damaged.2. The connection between the water sensor and wire is not secure.3. The water sensor is damaged.Possible CauseThe machinefills overtime.There is a Doorlock alarm.1. The water tap is not open.2. The drain hose is put down.3. The water inlet valve is damaged.1. Open the water tap.2. hook up the hose.3. Change the water inlet valve.“Spin”LEDflickers.ProblemError Code
The machinedrains overtime.
Water overflowsthe machine./ Water sensorworks abnormal.
The motor doesnot work.
There is aheating tubefault.There is atemperaturesensor fault.“Rinse”LEDflickers.
“Rinse”and “Spin”LEDs flicker.
“Washing”LEDflickers.
“Washing”and “Spin”LEDsflicker.
“Washing”and “Rinse”LEDsflicker.“Washing”, “Rinse”and “Spin”LEDsflicker.
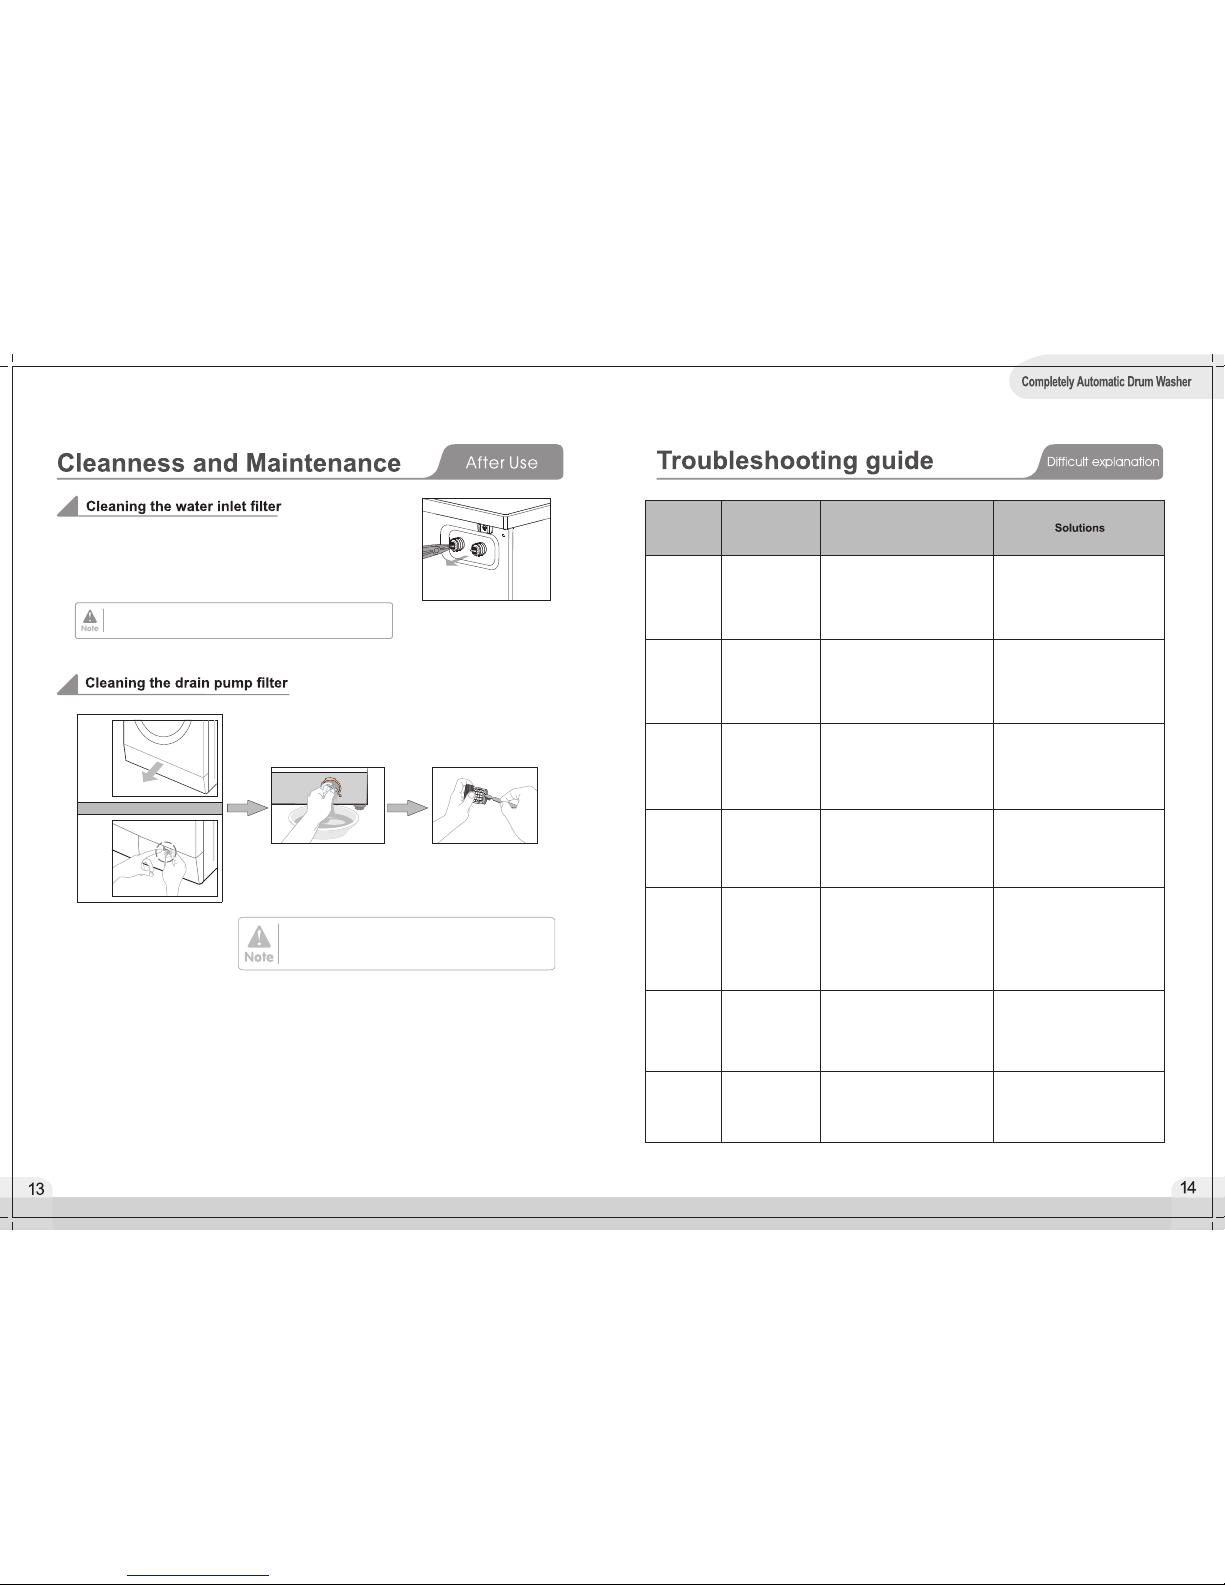
1. Check the drain hose.2. Clean the filter.3. Check the drainage systemand clean it.1. The drain hose is squashed or kinked.2. The drain pump filter is block. 3. The drainage system pipes are blocked.1. Lock the door well.2. Put the garment into the drum.3. Change the door lock.1. The door is not locked well.2. garment is caught between the door and the seal.3. The door lock is damaged.Use pointed nose pliers to withdraw the plastic filter.Clean, put back and secure. These filter should bechecked every 6 months or so, or more often if thereare frequent interruptions to the water supply.Important:If the machine is exposed to temperatures below 0°C, certain precautionsshould be taken.1. Turn off the water tap.2. Unscrew the inlet hose.3. Unhook the drain hose from the rear support and position the end of this hose and that of the inlet hose in a bowl. Run the spin programme.4. Disconnect the appliance.5. Screw the inlet hose and reposition the drain hose.6. When you intend to start the machine up again, make sure that the room temperature is above 0°C.The filter should be cleaned every 2 months or so, or when there is a fault that the “Rinse” and “Spin” LEDs flickers for A2 series and “E3” is lighted up on the screen for A5/A8.The filter must be put back in place after cleaning.3. Clean the filter carefully.2. Place a container under the pump. Unscrew and remove the filter.1. There are two kinds of lower covers for different models. Disconnect the machine from the mains electricity supply and open the lower cover with a screwdriver following the drawings above.Type AType B
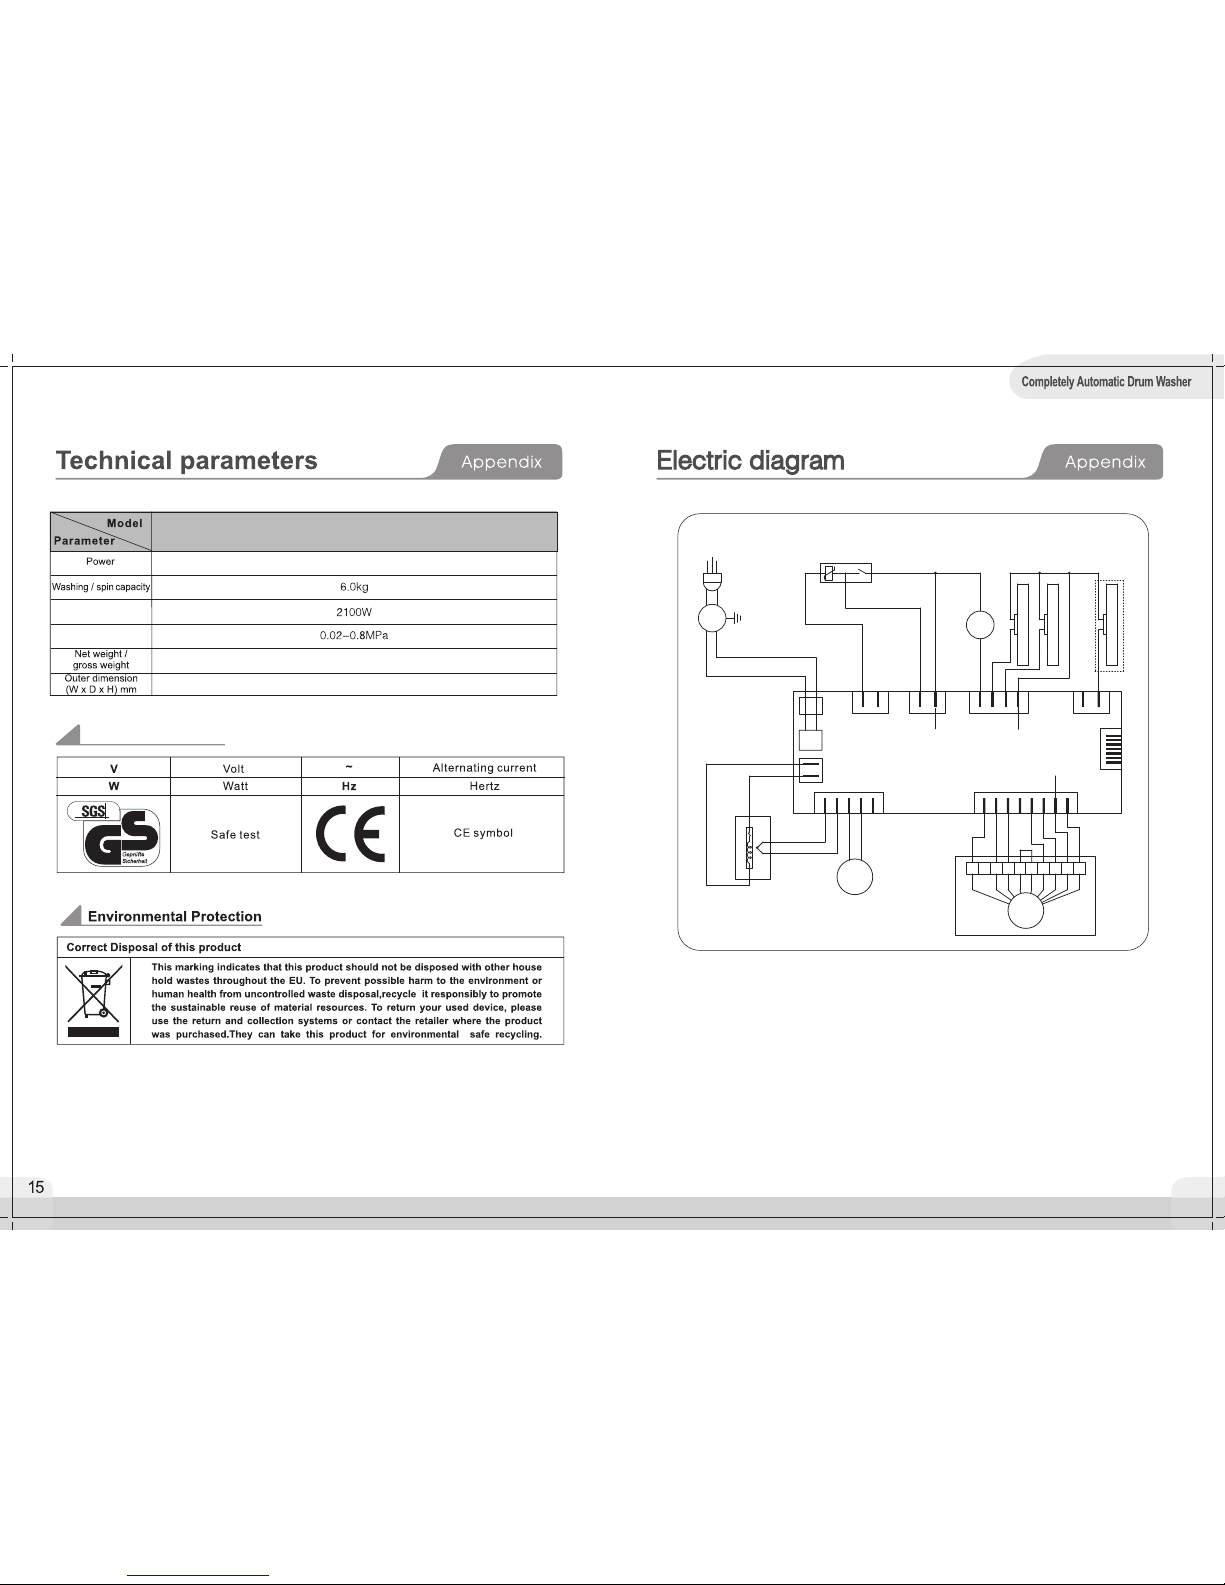
16Symbol expalanation64kg/68kg595X530X845Rated powerWater pressure
EFL6KWH
220V-240V~, 50Hz
PTC
LNLX6X5X2NX1X8X7ST2
5432112345678910121221123412
Power
38546217
SW1L'L'X4
12
PUMP
Power Panel
Motor
Water Level SensorWater Temperature sensor
Water Heater
FilterPTC Door LockElectric Diagram
Main Wash Inlet ValvePre-Wash Inlet ValveHot Water Inlet Valve
L'
Table of contents
Other EURO Washer manuals


