EuroFlame Amadora User manual
A MAJOR CAUSE OF OVEN-RELATED FIRES IS FAILURE TO MAINTAIN REQUIRED CLEARANCES (AIR SPACES) TO COMBUSTIBLE MATERIALS.
IT IS OF UTMOST IMPORTANCE THAT THIS OVEN BE INSTALLED ONLY IN ACCORDANCE WITH THESE INSTRUCTIONS.
User Manual

WARNING: Users of this appliance are hereby warned that the burning of wood can result in
low level exposure to some of the listed substances, including formaldehyde, benzene, soot and carbon monoxide. The California
Safe Drinking Water and Toxic Environment Act of 1986 (Proposition 65) requires the Governor of California to publish a list of
substances known to the State of California to cause cancer or birth defects or other reproductive harm. In addition, businesses
must warn customers of potential exposure to such substances. This is caused primarily from the incomplete combustion of
natural gas or LP fuel. Properly adjusted burners will minimize incomplete combustion. Exposure to these substances can also be
minimized by properly venting the burners by opening a window or using a ventilating hood or fan. For more information, visit
www.P65Warnings.ca.gov.
www.euroflameovens.com
888-521-6906
Manufacturer's Contact Information
EuroFlame Inc
651 N Broad St, Ste 205 #4733
Middletown, Delaware 19709
READ ALL INSTRUCTIONS BEFORE INSTALLING AND USING THIS
WOOD BURNING OVEN. SAVE THESE INSTRUCTIONS.
Before installation, contact local authorities who have jurisdiction
(municipal building department, fire prevention bureau, etc.) about
required permits, restrictions and installation inspection in your area.
Also, check with your HOA about installation requirements and
restrictions (if applicable).
Please read this entire manual before you install the Oven. Failure to
follow instructions may result in property damage, bodily injury or
even death.
Install and use the Oven only in accordance with EuroFlame’s
installation and operating instructions (or equivalent).
For Outdoor Installation of the EuroFlame Amadora, local regulations
regarding wood burning equipment should be consulted.
NOTE: PLEASE USE EXTREME CAUTION AROUND THE OVEN. THE INTERIOR OVEN DOME, HEARTH, ARCH AND DOOR WILL BE
EXTREMELY HOT WHEN IN USE AND FOR HOURS AFTER USE. KEEP CHILDREN, CLOTHING AND FURNITURE AWAY.
CONTACT MAY CAUSE SKIN BURNS.
CAUTION: TO ENSURE THE STABILITY AND SAFE OPERATION OF THE OVEN, DO NOT USE MAKESHIFT MATERIALS IN
ITS ASSEMBLY OR THE CONSTRUCTION OF ITS SUPPORT BASE OR DECORATIVE SURROUND. USE ONLY THE
MATERIALS SUPPLIED OR RECOMMENDED BY EUROFLAME.
CAUTION: TO PREVENT DIRT, DEBRIS AND SPILLS FROM CONTAMINATING THE SPLASH ZONE AROUND THE MOUTH
OF THE OVEN, THE SURFACE SURROUNDING THE OVEN FACE MUST BE CONSTRUCTED
OF A SMOOTH AND CLEANABLE MATERIAL.
1

2
Table of Contents
Installation Preparation .................................................................................3
Oven Specifications .......................................................................................3
Operating Instructions ...................................................................................4
Best Practices ................................................................................................4
Regular Maintenance.....................................................................................5
Curing Process................................................................................................5
Firing Process.................................................................................................6
Frequently Asked Questions .........................................................................7

3
Setting up your Oven base is a critical step in keeping your Oven safe for
years to come. For outdoor use, we recommend that you build a platform
using materials that can hold at least 1,500 pounds. For permanent
installation most customers will pour a concrete platform or drive piles into
soil to provide foundation support for a permanent frame.
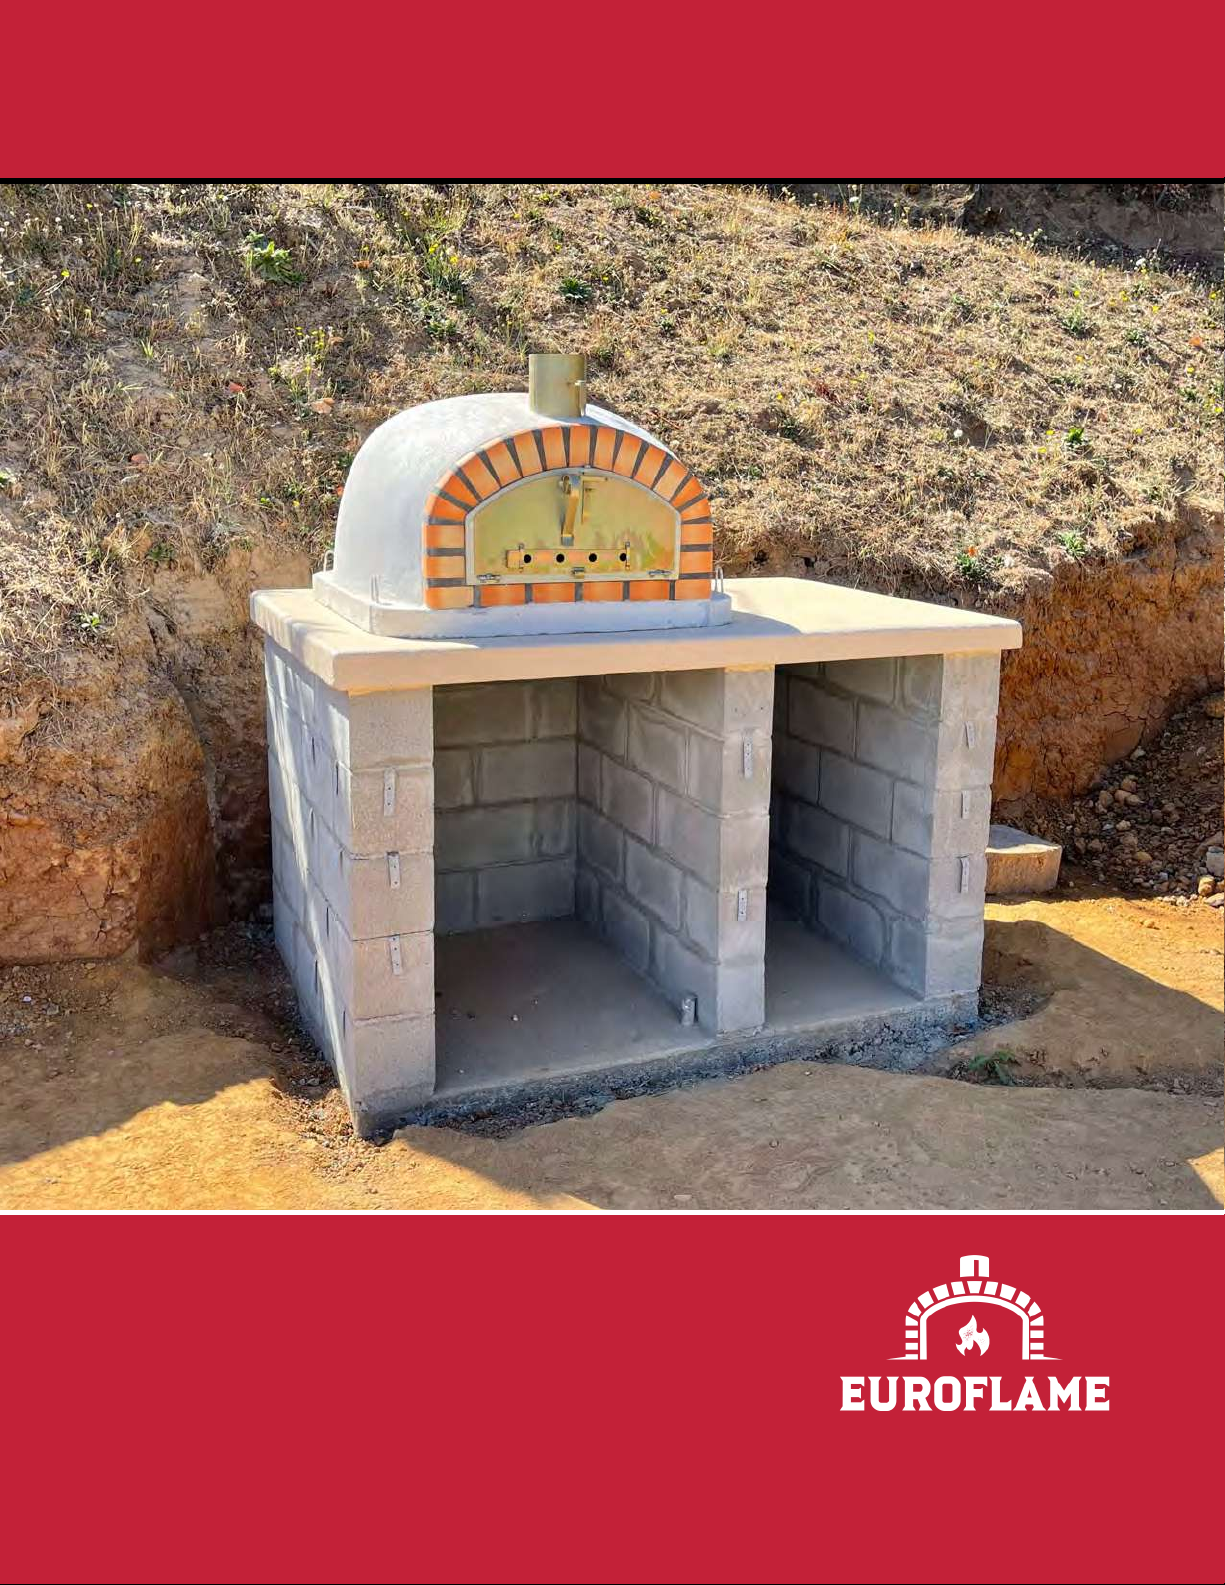
Once the platform is built, we advise customers to build their Oven base
using 8 inch cinder blocks stacked 4 or 5 high (32” or 40” of cinder block
height). Make the height to suit you. Once your cinder block base is
installed and leveled, you can install a countertop where your Oven will
rest. We recommend using a thick concrete slab. The thickness will depend
on the anticipated use of your base and expected overall weight. You will
not need to bolt the Oven down to the countertop.
Now that your base is complete, you are ready to position your Oven in its
new home! The EuroFlame Amadora is just over 1,200 pounds, so it is not
easy to move. We recommend that our customers contact a local
contractor, landscape design company or appliance mover (like a piano
moving company) to move the Oven into place. If you are comfortable
moving the Oven yourself then you can use a combination of a pallet jack
and engine hoist, or forklift to move the oven to your base. Then raise the
Oven onto the base using ropes or chains connected through the Oven’s
corner eyelets.
It is your responsibility to know the rated weight capacity of the equipment
you use if not using a professional to move the Oven. The steel eyelets can
then be cut off after installation if you will never need to move the Oven.
With the cinder block construction base you can leave space under the
Oven for wood fuel storage, cooking accessories, etc.
EuroFlame Amadora Oven EF-AMAD
Installation Preparation
SKU: EF-AMAD
UPC: 195893932498
ASIN: B09BDMN2TQ
EuroFlame Amadora Oven EF-AMAD
Specifications
• Arrives Fully Assembled (Chimney Pipe Extension(s) And Cap Are Sold
Separately)
• Hearth Cooking Surface: 33.5” x 29.6”
• 4 Eyelets On Oven Base Corners For Transporting Oven With Properly
Rated Rope Or Chain
• Crack Repair Kit For Patching Hairline Cracks In Refractory Cement
• Terracotta Brick Facade With An Iron Door
Product Details
PARTS AND COMPONENTS
• 1x EuroFlame Amadora Pizza Oven
• 1x Iron Door With 2 Hinge Pins
• 1x Crack Repair Kit Paint Tub With Paint Brush
•1x Digital Thermometer Laser Infrared Temperature Gun

4
Please follow these instructions exactly as written. Failure to follow
instructions may cause permanent damage to your Oven and your Warranty
may be void.
Although your Oven may seem dry once you complete the installation
process, there are small amounts of moisture pockets created during the
manufacturing process that need to work their way out. If you build a large
fire in your Oven from the onset, you could compromise your Oven’s
structural integrity, longevity and cooking efficiency, and can ultimately
cause permanent damage, which may void the manufacturer’s warranty.
Follow the 5-Day Firing Schedule to Cure your Oven properly before
cooking. Please refer to the Curing Your Oven section on page 9 for specific
details.
CAUTION: NEVER USE GASOLINE, GASOLINE-TYPE LANTERN
FUEL, KEROSENE, LIGHTER FLUID, OR SIMILAR LIQUIDS TO
START OR FRESHEN UP A FIRE IN THIS OVEN. KEEP ALL SUCH
LIQUIDS WELL AWAY FROM THE OVEN WHEN IT IS IN USE.
NEVER USE CHARCOAL EITHER.
A good practice is to build a fire in a separate location and place the wood
embers into the Oven. You will generate heat without the flame and the
Oven will cure slowly, without large fluctuations in temperature. A
requirement to minimize oven cracking.
Due to thermal expansion, small cracks will appear in the dome or hearth
during the curing and cooking process. Do not worry; this is normal and the
quality of your Oven will not be compromised. If you do not like the way it
looks, then feel free to use the included crack repair kit to cover exterior
cracking. This is not required and will not increase or decrease the Oven’s
performance.
IT IS VERY IMPORTANT TO PROTECT THE INTERIOR OF YOUR OVEN FROM
RAIN, SNOW AND OTHER MOISTURE. A PROTECTIVE RAIN CAP/CHIMNEY
CAP MUST BE INSTALLED ON TOP OF THE FLUE PIPE TO ENSURE THAT
MOISTURE DOES NOT GET INTO YOUR OVEN.
After you have completed the curing process for your Oven and are ready to
start cooking, light a small fire and slowly build it up. The interior dome of
the Oven will at first turn black from the fire smoke. You will know the Oven
temperature has reached approximately 700°F when the inner walls turn
from black to a whitish grey. This is an ideal temperature for many types of
cooking. Use an infrared thermometer heat gun to check temperatures
inside your Oven. You can just point and shoot to get a reading in any place
in the Oven.
Note: You should re-cure your Oven if it has not been used for an extended
period of time or if the Oven has been exposed to excessive amounts of
moisture.
EuroFlame Amadora Oven EF-AMAD
Operating Instructions
• Local regulations about wood-burning equipment should be
consulted prior to use.
• Euroflame ovens should be installed by a professional or
suitably qualified individual.
• For indoor installations, a source of fresh air into and out of the
room is required. Check with local building officials regarding
ventilation requirements.
• Do not use products not specified for use with this oven.
• Do not install in a mobile home.
• Do not connect to or use in conjunction with any air
distribution ductwork. Unless specifically approved for such
installations by a licensed professional.
• Do not use chemicals or fluids to start the fire.
• Do not burn garbage or flammable fluids, such as gasoline,
naphtha or engine oil.
• Never allow anyone under the age of 18 to operate the oven.
• Do not throw chunks of wood violently into the Oven.
• Always use kiln-dried hardwoods. If not kiln-dried, then dry for
at least two years to achieve optimal performance. If you see
moisture coming from the logs while they are on the fire, the
wood is not dry. Using wood that is not dry will cause the Oven
to throw off a considerable amount of smoke and can also
cause damage to the Oven because of the high moisture
content.
• The first two times you cook in your new Oven, cook some
thing simple (for example, a pizza shell) then throw it away without
actually eating what you have cooked. The third time, you can begin
enjoying what you have cooked in your new Oven.
• Always pre-warm any cooking accessory (a cast iron pot, glass tray,
etc.) before you put it in the Oven. If you place a cold accessory on a hot
hearth, the thermal shock may cause the hearth to crack. You can also
add an Oven rack so the pot or pan does not sit directly on the hearth.
• The manufacturer is not responsible for eventual environmental
damages, nuisance or smoke and carbon particles.
• In cold temperatures, bring your Oven up to temperature slowly.
• Never use frozen foods directly on the hearth.
• Never use water, marinades or other liquids directly on the hearth.
• With the exception of bread or pizza, always cook foods on or in a
cooking accessory (a grill, a cast iron pot, etc.) to prevent spillage onto
the hearth surface.
• DO NOT OVER-FIRE! When flame spills out of the Oven, you are
over-firing.
EuroFlame Amadora Oven EF-AMAD
Best Practices
CAUTION: NEVER OBSTRUCT THE FLUE PIPE WHILE OPERATING
THE OVEN.
Note: Your Oven is designed for burning solid, kiln-dried hardwood only.
Do not burn scrap wood, compressed logs, coal or other materials. Failure to
follow these instructions may damage your Oven and void your warranty

5
Your EuroFlame Amadora Oven will last for many years to come if
you follow these simple, regular maintenance tips:
• Never use any cleaning products inside the Oven! Heat the Oven
properly to clean it.
• Clean the splash zone around the mouth of the Oven with hot water and
soap after each use.
• Lubricate the EuroFlame Amadora Oven Door hinges on a regular basis.
• Creosote Formation and the Need for Removal. When wood is burned
slowly, it produces tar and other organic vapors that combine with
expelled moisture to form creosote. The creosote vapors condense in a
relatively cool oven flue and exhaust hood of a slow-burning fire. As a
result, creosote residue accumulates on the flue lining and chimney cap.
When ignited, this creosote makes an extremely hot fire. To reduce the
risk of a creosote fire, inspect the flue lining and chimney cap on a
regular basis. Make sure it is free from any buildup. If you have buildup,
use a wire brush to clean it. Contact your local municipal or provincial
fire authority for information about how to handle a chimney fire. Have a
clearly understood plan for how to handle a chimney fire.
• Inspect the flue pipe on a regular basis. Make sure it is in good repair
and is seated securely into the flue connection.
• Inspect your chimney cap to ensure there is no buildup blocking the flow
of air. If you have any buildup, you can use a wire brush to clean it.
• Touch-up the mortar around the arch of the oven to maintain a nice
finished look. You can use your EuroFlame Repair Kit included with your
Oven purchase to touch-up hairline cracks around the arch (usually
found between the bricks) or on the dome.
• Always cover your Oven when not in use. We recommend our
EuroFlame Oven Cover be used between cooks. The Oven must be cool
to the touch before it can be covered.
• When using any EuroFlame accessory, please do not allow any type of
liquid to touch the hearth or dome of the oven. For example: When
cooking steak on a grill, you need to place a pan underneath the grill
grate to “catch” the drippings. This will keep your hearth and Oven
interior clean.
If you have any questions about the use and care of your EuroFlame Oven,
please send us an email to support@euroflameovens.com
EuroFlame Amadora Oven EF-AMAD
Regular Maintenance
Although your Oven may seem dry once it is installed, there are small
pockets of moisture in the mortar and brick that need to work their way out.
“Curing” is the process of building small fires to dry out the moisture from
the mortar, concrete, and bricks used in the manufacture of your Oven. You
will need to cure your wood-fired Oven before you start cooking food.
If you get a massive fire going during the Oven’s first use you could cause
significant cracking from the cement and brick drying too quickly. The high
heat could turn the water trapped in the bricks into steam which will expand
and crack your Oven’s bricks.
The idea behind curing is fairly simple. To cure your Oven you should create
small fires for a reasonably long period of time to slowly dry the Oven out.
Follow the 5-Day Firing Schedule below for best Curing results:
5-Day Firing Schedule
• Day 1. 140°F/60°C
• Day 2. 215°F/100°C
• Day 3. 300°F/ 150°C
• Day 4. 400°F/200°C
• Day 5. 480°F/250°C
Lighting your Oven for the first time will be a momentous occasion! You
should aim to keep your Oven at its target heat for at least three hours per
day. You will need to keep feeding your fire with wood and gauging your
temperature to stay close to your target temperature for those three hours.
The initial fire must be started slowly. When lighting the first fire, keep the
flames low so the moisture can be slowly released from the Oven and the
surrounding masonry work. If you build a large fire in your Oven from the
onset, you could compromise your Oven’s integrity and cooking efficiency,
and can ultimately cause permanent damage, which may void the manufac-
turer’s warranty.
Note: Due to thermal expansion, small cracks may appear in the dome or
hearth during the curing process. Don’t worry; this is normal and the
quality of your Oven will not be compromised.
Note: You should re-Cure your Oven if it has not been used for an
extended period of time or if the Oven has been exposed to excessive
amounts of moisture.
EuroFlame Amadora Oven EF-AMAD
Curing Process

Once you’ve properly cured your Oven, you’re finally ready to fire it for
cooking! This is a momentous occasion. For most customers, the process
of researching an oven, building a base, purchasing and delivering their
oven, and finally installing and curing the oven has been a long process.
Now it’s time to finally cook some delicious wood-fired cuisine!
Always start with dry kindling placed 10 inches inside the oven
measured from the mouth of the oven. You should avoid building the
fire too close to yourself - this makes it more difficult to push your fire
to the back of the oven once it is burning.
Once the fire is going, add small pieces of wood to build the fire. You
want to raise the temperature slowly, so avoid building a huge fire that
pours out of the mouth of the Oven.
EuroFlame Amadora Oven EF-AMAD Firing Process
CAUTION: NEVER USE CHEMICALS OR STARTER FLUIDS; YOU
WILL NOT NEED THEM.
A
B
We recommend adding large chunks of wood to the fire once it’s going
strong. Add these chunks and build your fire in the center of the oven.
Move the fire to the back of the Oven about 20 minutes after the fire is
going. It should take about 45-60 minutes from the moment you start
your fire before your oven is ready to start cooking, so start your fire
early. Use an infrared thermometer temperature gun to gauge the
heat of your cooking surface by pointing your gun toward the surface
where you expect to cook your food. Most customers find the perfect
temperature for cooking a pizza is between 700°F and 750°F.
C
You’ll notice the interior Oven dome turning black as you light your first
fire (this is also normal during future fires you will start in your oven).
The smoke from the fire passes along the interior surface of the oven
depositing soot and carbon that clings to the concrete surface. This
happens when the oven temperature is not high enough to burn the
soot out of the oven. As the temperatures rise and more heat is stored
in the dome of the Oven, you will see those black areas turn a whitish
grey. This is because your fire has reached a temperature hot enough
to burn the soot and carbon off any surface anywhere near your food.
Your goal is to heat the Oven in a way that the entire dome turns
whitish grey.
D
6

What is Your Shipping Policy?
EuroFlame Frequently Asked Questions
We offer FREE shipping to commercial and residential addresses within
the lower 48 USA on orders over $499. If you are in AK, HI, or island
territories please contact us for a special shipping quote.
Please see our Shipping Policy for details about the
shipping and delivery process.
Do You Ship Outside of the United States?
No, we do not currently ship to addresses outside of the United States. How Will My Oven Arrive?
Your oven will ship in a custom wooden crate which sits on a pallet. Check
your individual product webpage or user’s manual for crated dimensions and
weight. We only ship to curbside or driveway, but we are always happy to
consult with customers about best practices for protecting your oven once it
has arrived. We use various freight trucking companies who can use a lift
gate to lower your oven to the street level. This is included in our free
shipping offers.
The shipping company will call to arrange a delivery appointment as someone
will need to be present to sign for the delivery. They will never deliver your
oven without you setting up a delivery appointment.
Can I Pick Up the Oven Myself?
We do offer pick up options for those who are willing to travel to our
Houston, TX warehouse location. Please call us if you are interested in this
option.
How Long Do Our Ovens Take to Heat Up?
Your oven should take approximately 45-60 minutes to get to the perfect
temperature. We recommend lighting your fire and making sure it is strong,
then use the 45-60 minute heat-up period to prepare your pizza, bread, fish, or
whatever you intend to bake. Once the oven is heated to your target
temperature, your dish will be ready for the oven.
What if My Oven or Product Arrives Damaged?
All of our ovens and accessories are inspected and shipped without any
damages so it is important that you inspect your oven or accessories upon
arrival BEFORE the delivery truck leaves your home or business. We
recommend that you take pictures during the unloading process and note any
damage with the shipping company before signing for the delivery.
Do you Charge Sales Tax?
We currently do not charge sales tax as we are based out of Delaware.
Can EuroFlame Install My Oven or Place it Where
it’s Going to be Installed?
We do not offer an installation service. We only ship our products to
your curbside or driveway. We cannot deliver ovens to your backyard or
install them on a countertop. Customers are encouraged to find a
crane, or forklift to move the oven into place. If you are not
accustomed to handling heavy equipment or don’t wish to, we
recommend contacting a contractor, landscape design company, or
heavy equipment mover (like a piano company) to move and place your
oven.
In some cases, we can recommend installation companies in your area
who we have worked with before. Our ovens are heavy so moving
them is not a one-man job. If you intend to install your oven we highly
recommend that you contact an outdoor kitchen contractor or
landscape design company before making your purchase.
What is the Expected Delivery Time?
Our ovens ship from Houston, TX. We estimate product departure from
our warehouse between 1-3 business days from the date of your order
if your unit is in stock. Our ovens ship freight which normally takes
longer than the short parcel delivery times we all are accustomed to.
Freight transit to most parts of the country from Houston will take 5-12
business days.
As soon as your order ships you will receive an email with tracking
information and instructions for accepting the shipment from the
delivery company. We recommend that you take pictures during the
delivery process.
7
Self-installations are most commonly done with help from a local moving
company (think appliance delivery companies). Having a plan for moving your
oven from your driveway to its destination is an important part of the
planning process.
Give us a call for any questions. Our phone number is
888-521-6906 and our support email is support@euroflameov-
ens.com

What Should I Do About Cracks?
Cracks are completely normal and should not affect the function of your
oven (unless they get dirt, snow, and water in them and expand
significantly over time). We do include a crack repair kit which is a
paint-like substance that can be applied to fill in small cracks for those
who want a perfectly smooth surface. It is best to apply the crack
repair kit when the oven is hot. Check out our Crack Repair Kit for
more information.
How Do I Clean the Oven?
You do not need to clean the interior of the oven. Once you are
finished cooking just close the door and leave the dampers open so the
remaining coals will burn down to ash. Wait at least 12 hours for the
ash to cool, then use your brush and shovel to remove the ashes. The
floor of the oven does not need to be wiped clean or sanitized between
cooks.
How Do I Cure My Oven?
Curing is a required step in preparing your brand-new oven for use.
We do not recommend starting a very hot fire right away since this
could damage your new oven. For a detailed description, check out our
article about How To Cure Your Wood-Fired Oven.
Curing is the process for removing moisture from the mortar and brick
left over during the construction process. We recommend starting a
series of progressively hotter fires to get the oven used to the intense
swelling and contracting effects of heating and cooling the oven
repeatedly. After the curing process is complete, your oven mortar and
bricks will be dried and hardened – finally ready to cook some delicious
meals.
What Kind of Wood Should I Use To Cook In My
Oven?
We recommend hardwoods like walnut, oak, mesquite, apple, maple,
cherry, etc. Softer woods like pine are resinous and do not burn as well
(they can also be messy).
Do I Need to Keep My Oven Covered When Not
In Use?
YES. You should always protect your oven from the elements. It's okay
if it gets wet occasionally, but extended exposure will cause cracks to
form quickly which might eventually threaten the structure and
usability of your oven. Check out our Pizza Oven Covers for more
information.
What can I cook in my Wood-Fired Brick Oven?
There is no limit to what you can cook in your EuroFlame Wood-Fired Brick
Oven. Anything you can cook in your indoor home Oven, you can cook in your
Outdoor, Wood-Fired Oven — whole turkeys, bread, grinders, chicken,
steaks, chops, vegetables, stews, empanadas, desserts and obviously, PIZZA!
Can the Oven be used in all climates?
Yes, you can use the Oven year-round. Customers will sometimes build a
structure around the Oven to keep the dirt, wind, and rain out and keep the
interior Oven dome dry. A shaded, well-ventilated area during hot periods is
recommended for your comfort during hot summer days since standing near
the oven mouth can get a bit warm. A covered, dry area during cold winter
days will protect your oven and keep you warm while you cook.
Can I install my own Oven?
Yes, it can be a do-it-yourself project. Some customers will contact a local
metal-worker to build a simple metal-framed stand to hold their oven in place.
There are stands with wheels available for customers who want to be able to
move their oven. Others who prefer a more secure, long-term installation will
need to have some skill in concrete and masonry to build a permanent platform
for their Oven. (Check out our Assembly Instructions for more details.)
Is the Oven safe around children?
Any time you have fire there is potential danger. The outside of the Oven
should not be hot to the touch, but we still advise caution when dealing with
high temperatures. If installed properly, the Oven should not pose any more
danger than a BBQ grill.
How long does it take to heat the Oven?
We recommend building a small fire and slowly adding to it to bring up the
temperature of the Oven. This process usually takes 45-60 minutes. Once it’s
hot, your triple-insulated oven will stay hot for many hours. In fact, many of our
customers will cook dinner in their oven then wake up the next morning to bake
bread in their still-hot Oven.
How much does the EuroFlame Amadora weigh?
The approximate weight of the EuroFlame Amadora Oven (including the door)
is 1,213 lbs. Each EuroFlame Amadora is handmade so the total weight will
vary within 15 pounds of the stated approximate weight.
Do You Need Tools to Operate a Wood Fired Pizza
Oven?
Yes! These ovens get extremely hot and you will need a few things to
keep you safe. If you do not already own one, we recommend that
customers purchase our 5 Piece Starter Tool Kit which has all the
important tools you will need to operate and maintain your new oven.
8
We recommend that you start and monitor 5 small fires in your oven and
repeat daily for 5 days. This process does not have to happen every single
day in sequence, but you should finish all 5 fires before your curing cycle is
completed.
Start a small fire and let it burn throughout the day for at least 3 hours while
maintaining the temperatures shown below (an infrared thermometer
temperature gun is best for monitoring your oven heat):
• Day 1: 140°F / 60°C
• Day 2: 215°F / 100°C
• Day 3: 300°F / 150°C
• Day 4: 400°F / 200°C
• Day 5: 480°F / 250°C

How do I shut down my Oven?
Let the flames burn down, and when the Oven cools down to below 200°F it is best to close the Oven door and seal the air-hole strip on the door. The
Oven will slowly cool down over several hours. (Sometimes it can take an entire day for the embers from a hot fire to completely cool down. Be cautious
when removing ashes within 1-2 days from firing the Oven.)
Can I have a EuroFlame Amadora Oven installed indoors?
Yes. For Indoor Installation, a EuroFlame Oven certified to UL Standards is required. You must check your local building codes to find out all of the permits,
restrictions and inspection requirements. You must also install and use the Oven only in accordance with EuroFlame’s installation and operating
instructions (or equivalent).
Do I need a chimney pipe on my Oven?
No, you do not have to have a chimney pipe. They are useful for directing the smoke away from your face and clothes while you are cooking, but you can
still prepare food normally without the chimney.
Do You Offer Returns/Exchanges?
We have a 30-day return policy. Please visit our Return and Refund Policy for more information.
As always, we are happy to answer any questions you might have about our products. Please Contact Us and we will respond quickly to help you.
Can EuroFlame install my Oven for me?
Unfortunately, we cannot install your oven. The freight company who delivers your oven will lower your unit onto the ground off the back of a truck using
a liftgate. Normally, the driver will use a pallet jack to roll your oven to a dry place as long as you have a paved surface. You will be responsible for
lifting your oven off the ground and installing it once the delivery is complete. Remember, the delivery personnel will not help install your oven or drop it
onto your countertop.
We encourage you to contact a local contractor or landscape design company to assist with the installation process if you are not familiar with moving
heavy equipment.
Contact Us if you have questions about installing a countertop to suit your oven purchase.
9

For more information, visit
www.euroflameovens.com
© 2021 Euro flame Oven. All rights reserved.
www.euroflameovens.com
888-521-6906
EuroFlame Inc
651 N Broad St, Ste 205 #4733
Middletown, Delaware 19709
This manual suits for next models
1
Table of contents
Popular Oven manuals by other brands


Frigidaire
Frigidaire REG-97 BK Cook-n-care guide

AEG
AEG BN 601 G operating instructions

Zanussi
Zanussi FM 9231 Instructions for the use and care

Kernau
Kernau KBO 0946 PT B Instructions for use

Siemens
Siemens HR538AB 1 Series User manual and installation instructions

Blodgett
Blodgett KFC CTBR-AP Installation operation & maintenance