Eurotech Design ED-RF132SS User manual

EUROTECH 128
LITRE FRIDGE
FREEZER
ED-RF132SS
ED-RF132WH
INSTRUCTION MANUAL
PLEASE READ THIS MANUAL CAREFULLY BEFORE
USING YOUR PRODUCT AND KEEP IT FOR FUTURE
REFERENCE.
Content
1. Safety
information
Page 1~5
2. Overview
Page 6
3. Reverse Door
Page 7~10
4. install action
Page 11~12
5. Dai y #se
Page 13~16
6. Warnings
Page 17
Safety information
In the interest of your safety and to ensure the correct use, before
installing and first using the appliance, read this user manual carefully,
including its hints and warnings. To avoid unnecessary mistakes and
accidents, it is important to ensure that all people using the appliance
are thoroughly familiar with its operation and safety features. Save
these instructions and make sure that they remain with the appliance if
it is moved or sold, so that everyone using it through its life will be
properly informed on appliance use and safety.
For the safety of life and property keep the precautions of these user's
instructions as the manufacturer is not responsible for damages
caused by omission.
Children and vulnerable people safety
This appliance can be used by children aged from 8 years and above
and persons with reduced physical, sensory or mental capabilities or
lack of e perience and knowledge if they have been given super
vision or instruction concerning use of the appliance in a safe way
and understand the ha!ards involved.
"
Children
should be supervised to ensure that they do not play
with the appliance.
"
leaning
and user maintenance shall not be made by children unless
they are aged from 8 years and above and supervised.
#eep all packaging well away from children. There is risk of
suffocation.
If you are discarding the appliance pull the plug out of the socket, cut
the connection cable $as close to the appliance as you
can
%
and
remove the door to prevent playing children to suffer electric shock or
to close themselves into it.
If this appliance featuring magnetic door seals is to replace an older
appliance having a spring lock
$
latch
%
on the door or lid, be sure to
make that spring lack unusable before you discard the old appliance.
This will prevent it from becoming a death trap for a child.
General safety
WARNING! #eep ventilation openings, in the appliance enclosure
or in the built-in structure, clear of obstruction.
WARNING!
'
o
not use mechanical devices or other means to
accelerate the defrosting process, other than those recommended
by the manufacturer.
WARNING!
'
o
not damage the refrigerant circuit.
(
Safety information
0
WARNING!
'
o
not use other electrical appliances $such as ice
cream
makers
%
inside of refrigerating appliances, unless they are
approved for this purpose by the manufacture.
WARNING!
'
o
not touch the light bulb if it has been on for a long
period of time because it could be very hot.
(%
'
o
not store e plosive substances such as aerosol cans with a
flammable propellant in this appliance.
The refrigerant isobutane
$)*++
a
%
is contained within the refrigerant
circuit of the appliance, a natural gas with a high level of
environmental compatibility, which is nevertheless flammable.
'
during
transportation and installation of the appliance, be certain
that none of the components of the refrigerant circuit become
damaged.
&
avoid open flames and sources of ignition
&
thoroughly ventilate the room in which the appliance is situated
It is dangerous to alter the specifications or modify this product in any
way.
,
ny
damage to the cord may cause a short circuit, fire and-or
electric shock.
This appliance is intended to be used in households and
similar applications such as
&
staff kitchen areas in shops, offices and other working
environments.
&
farm houses and by clients in hotels, motels and other residential
type environments.
&
bed and breakfast type environments.
&
catering
and
similar
nonretail
applications.
WARNING!
,
ny
electrical components plug, power cord,
compressor and
etc.
%
must be replaced by a certified service agent
or
/
ualified
service personnel.
WARNING! The light bulb supplied with this appliance is a 1special
use lamp bulb2 usable only with the appliance supplied. This 1special
use lamp2 is not usable for domestic lighting.(%
(% If there is a light in the compartment.
Safety information
6
The ower cord must not be lengthened.
8ake sure that the power plug is not
s
/
uashed
or damaged by the
back of the appliance.
,
s
/
uashed
or damaged power plug may
overheat and cause a fire.
8ake sure that you can come to the mains plug of the appliance.
'
o
not pull the mains cable.
If the power plug socket is loose, do not insert the power plug. There
is a risk of electric shock or fire.
You must not operate the appliance without the lamp.
This appliance is heavy.
"
are
should be taken when moving it.
'
o
not remove nor touch items from the freezer compartment if you
hands are damp-wet, as this could cause skin abrasions or
frost-free
burns.
,
void
prolonged exposure of the appliance to direct sunlight.
Daily use
'
o
not put hot on the plastic parts in the appliance.
'
o
not place food products directly against the rear wall.
Fro!en food must not be refrozen once it has been thawed out.(%
Store prepacked frozen food in accordance with the frozen food
manufacture, s instructions.(%
,
appliance
,
s manufactures storage recommendations should be
strictly adhered to.
refer
to relevant instructions.
'
o
not place carbonated of fi!!y drinks in the freezer compartment as
it creates pressure on the container, which may cause it to e plode,
resulting in damage to the appliance.
(%
Ice lollies can cause frost burns if consumed straight from the
appliance.(%
Care and cleaning
3efore maintenance, switch off the appliance and disconnect the
mains plug from the mains socket.
'
o
not clean the appliance with metal ob4ects.
'
o
not use sharp ob4ects to remove frost from the appliance. 5se a
plastic scraper.
(%
)egularly e amine the drain in the refrigerator for defrosted water. If
necessary, clean the drain. If the drain is blocked, water will collect in
te bottom of the appliance.0%
(% If there is a free!er compartment.
0% If there is a fresh&food storage compartment.
Safety information
:
Installation
Important! For electrical connection carefully follow the instructions
given in specific paragraphs.
5npack the appliance and check if there are damages on it.
'
o
not
connect the appliance if it is damaged.
)
eport
possible damages
immediately to the place you bought it. In that case retain packing.
It is advisable to wait at least four hours before connecting the
appliance to allow the oil to flow back in the compressor.
,
d
e/
uate
air circulation should be around the appliance, lacking this
leads to overheating. To achieve sufficient ventilation follow the
instructions relevant to installation.
;
herever
possible the spacers of the product should be against a
wall to avoid touching or catching warm parts $compressor, con&
denser
%
to prevent possible burn.
The appliance must not be located close to radiators or cookers.
8ake sure that the mains plug is accessible after the installation of
the appliance.
Service
,
ny
electrical work re/uired to do the servicing of the appliance
should be carried out by a
/
ualified
electrician or competent person.
This product must be serviced by an authori!ed Service
"
enter,
and
only genuine spare parts must be used.
Energy saving
'
on
'
t
put hot food in the appliance.
'
on
'
t
pack food close together as this prevents air circulating.
8ake sure food don't touch the back of the compartment$s%.
If electricity goes off, don't open the door$s%.
'
on
'
t
open the
door
$
s
%
fre/uently.
'
on
'
t
keep the
door
$
s
%
open
for too long time.
'
on
'
t
set the thermostat on e ceeding cold temperatures.
Some accessaries, such as drawers, can be removed to get larger
storage volume and lower energy consumption.

Safety information
=
Environment Protection
This appliance does not contain gasses which could damage the
o!one layer, in either its refrigerant circuit or insulation materials. The
appliance shall not be discarded together with the urban refuse and
rubbish. The insulation foam contains flammable gases< the appliance
shall be disposed according to the appliance regulations to obtain from
your local authorities.
,
void
damaging the cooling unit, especially the
heat e changer. The materials used on this appliance marked by the
symbol are recyclable.
The symbol on the product or on its packaging indicates that this
product may not be treated as household waste. Instead it
should be taken to the appropriate collection point for the
recycling of electrical and electronic
e
/
uipment.
3y ensuring this
product is disposed of correctly, you will help prevent potential
negative conse/uences for the environment and human health, which
could otherwise be caused by inappropriate waste handling of this
product. For more detailed information about recycling of this product,
please contact your local council, your household waste disposal
service or the shop where you purchased the product.
7ackaging materials
The materials with the symbol are recyclable.
'
ispose
the packaging in
a suitable collection containers to recycle it.
'
isposal
of the appliance
(.
'
isconnect
the mains plug from the mains socket.
0.
"
ut
off the mains cable and discard it.
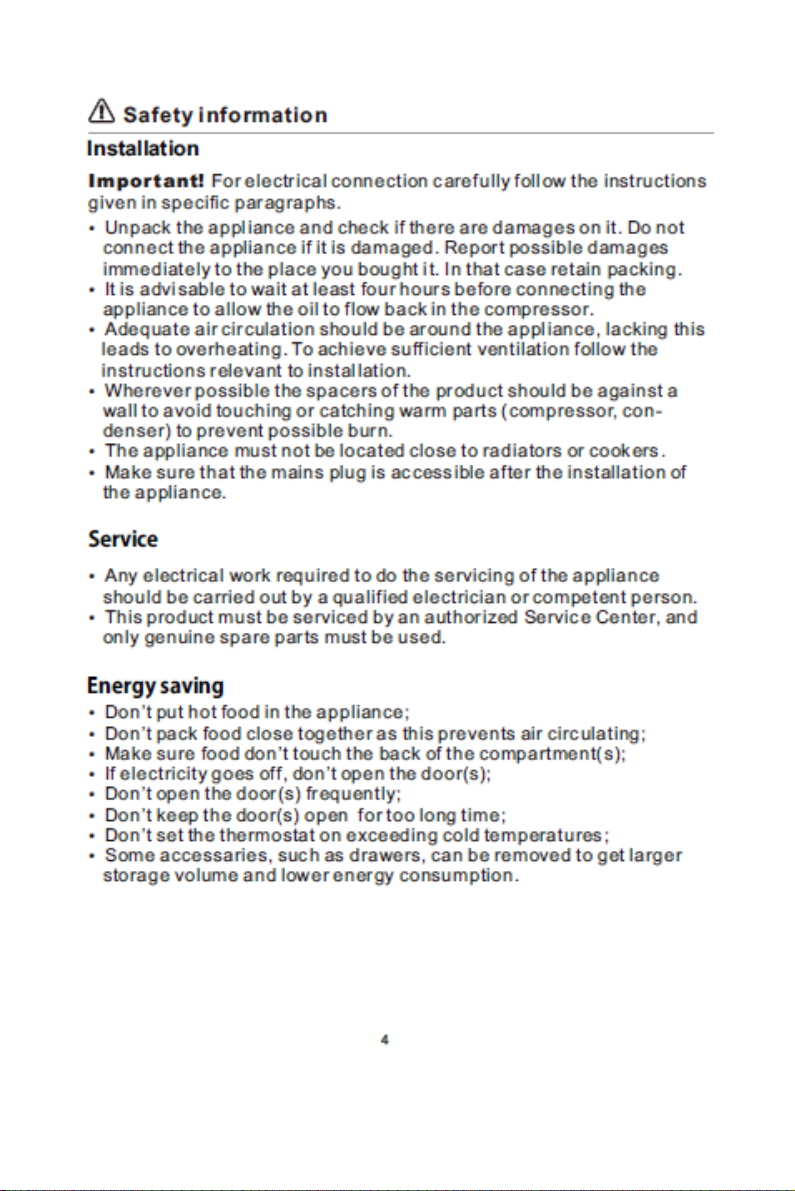
Overview
6
Freezer Shelf
Balconies
Glass Shelves
Crisper
This illustration is only for hinting, the detail please check your appliance.
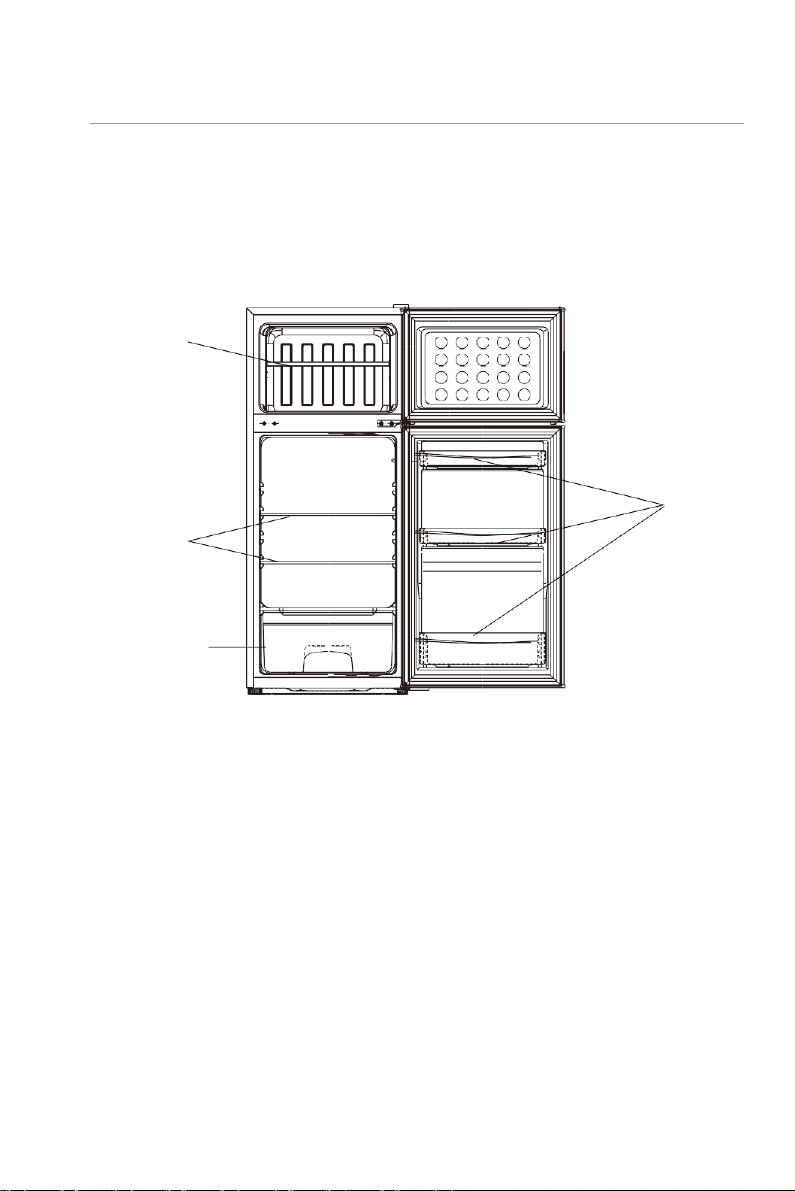
Reverse Door
7
Tool required:
Philips screwdriver, Flat bladed screwdriver, hexagonal spanner.
Ensure the unit is unplugged and empty.
To take the door off, it is necessary to tilt the unit backwards.
You should rest the unit on something
solid so that it will not slip during the door-reversing process.
all
parts removed must be saved to do the reinstallation of the door.
"o
does not lay the unit flat as this may damage the coolant system.
#t
'
s better than $ people handle the unit during assembly
.
%. carefully remove the top hinge cover with an 'at screwdriver
$. Unscrew the top hinge with a Philips screwd r i v e r .
). *Remove the hole cover with an 'at screwdriver.
+. , over the core cover from the left side to right side. ! and then lift the
upper door and place it on a padded surface to prevent it from
scratching.
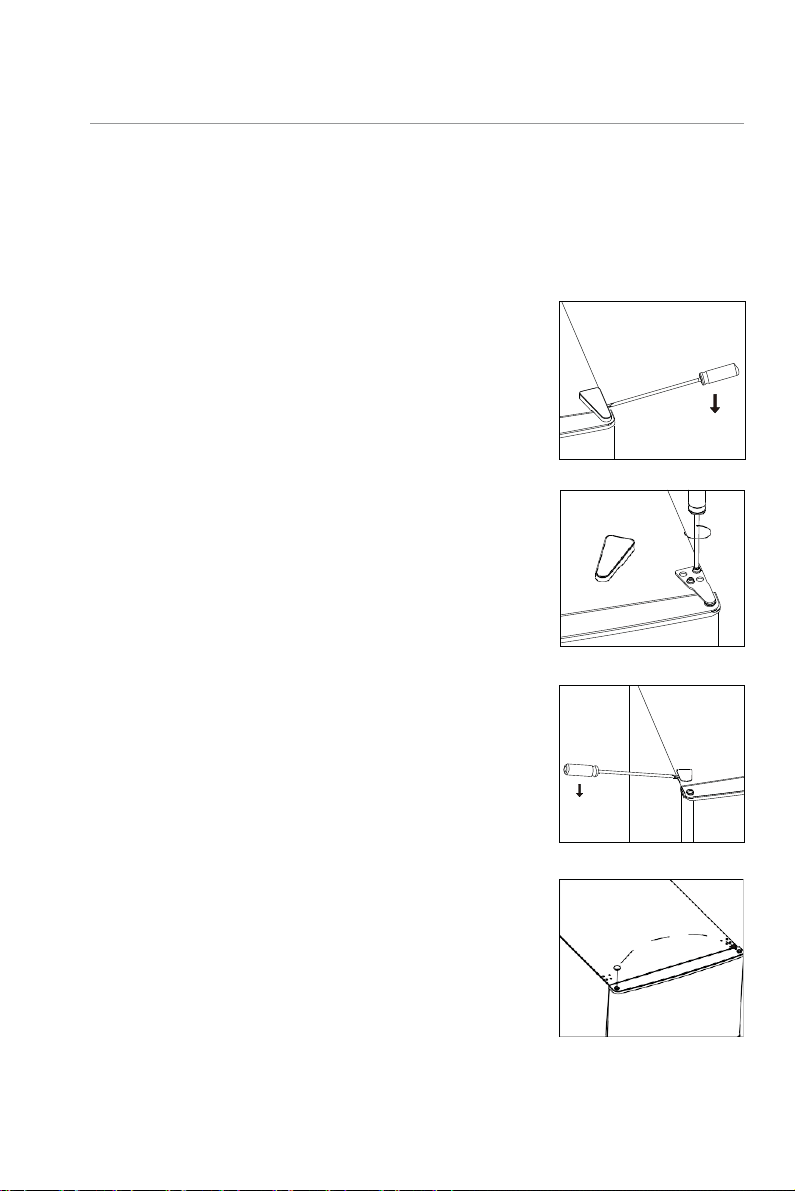
Reverse Door
8
Unscrew
Screw
..
(unscrew the middle hinge and then lift the bottom door and put it
on a soft pad to avoid scratch.
-. ,over two middle hole covers from left to right.
/. 0ie down the rear of cabinet on a soft pad. !nd unscrew the bottom
hinge and levelling foot.
1.
(unscrew and remove the bottom hinge pin, turn the bracket over and replace it.

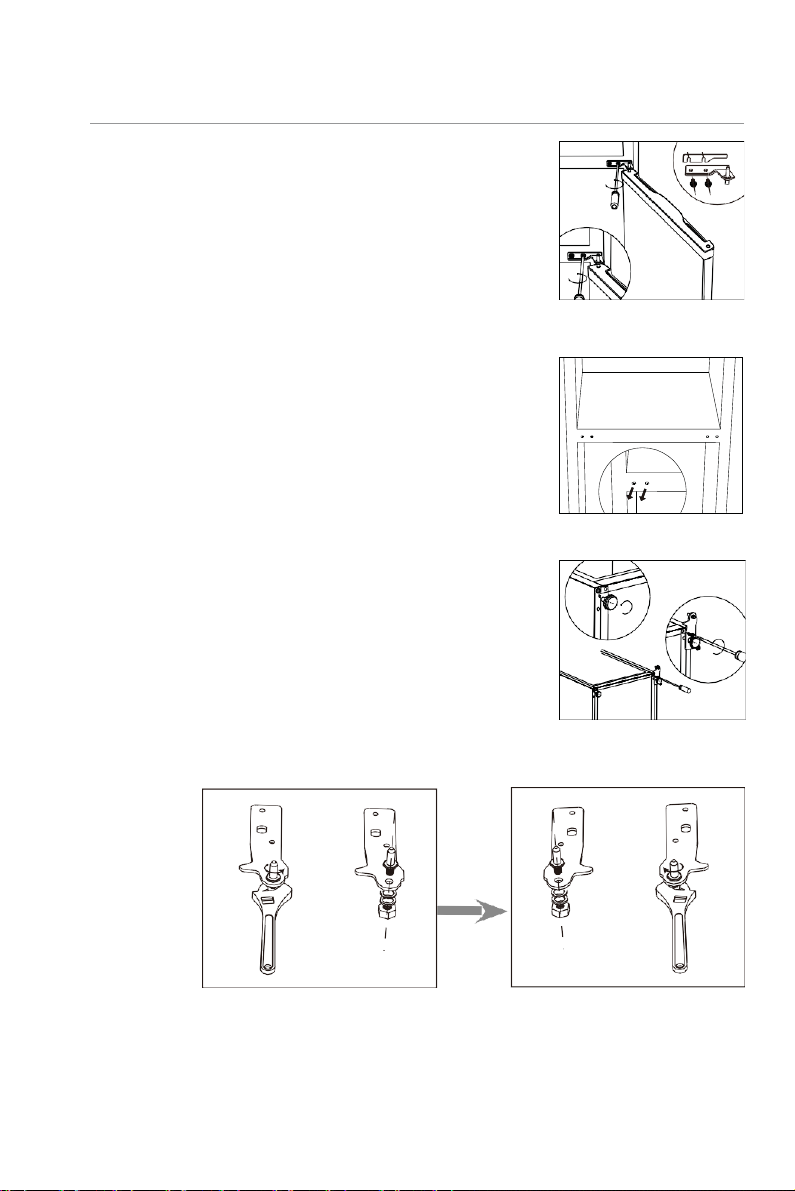
Reverse Door
9
2.
#nstall the hinge at left side and foot base at right side. Then screw
two leveling feet with their original parts.
%3.
,over two middle hole covers from left to right.
%%. 0ie down the rear of cabinet on a soft pad. !nd unscrew the bottom
hinge and levelling foot.
%$.
4tand up the unit and put the door on the bottom hinge. , make
sure the bottom hinge core is inserted in the door hole. Then
move the hinge hole cover of bottom door from left side to right
side.

Reverse Door
10
%). #nstall the middle hinge.
%+. #nstall the upper door with the upper hinge.
%.. &lap in the hinge cover and hole cover on the top of unit.

Installation
11
Space
Requirement
Keep enough space of th e door open.
Keep at least 50mm gap at two sides.
Levelling
the
unit
To do this adjust the two levelling feet at front of the unit.
If the unit is not level the doors and magnetic seal
alignments will note be covered properly".
xxxmm
xxxmm
Installation
12
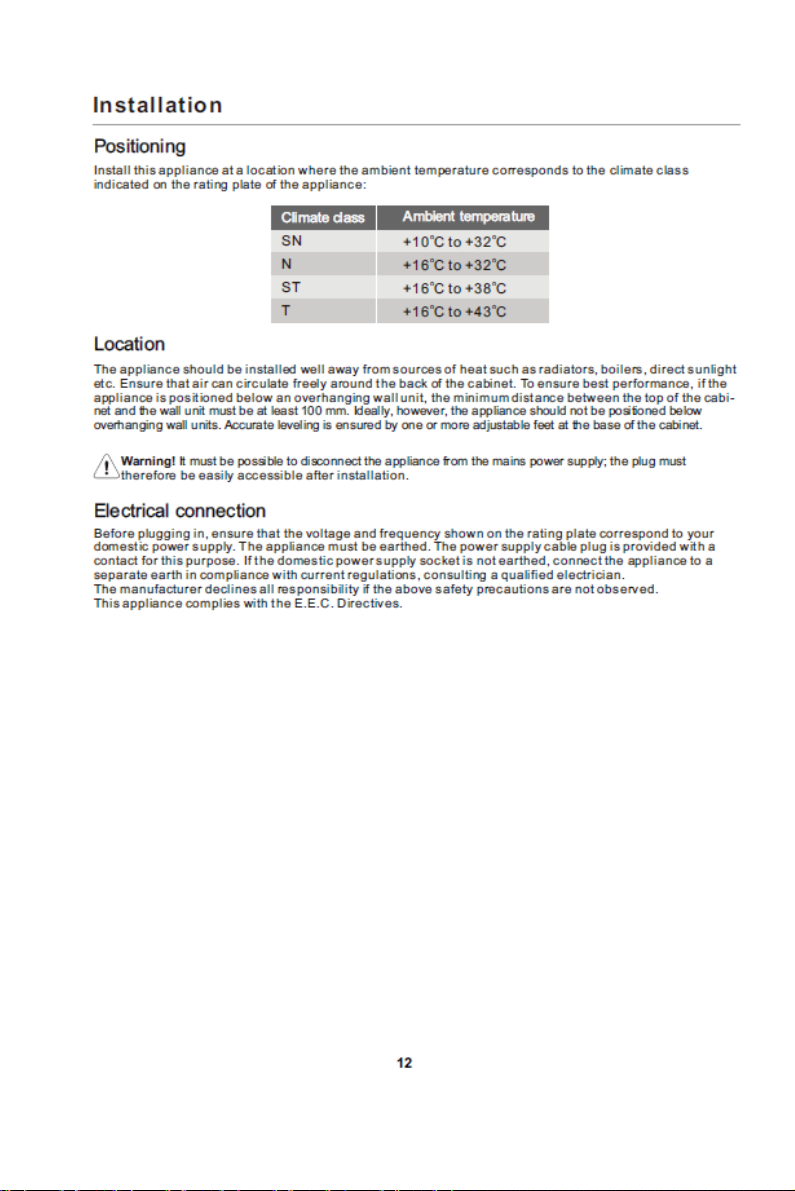
%positioning
Install this appliance at a location where the ambient temperature corresponds to the climate class
indicated on the rating plate of the appliance$
climate class
'm!isn’temperature
S(
)*0
o
& to )+,
o
&
(
)*-
o& to
)+,
o
&
ST
)*-
o& to
)+#
o
&
T
)*-
o& to ).+o&
location
The appliance should
be
installed well away" from sources of heat such as radiators boilers direct
sunlight etc. /ensure that air can circulate freel" around the
!
a
c0
of the cabinet. To ensure !est
performance if the appliance is positioned ! below an overhanging wall unit the minimum distance !
between the top of the ca!i1 net and the wall unit must
!e
at least *00 mm. Ideall" however the appliance
should not
!e
positioned ! below overhanging wall units.'accurate leveling is ensured
!"
one or more adjustable
feet at the
!ase
of the cabinet.
Warning!
It must be possible to disconnect the appliance from the mains power suppl"3 the plug must
therefore !e easil" accessible after installation.
/Electrical connection
4efore plugging in ensure that the voltage and fre5uenc" shown on the rating plate correspond to "our
domestic power suppl". The appliance must be earthed. The power suppl" cable plug is provided with a
contact for this purpose. If the domestic power suppl" soc0et is not earthed connect the appliance to a
separate earth in compliance with current regulations consulting a 5ualified electrician.
The manufacturer declines all responsibility" if the above safety" precautions are not
observed. This appliance complies with the
/./.&.
6irectives.

Daily Use
13
First
use
Cleaning
the
interior
Before using the appliance for the first time
wash the interior and all internal accessories with lukewarm
water and some neutral soap so as to remove the typical smell of a brand new product then dry thoroughly.
Important!
#o not use detergents or abrasive powders as these will damage the finish.
Temperature
Setting
Plug on your appliance. The internal temperature is controlled by a
thermostat. There are 8 settings . 1 is warmest setting and 7 is coldest
setting and O is off.
The appliance may not operate at the correct temperature if it is in a
particularly hot or if you open the door often.
Freezing
fresh
food
The freezer compartment is suitable for freezing fresh food and storing frozen and deep-frozen food for
a
long time.
Place the fresh food to be frozen in the freezer compartment.
The maximum amount of food that can be frozen in $( hours is specified on the rating plate.
The freezing process lasts $( hours) during this period do not add other food to be frozen.
*storing frozen food
+hen first starting
up or after a period out of use before putting the product in the compartment let the
appliance run at least $ hours on the higher settings.
Important!
,n the event of accidental defrosting for example the power has been off for longer than the
"value shown in the technical characteristics chart under -rising time.
the defrosted food must be
consumed
/quickly
or cooled immediately and then
re
f
rozen 0after coo!ed1.
Thawing
#eep
&
fro%en
or frozen food prior to be used can be thawed in the fridge compartment or at room
temperature
depending on the time available for this operation.
*mall pieces may even be cooled still frozen directly from the freezer. ,n this case cooling will take
longer.
,ice
&
cube
This appliance may be equipped with one or more ice cube to produce ice.
2ccessories
3o"able shelves
The walls of the refrigerator are e/uipped with a series of runners so
that the shell"es can be positioned as desired.
Positioning
the
door
balconies
To permit storage of food packages of "various sizes the door
balconies can be placed at different heights. To make these
ad
4
ustments
proceed as follows) gradually pull the balcony in the
direction of the arrows until it comes free then reposition as re/uired.
0

Daily Use
14
helpful hints and tips
To help you make the most of the freezing process here are some important hints)
the maximum /quantity of food which can be frozen in $( hrs. is shown on the rating plate7
the freezing process takes $( hours. 9o further food to be frozen should be added during this period7
only freeze top /quality
fresh and thoroughly cleaned
foodstuffs7
prepare food in small portions to enable it to be rapidly and completely fro%en and to ma!e it possible
subse/uently to thaw only the /uantity
re
/
uired7
wrap up the food in aluminium foil or polythene and ma!e sure that the pac!ages are airtight7
do not allow fresh unfro%en food to touch food which is already fro%en thus a"oiding a rise in
temperature of the latter7
lean foods store better and longer than fatty ones7 salt reduces the storage life of food7
water ices if consumed immediately after remo"al from the free%er compartment can possibly cause
the s!in to be free%e burnt7
it is ad"isable to show the free%ing in date on each indi"idual pac! to enable you remo"al from the
free%er compartment can possibly cause the s!in to be free%e burnt7
it is ad"isable to show the free%ing in date on each indi"idual pac! to enable you to !eep tab of the
storage time.
hints for storage of fro%en food
To obtain the best performance from this appliance
you should)
ma!e sure that the commercially fro%en foodstuffs were ade/uately stored by the retailer7
be sure that fro%en foodstuffs are transferred from the food store to the free%er in the shortest possible
time7
not open the door fre/uently or lea"e it open longer than absolutely necessary.
once defrosted food deteriorates rapidly and cannot be
re
&
fro%en7
do not e'ceed the storage period indicated by the food manufacture.
6ints
for
fresh
food
refrigeration
To obtain the best performance)
#o not store warm food or e"aporating
li
/
uids
in the refrigerator
#o co"er or wrap the food
particularly if it has a strong fla"our
3a!e 0all types1) wrap in polythene bags and place on the glass shel"es abo"e the "egetable drawer.
For safety store in this way only one or two days at the most.
Coo!ed foods
cold dishes
etc...) these should be co"ered and may be placed on any shelf.
Fruit and "egetables) these should be thoroughly cleaned and placed in the special drawer0s1 pro"ided.
butter and cheese) these should be placed in special airtight containers or wrapped in aluminum foil or
polythene bags to e'clude as much air as possible.
3il!
bottle) these should ha"e a cap and should be stored in the balconies on the door.
Bananas
potatoes
onions and garlic
if not pac!ed
must not be !ept in the fridge.
Cleaning
For hygienic reasons the appliance interior including interior accessories should be cleaned regularly.
Caution!
The appliance may not be connected to the mains during cleaning. #anger of electrical
shoc!8 Before cleaning switch the appliance off and remo"e the plug from the mains or switch off or
turn out the circuit brea!er or fuse. 9e"er clean the appliance with a steam cleaner. 3oisture could
accumulate in electrical components
danger of electrical shoc!8 6ot "apors can lead to the damage
of plastic parts. The appliance must be dry before it is placed bac! into ser"ice.
Important!
:thereal oils and organic sol"ents can attac! plastic parts e.g. lemon
4
uice
or the
4
uice
form
orange peel butyric acid cleanser that contain acetic acid.
Clean drain hole
T
o a"oid defrost water o"erflowing into the fridge periodically clean the
drain hole at bac! of fridge compartment.
;se
a cleaner to clean the hole as
showed in right picture.
1)
If the condenser is at back of appliance.

Daily Use
15
#o not allow such substances to come into contact the appliance parts.
#o not use any abrasi"e cleaners
<emo"e the food from the free%er. *tore them in a cool place well co"ered.
*witch the appliance off and remo"e the plug from the mains or switch off or turn out the circuit brea!er
of fuse.
Clean the appliance and the interior accessories with a cloth and lu!ewarm water. 2fter cleaning wipe
with fresh water and rub dry.
2fter e"erything is dry place appliance bac! into ser"ice.
#efrosting of the free%er
The free%er compartment howe"er will become progressi"ely co"ered with frost. This should be remo"ed.
9e"er use sharp metal tools to scrape off frost from the e"aporator as you could damage it.
6owe"er when the ice becomes "ery thic! on the inner liner complete defrosting should be carried out as
fellows)
pull out the plug from the soc!et7
remo"e all stored food
wrap it in se"eral layers of newspaper and put it in a cool place7
!eep the door open
and placing a basin underneath of the appliance to collect the defrost water7
when defrosting is completed dry the interior thoroughly
replace the plug in the power soc!et to run the appliance again.
<eplace the lamp
Caution
!
Before replacing the lamp shall disconnect the
appliance from mains power supply.
=amp specification is listed in rating label.
Follow below process to replace the lamp)
1. *et the temperature regulation !nob at number -O. to switch off
the appliance.
$. ;nplug the appliance to ma!e sure the appliance is
disconnected from main power supply.
5. <emo"e the screw of the lamp co"er.
(. Pull the lamp co"er out.
>.
;
nscrew
the lamp.
?. Fit new lamp according to the opposite direction then replace the
lamp co"er and screw.
7. Plug in the appliance and regulate the !nob to right position.
Daily Use
16
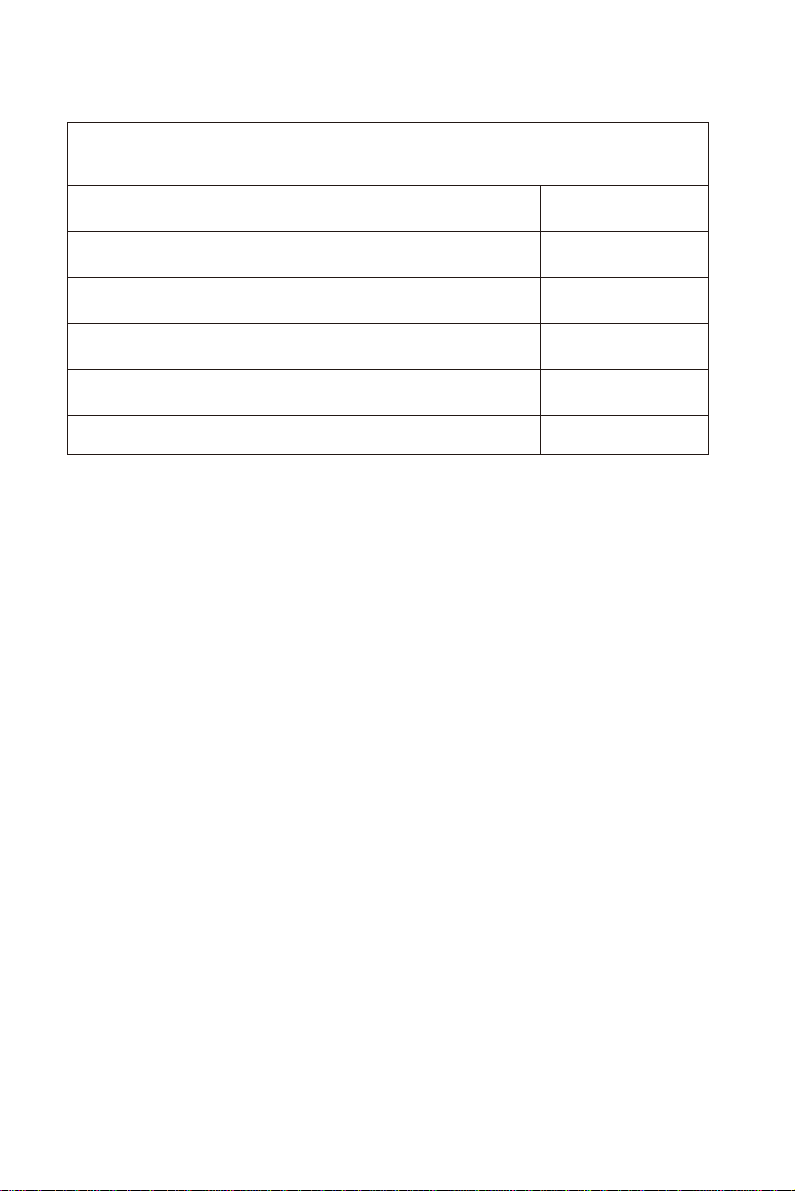
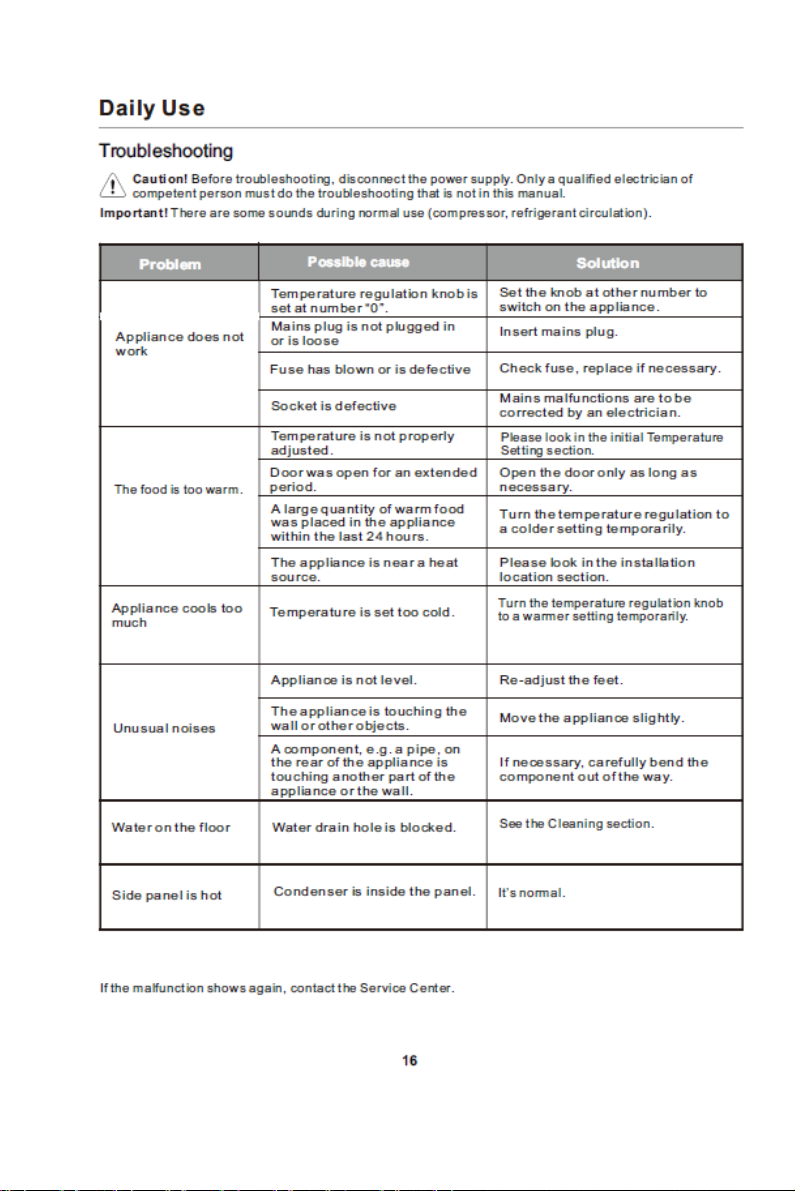
Troubleshooting
Caution!
Before troubleshooting
disconnect the power supply. @nly a /ualified electrician of
competent person must do the troubleshooting that is not in this manual.
Important!
There are some sounds during normal use 0compressor refrigerant circulation1.
Problem
Possible cause
Solution
2ppliance does not
wor!
Temperature regulation !nob is
set at number -O..
*et the !nob at other number to
switch on the appliance.
3ains plug is not plugged in
or is loose
,nsert mains plug.
Fuse has blown or is defecti"e
Chec! fuse
replace if necessary.
*oc!et is defecti"e
3ains malfunctions are to be
corrected by an electrician.
The food is too warm.
Temperature is not properly
ad
4
usted.
Please loo! in the initial Temperature
*etting section.
#oor was open for an e'tended
period.
@pen the door only as long as
necessary.
2 large /uantity of warm food
was placed in the appliance
within the last $( hours.
Turn the temperature regulation to
a colder setting temporarily.
The appliance is near a heat
source.
Please loo! in the installation
location section.
2ppliance cools too
much
Temperature is set too cold.
Turn the temperature regulation !nob
to a warmer setting temporarily.
;nusual noises
2ppliance is not le"el.
<e
&a
d
4
ust
the feet.
The appliance is touching the
wall or other
ob
4
ects.
3o"e the appliance slightly.
2 component e.g. a pipe on
the rear of the appliance is
touching another part of the
appliance or the wall.
,f necessary carefully bend the
component out of the way.
+ater on the floor
+ater drain hole is bloc!ed.
*ee the Cleaning section.
*ide panel is hot
Condenser is inside the panel.
,t
A
s
normal.
,f the malfunction shows again contact the *er"ice Center.

17
-
Warnings
•
This appliance is not intended for use by persons (including children) with reduced
physical.sensory or mental capabilities, or lack of experience and knowladge, unless
they have been given supervision or instruction concerning use of the appliance by
a person
responsible for their safety.
•
Children should be supervised to ensure that they do not play with the appliance.
If the supply cord is damaged, it must be replaced by the manufacturer, its service
agent or similarly qualified persons in order to avoid a hazard.
*
Keep ventilation openings, in the appliance enclosure or in the built-in structure,
clear of obstruction.
*
Do not use mechanical devices or other means to accelerate the defrosting
process, other than those recommended by the manufacturer.
*
Donot damage the refrigerant circuit
•
Do not use electrical appliances inside the food storage compartments of the
appliance, unless they are of the type recommended by the manufacturer.
IMPORTANT DISPOSAL INSTRUCTIONS
As a responsible retailer we care about the environment.
As such we urge you tofollow the correct disposal procedure for your product
and packaging materials, This will help conserve natural recourses
and ensure that it is recycled in a manner that protects health and the
environment.
You must dispose of this product and its packaging according to lacal laws
and regulations.Because this product contains electronic components and
sometimes batteries, the product and its accessories must be disposed of
separately from household waste when the product reaches its end of life.
Contact your local authority to learn about disposal and recycling.
The product should be taken to your local collection point for recycling.
Same collection points accept free of charge.
We apologise for any inconvenice caused by minor inconsistencies in these instructions,
which may occur as a result of product improvement and development.
This manual suits for next models
1
Table of contents
Other Eurotech Design Refrigerator manuals


