Evinrude Trailblazer E2020 User manual

MODEL
AND
SERIAL
NUMBER
ID
ENTIFICATION
EVINRUDE
MOTORS
MILWAUKEE,
WIS.,
U.
S.
A.
MOD
EL
NO.
Q
SER
I
AL
NO.
OUTBOARD
MARINE
CORPORATION
OF
CANADA
LTD
PETERBOROUGH
CANADA
MADE
IN
CANADA
SEE
YOUR EVINRUDE
DEALER
FOR
SNOWMOBILE ACCESSORIES.
PARTS
AND
REPAIR
SERVICE
Be
su
re
that
only
factory
approved
parts
are
used
in
your
;·
ehi
cle
. De
alers
usually
have
a
complete
stock
of
genuine
0:\1C p
arts
a
nd
c
an
p
rovide
expert
service
.
Replacement
pR
rts
not
of
our
manufacture
ha
ve
not
been
approved
f
or
your
Snowmobile.
If
fail
u
re
occ
u
rs
in
parts
not
made
or
approved
by OMC,
your
wRrrRnty
is
void.
Your
dealer
can
be
found
in
the
ye
llow
pages
of
your
phone
directory
under
"Snow
Vehicles."

FOREWORD
his
Ow
ner s
~l
an
u a
l
ha
s b
ee
n
pr
e
pared
to
assist
you
in
th
e
op
e
ration
an
d
~intenance
of
your
n
~
w Evi
nrude
Tr
ail-Bl
aze
r.
It
co
ntai
ns
info
rm
ati
on
J.at
you
s
hou
ld k
now
in order to reali
ze
peak
pe
rf
o
rm
anc
e a
nd
pl
eas
ur
e
~
operatio
n. Please
re
ad
the
e
ntire
b
ook
c
ar
efully
an
d k
ee
p it
han
dy
for
1n.tre
refe
rence
.
Many Evin
rude
Dea
le
rs or OMC S
er
v
icentre
s in s
now
ar
eas will s
tock
s
er
vice
parts
and
will
have service
inform
at
io
n for
th
e
compl
ete uni
t.
For servi
ce,
always
co
nta
ct
you
r Evin
rud
e dealer.
Sp
ec
ify t he
mo
del
n
umb
er of the
com
pl
e
te
un
it
and
the
en
gine spec
if
ic
at
ion
numbe
r.
TABLE
OF
CONTENTS
'
ARTS
AND
REPAIR
SERVItE
WDEL
AND
SERIAL
NUMBER
Insid
e
Fr
o
nt
Cover
Inside
F ro
nt
Cov
er
'PECIF
ICA
TIONS
AND
FEATURE
S . . . . . . . . . . . . .
2-3
'
l,;:C::L
REC
OM
MENDATIONS
. . . . . . . . . . . . . . . . .
4-5
0
1rC
2+4
Fu
el
Conditioner
. . . . . . . . . . . . . . . . . . . . 5
I
~A
K
-
Dl
P
ERIOD
...
............
. .
..
......
5
'
0:::-."TROL
S . . . . . . . . . . . . . . . . . . . . . . . . . . . . . . . 6
-
Sand
Bra
ke
and
Parking
Lock
. . . . . . . . . . . . . . . . . 6
-
::\eutr
al
C
ontrol
.
....
. .
....
.
.....
. .
...
. . . . 6
-
Choke
..
. . .
..
.
....
.
..
.
...........
.
....
. 6
-
Prime
r . .
....
.
....
. . .
..
.
...............
6
-
Co
mp
res
si
on Re
li
ef
. .
...
. . .
....
.· .
.....
.
...
6
- T
hrottl
e . . . . .
.....
.
..
..
. .
..............
6
-
!gnition
/ L
ights
Switch
. . . . . . . . . . . . . . . . . . . . . . 6
-
~anua
l
starter
Handl
e . . . . . . . . . . . . . . . . . . . . . . 6
-
Rever
se
Control
. . . . . .
......
.
............
. 7
-
Headlig
ht
Retractin
g
Lever
. . . . . . . . . . . . . . . . . . . 7
-H
ood
Lo
ck
Lever
. . . . . . . . .
..
.
.. ..
.......
. . 7
-
:..ighter
. .
..
....
.
..
. .
..
. .
.....
. .
..
• . .
...
7
-
Fue
l
Le
ve
l
Gau
ge . . . . . . . . . . . . . . . . . . . . . . . . . 7
-
Tacho
me
ter . . . . . . . . . . . . . . . . . . . . . . . . . . . . . 7
-
Speedo
me
ter
/
Odomet
er
.....................
7
-
Inst
rumen
t
Panel
D
oo
r . . . . . . . . . . . . . . . . . • . . . 7
:
ow
TO
G
ET
STARTED
. . . . . . . . .
........
.
..
8-9
-E
me
r
ge
ncy
starting
. . . . . . . . . . . . . . . . . . . . . . . 9
ETY
PR
ECAUTION
. . . . . . . . . . . . . . . . . . . . .
10
E2020
TUNE-
UP
....
. . . . .
..
•.....
. . .
......
.
...
11
-
Rai
si
ng
H
oo
d . . . . . . . . . . . . . . . . . . . . . . . . . . . 11
-Carbur
e
tor
High Sp
ee
d
Needl
e Valve . . . . . . . . . . . 11
-L
ow
Spee
d Ne
edl
e and
Idle
Adju
s
tm
e
nt
Scr
ew . . . . .
12
-
Spark
Plug
Recomm
e
ndation
and
Repl
acem
e
nt
. . . . .
12
DRIVE
TRAIN
• . . . . . . . . . . . . . . . . . . . . . . . . . . . 13
-Transmission
Be
lt
Inspection
an
d Re
placement
. . . . 13
-Pro
ce
dure
for
Ins
t
all
i
ng
Transm
i
ssion
Belt
. . . . . .
14
-
Brak
e
Adjustment
...
...
..
...
.
..
.
......
..
.
15
-D
r
iv
e
Chain
Adjustm
e
nt
. . . . . . . . . . . . . . . . . . . .
15
-Driv
e
Chain
Lubri
c
ation.
. . . . . . . . . . . . . . . . . . .
16
-
Reversi
ng
Mechanism
Lubrication
. . . . . . . . . . . . .
16
-
Track
Tension
. . . . . . . . . . . . . • . . . . . . . . . • . .
17
-
Tra
ck
Alignm
e
nt
. . . . . . . • . . . . . . . . . . . . . . . .
17
-S
ki
Ali
g
nment.
. . . . . . . . . . . . . . . . . . . . • . . . . .
18
BATTERY
MAINTENANCE
AND
SPECIFICATIONS
. . .
1
~
BATTERY
WARRANTY
.
.•.
.
..
.........
. . . . .
19
OFF
SEASON
STORAGE
. . . .
•.•.•...
.
...
. •
..
•
20
-Aft
er
storing
Bef
or e U
sing
.
.. ..
........
.
....
20
SERVICE
MANUAL
. . . . . . . . . . . . . . . . . . . . . . . . 20
PREVE
N
TIVE
MAINTENANCE
. . . . . . . . . . . . . • . . 21
-
Ca
r
bur
e
tor
-
Air
Filter
. . . . . . . . . . . . . . . . . . 21
-Chain
and
Track
. . . . . . . . . . . . . . . . . . . . . . . . . 21
-
Fu
el
Filter
. . . . . . . . . . . . . . . . . . . . . . . . . . . . 21
LUBRI
C
ATION
RECOMMEND
A
TI
ONS
..
.
.....
....
22
SERVI
CE DIAGNOSIS .
..
. .
.............
...
23
-
24
OWNER'S
WARRANTY
CE
RTIFI
CA
TE
.•
Inside
B
ac
k Co
ver
WARRANTY
SERVICE
. •
.....
..
. . .
Insid
e
Ba
ck
Cover
WARRANTY
. . . . . . . . . . . . . . . . . . . . . . .
Ba
ck C
over
@ OUTBOARD MAR
INE
CORPORATION
ALL
RIGHTS RESERVED
1971
MODELS:
E2025
(ELECTRIC START 1
FEATURES... • Capacitor Discharge (C.D.) Ignition • Dash Mounted Fuel Gauge
•
One
Piece Polycarbonate Hood
• Retractable Sealed Beam Headlights
• Steel Skis With Replaceable
Runners
• Compression Relief
• Super-Range Automatic
Torque-Sensing
Transmission
• Neutral Lockout
• Reverse Gear
2 • Wide Track Stability
• Safety Padded
Steering Bar
• Cigarette Lighter
On
Electric Start Model
• Chrome Wrap-Aroum
Front & Rear
BumpE
• Power
Tune
d Muffle!
"
• Under Seat Storage
Compartment
• Polyurethane Track
• Low Cen.ter Of Gravity
• Reaction Balanced (Opposed Firing)
Two Cylinder Engine
SPECIFICATIONS
AND
FEATURES
CAUTION: Snow
Vehic
les
are
n
ot
manufac
tu
red
for
hi
gh-
way u
se
and
the
ma
n
ufac
t
urer
does
n
ot
repre
sent
that
they
a r e equi
pped
with
all
the
devic
es l
ega
lly
req
uir
ed
for
such
us
e.
DIMENSIONS IN INCHES
LENGTH
- - - - - - - - - - - - - - 103"
WIDTH - - - - - - - - - - - -
37"
HEI
GHT
-
With
windshie
ld - - - - - - -
41.4"
Without
windshie
ld - - - - - - - - - - 3
7"
TRACK
WIDTH - - - - - - - - - - - - - - -
20.5"
ENGINE - - - - - - - - - - OMC 2-
cyc
le
oppos
ed
twin
BORE
- - - - - - - - - - - - - - - - - - 2.750
STROKE -------------------
2.250
DISPLACEMENT
26.7
cu
in
(437
C.C.)
COOLING - - - - - - - - - - - - - - -
·Air
CARB - - - - - - - - - -
Tillo
t
son
HD-llA
IGNITION -----
Capaci
to
r
discharg
e (C.D.)
RA
TING - - -
Maximum
30
HP
at
5800
rpm
VARI
ABLE
SPEED
DRIVE
Centrifuga
l
operated
sheave
en
gages
V-
belt
Overall
r
at
io 5 to 1
FINAL
DRIVE - - - - - - ASA 35
double
c
hain
Sprocket
r
atio
16
to
42
REVERSE TRANSMISSION Dog
clutch
and
bevel
gea
rs
COMPRESSION
RELIEF
T
hi
s
control
is
u
sed
to
ease
starting
by
reduc
i
ng
the
i
ni
ti
al
compre
ssion.
Pull
it
out
before
starting
.
After
machi
ne
is
sta
rted
be
sure
to
pus
h
it
i
n.
MUFFLER
Tuned
for
maxim
um
p
er:
o:-=...._;
BRAKE - - - - - - - - - - -
Disc
typ
e,
han
d ope
:-
.>.l:-::.
TRACK
-
One
pi
ece
mo
l
ded
po
lyuret
hane
t!'"?.CL..
full
y
ad
jusra!::e
SKIS - - - - - - - -
Formed
steel,
eq
ui
ppe
d wi
th
shocl:-
a
bsorbing
leaf
sp
ring
s a::::!
rep
lac
eab
le
wea r rtm::!e:-s
SEA
TING
CAPA
CITY
- -
Two
ad
u
lts
. Vinyl coa
ted
co,e
:-
.
mol
ded
urethan
e foam cust::
o::_
HOOD - - - - - - - - -
FUEL
TANK
CAPACITY
Mo
l
ded
pol
ycar
bo
=
6 U.S.
gallons
or
5 I
mp
e
!""'
.a:
gall
<r
..s
ENGINE
FUEL
M
IX
TURE
- - - - - -
Ga
s/ o
il
rati
o 2
.;
::
GASOLINE -------------
Pre
mi
um
l
eaded
LUBRICANT - - - -
Evinrude
Snowmobil
e
L
ubr
ic
~
::.
(in
Canada
) OMC 2-cy
cl
e
motor
o
il
SPARK
PLUG
AND GAP - - - - - - -
Ch
amp
i
on
l:
J2.j -
.028..
to
.033..
g2;J
HEADLIGH
TS
-
Retractable
sealed
beam
- - - - - -
TAIL
LIGHTS - - - - - - - -
O
UTB
OA
RD
MA
RINE CO
RP
O
RA
TION
reserves
the
ri
ght to
ch
ang
e w
ei
ght, construc-
tion,
mat
e ri
als
,
specif
i
cat
i
on
s or
pr
i
ces
w
it
hout
notic
e and
witho
ut
obligat
ion.
3
FUEL
RECOMMENDATIONS
The
corre
ct
fuel
mixture
ra
tio
is
50
par
ts
of
a g
ood
g
rade
,
regu
l
ar
lead
ed
gasoline
to
one
part
Evinrude
50:1
Sn
ow-
mobil
e
Lubr
ican
t , or
in
Canada
OMC 2-
cycle
motor
011.
In
some
gaso
lines
the
amount
of l
ea
d
has
b
een
replaced
with
phosphorus
.
Since
ph
osph
o
rus
is
detrim
e
nt
al
when
used
in
2-
cyc
le
engines,
th
e
us
e
of
these
gas
ol
in
es
is
not
r
ec
ommended
.
lf
rec
om
m
ende
d l
ubr
ic
ant
is
not
available,
use
an
ash
l
ess
outboard
or
ash
l
ess
sn
owmob
il
e
oil
m
ix
ed
at
24:1
ratio
.
Automotive
oils
and 24:1
premix
fue
ls
shoul
d
not
be
u
sed
exc
e
pt
in
eme
r
ge
nc
ies
when
the
reco
mm
en
ded
o
il
is
not
available.
It
sh
o
uld
be
r
ecog
ni
zed
that
a
ut
omo
ti
ve
o
ils
ar e
formulated
to
fit
the
nee
ds
of
4-
cycle
a
utom
ot
ive
en
gi
nes
and E
vi
nr
ude 50:1 Snowmobile
Lubricant
and
OMC
2-
cyc
le
mo
t
or
oils
ar e
formulated
f
or
t
he
2-
cycle
en
gine
installed
in
your
snowmobile.
4
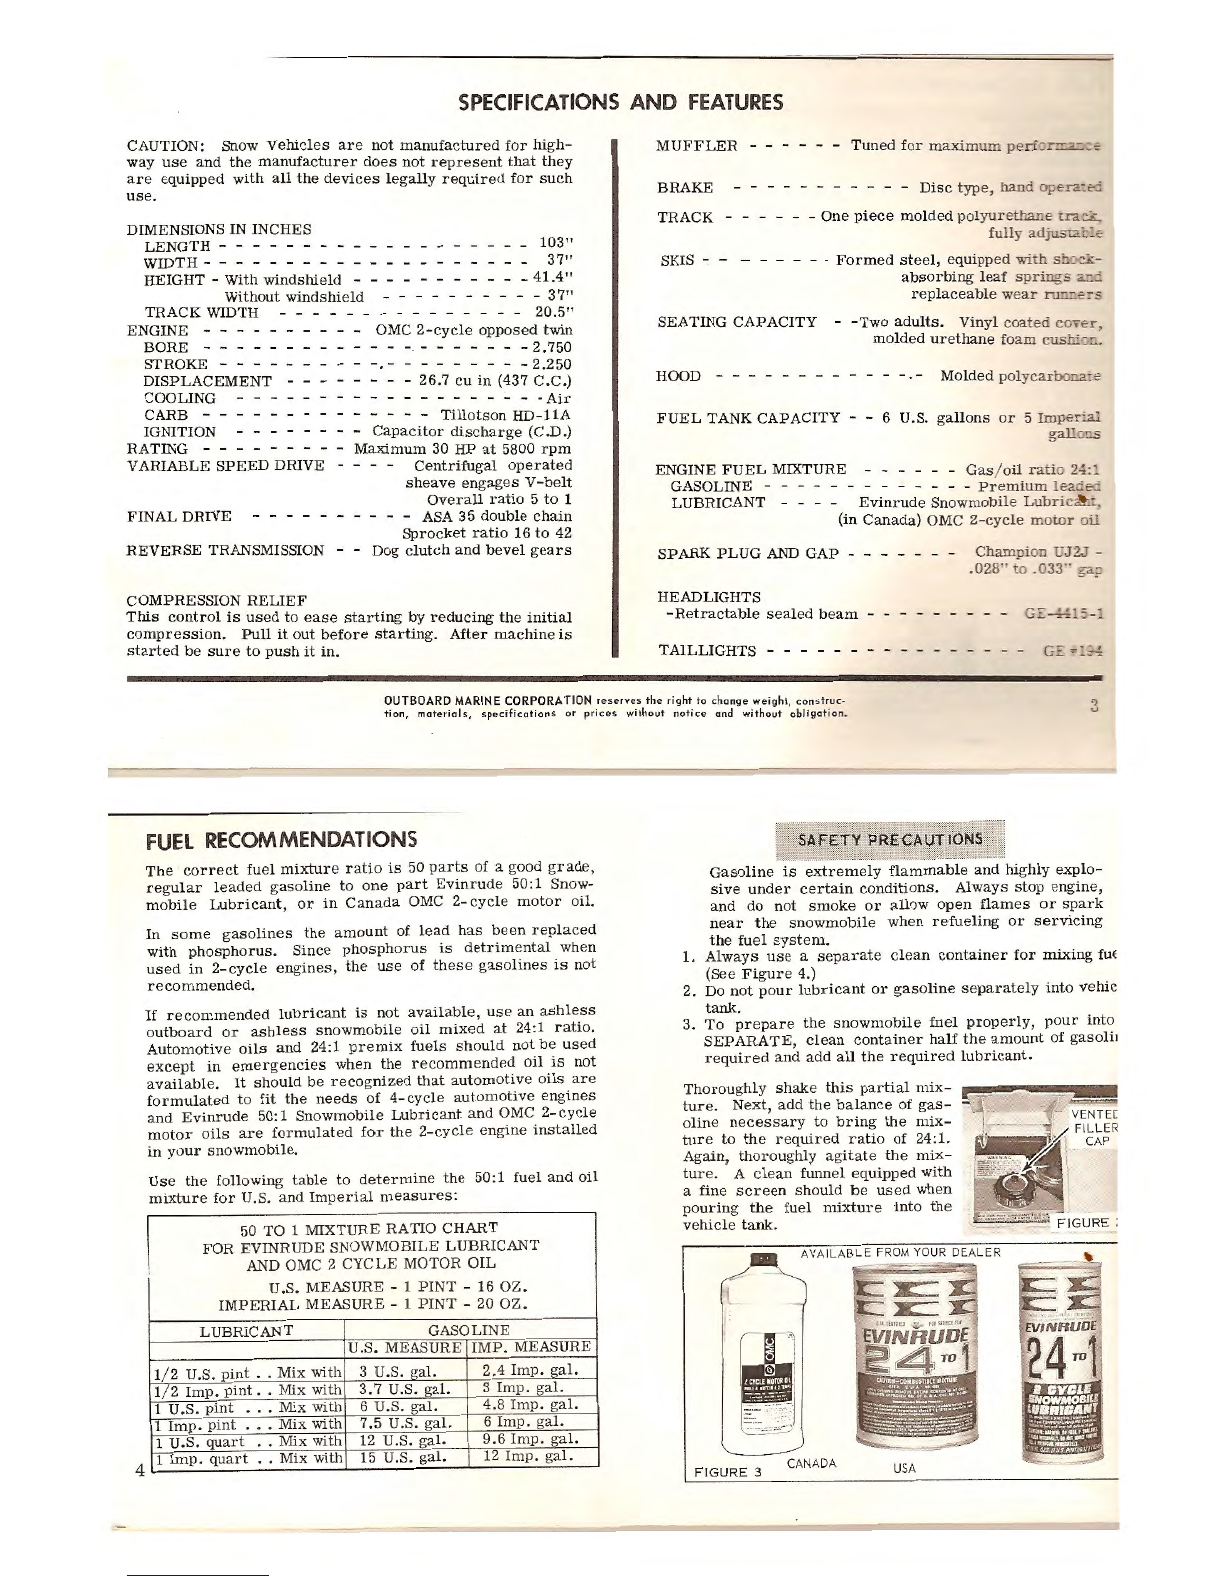
Use
th
e
follo
wing t
ab
le
to
determ
in
e
the
5
0:
1 fuel
and
oil
miXture
for
U.S. a
nd
Imperial
mea
sur
e
s:
I 50 TO 1 MIXTURE RATIO
CHART
FOR
EVINRUDE SNOWMOBILE
LUBRICANT
AND OMC 2
CYCLE
MOTOR
OIL
U.S. MEASURE - 1
PINT
-16
OZ.
IMPERIAL
MEASURE - 1
PI
N
T-
20 OZ.
LUBRICANT GASOLINE
U.S. MEASURE
IMP.
MEASU
RE
1/ 2 U.S.
pint
. .
Mix
with
3 u.s.
gal.
2.4
Imp.
ga
l.
1/ 2
Imp.
pint
. .
Mix
with
3.
7 u.s.
gal.
3 Imp.
ga
l.
1
U.S.
pint • . .
Mix
with 6 u.s.
ga
l.
4.8
Imp.
g
al.
1
Imp.
pint
.
•.
Mix
with
7.5
U.S.
ga
l.
6
Imp.
gal.
1 U.S. q
ua
rt
.•
Mix
with 12 U.S.
ga
l.
9.6
Imp
.
ga
l.
1
Imp.
qu
art
..
Mix
with 15 U.S.
gal.
12 I
mp.
ga
l.
Gasoline
is
extreme
ly
flammable
and
hi
g
hl
y explo-
sive
und
er
certain
condition
s.
Alwa
ys
stop
engi
ne,
and
do
not
sm
oke or a
ll
ow
open
fl
ames
or
spark
n
ea
r t
he
snowm
ob
il
e
whe
n
refu
e
lin
g
or
servici
ng
th
e
fuel
system.
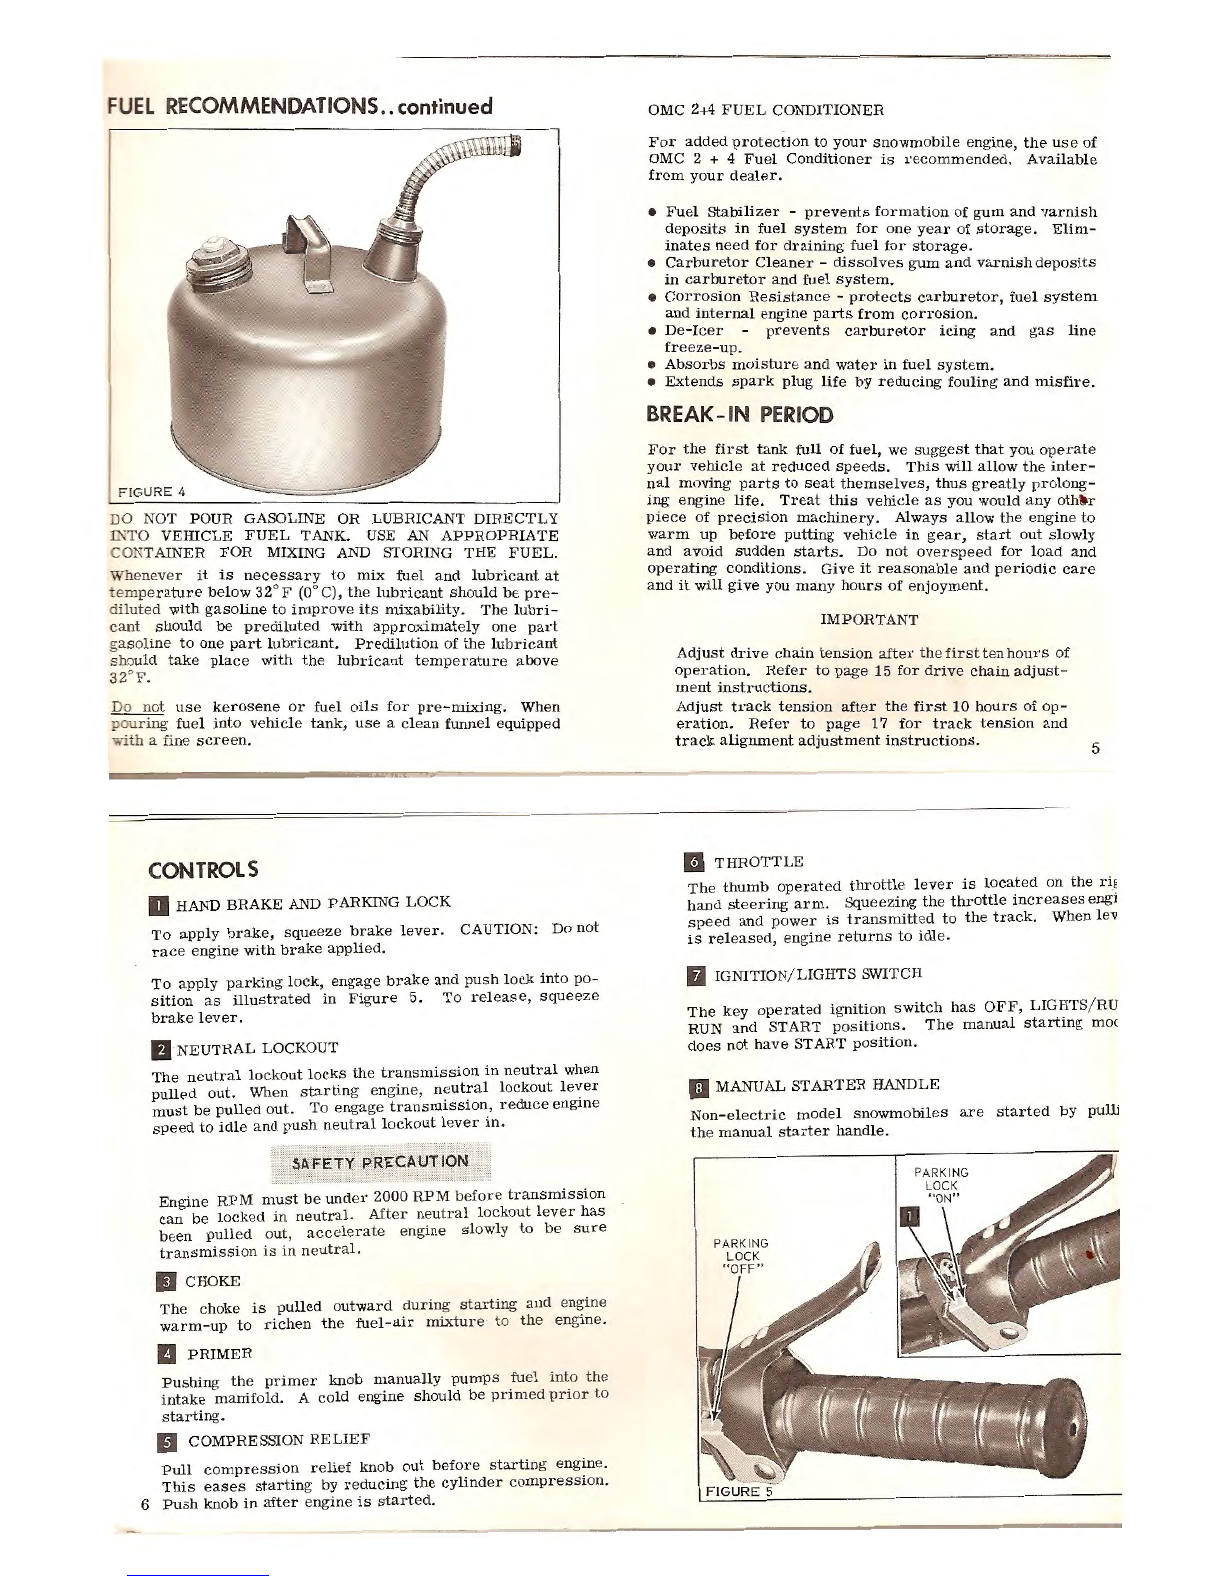
1.
Always
use
a
separat
e c
lean
containe
r
for
mixin
g
fuE
(S
ee
Fi
gure
4.)
2. Do
not
pour
lubri
cant
or
gasoline
separately
into
vehic
ta
nk.
3.
To
prepare
the
snowmob
il
e
fuel
prope
rly, po
ur
into
SEPARATE
clean
co
ntain
er ha
lf
t
he
amount
of
g
asolil
requ
i
red
and add
a
ll
the
required
lubri
cant
.
Thoroughly
shake
this
part
i
al
mix
-
tur
e.
Next,
add
the
balance
of
ga
s-
o
lin
e
necessary
to
bring
th
e m
ix-
ture
to
the
required
rati
o
of
24:
1.
Agai
n,
thoroughly
agitate
the
mix
-
tu
re
. A
clea
n
funnel
eq
u
ipped
with
a
fine
screen
sh
o
uld
be
us
ed
when
pou
rin
g
th
e
fuel
mix
tu
re
i
nto
the
vehicl
e
tank.
F I
GURE
3
CAN
A
DA
USA
FUEL
RECOMMENDATIONS
..
continued
DO NOT
POUR
GASOLINE OR LUBRICANT DI
RECTLY
IXT
O
VEHICLE
FUEL
TANK. USE AN
APPROPRIATE
CONTAINER
FOR
MIXING AND STORING
THE
FUEL
.
Whe
never
it
is
necessary
to
mix
fuel
and
lubricant
at
te
mp
erature
below
32
°F (0°C), t
he
lubricant
should
be
pre
-
dil
ut
ed
with
gasoli
ne
to
improve
its
mixability.
The
lu
bri
-
c
ant
should
be
prediluted
with
approximate
ly
one
part
ga
soline
to
one
part
lubricant.
Pre
dilu
tion
of
the
l
ubrica
nt
sho
uld
take
place
with
the
lubricant
temperature
above
32°F .
Do
not
use
kerosene
or
fuel
oils
for
pre
-
munng.
When
pou
ring
fuel
into
vehicle
tank
,
use
a
clean
fu
nn
el
equ
ipp
ed
v.it
h a
fine
screen.
CONTROLS
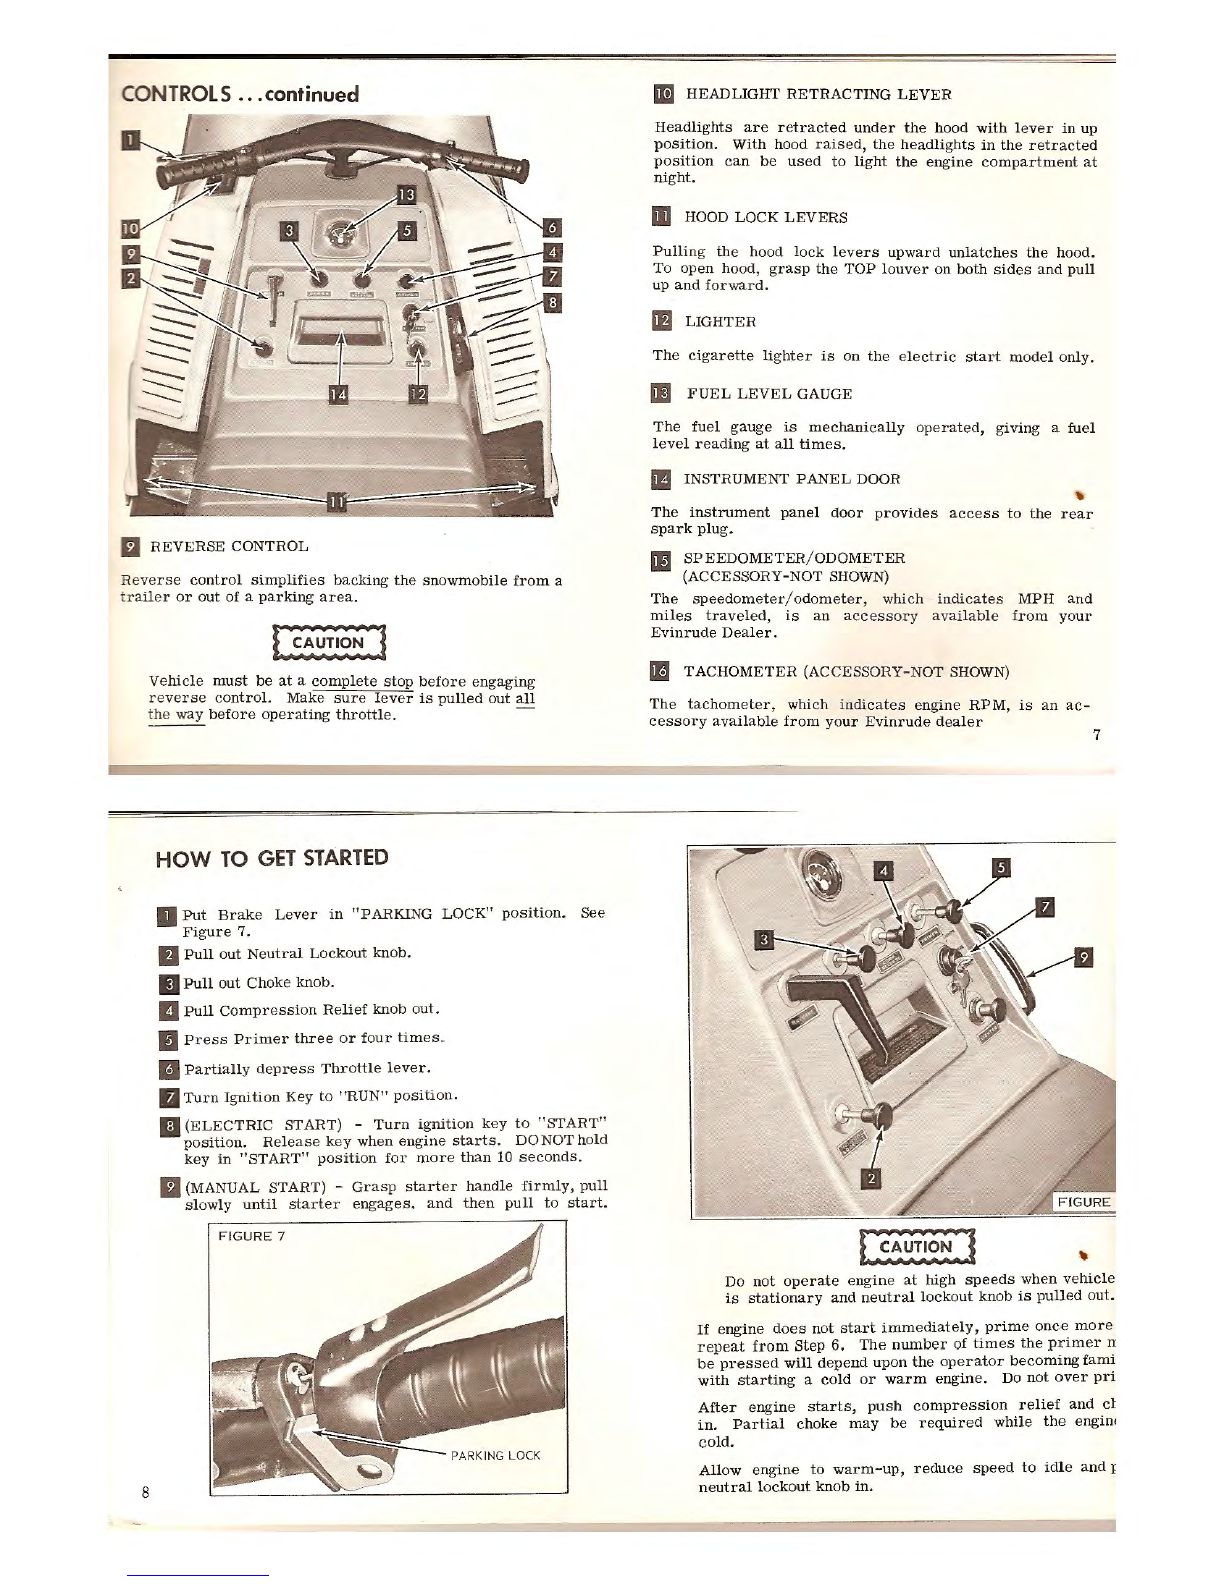
D HAND
BRAKE
AND pARKING LOCK
To
apply
brake,
squeeze
brake
l
ever.
CAUTION: Do
not
race
eng
ine
with
brake
applied.
To
apply
parking
lock,
en
g
age
b
rak
e
and
push
lock
into
po-
sition
as
illustrated
in
Figure
5.
To
release
,
squee
ze
brake
l
ever.
II
NEUTRAL
LOCKOUT
The
neutral
lo
c
kout
locks
the
transmission
in
ne
utral
when
pulled
out.
When
startin
g
engine
,
neutral
lo
cko
ut
l
ev
er
mu
st
be
pulled
out.
To
engage
transmission,
reduce
engme
speed
to
i
dle
and
push
neutral
lock
out
lever
m.
SAFETY
PRECAUTION
En
gine
RPM
must
be
und
er 2000
RPM
before
trans
mi
ssion
can
be
locked
in
neutral.
After
ne
utral
lockout
lever
has
been
pulled
o
ut
,
acc
el
era
te
en
gine
sl
owl
y to
be
sur
e
transmission
is
in
neu
t
ral.
II
CHOKE
The
choke
is
pulled
outward
duri
ng st
arti
ng
an
d
en
g
in
e
warm-up
to
richen
the
fuel
-a
ir
mixture
to t
he
eng
in
e.
II
PRIMER
Pushing
th
e
primer
knob
manually
pumps
fuel
int
o the
intak
e
manifold
. A
cold
engine
should
be
pn
med
pn
or
to
starting.
11
COMPRESSION
REL
IEF
Pull
compression
relief
knob
out
before
startin
g
engine.
This
e
ases
starting
by
reducing
th
e
cylinder
c
ompression.
6
Push
knob
in
after
engin
e
is
started.
OMC 2+4
FUEL
CONDITIONER
For
added
protection
to
your
snowmobile
en
g
ine,
the
use
of
OMC 2 + 4
Fue
l
Conditioner
is
recommended.
Availab
le
from
yo
ur
dealer.
•
Fuel
stabilizer
-
prevents
formation
of
gum
and
varnish
depos
its
in
fuel
system
for
one
year
of
storage.
Elim
-
inates
need
for
draining
fuel
for
storage
.
•
Carb
ur
etor
Cleaner
-
disso
l
ves
gum
and
varnish
deposi
ts
in
carburetor
and
fuel
system.
•
Corrosion
Resistance
-protects
carburetor,
fue
l
syst
em
and
internal
engine
parts
fr
om
corros
ion.
•
De
-Icer
preve
nts
ca
rbu
retor
icing
and
gas
line
freeze
-
up.
•
Absorbs
moisture
and
water
in
fuel
system.
•
Extends
spark
pl
ug
life
by
reducing
fouling
and
misfire.
BREAK
-IN
PERIOD
For
the
first
tank
full
of
fuel,
we
suggest
that
you
operate
your
vehicle
at
red
uc
ed
speeds
.
This
will
a
ll
ow
the
inter-
nal mowing
parts
to
seat
th
emselves,
th
us
greatly
prolong-
ing
engi
ne
life
.
Treat
this
vehicl
e
as
you
would
any
ot
h' r
pi
e
ce
of
precision
machinery.
Always
allow
the
engine
to
warm
up
before
putting
vehicle
in
gear,
st
art
out
slowly
and
avoid
sudden
starts.
Do not
over
s
peed
for
load
and
operating
conditions.
Give
it
reasonab
le
and
periodic
c
are
and
it
will
g
iv
e
you
many
hours
of
enjoymen
t.
IMPORTANT
Adjust
drive
c
hain
tensi
on
afte
r
the
firs
tten
hours
of
operation.
Refer
to
page
15 f
or
d
rive
chain
adjust
-
ment
ins
tructions.
Adjust
track
tension
after
the
first
10
hours
of
op-
erat
ion.
Refer
to
page
17
for
track
tension
and
track
alignment
adjustment
in
structions.
B
THROTTLE
5
The
thumb
operat
ed
throttle
l
ever
is
l
o
c
a
~
ed
on
th
e
ri~
hand
st
ee
ring
arm
.
Squeezin
g
the
throttl
e
mcreases
eng1
speed
and
power
is
transmitt
ed
to
th
e
tra
c
k.
When lev
is
releas
e
d,
engin
e
returns
to
i
dle.
D IGNITION/LIGHTS SWITCH
The
key
operated
ignition
switch
has
OFF,
LIGHTS/ RU
RUN
and
START
pos
iti
ons.
The
manual
startm
g moe
does
not
have
START
position
.
liJ
MANUAL
START
ER HANDLE
Non-elec
t
ric
model
snowmobiles
are
started
by
pull
i
the
manual
start
er
handle.
CONTROLS
.
..
continued
Ill
REV
ERSE
CONTRO
L
Rever
se
control
simplifies
back
i
ng
the
snowmo
b
ile
from
a
t
ra
iler
or
out
of
a
parking
area
.
Vehicl
e
must
be
at
a
complete
stop
before
en
gaging
reve
rse
control.
Make
sure
l
ever
is
pulled
out
all
t
he
way
before
operating
throttle
. -
8
HOW
TO
GET
STARTED
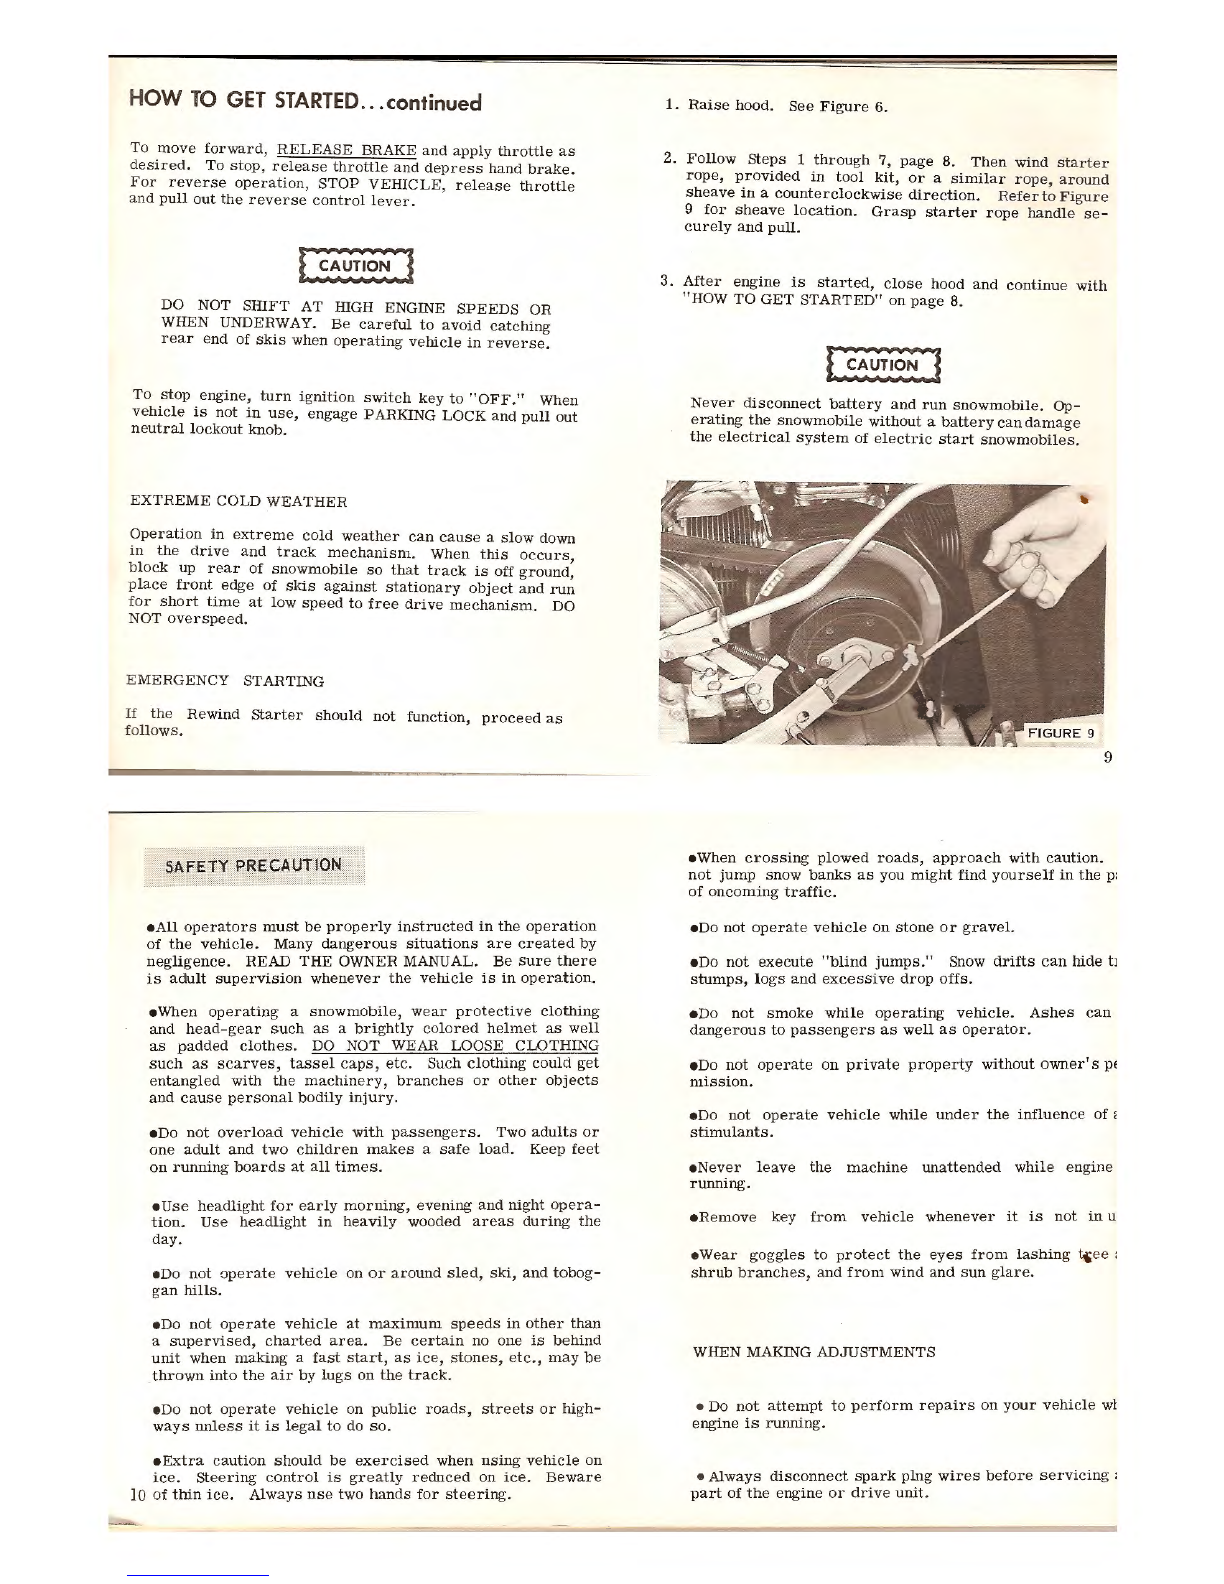
II
Put
Brake
L
ever
in
"PARKING LOCK"
position.
S
ee
Figure
7.
IJ
Pull
o
ut
Neutral
Lockout
knob
.
IJ
Pull
out
Choke
knob
.
II
Pull
Compression
Relief
knob
out.
II
Press
Primer
three
or
four
time
s.
IJ
Partially
depres
s
Throttle
lev
er .
11
Turn
Ig
nition
Key
to
"RUN"
position
.
II
(ELECTRIC
START} -
Turn
ignition
key
to
"START"
posit
i
on
. Re
lease
key
when
engme
starts.
DO
NOT
hold
key
in
"S
TART
"
positio
n
for
more
than
10
seconds.
II
(MANUAL START) -
Grasp
starter
handle
firmly,
pull
slow
ly
un
t
il
starter
engages
. a
nd
th
en
pull
to
start
.
1m
HEAD
LI
GHT
RETRAC
T
IN
G
LEVER
Headlights
are
r e
tracted
u
nder
t
he
hood
wi
th
le
ver
in
up
posi
ti
o
n.
With
h
ood
ra
i
sed,
the
headlights
in
t
he
retracted
position
can
be
used
to
ligh
t
the
eng
i
ne
compartm
ent
at
night.
ID
HOOD LOCK
LEVERS
Pull
in
g
th
e
hood
lock
levers
upwa
rd
unlat
ches
the
ho
od
.
To
open
hood,
grasp
t
he
TOP
l
ouver
on
bo
th
sides
and pu
ll
up
and
forward.
IB
LIGHTER
The
cigarette
ligh
ter
is
on
th
e
elec
t
ric
st
art
model
only.
IEJ
FUEL
LEVEL
GAUGE
The
fuel
gauge
is
mechanically
operated,
giving
a
fuel
level
reading
at
all
times.
II
INSTRUMENT
PANEL
DOOR
The
in
strument
panel
door
provides
access
to
th
e
rear
spark
plug.
II
SPEEDOMETER
/
ODOMETER
(ACCESSORY-NOT SHOWN}
The
speedometer/
odometer,
which
indicates
MPH
and
miles
tra
ve
led,
is
an
accessory
available
from
yo
ur
Ev
i
nr
u
de
Dea
l
er.
lf':1
TACHOMETER
(ACCESSORY- N
OT
SHOWN)
The
tachometer
,
which
in
di
ca
tes
engine
RPM
, is
an
ac -
cessory
ava
il
ab
le
from
your
Ev
in
r
ude
dea
l
er
7
Do
not
operate
engine at
high
speeds
when
vehicl
e
is
stationary
and
neutral
lock
out
knob
is
pulled
out.
If
eng
i
ne
does
not
st
art i
mm
ed
ia
tely,
prime
once
m
ore
r
epea
t f
rom
S
tep
6.
The
number
of
times
the
primer
n
be
pressed
will
depend
up
on the
operator
becoming
fami
with
starting
a
co
ld
or
war
m
engi
n
e.
Do n
ot
over
pri
After
eng
i
ne
starts,
push
co
mpress
ion
reli
ef
and
ct
in.
Partial
choke
m
ay
be
re
q
uire
d
while
the
engin•
co
ld
.
Allow
engi
ne to
wa
rm
-
up,
reduce
s
pe
ed
to
idl
e
and
I
ne
utral
loc
kout
knob
i
n.
HOW
TO
GET
STARTED
..
.
continued
To
move
forward,
RELEASE
BRAKE
and
apply
t
hrottle
as
desired
.
To
stop
,
release
th
r
ottle
and
depress
hand
brake
.
For
reverse
operation,
STOP
VEHICLE,
release
throttle
an
d
pull
out
the
reverse
control
l
ev
er.
DO
NOT
SffiFT
AT
ffiGH ENGINE
SPEEDS
OR
WHEN UNDERWAY.
Be
careful
to
avoid
catching
rear
end
of
skis
when
operating
vehicle
in
reverse
.
To
stop
engine
,
turn
ignition
switch
key
to
"OFF
."
When
ve
hicle
is
not
in
use,
engage
PARKING LOCK
and
pull
out
neutral
lockout
knob
.
EXTREME
COLD WEATHER
Operat
i
on
in
extreme
co
ld
weather
can
cause
a
slow
down
in
the
drive
and
track
mechanism.
When
this
occurs,
blo
ck
up
rear
of
snowmobile
so
that
track
is
off
ground,
p
lace
front
edge
of
skis
against
stationary
object
and
run
fo
r
short
time
at
low
speed
to
free
drive
mechanism.
DO
NOT
overspeed.
EME
RGENCY STARTING
If
t
he
Rewind
starter
should
not
function,
proceed
as
follo
ws.
SAFETY PRECAUTION
e
All
opera
to
rs
must
be
properly
instructed
in
the
operatio
n
of
the
vehicle
.
Many
danger
o
us
situations
are
created
by
negligence
. READ
THE
OWNER MANUAL.
Be
sure
there
is
adult
supervision
whenever
the
vehicle
is
in
operation.
e
When
operating
a
snowmobile,
wear
protectiv
e
clothing
and
head-gear
such
as
a
brightly
colored
helm
et
as
well
as
padded
clothes
. DO N
OT
WEAR LOOSE CLOTHING
such
as
scarves,
tassel
caps,
etc.
Such
clothing
could
get
e
ntangled
with
the
machinery,
branches
or
other
objects
and
cause
personal
bodily
injury.
eDo
not
overload
vehicle
with
passengers
. Two
adults
or
one
adult
and
two
children
makes
a
safe
load.
Keep
feet
on
runnin
g
boards
at
a
ll
times
.
e
Use
headlight
for
early
morning,
evening
an
d
night
opera-
tion
.
Use
headlight
in
heavily
wooded
areas
during
the
day.
e
Do
not
oper
a
te
v
ehicle
on
or
around
sled,
sk
i,
an
d
tobog-
gan
hills.
e
Do
not
operate
v
ehicle
at
max
imum
speeds
in
other
than
a
supervised,
charted
area
.
Be
cert
a
in
no one is
behind
unit
when
making
a
fast
start,
as
ice,
stones,
etc.
, m
ay
be
thr
ow
n
into
the
air
by
lugs
on
th
e
track
.
eDo
not
operate
v
ehicle
on
public
roads,
streets
or
high-
w
ays
unless
it
is
legal
to
do
so.
•
Extra
caution
should
be
exercised
when
using
vehicle
on
ice
.
Steering
control
is
greatly
reduced
on
ic
e.
Beware
10
of
t
hin
ice.
Always
use
two
hands
for
steering
.
1.
Rai
se
hood.
See
Figure
6.
2.
Follow
Steps
1
thro
u
gh
7,
page
8.
Then
win
d
st
arter
rope,
provided
in
tool
kit,
or
a
similar
rope,
around
sheave
m a
counterclockwise
direction.
Refer
to
Fi
gure
9 f
or
sheave
location.
Grasp
starter
rop
e
handle
se-
c
urel
y
and
pull
.
3.
After
engine
is
started,
close
ho
od
and
continu
e w
ith
"HOW
TO
GET
STARTED"
on
page
8.
Never
disco
nn
ect
battery
and
run
snowmobile.
Op-
erating
the
sn
ow
mobile
without
a
battery
can
dam
age
the
ele
c
tr
ical
system
of
electr
ic
start
snowmobiles.
9
•When
crossing
plowed
roads,
approach
with
caution.
n
ot
jump
snow
banks
as
you
might
find
yourself
in
the
p:
of
oncoming
traffic.
eDo
not
operate
vehicle
on
stone
or
grave
l.
eDo
not
execute
"
blind
jumps."
Snow d
rifts
can
hide
tJ
stumps,
logs
and
excessive
drop
o
ffs.
eDo
not
smok
e
while
operating
vehicle
.
As
he
s
can
dangerous
to
passengers
as
well
as
o
perator.
e
Do
not
operate
on
private
property
wit
hout
owner's
p!
mission.
eDo
not
operate
veh
ic
le
whil
e
under
the
influence
of
~
stimulan
t
s.
e
Never
leave
the
machine
unattended
while
e
ngine
running
.
•R
emove
k
ey
fr
om
ve
hicl
e whe
ne
ver
it
is
not
in
u
e
Wear
goggles
to
protect
the
eyes
from
lashing
"
ee
:
shrub
branches,
and
from
w
ind
and
sun
g
lar
e.
WHEN MAKING ADJUSTMENTS
• Do
not
attemp
t to
perform
repairs
on
your
vehicle
wt
engine
is
running.
•
Always
disconnect
spark
plug
wires
before
s
ervici
ng
:
part
of
the
engine
or
dr
i
ve
un
it.
TUNE
-UP
RAISING HOOD
1.
Pull
hood
lock
levers
up
to
release
hood
lat
ches
.
See
Fi
gur
e 6.
2.
Grasp
top
l
ouver
on
both
s
id
es
and
pull
up
and
forward
.
A
retainer
bar
will
prevent
hood
from
being
dama
ged
agains
t
the
front
bumper.
3. When
closin
g
hoo
d,
end
of
retainer
bar
mus
t
be
held
up
so
that
it
does
not
ca
tch
on
la
tch
.
CA
RB
U
RETO
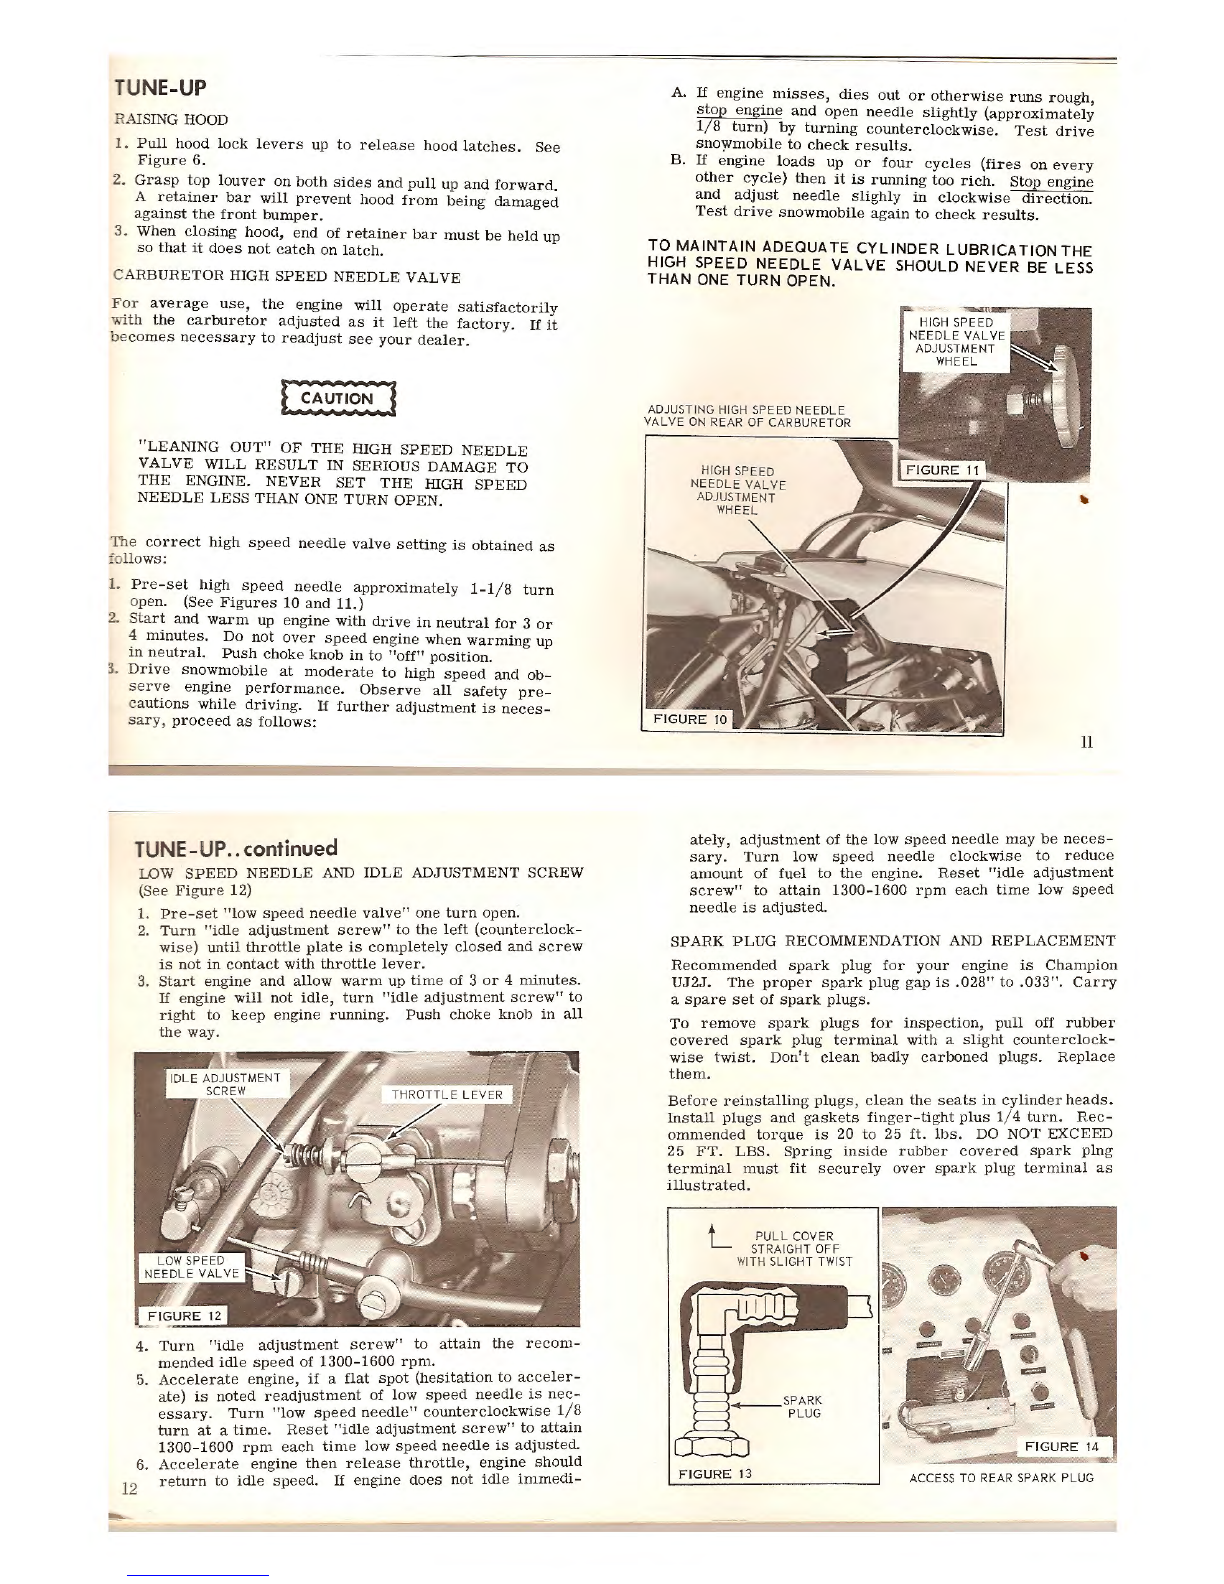
R HIGH S
PE
ED
NEED
LE
VALVE
For
average
us
e,
the
engine
w
ill
operate
satisfactorily
With
the
carb
uretor
adjusted
as
it
left
the
f
acto
r y.
If
it
bec
omes
n
ec
essar
y
to
readjust
see
yo
ur
dea
l
er.
"LEANING
OUT"
OF
THE
HIGH
SPEED
NEEDLE
VAL
VE
WILL
RESULT
IN SERIOUS DAMAGE
TO
THE
ENGINE. NEVER
SET
THE
HIGH
SPEED
N
EEDLE
LESS THAN ONE TURN
OPEN
.
The
correct
high
speed
n
eed
le
valve
setting
is
ob
t
ained
as
fo
llo
ws:
1. Pr e-
se
t
high
sp
eed
n
eedle
approximately
1-1
/ 8
turn
o
pen
. (See
Figures
10
and
11.)
2.
Sl
art
and
warm
up
engine
with
drive
in
ne
utr
al
for
3
or
4
min
ute
s.
Do
not
over
speed
engine
when
warm
ing
up
m ne
utral.
Push
choke
knob
in
to
"
off"
pos
ition.
3.
Dr
ive
snowm
ob
il
e
at
moderate
to
high
speed
and
ob-
se
rve
eng
in
e
performance.
Observe
all
safety
pre-
c
au
twns
wh
ile
dri
ving.
If
further
adjustment
is
neces-
sary,
p
roceed
as
follows:
TUNE-
UP
..
continued
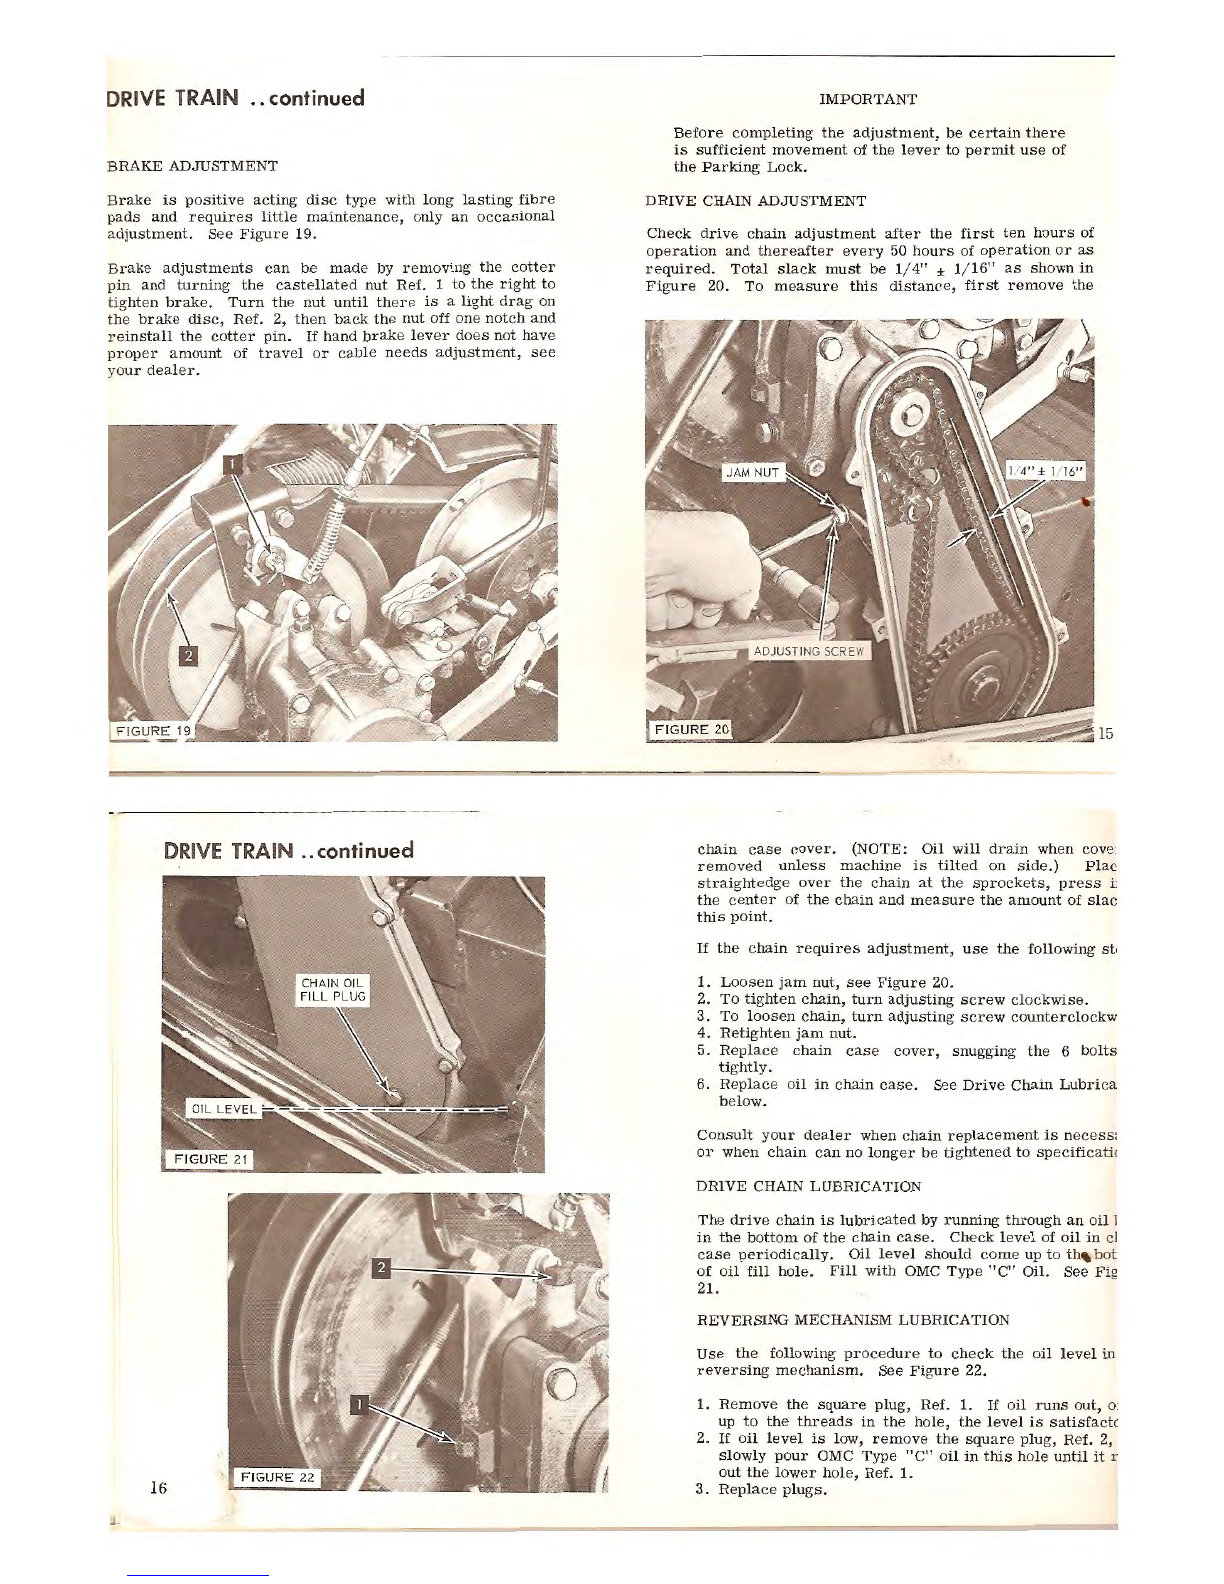
LOW
SP
EED
NE
EDL
E
AND
IDLE
ADJUSTMENT SCREW
(
See
Fi
gur e
12
)
1. Pr e-s
et
"
low
speed
needl
e
va
lv
e"
one
turn
o
pen.
2.
Tu
r n "
idle
adjustment
screw
"
to
th
e
left
(counterc
l
ock
-
wi
se
) un
til
throttl
e
plate
is
completely
closed
and
screw
is
not
in
c
ontact
with
throttle
l
eve
r.
3.
Start
engine
and
allow
warm
up
tim
e
of
3
or
4
min
u
tes
.
If
engi
ne
will
not
idle,
tu
rn
"
id
le
adjustment
screw"
to
ri
ght
to
k
ee
p eng
in
e r unning.
Push
ch
oke
knob
in
a
ll
the
w
ay
.
4.
Turn
"idl
e
adj
us
tment
screw
"
to
attain
the
re
com-
mende
d
idle
speed
of
13
00
-1600
rpm.
5.
Accelerate
engi
ne,
if
a
flat
sp
ot
(hesitation
to a
cceler
-
ate)
is
noted
readjustme
nt
of
low
speed
ne
edle
is
nec-
essary
.
Turn
"l
ow
sp
e
ed
needle
"
counte
r
clo
c
kwis
e 1/ 8
turn
at
a
tim
e.
Reset
"idl
e
adjustm
e
nt
screw"
to at
tain
1300-
1600
rpm
each
tim
e low
speed
needle
is
adjusted.
6. Ac
celerate
engine
then
relea
se
throttle,
eng
in
e
should
r e
tu
r n to
idle
speed.
If
engine
does
not
idle
immedi
-
12
A.
If
engi
n
e.
misses,
dies
out
or
oth
er
wise
runs
ro
ug
h,
stop
engme a
nd
open
needl
e
slightly
(ap
pr
oximately
1/ 8 t
urn)
by
turnin
g
counter
c
lockwise
.
Test
drive
sno~mobile
to
check
r
esults.
B.
If
engine
load
s up
or
fo
ur
cy
cl
es
(fir
es
on
ev
ery
other
c
ycle)
then
it
is
runn
ing
to
o
rich.
Stop
e
ngine
and
adjust
n
ee
dl
e
slighly
in
clockwis
e
directio
n.
Test
d
ri
ve
snowmobile
ag
ain
to
ch
e
ck
resu
lts.
TO
MAINTAIN
ADEQUATE
CYLINDER
LUBRICATION
THE
HIGH SPEED
NEEDLE
VALVE
SHOULD
NEVER
BE
LESS
THAN ONE TURN OPEN.
ADJUST ING HI
GH
SPEED
NEEDL
E
VALV
E ON RE
AR
OF CARBURETOR
HI
GH
S
PEED
N
EE
DLE
VA
LVE
ADJUSTM
ENT
WHEEL
ll
ately
,
adjustment
of
th
e
low
sp
e
ed
needl
e
ma
y be n
ece
s-
sary.
Turn
low
sp
e
ed
need
le cl
ockw
i
se
to r
educe
amount
of
fuel
to
t
he
engine.
Rese
t "
idl
e
adjus
t
ment
screw"
to
atta
in 1300
-1
600
rpm
each
ti
me
lo
w
sp
ee
d
need
le
is
adjus
te
d.
SPARK
PLUG
RECOMMENDATION AND
REPLACE
M
ENT
Recommended
sp
ark
plug
for
yo
ur
e
ngine
is
Cham
p
ion
UJ2J
.
The
prop
er
spark
p
lu
g
ga
p
is
.
02
8" to
.033".
Ca
r ry
a
spare
set
of
spa
rk
plugs.
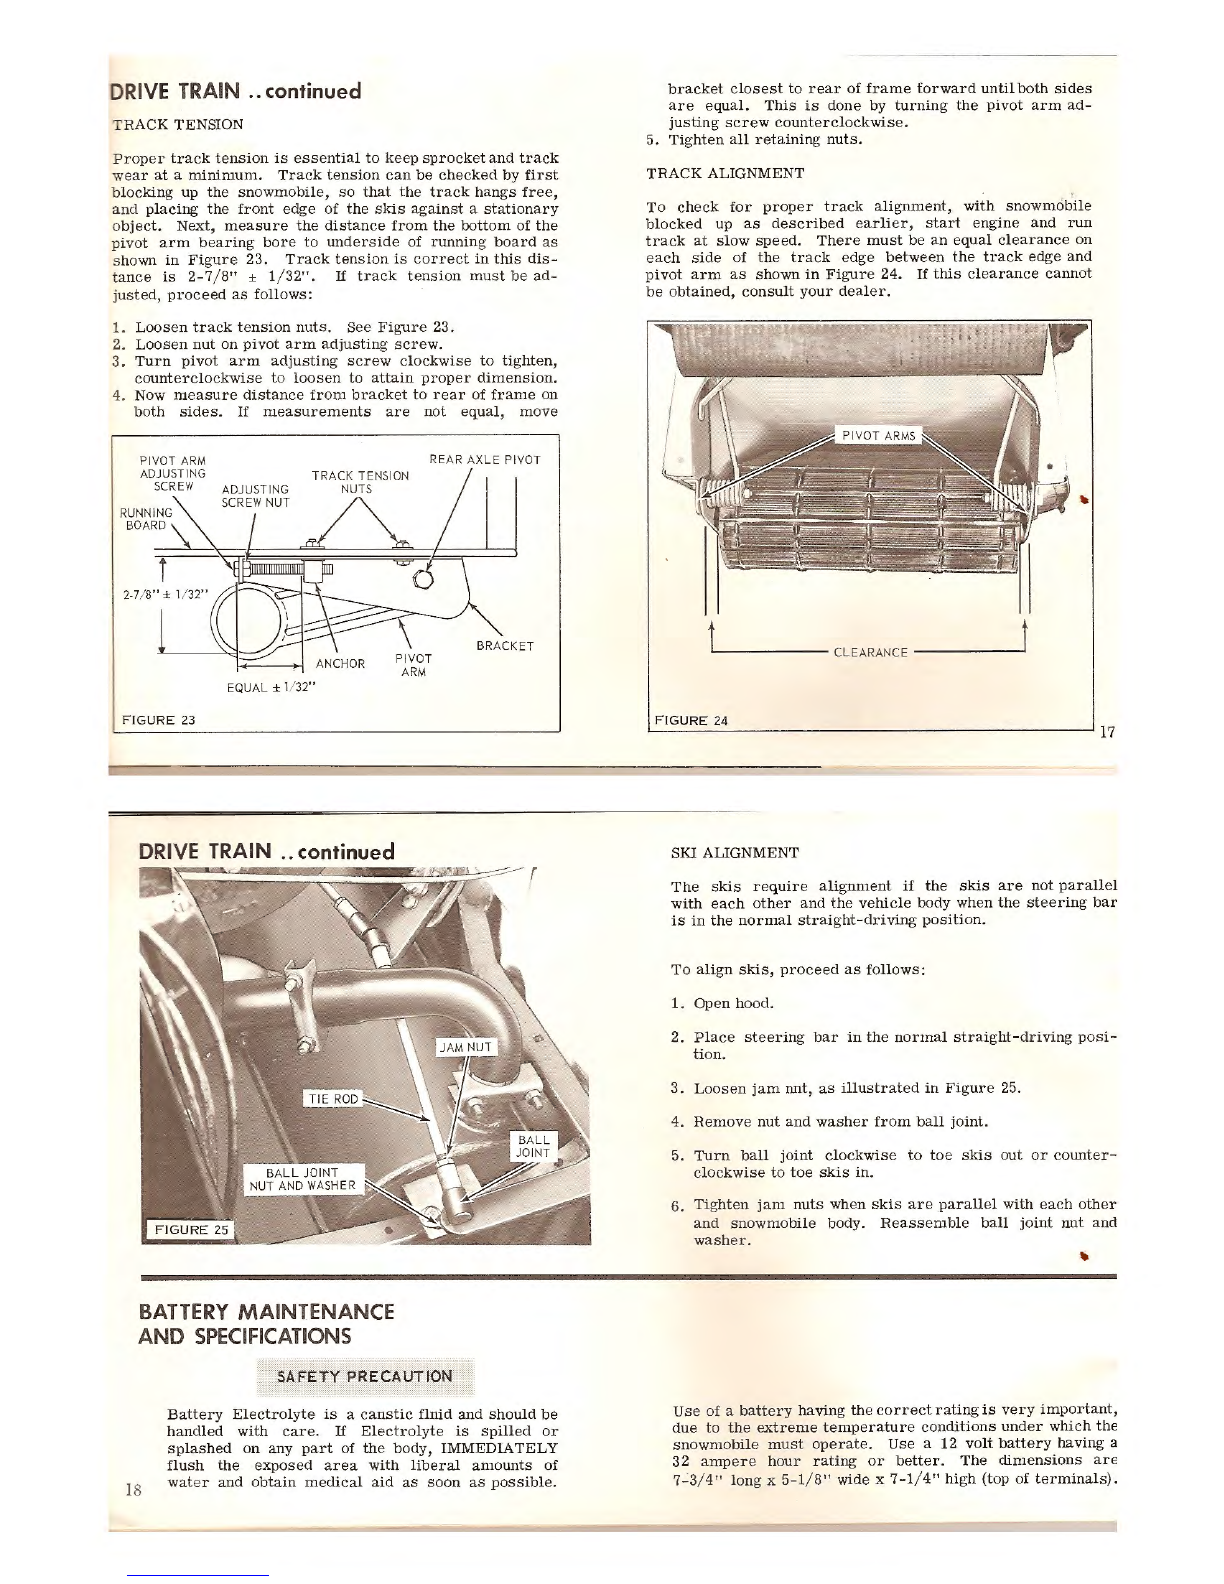
To
remove
spark
plugs
for
in
spe
ct
ion
,
pull
off
ru
bb
er
cov
er ed
spark
p
lu
g
te
r
minal
with
a
slight
count
e
rc
l
ock
-
wise
twist.
Don't
cl
e
an
bad
ly ca
rboned
plugs.
Repla
ce
t
hem.
Befor
e
reinstalling
plugs
,
cl
e
an
t
he
seats
in
cy
lind
er h
ead
s.
Install
pl
u
gs
and
ga
skets
fin
g
er
-tig
ht
plus
1/ 4
turn
. R
ec
-
omm
e
nd
ed
tor
que is
20
to 25 f
t.
lb
s. DO N
OT
E
XCEED
25
FT.
LBS.
Spri
ng
i
ns
i
de
r ubber co
ve
r ed
sp
a
rk
p
lu
g
te
rm
i
na
l mu
st
fit
s
ec
ur ely
over
sp
ar
k
plu
g
ter
min
al
as
illu
st
r
at
ed.
L PU
LL
COVER
STRAIGHT O
FF
WITH
SLIGHT
TW
IST
F I
GURE
13 ACCESS TO REAR SPARK
PL
UG

)RIVE TRAIN
~
he
drive
train
transmits
power
from
the
engine,
through
a
·a
riable
speed
drive,
forward
or
reverse
transmission,
!
rive
c
hain
and
track
which
propels
the
snowmobile
.
The
"Pr
i
mary
Sheave
Assembly
"
attaches
directly
to
the
?O
wer
take
off
end
of
the
crankshaft.
The
"Secondary
She
ave
Assembly"
is
larger
in
diameter
:han
the
Primary
Assembly.
The
two
are
connected
by
the
:
ransmiss
ion
belt
.
The
Pr
imary
Sheave
is
centrifugally
operated
and
engages
w
hen
the
engine
speed
reach
es
approximatel
y
2700
rpm
.
As
the
engine
speed
is
increased,
the
Primary
Sheave
h
alves
close
forcing
the
belt
to
ride
on
the
outer
d
iam
eter
of
the
primary
drive
which
increases
the
belt
sp
ee
d.
At
this
point
the
Secondary
Sheave
halves
spread
apar
t,
a
llowing
the
belt
to
ride
on
the
small
diam
e
ter.
Basically,
the
vehicle
speed
increases
due
to
the
power
b
eing
transmitted
from
the
primary
pulley
to
the
secondary
d
rive
mechanism.
The
secondary
drive
mechanism
incorporates
a
torq
ue
sens
ing
device
that
allows
automatic
shifting
to
a
lower
g
ear
for
steep
inclines
or
deep
snow.
Th
e
primary
assembly
is
eq
uipped
with
an
emergency
sta
rting
sheave
and
a
neutral
shift
mechanism,
both
of
w
hich
are
covered
in
o
ther
parts
of
this
Manual.
Do
n
ot
attempt
to
disassembly
the
variable
speed
drive
or
reve
rse
transmissi
on.
Contact
yo
ur
dealer
.
The
reverse
DRIVE TRAIN
..
continued
3.
Spread
the
secondary
sheaves
by
pulling
movable
half
of
the
sheave
toward
the
steering
column,
at
the
same
tlme
pull
belt
up
until
the
belt
hold
s
the
sheave
apart.
(F1g. 16)
SAFETY PRECAUTION
Ke
ep
fi
n
gers
from
between
halves
of
s
econda
ry
sh
eave
wh
en
performing
next
step.
4.
Work
belt
over
top
of
movable
h
alf
of
secondary
sheave
(Fig.
16-A).
5.
Work
belt
between
primary
and
secondary
sheaves
.
See
Fig.17.
transmission
is
gear
operated.
Operation
of
reverse
con-
trol
is
covered
on
page
7
and
8
and
l
ubrication
on
page
22.
TRANSMISSION
BELT
INSPECTION
AND
REPLACEMENT
A
belt
measuring
l
es
s
than
1-9
/16
"
across
the
width
or
o
ut
er
surface
must
be
replaced
with
a n
ew
one
.
Worn
belt
may
be
retain
ed
and
used
as
a
spare.
A
spare
belt
should
be
carried
at a
ll
times
.
NOTE:
DO
NOT
RUN ENGINE
WITHOUT
BELT.
Proced
ur
e
for
R
emo
ving
Tr
a
nsmission
Belt:
1.
Open
hood,
see
Figure
6.
2.
Refer
to
Figure
15.
Remove
two
quarter
turn
wing
fasteners
and
belt
guard.
6.
Disconnect
neutral
control
ca
ble
from
actuator
arm~
m
ove
belt
between
actuator
arm
and
primary
shea·
See
Figure
18.
PROCEDUR
E
FOR
INSTAL
LIN
G TRANSMISSION
BEl
1.
Pass
belt
between
actuator
arm
and
prim
ary
sh
ea·
Reconnect
neutral
l
ockout
cab
le
to
actuator
arm
.
2.
Loop
one
end
of
the
replacemen
t
belt
around
the
prim
3
sheave
.
3.
Spread
halv
es
of
secondary
she
av
e
and
work
other
e
of
belt
around
bottom
of
movabl
e
half
and
ro
ll
sh
ea
forward.
4.
Belt
will
ride
the
sheave
up
and
fa
ll
in
pl
ace
betwe
the
two
halves.
DRIVE TRAIN
..
continued
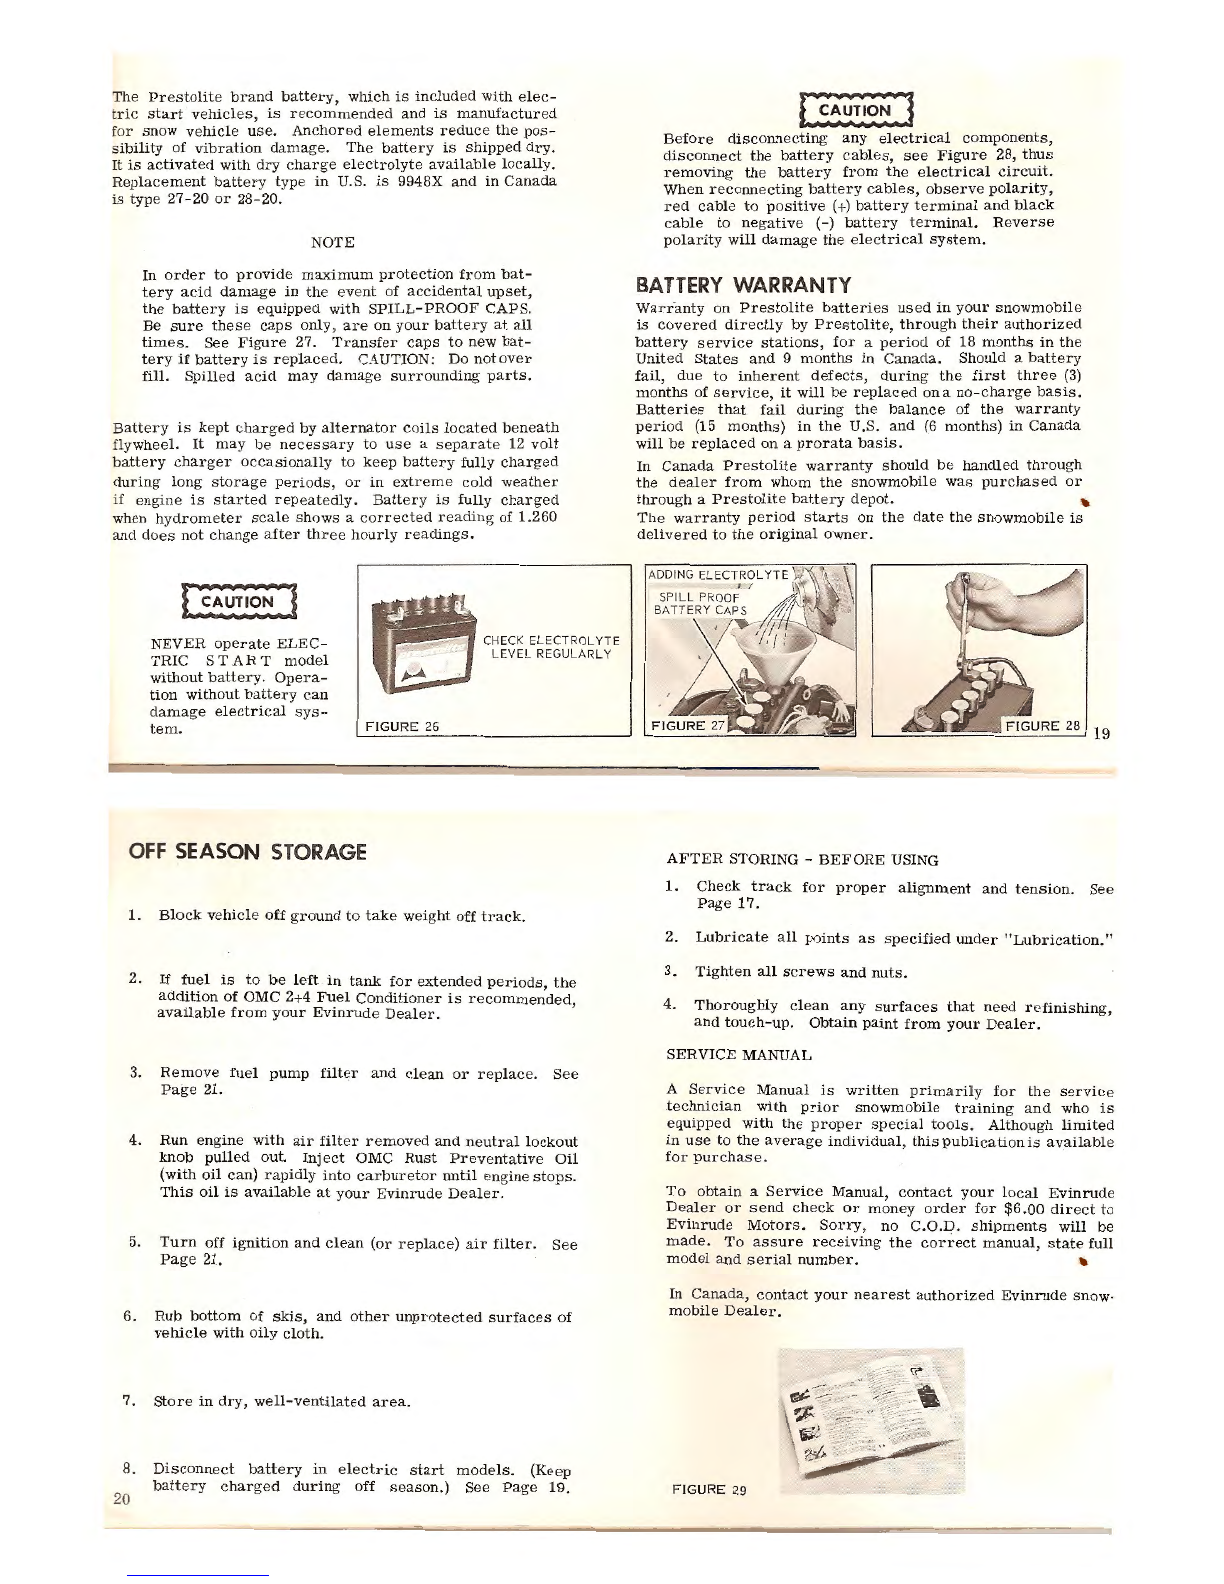
BRAKE ADJUSTMENT
Brake
is
positive
acting
disc
typ
e
with
l
ong
lasting
fibre
pads
and
re
quires
little
maintenance,
only
an
occas
ional
adj
ustment.
See
Figure
19.
Brake
adjustments
can
be
made
by
removing
the
cotter
pin
and
turning
the
castellated
nut
Ref.
1
to
the
right
to
tig
ht
en
brake.
Turn
the
nut
until
there
is
a
light
drag
on
the
brake
disc,
R
ef.
2,
then
back
th
e
nut
off
one
notch
and
re
install
the
cotter
pin.
If
hand
brake
lev
er
does
not
have
proper
amount
of
travel
or
cable
needs
adjustment,
see
y
our
dealer.
DRIVE TRAIN
..
continued
IMPORTANT
Before
comp
l
eting
the
adjustment,
be
certain
there
is
sufficient
movement
of
the
lever
to
permit
use
of
the
Parking
Lock.
DRIVE CHAIN ADJUSTMENT
Check
drive
chain
adjustment
after
the
first
ten
hours
of
operation
and
thereafter
every
50
hours
of
operation
or
as
required.
Total
slack
must
be 1/
4"
± 1
/1
6"
as
shown
in
Figure
20.
To
measure
this
distance,
first
remove
the
chain
case
cover
. (NOTE:
Oil
will
drain
when
cove
removed
unless
machine
is
tilt
ed
on
side.)
Plac
straightedge
over
the
cha
in
at
the
sprockets,
press
i:
the
center
of
the
chain
and
measure
the
amou
nt
of
slac
this
point.
If
the
chain
requires
ad
justment,
use
the
following
st'
1.
Loosen
jam
nut,
see
Figure
20.
2.
To
t
ight
en
chain,
turn
ad
justing
screw
clockwise.
3.
To
loosen
chain,
turn
adjusting
screw
counterclockw
4.
Retighten
jam
nut.
5.
Replace
chain
case
cove
r,
snugging
the
6
bolts
tightly.
6.
Replace
oil
in
chai
n
case
. See
Drive
Chain
Lubric
a
below.
Consult
your
dealer
when
chain
replacement
is
necess
:
or
when
chain
can
no
lon
ger
be
tightened
to
specific
ati<
DRIVE CHAIN LUBRICATION
The
drive
chain
is
lubricat
ed
by
running
throu
gh
an
oill
in
the
bottom
of
the
chain
case
. Ch
eck
level
of
oil
in
cl
case
periodically
.
Oil
l
evel
should
come
up
to th
' b
ot
of
oil
fill
hol
e.
Fill
with
OMC
Type
"C"
Oil.
See Fig
21.
REVERSING MECHANISM LUBRICATION
Use
the
following
proced
ure
to
check
the
oil
level
in
r
eve
rsing
mechanism.
See
Figure
22.
1.
Remov
e
the
sq
uar
e
plug,
Ref.
1.
If
oil
runs
out,
o.
up
to
the
threads
in
the
hole,
the
l
evel
is
sat
i
sfact
c
2.
If
oil
le
vel
is
low,
remove
the
squar
e
plug,
Ref. 2,
slowly
pour
OMC
Type
"C
"
oil
in
this
hole
un
til
it
r
out
the l
ower
hol
e,
Ref.
1.
3.
Replac
e
plugs.
DRIVE
TRAI
N
..
co
ntinu
ed
TR
ACK TENSION
Pr
oper
track
tension
is
essential
to
keep
sprocket
and
track
we
ar
at
a
minimum.
Track
tension
can
be
checked
by
first
b
locking
up
the
snowmobile,
so
that
the
track
hangs
free,
a
nd
placing
the
front
edge
of
the
skis
against
a
stationary
o
bject
.
Next,
measure
the
distance
from
the
bottom
of
the
p
ivot
arm
bearin
g
bore
to
underside
of
running
board
as
sh
own
in
Figure
23.
Track
tension
is
c
orrect
in
this
dis-
ta
nce
is
2-7
/
8"
± 1/ 32" .
If
track
tension
must
be
ad-
ju
s
ted,
proceed
as
follows:
1.
Loosen
track
tension
nuts
.
See
Figure
23.
2.
Loosen
nut
on
pivot
arm
adjusting
screw.
3.
Turn
pivot
arm
adjusting
scr
ew
clockwise
to
tighten,
counterclockwise
to
l
oo
sen
to
attain
proper
di
mens
ion.
4. Now
measure
distance
from
brack
et
to
rear
of
frame
on
both
sides
.
If
measurements
are
not
eq
u
al,
mov
e
PIVOT
AR
M
ADJ
US
TING
SC
REW
TRA
CK
TEN
SION
NUTS
R
EAR
AX
LE
PIVO
T
EQUAL
± l /
32"
F
IGURE
23
BATTERY
MAINTENANCE
AND
SPECIFICATIONS
18
SAFETY
PRECAUTION
Batte
ry
Electrolyte
is
a
caustic
fluid
and
should
be
handled
with
care.
If
Electrolyte
is
spilled
or
splashed
on
any
part
of
the
b
od
y,
IMMEDIATELY
flush
the
exposed
area
w
ith
lib
e
ral
amounts
of
w
ater
and
obtain
medical
aid
as
soon
as
possibl
e.
bracket
closest
to
r
ear
of
fram
e f
orward
until
both
si
de
s
are
equal.
This
is
done
by
turning
the
pivo
t
arm
ad
-
justing
screw
counterclo
c
kwise.
5.
Tighten
all
retaining
nu
ts
.
TRACK
ALIGNMENT
To
check
for
proper
track
alignment
,
with
snowmobile
bl
ocked
up
as
described
earlier,
start
en
gine
and
run
track
at
slow
speed
.
The
re
must
be
an
equal
clearance
on
each
side
of
the
track
edge
between
t
he
track
edge
and
pivot
arm
as
shown
in
Figure
24.
If
this
clearance
cannot
be
obtained
,
consult
your
dea
l
er.
FIGUR
E 24
L-~~~------
--------
----------------~17
SKl
ALIGNMENT
The
skis
require
alignmen
t
if
the
skis
are
not
parallel
with
each
other
and
th
e ve
hicle
bod
y
when
the
steering
bar
is
in
the
normal
straight
-
driving
position
.
To
align
skis,
pr
o
ceed
as
fo
llows:
1.
Open
hood
.
2.
Place
steering
bar
in
the
normal
straight
-dr
iving
po
si-
tion
.
3.
Loosen
jam
nut,
as
illustrated
in
Figure
25.
4.
Remove
nut
and
washer
from
ball
joint.
5.
Turn
ball
join
t
clock
w
ise
to
toe
skis
ou
t
or
cou
nter-
cl
oc
kwise
to
to
e
skis
in.
6.
Tig
ht
en j
am
nuts
w
hen
skis
ar e pa
rallel
with
each
ot
h
er
and
snow
mo
bile
body.
Reassem
b
le
ba
ll
join
t
nut
an
d
washer
.
Use
of a b
attery
having
the
correct
rating
is
very
importan
t,
due
to
the
e
xt
rem
e t
emperature
conditions
under
which
the
snowmo
b
ile
must
operate.
Use
a 12
volt
battery
having
a
32
amp
er e ho
ur
rating
or
better.
Th
e
dimensions
are
7~3
/
4"
long x 5-
1/
8"
wid
e x
7-1
/
4"
high (top
of
te
rmin
a
ls
).
The
Pres
tolit
e b
ra
nd
battery,
wh
ich
is
included
with
el
ec
-
t
ric
star
t
ve
hicl
es,
is
recommended
and
is
manufact
u
red
for
snow
vehicle
us
e.
Anchored
eleme
nts
reduce
the
pos
-
sib
ili
ty
of
v
ibr
at
ion
damage.
The
battery
is
ship
p
ed
dry.
It
is
act
ivated
w
ith
dry
c
har
ge
e
lectrolyte
available
l
oca
ll
y.
Replaceme
nt
battery
type
in
U.S. is 9948X
and
in
Canada
is
ty
pe
27-20
or
28
-20.
NOTE
In
order
to
prov
id
e
maximum
pro
t
ectio
n
from
bat
-
tery
acid
damage
in
th
e
event
of
accidental
ups
et,
the
battery
is
e
quipped
with
SP
ILL
-
PRO
OF
CAPS
.
Be
sure
thes
e
caps
only,
ar
e on yo
ur
batt
ery
at
all
times
. S
ee
Figure
27.
Transfer
caps
to
n
ew
bat
-
tery
if
battery
is r
eplaced.
CAUTION: Do
not
ove
r
fill.
Spi
ll
ed
ac
id
may
damage
surroundin
g
parts.
Ba
ttery
is
kept
ch
arged
by
alt
er
nat
or
coils
l
ocated
beneath
flywh
ee
l.
It
m
ay
be
necessa
ry
to
us e a
separate
12
volt
ba
ttery
charger
occasio
nall
y
to
keep
batt
er y
full
y
charged
d
uring
long
stora
ge
periods,
or
in
ext
r
eme
co
ld
weathe
r
if
engine
is
started
repeated
l
y.
Ba
tt
ery
is
fully
ch
arged
when hy
dromet
er
scale
shows
a
co
rr
ected
reading
of
1.260
an
d
does
not
ch
ange
a
ft
er
three
hourly
r
ea
din
gs.
NEVER
ope
rate ELEC-
TRIC
START
mo
del
witho
ut
b
attery.
Opera-
ti
on w
it
h
out
batt
ery
can
damage
el
ectrica
l
sys-
tem.
e
CHE
CK
ELECTROLYTE
LEV
EL REGULARLY
;...-4
F I
GURE
26
OFF
SEASON
STORAGE
1.
Block
vehi
cle
off
ground
to
take
wei
ght
o
ff
tr
ack
.
2.
If
fuel
is
to
be
left
in
tank
for
extended
per
i
ods,
the
addition
of
OMC 2+4
Fue
l Co
nditioner
is
recomme
nd
ed
ava
ilabl
e
from
yo
ur
Evinrude
Dealer.
'
3.
Remove
fuel
pump
filt
er and cl
ean
or
re
plac
e.
See
Page
21.
4.
Run
eng
in
e
with
air
filter
removed
and
neutral
l
oc
kout
knob
p
ull
ed
out
. Inj
ec
t OMC
Rust
Pr
eve
ntat
i
ve
O
il
(with
oil
ca
n)
rapid
ly
int
o
car
bur
et
or
until
eng
i
ne
stops
.
This
oil
is
ava
il
ab
le
at
your
Ev
i
nrude
Dea
l
er
.
5.
Turn
off ig
nition
a
nd
clean
(or
r
eplace)
air
filt
er.
See
Page
21.
6.
Rub
bott
om
of
skis,
and
ot
h
er
unprot
ected
su
rf
ac
es
of
vehic
le
with
oily
cl
oth.
7.
8.
20
store
in
dry,
well
-
vent
il
at
ed
area
.
Disco
nn
ect
ba
tt
ery
in
el
ectr
ic
star
t
mo
del
s.
(Keep
ba
tte
ry
charged
durin
g
off
s
easo
n.)
See
Page
19.
IEiEJ
Before
disc
onn
ec
ting
any
el
ec
trica
l
components,
disconnect
th
e
bat
t
ery
cabl
es,
see
Figur
e 28,
thus
removing
th
e
battery
fr
om
the
e
lect
r
ical
circuit.
When
reconn
ecting
battery
cab
le
s,
observe
po
larity,
red
cable
to
positive
(
+)
batte
ry
term
in
al
and
black
cab
le
to
ne
gat
iv
e
(-)
batt
ery
term
i
nal.
Rever
se
po
la
rit
y
will
damage
the
electrical
system
.
BATTERY
WARRANTY
Warr
·a
nty
on
Pre
sto
lit
e
batterie
s
used
in
your
snowmob
il
e
is
covered
dire
c
tl
y by
Prestolit
e, th
ro
ugh
th
eir
author
i
zed
battery
serv
ice
stations,
for
a
pe
ri
od
of
18
months
in
the
Un
it
ed
S
tates
and
9
months
in
Canada.
Sho
ul
d a
battery
fa
il
,
due
to
inherent
defec
ts,
duri
ng
the
fir
st
th
ree
(3)
mon
ths
of
service,
it
w
ill
be
repl
aced
ona no- c
har
ge
basis.
Batt
eries
that
fail
during
the
balance
of
th
e
warranty
period
(15
months)
in
the U.S. and (6
months)
in
Ca
n
ada
will
be
rep
laced
on a
pro
rata
b
as
is
.
In
Canada
Prestolite
war
ran
ty
sh
o
uld
be
handled
through
th
e
deale
r
fro
m whom
the
snowmobile
was
pu
rch
ased
or
t
hrough
a
Prestolite
battery
dep
ot.
-
The
warra
nty
peri
od
starts
on
the
date
the
snowmob
il
e
is
de
liver
ed
to
the
or
ig
ina
l
owner
.
AFTER
STORI
NG
-
BEFORE
USING
1.
Check
trac
k
for
prop
er
a
lignment
and
tension.
See
Page
17
.
2.
Lubricate
a
ll
poi
n
ts
as
specified
under
"L
ubrication.
"
3.
Tighte
n
all
s
crews
and
nuts.
4.
Thoroug
hl
y
cl
ea
n
any
s
urfa
ces
that
n
ee
d
refinishing,
and touch-
up
.
Obtain
paint
fr
om
you
r
Dea
l
er.
SERVICE MANUAL
A
Service
Manual
is
written
primarily
for
the
service
technic
ian
with
prior
sn
owmobile
t
raining
an
d who
is
eq
uipped
with
t
he
pr
oper
specia
l t
ools
. A
lth
ough
limited
in
u
se
to
th
e
average
individua
l,
this
publication
is
ava
il
ab
le
for
purc
h
ase
.
To
obtain
a
Serv
i
ce
Manual,
co
nt
ac
t
yo
ur
local
Evi
nrud
e
Dealer
or
se
nd
check
or
money
or
de
r
for
$6
.00 di
rect
to
Evinrude
Motors.
Sorry
, no C
.O
.
D.
shipments
will
be
made.
To
assure
receiving
th
e
correct
manual,
state fu
ll
mo
del
and
s
erial
numbe
r.
-
In
Canada,
contact
your
n
earest
a
uthorized
Ev
inrud
e snow·
m
obile
D
ealer.
FI
G
URE
29

PREVENTIVE
MAINTENANCE
CARBURETOR
-
air
filter
The
carburetor
is
equipped
with
an
air
filter
that
s h
ould
be
cleaned
during
the
operating
season
and
at
the
end
of
the
season
for
storage.
To
cl
ean
filter,
wash
with
solvent
and
shake
dr
y.
See
Figure
30.
CHAIN
AND
TRACK
TIME
MAINTENANCE
Af
ter
first
10
hours,
then
every
Adjust
Chain
Tension
50
hrs
.
or
as
required
Af
ter
f
irst
10
hours.,
then
every
Adjust
Track
Tension
25
hrs
.
or
as
required
Check
Track
Alignment
LUBRICATION RECOMMENDAT
IO
NS
TIME
FUEL
FI
LTER
Exercise
care
to
prevent
fuel
spillage
when
removing
fuel
filter
when
engi
ne
is
hot.
The
fuel
filter
is
attached
to
the
fuel
pump.
See
Figure
31.
To
inspect
for
sed
ime
nt
or
water
accumu
l
ation,
back
off
the
mounting
screw
approxima
te
ly
three
turns
(counterclock
-
wise)
and
remo
ve
the
cover
togeth
er
with
t
he
sc
reen
,
gasket
and
mounting
sc
rew
.
Remove
and
wash
f
il
ter
screen
w
ith
clean
solvent
and
br
ush
.
Assemble
filter
as
shown
in
Figure
32,
being
careful
to
asse
mble
gasket
and
filter
screen
on
fuel
filter
cover.
Tighten
mounting
screw
se-
curely
with
screwdriver
(do
not
over-tighten).
MAINTENANCE
'
COY
Eli
WASHER
AND
SCREW
~SCR
E
EN
~
~G
A
SKE
T
FIGURE
32
LUBRICANT
Every
25
hrs
.
(D
Ski
Pivots
(leaf
spring
co
nnections
to
skis)
SAE #
10
o
il
22
OMC
Type
"C"
After
10
hrs.
the
n
every
25
hrs
. of
operation
f--------=-----
--
---t----
-1
{
Q)
Drive
Chain
-
oil
bath
(D
Reversing
transm
i
ssion
Once
a
season
(normal
use)
Twice
a
season
(extended
use)
(D
Primary
Dr
ive
(disassembly
required,
see
your
dea
l
er)
Specified
lubricants
available
from
your
dealer
.
OMC
Type
"C"
Standard
Oil
Rykon
EP
#2

;ERVICE
DIAGNOSIS
TROUBLE
PROBABL
E
CAtsE
REMEDY
Eng
in
e
fails
to
Fue
l
tank
empty
.
Fill
with
correct
fuel
mixt
ure
.
sta
rt.
Ignition
switc
h off.
Turn
on
or
check
for
short.
Engine
starving
f
or
fuel.
Prim
e
and
check
carbur
e
tor
adjustment.
Check
for
position
of
cho
ke.
Check
the
fue
l
pump.
Plugged
fuel
lin
e
or
filter.
Clean
fuel
lines
an
d
filt
er
screen
in fuel
pump
and
carb
ur
et
or.
Engine
floods
.
Check
carburetor
adjustment,
and
position
of
ch
oke.
Improper
or
no
ignition.
Ch
eck
spa
rk
pl
ug
leads
to
be
sure
they
are
secure
ly
in
place.
Check
for
correct
spa
rk
plu
g
in
g
ood
condition.
Replace
if
necessary
.
If
engine
fails
to
start
aft
er
spa
rk
plug
ch
eck
has
been
made,
consult
yo
ur
dea
ler.
Rew
in
d
starter
Broken
or
worn
pa
rts
Consult
your
d
eale
r.
Follow
procedure
outlined
for
e
mergency
starting
fails
to
engage
. i
nt
e
rn
a
ll
y.
until
star
ter
ca
n
be
serviced
.
Engine
runs
Carburetor
out
of
adjustment
.
Adjust
car
buretor.
roug
h.
Poor
ignition
.
Foll
ow
same
check
procedur
e
as
for "
improper
or
no
ignition
"
under
-
"
engine
fails
to
start."
Engi
ne
won't
Idle
speed
set
to
o low.
In
crease
idle
speed
setting
to
approximately
1300-1600 RPM.
id
le.
Carburetor
out
of adj
ustm
ent.
Adjust
carbureto
r .
Poor
ac
celera-
Carburetor
out
of
adjustment.
See
item
5,
Page
12
.
ti
on.
Engine
run
-
Carburetor
o
ut
of
adjustment.
See
it
em 6,
Page
12.
aw
ay. 23
SERVICE
DIAGNOSIS
...
continued
TROUBLE
PROBABLE
CAUSE RE
MEDY
Low RPM.
Poor
ignition.
Follow
sa
me
check
procedur
e
as
for
"improper
or
no
ignition"
under
"engine
fails
to
start."
·
Carburetor
air
filt
er
dirty.
Re
move
and
wash
in
solv
ent.
See
pa
ge
21.
Carburetor
out
of
ad
ju
stment.
Adjust
carburetor.
Excess
i
ve
engine
w
ea
r . Cons
ult
y
our
deal
er
.
Vehicle
fails
to
Neut
ral l
ockout
in n
eu
tr
al
Push
ne
utral
l
ockout
knob
int
o
driv
e
position.
(Neutra
l
loc
kout
will
not
move when
position.
engage
u
nle
ss
e
ngin
e
speed
is be
lo
w 2000
RPM.
throttl
e
is
de
-
Transm
issi
on
belt
worn
or
Rep
l
ace
transmissi
on
be
lt.
pressed.
broken.
Dri
ve
chain
out
of
adjustmen
t
Adjust
or
re
place
dri
ve
ch
ain.
or
broken
.
Low v
eh
icl
e
Transmission
belt
worn.
Replace
tra
nsmi
ssion
belt.
speed.
Skis
out
of
a
li
g
nm
e
nt
.
Alig
n
skis.
Operating
on
only one
spark
Follow
same
check
procedur
e
as
for
"improper
or
no
ignition"
under
plug.
"e
ng
ine
fails
to
start.
" -
Chain
and/
or
track
too
tight.
R
ea
djust.
Lights
won't
Loose
conn
ections.
Check
a
nd
tighten.
li
ght.
Corroded
conn
ect
ions.
Clean
.
Bad
switch.
Repair
or
replace.
Bulb
b
urn
ed
out
.
Replace
bu
lb
No
output
from
a
lt
e
rnat
or.
Con
sult
yo
ur
deal
er.
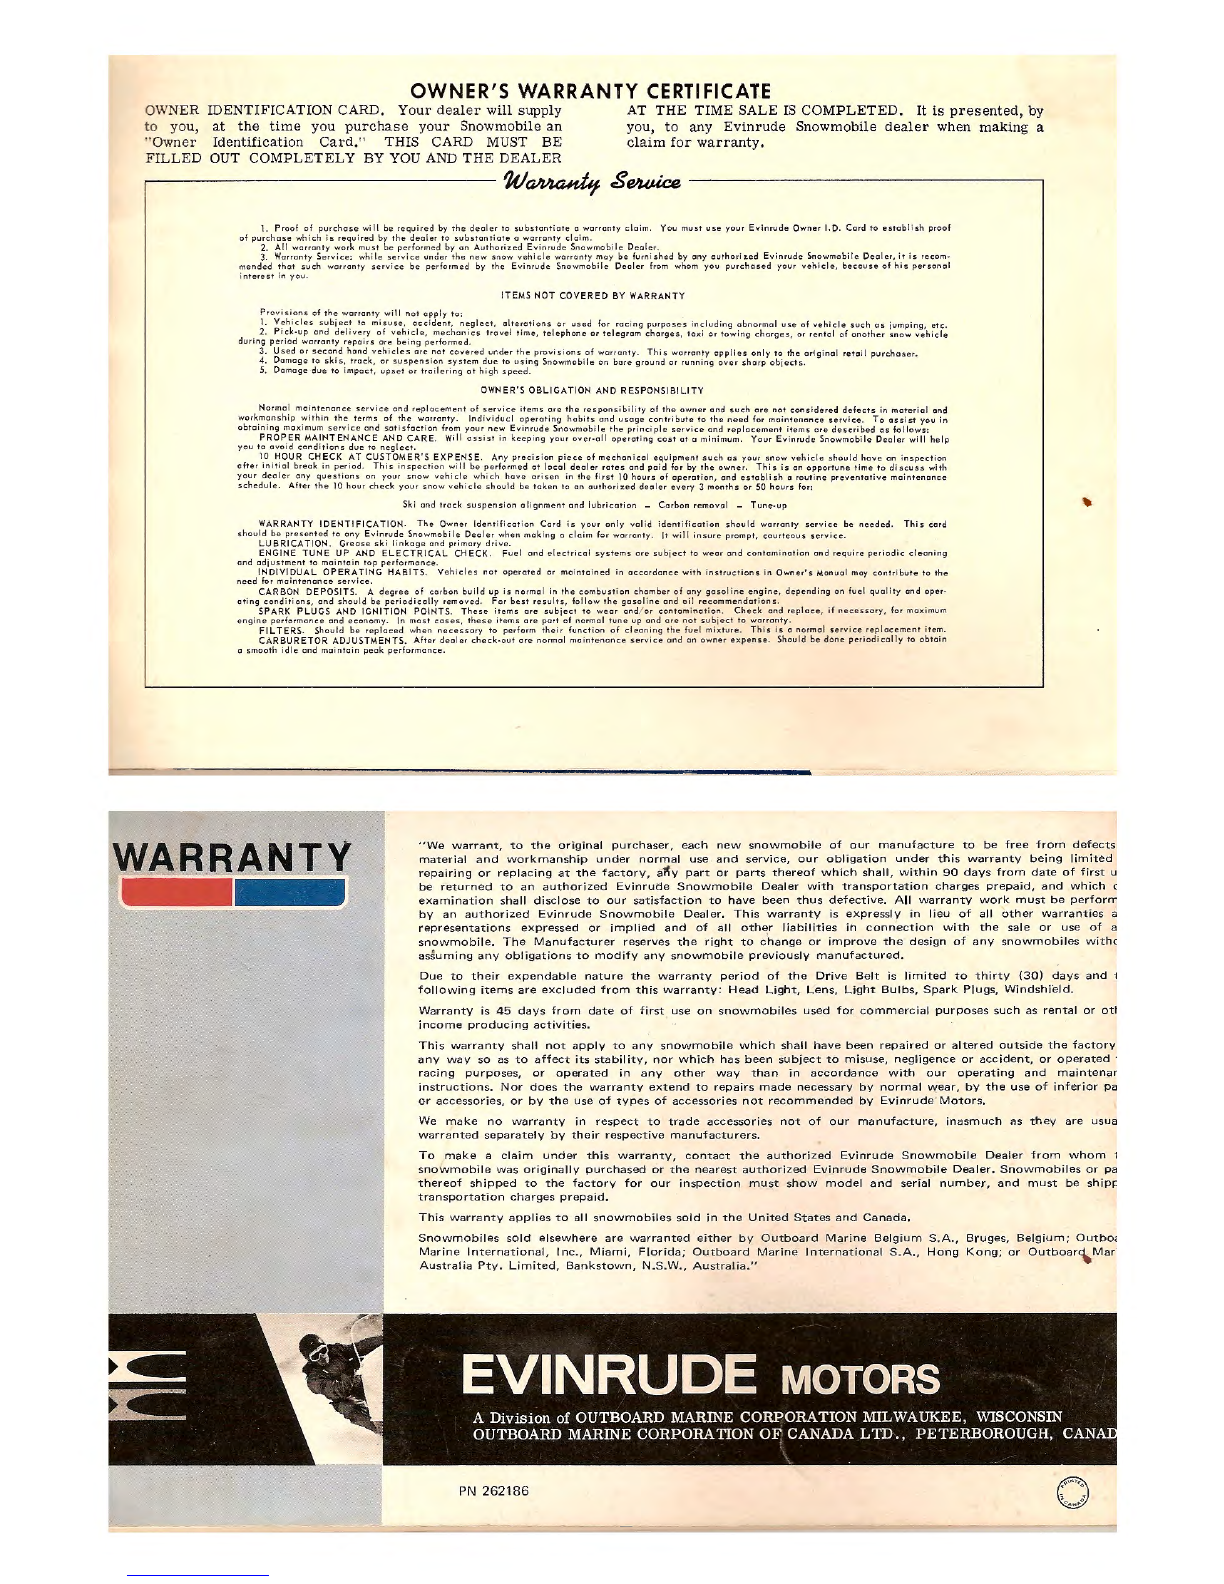
OWNER'S WARRANTY
CERTIFICATE
OWN
ER
IDENTIFICATION CARD,
Your
deale
r
will
supply
to you,
at
the
time
you
purchase
your
Snowmobile
an
"Ow
ner
Identification
Card."
THIS CARD MUST
BE
FILLED
OUT
COMPLETELY
BY
YOU AND
THE
DEALER
AT
THE
TIME
SALE
IS
COMPLETED.
It
is
presented,
by
you,
to
any
Evinrude
Snowmobile
dealer
wh
en
makin
g a
cla
im
for
warra
nt
y.
,------
--
--------
'k/~
$ewi,ce
---
----
-------,
1.
PrClof
of
purchase
wi ll
be
reqvi
re
d
by
the
decder
to
s
ub
s
to
n
tiote
a
worronty
claim
.
You
mus t U
l!i
e
your
Evinn.Jde
Own
er I. D.
Card
to
est
ab
li
sh
pr
oof
of
purc
h
on
which
i 5 re
qu
ired
by
t
he
d e
al
er
to
substantiat
e g
worror.ty
claim
,
2.
Al
l
warranty
work
must
he pe
rfor
med
by
on
Aut
ho
rized
Evinrud
e
Snowmobi
le
Dea
le
r.
3. W
ar
ranty
Se
rv
ic
e:
wh
ile
ser
vi
ce
und
er t he
new
snow
vehi
cle
warranty
may
be
furn i
shed
by
ony
o
u
tho
ri
~ed
Evinrude
Snowmo
bile
Dea
l
er,
it
is
recom·
mended
that
s
uch
wa
rr
anty
service
be
pe
rformed
by
th
e
Evinr
vde
Snowmobil
e D
eal
er
from
who
m
you
purchas
e d yolJr ve
hicle,
becau
s e
of
his
pe
r
soool
i
ntere
s t in
you
.
ITEMS
NOT
COVERED
BY
WARRANTY
Provisions
of
th
e
warr
anty
wil
l
not
apply
to;
1.
V~h
i
c
l
e s
s
ubi
e
c!
to
m
isuse
•.
occid
e
nt
, n
':gle
ct,
o!te~otion
s
or
u
se
d fo r ra c i
ng
purpos
e s in
cludin
g
abnor
m
al
usc
of
vehic
le
such
as
jumping,
etc.
2.
Pock-up
Ol'ld
d
el
ov
e
ry
of
veht
cl
e,
mech
an
rc s
travel
tome , te l ep
hone
or
telegram
c
ha
rges,
taxi
or
towing
char
ge
s,
or
r
en
t
al
of
ano
th
er
sn
ow
vehic
le
dur
i
ng
peri
od
warranty
repa
i
rs
ore
b
ei
ng
perfor
me
d.
3.
U
se
d
or
seco~d
hand
vehicles
ore
.
not
cov
e
re
d
ur.der
t
h ~
provis
i
ons
of
wor
rol'lty.
Th
i s
worronty
appli
e s
onl
y
to
t
he
orlg
i
no
l re
lo
il
purchaser.
4.
Damage
to
sk
os,
trock,
or
suspens
oon
system
d
ue
to
usong
Snowmob
ile
on
bare
ground
or
running
over
sharp
ob
je
ct
s.
5.
Damage
due
to
im
pact,
ups
et
or
tro
ilering
ot
high
sp
e e
d.
OWNER'S
OBLIGATION
AND
RESPONSIBILITY
Norma
~
ma
i
nt
e
nance
service
ond
re
ploo:;;
e
ment
of
se
rvic
e i
tem
s
ore
the
re
spo!'lsi
bil
i
ty
of
th
e
own
er
and
su
ch
ore
not
consid
e re d de fe
cts
in
mat
e
rial
al'ld
work
_m~nsh
1
p
:"'ithin
the
terms
of
the
worranty.
lndivid
ud
operat
i
ng
habits
and
IJ
S
oge
cont
ri
but
e
to
th e
need
fo
r
ma
inte
nan
ce
servic
e .
To
as
sis
t
you
in
obtoon
•
ng
max
omum
se
rv
ice
and
sa
ti
sfact
io
n from
your
n ew
Evi
n
rude
Snowmobi
le
th
e
princ
iple
service
and
re p
lacem
e
nt
items
or
e
described
as
follows:
PROP
_
ER
MAINTENA
N
CE
AND
CARE
.
Wi
ll
ass
i
ST
in ke
ep
i
ng
you
r
over
-o i l
opera
t
ing
co
s t
ot
a minimiJm. Y
ou
r Evi
nrude
Snowm
obile
Dea
l
er
w
il
l
he
lp
you
to
avo
1d
condit
io!'ls due
to
ne
gl
ect
.
10 .
HOUR
CHECK
AT
CUS!O_MER'S
EXPENSE.
Any
precis
i
on
pi
e
ce
of
mechan
i
cal
e
qu
ipm
en
t
suc
h
as
your
s
now
v
eh
ic
le
should
hov
e on i
nspect
ion
after
i
notiol
break
in
pe
riod.
Ttus
onspe
ct
ion
wi
ll
be
performed
at
local
de
al
er
ra
te s and
paid
for
by the
owner
.
This
is
on
opportune
time
to d i
scuss
w
ith
your
dea ler
any
quest
i
ons
on
your
snow
vehicle
wh
ic
h
hov
e
ar
is en
in
the
fi
rs
t
10
hours
ol
op
e
rat
ion,
and
e
stab
li
sh
o ro
ut
i
ne
prev
e
nta
t
ive
moin
te
nonc
e
schedul
e.
After
t
he
10
hour
check
your
snow
veh
i
cle
shoul
d be
tok
en
to
on
author
iz
ed
deoler
every
3
months
or
50
ho
ur
s
for
:
Ski
and
track
su
s
pen
s i
on
alignment
and
lubrication
-
Carbon
re
moval
- T
une
-u
p
WARRANTY
IDENT
IFI
CATION.
The
Own
er
ld
e
nt
i
ficot
i
oro
C
ord
is
your
on
ly v
al
id
id
e
nt
i
fi
c
at
i
on
should
warroroty se
rv
ice
be nee
ded
.
This
cord
shou
ld
be
pre
sented
to
any
Evinrude
Snowmobile
De
ole r
wh
e n
mak
i
ng
o
cloim
for
warranty
. It wi
ll
i
nsure
prompt,
cour
t
eous
serv
ic
e.
L
UBRICATION
. Gr
eas
e
ski
li
nkag
e
and
pri
mary
drive
.
ENGINE
TUNE
UP
AND
ELEC
TR
ICA
L
CHECK.
Fuel
and
electrical
s
ystems
ore
subject
to
wear
and
contom
in
ot
io
n
and
requ
i
re
periodic
clean
i
ng
end
adjustm
e
nt
to
mo
i
nto
in
top
p
erfo
rm
an
ce
.
INDIVIDUAL
OPERATING
HABITS.
V
ehi
cle
s
no
t
operated
or
ma
i
nta
i
ned
in
occardonc
e
wi
th
ins
t
ructions
in
Owne
r' s
Manua
l moy
contr
ib
ute
to
th
e
!'ICe
d for
maint
e
nance
se
rvice.
CARBON
DEPOSITS.
A de
gree
of
corbol'l
bu
ild up is
norma
l
in
the
co
mb
ust
i
o,
chamber
of
any
gaso
li
ne
e
ngine
, depe
ndin
g
on
fu e l
qua
l
ity
O!'ld
o
per
·
oting
cond
iti
ons,
ond
s
ho
uld
be
per
i
od
ico
lly
re
moved.
For
bes
t
res
ult s ,
fo
ll
ow
th
e
ga
soli
ne
ond
oil
recom
mend
at
i
ons.
SPARK
PLUGS
AND
I
GNITION
POINTS.
Th
ese
items
ar
e
subject
to we
ar
and
/
or
cont
ominot
i
on.
Check
and
re pl
ace,
if
ne
c
ess
a ry,
lor
ma
ximum
e n
gine
perfo
rma
nce
on
d
economy
. In
mast
cases,
these
itemli
or
e
part
of
!'larmol
tun
e
up
ond
ore
n
ot
sub
je
ct
to
worron
t
y.
FlL
T
ERS.
S
ho
uld
be r
ep
l
aced
when
nec
e
ssar
y
to
pe
rform
t
he
ir fu
nction
o f
cl
eanin
g
the
f
uel
mixtur
e .
This
is
o
no
rmol
ser
vi
ce
rep l
ac
emen
t i
te
m.
CARBURETOR
ADJUSTMENTS
.
After
dea
l
er
check-out
ore
normal
mointenon
ce
se
rvi
ce
and
on
ow
r1e
r e
xp
e
nse.
Shou
ld
be
do
ne
per
io
di
ca
lly
to
obta
in
o
sm
ooth
idle
and
moi
nto
in
pcok
pe
r
formanc
e .
"We
w
arrant,
to
the
o r
igina
l
purchase
r,
each
ne
w
snowmobile
of
ou
r
manufacture
to
be
free
from
defects
material
and
wo
r
kmanship
under
norma
l
use
and
service,
our
obligation
u
nder
this
wa
rranty
be
i
ng
lim
i
ted
repairing
or
rep
la
ci
ng
at
the
factory,
al'ly
part
or
par
ts
t
hereof
which
shall,
w
it
hin
90
days
from
date
of
f
irs
t u
be
returned
to
an
author
i
zed
Evinrude
Snowmobile
Dealer
wi
th
transpor
t
at
i
on
charg
es
prepaid,
and
w
hich
c
examination
shall
disclose
to
our
satisfact
i
on
to
ha
ve
been
thus
defecti
ve.
All
wa
r
ran
t y w
ork
must
be
perforrr
by
an
authorized
Evinrude
Snowmobile
Dealer.
This
warranty
is
expressly
in
l
ieu
of
all
other
warranties
a
representations
expressed
or
implied
and
of
all
other
li
abilities
ih
co
n
nec
tion
wi
th
the
sale
or
use
of
a
snowmob
il
e.
The
Manufacturer
reser
v
es
the
right
to
chan
ge
or
improve
the
design
of
an
y
snowmobiles
withe
as
~
uming
any
obligations
to
mod
i
fy
any
snowmob
i
le
previously
manufactured.
Due
to
the
ir
expendable
nature
the
wa
rranty
per
i
od
of
the
Dr
ive
Belt
is
li
mi
ted
to
thir
t y
(30)
days
and
1
following
it
ems
are
exc
l
uded
from
this
w
arranty:
Head
Light,
Lens,
Light
Bu
l
bs,
Spark
Plugs,
Wi
ndsh
i"eld.
Warranty
is
45
days
f
rom
date
of
first
use
on
snowmob
il
es
used
fo
r
commerc
ia
l
purposes
suc
h
as
rental
or
ott
income
producing
activities.
This
warran
ty
sha
ll
no
t
app
ly to
any
snowmobi
le w
hich
shall
have
been
repa
i
red
or
al
te
r
ed
outside
the
facto
ry
any
way
so
as
to
affect
it
s st
abi
l
ity,
nor
w
hich
has
been
subject
to
m i
suse,
neg
li
gence
or
acc
i
den
t ,
or
operated·
racing
purposes,
or
operated
in
any
other
way
than
in
accordance
w
ith
our
o
perat
i
ng
and
m
aintena
r
ins
tr
uctions.
Nor
does
the
warranty
extend
to
repa
i
rs
made
necessary
by
normal
wear,
by
the
use
of
i
nfe
ri
or
pa
or
accessories,
or
by
the
use
of
types
of
ac
c
essories
not
recommended
by
Ev
i
nrude
M
otor
s.
We
make
no wa r
ranty
in
respect
to
trade
accessor
i
es
not
of
our
manufactu
re,
inasmuch
as
they
are
usua
warranted
separately
by
thei
r
respecti
ve
manufacturers.
T o
make
a
claim
under
this
war
r
anty,
contact
the
authorized
Evinrude
Snowmobi
le
Deale
r
from
w
ho
m 1
snowmobi
le
was
orig
i
nally
purchased
or
the
nea
r
est
authorized
Evin
rude
Snowmobile
Dealer.
Snowmo
bi
les
o r
pa
thereof
sh
ipped
to
the
factory
for
ou
r i
nspect
i
on
must
show
mode
l
and
serial
number,
and
must
be
shiP!=
transportation
charges
prepaid.
This
warranty
a
pplie
s
to
all
snowmobiles
so
ld
in
the
United
States
and
Canada.
Sno
w
mobi
l
es
sold
else
w
here
are
warranted
ei
ther
by
Outboard
Marine
Be
lgi
um
S.A.,
Bruges
,
Belg
i
um;
Outboc
Marine
I
nternational,
Inc.,
Miami,
Fl
or
ida;
Outboard
Marine
In
ternational
S.A.,
Hong
Kong;
or
Outboar
~
Mar
Australia
Pty.
Limited,
Bankstown,
N.S.W.,
Austral
ia."
This manual suits for next models
1
Table of contents
Other Evinrude Offroad Vehicle manuals


