Eyerain Technology & Industry Co. ECM-B1 User manual

Introduction
Action Camerais a high-definition digital motion video recording device, created to reach
market demand. It has a wide variety of the leading features for digital video recording,
photo shooting, audio recording with screen display and detachable battery. Best suitable
for vehicle recording, outdoor sports, home security, diving and more related activities.
Allowing you to enjoy the moments while capturing every scene anytime, anywhere.
Warning
1. Keep it safe from falling and dropping .
2. Keep it distance from any strong magnetic interference objects like electrical machine to
avoid strong radio waves that might be damaging the product and affect the sound or
image quality.
3. Don’t expose the product directly to high temperatures and strong sunlight .
4. We recommend using high quality Micro SD Card for the best results.
5. Don’t place your Micro SD card near strong magnetic objects to avoid data error.
6. In case of overheating, unwanted smoke or unpleasant smell from the device, unplug it
immediately from the power outlet to prevent hazardous fire.
7. Keep it safety from children while on charging.
8. Stored the device in a cool, dry and dust free local.
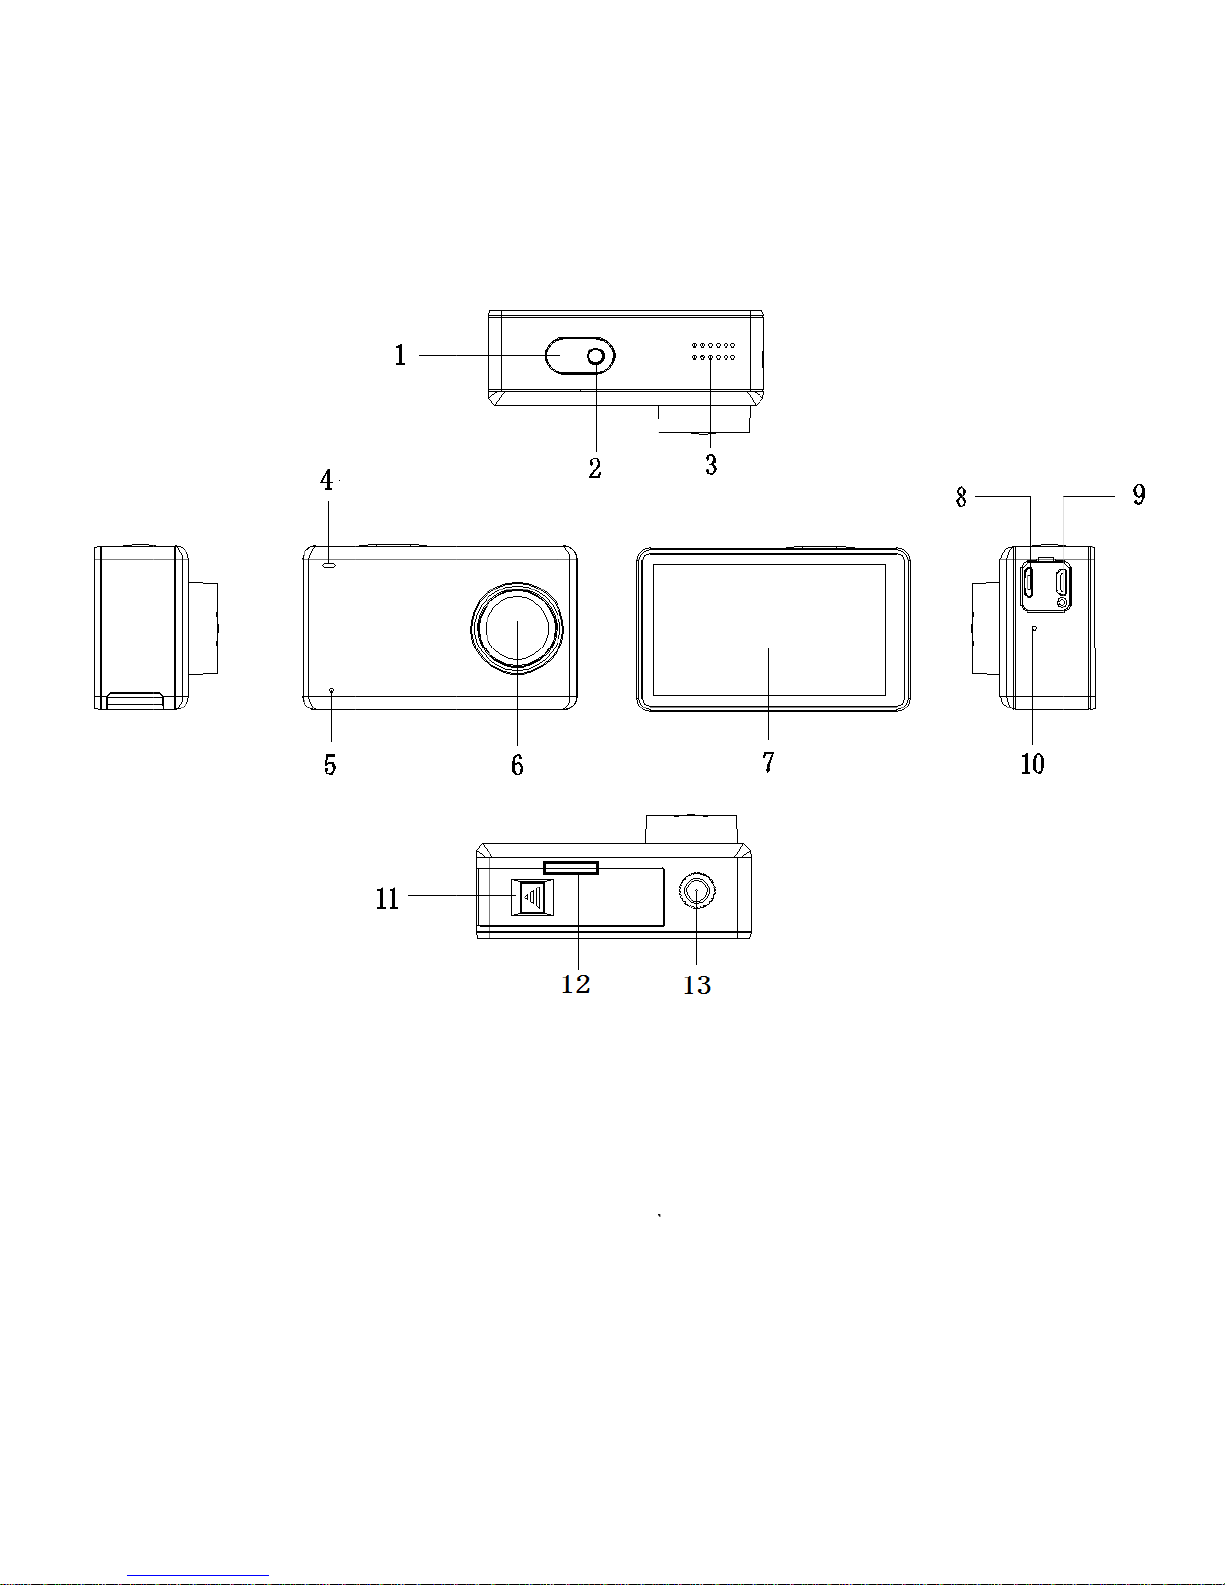
Product Features
1. With a water proof casing, allowing you to film 30 meters under water scene.
2. 2.45 inch HD screen display for convenient videos and image playback .
3. 1100MAH removable battery, easy to replace the battery, safe and durable, longer life.
4. 7 glass A+ 170°high precision lens.
5. HD 12Mpixel wide angle lens .
6. HDMI Output.
7. support the highest 64G storage card.
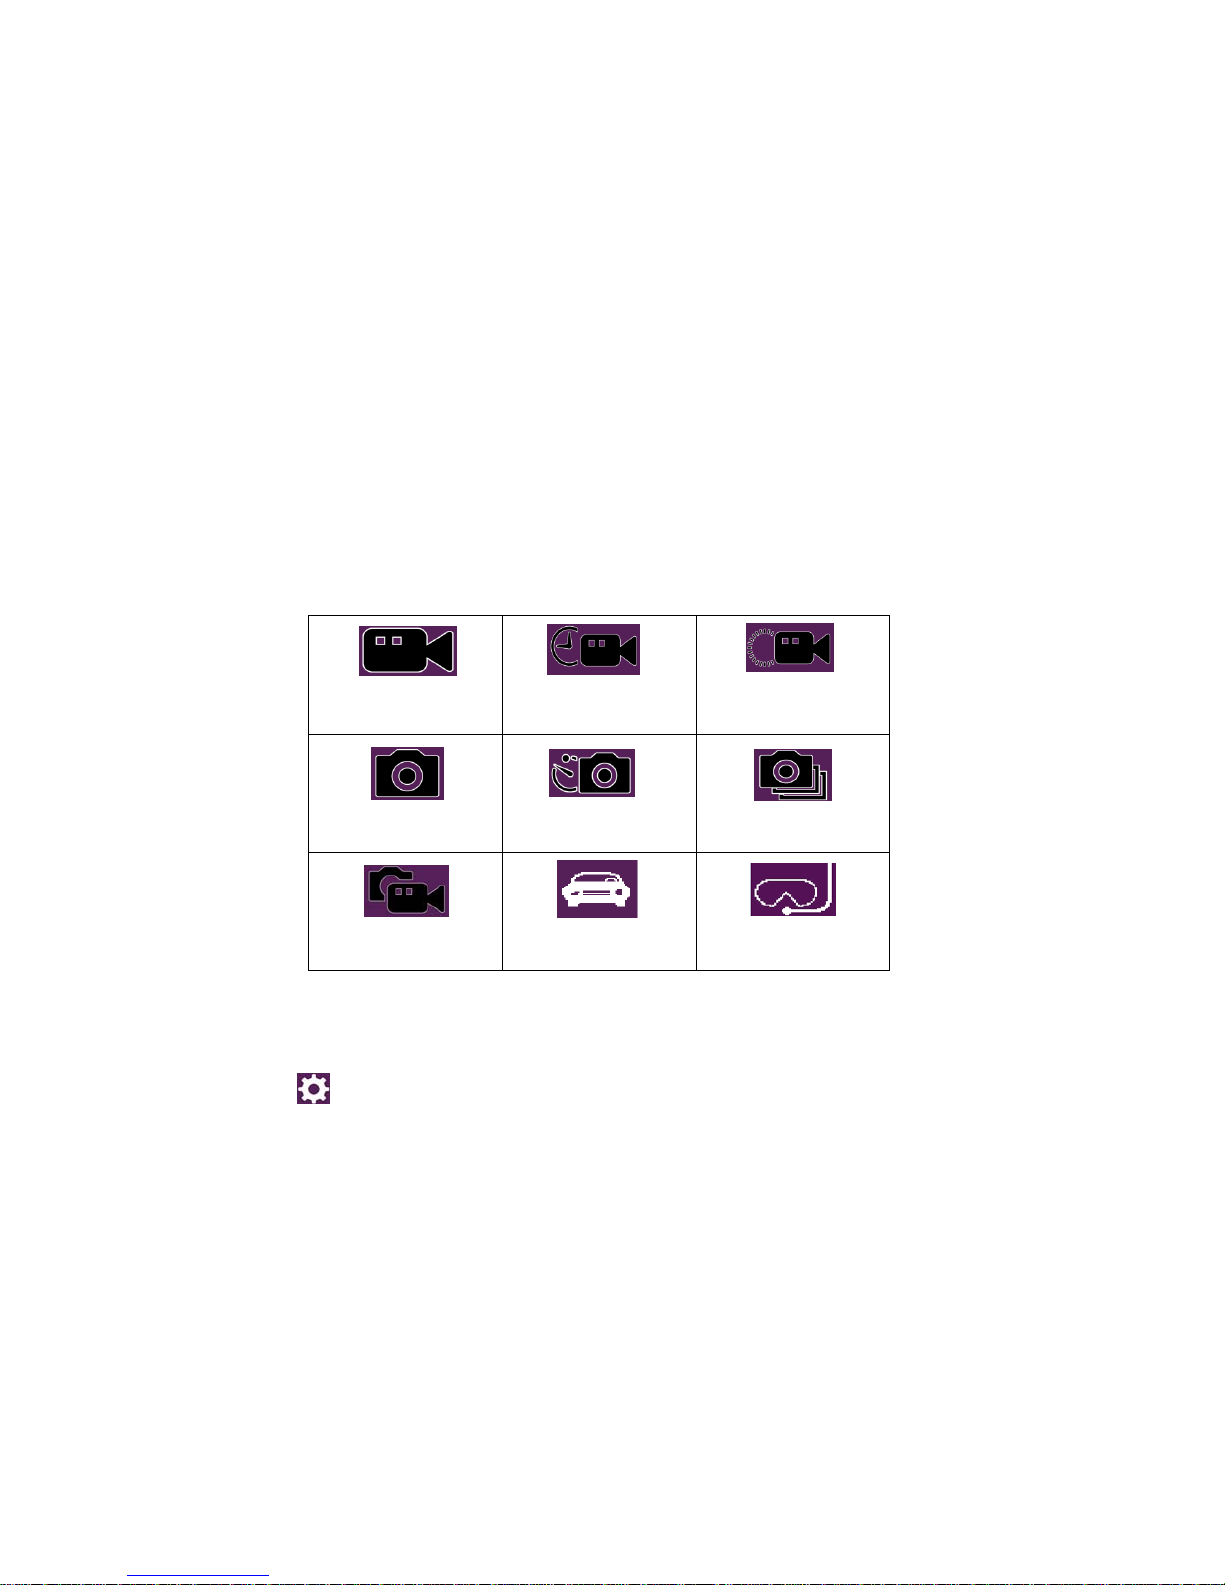
8. kinds of video recording format 4K 2K 1080P 720PWVGA.
9. MP4 format video recording, H.264 compression format.
10. consecutive pictures, compressed video, video and other slow shooting modes.
11. proprietary underwater shooting mode.
12. 6 axis gyroscope anti shake Technology.
13. super WIFI,APP Internet, can share the wonderful picture in real time.
14. dual channel stereo sound, listen to the most clear voice.

1. S
6.
C
12.
inte
r
hutter/ON/
O
C
amera 7.
SD card sl
o
r
face
O
FF 2. Vid
e
Screen 8
o
t (need to
o
Cam
e
e
o Indicator
.USB 9.
H
o
pen the bat
t
e
ra Illust
r
3. Speake
r
H
DMI 10.
t
ery compa
r
r
ation
r
4. Work I
n
MIC 11.
B
r
tment) 13.
n
dicator 5.
B
attery swit
c
Self timer
.
MIC
c
h
or a three t
r
r
ipod

1.Shutter/O
N
N
/OFF
Wa
2. Case se
c
terproof
c
c
urity lock
c
ase
3. Camera 4.Brac
k
k
et buckle

1.
2.
A.
P
the
b
B. t
h
and
Installing
M
A. in accor
the SD car
d
B.Note: Pl
e
b
efore use.
Installing a
P
ress the swi
t
b
attery cove
r
h
e battery is
arrows indi
c
M
icro SD C
a
dance with t
h
d
slot positio
n
e
ase choose
a
We suggest
a
nd removin
t
ch of the b
a
r
, a battery c
o
installed an
d
c
ated on the
b
O
a
rd
h
e direction
n
, insert the
a
branded M
i
a
high quali
t
g the batte
r
a
ttery, and th
e
o
ver can be
o
d
removed i
n
b
attery.
O
peratio
n
of the arro
w
SD card.
i
cro SD car
d
t
y SD card f
o
r
ies
e
battery co
v
o
pened up.
n
accordanc
e
n
w
battery cov
e
d
, and then f
o
o
r the perfec
t
v
er in the dir
e
e
with the po
s
e
r, open the
b
o
rmat it with
t
result.
e
ction of th
e
s
itive and n
e
b
attery cove
r
the comput
e
e
arrow, slid
e
e
gative signs
r
,
e
r
e

3. Charging
A. You can recharge this Action Camera by connecting it directly to the computer or
with the power adapter.
B. Action Camera can record the video while charging ( Switch to Vehicle-mounted
Mode in the “Menu”).
C. The camera can be charge even the power is switch off.
D. When charging, the device 4 indicator light will be bright, and the indicator light will
off
4. Switching the camera on and off
A. Press the ON/OFF switch for 1 seconds to turn it on
B. Press and hold the ON/OFF switch for 3 seconds to turn it off
5. Mode Change
A. boot, touch the bottom of the screen, there will be 9 shooting mode, shooting mode
can be Selected
6. Menu setting
A. select the shooting mode, click on the lower right corner of the screen settings
Icon, you can enter the menu settings.
B. in the menu settings can be set on the shooting mode, in different modes, menu
options will be different.
C. shooting mode menu: resolution, color, white balance, exposure settings.
D. system menu: time settings, language, screen protection, formatting, etc..
7. Photo shooting mode
A.in the shooting mode, select the photo mode, press the shutter button to takepictures.
8. Video recording mode
A. Choose the video mode in shooting mode, press the shutter button for recording, press
the shutter button again, can stop the video.
B. video indicator 2,will be flash.
Video
Time-lapse
Slowmotion
Photo
Photolapse
Sequence
Video+Photo
Carmode
Aquamode

9. Playback
A.In the bottom left corner of the screen, click on the replay icon, you can enter the
impact playback mode.
10. Date storage
A. using Micro USB data cable, the date files will be copied to the computer to play, or
youCanalso take the Micro SD out,and use the card reader to read the image data .
11. shortcut key mode
A. boot, slide down from the screen, there will be a shortcut menu, you can quickly
operate.
7. WIFI connection
A. installed on the phone or tablet computer OKCAM software (Android system can be
searched on the Google Play and download, Apple's system can be downloaded from the
APP Store , the china mainland market, Android users can search in the application
treasureLoad).
B. open the camera, open the WIFI, the camera screen will display the WIFI logo, and
then appear 4K SportsDV_...... .......
C. on the phone or tablet PC to open the WIFI function, in the settings, search and
connect 4K Sports DV...... ,The initial password is: 12345678; after the connection is
successful, the camera screen will display WIFI connection ready.
D. After the success of the connection, can be on the phone or tablet PC, open the APP
"OKCAM" for the corresponding operation or image sharing.
E.WIFI indicator light
WIFION/OFF
Screenlockswitch
Shutdown

Specifications
Note: specifications may be upgraded, updated and other reasons to make changes in order
to prevail in kind.
CPU Novatek96660
Sensor SonyIMX078/PanasonicMN34120PA(Optional)
Lens 170°A+Highresolutionwideangle
Screen 2.45inchLCDtouchscreen
Video/Compression
format MP4/H.264
Videoresolution
4k(3840*2160)24FPS
2K(2560*1440)30FPS
1080P(1920*1080)60/30FPS
720P(1280*720)120/60/30FPS
VGA(640*480)240FPS
Pictureformat JPG
Pictureresolution 16M/14M/12M/10M/8M/5M/3M/2M
Visualangle Standard/wide/narrowangle
Storageformat MicroSDcard,maximumsupport64G
USB Micro5pin2.0USB
Waterproofdepth 30M
Audiofrequency stereo
Battery 3.7V/1000mAh
Batteryautonomy 70Minutes
Measurement 64.43*21.5mm
Weight 88g
Videomode Video/Time-lapse/Slowmotion
Photomode Photo/Photolapse/Sequence
Operatingsystem WindowsXP/MacOS
Language
English/French/German/Spanish/Italian/Portug
uese/SimpleChinese/Japanese/Traditional
Chinese/Russian

Warning Statement
This device complies with part 15 of the FCC Rules. Operation is subject to the
following two conditions: (1) This device may not cause harmful interference, and (2)
this device must accept any interference received, including interference that may cause
undesired operation.
Any Changes or modifications not expressly approved by the party responsible for
compliance could void the user's authority to operate the equipment.
Note: This equipment has been tested and found to comply with the limits for a Class B
digital device, pursuant to part 15 of the FCC Rules. These limits are designed to
provide reasonable protection against harmful interference in a residential installation.
This equipment generates uses and can radiate radio frequency energy and, if not
installed and used in accordance with the instructions, may cause harmful interference
to radio communications. However, there is no guarantee that interference will not
occur in a particular installation. If this equipment does cause harmful interference to
radio or television reception, which can be determined by turning the equipment off and
on, the user is encouraged to try to correct the interference by one or more of the
following measures:
-Reorient or relocate the receiving antenna.
-Increase the separation between the equipment and receiver.
-Connect the equipment into an outlet on a circuit different from that to which the
receiver is connected.
-Consult the dealer or an experienced radio/TV technician for help.
The device has been evaluated to meet general RF exposure requirement. The device
can be used in portable exposure condition without restriction.
Table of contents