FAVI F19BL-TV User manual


1
Table of contents
Safety information
Unit and accessories
Product features
Introduction
Front view
Rear view
Wall mounting
Remote control button layout
Remote control battery installation
Power cord connection
Antenna (RF) connection
Connecting a Composite (A/V) video source
Connecting a Component (YPbPr) video source
Connecting an HDMI source
Connecting a PC to your TV
Powering your TV on and off
Selecting an input source
Menu operation overview
Picture menu settings
Audio menu settings
Time menu settings
Setup menu settings
PC setup sub menu screen
Closed Captioning sub menu screen
Closed Captioning options sub menu screen
Parental lock menu settings
Channel menu settings
Auto scan sub menu settings
Favorite channel sub menu settings
Show/Hide sub menu settings
Troubleshooting
Technical specifications
2-3
4
4
5
5
6
6
7
8
9
9
10
10
11
11
12
12
12
13
14
14
15
15
16
16
17-19
19
20
21
21
22
23
2
Safety information
Correct disposal of this Product
in!
.

3
Safety Information (continued)
Your TV comes with an AC power adapter. This power adapter is designed for your TV.
Operating your TV with a different AC adapter may cause damage to the TV and void
your warranty.
The TV should be unplugged during an electrical storm, or if it’s not going to be used for an
extended period of time.
Do not use this TV near sources of heat such as space heaters, fireplaces, or other heat
producing appliances.
Do not allow liquids to come into contact with this TV. Doing so could damage the internal
electronics. To clean the TV, wipe it with a damp cloth and allow it to fully dry before operating
it.
This TV should not be used at temperatures above 104ºF or below 40ºF. Relative humidity
should be less then 80%.
Please make sure your TV is placed on a steady surface prior to operating it.
Do not block any of the ventilation slots on the back of your TV.
If placing the TV in a cabinet, please make sure there is at least 2 to 3 inches of clearence
on all sides of the TV to allow for proper ventilation.
Please place the TV on a steady surface prior to operating it.
Do not attempt to disassemble this TV. There are no user servicable parts inside. Please refer
servicing to qualified service personnel.
4
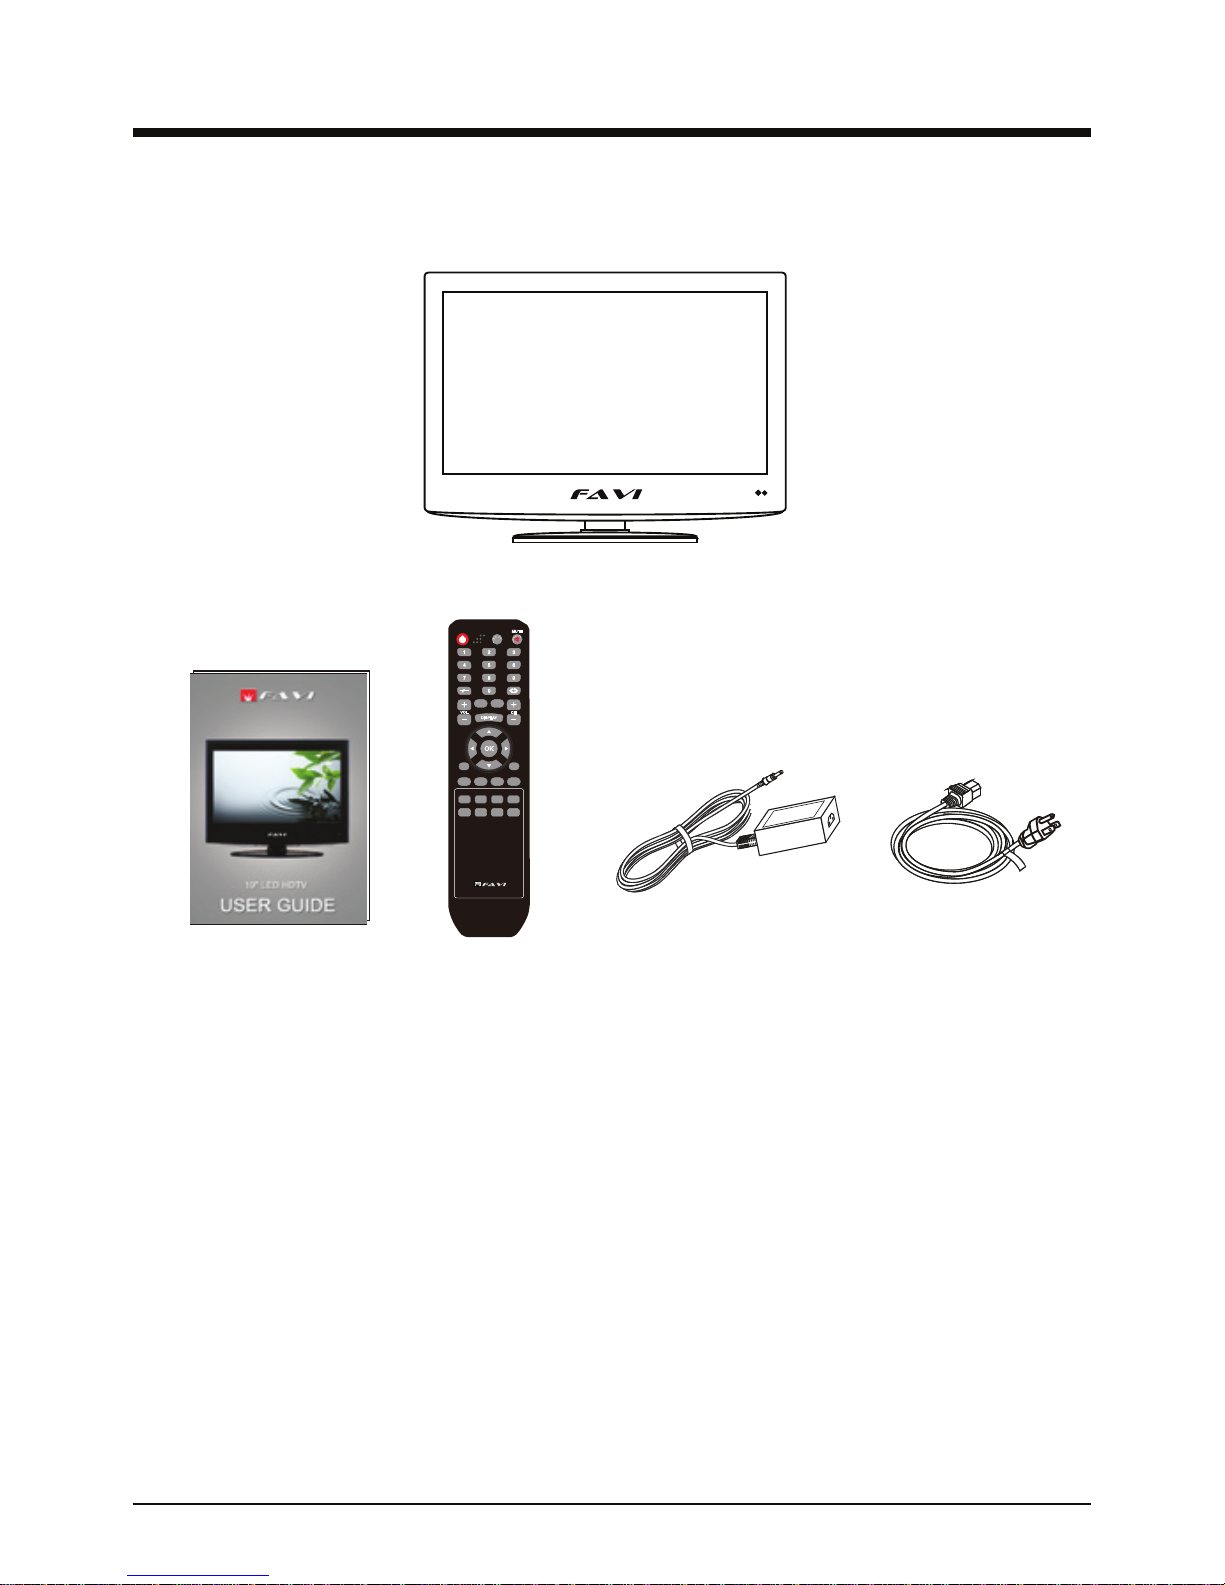
Unit and accessories
TV set
USER GUIDE Remote control
Product Features
AC adapter Power cord
• 18.5” 16:9 screen.
• Energy saving design. Uses less then 40 watts of power.
• LED backlight allows for more natural colors and better image quality then a standard CCFL
backlight.
• 1366 x 768 native LCD resolution for HD performance.
• Integrated ATSC TV tuner for HDTV broadcast reception.
• Supports Composite video, Component video, HDMI, and VGA video inputs
• Supports headphone audio output, and Coax digital audio output.
• VESA wall mount compatible.
VOL
DIS PLAY
CH
MUTE
-/ - -
OK
MTS CC
ASPECTINPUT
FAVLIST FAVCH+
CHLIST AUTO PMODE SMODE
FAVCH-ADD/ERASE
FREEZE SLEEP
EXIT MENU
EPG
POWER
• Detachable tilting base.
5
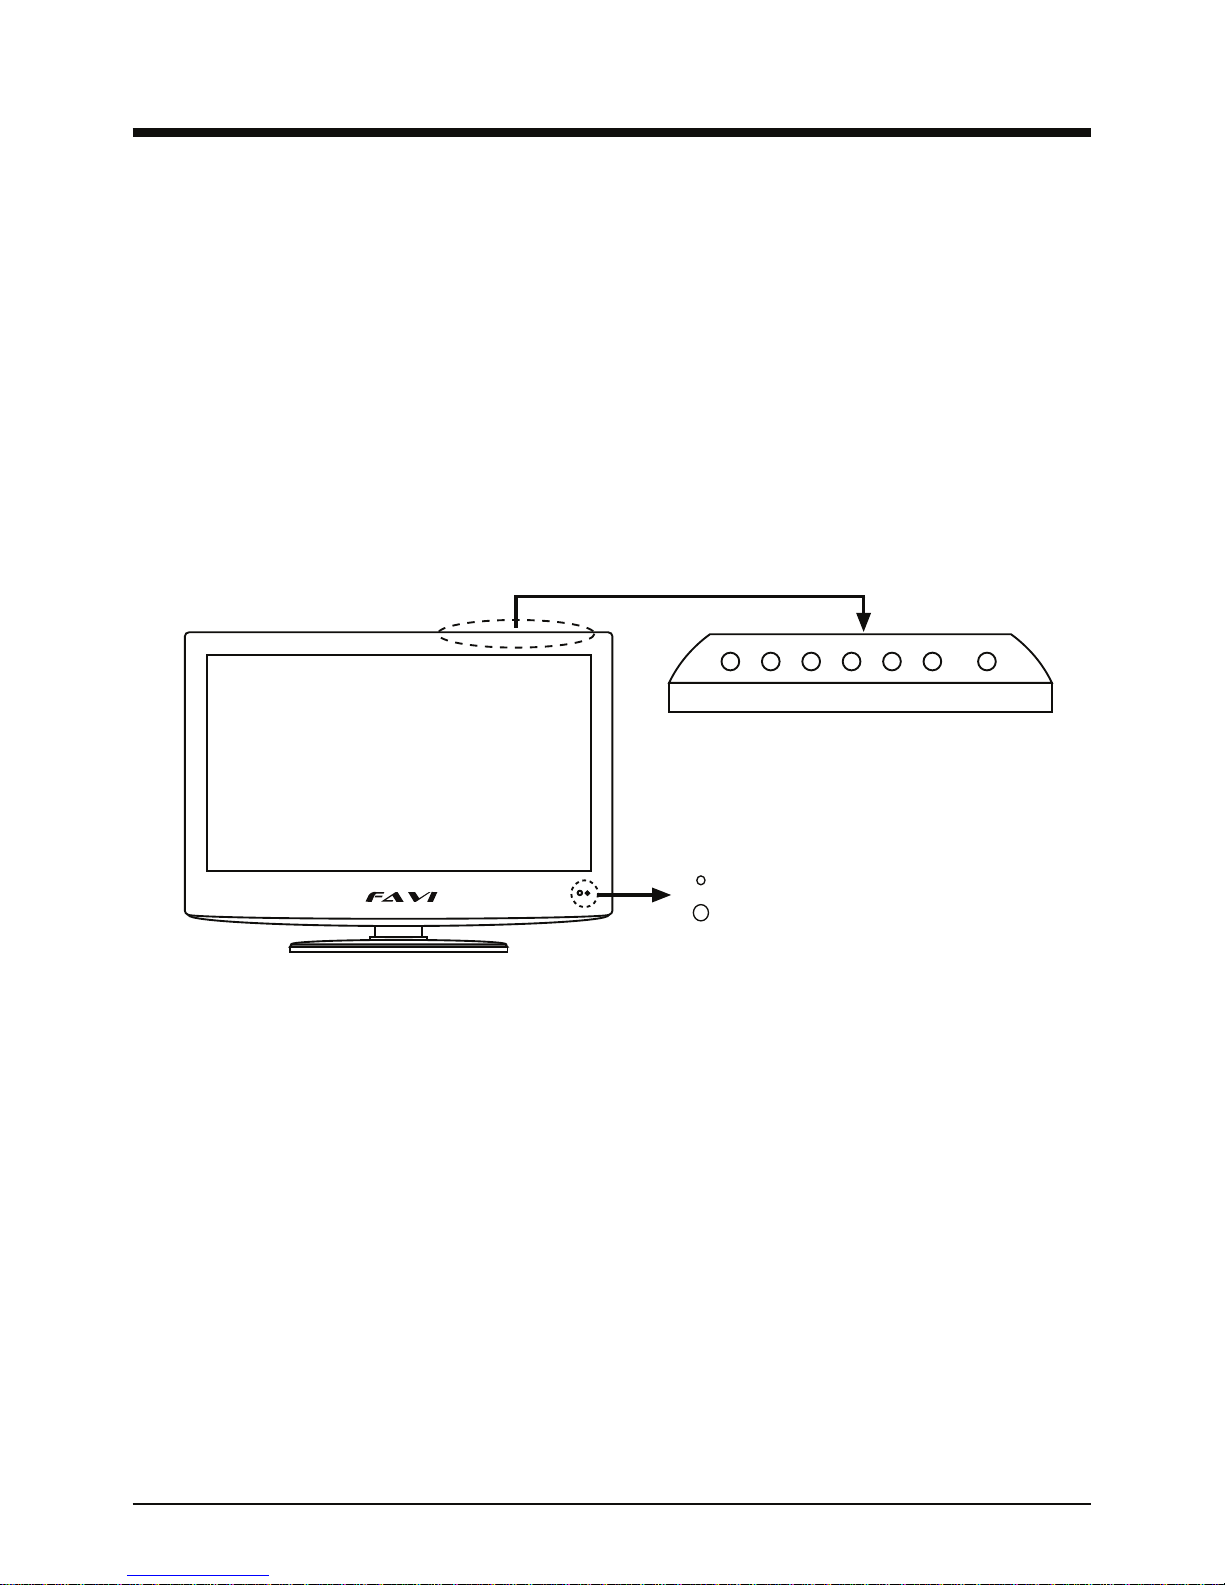
Introduction
Infrared (IR) receiver: Receives IR signals from the remote control.
(Power on/Standby)LED Indicator: Indicates whether the TV is plugged in and operating.
Indicator on (Red) Standby mode
Indicator on (Green) Power on mode
Led Indicator
IR receiver
INPUT MENU CH+ CH- VOL+ VOL- POWER
Your new TV uses new LED based backlight technology to providde a crisp, clear picture in
a compact, space saving design.
This user guide is designed to help you setup and operate your new TV. Please read this user
guide carefully.
We hope that you enjoy your new FAVI LED TV, and that it fulfills your home or business
needs.
Front view
INPUT: Brings up the source selection menu. Use the CH- and CH+ buttons to highlight a
source and use the VOL- and VOL+ buttons to select the highlighted source.
MENU: Brings up the menu screen. Use the VOL - and VOL+ buttons to navigate between
menu screens and change settings. Use the CH- and CH+ buttons to highlight settings in a
menu screen.
CH- / CH+: Changes channels in TV mode.
VOL- / VOL+: Changes volume in all modes.
6
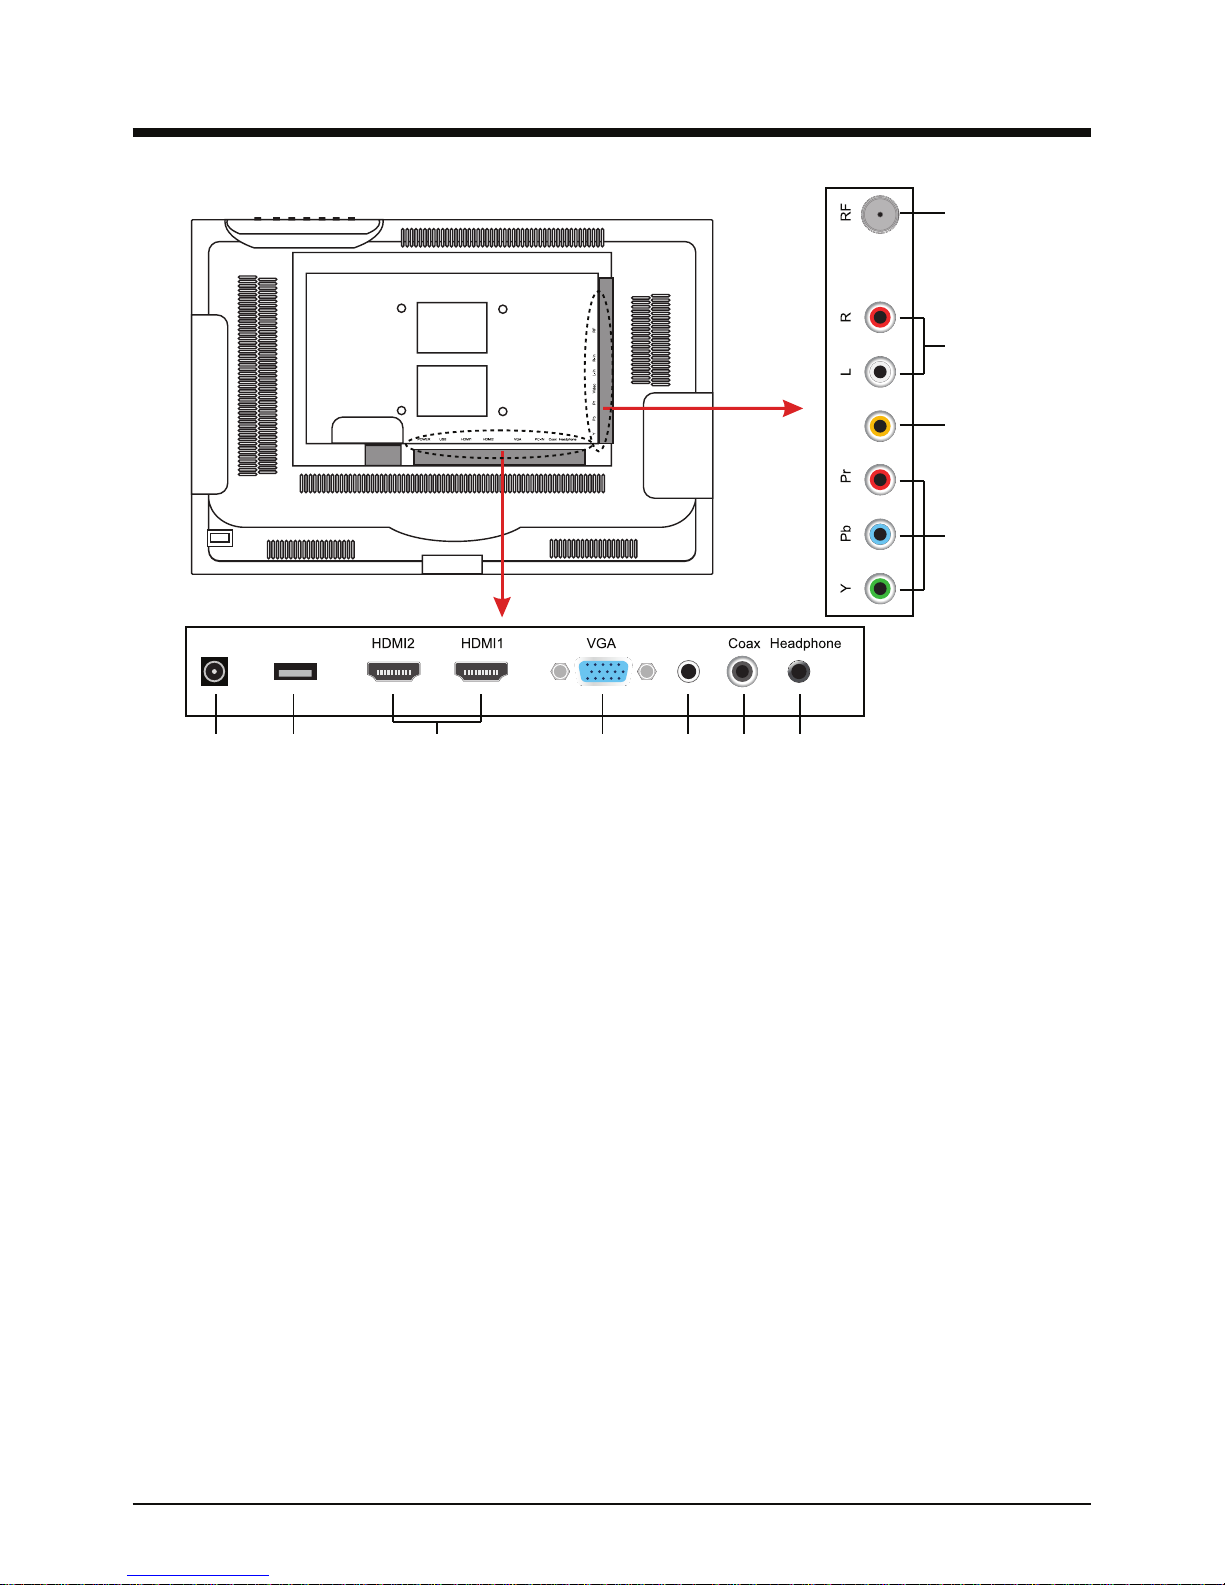
Rear view
1. DC IN : Connect to the AC adapter.
2. USB service port: For factory service only.
3. HDMI ports: Connect to any HDMI source.
4. VGA: Connect to any standard VGA source.
5. PC-AUDIO IN : Connects to standard PC sound cards (For use in VGA mode only).
6. Coax: Coaxial Digital Audio output.
7. Headphone jack: Connect a pair of headphones or external speakers.
8. YPbPr: Connect to any Component video source.
9. AV IN: Connect to any Composite video source.
10.Line audio jacks: Connect to any line audio source. (Note: Both Composite and Component
video share these audio input jacks.)
11. 75 Ohm coax input: Connect to an antenna or cable source.
Wall Mounting
The TV is provided with mounting holes for a VESA approved wall mounting bracket (not
supplied). To remove the base, first place the TV screen side down on a table covered with a soft
towel to avoid damaging the screen. Remove the two phillips screws on the back of the base. Next,
remove the single phillips screw inside the bottom of the base. You can then remove the base from
the TV.
When attaching the TV to a wall mount, do not use screws that will penetrate into the TV more then
3/8 of an inch. Longer screws may damage your TV’s internal components.
1 2 3 4 5 6 7
8
9
10
11
USB IN
PC-AUDIO
DC IN
AV IN

7
Remote control button layout
This page points out the buttons on your TV’s remote control, and their functions.
VOL
DISPLAY
CH
MUTE
MTS CC
ASPECTINPUT
FAV LIST FAV CH+
CHLIST AUTO PMODE SMODE
FAV CH-ADD/ERASE
FREEZE SLEEP
EXIT MENU
EPG
POWER
ENTER
12
3
4
5
1: Power button
2: Electronic Program Guide
3: Mute button
4: Channel numbers
5: Go back to previous channel
6: Channel selection
7: Closed Captioning selection button
8: Menu navigation arrows
9: Select sub-menu
10: Bring up the menu screen
11: Activate the sleep timer
12: Freeze frame (Available on analog
channels only)
13: Favorite channel selection
14: Sound preset selection
15: Picture preset selection
16: VGA mode auto calibration
17: Brings up the channel list
18: Brings up the favorite channel list
19: Add or remove favorite channels
20: Aspect ratio selection
21: Input source selection
22: Exit out of menu and sub-menu
screens
23: Brings up information on the channel
or video mode you are viewing. Press
again to display the event guide on
digital channels.
24: Volume control
25: MTS audio selection
6
7
8
9
10
11
13
14
1516
17
18
19 12
20
21
22
23
24
25
8
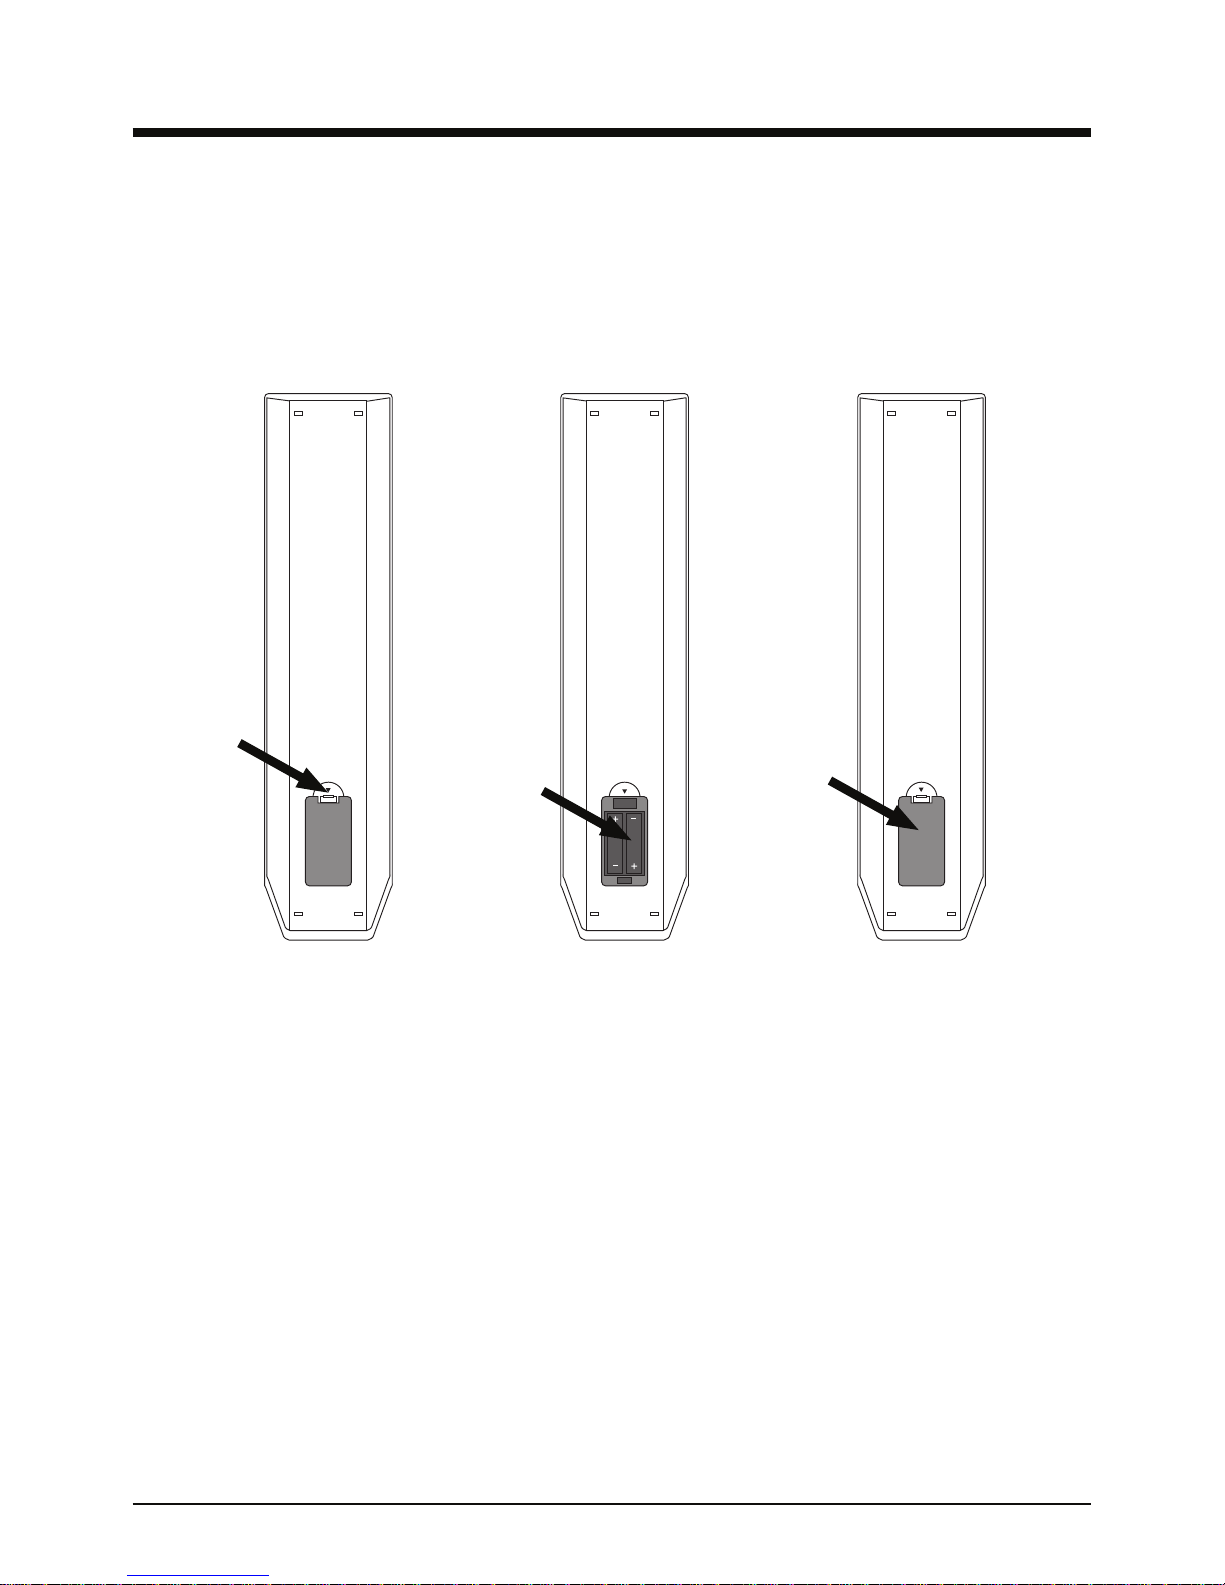
Remote control battery installation
1. Remove the battery compartment cover on the back of the remote control.
2. Insert two 1.5V AAA batteries observing the polarity markings printed inside the battery
compartment.
3. Replace the battery compartment cover.
Remove battery
cover. Insert two
AAA batteries.
Replace the
battery cover.
9
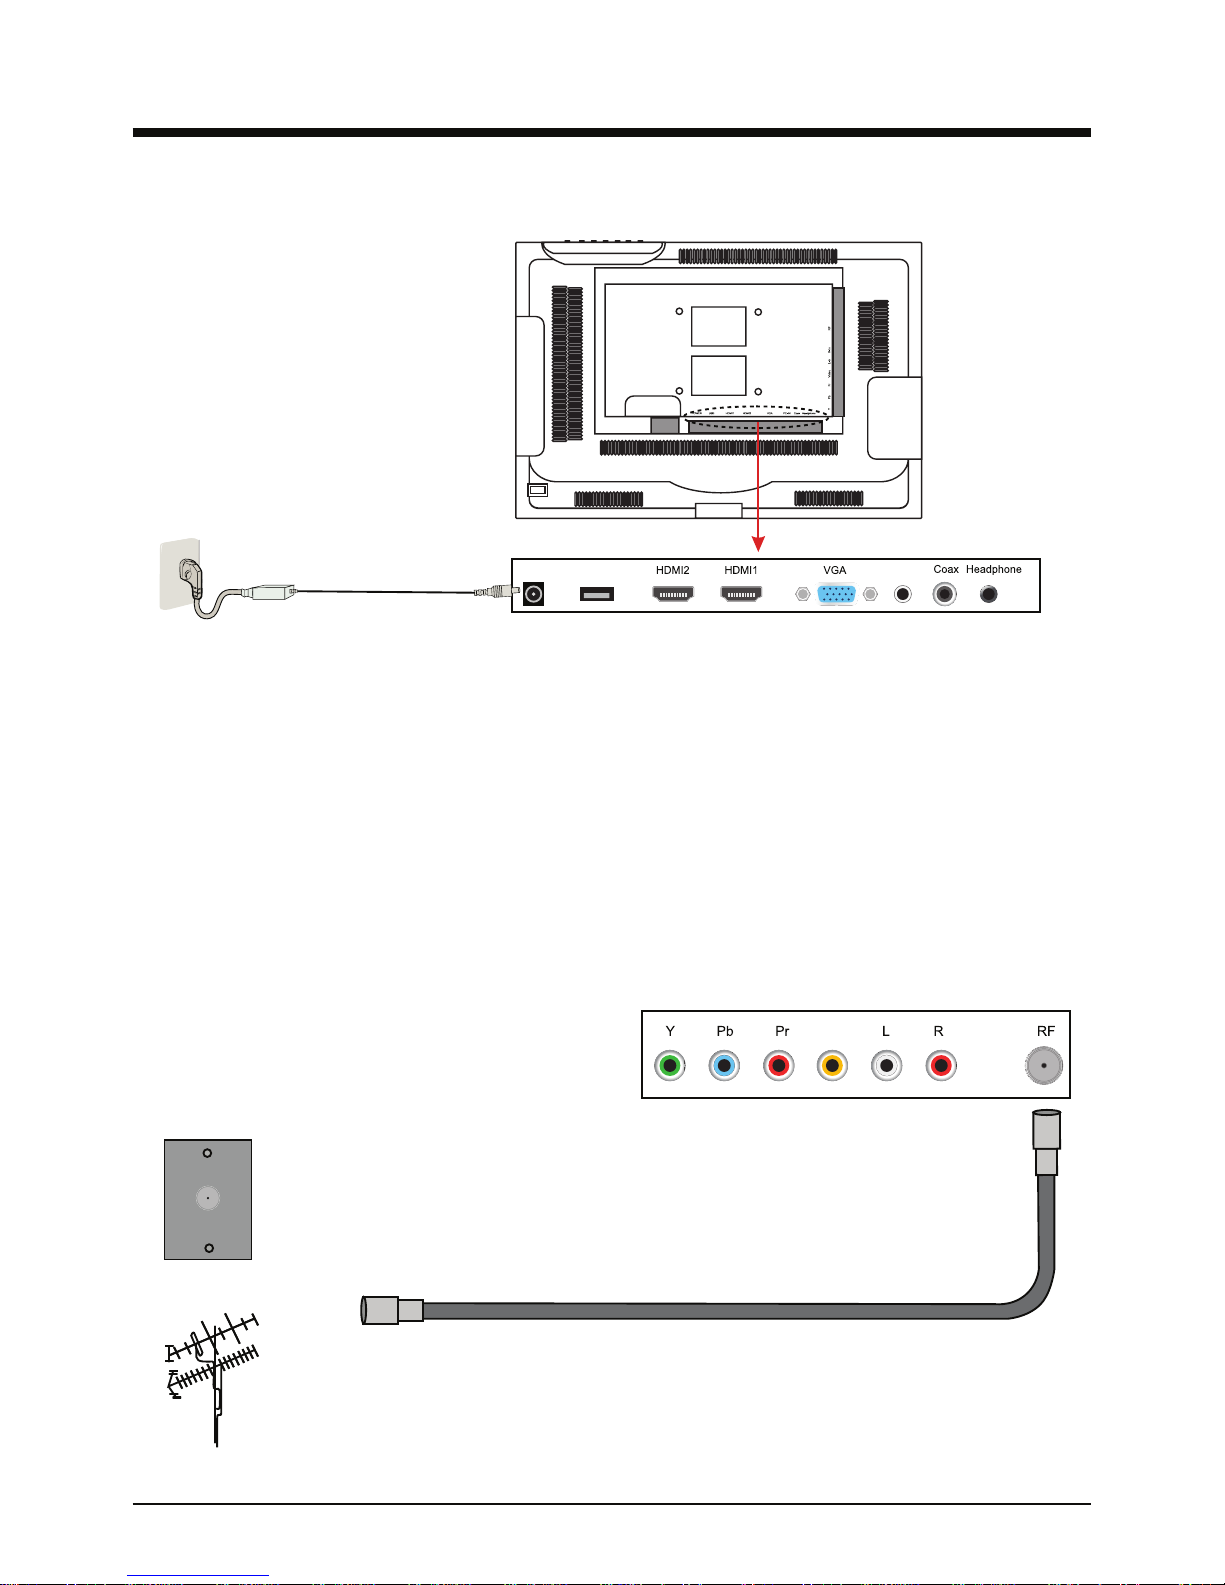
Antenna (RF) Connection
Power Cord Connection
After plugging the power supply into a wall outlet, connect it to the DC IN jack located on the back
of the TV.
USB PC-AUDIO
IN
DC IN
75 ohm coaxial cable
Coax cable wall plate
External Antenna
AV IN
Your TV is designed to receive both ATSC and clear QAM, as well as regular NTSC programming.
Connect a standard 75 ohm coaxial cable to the RF jack located on the left side of the TV. You can
connect a regular antenna to your TV, or connect your TV to a cable system if available.
10
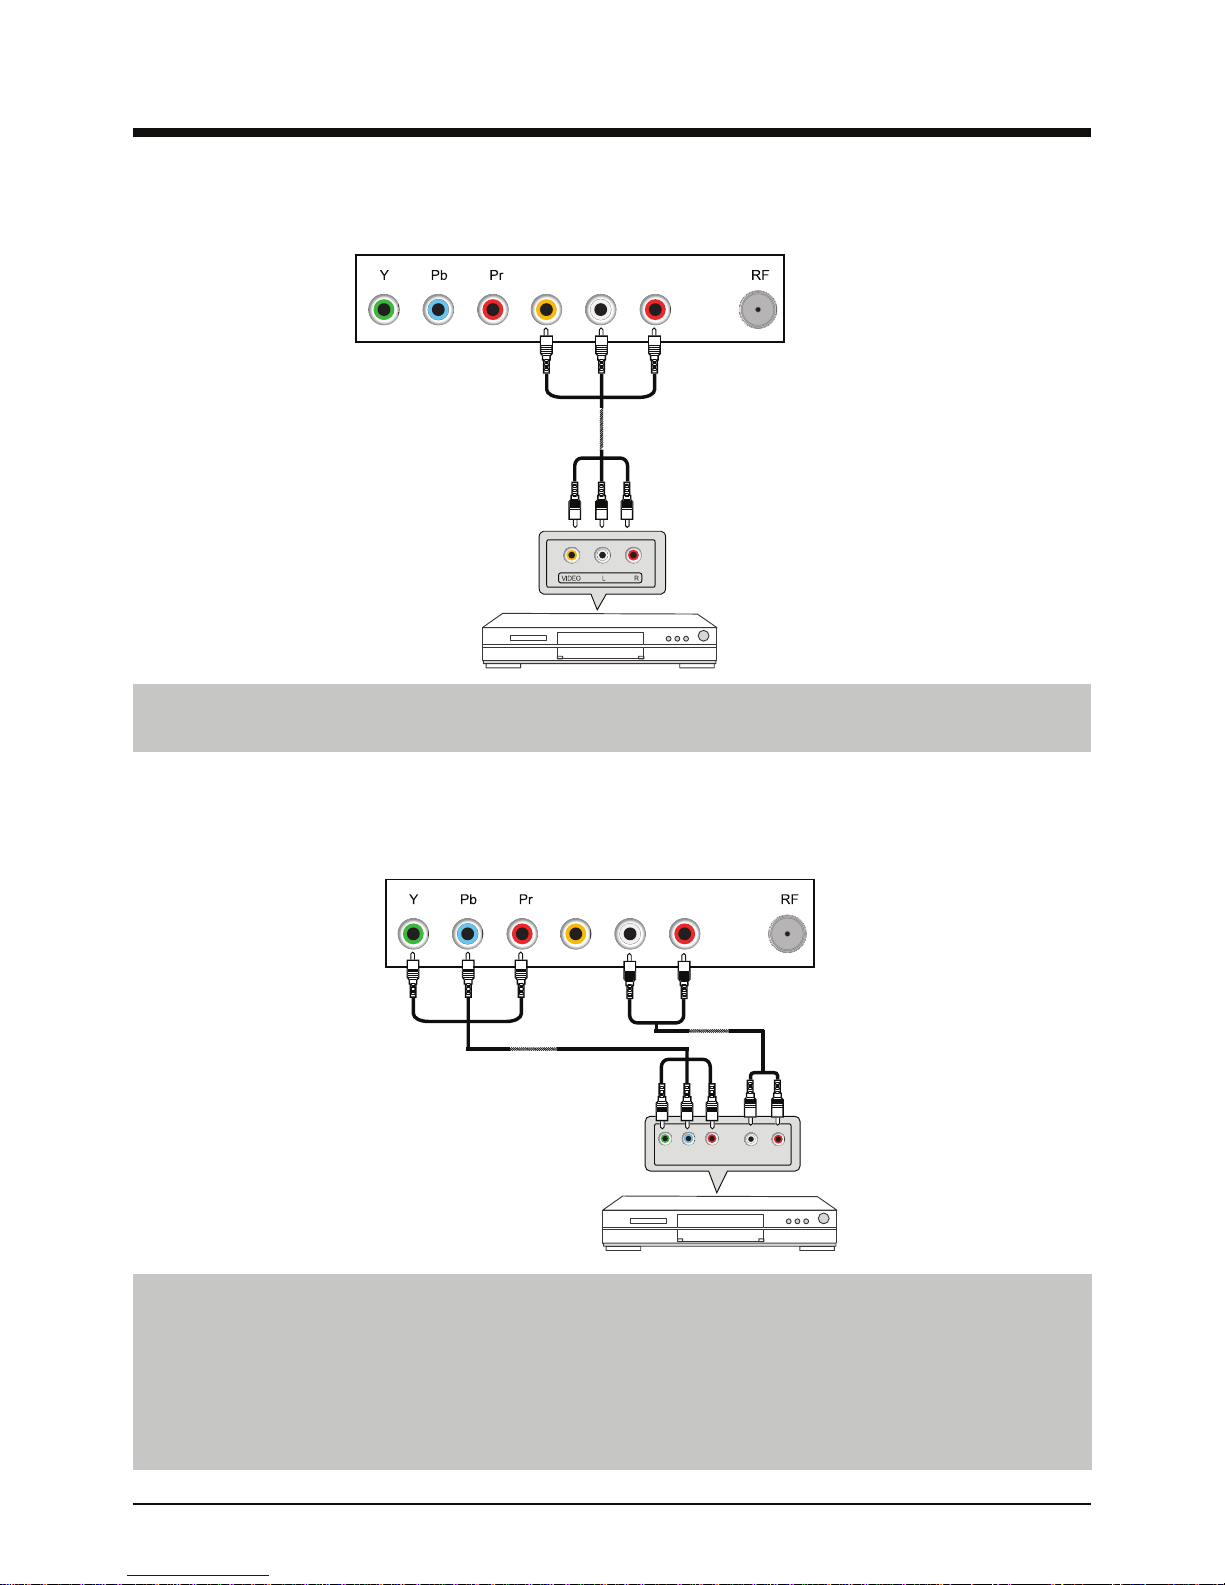
Connecting a Composite (A/V) video source
Locate the Yellow, White, and Red RCA jacks on the back of your TV and Composite video
source. Connect an A/V cable to these jacks as shown in the diagram above.
A/V cable
Audio Cable
Composite
video source
Connecting a Component (YPbPr) video source
Locate the Green, Blue, and Red RCA jacks on the back of your TV and Component video
source. Connect the Component video cable to the color coded jacks labeled Y (Green) Pb
(Blue) and Pr (Red).
Connect a stereo audio cable to the red and white jacks on the back of your TV labeled L-in
and R-in. Connect the other end of the cable to the audio output jacks on your Component
video source.
Component
video source
Component video
cable
Y Pb Pr
VIDEO
Back of TV
L-in R-in
Back of TV
VIDEO L-in R-in
LR
11
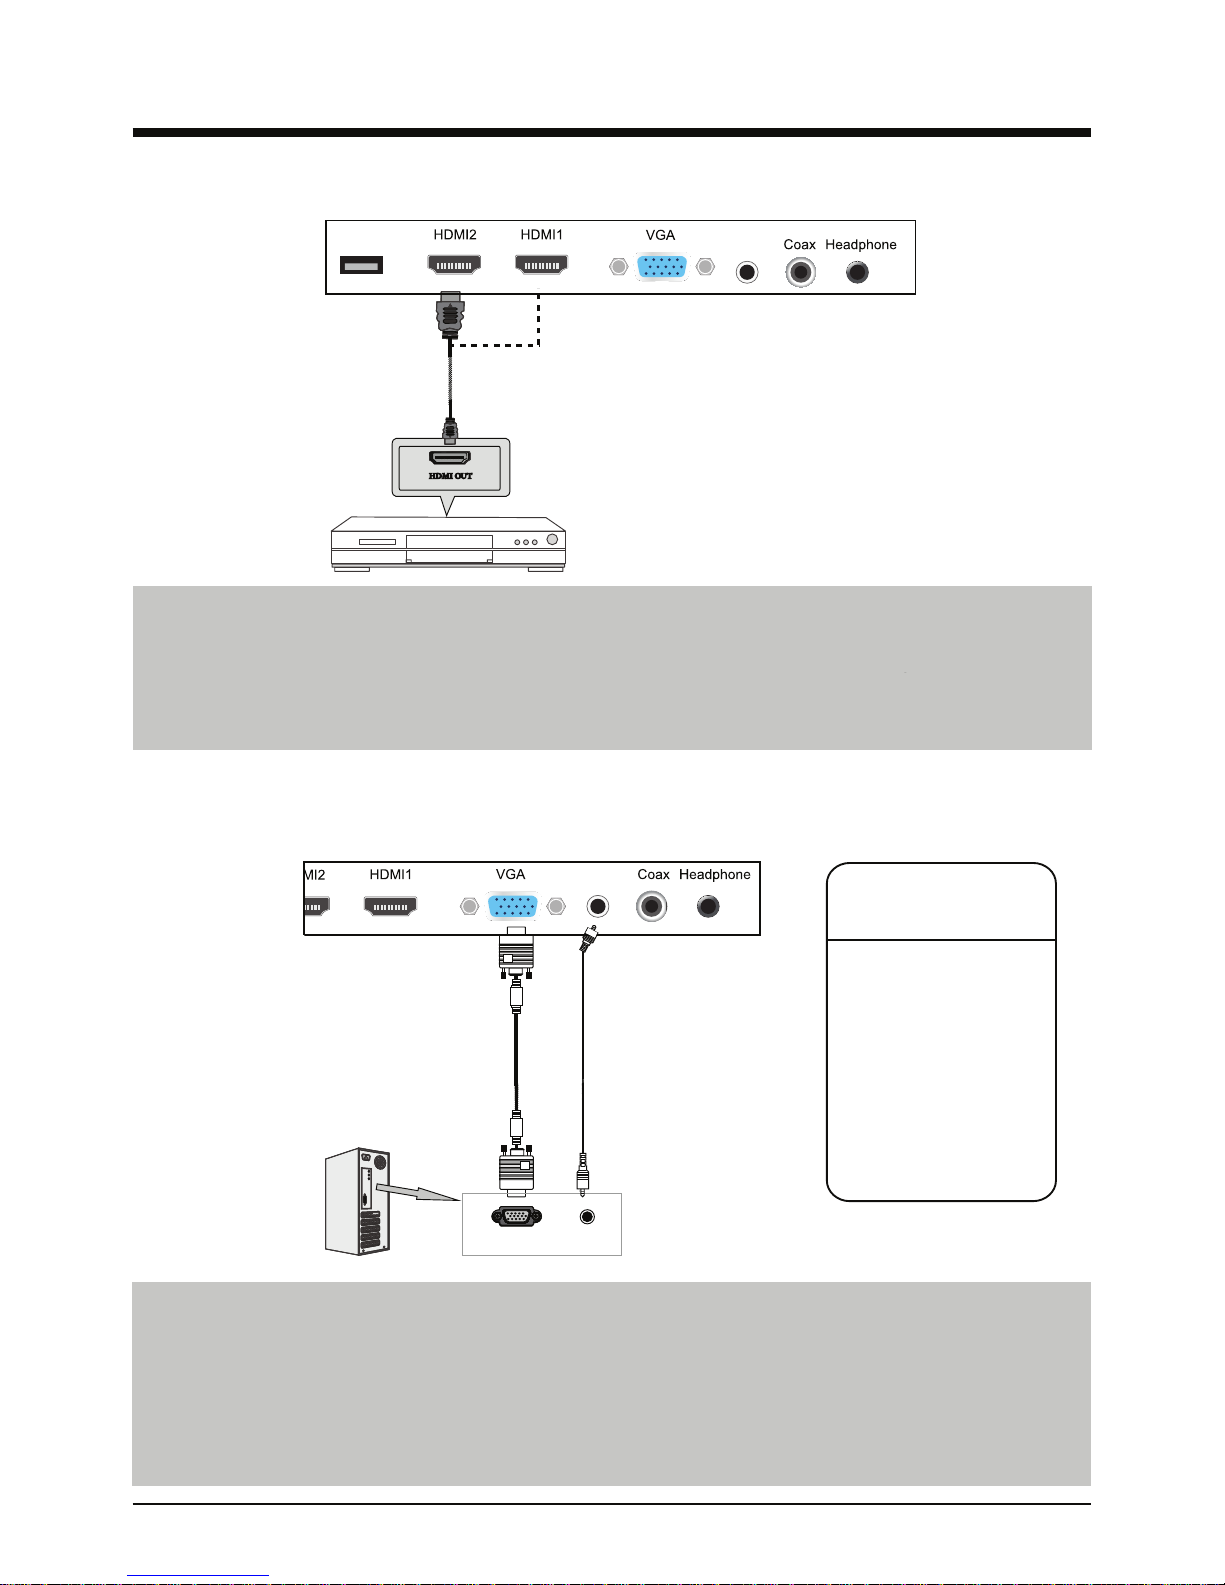
Connecting an HDMI source
Connecting a PC to your TV
HDMI source
Locate the HDMI ports on the back of your TV and video source. Connect one end of the HDMI
cable to the port on your HDMI source, and connect the other end to one of the HDMI ports on
the back of your TV. If you have more then one HDMI source, you can connect it to the other
HDMI port. The HDMI standard includes integrated audio. You do not need to connect a
separate audio cable.
Locate the VGA port on the back of your TV and on your PC. Connect one end of the VGA
cable to the VGA port on the back of your TV, and connect the other end to the VGA port on
your PC. After selecting the VGA source on your TV, power up your PC. You should see the
BIOS and operating system startup screens. Please refer to the table of supported resolutions
listed above. Once a resolution has been selected, the TV will automatically calibrate the
display. Depending on the resolution you select, you may need to change the aspect ratio.
You can also manually adjust image position, clock and phase in the TV’s menu.
HDMI cable
VGA cable
PC audio
cable
USB PC-IN
PC-IN
640 × 480, 60 Hz
720 × 400, 70 Hz
800 × 600, 60 Hz
1024 × 768, 60 Hz
1360 × 768, 60 Hz
VGA Audio
out
Supported VGA
resolutions and refresh
rates
12
Powering your TV on and off
After connecting the power supply to the TV (Please see page 9), press the Power button on
either the TV or the remote control. The TV will power up and display the following message:
TV
AV
Component
HDMI1
HDMI2
VGA
INPUT SOURCE
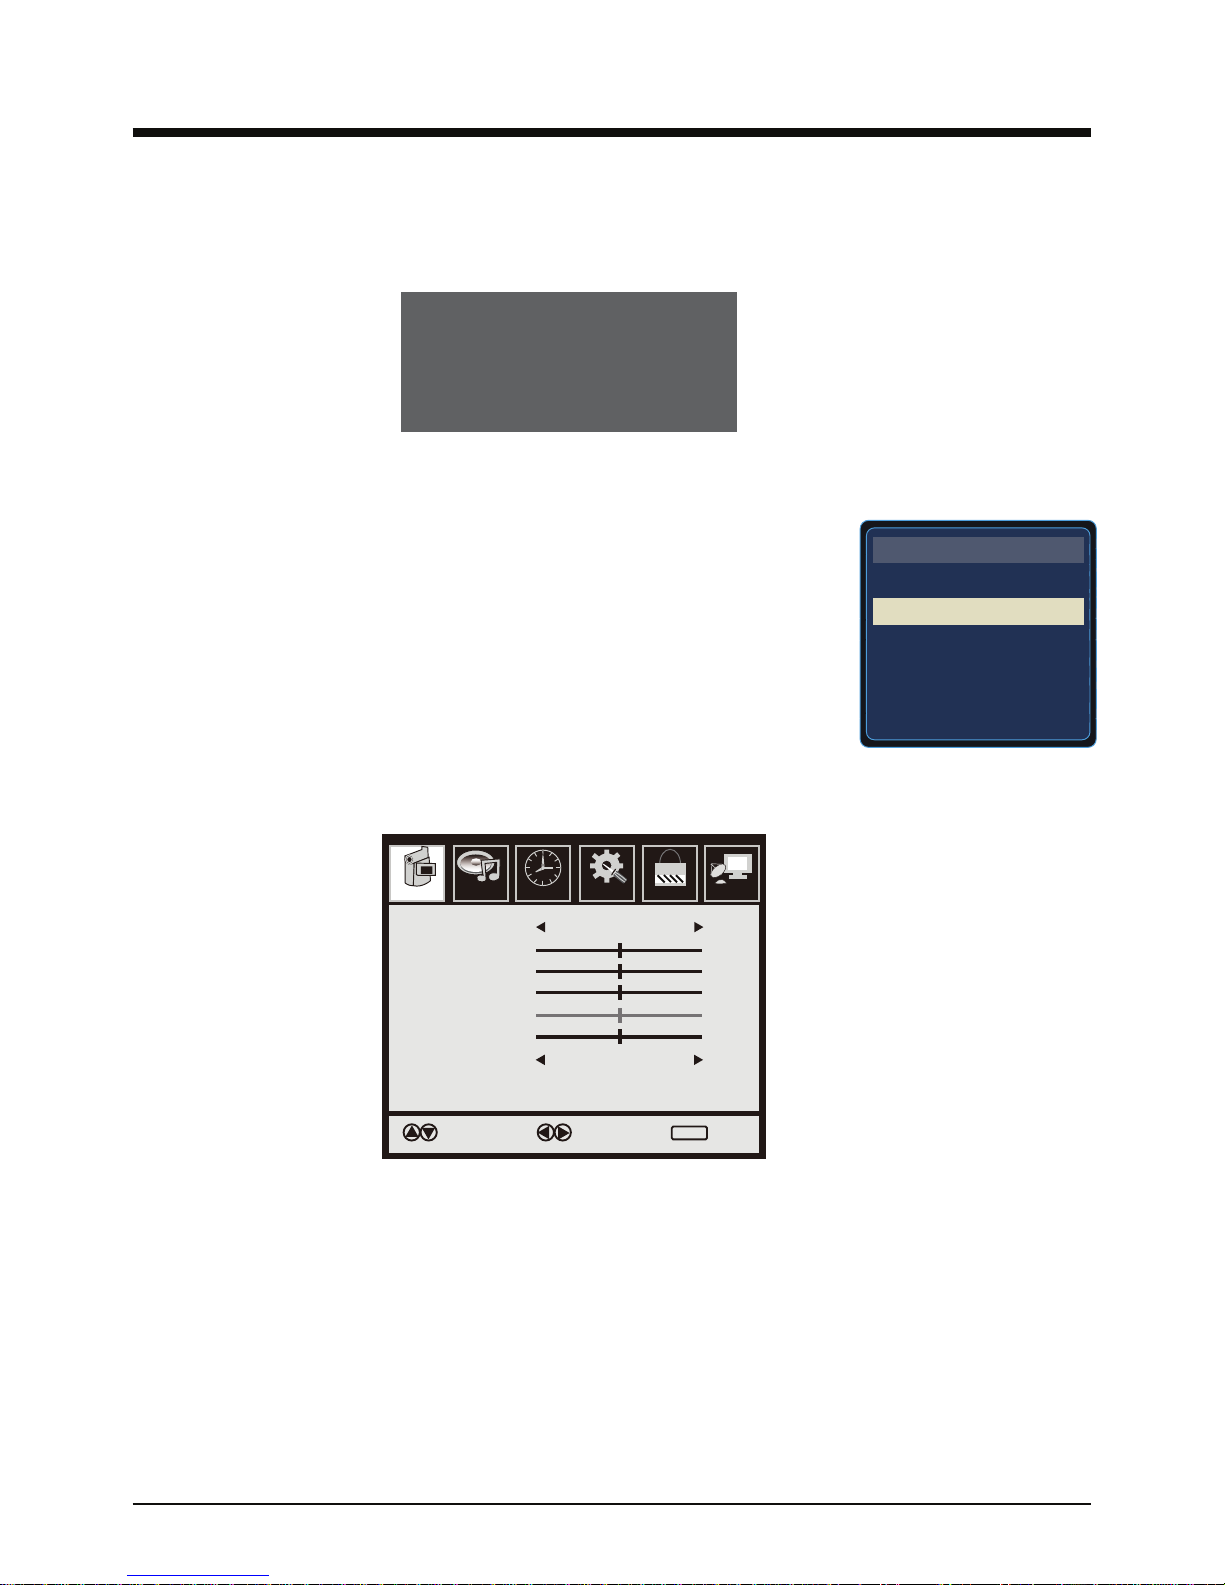
Menu operation overview
Picture Audio Time Setup Lock Channol
Picture Mode
Contrast
Brightness
Color
Tint
Sharpness
Color Temp.
Standard
Select
Normal
Move Exit
50
50
50
0
50
MENU
Please Run
Channel Auto Scan
To have your TV scan for channels, please refer to pages 19 and 20 of this user guide.
Selecting an input source
Press the INPUT button on either the TV or remote control. The input
source menu (pictured to the right) will appear in the upper left corner of
the screen. On the TV, use the channel - or + buttons to highlight the
input source that you want to select. On the remote control, use the
navigation arrow buttons to highlight the input source you want, then
press the ENTER button to select that input.
Press the MENU button on either the TV or the remote control. The menu screen (pictured above)
will come up. On the TV, use the volume - or + buttons to select which menu you want, then press
the channel - button to highlight settings in that menu. Once you have highlighted a setting,
press the volume - or + buttons to change that setting. Press the MENU button to exit the sub menu.
Press the MENU button again to close the menu screen.
On the remote control, press the MENU button to bring up the menu screen. Use the left or right
arrow buttons to select which menu you want, then press the down arrow button to highlight
settings in that menu. Once you have highlighted a setting, press the left or right arrow buttons to
change that setting. Press the MENU button to exit the sub menu. Press the MENU or EXIT button
to close the menu screen.
13
Contrast:
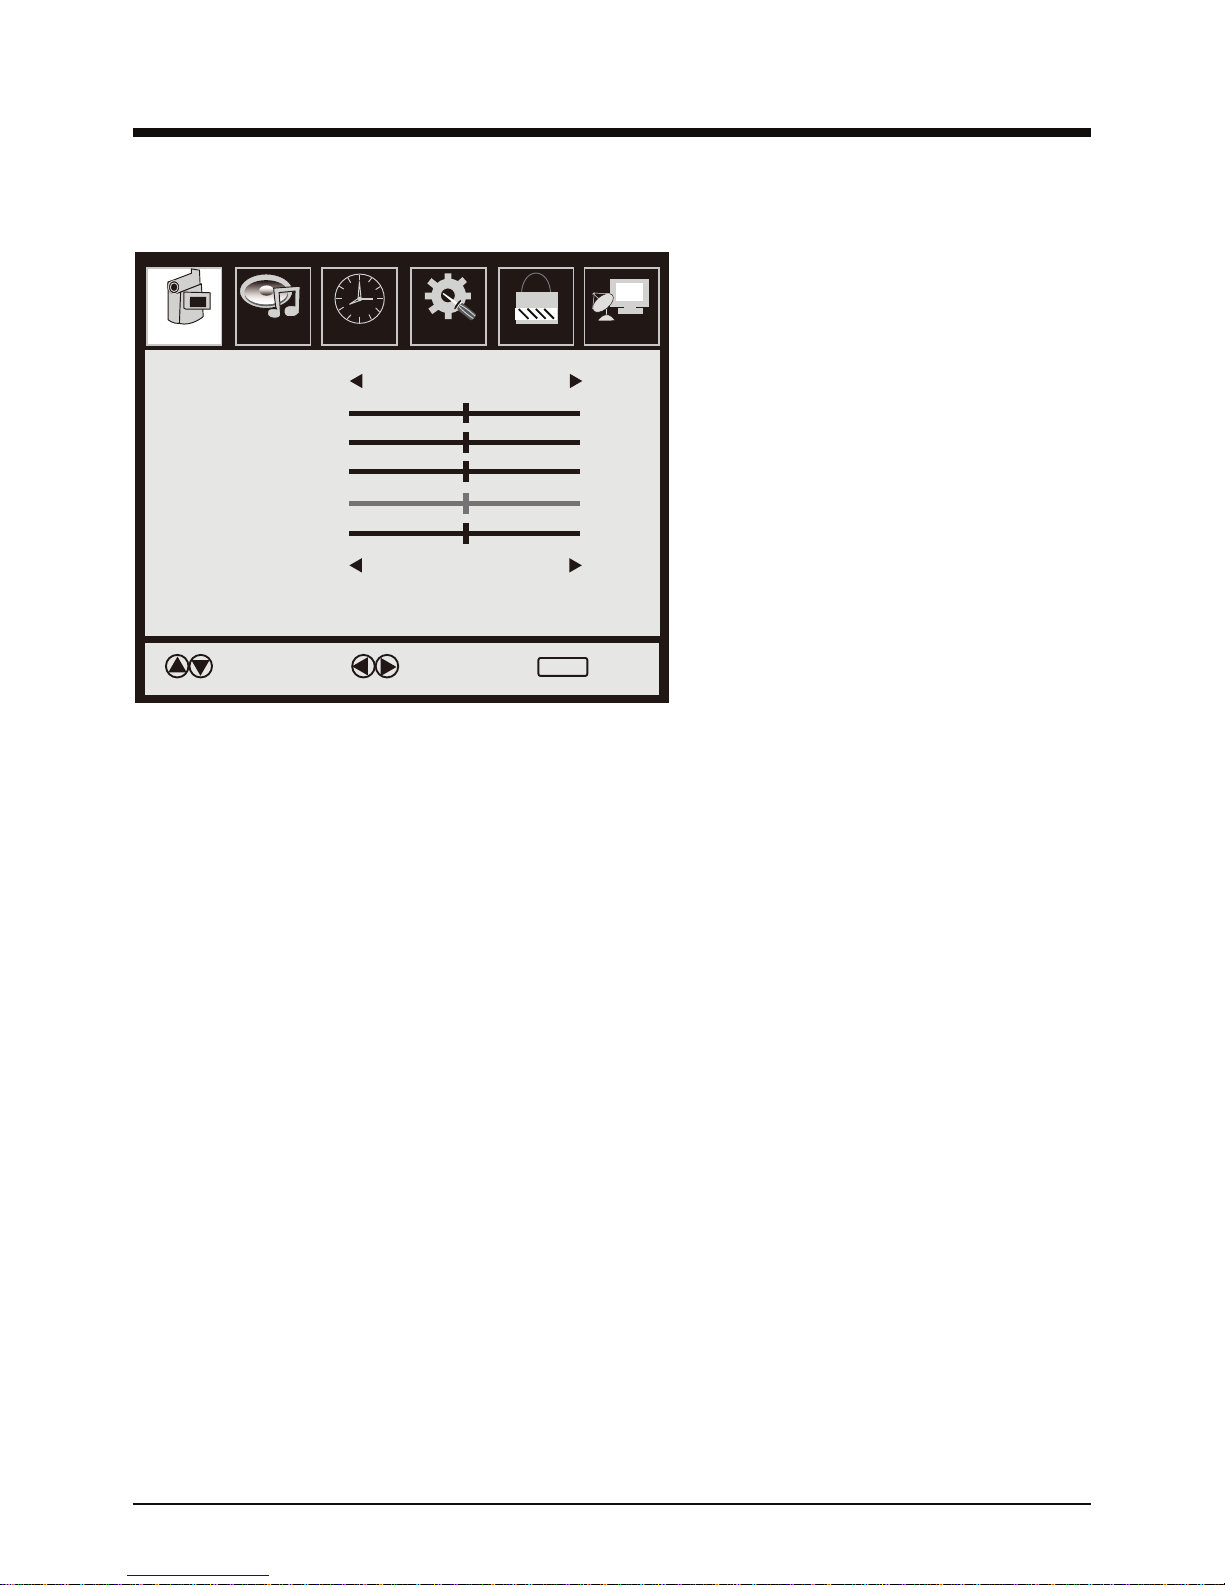
Picture menu settings
Picture mode: You can select between several picture presets such as Standard, Dynamic, Mild,
Sports, and User. With the menu screen closed, the PMODE button on the remote control will also
perform this function. The User preset allows you to manually adjust the Contrast, Brightness, Color
saturation, Tint, and Sharpness.
Contrast: Adjusts the black level in the image.
Brightness: Adjusts the white level in the image.
Tint: Adjusts the tint on NTSC programming. (Note: the Tint control is a leftover from the NTSC
standard, and will only function on NTSC TV channels, and the Composite video input source. ATSC
and QAM TV channels, Component video, and HDMI do not support Tint adjustment.)
Sharpness: Adjust the amount of detail the image has.
Color Temp: Select between color temperature presets. You can choose from Normal, Warm,
and Cool. (Note: Unlike the Tint control, the color tenperature control is available in all video modes.)
Picture Audio Time Setup Lock Channol
Picture Mode
Contrast
Brightness
Color
Tint
Sharpness
Color Temp.
Standard
Select
Normal
Move Exit
50
50
50
0
50
MENU
13
14
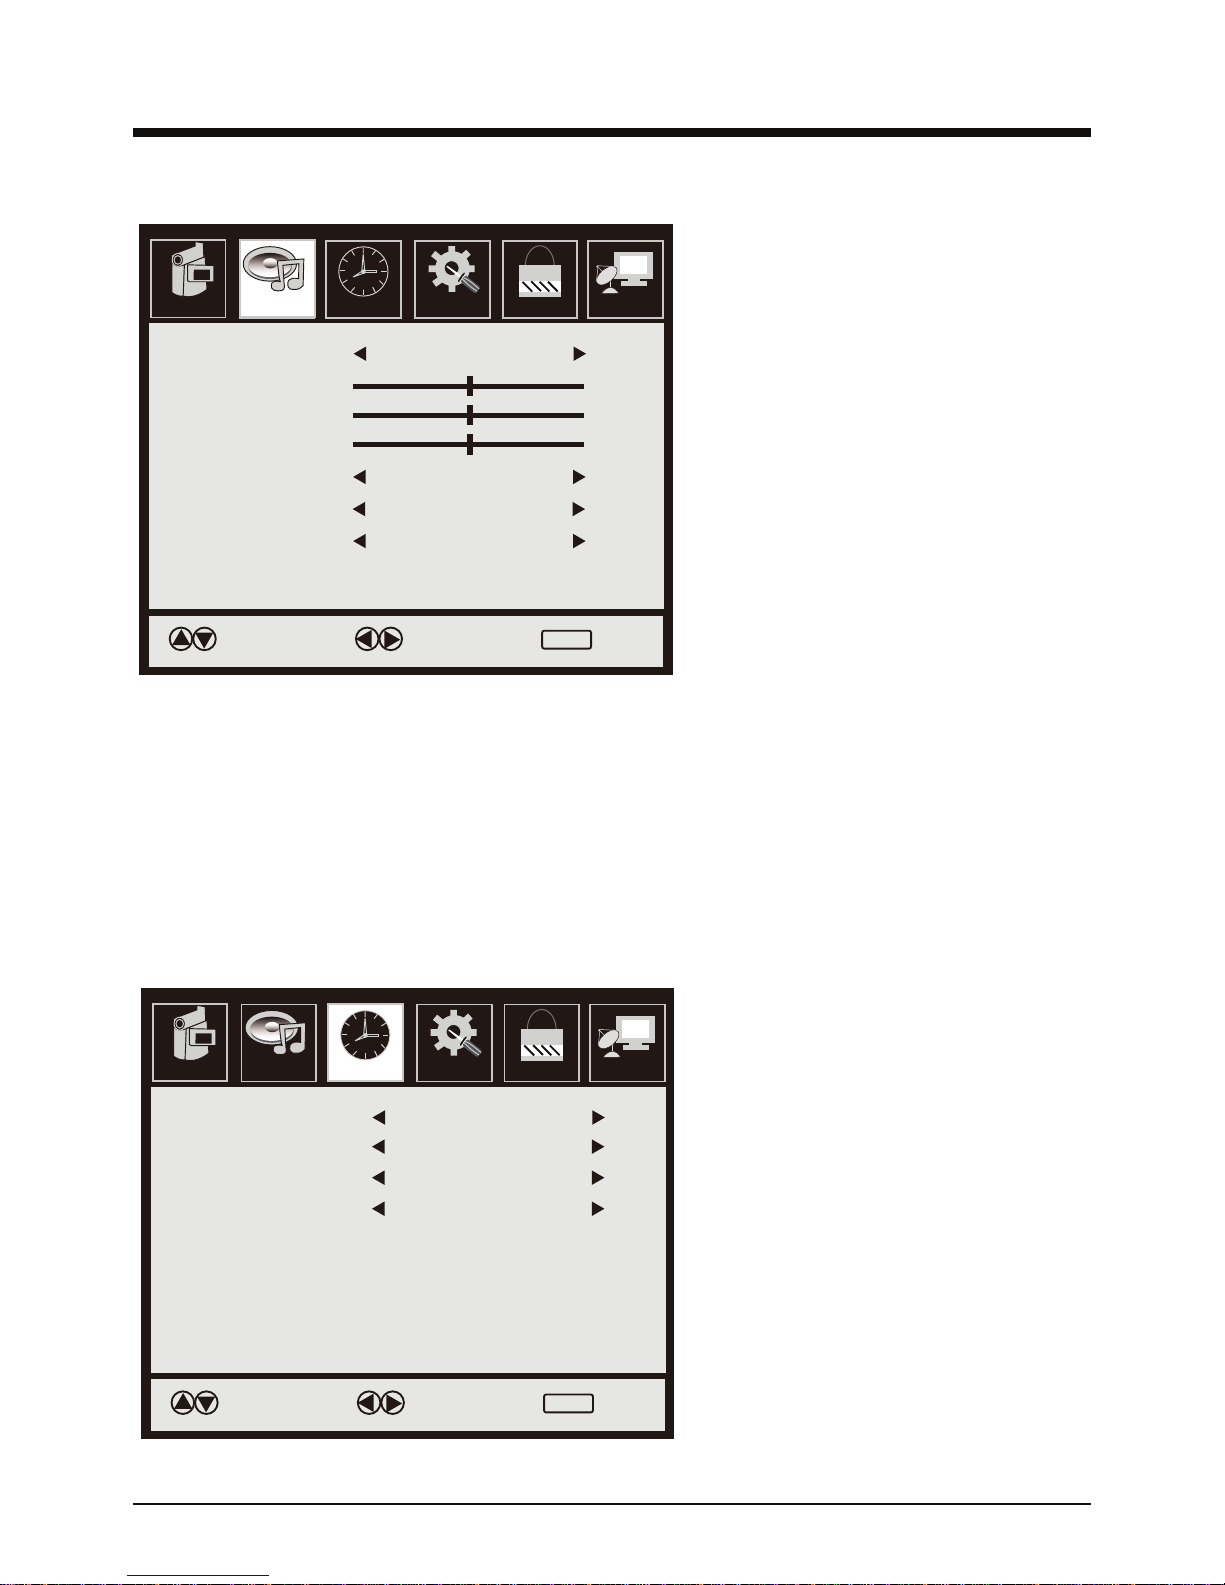
Audio menu settings
Sound mode: You can select between
several sound presets such as: Flat,
Music, Movie, Sports, and User. The
user preset allows you to manually
adjust the Bass, Treble, and Balance.
Bass: Adjusts the level of low frequencies
in the audio.
Treble: Adjusts the amount of high
frequencies in the audio.
Balance: Adjusts the sound levels for
the left and right speakers.
Surround: Actyivate or deactivate the
simulated surround sound feature.
SPDIF Type: Changes the SPDIF audio
output type. You can choose between
RAW and PCM output.
Audio Language: You can choose from
English, French, and Spanish if available.
Time menu settings
Sleep timer: Activates the sleep timer
function. You can choose from 5, 10, 15
30, 45, 60, 90, 120, 180, and 240 minutes.
Time Zone: Adjusts the time zone. You
can choose from: Eastern, Central,
Mountain, Pacific, Alaska, and Hawaii time
zones.
Daylight Saving Time: Activates or
deactivates the Daylight Savings time
function.
Time Setup Lock Channol
Sound Mode
Bass
Trebie
Balance
Surround
Audio Language
Flat
Move
English
SPDIF Type RAW
Off
Select Exit
50
50
50
MENU
Picture Audio
Setup Lock Channol
Sleep Timer
Time Zone
Daylight Saving Time
Clock
Off
Move
2010/02/13 08:23AM
Off
Pacific
Select Exit
MENU
Picture Audio Time
15
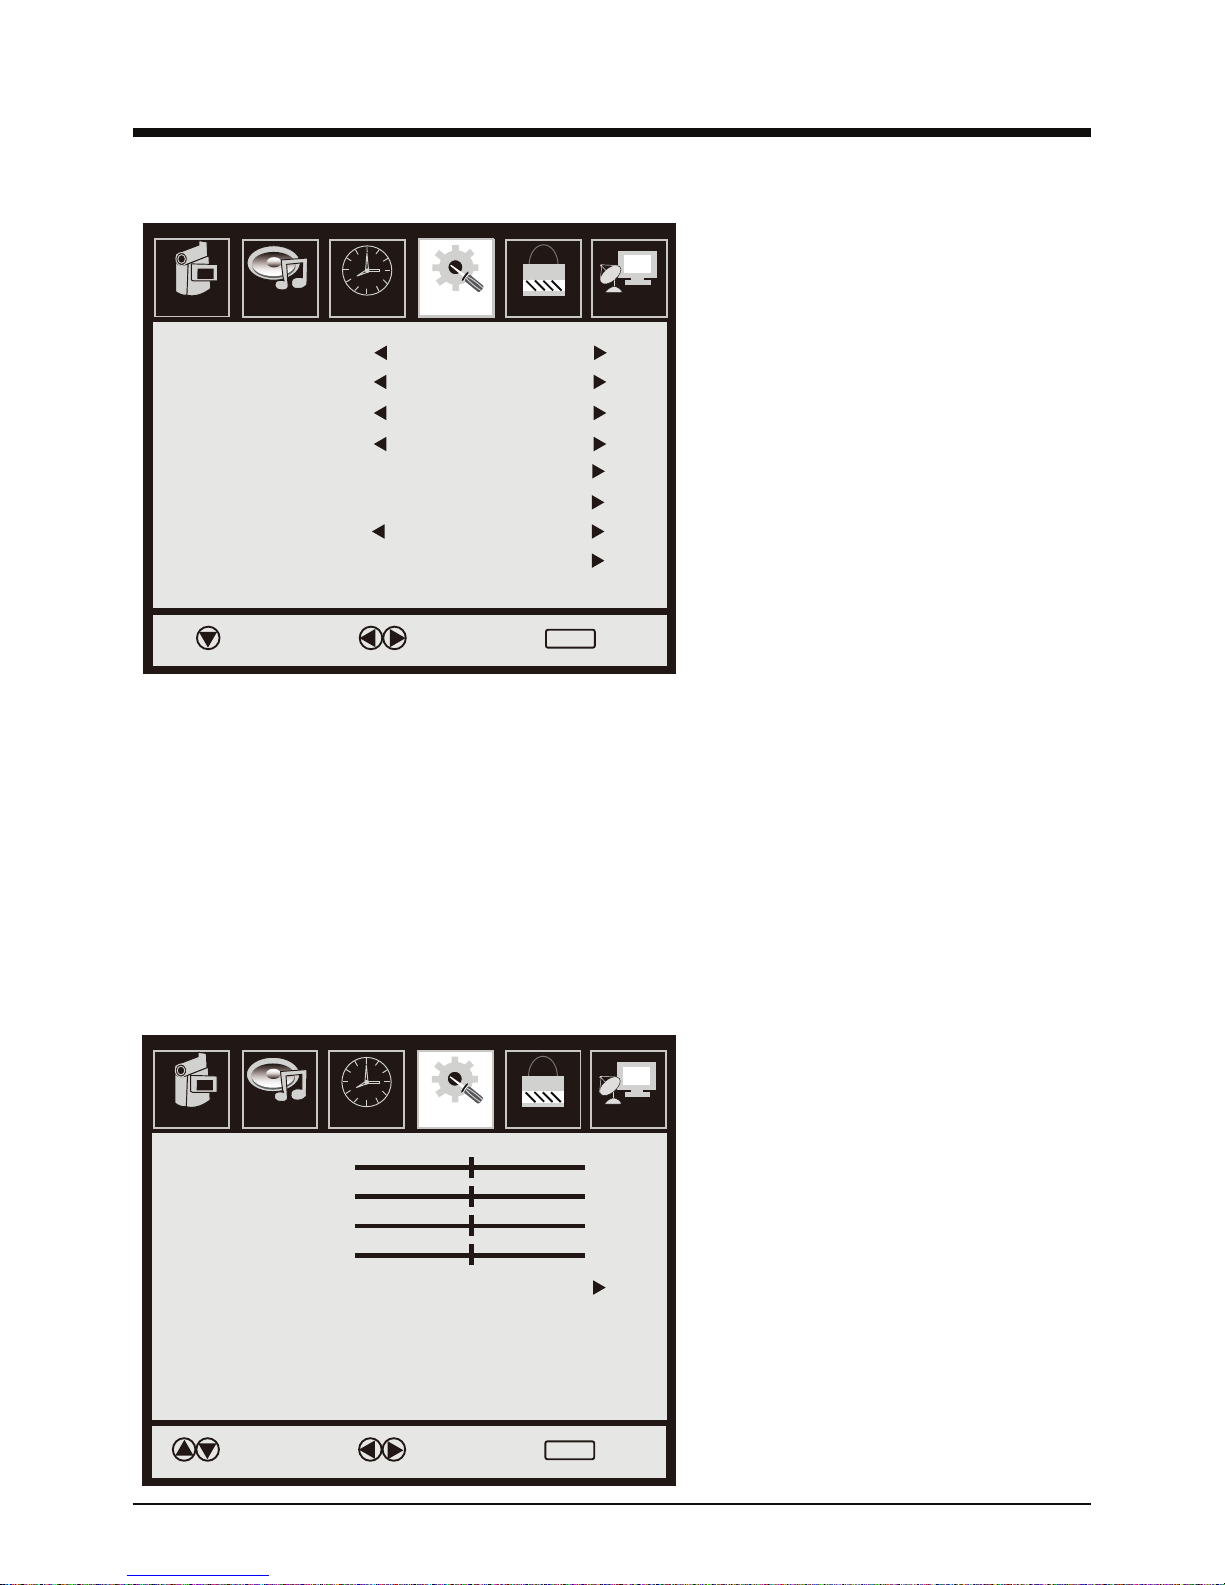
Setup menu settings
Menu Language: Changes the language
of the OSD menu. You can choose between
English, French, and Spanish.
Transparency: Activating this setting makes
the OSD menu screen semi transparent.
Zoom Mode: Adjusts the aspect ratio of the
image. With the menu closed, the ASPECT
button on the remote control will also perform
this function.
Noise Reduction: Activates the noise
reduction feature.
PC SETUP: Adjusts the image in VGA mode.
(Please see below)
Closed Caption: Activates the Closed
Captioning feature. Please see page 16 to
adjust Closed Captioning features.
XVS: Activate or deactivate the dynamic
brightness function.
Restore Default: Restores all menu settings
back to their facory defaults.
PC SETUP sub menu screen
This screen is available in VGA mode only.
In this screen, you can calibrate the image
manually or automatically.
H-Pos: Adjusts the horizontal position of the
image.
V-Pos: Adjusts the vertical position of the
image.
Clock: Adjusts the clock frequency.
Phase: Adjusts the clock phase.
Auto: Automatically calibrates the image.
Lock Channol
Menu Language
Transparency
Zoom Mode
Noise Reduction
PC SETUP
Closed Caption
XVS
Restore Default
English
Move
Off
Normal
Off
Off
Select Exit
MENU
Picture Audio Time Setup
Time Lock Channol
H-Pos
V-Pos
Clock
Phase
Auto
Move Select Exit
50
50
50
0
MENU
Picture Audio Setup
16
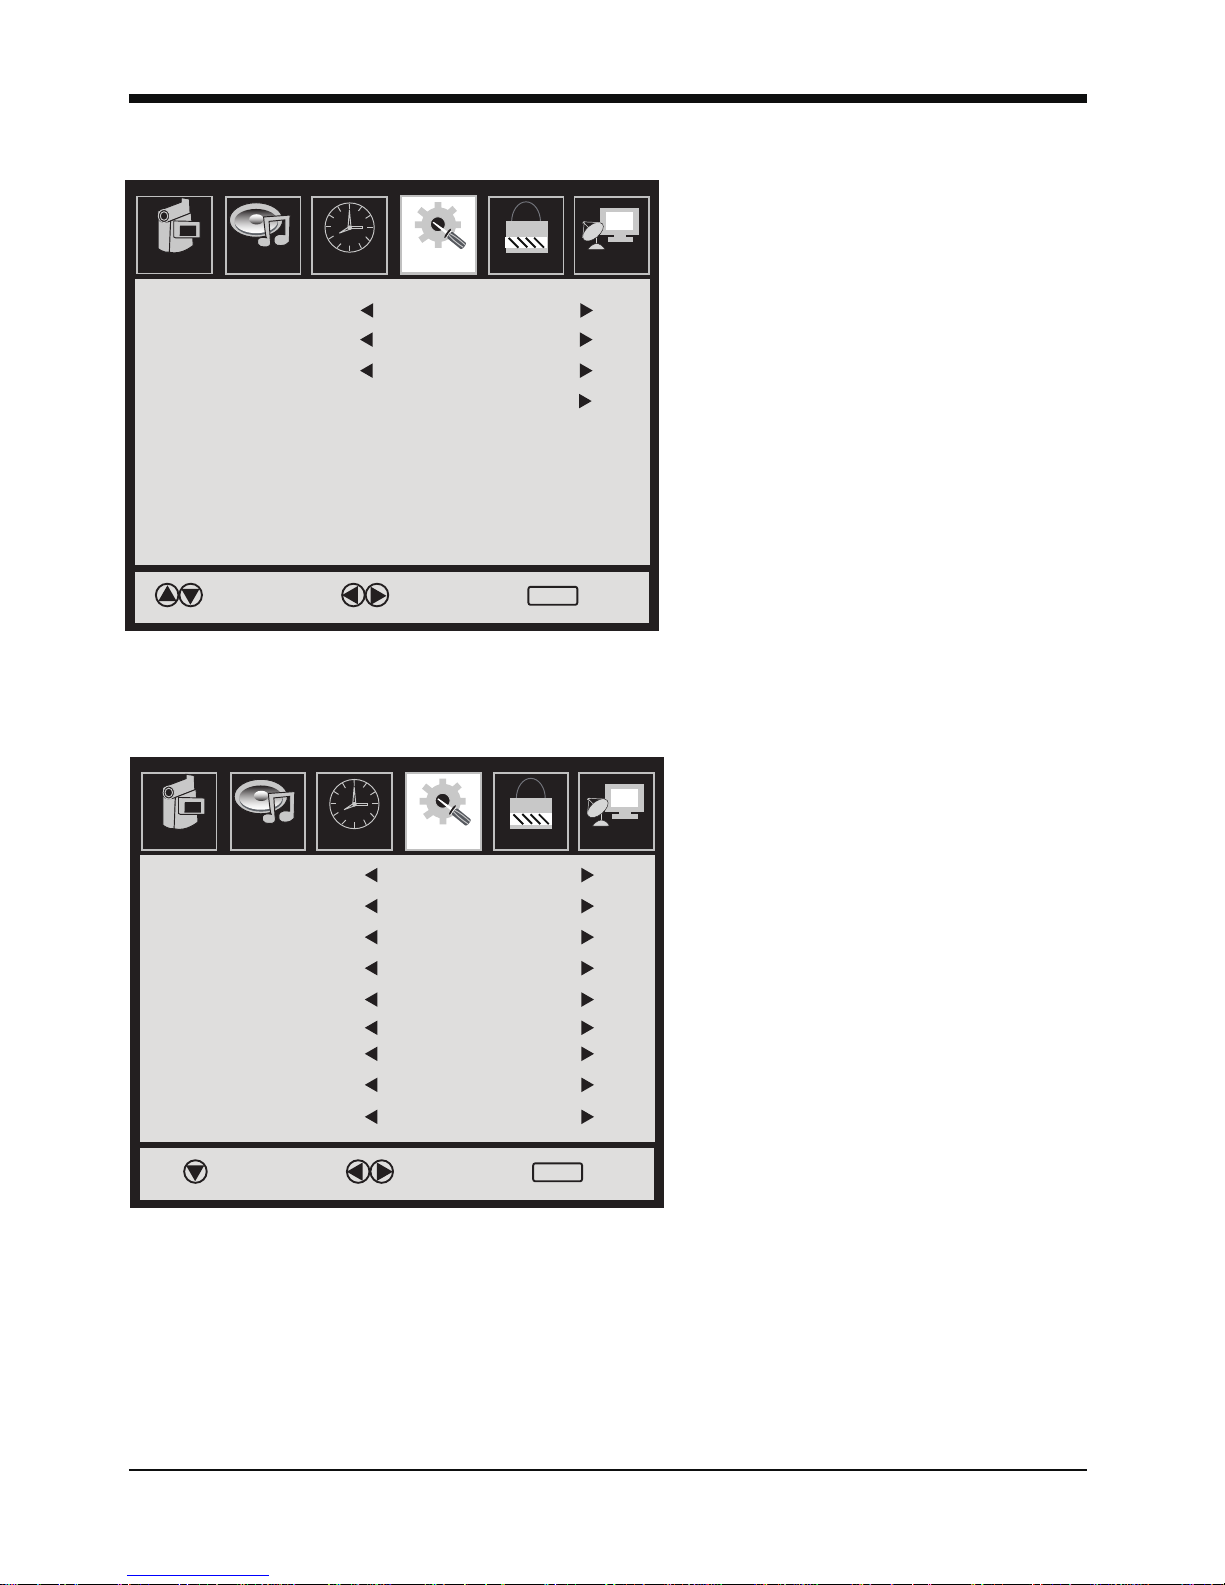
Closed Captioning sub menu screen
CC mode: Activates or deactivated
closed captioning.
Basic Selection: Select between basic
Closed Captioning and text services if
available.
Advanced Selection: Select between
advanced Closed Captioning services
if available.
Option: Enters the Closed Captioning
options sub menu. (Please see below)
Time Lock Channol
CC Mode
Basic Selection
Advanced Selection
Option
Move Select Exit
MENU
Picture Audio Setup
On
Service1
CC1
Lock Channol
Mode
Fonl Slyle
Fonl Size
Font Edge Style
Font Edge Color
FG Color
BG Color
FG Opacity
BG Opacity
Custom
Move
Default
Default
Default
Default
Default
Default
Default
Default
Select Exit
MENU
Picture Audio Time Setup
Closed Captioning options sub menu screen
Here you can customize how the closed
captioning will look. You can choose from
a wide variety of fonts, text sizes, edge
styles, and edge colors.
You can also change the background
and text colors as well as opacity.

17
Parental lock menu settings
The default password is 0000. Highlight the ENTER PASSWORD option, and use the number
buttons on the remote control to enter the password. Entering the password will allow access
to the options in this menu.
Time Channol
Enter Password
Select Move Exit
MENU
Picture Audio Setup Lock Time Channol
Change Password
System Lock
US
Canada
RRT Setting
Reset RRT
Move Next Exit
MENU
Picture Audio Setup
Off
Lock
Change Password: Select this option to change the parental lock menu password. The
new password must be 4 digits long. You can use the number buttons as well as the dash
button to create a new password. The new password can be any combination of numbers
and dashes. You will have to enter the new password twice in order to verify it.
System Lock: This option activates or deactivates the TV’s built in parental lock.
US: Enters the US TV ratings sub menu. (Please see page 18)
Canada: Enters the Canadian TV ratings sub menu. (Please see page 19)
RRT Setting: View the RRT settings.
Reset RRT: Reset the RRT settings.
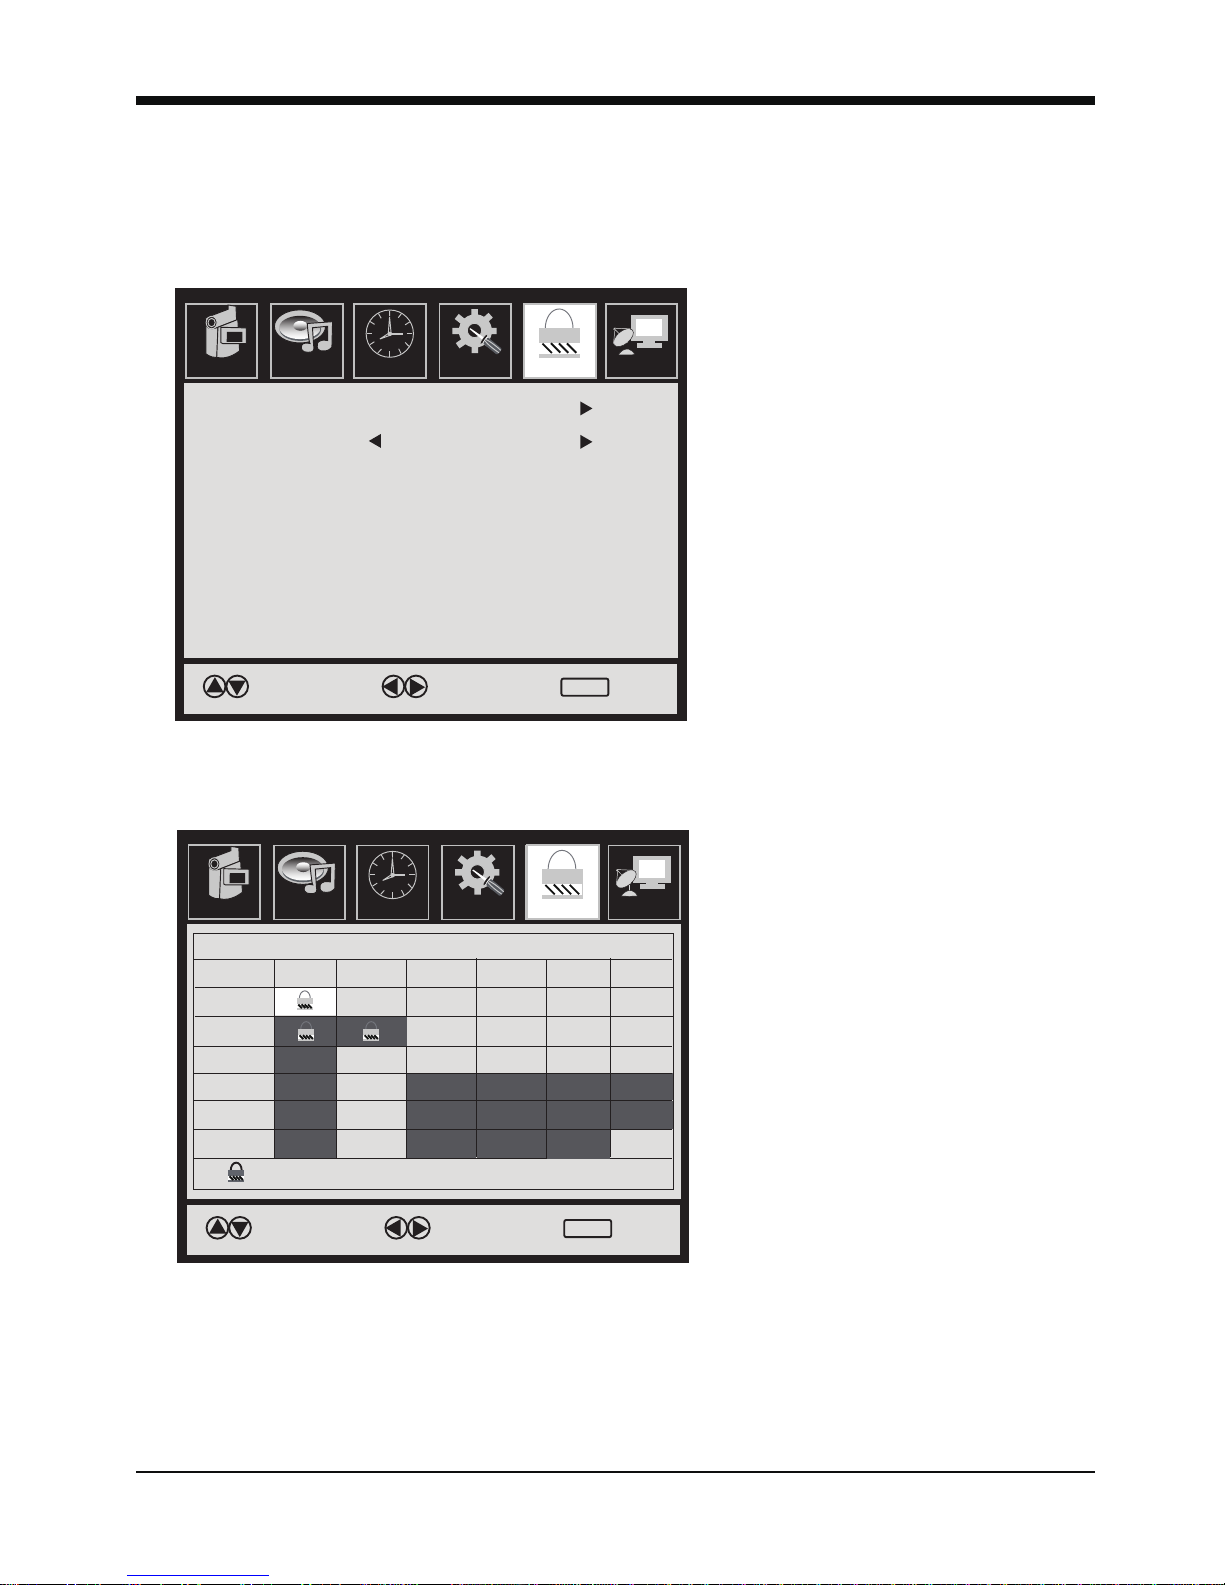
18
Parental lock menu settings (continued)
Audio Time Setup
Time Channol
TV
MPAA
Move Select Exit
MENU
Picture Audio Setup Lock
N/A
Time Channol
Move
Block
Select
ALL
TV-Y
TV-Y7
TV-G
TV-PG
TV-14
TV-MA
V S L DFV
TV RATING
Exit
MENU
Picture Audio Setup Lock
TV: Select this option to set the rating
for TV programs. Highlight the rating or
content you wish to block and press the
ENTER button to select it. A lock
symbol will appear in the section you
selected. If you block a rating, all
ratings higher then that rating will also
be blocked. For example: If you block
the TV-PG rating, then the TV-14 and
TV-MA ratings will also be blocked. If
you block content such as violence for
a specific rating, the block will also
affect all higher rated programs that
have violence in them.
MPAA: This option allows you to set
the ratings for movies that play
unedited on TV. Use the left or right
arrow buttons to select which rating you
wish to block. All ratings higher then the
one you select will also be blocked..
This manual suits for next models
1
Table of contents
Other FAVI HDTV manuals


