Feider FST200PRO User manual

ORIGINAL INSTRUCTIONS
1
Petrol Lawn Scarifier And Aerator
Instruction manual
Model: FST200PRO
READ INSTRUCTIONS BEFORE USE THE MACHINE
BUILDER SAS
32, rue Aristide Bergès - ZI 31270 Cugnaux - France
MADE IN PRC

ORIGINAL INSTRUCTIONS
2
INTENDED USE
The basic version of the equipment is a scarifier intended for private use, i.e. for use in home and gardening
environments. The scarifier roller is designed for ripping moss and weeds out of the soil and for loosening
the soil. As a result your lawn can absorb nutrients better and is cleaned. We recommend you to scarify you
lawn in the spring and autumn.
Scarifier for private use machines whose annual operating time generally does not exceed 10 hours, during
which the machine is primarily used to maintain small-scale, residential lawns and home/hobby gardens.
Public facilities, sporting halls, and agricultural / forestry applications are excluded.
The operating instructions as supplied by the manufacturer must be kept and referred to in order to ensure
that the equipment is properly used and maintained. The instructions contain valuable information on
operating, maintenance and servicing conditions.
Warning! : Due to the high risk of bodily injury to the user, the equipment may not be used to grind up
branch or hedge clippings. Moreover, the equipment may not be used as a cultivator to level out high areas
such as mole hills.
For safety reasons, the scarifier may not be used as a drive unit for other equipment or toolkits of any kind,
unless specifically advised to do so by the manufacturer.
The equipment is to be used only for its prescribed purpose. Any other use is deemed to be a case of misuse.
The user/operator and not the manufacturer will be liable for any damage or injuries of any kind caused as a
result of this.
Please note that our equipment has not been designed for use in commercial, trade or industrial applications.
Our warranty will be voided if the machine is used in commercial, trade or industrial businesses or for
equivalent purposes.

ORIGINAL INSTRUCTIONS
3
CONTENT
SECTION 1 SYMBOLS MARKED ON THE PRODUCT ……………..………….….4
SECTION 2 GENERAL SAFETY RULES……………… ……………..….………….4
SECTION 3 GENERAL IDENTIFICATION ………………..……………….………9
SECTION 4 TECHNICAL DATA ................... ………………………………………..9
SECTION 5 ASSEMBLY ................................ ………………………………………..10
SECTION 6 OPERATING INSTRUCTIONS ….…………………….……..……..12
SECTION 7 REPLACEMENT OF THE ROLLER………….……………………….14
SECTION 8 FUNCTIONAL DESCRIPTION………….……….…………………….16
SECTION 9 MAINTENANCE INSTRUCTIONS…………………….……..………16
SECTION 10 LUBRICATION INSTRUCTIONS…………………….……..………16
SECTION 11 CLEANING…………………….……….……….……..……..………16
SECTION 12 STORAGE AND TRANSPORT…………….…………………..……17
SECTION 13 TROUBLESHOOTING………………………………..………...…….18
SECTION14 ENVIRONMENT…………………….…………….….……..…….. 19

ORIGINAL INSTRUCTIONS
4
1. SYMBOLS MARKED ON THE PRODUCT
SAFETY ALERT SYMBOL: Indicates caution or warning may be used in conjunction with other
symbols or pictures.
Noise level marking
Your tool noise is not more than 105dB.
Read this instruction book carefully before using the product and keep it in a safe
place for future reference.
Keep by standers away. Risk of projections
Do not expose to rain or damp conditions.
Use hearing protection.
Attention toxic fumes!
Warning! Do not use the appliance in closed or poorly ventilated environment.
Risk of breathing in toxic gases!
Beware of cutting fingers or toes.
Remove spark plug lead before performing any service on the machine
Use ocular protection.

ORIGINAL INSTRUCTIONS
5
2. GENERAL SAFETY RULES
Before you put this machine into operation you have to read instructions in this manual.
When using this machine, observe the following safety instructions to exclude the risk of
personal injury or material damage. Please also observe the special safety instructions in the
respective chapters. Where applicable, follow the legal directives or regulations for the prevention of
accidents pertaining to the use of machine.
WARNING! When using petrol tools, basic safety precautions, including the following, should
always be followed to reduce the risk of serious personal injury and/or damage to the unit.
WARNING: this machine produces an electromagnetic field during operation. This field may
under some circumstances interfere with active or passive medical implants. To reduce the risk of
serious or fatal injury, we recommend persons with medical implants to consult their physician and
the medical implant manufacturer before operating this machine.
IMPORTANT
READ CAREFULLY BEFORE USE
KEEP FOR FUTURE REFERENCE
Safe operation practices
Training
a) Read the instructions carefully. Be familiar with the controls and the proper use of the machine.
Preparation
a) Never allow people unfamiliar with these instructions or children to use the machine. Local regulations can
restrict the age of the operator;
b) Never operate the machine while people, especially children, or pets are nearby;
c) Operators should take care to prevent accidents to themselves or other people and damage to property;
d) Wear ear protection and safety glasses at all times while operating the machine;
Do not the tool under rain
Wear ocular and hearing protection.

ORIGINAL INSTRUCTIONS
6
e) While operating the machine, always wear substantial footwear and long trousers. Do not operate the
machine when barefoot or wearing open sandals;
f) Thoroughly inspect the area where the machine is to be used and remove all stones, sticks, wires, bones
and other foreign objects;
g) WARNING — Petrol is highly flammable;
h) Store fuel in containers specifically designed for this purpose;
i) Refuel outdoors only and do not smoke while refueling;
j) Add fuel before starting the engine. Never remove the cap of the fuel tank or add petrol while the engine is
running or when the engine is hot;
k) If petrol is spilled, do not attempt to start the engine but move the machine away from the area of spillage
and avoid creating any source of ignition until petrol vapors have dissipated;
l) Replace all fuel tanks and container caps securely;
m) Replace faulty silencers;
n) Before using, always visually inspect to see that the tines, bolts are not worn or damaged. Replace worn or
damaged tines and bolts in sets to preserve balance;
o) For rear discharge appliances with exposed rear rollers, when used without a catcher, full eye protection
shall be worn.
Operation
a) Do not operate the engine in a confined space where dangerous carbon monoxide fumes can collect;
b) Operate the machine only in daylight or in good artificial light;
c) Avoid operating the machine in wet grass or take additional precautions to avoid slipping;
d) Always be sure of your footing on slopes;
e) Walk, never run;
f) Always work across the face of slopes, never up and down;
g) Exercise extreme caution when changing direction on slopes;
h) Do not operate the machine on steep slopes;
i) Use extreme caution when reversing or pulling the machine towards you;
j) Stop the tines if the machine has to be tilted for transportation. Do not operate the tines when crossing
surfaces other than grass, and when transporting the machine to and from the working area;
k) Never operate the machine with defective guards, or without safety devices, for example deflectors and/or
catchers, in place;

ORIGINAL INSTRUCTIONS
7
l) Do not change the engine governor settings or over-speed the engine;
m) Disengage all tine and drive clutches before starting the engine;
n) Start the engine carefully according to instructions and with feet well away from the tine(s);
o) Do not tilt the machine when starting the engine, except if the machine has to be tilted for starting. In this
case, do not tilt it more than absolutely necessary and lift only the part which is away from the operator;
p) Do not put hands or feet near or under rotating parts. Keep clear of the discharge opening at all times;
q) Never pick up or carry a machine while the engine is running;
r) Avoid operating the machine in bad weather conditions especially when there is a risk of lightning;
s) Stop the engine, disconnect the spark plug wire and for battery start machines remove the ignition key:
1) Before clearing blockages or unclogging chute;
2) Before checking, cleaning or working on the machine;
3) After striking a foreign object. Inspect the machine for damage and make repairs before restarting and
operating the machine;
4) If the machine starts to vibrate abnormally (check immediately);
t) Stop the engine, disconnect the spark plug wire and for battery start machines remove the ignition key:
1) Whenever you leave the machine;
2) Before refueling;
u) Reduce the throttle setting during engine shut down and, if the engine is provided with a shut-off valve, turn
the fuel off at the conclusion of aerating or scarifying.
Maintenance and storage
a) Keep all nuts, bolts and screws tight to be sure the machine is in a safe working condition;
b) Never store the machine with petrol in the tank inside a building where fumes can reach an open flame or
spark;
c) Allow the engine to cool before storing in any enclosure;
d) to reduce the fire hazard, keep the engine, silencer, battery compartment and petrol storage area free of
grass, thatch, moss, leaves or excessive grease;
e) Check the catcher frequently for wear or deterioration;
f) Examine the machine regularly and replace worn or damaged parts for safety;
g) If the fuel tank has to be drained, this should be done outdoors. The drained fuel should be stored in a
container specifically designed for fuel storage or it should be disposed of carefully.
Additional safety instructions

ORIGINAL INSTRUCTIONS
8
- The operators and first-time and/or inexperienced operator must receive proper training in the use,
adjustment and operation of the machine, including prohibited operations.
1. Never allow children or people unfamiliar with these instructions to use the machine. Local regulations can
restrict the age of the operator.
2. This machine is not intended for use by persons (including children) with reduced physical, sensory or
mental capabilities, or lack of experience and knowledge, unless they have been given supervision or
instruction concerning use of the machine by a person responsible for their safety.
3. Keep in mind that the operator or user is responsible for accidents or hazards occurring to other people or
their property.
4. Do not leave engines running in closed rooms where dangerous carbon monoxide could cumulate.
5. Do the tilling at daylight or at good artificial lighting. If possible, do not use the tiller on wet grass.
6. Mind the good stability on slopes.
7. Conduct the unit walking.
8. With machines on wheels, it is necessary that you till across the slope, never up and down.
9. Be particularly careful if changing direction of travel on the slope.
10. Do not do tilling on sleep slope.
11. Be particularly careful when you turn the tiller or when you pull towards you.
12. Stop the tiller blade if it is to be tilted for it to be carried out to travel across other areas and must be
transferred to/from tilled areas.
13. Never use the tiller with a damaged protection facility or protection grids without any protection facility
mounted on such as buffers and/or moss/grass collection basket.
14. Do not change the engine regulation set up and do not turn it over.
15. Carefully start the engine. Keep the sufficient distance of the feet from the tiller blade.
16. Start the engine, the scarifier shall not be tilted, a not even when it is to be lifted in the process. Tilt in only
as necessary, lift it on the user’s reverse side only.
17. Never reach behind or under the rotating parts with hands or feet. Always keep a distance from the ejector.
18. Never lift the scarifier up and do not carry it while the engine is on.
19. Switch the engine off and pull the spark plug connector out before blocking or removal of clogs in the
ejector:
- Before releasing the blocks or removal of blocked placed in the ejector
- Before removing collection bag or before check, cleaning or working on the tiller.
- After bumping into an obstruction. Before restarting and work search for damage of the tiller and
20. Make the repairs as necessary. If the tiller starts vibrating unusually, it should be inspected immediately.
21. When switching off the engine, ignition switch needs to be in position OFF (position OFF or O). Close the
gasoline cock position OFF or O.
22. Keep the discharge chute clear of debris.
23. Keep work area clean and well lit. Cluttered and dark areas invite accidents.
24. Check the landscape where the machine will be used and remove all objects such as stones, toys, sticks
and wires, which could be caught and thrown away. Damage of the machine or operator’s injury could be
caused.
25. Do not operate this machine in explosive atmospheres, such as on the presence of flammable liquids,
gases, or dust. Machine creates sparks which may ignite the dust or fumes.
26. Keep children and bystanders away while operating the machine. Distractions can cause you to lose
control.
27. Warning – Do not operate the machine on slopes and near drop-offs, ditches or embankments. If the use is
really needed in this kind of area, take an extreme precaution.
28. Stay alert, watch what you are doing and use common sense when operating this machine.

ORIGINAL INSTRUCTIONS
9
29. Do not use this machine while you are tired, ill or under the influence of drugs, alcohol, or medication. A
moment of inattention while operating this machine can cause you to lose control and may result in series
personal injury.
30. Do not overreach. Keep proper footing and balance at all times. This enables better control of the tool in
unexpected situations.
31. Remove any adjusting key or wrench before turning the machine on. A wrench or a key that is left attached
to a rotating part of the machine may result in personal injury.
32. Use safety equipment. Always wear eye protection. Safety equipment such as a dust mask, non-skid
safety shoes, hard hat, or hearing protection used for appropriate condition will reduce personal injuries.
Wear suitable protective clothing.
33. Dress properly. Do not wear loose clothing or jewellery. Keep your hair, clothing and gloves away from
moving parts. Loose clothes, jewellery or long hair can be caught in moving parts.
34. Prolonged use of the machine may lead to disorders of blood circulation in hands caused by vibration.
These effects can be worsened by low ambient temperatures and/or by gripping the handgrips excessively
tightly. Period of use you can extend with appropriate gloves or regular breaks. Take frequent work breaks.
Limit the amount of exposure per day.
35. A long exposition to noise can affect the health of the operator (such as loss hearing). A hearing protection
must be always used when operating the tool. The operation of the tool must be limited and some rest
must be taken between two sessions (e.g. 10min of operation and 20min of rest).
36. The machine safety systems or features shall not be tampered with or disabled.
37. The operator should not alter or tamper with any sealed adjustments for the engine speed control.
38. Danger – Exhaust gases. Do not inhale exhaust gases and do no expose people and yourself to exahaut
gases.
39. Warning – So not use of the machine when there is a risk of lightning.
PETROL TOOL USE AND CARE
WARNING! Gasoline is highly flammable and explosive.
1. Store fuel in containers specifically designed for this purpose.
2. Refuel outdoors only and do not smoke while refueling.
3. Add duel before starting the engine. Never remove the cap of the tank or add petrol while the engine is
running or when the engine is hot.
4. If petrol is spilled, do not attempt to start the engine but move the machine away from the area of spillage
and avoid creating any source of ignition until petrol vapors have dissipated.
5. Replace all fuel tank and container caps securely.
6. Do not operate the engine in a confined space where dangerous carbon monoxide can collect.
7. Do not force the petrol tool. Use the correct petrol tool for your application. The correct petrol tool will do
the job better and safer at the rate for which it was designed.
8. Do not use the petrol tool if the main switch does not work. Any petrol tool that cannot be controlled with
switch is dangerous and must be repaired.
9. Turn tool off completely before making any adjustments, changing accessories, or storing petrol tools.
Such preventive safety measures reduce the risks of starting the petrol tool accidentally.
10. Store idle petrol tools out of the reach of children and do not allow persons unfamiliar with the petrol tool or
these instructions to operate the petrol tool. Petrol tools are dangerous in the hands of untrained users.
11. Maintain petrol tools. Check for misalignment or binding of moving parts, breakage of parts and any other
condition that may affect the petrol tool’s operation. If damaged, have the petrol tool repaired before use.
Many accidents are caused by poorly maintained petrol tools.

ORIGINAL INSTRUCTIONS
10
12. Use the petrol tool, accessories and tool bits etc., in accordance with these instructions and in the manner
intended for the particular type of petrol tool, taking into account the working conditions and the work to be
performed. Use of the petrol tool for operations different from intended could result in a hazardous
situation.
PERSON PROTECTION
Be prepared! Have about one following things at least:
-Suitable fire extinguisher (Dry Powder)
-Fully equipment first-aid kit, available easily for machine operator and accompanying person. It should
contain enough pieces of bandage for lacerated/cutting wounds.
-Mobile phone or another device for quick calling of rescue service.
Don’t work alone. There must be around another person who knows principles of the first aid.
The accompanying person must keep safe separation distance from your workplace, but he/she
must be able to see you the whole time! Work only on such places where you are able to call the
rescue service quickly!
1. In case of any injury always proceed in accordance with the principles of the first aid.
2. If someone is cut, cover the wound with a clean cloth and press hard to stop the flow of blood.
3. Do not let petrol or oil come in contact with your skin. Keep petrol and oil away from the eyes. If petrol or oil
comes in contact with the eyes, wash them immediately with clean water. If irritation is still present, see a
doctor immediately.
4. Individuals with poor circulation who are exposed to excessive vibration may experience injury to blood
vessels or the nervous system. Vibration may cause the following symptoms to occur in the fingers, hands
or wrists: “falling asleep” (numbness), tingling, pain, stabbing sensation, alteration of skin colour or of the
skin. If any of these symptoms occur, see a physician.
Put safety first in the case of fire:
5. If fire comes from the engine or smoke appears from any other than the exhaust vent, first distance
yourself from the product to ensure your physical safety.
6. Use dry powder fire extinguisher on the fire to prevent it from spreading.
7. A panicked reaction could result in the fire and other damage becoming more extensive.
MAINTENANCE AND STORAGE
1. Make sure that all nuts, bolts and screws are tightened securely and that the equipment is in a safe working
condition.
2. Routinely check the catch basket for signs of wear and impaired functionality.
3. Remember that on equipment with teeth units, the movement of one teeth unit may result in the other teeth
units starting to rotate.
4. While you are adjusting the equipment, take care not to jam your fingers between moving teeth and
stationary parts of the equipment.
5. While you are carrying out maintenance work on the teeth, it is important to remember that the teeth can still
be moved even if the drive has been switched off.
6. For your own safety, replace worn or damaged parts without delay. Use only original spare parts and original
accessories.
7. Keep the equipment where it is out of children's reach.
8. Never store the machine with petrol in the tank inside a building where fumes can reach an open flame or

ORIGINAL INSTRUCTIONS
11
spark
9. Allow the engine to cool before storing in any enclosure;
10. To reduce the fire hazard, keep the engine, silencer, battery compartment and petrol storage area free of
grass, thatch, moss, leaves or excessive grease;
11. If the fuel tank has to be drained, this should be done outdoors. The drained fuel should be stored in a
container specifically designed for fuel storage or it should be disposed of carefully.
12. Raise the tines above ground level before storing the machine.
3. GENERAL IDENTIFICATION
4. TECHNICAL DATA
Model
FST200PRO
Engine Displacement
212cm3
Nominal Power
4.0kW
Maximum operating engine speed
3400/min
Fuel Tank Capacity
3.6L
Oil Tank Capacity
0.6L
Grass catcher capacity
45L
Working Width
400mm
Net Weight
36.7kg
Height Adjustment
-5 +15mm

ORIGINAL INSTRUCTIONS
12
5. ASSEMBLY
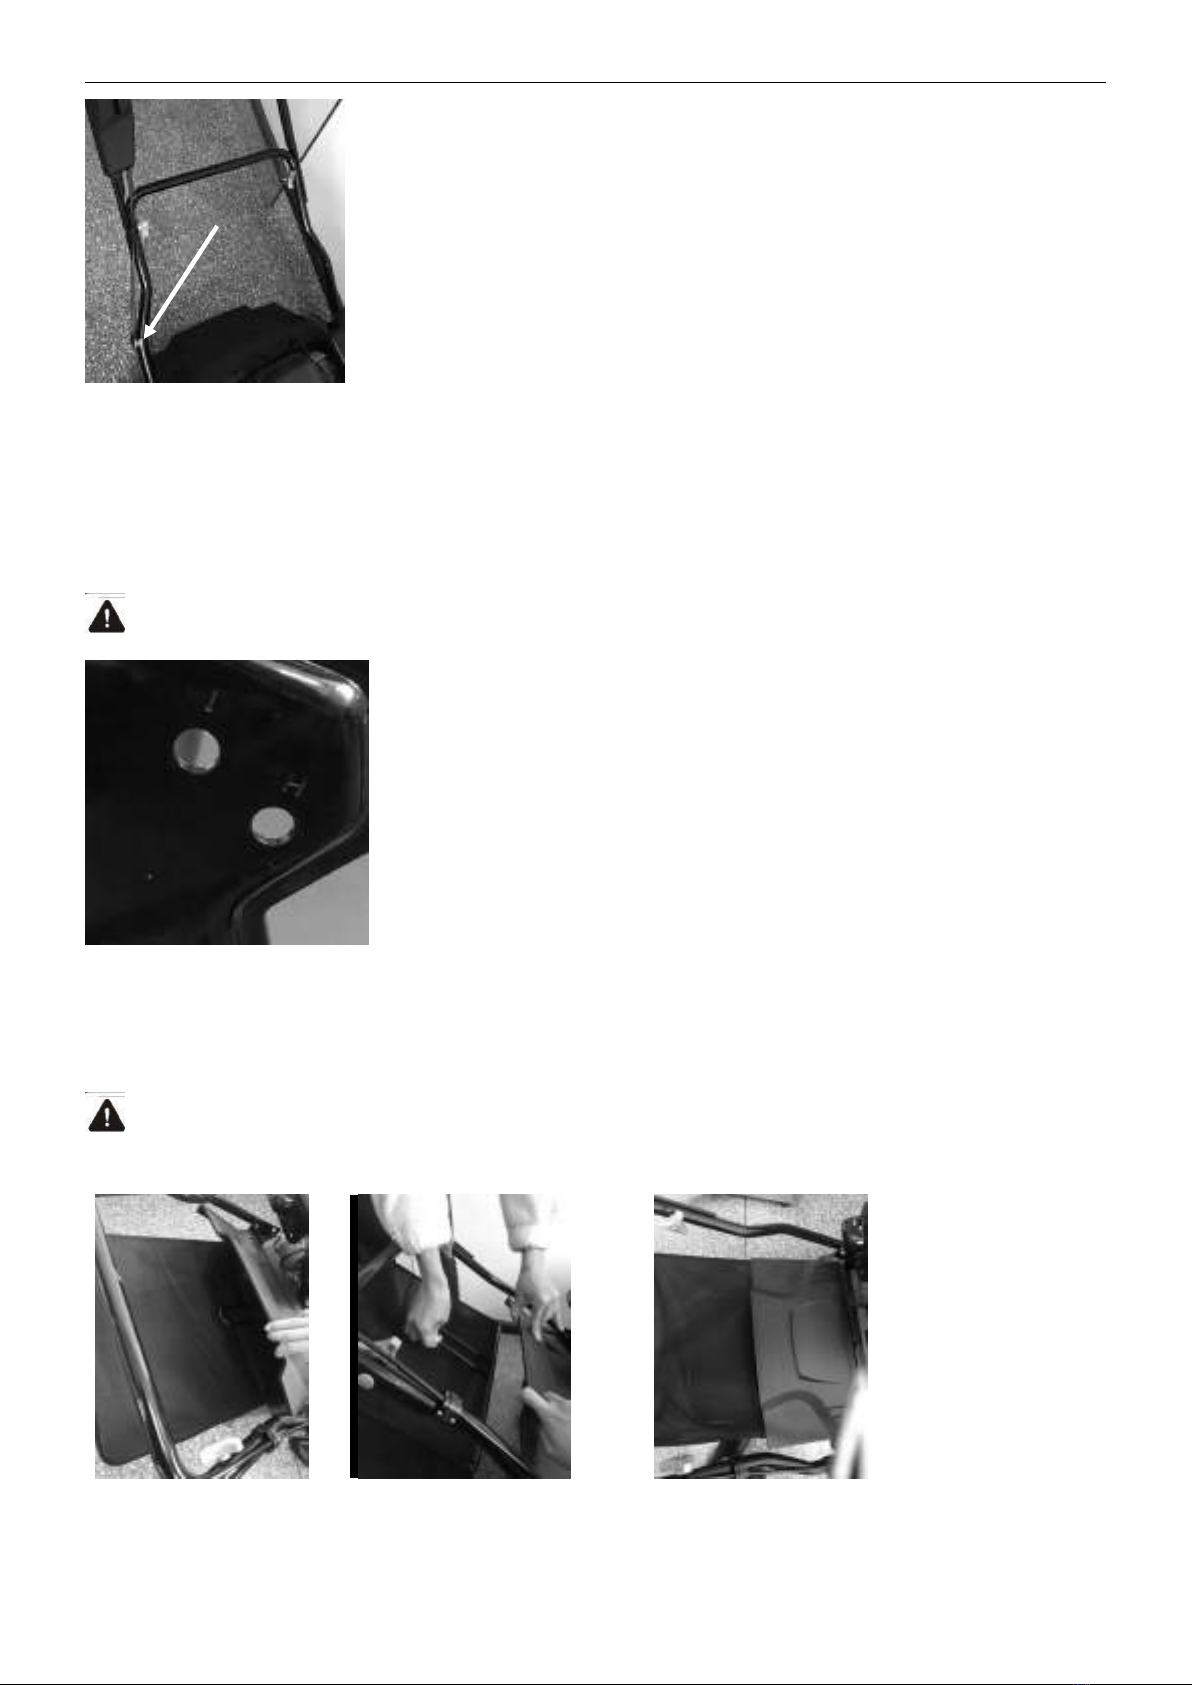
5.1 FOLDING HANDLE
1. Fix the lower handlebar into the unit body with screws, washers and locking knobs (Fig. 2A/Fig.2B/Fig.2C).
Then, add screws and bolts in the holes which are just above.
2. Connect the lower handlebar and upper handlebar with blots, washers and locking knobs.
(Fig.2D/Fig.2E/Fig.2F)
3. Attach the cable-clamps to the position shown and then attach the cable. (Fig.2G)
Fig.2A Fig.2B Fig.2C
Fig.2D Fig.2E Fig.2F
Measured sound power level
101.2 dB(A) K=3.43dB(A)
Measured sound pressure level
85.9 dB(A) K= 3 dB(A)
Guaranteed sound power level
105dB(A)
Vibration
7.03 m/s² K= 1,5 m/s²
Bolt
Washer
Locking knob
Bolt
Washer
Locking knob
ORIGINAL INSTRUCTIONS
13
Fig.2G
5.2 ADJUSTMENT FOR AN APPROPRIATE ANGLE
1. Screw out the locking knobs which fixed the lower handle. (Fig.3A)
2. Move the lower handle up or down, adjust it to the proper height. There are 2 adjusting height to be choose
on this type lawn mower; at 2 height, lower handle to the ground is highest, 1 height is the lowest.
3. Adjusting to the proper height, then fix the lower handle by the locking knobs.
WARNING: The left side and right side of lower handle must adjust to the same height.
Fig.3A
39.3 MOUNTING AND DISMOUNTING THE GRASS CATCHER
To fit: Raise the rear cover and hitch the grass catcher on rear of mower. (Fig.4A/Fig.4B/Fig.4C).
To remove: Grasp and lift the rear cover, remove grass catcher.
WARNING: Before you ever hook the grass catcher to the scarifier, you must ensure that the engine is
stopped and the cutting unit is not rotating.
Fig. 4A Fig. 4B Fig. 4C
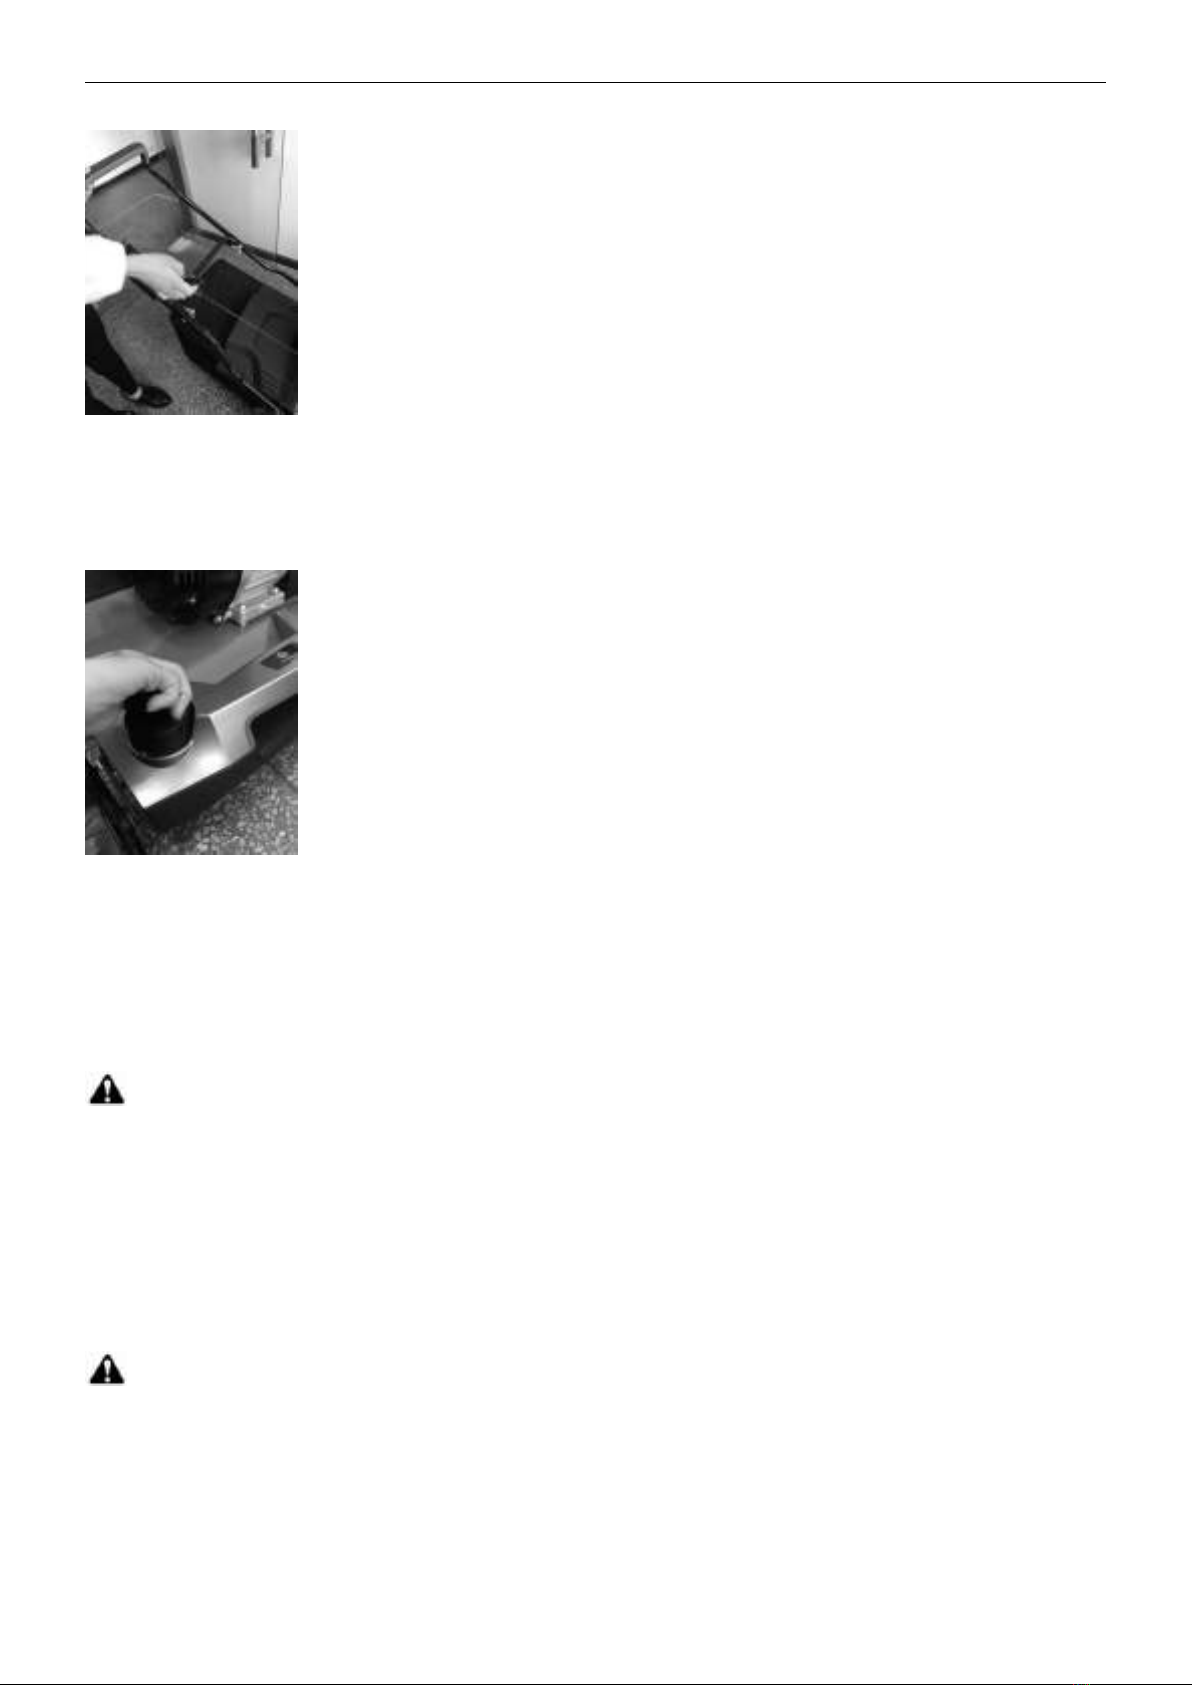
5.4 STARTER HANDLE
1
2
Cable Clamp
ORIGINAL INSTRUCTIONS
14
Move the starter handle from the engine to the rope guide. (Fig.5)
Fig.5
5.5 DEPTH OF CUT
Apply outward pressure to disengage lever from rack. Move lever forward or back to adjust height. (Fig. 6 and
see clause 6.4).
Fig. 6
6. OPERATING INSTRUCTIONS
Service the engine with gasoline and oil as instructed in the separate engine manual packed in your scarifier.
Read instructions carefully.
WARNING! Petrol is highly flammable.
Store fuel in containers specifically designed for this purpose.
Refuel outdoors only, before starting the engine and do not smoke while refueling or handling fuel.
Never remove the cap of the fuel tank or add petrol while the engine is running or when the engine is hot.
If petrol is spilled, do not attempt to start the engine but move the machine away from the area of spillage and
avoid creating any source of ignition until petrol vapors have dissipated.
Replace all fuel tanks and container caps securely.
Before tipping the scarifier to maintain the blade or drain oil, remove fuel from tank.
WARNING: Never fill fuel tank indoors, with engine running or until the engine has been allowed to cool
for at least 15 minutes after running.
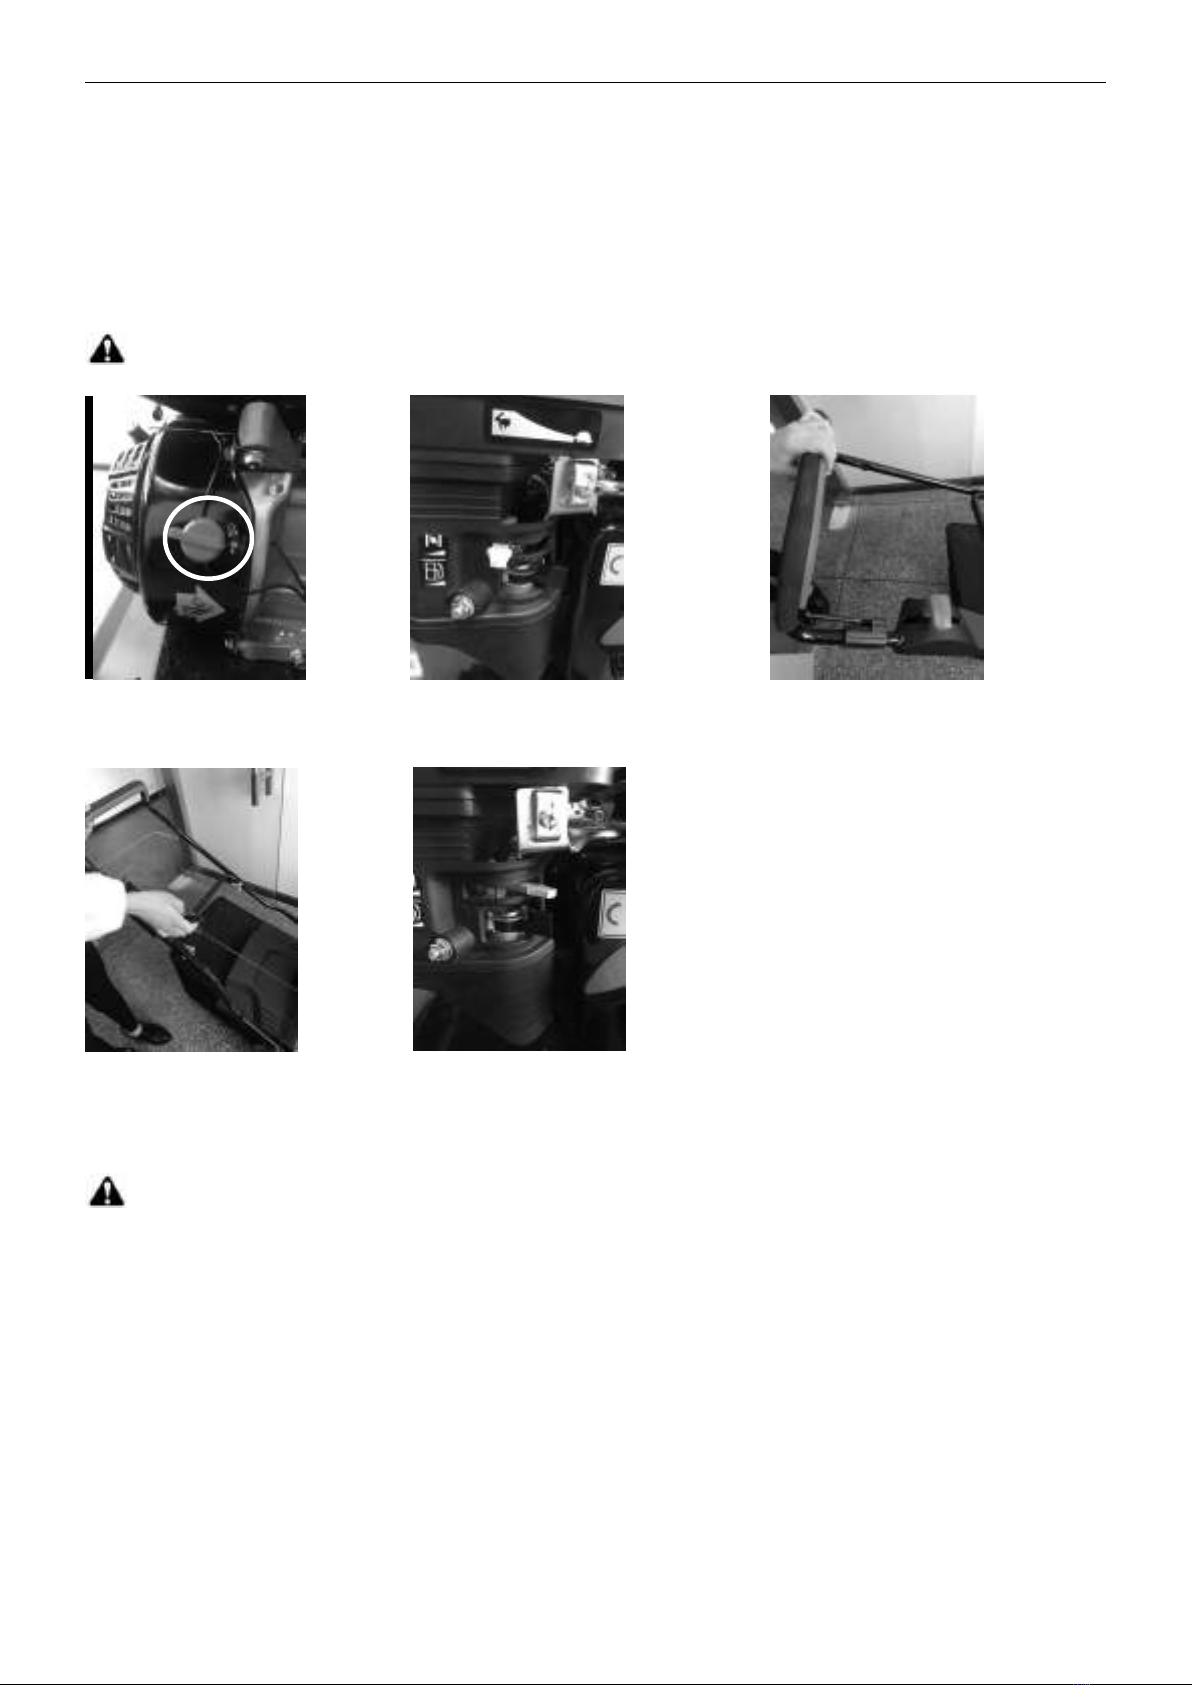
6.1 TO START ENGINE
1. Before starting engine, please turn the engine switch to the “ON” position. (Fig.7A)
3. To start a cold engine, move the Carburetor lever to the “on” position (Fig. 7B). keep the choke lever stay To
ORIGINAL INSTRUCTIONS
15
the “off” position (Fig. 7B).
4. Standing behind the unit, grasp the brake control handle and hold it against the Lower handle. (Fig. 7C)
5. Keep hold the brake lever as shown Fig.7C and Grasp the starter handle as shown Fig 7D pull up rapidly.
Return it slowly to the rope guide bolt after engine starts.
6. Move the choke lever to the “on” position. (Fig.7F)
Note! When the cutter deck is in contact with the ground, the unit can move.
Fig.7A Fig.7B Fig.7C
choke lever
Fig.7D Fig.7E
6.2 TO STOP ENGINE
CAUTION: The blade continues to rotate for a few seconds after the engine is shut off.
1. Release the brake control handle to stop the engine and blade. (Fig. 8A)
2. Move the engine switch to “OFF” position. (Fig.8B)
Carburetor lever
Grasp the brake
lever

ORIGINAL INSTRUCTIONS
16
Fig. 8A Fig. 8B
6.3 GRASS CATCHER
6.3.1 Wok without the grass catcher (optional)
For scarifier, you can work with grass catcher or without grass catcher. Whenever you detach the grass
catcher, the deflector flap dropped down. When scarifier without the grass catcher attached, the cuttings are
ejected straight onto the ground. (Fig.9A)
6.3.2 Wok with the grass catcher
When work with grass catcher, the cuttings are ejected to the grass catcher. If the grass catcher is full of
cuttings, you will need to empty and clean the grass catcher.
1. Stop the engine and wait until it comes to a stop.
2. Lift the deflector flap and unhook the grass catcher. (Fig.9B)
3. Empty out the contents.
Fig.9A Fig.9B
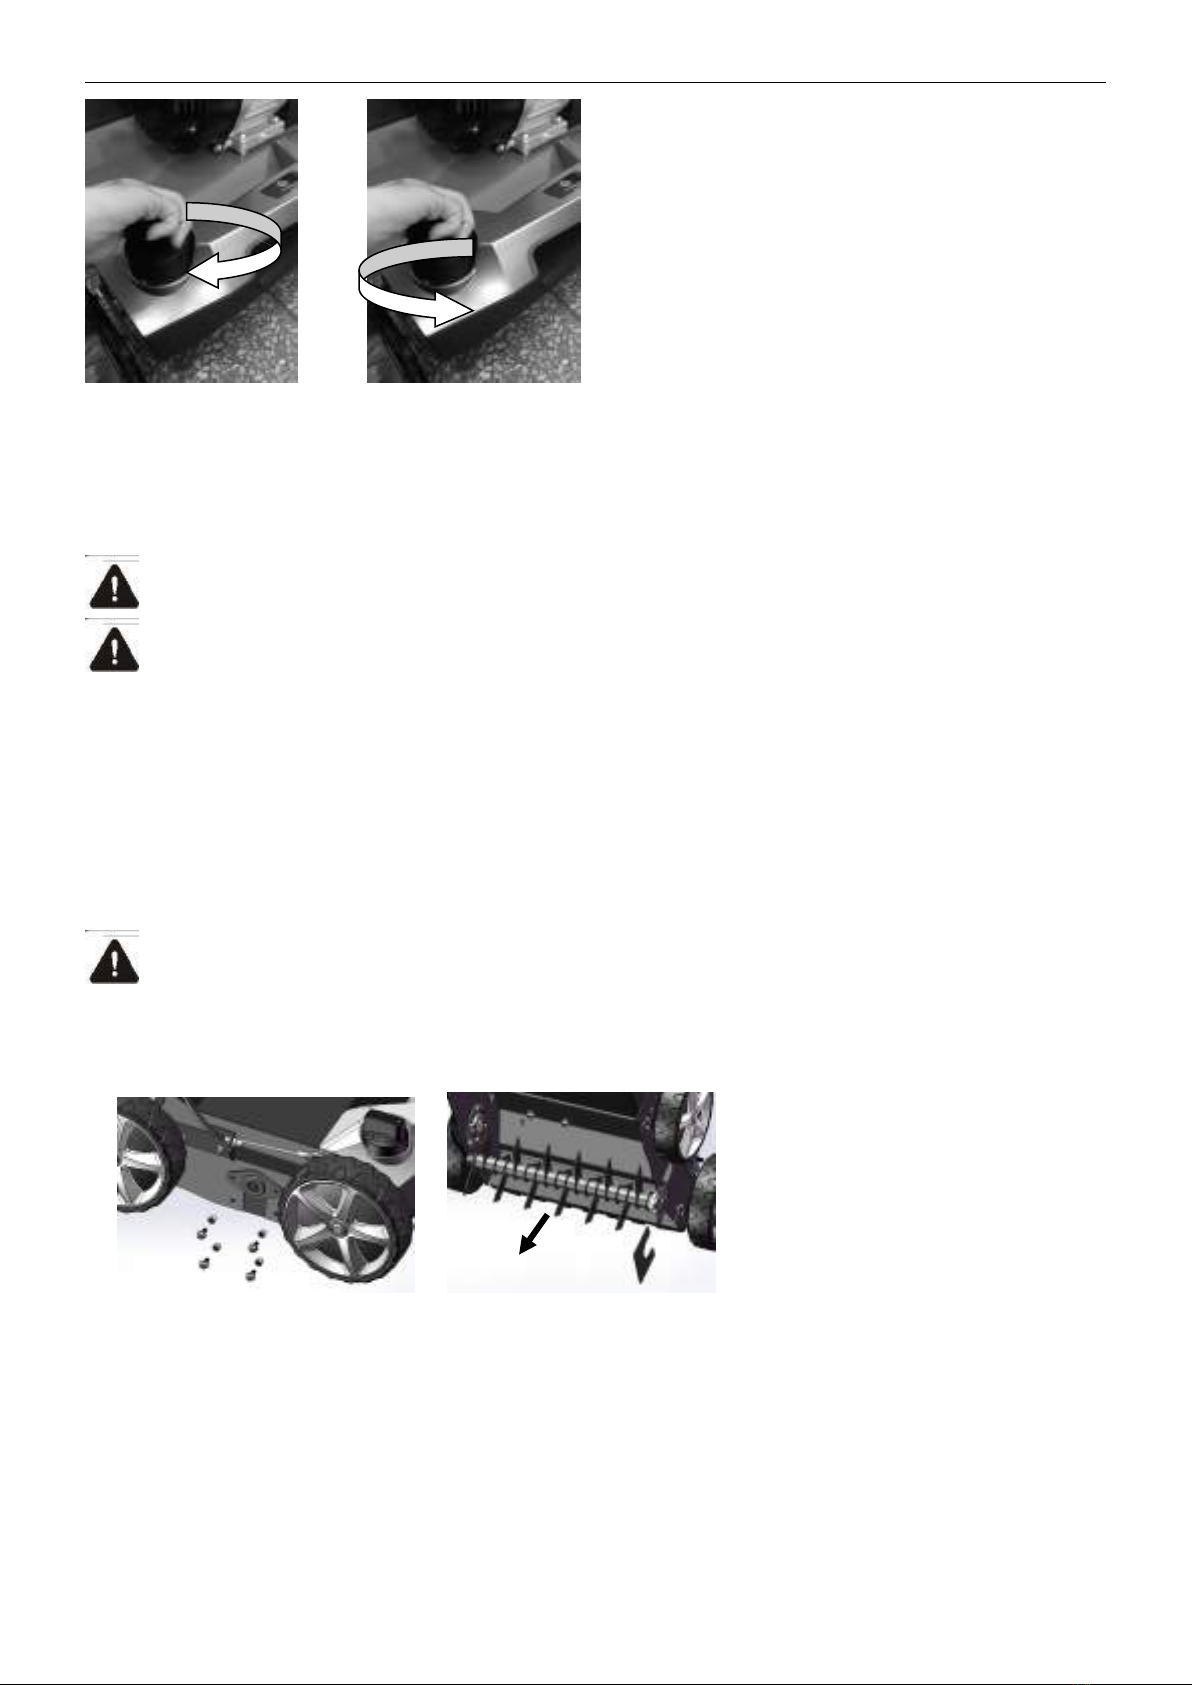
6.4 HEIGHT ADJUSTMENT INSTRUCTIONS
Danger — Do not touch rotating tines.
CAUTION: Do not at any time make any adjustment to scarifier without first stopping the engine .
Your scarifier is equipped with a depth adjustment lever offering a Unlimited working positions.The working
positions are -3mm, -6mm, -9mm, -12mm, -15mm height.
1. Stop mower and disconnect spark plug cable before changing mower cutting height.
2. To change the height of cut by turn the front knob clockwise rotation or negative rotation to selected height.
3. Move transport lever to transport position to prevent cutter deck from touching the ground after finish work.
ORIGINAL INSTRUCTIONS
17
Fig.10A Fig.10B
7. REPLACEMENT OF THE ROLLER
WARNING: Be sure to wear work gloves.
Caution: use only original scarifier/aerator shafts approved by the manufacturer.
The equipment can be assembled with the scarifying roller or the aerator roller.
Only replace the roller with an original Trex roller, as this will ensure top performance and safety under all
conditions.
To change the scarifying roller or the aerator roller, which is available as an option, proceed as follows.
1. Switch off the engine and leave to cool down.
2. Remove spark-plug terminal.
3. Remove the grass catcher.
4. Raise the unit slightly at the front.
Note: Do not raise too high, fuel may run out of the tank, if required, drain fuel before changing the roller.
Remove the roller
1. Remove the four screws. (Fig.11B)
2. Lift the roller and pull out in the direction of the arrow. (Fig.11C)
Fig.11A Fig.11B
Assemble the roller
1. Slide the new roller in the direction of the arrow, insert the shaft into the hexagonal socket and press the
other side into the holder (Fig.11C/ Fig.11D/ Fig.11E).
2. Refasten the roller with the two screws.
3. Check that the roller is seated correctly.
4. Assemble aerator shaft the same as scarifier shaft. (Fig.11F/ Fig.11G/ Fig.11H).
Blade UP
Blade Down

ORIGINAL INSTRUCTIONS
18
Fig.11C Fig.11D Fig.11E
Fig.11F Fig.11G
Fig.11H
8. FUNCTIONAL DESCRIPTION
The lawn scarifier is pushed by hand over the area of grass to be cut. The cutters are driven by a petrol engine.
The depth of cut is set by varying the central height-adjustment mechanism individually.
Scarification:
The cutter deck rotates and removes the felt layer formed by moss, lichen and weeds and conveys the
scarified material to the outside or into the grass catcher. During cutting the cutters penetrate the ground and
therefore ensure that the lawn is loosened and absorbs nutrients better. We recommend scarifying the lawn in
spring (April/May) and autumn (October).
Aerating:
The cutter deck (aerator shaft) rotates and combs the lawn or aerates the slightly mossy areas. The removed
moss is conveyed outwards or into the grass catcher. During aeration the surface of the ground is scratched;
this improves water drainage and facilitates the absorption of oxygen.
We recommend aerating the lawn during the entire growing period as when required.
9. MAINTENANCE INSTRUCTIONS
Always provide maintenance to the tool. Before maintenance, switch off the machine and let it cool down. Do
the maintenance in a safe place. Always follow the instructions given in this manual. Improper maintenance
can reduce the lifetime of the product, and may causes accidents and injuries.
SPARK PLUG
Use only original replacement spark plug. For best results, replace the spark plug every 100 hours of use.
BRAKE PADS
Check and/or replace the engine brake pads in service agent regularly, only original parts can be used as
ORIGINAL INSTRUCTIONS
19
replacement.
10. LUBRICATION INSTRUCTIONS
CAUTION: DISCONNECT SPARK PLUG BEFORE SERVICING.
1. WHEELS-Lubricate the ball bearings in each wheel at least once a season with a light oil.
2. ENGINE-Follow engine manual for lubrication instructions.
11.CLEANING
CAUTION: Do not hose engine. Water can damage engine or contaminate the fuel system.
1. Wipe deck with dry cloth.
2. Hose under deck by tilting the mower so that the spark plug is up.
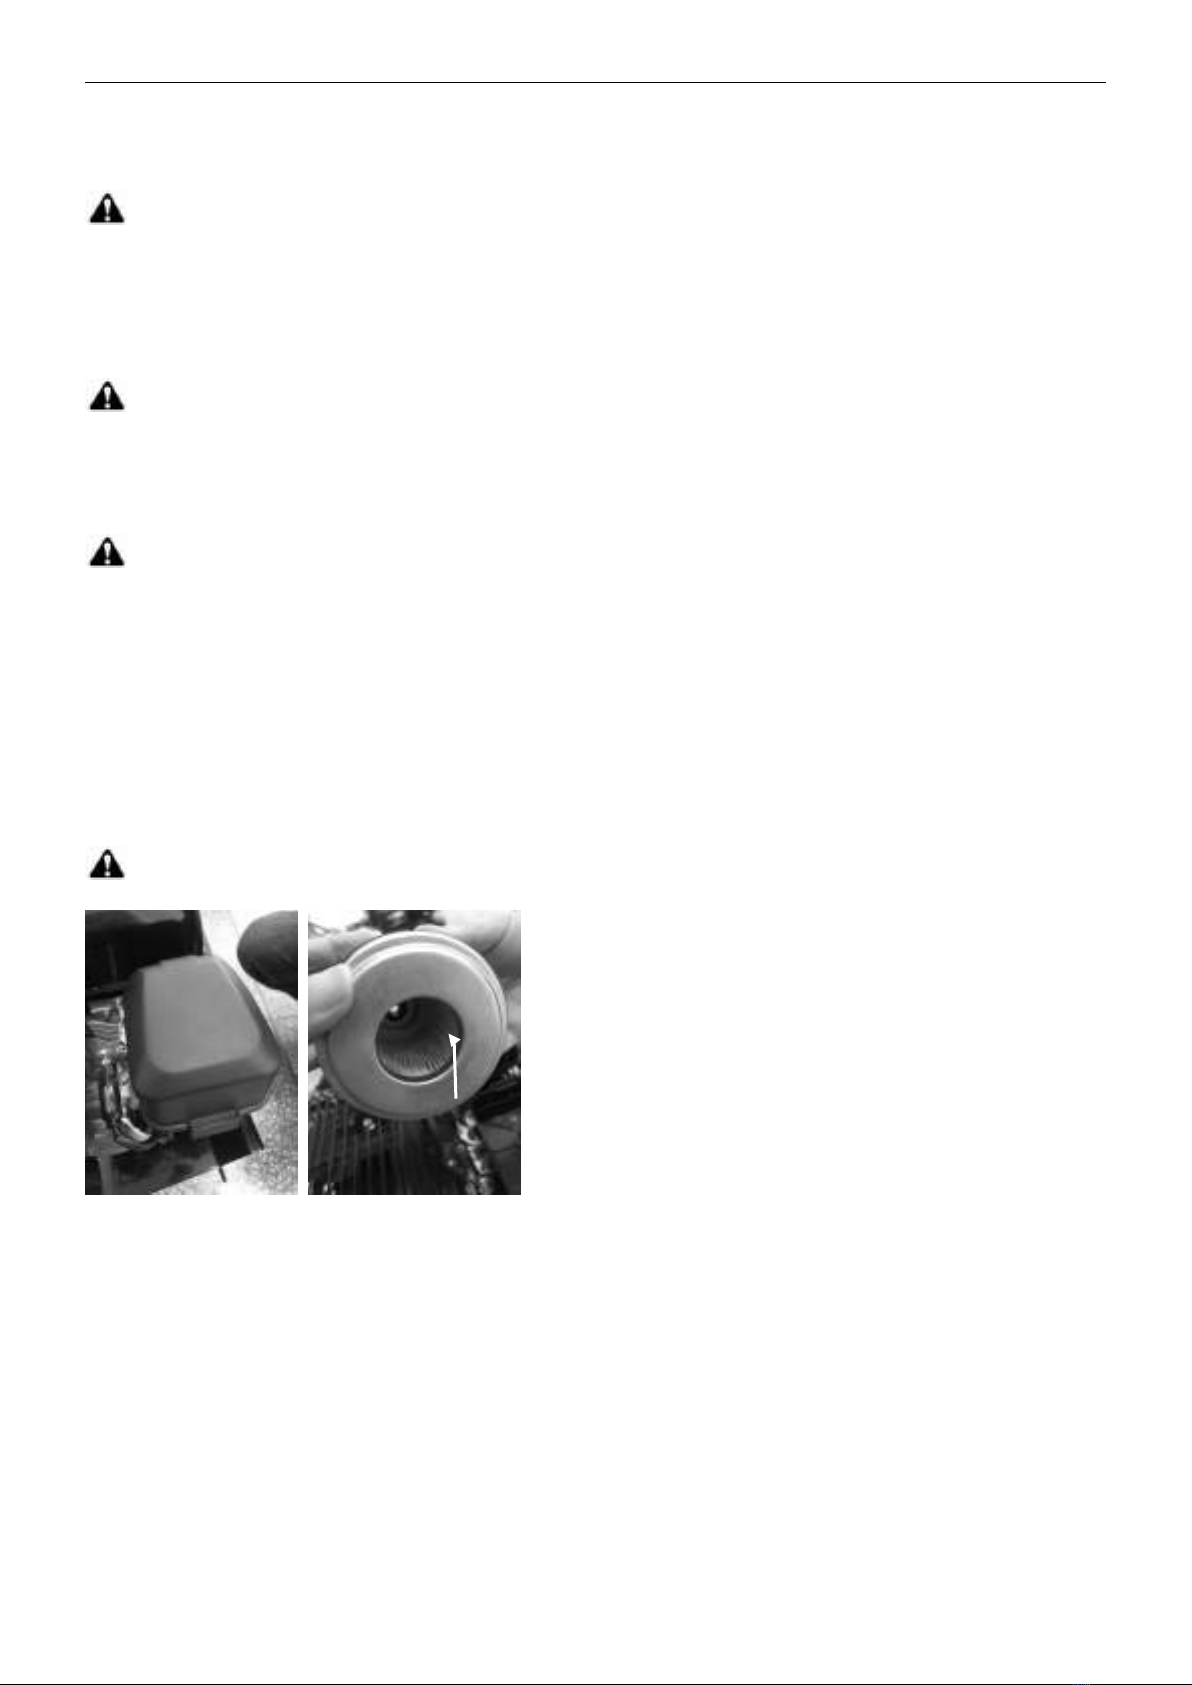
11.1 ENGINE AIR CLEANER
CAUTION: Do not allow dirt or dust to clog the air filter foam element.
The engine air cleaner element must be serviced (cleaned) after 25 hours normal mowing. The foam element
must be serviced regularly if the mower is used in dry dusty conditions.
To CLEAN AIR FILTER
1. Remove cover. (Fig.12A)
2. blow the the Filter element dust off . (Fig.12B).
3. Place a few drops of SAE30 oil on the foam filter and squeeze tightly to remove any excess oil.
4. Reinstall filter.
5. Close the filter cover.
NOTE: Replace filter if frayed, torn, damaged or unable to be cleaned.
Fig.12A Fig.12B
11.2 ENGINE
Refer to the separate engine manual for engine maintenance instructions.
Maintain engine oil as instructed in the separate engine manual packed with your unit.
Read and follow instructions carefully.
Service air cleaner as per separate engine manual under normal conditions. Clean every few hours under
extremely dusty conditions. Poor engine performance and flooding usually indicates that the air cleaner should
be serviced.
To service the air cleaner, refer to the separate engine manual packed with your unit.
The spark plug should be cleaned and the gap reset once a season. Spark plug replacement is recommended
at the start of each mowing season; check engine manual for correct plug type and gap specifications.
Filter cover
Filter element
Tab

ORIGINAL INSTRUCTIONS
20
Clean the engine regularly with a cloth or brush. Keep the cooling system (blower housing area) clean to
permit proper air circulation which is essential to engine performance and life. Be certain to remove all grass,
dirt and combustible debris from muffler area.
12. STORAGE AND TRANSPORT
Storage
The following steps should be taken to prepare lawn scarifier for storage.
1. Empty the tank.
a) Empty the petrol tank with a suction pump.
CAUTION! Do not drain the petrol in closed rooms, in close proximity of open fire, etc. Do not smoke!
Petrol fumes can cause explosion or fire.
b) Start the engine and let it run until it has used up all remaining petrol and stalls.
c) Remove the spark plug. Use an oilcan to fill approx. 20 ml oil into the combustion chamber. Operate the
starter to evenly distribute the oil in the combustion chamber. Replace the spark plug.
2. Clean and grease the lawnmower carefully as described above under “Lubrication instructions”.
3. Slightly grease the cutter to avoid corrosion.
4. Store the lawn scarifier in a dry, clean and frost-protected place, out of reach of unauthorized persons.
CAUTION! The engine must have completely cooled down before storing the lawnmower.
NOTE: - When storing any type of power equipment in an unventilated or material storage shed,
-Care should be taken to rust-proof the equipment. Using a light oil or silicone, coat the equipment, especially
cables and all moving parts.
- Be careful not to bend or kink cables.
- If the starter rope becomes disconnected from rope guide on handle, disconnect and ground the spark plug
wire, Depress the blade control handle and pull the starter rope out from engine slowly. Slip the starter rope
into the rope guide bolt on handle.
Transport
1. Secure the machine during transport to prevent loss of fuel, damage or injury.
2. Move transport lever to transport position.
3. Stop the engine
Danger!
Before transportation, always stop the engine and leave to cool down. Remove spark-plug terminal. The
appliance must not be tilted when it is transported. When transporting the scarifier in or on a vehicle, ensure
that it does not move around unintentionally.
Empty the fuel tank before transporting the unit. Filler cap must be closed tightly.
Always park the tool in a safe place.
13.TROUBLESHOOTING
Problem
Possible causes
Remedial action
Engine does not start
Throttle choke is not in the correct
Move throttle choke to correct
position.
Table of contents
Other Feider Lawn And Garden Equipment manuals

Popular Lawn And Garden Equipment manuals by other brands

Echo
Echo SRM series Safety manual

Stratco
Stratco Flat Roof Homesheds installation guide

Land Pride
Land Pride FPS48 installation instructions

ABSCO SHEDS
ABSCO SHEDS 30152SECOK Assembly & instruction manual

Earth & Turf Products
Earth & Turf Products TruFlow 24D Operator's manual

Safavieh Outdoor
Safavieh Outdoor Atticus PAT5035 manual

Billy Goat
Billy Goat QL2000VE Operator owner's manual

NewTechWood
NewTechWood UltraEasy Fence UH78 installation guide

Echo
Echo SHC-1700 1, SHC-1700 1E, SHC-2 Operator's manual

Simplicity
Simplicity 3538 Illustrated parts list

Hard Head
Hard Head 019146 operating instructions

Biogents
Biogents BG-Mosquitaire CO2 instruction manual


