fireStorm I Series User manual

OWNER’S GUIDE AND
INSTRUCTION MANUAL
SCAN TO VISIT
GOLIVEOUTDOOR.COM
SCAN FOR UPDATED
CERTIFICATIONS
SERIES I - L.P.
2
INSTALLER: Leave this manual with the appliance.
CONSUMER: Retain this manual for future reference.
DANGER
FIRE OR EXPLOSION HAZARD
If you smell gas:
Shut off gas to the appliance.
Extinguish any open ame.
If odor continues, leave the area immediately.
After leaving the area, call your gas supplier or
re department.
Failure to follow these instructions could
result in re or explosion, which could cause
property damage, personal injury, or death.
WARNING
Do not store or use gasoline or other
ammable vapors and liquids in the vicinity
of this or any other appliances.
An LP-cylinder not connected for use shall not be
stored in the vicinity of this or any other appliance.
WARNING: For Outdoor Use Only.
Installation and service must be performed
by a quali ed installer, service agency, or
the gas supplier.
WARNING: If the information in this
manual is not followed exactly, a re or
explosion may result causing property
damage, personal injury, or loss of life.
INSTALLATEUR: Laissez ce manuel ave l’appliance
CONSOMMATEUR: Conserves ce manuel pour
référence ultérieure.
Ne pas utiliser cet appareil s’il a été plongé, même
partiellement, dans l’eau. Appeler un technicien
quali é pour inspecter l’appareil et remplacer toute
partie du système de commande et toute commande
qui a été plongée dans l’eau.
AVERTISSEMENT
Ne pas entreposer ni utiliser de l’essence ni
d’autres vapeurs ou liquides in ammables
dans le voisinage de l’appareil, ni de tout autre
appareil.
Une bouteille de propane qui n’est pas raccordée
en vue de son utilisation, ne doit pas être
entreposée dans le voisinage de cet appareil ou
de tout autre appareil.
AVERTISSEMENT: Pour utilisation à
l’extérieur seulement.
L’installation et l’entretien doivent être effectués
par un installateur quali é, une agence de service
ou le fournisseur de gaz.
AVERTISSEMENT: Si les informations de ce
manuel ne sont pas suivies à la lettre, un
incendie ou une explosion peut en résulter
et causer des dommages matériels, des blessures
corporelles ou la mort.
IMPORTANT PRODUCT WARNINGS / avertissements
importants concernant les produits
DANGER
RISQUE D’INCENDIE OU D’EXPLOSION
S’il y a une odeur de gaz :
Coupez l’admission de gaz de l’arrareil.
Éteindre toute amme nue.
Si l’odeur persiste, éloignez-vous de l’appareil et
appelez immédiatement le fournisseur de gaz ou
le service d’incendie.
Si ces précautions ne sont pas respectées, cela
pourrait provoquer un incendie ou une explosion,
pouvant causer des dommages matériels, des
blessures ou la mort.
DANGER!
MONOXYDE DE CARBONE
Cette appareil peut produire
du monoxyde de carbone, un
gaz inodore.
L’utilisation de cet appareil
dans des espaces clos peut
entrainer la mort.
Ne jamais utiliser cet appareil
dans un espace clos comme
un véhicule de camping, une
tente, une automobile, ou une
maison.
CARBON MONOXIDE HAZARD
This appliance can produce carbon
monoxide which has no odor.
Using it in an enclosed space can
kill you.
Never use this appliance in an
enclosed space such as a camper,
tent, car, or home.
DANGER!
Do not use this appliance if it has been submerged,
even partially, in water. Call a quali ed technician to
inspect the unit and replace any part of the control
system and any control which has been under water.

General Warnings and Information.......................................................................................................................................................4
Code Requirements................................................................................................................................................................................5
Minimum and Maximum Gas Inlet Pressures.......................................................................................................................................5
Location Considerations.........................................................................................................................................................................5
Clearance Requirements........................................................................................................................................................................5
Media........................................................................................................................................................................................................5
Assembling the Shell of the FIRESTORM.............................................................................................................................................6
Using Quick Connect Fittings................................................................................................................................................................6
Connecting the Hose to the Burner Box and Completing Assembly................................................................................................7
Connecting the Regulator Hose to the LP Tank...................................................................................................................................8
Operating Instructions............................................................................................................................................................................8
Lighting Instructions................................................................................................................................................................................8
Cooking Instructions...............................................................................................................................................................................8
General Maintenance..............................................................................................................................................................................8
Warranty....................................................................................................................................................................................................9
Prop 65 Warning......................................................................................................................................................................................9
Return Policy...........................................................................................................................................................................................11
Contact Us..............................................................................................................................................................................................12
TABLE OF CONTENTS
CERTIFIED UNITS
SCAN THE QR CODE FOR UPDATED CERTIFICATIONS
PATENTS
SCAN THE QR CODE FOR UPDATED PATENTS
www.GoLiveOutdoor.com/Patents www.Warming-Trends.com/Patents
4
WARNING: THE FIRESTORM WILL BECOME EXTREMELY HOT WHEN IN USE.
HOT! DO NOT TOUCH.
SEVERE BURNS MAY RESULT.
CLOTHING IGNITION MAY RESULT.
• Keep the unit out of reach of children.
• Clothing or other ammable materials should not be hung from the appliance or placed on or near the
appliance.
• Children and adults should be alerted to the hazards of high surface temperatures and should stay away to
avoid burns or clothing ignition.
• Never leave the unit unattended while in use.
WARNING:
Product is not intended to be used to burn wood or other combustibles. Solid fuels shall not be burned in the
appliance. Do not place any objects inside the burner component or add wood or other materials to the re.
Do not put any combustible materials into the re pit.
WARNING:
Only use Liquid Propane as specied for your Live Outdoor FIRESTORM unit.
Do not use an alternative fuel.
WARNING:
DO NOT MOVE THE FIRESTORM WHILE IT IS IN OPERATION. TURN OFF THE APPLIANCE AND ALLOW IT TO
COOL TO THE TOUCH AT LEAST 20 MINUTES BEFORE HANDLING OR MOVING. ALTERATIVELY, TURN OFF
THE APPLIANCE AND HANDLE WITH HEAT RESISTANT GLOVES.
WARNING:
CARBON MONOXIDE HAZARD
• This burner is a combustion appliance, and all such appliances generate Carbon Monoxide (CO) during the
combustion process. It is important to ensure that there is adequate airow into and out of the appliance.
• Carbon Monoxide (CO) poisoning can cause u-like symptoms, such as headaches, dizziness, fatigue,
nausea, watery eyes, and can even lead to death. Carbon Monoxide gas is both odorless and invisible,
making it a potentially lethal threat. If any of these symptoms occur during the operation of this appliance,
move to a well-ventilated area immediately.
• FOR OUTDOOR USE ONLY! Never use this appliance indoors, in a house, camper, tent, vehicle, or any
other enclosed space. This appliance consumes oxygen from the air, and using it in an unventilated or
enclosed area can put you and others at risk of asphyxiation.
WARNING:
DO NOT USE IN THE PRESENCE OF COMBUSTIBLE MATERIALS.
Do not leave the appliance unattended while it’s in use, and operate it in a safe area away from anything that could
ignite in the presence of combustible materials, such as paper, cardboard, gasoline, or other ammable liquids or
powders.
GENERAL INFORMATION
This Owner’s Guide and Instruction Manual contains critical information for the safe assembly and operation of your
FIRESTORM. You must read this manual in its entirety prior to assembly and/or operation. Failure to follow these
instructions may result in property damage, personal injury, or death. Instructions are updated as needed, and it is the
owners’ responsibility to periodically review Live Outdoor’s website for applicable updates (www.GoLiveOutdoor.com.)
Please keep this manual with your important papers.

CODE REQUIREMENTS
MATCH LIT Minimum Maximum
Liquid Propane 11.0” W.C.
(2.7399 Kpa)
13.0” W.C.
(3.2381 Kpa)
GAS INLET PRESSURES
MINIMUM AND MAXIMUM GAS INLET PRESSURES
Your FIRESTORM has been provided with a LP hose with an in-line regulator set at 11” W.C. (2.7399 Kpa). Any additional fuel lines or
regulators must be provided by Live Outdoor or a qualfied gas professional within the specified minimum and maximum gas inlet
pressures below:
It is the responsibility of the user to consult with the local municipality and to FOLLOW ALL LOCAL CODES concerning the
installation and operation of the fire feature.
LOCATION CONSIDERATIONS
The FIRESTORM is designed and intended for outdoor use only.
Select a location where the appliance can be attended during operation. Never leave an operating appliance unattended or
by someone not familiar with its operation or shutoff procedure.
Pick a location that allows sufficient horizontal room to enjoy the appliance while allowing a safe distance from the heat and flame.
Keep the area around the appliance clear of combustible materials, gasoline, and other flammable substances. Do not burn
solid fuels in this appliance.
Choose a location that allows easy access to the fire feature.
Appliances may create very high temperatures - combustibles must be located far enough away that there is no risk of
ignition.
CLEARANCE REQUIREMENTS
Your FIRESTORM must only be used in a location that provides sufcient clearance from combustible materials. Never use
your FIRESTORM on a combustible surface and provide side and top clearance as follows:
• 36” side clearance from any combustible structure or materials.
• Overhead clearance should be a minimum 72” from the top of the appliance to combustible structures or materials.
• Always consult with local municipality regarding any local code requirements.
Media is not required but may be used on the FIRESTORM.
Only use approved decorative media (lava rock, ceramic log sets, etc.) that have been manufactured for specific use in fire
features. Do not use re glass as it, or debris from it, may fall into the burner pan.
Media must be ½” or larger in size to prevent media from falling into gas orifices and blocking flow of gas out of jets. Use
approved media only. To avoid dust and clogs getting into the system, do not dump the media over the burner. Place the
media onto the plate or pan.
Burner may be covered by approved media up to ” above the jets. Media may also be positioned so that jet tips or barrels
are visible. Covering jets by more than ” of media may create back pressure and gas leakage resulting in pooling of gas
under the re feature which can result in explosion which could cause property damage, personal injury, or death.
MEDIA
The FIRESTORM must be placed on a stable surface and must be level.
6
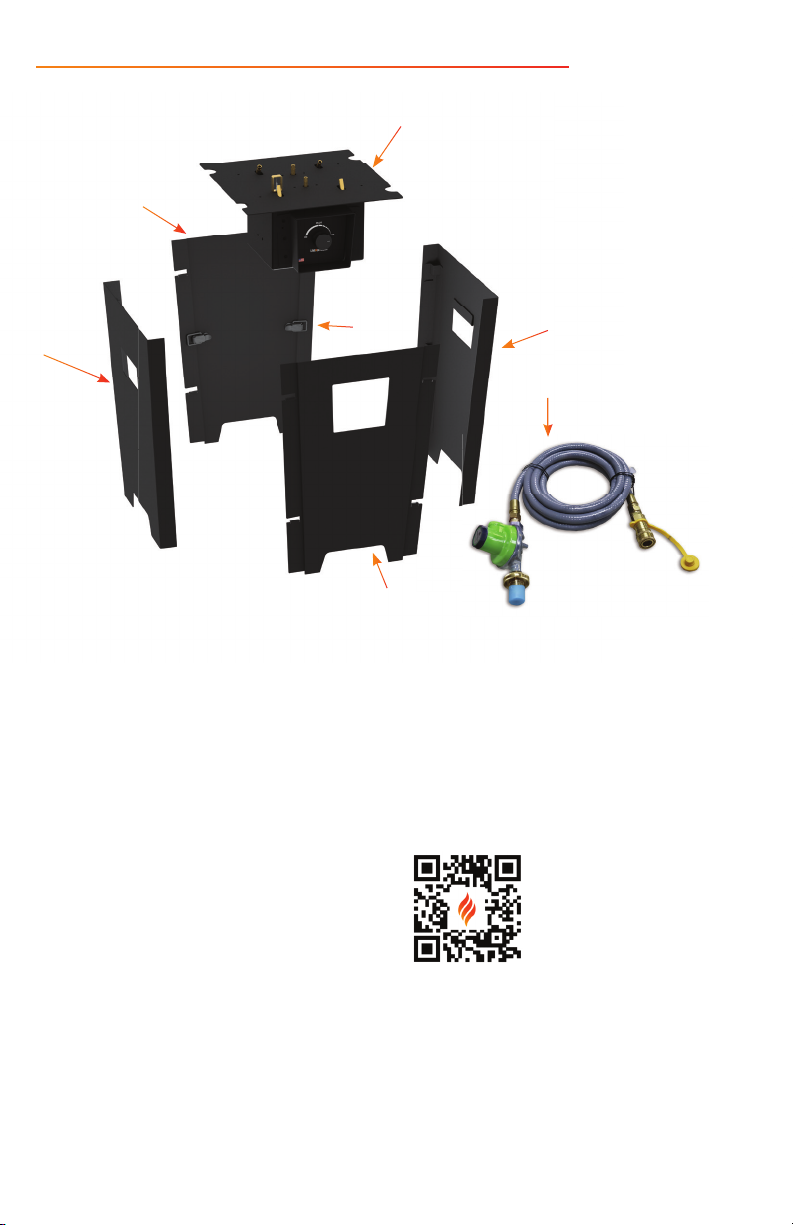
ASSEMBLING THE SHELL OF THE FIRESTORM
SCAN THE QR CODE FOR A SHORT ASSEMBLY VIDEO.
Back Panel
Burner Box
Latch Side Panel
Front Panel
Side Panel
Quick Connect Hose
The shell of the FIRESTORM includes a FRONT PANEL, BACK PANEL, and two (2) identical SIDE PANELS.
1. Attach the BACK PANEL to one of the SIDE PANELS by sliding it into the slots on one side of the SIDE PANEL. Connect
and lock the latch at the inside corner of the two panels to secure them in place.
2. Attach the FRONT PANEL to the opposite side of the same SIDE PANEL by sliding it into the slots on the SIDE PANEL.
Connect and lock the latch at the inside corner of the two panels to secure them into place.
3. Attach the second SIDE PANEL by inserting the sides of the FRONT PANEL and the BACK PANEL into the slots on each
side of the SIDE PANEL. Connect and lock the latches of the two inside corners of the panels to secure them into place.
4. Con rm that all four latches are connecting the four panels and are locked in place.
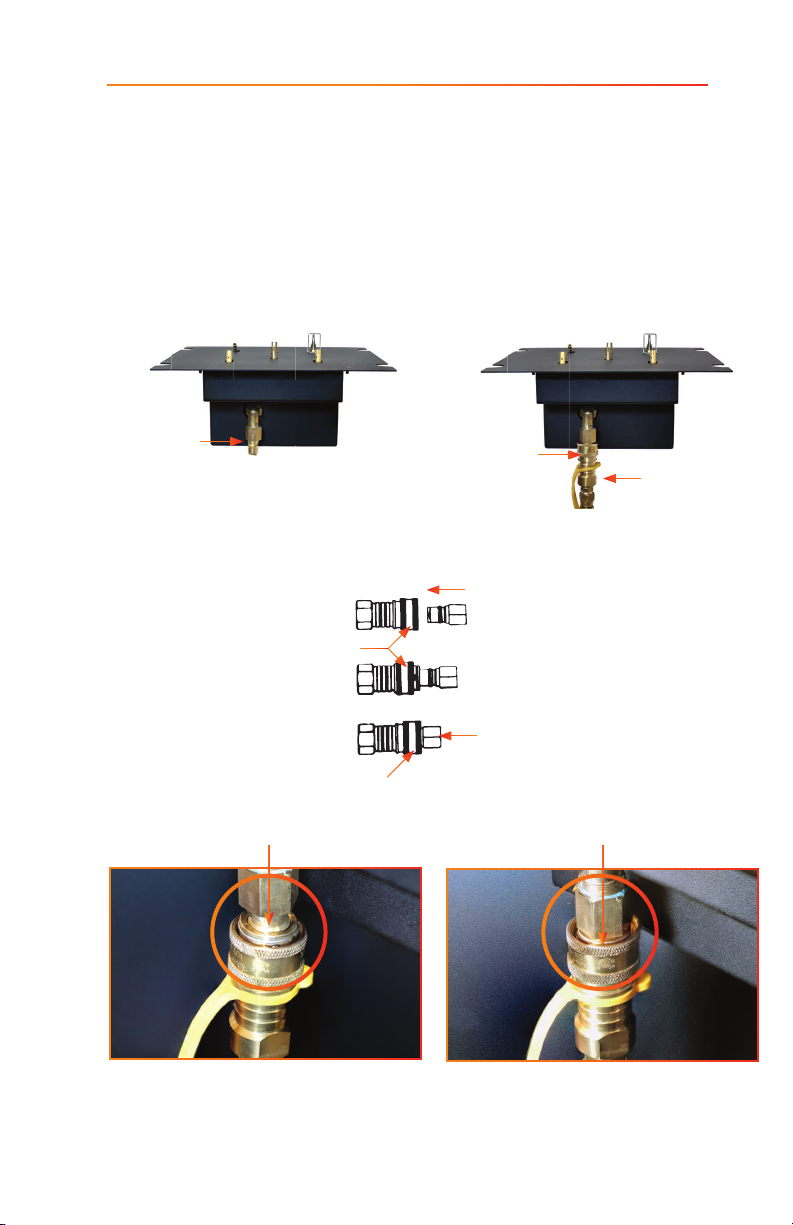
CONNECTING THE HOSE TO THE BURNER BOX AND
COMPLETING ASSEMBLY
The QUICK CONNECT is used to connect the FIRESTORM to your gas supply.
Before using the unit, inspect the hose assembly for excessive wear or damage. If you notice any issues, replace the hose
before operating the appliance. Contact Live Outdoor to obtain a replacement hose.
1. Tip the shell slightly to one side to allow you to pull about 18” of the VALVE CONNECTOR end of the HOSE under the
BACK PANEL and inside the shell.
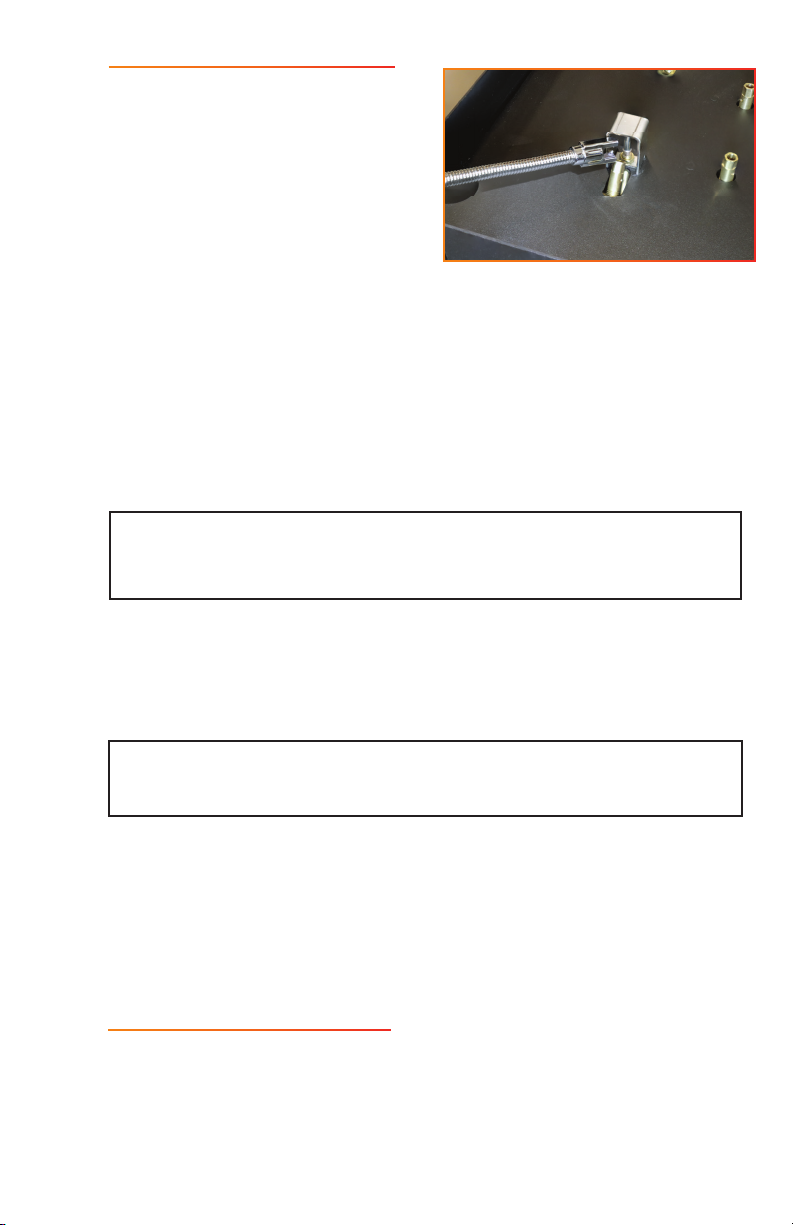
2. Locate the BURNER VALVE on the back of the BURNER BOX on the opposite side from the CONTROL KNOB.
[Photo A1].
3. Connect the HOSE to the BURNER VALVE by pulling back the spring collar on the HOSE SOCKET and pushing the
SLEEVE onto the BURNER VALVE. Confirm the connection is locked in place and secure by tugging on the hose.
[Photo A2].
Socket Burner Valve
Sleeve
Sleeve
Burner Valve
(FIG. 1)
(FIG. 2)
(FIG. 3)
Photo A1: Burner Box Photo A2: Quick Connect Properly Connected to
Burner Box
Burner Valve
Burner Valve
Hose Socket
4. Align the CONTROL KNOB with the FRONT PANEL and then set the BURNER BOX in the shell.
For more detailed asssembly instructions, please scan the QR Code on page 6.
INCOMPLETE QUICK CONNECT CONNECTION COMPLETE QUICK CONNECT CONNECTION

8
Keep the area clear and free from combustible materials, gasoline, and other ammable vapors and liquids.
Solid fuels shall not be burned in the re pit. Leaves, sticks, wood, paper, clothing, food material, etc. should be kept
away from the re pit. Make sure that there is no vegetation or other objects over the top or sides of the re pit that could
interfere with safe operation.
Wind and gusty conditions may cause the ame to behave in an unpredictable manner. If conditions exist, turn off the re
feature.
All media (lava rock, volcanic stone, etc.) has the potential of thermal spalling. This process may occur when media is wet
and moisture gets trapped inside of the material due to rapid temperature differences. When this happens the media
has the potential to crack or pop outside of the vessel. Extra caution should be taken when lighting in high humidity or
moisture. After igniting, allow 30 minutes to dry out the media and monitor from a distance until all popping has ceased
before fully enjoying the re.
OPERATING INSTRUCTIONS
WARNING:
TRIP HAZARD! Be sure to place the gas hose in
an area where it is unlikely to be tripped over
and won’t be damaged, such as away from
pathways or trails.
WARNING:
The hose should not be twisted or kinked
when attached to the gas cylinder. The hose
should never touch the appliance. Ensure that
the appliance is kept at a minimum distance of
36” (91 cm) from the gas cylinder.
CONNECTING THE REGULATOR HOSE TO THE LP TANK
Tip: The threads on the Regulator Hose are Left-Handed Threaded so they will tighten by turning to the left and loosen by
turning to the right.
1. Do not rell disposable propane cylinders under any circumstances.
2. Use only with a regulator set between 11” W.C. (2.7399 Kpa) and 13” W.C. (3.2381 Kpa). The regulator hose
provided with your unit is pre-set at the correct pressure. Do not adjust the pressure.
3. Keep your Regulator Hose horizontal.
4. Attach the Regulator Hose to the threads on the Propane Tank and twist until it comes to a full stop.
5. Extend the hose to its full length and make sure that the Propane Tank is positioned as least 3 feet from the
FIRESTORM.
6. Once the Regulator Hose is rmly attached to the Propane Tank, slowly turn on the Propane Tank by turning the
knob counterclockwise to fully open the Propane Tank.
For safe operation of this appliance, it is important to use LP cylinders that meet the following criteria:
• The cylinders must be constructed and marked in accordance with the LP-Gas Cylinders Standard of ANSI/NFPA or CAN/CSA
which specifies the requirements for cylinders, spheres, and tubes for the transportation of dangerous goods.
• The cylinders must be equipped with a listed overfilling prevention device.
• The cylinder connection device must be compatible with the connector for outdoor appliances.
Tip: Hold the Regulator Hose in a straight line with the Cylinder Valve in one hand and tighten the POL coupling turning
counterclockwise until it comes to a full stop.
Optional Tip: Use Channel Locks to tighten your Regulator Hose to ensure it’s securely fastened for safety purposes.
6. Once pilot is lit, press the Control knob in and turn counterclockwise to achieve desired ame height.
7. If burner does not light, turn Control knob to OFF position. Wait 3-5 minutes before repeating lighting process.
1. Slightly push in the Ignition button and while depressed, turn the Ignition Button to the OFF position. Verify ame
is out.
WARNING:
DO NOT MOVE THE FIRESTORM WHILE IT IS IN OPERATION. TURN OFF THE APPLIANCE AND ALLOW IT TO
COOL TO THE TOUCH AT LEAST 20 MINUTES BEFORE HANDLING OR MOVING. ALTERATIVELY, TURN OFF
THE APPLIANCE AND HANDLE WITH HEAT RESISTANT GLOVES.
2. If using a LP tank, turn tank to CLOSED position by turning the tank counterclockwise.
3. Once the unit is cool, remove Quick-Connect Socket from FIRESTORM, and remove hose connector from LP tank
valve.
4. Once FIRESTORM is cool to the touch, it is safe to place unit back in provided storage bag or break the unit down.
5. Do not place the FIRESTORM in a vehicle or enclosed space until it has cooled.
DISASSEMBLING THE FIRE FEATURE
Once the unit is cool, take the following steps to disassemble:
1. Remove Burner Insert from unit and set aside.
2. Starting with one front/back and side panel, unclip latches.
TURNING ON FIRE FEATURE
1. Con rm that the knob on the LP tank has been fully
turned to the open position.
2. Press Control knob and turn counterclockwise to the
Pilot position.
3. Using a BBQ Lighter, ignite the lighter and place
next to the jet closest to the thermocouple. [Photo
L1]
4. Fully depress the Control knob.
5. Once burner is lit, keep the Control knob pressed in
for 15 - 20 seconds. Burner should remain lit.
LIGHTING INSTRUCTIONS
Tip: If you release the Ignition Button and the FIRESTORM unit turns off, start
the lighting process again and hold down the ignition button for the full 20
seconds.
TURNING OFF FIRE FEATURE
To safely turn off the FIRESTORM unit:
WARNING:
Ensure that no parts of your body, clothing, or any other combustible material are above the burner before, during,
and after ignition.
Photo L1: Lighting Jet Nearest Thermocouple
If cooking with the FIRESTORM, pan or griddle must be supported and at least 4” above the plate. Do not allow grease or
cooking liquids to drip onto the burner as they may clog jets creating a dangerous condition.
COOKING INSTRUCTIONS

10
LIMITED WARRANTY FOR LIVE OUTDOOR
Live Outdoor, LLC. (“Live Outdoor”) warrants that the FIRESTORM Series I, Series II and Series III (the “Product”) will be free from
defects in workmanship and materials under normal use (“Limited Warranty”) for a period of three (3) years from the original
purchase date (“Limited Warranty Period”).
The Limited Warranty is non-transferable and applies only to the original end user purchaser. Proof of purchase in the form of a
sales receipt is required for warranty coverage/service.
The Limited Warranty does not cover any damage (including scratches or other damage to the powder coat, stains, or
discoloration) resulting from normal wear and tear, of misuse, lack of care, mishandling, accident, abuse or other abnormal use,
use of the Product other than for its intended purpose, damage caused by improper or unauthorized repair, modication or
maintenance. The Limited Warranty does not apply to any Product purchased from Non-Authorized, third party merchants or Non-
Authorized online marketplaces.
Warranty claims must be made directly to Live Outdoor. All returned Products must be returned within the Limited Warranty
Period and include an RMA (Return Materials Authorization) number issued by Live Outdoor. To obtain an RMA number, a
request for RMA must be completed and submitted directly to Live Outdoor during the Limited Warranty Period. The basis for
the Warranty Claim must be clearly explained. You may request an RMA by e-mailing Orders@LiveOutdoor.io. Please reference
“Warranty Claim” in the subject line. For the Claim to be considered, you must provide proof of your purchase within the Limited
Warranty Period for the Product. Incomplete requests will not be accepted. Live Outdoor will evaluate your Claim and, if warranty
coverage may apply, issue you an RMA number. Once you have received a Live Outdoor RMA number, you may ship your
product to Live Outdoor for review. Please reference your RMA number on the exterior of the packaging. We highly recommend
that your shipment to Live Outdoor include a trackable shipment method. Live Outdoor is not liable for Products that are
damaged or lost in transit prior to delivery to Live Outdoor.
Once your Product is received it will be inspected and evaluated for Limited Warranty coverage. If the Product is not eligible for
coverage, Live Outdoor will ship the Product back to you, at our expense. If Live Outdoor determines that there is a warranted
defect in the Product, Live Outdoor will, at its option, remedy the defect as set forth below in this Limited Warranty.
The sole and exclusive remedy for a breach of this Limited Warranty, and Live Outdoor’s sole and entire liability is, to repair or
replace the defective Product, at Live Outdoor’s option. Repair or replacement shall be made at Live Outdoor’s expense. Live
Outdoor reserves the right to replace the Product with the same or of a similar style or a substitute equivalent that may not be
of like kind (depending on availability). Replacement products are warranted for the remainder of the Product Warranty Period
based on the original date of purchase.
YOUR RIGHTS UNDER STATE LAW
This Warranty gives you specic legal rights, and you may also have other rights which vary from state to state. You may nd
this information from the Federal Trade Commission helpful in understanding your rights, but we recommend you speak to your
attorney regarding your specic situation and the laws in your state or jurisdiction. https://www.consumer.ftc.gov/articles/0252-
warranties
WARRANTY
GENERAL MAINTENANCE
Installation and repair should be done by a qualied technician. Appliances should be inspected prior to each use and
inspected at least once annually by a qualied gas appliance service professional.
Ensure gas is shut off and re pit is cool before servicing.
Keep re feature stored in a cool, dry place.
Keep any debris out of appliance - clean as needed. If debris is found, remove before lighting system.
JET ORIFICE CLEANING
Annual inspection and cleaning of the re feature is recommended. If at any time the ames exhibit any abnormal shapes
or behavior or if burner fails to ignite properly, the burner holes located in bottom of gas jet orices may require cleaning.
Debris may be dislodged from the orice using a small paper clip or toothpick.
PILOT ASSEMBLY/THERMOCOUPLE CLEANING OF SOOT
Every six months or as needed, remove media, lava rock, or glass from around the pilot assembly. Clean the thermocouple of
any soot using a soft brush. Be careful not to damage the igniter element. Be sure when returning your media to the feature
to avoid over covering the jets or the pilot assembly as detailed on page 5.
If the gas is not consistently owing from the pilot gas orice, it should also be cleaned. Remove the pilot hood and clean the
opening on the side of the orice of any debris or soot that may be obstructing gas ow from the pilot gas orice. Replace
the pilot hood when done.

WHAT IS “PROP 65”?
Proposition 65 (“Prop 65”) is a California law which requires businesses to provide warnings to Californians about signicant exposures
to chemicals that cause cancer, birth defects or other reproductive harm. These chemicals can be in the products that Californians
purchase, in their homes o r workplaces, or that are released into the environment. Prop 65 enables Californians to make informed
decisions about their exposures to these chemicals.
Prop 65 also prohibits California businesses from knowingly discharging signicant amounts of listed chemicals into sources of drinking
water.
Prop 65 requires California to publish a list of chemicals known to cause cancer, birth defects or other reproductive harm. This list, which
must be updated at least once a year, has grown to include approximately 900 chemicals since it was rst published in 1987.
Prop 65 became law in November 1986, and is also known as the Safe Drinking Water and Toxic Enforcement Act of 1986. Prop 65
does not apply to products sold outside of the state of California. For more info on Prop 65, go to: www.p65warnings.ca.gov For a fully
updated list of all the chemicals and compounds that are known to the State of California to cause cancer or reproductive toxicity, go to:
https://oehha.ca.gov/proposition-65/proposition-65-list.
WARNINGS
Lead: Can cause birth defects or other reproductive harm. Lead can be found in brass ttings. View the fact sheet at www.p65warnings.
ca.gov
Carbon Monoxide: Carbon monoxide is a colorless, odorless, and poisonous gas. It is formed during the combustion of various fuels. View
the fact sheet at www.p65warnings.ca.gov
Bisphenol A: BPA is a widely used chemical that be found in linings, plastics, and other materials. It can cause harm to the female
reproductive system. View the fact sheet at www.p65warnings.ca.gov
Furniture Product Exposure: Some furniture products can expose you to chemicals which are known to the State of California to cause
cancer or birth defects or other reproductive harm. View the fact sheet at www.p65warnings.ca.gov
Want to see more? View all of the Prop 65 fact sheets at www.p65warnings.ca.gov
MORE INFO ON PROP 65
If you have specic questions on the administration or implementation of Proposition 65, you can contact OEHHA’s Proposition 65
For enforcement information, contact the California Attorney General’s Ofce at (510) 622-2160, or visit https://oag.ca.gov/prop65.
Note: The information provided is for informational purposes only and does not constitute legal advice. If you have any concerns about
Prop 65 or how it may apply to our products, please consult your attorney.
PROP 65 WARNING
We only accept returns for products purchased directly from Live Outdoor. Proof of Purchase from goliveoutdoor.com is required. For
products purchased elsewhere, please contact that business regarding your return.
Please email your request for return together with the Proof of Purchase to Or[email protected]. Upon receipt of your request, we
will email you a prepaid shipping label. Print the label, put it on the package and take it to an authorized UPS drop-off location and ship
it to us during the return period. The cost of return shipping will be deducted from any refund amount issued to you.
Upon receipt of your return, we will process it within 7–10 business days. Depending on your bank’s processing time, it may take up to
10 days after we process the return to reect on your account.
MODIFICATIONS AND CANCELLATIONS
Once an order is submitted, it cannot be modied. If you wish to cancel your order, email us at Or[email protected] or call us at 720-
679-9800 as soon as possible and we will do our best to accommodate your request.
RETURNS
We hope that you truly enjoy your Live Outdoor purchase. If you are not satised, we accept product returns for thirty (30) days of date
of purchase, subject to the conditions below.
HOLIDAY SEASON RETURNS
Purchases made between December 1st and December 24th may be returned for forty-ve (45) days from the date of purchase,
subject to the conditions below.
DAMAGED, DEFECTIVE, OR INCORRECT ITEMS
Once you receive your order, you have seven (7) days to open and inspect the product(s). If anything is missing or damaged, or not
what you ordered, please contact us at Orders@LiveOutdoor.io with photos/videos of the issue. One of our team members will reach
out to assist you with a return/replacement.
LIKE-NEW CONDITION
Items must be returned in the original packaging and must be in like-new condition upon our receipt. Items that are damaged,
unsanitary, dented, scratched or missing parts will not be accepted for return.
PRODUCT ACCESSORIES AND PACKAGING
Product returns must include all accessories and packaging. If not included, we may either deny the return, or allow a return with a
nonrefundable deduction on your refund for what is missing.
PROOF OF PURCHASE
We only accept returns for products purchased directly from Live Outdoor. Proof of Purchase from goliveoutdoor.com is required. For
products purchased elsewhere, please contact that business regarding your return.
RETURN POLICY
www.GoLiveOutdoor.com | (720) 679-9800 | Info@LiveOutdoor.io
12
www.GOLIVEOUTDOOR.com
(720) 679 - 9800
Replacement parts are available for purchase. For replacement parts or any other questions, call our Flame Specialists at
(720) 679-9800 or email them at Orders@LiveOutdoor.io.
For more information about Live Outdoor products, please visit us at www.GoLiveOutdoor.com.
SCAN QR CODE TO VIEW PARTS:
CONTACT US
Table of contents
Popular Outdoor Fireplace manuals by other brands

Creative Outdoor Solutions
Creative Outdoor Solutions FHTA80008 manual

Pur Line
Pur Line EFP68 manual

HAMPTON BAY
HAMPTON BAY 3022FP-3PC-1 Use and care guide

Master cook
Master cook SRFP11406 instruction manual

Skytech
Skytech Firegear Outdoors FPB-20DBSMT-N Installation and operating instructions

Classic Flame
Classic Flame FP35052-D915 manual


Firesense
Firesense 60243 Assembly guide

RealFlame
RealFlame 11775LP owner's manual

Skytech
Skytech Firegear Outdoors FPB-25SFBSMT-N Installation and operating instructions

HOMEDEPOT
HOMEDEPOT DS-21394 Use and care guide

Firesense
Firesense 62342 owner's manual

Skytech
Skytech firegear Outdoors FPB-19/P-LF Installation and operating instructions