fis The Solutionists Z176SFTTX User manual
ISSUE 3 | MAy 2019 | PAGE 1 OF 4
Fiber Transition Housing
Z176SFTTX
related literature |
Z176SFTTX Fiber Transition Housing, Specification Sheet
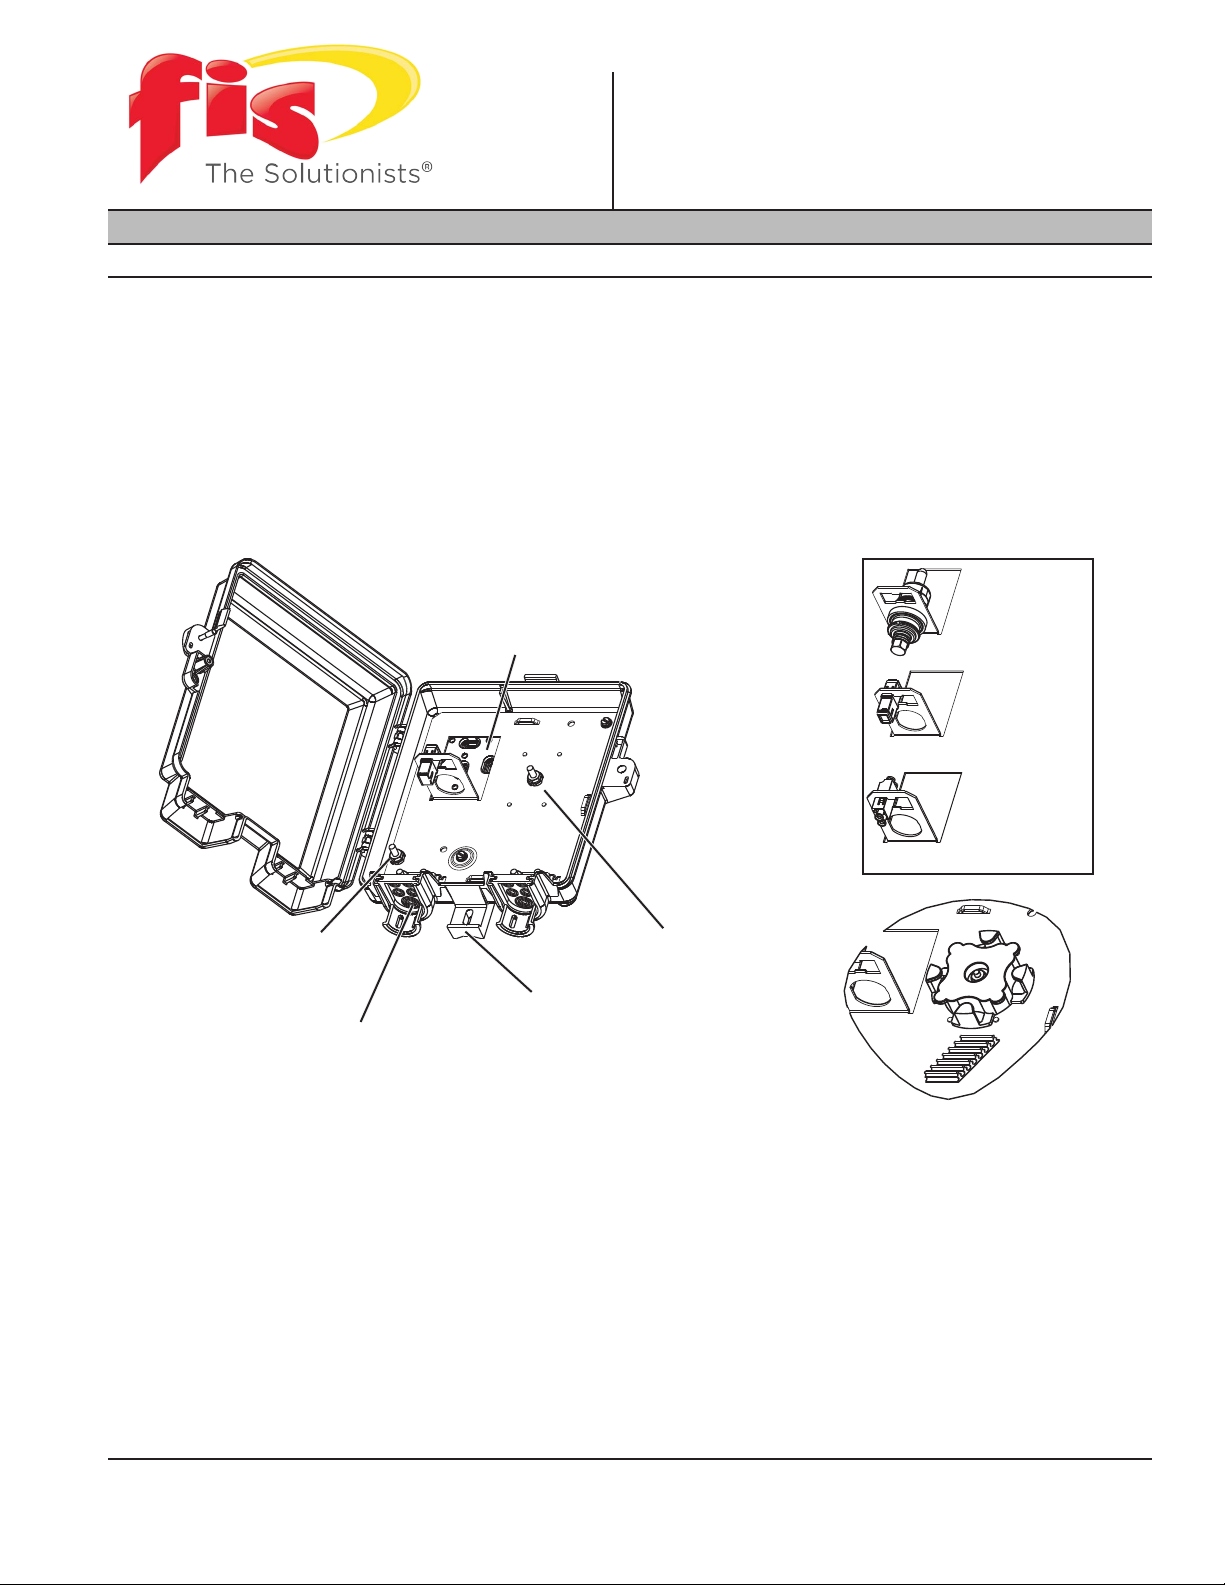
1. CARTON CONTENTS
•Housing
•Adapter(s), one of the following types (optional):
•OptiTap®•Single SC simplex •Single LC
•Fiber Management Spool (optional)
•Fiber Management Spool with splice organizer (optional)
Figure 1 — Carton Contents
2. TOOLS AND MATERIALS
The following may be required for installation:
•Can wrench
•Hammer
•Standard screwdrivers , 1/4-in x 4-in
and pocket-size
•(2) #8 Mounting screws (wall-mount only) •Needle-nose pliers
•(2) Flat washers for mounting screws
(wall-mount only)
•(2) Large tie bands or cable ties
(conduit-mount only)
Backplate
Ground
Stud
Entry Grommets
Fiber Management Spool
Mounting Stud
Lower
Mounting Ear
Adapter Mounting Bracket
TPA-3689
OptiTap Adapter
Fiber Management Spool with Organizer
(Optional)
Single SC
Simplex Adapter
Single LC
Adapter
Adapter Port Options
ISSUE 3 | MAy 2019 | PAGE 2 OF 4
3. PRECAUTIONS
All applicable regulatory requirements supersede this document. Do not attempt an installation
unless a copy of these requirements is available for reference.
3.1. Laser Handling Precautions
WARNING: Never look directly into the end of a ber that may be carrying laser light.
Laser light can be invisible and can damage your eyes. Viewing it directly does not cause pain.
The iris of the eye will not close involuntarily as when viewing a bright light. Consequently,
serious damage to the retina of the eye is possible. Should accidental eye exposure to laser
light be suspected, arrange for an eye examination immediately.
WARNING: DO NOT use magniers in the presence of laser radiation. Diffused laser light
can cause eye damage if focused with optical instruments. Should accidental eye exposure to
laser light be suspected, arrange for an eye examination immediately.
3.2. Safety Precautions
CAUTION: Recommend the use of safety glasses (spectacles) conforming to ANSI Z87, for
eye protection from accidental injury when handling chemicals, cables, or working with ber.
Pieces of glass ber are very sharp and have the potential to damage the eye.
CAUTION: The wearing of cut-resistant safety gloves to protect your hands from accidental
injury when using sharp-bladed tools and armored cable is strongly recommended. Use
extreme care when working with severed armor. There will be a sharp edge where armor is
cut. To minimize the chance of injury from the cut armor, cover the exposed edge with a wrap
of electrical tape. To minimize the chance of injury from sharp-bladed tools, always cut away
from yourself and others. Dispose of used blades and armor scrap properly.
DANGER: Fiber Optic Cleaning Fluid can cause irritation to eyes on contact. Contains
hydrourocarbon and alcohol blend. Inhalation of high concentrations of vapor is harmful, may
cause heart irregularities, unconsciousness, or death. Use with adequate ventilation. In case
of eye contact, immediately ush eyes with water for at least 15 minutes. In case of ingestion,
consult a physician.
3.3. Optical Fiber Precautions
CAUTION: Cleaved or broken glass bers are very sharp and can pierce the skin easily.
Do not let these pieces of ber stick to your clothing or drop in the work area where they can
cause injury later. Use tweezers to pick up cleaved or broken pieces of glass bers and place
them on a loop of tape kept for that purpose alone. Good housekeeping is very important.
CAUTION: Fiber optic cable is sensitive to excessive pulling, bending, and crushing forces.
Consult the cable specication sheet for the cable you are installing. Do not bend the cable
more sharply than the minimum recommended bend radius. Do not apply more pulling force
to the cable than specied. Do not crush the cable or allow it to kink. Doing so may cause
damage that can alter the transmission characteristics of the cable; the cable may have to be
replaced.
ISSUE 3 | MAy 2019 | PAGE 3 OF 4
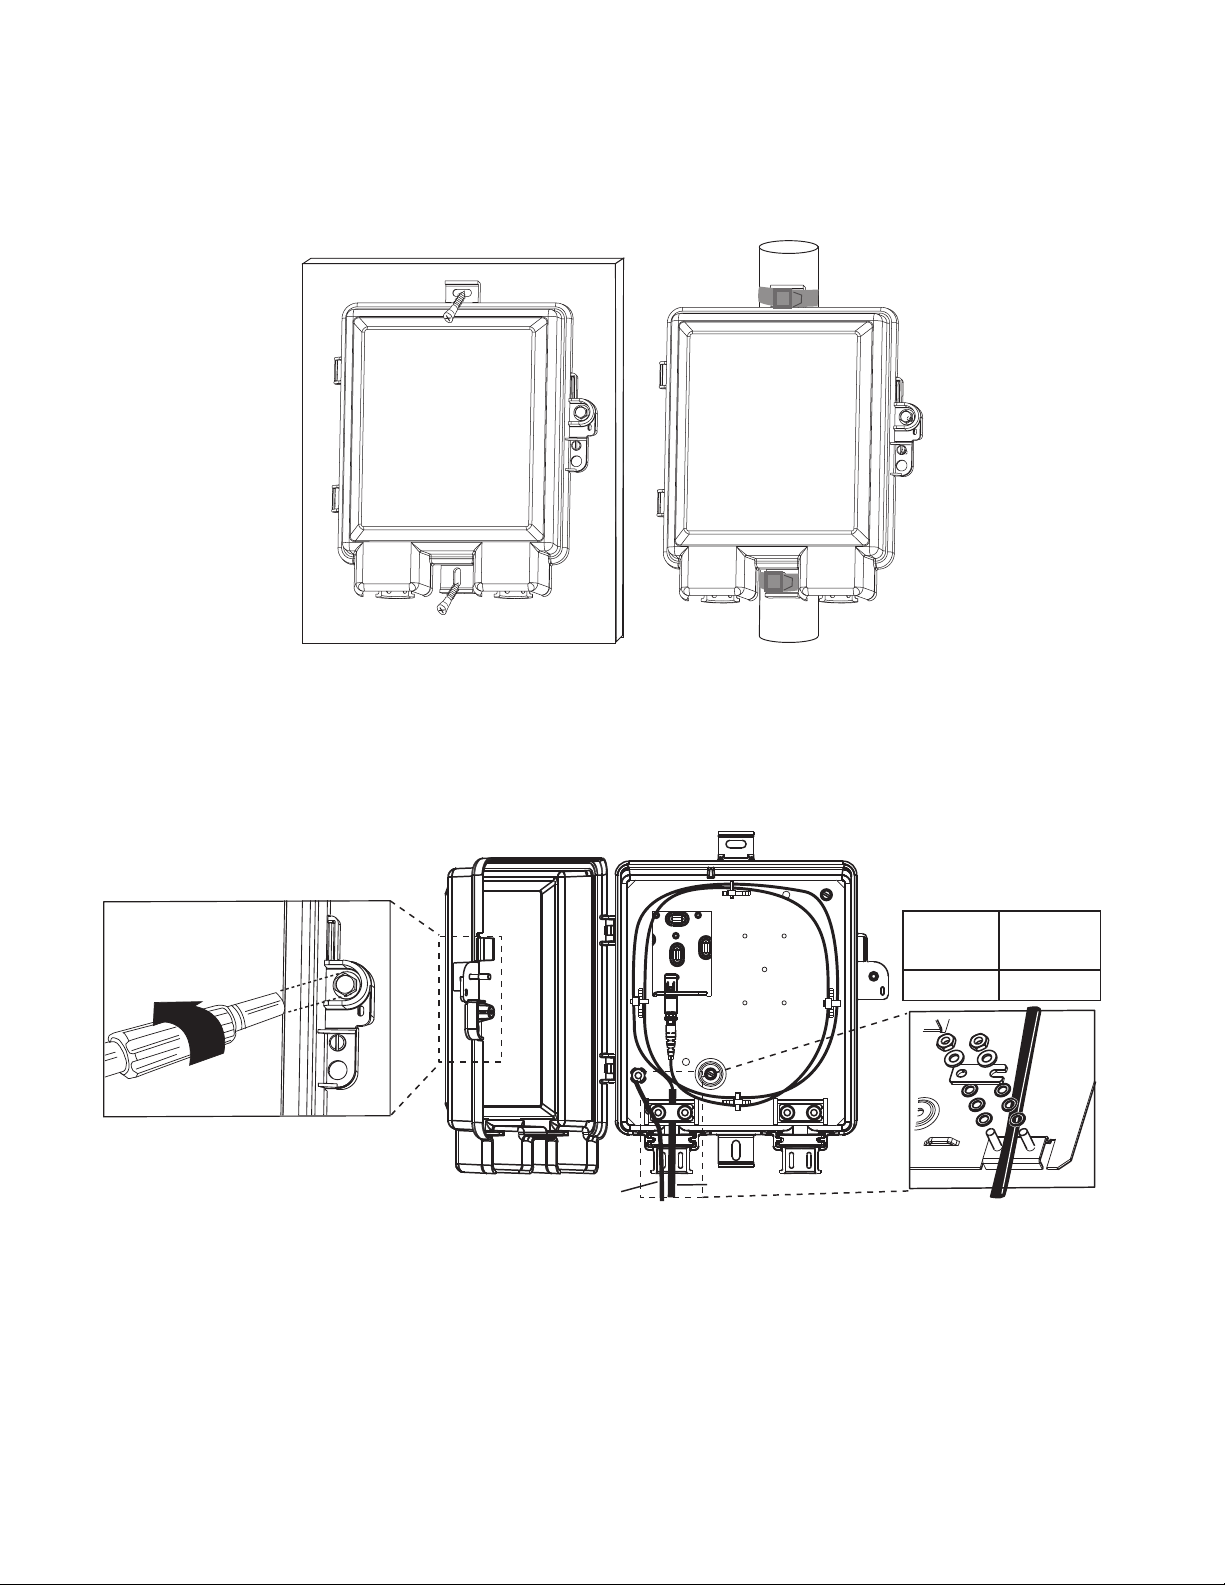
4. MOUNTING
Choose a vertical surface near approved ground but away from down spouts, permanent water
sprinklers, and other water sources.
To wall-mount the unit, select #8 wood screws (and washers, if needed behind screw head), or
hardware appropriate for the wall surface (Figure 2).
Figure 2 — Mount the Unit
5. GROUND THE UNIT
Step 1: Open cover.
Step 2: Pierce grommet and feed #6 AWG ground wire into the unit. Ground to the ground
stud or optional ground lug.
Figure 3 — Grounding and Feeder Cable Installation
Wall-mount Conduit-mount
TPA-3690
Use cable tie or
large hose clamp.
#8 Wood screw,
add washer if needed.
Ground Wire Feeder Cable
Open cover
using can wrench
Strain-relief Clamp x 2
Use spacers to prevent
crushing cable
ISSUE 3 | MAy 2019 | PAGE 4 OF 4
6. FEEDER CABLE INSTALLATION
Step 1: Remove cable sheath and strength members per standard company practices.
Step 2: Pierce grommet and insert feeder cable into the unit. Remove strain-relief hardware
using a can wrench. Strain-relieve the cable with the clamp as shown in Figure 3.
Step 3: Route slack around the perimeter of the unit, securing to the lances with cable ties as
needed.
Step 4: Remove dust caps from adapter and connector. Clean per standard company
practices. Mate connector into adapter as shown.
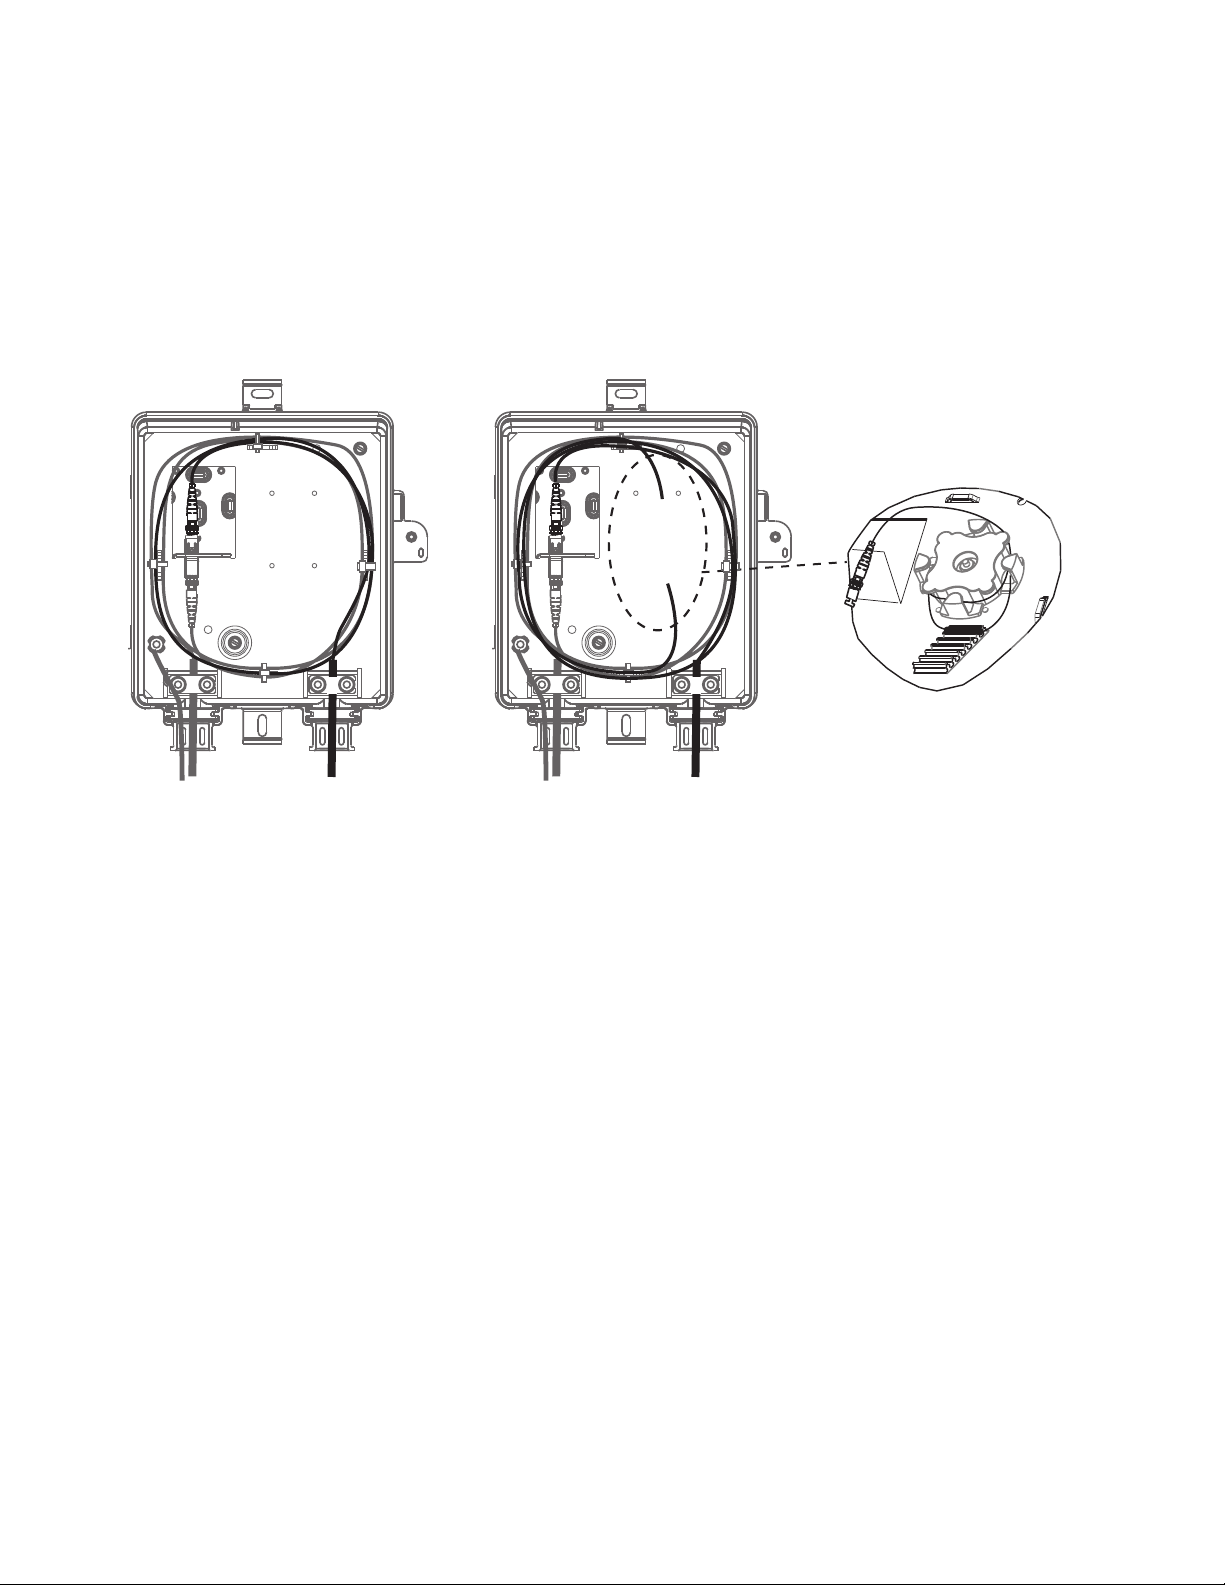
7. DROP CABLE INSTALLATION
Figure 4 — Install Drop Cable
Step 1: Pierce grommet and insert cable into the unit. Remove strain-relief hardware with a
can wrench. Strain-relieve with the clamp as shown in Figure 3.
Step 2: If splicing is required, splice to pigtails per the instructions provided with the splicing
equipment. Store ber in the splice organizer and ber management spool
(Figure 4).
Step 3: Route slack around the perimeter of the unit, securing to the lances with cable ties as
needed.
Step 4: Remove dust caps from adapter and connector. Clean per standard company
practices. Mate connector into adapter as shown.
8. SECURE THE UNIT
Step 1: Snap the outer cover closed. Secure with a can wrench.
Step 2: If desired, install a padlock or security seal through the padlock hole.
TPA-3692
Fiber Management Spool and Splice Organizer
Fiber Manage-
ment Spool
Direct
Connectorization


 user manual")


