Fisher-Price Kid Tough Video Camera User manual

Video CameraVideo Camera
www.fisher-price.com

2
Quick Start
A Real Video Camera for Preschoolers!
1Press and hold the power button to turn your video camera ON.
2Press the record button to stop the video demo.
3Aim the camera at your video subject and press the record button .
4Hold the camera steady and slowly move it to
capture the action! Press the record button
again when you are finished recording.
5Press the video play/pause button
to review your video instantly on your
video camera.
6Your video isn’t quite perfect yet? Press
the delete button and try again!

3
Consumer Information
Please keep this instruction booklet for future reference, as it contains•
important information.
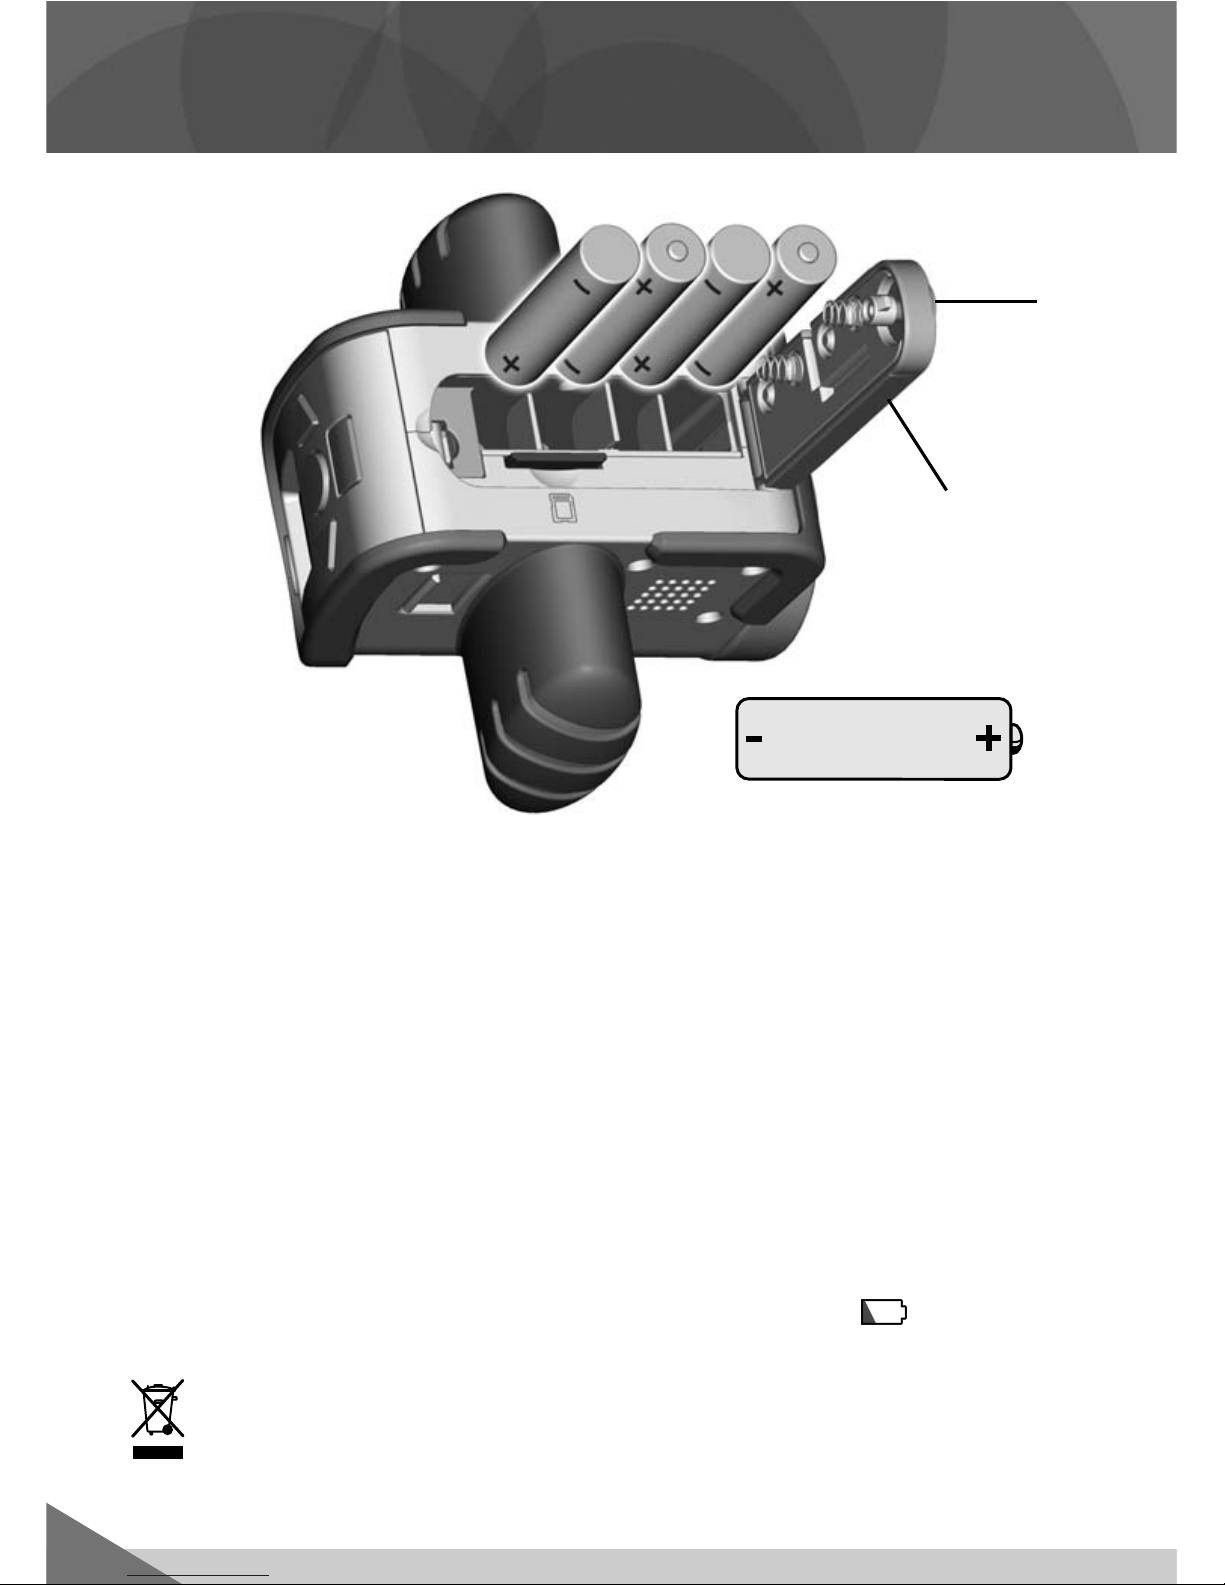
Requires four “AA“ (LR6)• alkaline batteries (included) for operation.
This product requires the installation and use of content management•
software to transfer and view video on your personal computer (PC).
Simply download this software by going to: www.fisher-price.com/kidtough.
Mac users do not need additional software to transfer and view video.
Adult assembly is required for battery replacement or SD card installation.•
Tool required: Phillips or slotted screwdriver (not included).
This product includes an internal memory of 256 MB or about 15 minutes of•
video. For extra recording time, use an Secure Digital (SD) card (not included)
in this product.
IMPORTANT!• Use only a new or clean SD card in the video camera. Once
inserted (if not using a new or clean SD card), files (e.g. photos or pictures)
on the SD card will be erased. This is intentional, to protect the video camera
from a virus or malware, and to protect your PC.
Keep the video camera away from direct sunlight and excessive heat.•
Wipe the video camera only with a soft, clean cloth. Do not immerse•
this product.
This video camera has no consumer serviceable parts. Please do not take•
this toy apart.
Product features may be different than images included in these instructions.•
Type - Equivalent to IEC Standard publication 529 IPX7.•
The toy is not to be connected to more than the recommended number of•
power supplies.
Computer System Requirements
Operating System............Microsoft Windows XP, Windows Vista™ or
Windows 7
Hard Drive .......................20 MB available
USB Port..........................1.1
Internet connection required (to download PC software).

4
Features
Lens
Recording Indicator FRONT VIEW
BACK VIEW
Power Button
Record Button
LCD Screen
Video Delete
Button
Video Forward
Button
Video Back
Button
Video Play/Pause
Button
USB Cable
(The USB cable is not a toy.)

5
Features
Lens - Aim at your subject when recording videos.
Recording Indicator - Indicator light flashes when video is recording.
Power Button - Press and hold to turn power ON. Press again to turn power OFF.
LCD Screen - Allows you to easily record and review your videos.
Video Play/Pause Button - Press to play your videos. Press again to pause.
Video Forward and Back Buttons - Press to scroll through more videos.
Video Delete Button - Press to delete a video. Press again to confirm deletion.
SD Card Slot - Open the battery compartment to insert a new or clean SD card
for more memory! SD card not included.
USB Port - Insert the USB cable to watch videos on your computer.
AV Output Jack - Insert an AV cable (not included) to watch videos on your TV.
USB Cable - Use to connect the video camera to your computer.
Video Camera Specifications
Video Resolution ........... 320 x 240 QVGA (without SD card) 640 x 480 VGA
(with SD card - not included and sold separately)
Internal Memory............ 256 MB (approximately 15 minutes of video)
LCD Screen.................... 1,4˝ color TFT LCD preview.
Connectivity................... USB port (version 1.1 or higher)
....................................... AV output jack (AV cable not included).
Batteries......................... 4 “AA“ (LR6) alkaline batteries (included).

6
Battery Replacement
Battery Compartment
Door
Lock
1,5V x 4
“AA” (LR6)
For best performance, we recommend replacing the batteries that came with
this toy with four, new “AA” (LR6) alkaline batteries.
Make sure video camera power is off.•
Locate the battery compartment door on the bottom of the video camera.•
Turn the lock on the battery compartment door a ¼ turn with a slotted•
or Phillips screwdriver. Open the battery compartment door. Remove the
batteries and dispose of them properly.
Insert four, new “AA” (LR6)• alkaline batteries into the battery compartment.
Hint: We recommend using alkaline batteries for longer battery life. Do not use
rechargeable batteries.
Close the battery compartment door and turn the lock a ¼ turn with a slotted•
or Phillips screwdriver.
When the low battery indicator appears on the LCD screen• , it’s time for
an adult to change the batteries.
Protect the environment by not disposing of this product with household•
waste (2002/96/EC). Check your local authority for recycling advice and
facilities (Europe only).

7
Battery Safety Information
In exceptional circumstances, batteries may leak fluids that can cause
a chemical burn injury or ruin your toy. To avoid battery leakage:
Do not mix old and new batteries or batteries of different types: alkaline,•
standard (carbon-zinc) or rechargeable (nickel-cadmium).
Insert batteries as indicated inside the battery compartment.•
Remove batteries during long periods of non-use. Always remove exhausted•
batteries from the toy. Dispose of batteries safely. Do not dispose of the
product in a fire. The batteries inside may explode or leak.
Never short-circuit the battery terminals.•
Use only batteries of the same or equivalent type, as recommended.•
Do not charge non-rechargeable batteries.•
Remove rechargeable batteries from the toy before charging.•
If removable, rechargeable batteries are used, they are only to be charged•
under adult supervision.

Record Button
Power Button
ord
Button
Re
c
8
Recording Video
Press and hold the power button• on the back of the video camera
to turn power ON. You will hear a tone.
To turn power OFF, press the power button. You will hear a tone.•
Hint: If you have not used the video camera for a while, it shuts off
automatically. To turn it back on, simply press the power button.
• Look at the LCD screen to see the video subject.
• Press the record button . Listen for the “recording sound”, look at the
flashing recording icon on the LCD screen. The recording indicator on the
front of the camera will also flash during recording.
• When ready, press the record button again to stop the video. The file
saving icon will appear on the LCD screen.

9
LCD Screen Icon Glossary
Flashes in the upper left corner of the screen when a video
is recording.
Appears on screen while video is saving on the video camera.
Appears on screen when a video is ready to play. Press the video
play/pause button to play the video.
Appears on screen when a video is paused. Press the video play/pause
button to continue playing the video.
Appears when there are no videos saved on the video camera.
Appears on screen when you press the delete button. Press the delete
button again to confirm you want to delete the video.
This orange icon appears when your video camera memory is almost
full. Insert a new or clean SD card (not included) or delete some videos
from the video camera.
This red icon appears when your video camera memory is full
and cannot save any more video. Insert a new or clean SD card (not
included) or delete some videos from the video camera.
Appears on screen when power is turned on and an SD card (not
included) is inserted in the video camera.
Indicates the SD card (not included) is locked. Remove the SD card
from the SD card slot and slide the switch on the card to unlock it.
Flashes on screen and then remains in the upper right corner of the
screen when there is less than 10% battery power left.
Flashes on screen and then remains in the upper right corner of the
screen when there is less than 5% battery power left. Replace the
batteries in the video camera with four “AA” alkaline batteries.

10
Reviewing Videos
Video Back
Button
Video Forward
Button Record
Button
• Press the video forward or video back buttons to scroll through
recorded video.
• Press the play/pause button to watch a video.
• When you are finished reviewing, press the record button to return to the live
screen and record more videos.
Hint: If you have installed an SD card (sold separately), you will only view video on the
SD card (and not on the video camera’s internal memory). To view video on the video
camera, simply remove the SD card.

11
Deleting Videos
• First locate the video you’d like to delete by using the video forward or back
buttons .
• Then press the video delete button . A trash can with a question mark
appears on the LCD screen.
• If you still would like to delete the picture, press the video delete
button again.
• If you decide you do not want to delete a video, simply wait a few seconds
and the trash can with question mark disappears on the LCD screen. Or, press
the either the video forward or back button .
• To delete all video all at once, use the content management software (go to
www.fisher-price.com/kidtough to download this software). Once installed
on your PC, go to Parental Controls. In the “Erase videos on camera after
import” section, click on the trash can icon.
Video Delete
Button

12
Share the Fun on Your TV
• Slide the AV and USB door on the side of the video camera open..
• Insert the AV cable pin into the AV output jack on the video camera.
• Plug the audio-video pins into the matching colored input jacks on your TV
or DVD player/VCR (Yellow for Video In and White for Left Audio In).
• Press the power button
on your video camera to turn the power ON.
• Turn on your TV or DVD player/VCR. To find the picture on your TV screen,
you may need to set your TV’s or DVD player/VCR’s mode selector to INPUT
or VIDEO IN.
• Press the play/pause button on the video camera to watch your videos.
• Press the video forward or back buttons to scroll through and watch
more videos.
TV
INPUT
AUDIO IN
LEFT
VIDEO IN
VCR/DVD
OR
White
Yellow
TV
Note: You will need an AV cable (not included) with a 3,5 mm pin to view video
on your TV.

SD Card (not included)
SD Card Slot
13
SD Card Installation
• Your video camera comes set up to take 320 x 240 QVGA quality videos,
and can store approximately 15 minutes of video. If you’d like to take higher
quality videos you can insert a new or clean SD card (not included) and take
640 x 480 VGA quality videos.
Note: A 1 GB SD card can store approximately 30 minutes of the higher
quality video.
• Turn the battery compartment lock a ¼ turn with a slotted or Phillips
screwdriver. Open the battery compartment door.
• Locate the SD card slot below the battery compartment.
• Insert a new or clean SD card into the slot.
Hint: Once you have used an SD card in the video camera, and put that same
SD card back into the device at a later time, you will not lose what was recorded
previously from our video camera. To avoid mix-ups and disappointments, it’s
best to reserve a particular SD card for use only in the video camera.
• Close the battery compartment door and turn the lock ¼ turn with a slotted or
Phillips screwdriver.
IMPORTANT! Use only a new or clean SD card in the video camera. Once
inserted (if not using a new or clean SD card), files (e.g. photos or pictures)
on the SD card will be erased. This is intentional, to protect the video camera
from a virus or malware, and to protect your PC.

14
• If using a PC to transfer, organize and view video, download content management
software (PC compatible only). Go to www.fisher-price.com/kidtough and follow
the instructions to download the software.
• The content management software is PC compatible only. To view videos
on a Mac, connect the video camera to your computer (see next section).
The Kid Tough™ Video Camera will appear as a removable storage device on
your desktop.
Your videos will be located at:
- NO NAME
- DCIM
- 100DSCIM
• If you are using an SD Card (see page 13) your videos will be located at:
- Untitled
- DCIM
- 100DSCIM
Hint: If you have renamed your SD Card it will appear on the desktop as named.
• To save videos onto your Mac computer, drag and drop the files to the
desired location.
Content Management Software

15
• Slide open the AV and USB door and insert the USB cord (smaller end) into
the USB port on your video camera.
• Insert the larger end of the USB cord into a USB port on your computer,
generally marked with this symbol .
• The video camera turns on automatically and will appear on the LCD
screen. The content management software will automatically open when you
connect your video camera to the computer.
Note: Do not disconnect the video camera or computer while videos are
transferring to your computer.
Content Management Software
To prevent
strangulation, keep
computer cables
away from children.
WARNING

16
Content Management Software
Getting Started
The content management software automatically opens when you connect•
your video camera to the computer. You can also double-click on the to
open the computer software program.
Click on the• to change the background color of the computer software.
Note: This option is only available if the Force Screen Resolution setting is
turned OFF. See Parental Controls.
Click on the• to exit the computer software.
Exit
Background
Colors

17
Content Management Software
Parental Controls
Click on the• to adjust your preferences.
Set Password• - Protect access to your desktop and hard drive by setting
a password. Type your password in the Set Password and Confirm
Password fields.
Note: If you set a password, you cannot enter Parental Controls or exit the
software without entering the password.
Automatic Updates - Click to turn automatic updates ON or OFF. To receive
updated software, we recommend selecting ON.
• Force Screen Resolution - Click to turn ON or OFF.
• Erase videos on camera after import - Click to turn this feature ON or OFF.
- Click to import videos that are saved on your computer into the
computer software program.
• Click on the to save your changes and exit parental controls.
Parental
Controls

18
Content Management Software
• The import screen will open when the computer software launches.
• Click the to import your new videos onto your computer. Click the to
close the import window without importing videos.
Hint: If you have installed an SD card (sold separately), you will only import
video on the SD card (and not on the video camera’s internal memory).
To import video on the video camera, simply remove the SD card.
• Click on a video in the video gallery and click the to watch it.
Hint: You can also double-click on a video to watch it.

19
Content Management Software
• Click on the to pause your video. Click on the to start it again.
• Click on the or to adjust the size of your video in the viewing window.
• Click on the to return to the video gallery.
• Click on the to add a video to your favorites.
• Click on the again to remove it from your favorites.
Video
Gallery
Video
Screen Size
Buttons
Play/Pause
Button

20
Content Management Software
• Click on the to show only your favorite videos in the video gallery.
• Click on the to show all your videos in the video gallery.
• To delete a video from the video gallery, click on the video. Then, click on
the to delete the video from your computer.
• Click on the to confirm you want to delete it.
• If you decide you do not want to delete the video, click on the .
Show
Favorite
Videos
Show All
Videos
Other manuals for Kid Tough Video Camera
12
Table of contents
Other Fisher-Price Camcorder manuals