Fiskars StaySharp Plus 6207 User manual
StaySharp™
Plus
Para ver la versión en español, vaya a la página N.o19
THE WORLD’S
MOST ADVANCED
REEL MOWERSTM

Fiskars Help Line: 1-877-201-3260 videos & more at: skars.com/reelmowers Fiskars Help Line: 1-877-201-3260 videos & more at: skars.com/reelmowers
THE WORLD’S MOST ADVANCED REEL MOWERS™
StaySharp™
Plus(17")
03-015265r1
Contents:
Safety Information ................................................................................ 3
StaySharp™Plus Technologies............................................................ 4
Mower Anatomy .................................................................................... 5
Assembly............................................................................................... 6–7
Adjusting Your Mower .......................................................................... 8–9
Checking Cutting Performance ........................................................... 10–12
Using Your Mower ................................................................................. 13–14
Troubleshooting.................................................................................... 15
Care and Maintenance ......................................................................... 16–17
Questions? Suggestions?
Don’t return to the store. We’re here to help.
Call our customer service team at 1-877-201-3260
Visit our website at skars.com/reelmowers
Save this manual for future reference.
Model Number: 6207
Fill in the following information for easy reference.
Serial Number:________________________________
(located on the lower back portion of the mower)
Date of Purchase:______________________________
Safety Information
Safety Information
Do not use mower if in poor health.
Do not operate with missing or damaged guards.
Always wear safety glasses, gloves and closed-toed shoes when
operating and maintaining your mower.
Never place hands, fingers or feet in the reel. When the reel is
spinning, it will cut.
Always remove debris from path of mower.
Always have sound footing when using mower, especially on wet grass or
on slopes (inclines).
Use safe lifting practices when moving mower.
Do not allow children under 12 to use mower.
Do not operate around children, other people or pets.
Do not run while using mower.
Do not use mower on surfaces other than grass.
Make sure mower is in safe operating condition by following the tips
outlined in this manual.
Do not use mower if it becomes damaged. Call 1-877-201-3260.
Before assembling or using the mower, read through the entire
manual and fully understand the safety information.
Fiskars warrants to the original consumer purchaser that its Lawn Mower products are free from defects in materials and workmanship appearing under normal use within two
(2) years after the date of purchase. This warranty does not cover damage to Lawn Mower products caused by abuse, acts of God, your failure to follow product instructions,
mishandling or unauthorized repair. THIS WARRANTY IS IN LIEU OF ALL OTHER EXPRESS WARRANTIES; AND ANY IMPLIED WARRANTIES, INCLUDING BUT NOT LIMITED
TO ANY IMPLIED WARRANTY OF MERCHANTABILITY OR FITNESS FOR PARTICULAR PURPOSE, ARE LIMITED TO THE DURATION OF THIS WARRANTY. IN NO EVENT
WILL FISKARS BRANDS, INC. BE LIABLE FOR ANY INCIDENTAL OR CONSEQUENTIAL DAMAGES. Some states do not allow limitations on how long an implied warranty
lasts and/or the exclusion or limitation of incidental or consequential damages, so the above limitation and/or the above exclusion may not apply to you. This warranty gives you
specific legal rights, and you may also have other rights which vary from state to state. As its sole responsibility and your sole remedy for any warranted defect, Fiskars Brands,
Inc. will replace any defective part of the Lawn Mower, containing a warranted defect, free of charge, with proof of purchase and notification within a reasonable period of time
(but no longer than 6 months) following the discovery of such defect. For warranty service, email warranty@fiskars.com or call 1-877-201-3260.
LIMITED TWO-YEAR WARRANTY
3
Register: Go to skars.com/registration
to register your StaySharp™Plus Reel Mower.
2
Congratulations!
You are now the owner of one of The World’s Most
Advanced Reel Mowers™. If you have used a reel mower
before, you will immediately appreciate the advantages
offered by your new reel mower. If this is your rst reel
mower, you will likely require a short transition period as
you adjust to using a reel mower. For more information
on how to enjoy all the benets of your reel mower,
see Using Your Mower on page 13.Also, remember that
Fiskars’ customer service team and website are both
available to you should you need additional help.
Fiskars Help Line: 1-877-201-3260 videos & more at: skars.com/reelmowers Fiskars Help Line: 1-877-201-3260 videos & more at: skars.com/reelmowers
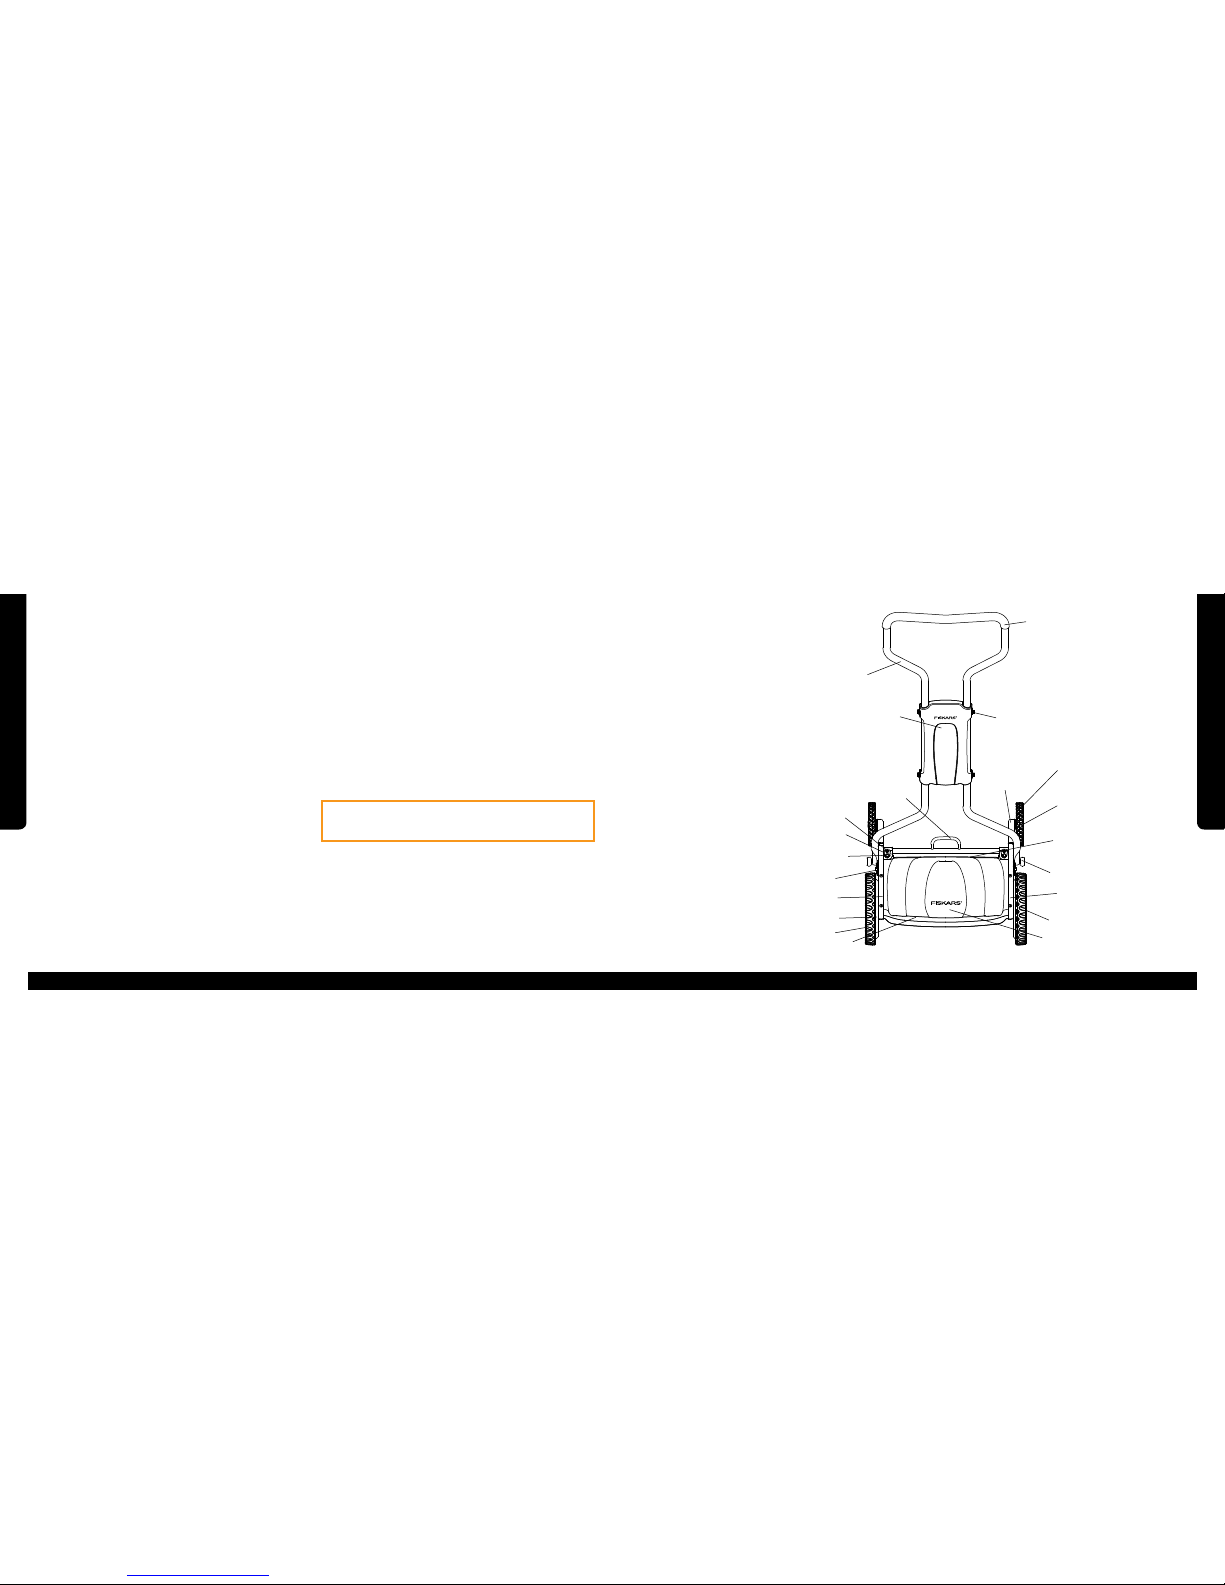
Mower Anatomy
Key Components
Being familiar with the parts and
technologies of your reel mower will
make assembly and maintenance
much easier. Review the components
shown on this illustration and refer to
it as needed when following the steps
outlined in this manual.
Note: If a clear reel cover is present,
remove before use.
Cutting
Reel*
Grass
Discharge
Chute
Cutting Reel
Bearings (2)*
Stationary
Blade*
Cut Height
Adjustment Knob (2)
Swing Arm (2)
Side Plate (2)
Hub Cap (2)
Wheel Cover (2)
Front Wheel (2)
Rear Wheel Washer
and Rear Wheel Bolt (2)
Rear Wheel (2)
Cotter Pin (2)
Lifting
Handle
Handle Bolts (4) and
Handle Nuts (4)
Ergo Grip
Handle
Shroud
Handle
Adjustment Lock
Screw (2)
Blade Adjustment
Lock (2)
Blade Adjustment
Bolt (2)
*Located under cover (not visible)
StaySharp™Cutting System, Fiskars Exclusive
What is it? Fiskars’ exclusive StaySharp™Cutting System uses precision-
ground, hardened steel blades engineered to efficiently cut grass without
actually touching, greatly reducing friction and blade wear.
How is it different? Standard reel mowers rely on contact between the cutting
reel and stationary blade for cutting. This steel-on-steel contact creates friction
and causes blade wear. As a result, the blades on standard reel mowers dull
quickly and require costly annual sharpening to maintain peak performance.
Why is it important? Since the StaySharp™Cutting System cuts grass
without the blades touching, friction and blade wear are virtually eliminated.
As a result, long-lasting performance is maintained without the cost and
inconvenience of annual blade sharpening.
InertiaDrive™Reel, Patent Pending
What is it? Fiskars’ patent-pending InertiaDrive™Reel combines a large-
diameter cutting reel and thick blades to store energy (like a flywheel) until a
burst of extra cutting power is needed.
How is it different? Standard reel mowers use small-diameter cutting reels
with thin blades. These reels and mowers lack cutting power and frequently
jam when cutting small twigs, weeds or dense grass. When this happens
the cutting reel seizes, completely stopping the mower. The obstruction
must be removed before mowing can resume.
Why is it important? InertiaDrive™Reel uses the mower’s large-diameter
cutting reel and heavy blades to store energy (like a flywheel) until a burst
of extra cutting power is needed. When a tough spot is encountered, the
InertiaDrive™Reel delivers 75% more cutting energy to power through
without jamming, providing a superior cut without interruption.
Forward Reel Design
What is it? Fiskars’ forward reel design with a unique grass discharge chute
throws clippings forward.
How is it different? Standard reel mowers feature rear grass discharge,
which means your shoes get covered in messy grass clippings.
Why is it important? Fiskars’ forward reel design with a unique grass
discharge chute throws clippings forward cleanly, away from your feet.
Cuts All GrassTypes
What is it? StaySharp™Plus Reel Mower offers a combination of advanced
technologies to cut all residential grass types easily.
How is it different? Standard reel mowers struggle to cut certain types of
residential grass, jamming or leaving uncut blades of grass.
Why is it important? StaySharp™Plus Reel Mower cuts all types of
residential grass easily, even tough southern varieties.
StaySharp™
Plus Technologies
45
40% Easier to Push Most reel mowers can be difficult to push —
especially in longer grass. The advanced technologies combine to
reduce push force by 40%.

Fiskars Help Line: 1-877-201-3260 videos & more at: skars.com/reelmowers Fiskars Help Line: 1-877-201-3260 videos & more at: skars.com/reelmowers
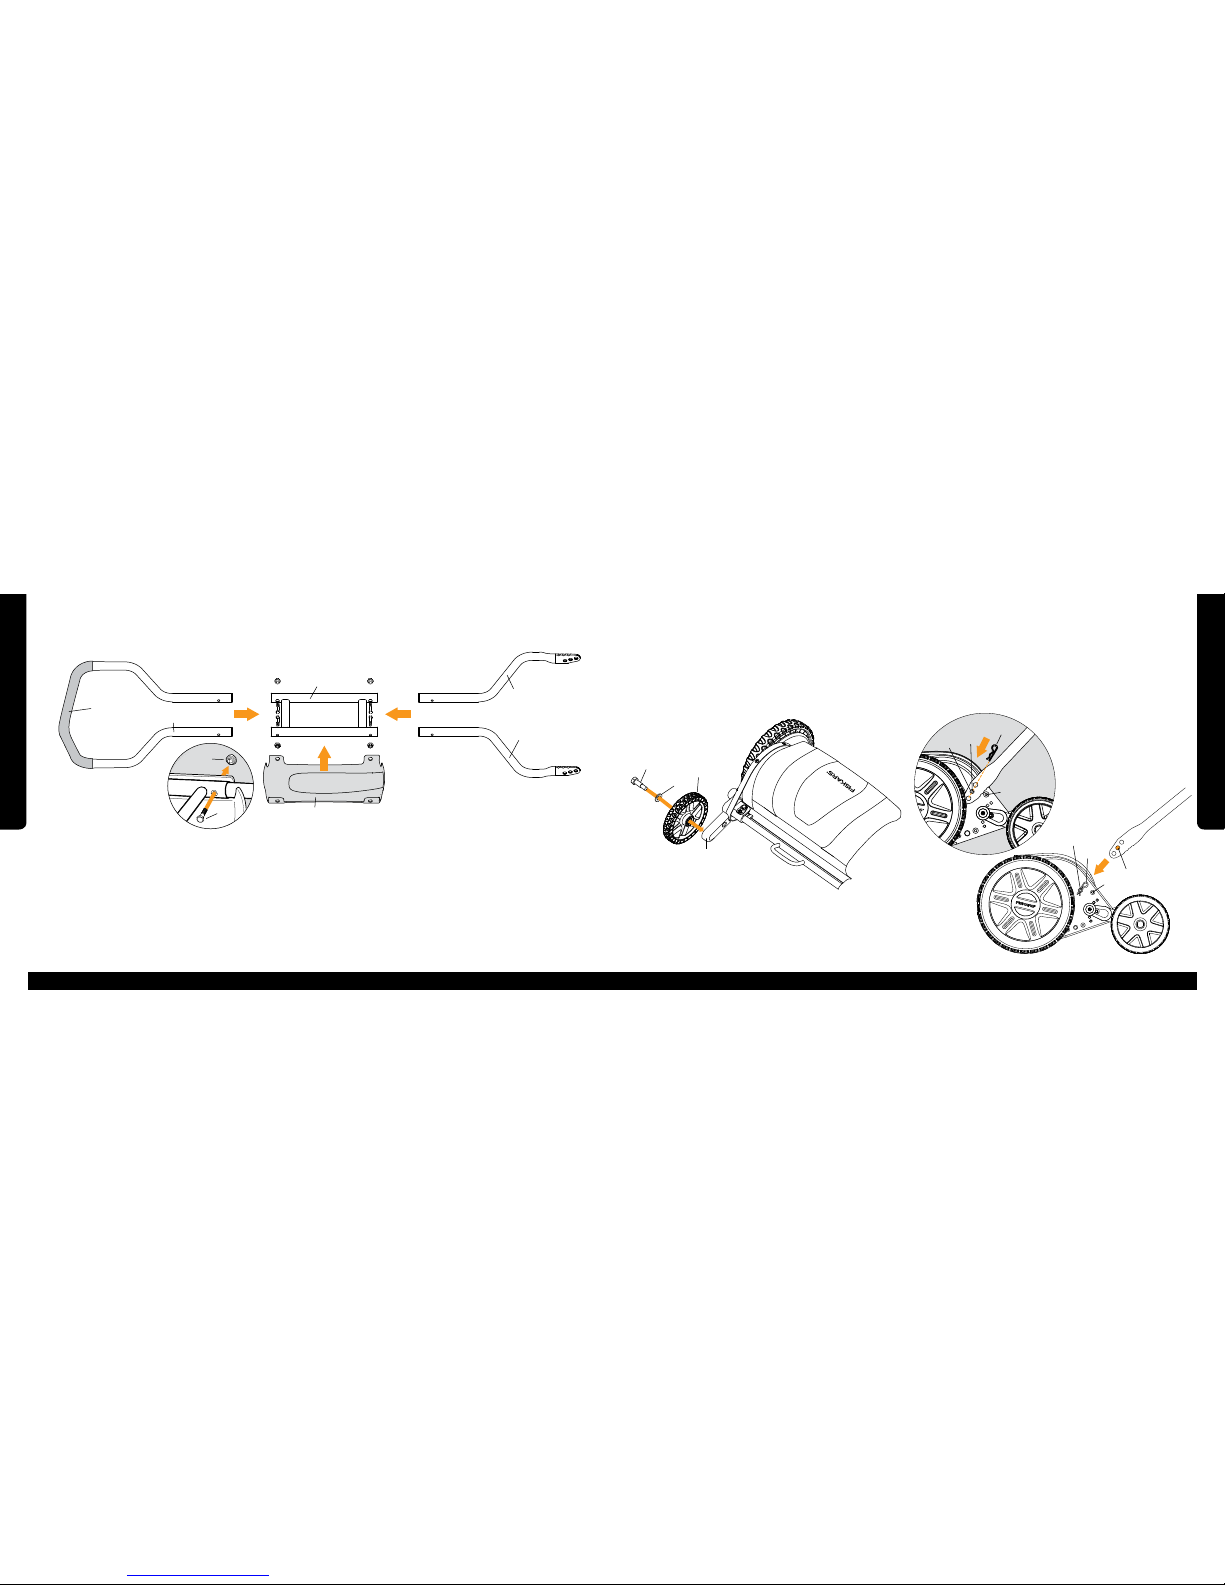
Rear Wheel Assembly
1. Assemble the rear wheel bolt (A) through the rear wheel washer
(B) and insert through the rear wheel (C).
2. Screw the bolt assembly into the swing arm (D) and tighten firmly
using the 18 mm wrench or socket.
3. Repeat for the other rear wheel.
Attaching the Handle
1. Remove the two cotter pins (A) from the handle mount pegs (B).
2. Slide hole number 2 (C) of the handle onto the handle mount pegs (B).
Some force may be needed to separate the handle legs so they fit over the
pegs. Release the handle until it rests on the handle stop peg (D).
3. Insert the cotter pins (A) to secure the handle.
Assembly
Assembly
A
B
C
D
A
BC
D
6 7
4. Slide handle shroud (E) into place from below with the Fiskars logo facing
down and toward the upper handle section (B).
5. Align holes in handle sections and shroud (E). Slide a handle bolt (F) through
from the inside, so that the end comes through the hole of the handle shroud.
Repeat for the remaining three handle bolts.
6. Align the hex-shaped bolt head with the hex-shaped cutout in the center
handle section (A), then hand-tighten a handle nut (G) onto the bolt. Repeat for
the remaining three handle nuts.
7. Using an 11 mm wrench or socket, tighten the four handle nuts (G) until they
are snug.
Handle Assembly
1. Lay out the handle parts upside down as shown above for easier
assembly. Note the center handle section (A) is symmetrical, so it can be
laid down on either side.
2. Make sure the arch of the upper handle section (B) is facing down. Then
insert the free ends of the upper handle section (B) into the center handle
section (A). Roughly align the holes.
3. Make sure the lower handle sections, (C) and (D),are laid out with the
notches up. Then insert the left lower handle section (marked with “L”) (C)
and the right lower handle section (marked with “R”) (D) into the center
handle section (A) as shown. Roughly align the holes.
The following parts are included in the hardware bag (bagged separately):
Handle Assembly
Handle nuts (4)
Handle bolts (4)
BA
C
D
123
Rear Wheel Assembly (next page)
Rear wheels (2)
Rear wheel bolts (2)
Rear wheel washers (2)
Tools required for assembly:
The only tools required for assembly are
11 mm and 18 mm wrenches or sockets.
L
R
A
BC
D
E
(left)
(right)
F
G
Handle Arch
(pointed down)

Fiskars Help Line: 1-877-201-3260 videos & more at: skars.com/reelmowers Fiskars Help Line: 1-877-201-3260 videos & more at: skars.com/reelmowersFiskars Help Line: 1-877-201-3260 videos & more at: skars.com/reelmowers
Cut Height Adjustment
1. Standing to the rear of the mower, place your left hand on the lifting handle
(A) to support the mower during adjustment.
2. Use your right hand to pull the cut height adjustment knob (B) away from
the mower and move to your desired cut height. Then release the knob,
making sure it snaps back into place.
3. Repeat the process on the other side, reversing hand placement, making
sure both wheels are at the same setting. Failure to align the wheels will result
in an uneven cut.
Note: The factory-set cut height range is 1.5"–3.5". To raise your cutting height
to 2"–4" range, refer to Cut Height Range Adjustment on page 9.
Adjusting Your Mower
8 9
Adjusting Your Mower
Handle Height Adjustment
1. For people of average height, handle hole 2 can be used for the middle
cut-height settings, which are the most common. If you are tall or plan to
use the lower cut height settings, consider using hole 3. If you are short or
plan to use the higher cut height settings, consider using hole 1.
2. Before adjusting the handle height, it is important to set the mower to the
cut height that you will use most frequently (see Cut Height Adjustment).
3. Push the mower forward several feet, then turn it around as you would at
the end of a mowing run. If you can push the mower comfortably without the
front end rising and if you can turn the mower without hunching over, you
have the handle set properly.
• If the front end rises, you have the handle set too high. Lower the
handle by using hole 1.
• If you have to hunch over a great deal to turn, you have the handle set
too low. Raise the handle by using hole 3.
3. As the cut height is adjusted, the handle’s bottom position will also move.
Consequently, you may need to adjust the handle height if you drastically
change the cut height. Adjustment may also be needed if you share
mowing duties with someone else.
IMPORTANT: To maximize comfort and control, your mower
features a height-adjustable handle. The handle is designed to
“oat” between its bottom and in-use positions. The bottom position is
used to pivot through turns. The in-use position should be 6"–10" above
the bottom position. Lifting the handle in this fashion keeps the front
end from rising off the ground to ensure an even cut. Since selecting
the correct handle height is extremely important, it is worth the
trial and error that may be required to nd the ideal height.
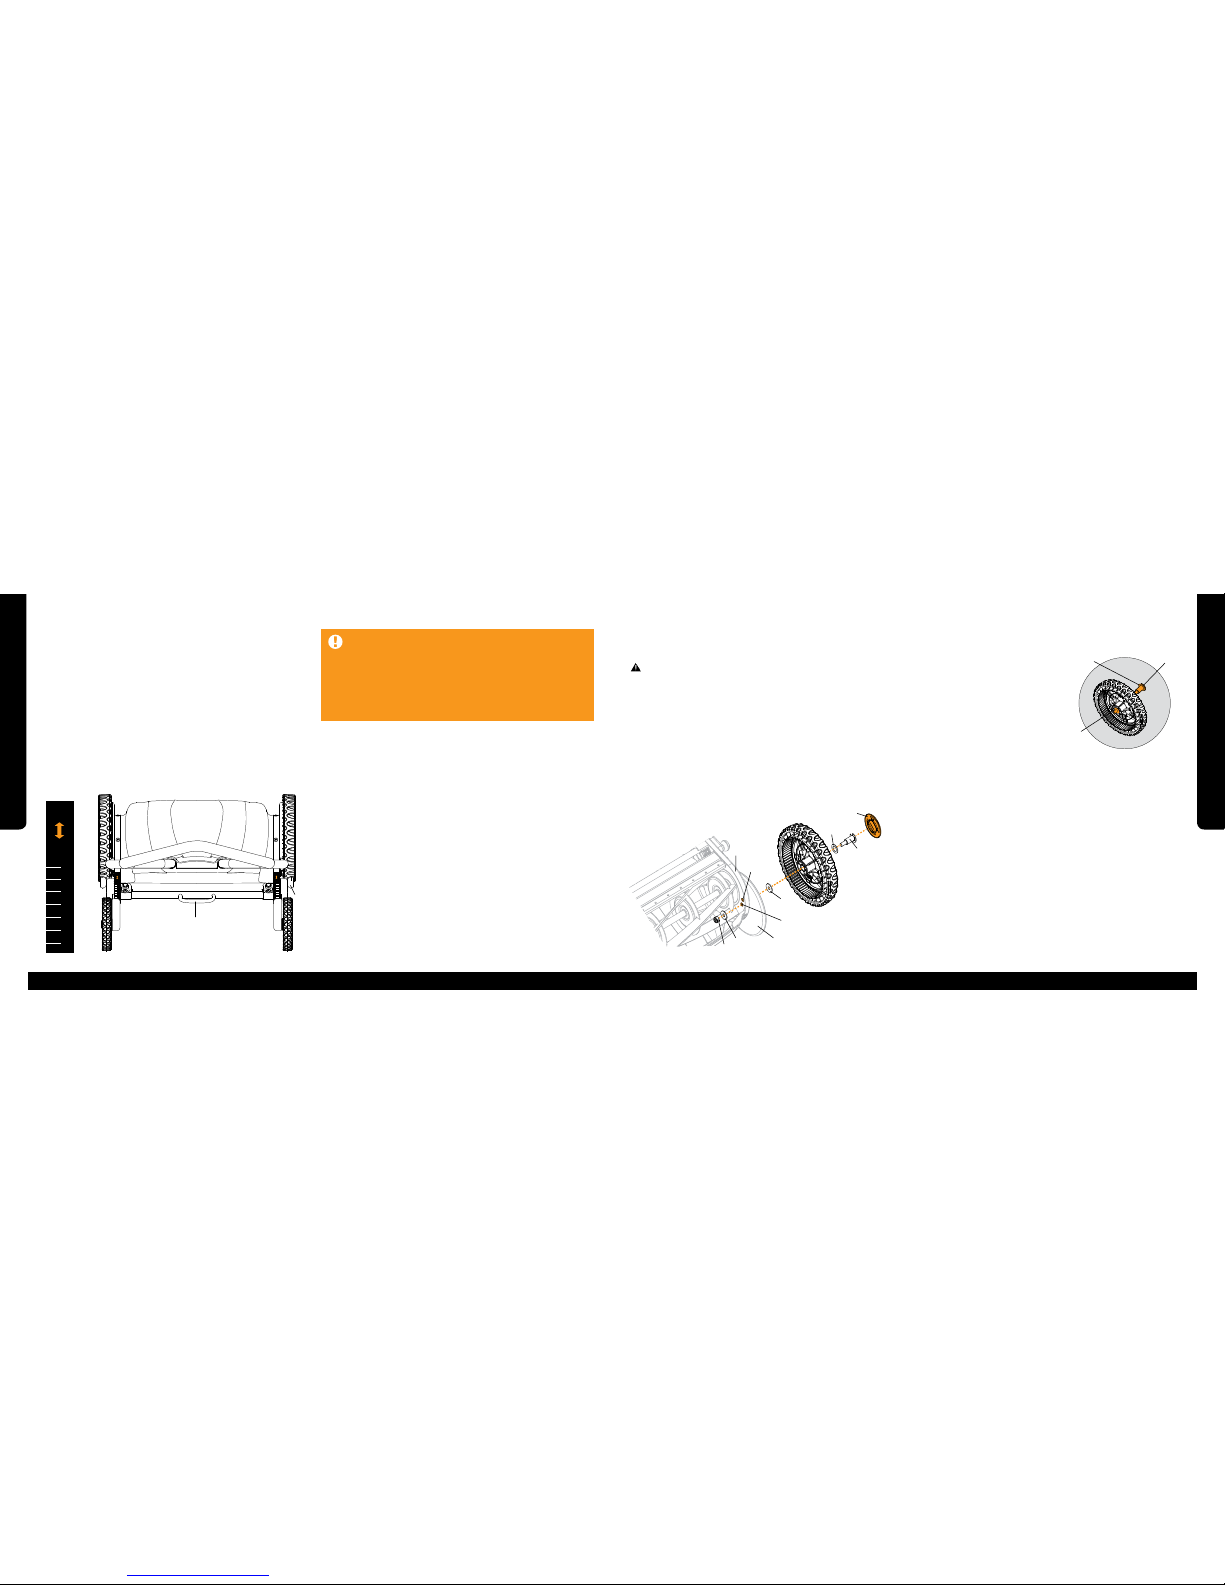
4. With the wheel removed, rotate the plastic wheel cover (G) from the upper
hole (H) to the lower hole (I) on the side plate (D). Moving to the lower hole
(I) provides the higher cut height range (2"–4"). Moving to the higher hole (H)
provides the lower cut height range (1.5"– 3.5").
5. Organize the wheel parts for reassembly.
a. Assemble the axle bolt (B) and
washer (E) and insert through the
outside of the wheel.
b. Place the other washer (F) on the
axle bolt on the inside of the wheel.
6. Position the wheel assembly from Step 5 through the lower hole (H).
Carefully replace the washer (J) on the axle bolt (B) and hand-tighten the
nut (C) from inside the side plate (D).
7. Hold the nut (C) in place with the 17 mm wrench and firmly re-tighten the
axle bolt (B) using the 8 mm Allen wrench.
8. Press the orange hubcap on to snap it back into place.
9. Repeat on other side.
E
F
B
Cut Height Range Adjustment
Note: The factory-set cut height range is 1.5"–3.5". To raise your cutting height
to 2"– 4" range, follow these steps.
The tools required are a 17 mm wrench, an 8 mm Allen wrench and a
flathead screwdriver.
1. Turn the mower upside down so it rests on the shroud. Set the mower to
the lowest cut height setting to move the rear wheels out of the way.
2. Starting on either side, use the flathead screwdriver to carefully pry off the
orange hubcap (A).
3. Remove the axle bolt (B) using the 17 mm wrench to hold the nut
(C) on the inside of the side plate (D) while turning the axle bolt (B)
counterclockwise with the 8 mm Allen wrench on the outside of the wheel.
CJ
D
E
F
G
I
H
B
A
WARNING: The mower blades are sharp. This adjustment requires
working in close proximity to the cutting reel blades. Leather gloves should
be worn at all times.
Low
Bajo
High
Alto
03-015271r1
1
2
3
4
5
6
7
Low
Bajo
High
Alto
03-015272r1
1
2
3
4
5
6
7
A
B
File Name: 03-015272r1_LEFT.ai
Package Part No.: 03-015272r1
Color Specs: 2/1: Black + PMS 144C
NOT FOR REPRODUCTION
Low
Bajo
High
Alto
03-015272r1
1
2
3
4
5
6
7

Fiskars Help Line: 1-877-201-3260 videos & more at: skars.com/reelmowers Fiskars Help Line: 1-877-201-3260 videos & more at: skars.com/reelmowersFiskars Help Line: 1-877-201-3260 videos & more at: skars.com/reelmowers
10 11
Checking Cutting Performance
Preparation
You’ll need several 1" x 8" strips of standard printer paper (not newspaper)
and a pair of work gloves.
WARNING: The mower blades are sharp. Wear gloves when
performing this procedure, and keep fingers away from the interface
between the cutting reel blades and stationary blade.
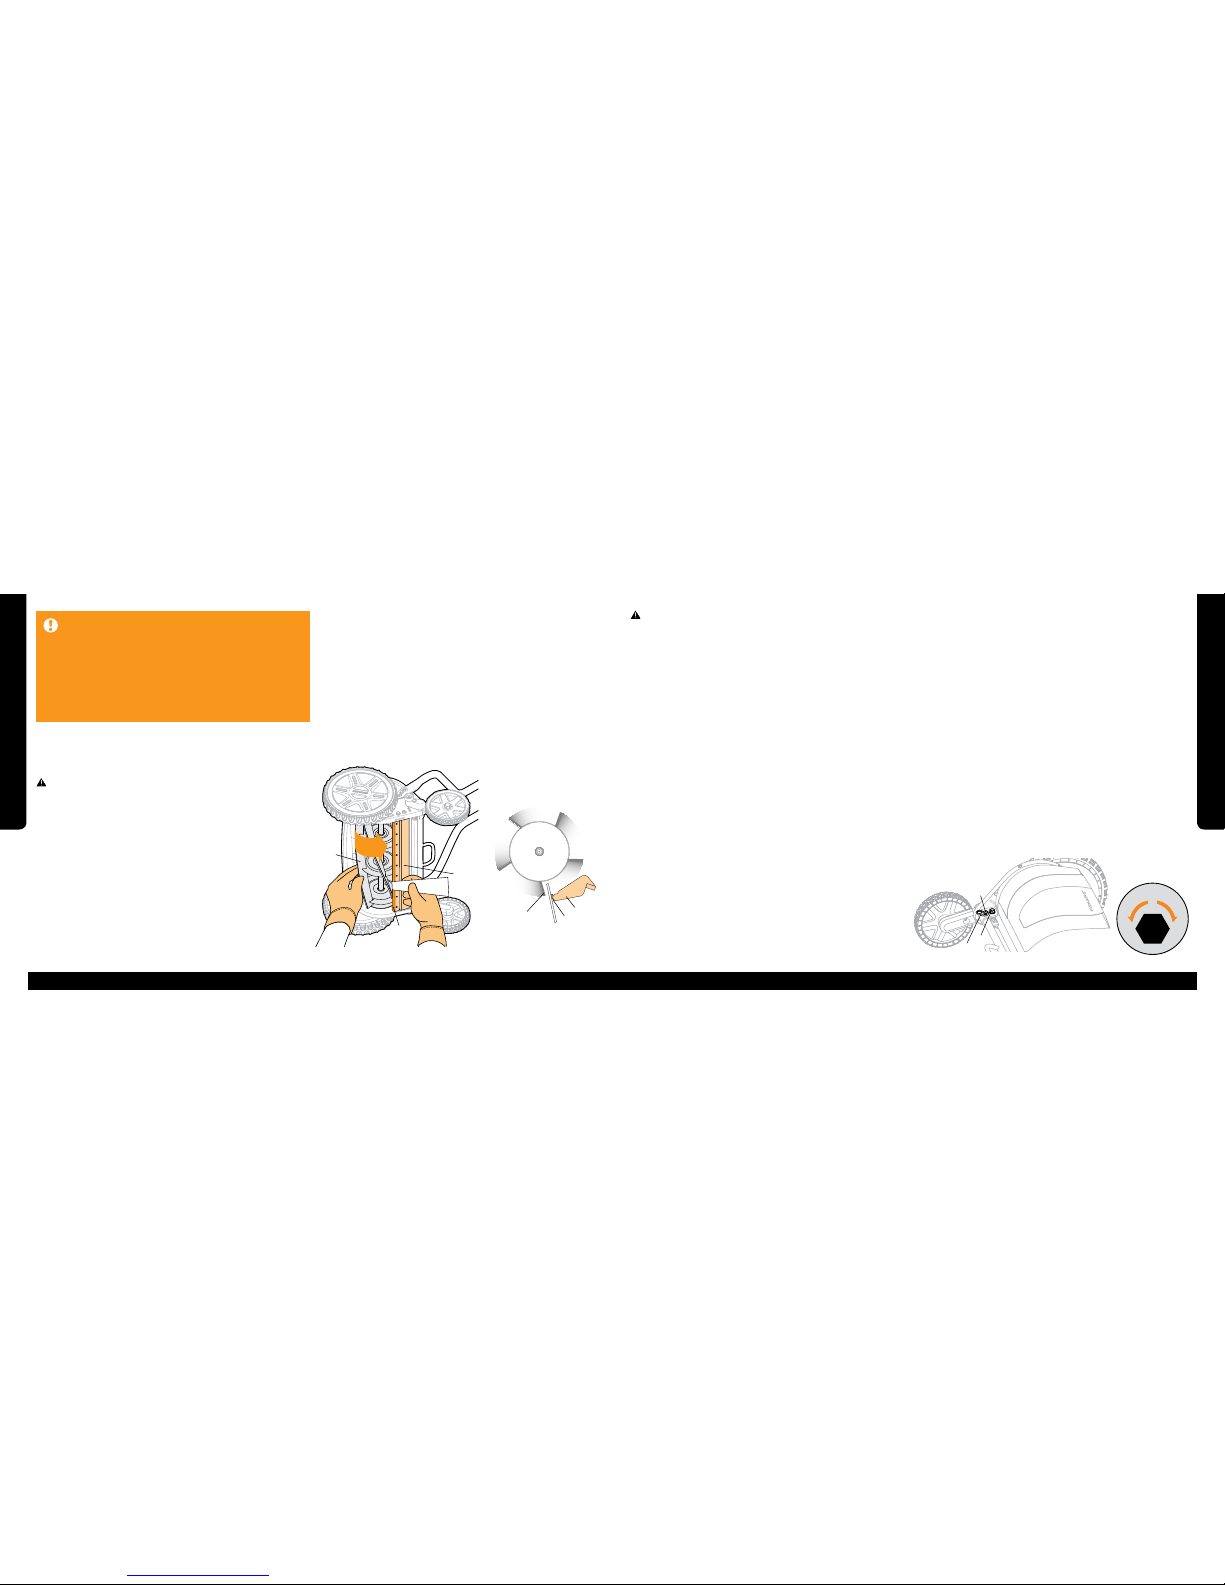
Check #1: Do the Blades Make Contact?
1. Ensure that the mower cannot roll forward by positioning it on a firm,
level surface with blocks in front of the rear wheels. Then raise the mower
to the highest position to improve access.
2. To check if the blades make contact with the mower resting on all
four wheels, slowly turn the cutting reel (A) forward, one blade at a time,
through a full rotation or two. If you hear scraping or feel resistance, skip
the remainder of this section and proceed to Adjusting the Blades on
page 11.
ATTENTION: If the cutting reel and stationary blade make contact, the
mower will be difficult to push and may dull the blades.
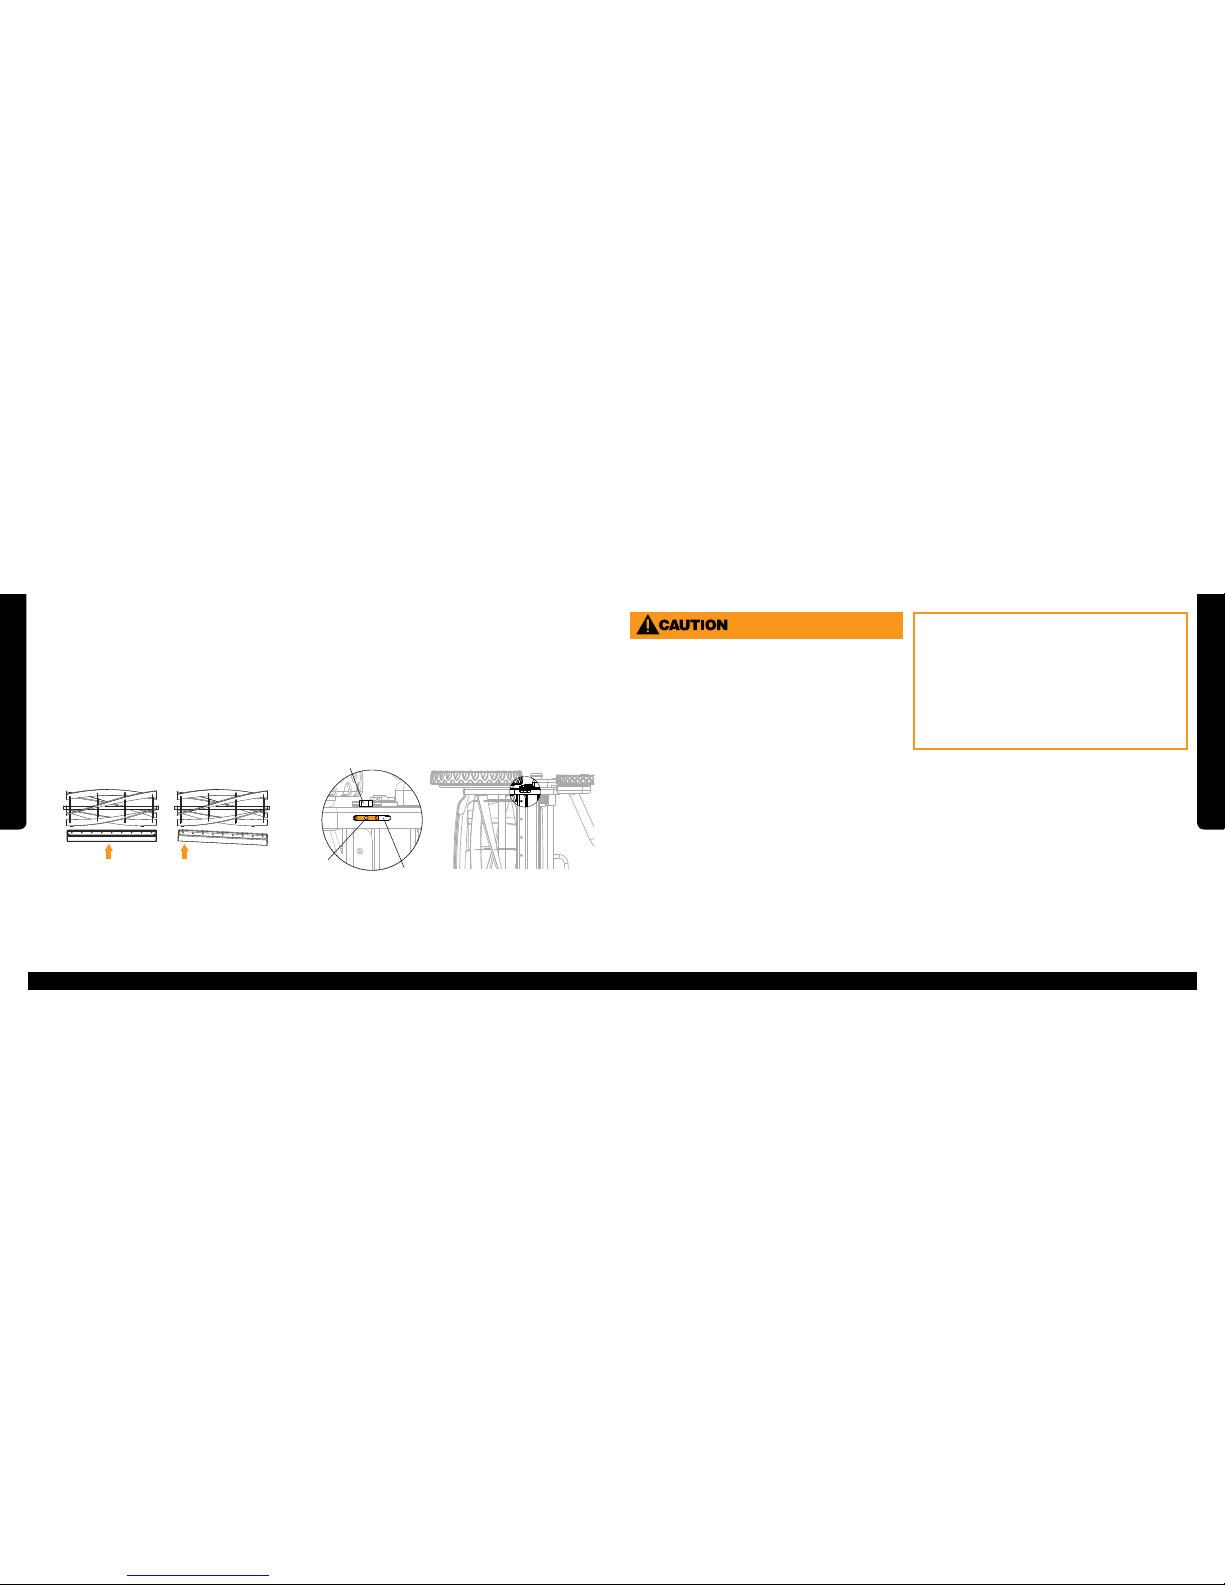
Check #2: Do the Blades Cut Properly?
1. Turn the mower onto its side.
2. To check if the blades cut properly, you will need to check the blades
on both ends of the mower. Starting with the end closest to the ground,
feed a strip of paper between a cutting reel blade (A) and the stationary
blade (B), keeping the paper flush against the side (C) of the stationary
blade (B). About half an inch of the strip should be visible beyond the
stationary blade.
IMPORTANT: The StaySharp™Cutting System is engineered
to cut grass without contact between the blades.This cutting system
was precision-set during assembly. However, since slippage may occur
during shipping, handling or use, it is very important to check the cutting
performance prior to rst use and periodically thereafter. Since slippage
can occur in two directions, two checks are required to evaluate cutting
performance —both checks need to be performed on both the left
and right side of the mower. Checking the cutting performance and
adjusting it as needed is the most important thing you can do to
ensure that your mower always performs optimally.
A
A
CC
B
B
Checking Cutting Performance
WARNING: Keep your fingers away from the cutting area; they should
be to the right of the stationary blade.
3. Slowly rotate the cutting reel (A) toward the stationary blade (B), observing
whether the paper is cut as the first cutting reel blade passes.
4. Continue to feed the paper into the reel horizontally half an inch at a time to
check the other blades.
5. Now check the opposite end of the reel by sliding the paper to the end
farthest from the ground and checking if the blades cut properly on that end.
6. If most of the blades cut on both ends, the cutting system is set correctly.
If all or most of the blades do not cut on one or both ends, the cutting system
needs to be adjusted. Proceed to Adjusting the Blades below.
ATTENTION: Failure to correct an improperly set cutting system will result
in poor cutting performance and uncut blades of grass.
Adjusting the Blades
The tools required are an 11 mm wrench or socket and a Phillips screwdriver.
1. With the mower resting on all four wheels, use the Phillips screwdriver to
loosen the adjustment lock screw (C) on both sides, then lift the adjustment
locks (D) over both adjustment bolts.
2. Turn the mower onto its side.
3. With the adjustment locks (D) lifted and turned to the side, adjust the
stationary blade by turning the adjustment bolts (E) as described below.
ATTENTION: When making adjustments, it is very important to turn both
adjustment bolts (E) with the same small adjustments (less than 1/8 of a turn
at a time) so the stationary blade is supported evenly on both sides. Never
turn one adjustment bolt without also turning the other the same amount.
If one bolt is turned significantly more than the other, one bolt will become
loose and be unable to properly support the stationary blade. If this occurs,
simply tighten the loose bolt so that both bolts have the same tension.
• If the blades did not cut paper:
Move the whole stationary blade closer to the cutting reel by making
small counter-clockwise turns on both ends until the blades just barely
come into contact. Then make small clockwise adjustments on either
end until the blades no longer touch. Be sure to turn both bolts equally.
• If the blades made contact:
Move the whole stationary blade away from the cutting reel by making
small clockwise turns on both ends, stopping as soon as the blades lose
contact. Be sure to turn both bolts equally. Then test that most of the
blades cut paper on both ends.
4. After the blades are properly adjusted, replace the adjustment locks and
firmly tighten the screws.
ATTENTION: If you have followed the directions for adjusting the blades
and are still not cutting paper on one or both sides of the mower, choose
the setting that maximizes the number of blades that cut paper and take
the mower out for a test pass. If the mower cuts to your satisfaction and the
blades do not make contact, you have adjusted the mower correctly. If the
mower does not cut to your satisfaction, the stationary blade and cutting
reel may be out of parallel alignment. If this is the case, proceed to Aligning
the Cutting Reel and Stationary Blade on page 12.
-- +
-- +
C
DE
Fiskars Help Line: 1-877-201-3260 videos & more at: skars.com/reelmowers Fiskars Help Line: 1-877-201-3260 videos & more at: skars.com/reelmowersFiskars Help Line: 1-877-201-3260 videos & more at: skars.com/reelmowers
12 13
UsingYour Mower
Checking Cutting Performance
Your reel mower has been designed and engineered to deliver best-in-
class cutting performance and a superior mowing experience. However,
there are several basic things you can do when mowing that will greatly
impact both your mower’s performance and your mowing experience.
If you have used a reel mower before, you will immediately appreciate
the advantages offered by the mower’s advanced cutting technologies
and design features. If this is your first reel mower, you will likely require
a short transition period as you adjust your mowing habits to maximize
efficiency and effectiveness. The information below will help both
experienced and new reel mower users enjoy all the benefits of the reel
mower. Also, remember that Fiskars customer service team and website
are both available to you should you need additional help.
Mowing Tips
For a healthy lawn, cut off no more than 1/3 of the grass length. To
maintain a healthy lawn and eliminate the mess created by very long grass
clippings, cut no more than 1/3 of the grass length at a time. If more than
1/3 of the length is removed, root growth will be impaired and the grass will
be stressed, making your lawn susceptible to weed invasion, disease and
poor appearance. If your grass gets too high, cut off 1/3 of the length, wait a
couple days, and then cut off another 1/3.
To prevent mower damage, clear the mowing area of debris in advance.
Before starting, inspect the area to be mowed and remove stones, medium-
sized or larger sticks, trash and other debris.
If you hit hard debris, stop and inspect the blades. If you strike a stone,
large stick or other hard object with the cutting blades, stop mowing
immediately and check for a jam or damage. If the blades are damaged, pull
the mower backward to an appropriate work area and follow the instructions
in Care and Maintenance on page 17. Continuing to mow with damaged
blades may make repair impossible.
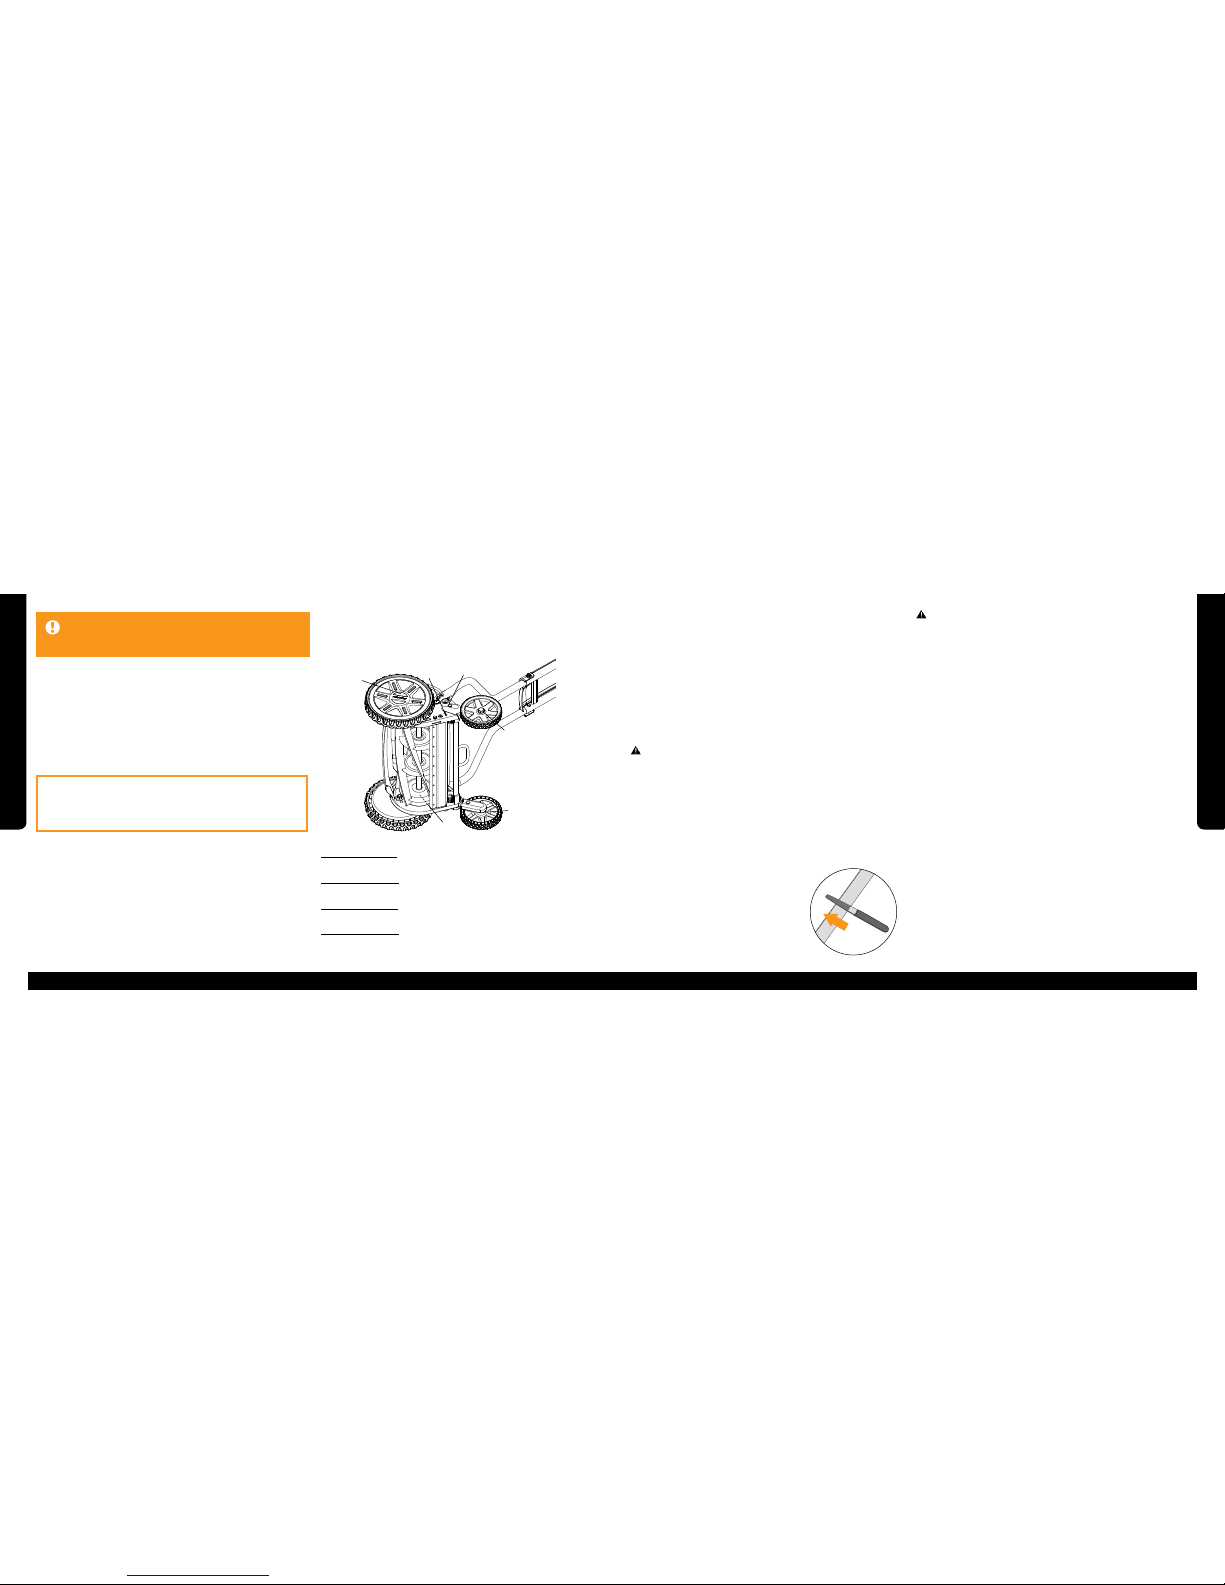
A
B
C
Aligning the Cutting Reel and Stationary Blade
The tools required are an 11 mm wrench or socket, a Phillips screwdriver,
and a nail or small screwdriver.
1. Rest the mower on all four wheels. Use a Phillips screwdriver to loosen
the adjustment lock screws on both sides, then lift the adjustment locks
over both adjustment bolts as shown in Adjusting the Blades on page 11.
2. Turn the mower onto its right side and loosen (but not remove) the
alignment cam locking bolt (A) using an 11 mm wrench or socket.
3. Locate the alignment cam adjustment window (B) on the bottom of the
left side plate. Through the window you will see the alignment cam (C), a
round disc with holes in it.
4. You will need to adjust both the alignment cam (C) and the blade
adjustment bolts to realign the stationary blade with the cutting reel.
Note: The movement of the stationary blade will be very slight, so watch the
adjustment closely.
6. You may initially need to move the stationary blade away from the cutting
reel by turning the blade adjustment bolts clockwise to create room for the
stationary blade to move into the proper position.
7. As you make adjustments, periodically check cutting performance as
described in Checking Cutting Performance on page 10. When most of the
blades cut paper on both ends without making contact, hold the alignment
cam (C) in place using the nail or small screwdriver and re-tighten the cam
locking bolt (A).
8. Replace the adjustment locks and firmly tighten the adjustment
lock screws.
Blade adjustment moves the
entire stationary blade toward
and away from the cutting reel.
Cam adjustment changes the
angle between the stationary
blade and cutting reel.
5. To adjust the alignment cam (C), insert a nail or small screwdriver into
one of the holes and slowly rotate it back and forth to determine which
direction brings the stationary blade back into parallel alignment with the
cutting reel.
Safety Information
Do not use mower if in poor health.
Do not operate with missing or damaged guards.
Always wear safety glasses, gloves and closed-toed shoes when
operating and maintaining your mower.
Never place hands, fingers or feet in the reel. When the reel is
spinning, it will cut.
Always remove debris from path of mower.
Always have sound footing when using mower, especially on wet
grass or on slopes (inclines).
Use safe lifting practices when moving mower.
Do not allow children under 12 to use mower.
Do not operate around children, other people or pets.
Do not run while using mower.
Do not use mower on surfaces other than grass.
Make sure mower is in safe operating condition by following the tips
outlined in this manual.
Do not use mower if it becomes damaged. Call 1-877-201-3260.

Fiskars Help Line: 1-877-201-3260 videos & more at: skars.com/reelmowers Fiskars Help Line: 1-877-201-3260 videos & more at: skars.com/reelmowersFiskars Help Line: 1-877-201-3260 videos & more at: skars.com/reelmowers
Using Your Mower
Are the blades making contact? While your mower’s cutting system was
precision-set during assembly, it is possible that some slippage may occur
during shipping, handling and operation. To check if the cutting gap is set
properly, refer to Checking Cutting Performance on page 11.
Problem:Turning the mower is difficult or requires
stooping.
Is the handle height set properly? If the adjustable handle is set too low,
turning your mower may require you to stoop over. If this happens, refer to
Adjusting Your Mower on page 8 for instructions on raising the handle.
Problem:The mower makes a scraping or
tinging noise.
Is the cutting reel or stationary blade damaged? While your mower has
hardened blades, blade damage can still occur if rocks, concrete edges or
other hard debris are struck. If this happens, the damaged area of the blade
may cause a high-pitched sound when it passes the other blade. See Care
and Maintenance on page16 for additional details.
Are the blades making contact? While your mower’s cutting system was
precision-set during assembly, it is possible that some slippage may occur
during shipping, handling and operation. To check if the cutting gap is set
properly, refer to Checking Cutting Performance on page 11.
Problem:The mower leaves some uncut blades
of grass.
Is your grass very long or are tall weeds present? If your grass is over 6"
long or tall weeds are present, they may be knocked down by the front of the
mower. If this happens, either pull these long stragglers by hand or make a
second mowing pass to cut them. To prevent this entirely, never let your grass
grow longer than 6".
Does the front of the mower rise off the ground? If the adjustable handle is
set too high, the force you exert when pushing the mower may cause the front
wheels to rise up off the ground, resulting in uneven cutting. If this happens,
refer to Adjusting Your Mower on page 8.
Are the blades set improperly? While your mower’s cutting system was
precision-set during assembly, it is possible that some slippage may occur
during shipping, handling and operation. To check if the cutting system is set
properly, refer to Checking Cutting Performance on page 10.
Problem:The mower is hard to push or the reel
doesn’t spin freely.
Are you trying to cut too much grass? The mower may become hard to
push or even clog if the cut height is set too low for the length of the grass
being cut. If this is the case, readjust the cut height so that you are cutting no
more than 1/3 of the length of the grass.
Is the mower awkward to push? If the adjustable handle is set too high, it may
feel awkward while pushing. If this happens, refer to Adjusting Your Mower on
page 8 for instructions on lowering the handle.
Is the drive train obstructed? If you find that your mower becomes harder to
push, examine the ends of the reel and the wheels to see if grass clippings or
other debris have caused a jam. If an obstruction is present, clear it with a long
bristled brush or soft tool.
Troubleshooting
14 15
To maximize cutting power, walk briskly. The cutting power of the
InertiaDrive™Reel increases with the speed of the mower. This means
that the faster you walk, the better your mower will cut. While it is not
necessary to run, if you’re used to mowing at a very leisurely pace, try
walking just a little more quickly.
For efficient mowing, cut your lawn in long, straight lines. Since
reel mowers only cut grass when they are moving, lay out your mowing
pattern to maximize the amount of long, straight runs and minimize
starts and stops. Overlapping wheel tracks will ensure a complete and
uniform cut.
Precut a turnaround zone to ease turns against obstructions. If any
mowing run ends against an obstruction (garden, foundation, fence,
etc.), begin by making one or two mowing passes along the obstruction
to provide a turnaround zone.
Scotts® Lawns:Your Guide to a Beautiful Yard, Second Edition,
recommends the following cut heights:
Cool Season Grasses
Bluegrasses (2"–4")
Fescue (2"–4")
Ryegrass (2"–4")
Warm Season Grasses
Bermuda (½"–2")
St. Augustine (2"–4")
Zoysia (¾"–2")
Bahia (2"–4")
Fiskars Help Line: 1-877-201-3260 videos & more at: skars.com/reelmowers Fiskars Help Line: 1-877-201-3260 videos & more at: skars.com/reelmowers
Care and Maintenance
IMPORTANT: To ensure long-lasting performance, protect
your mower from impact during use and storage, keep it clean
and dry and practice regular maintenance as follows.
Lubricate moving parts at least once a season and prior to winter
storage to maintain peak performance. Your mower will push easier
and last longer if all moving parts are lubricated periodically. It is also
recommended that lubrication be applied any time the mower gets wet.
General Maintenance
Keep your mower dry to prevent rust. Your reel mower will perform
better for longer if it is kept dry. The precision-ground blade edges of the
cutting reel, stationary blade, the bearings that carry the cutting reel, and
the rear axle are most vulnerable to rust. If your mower does get wet, dry it
off with a towel and spray it with a rust preventative as soon as possible.
ATTENTION: Do not use solvents such as mineral spirits or kerosene to
clean your reel mower. They will damage the plastic.
Keep your mower clean to eliminate potential jams and moisture that
could cause rust. Your reel mower will last longer and look better if it is
kept clean. After mowing, use a broom or long-bristled brush to clean any
grass clippings or other loose debris from the mower — especially around
the cutting reel and the bottom of the drive system cover. Removing grass
clippings prevents cutting and drive system jams and eliminates trapped
moisture that could cause rust.
ATTENTION: Do not use a garden hose to wash your mower. Storing the
mower wet will cause rust to form.
A
D
E
C
B
Care and Maintenance
Inspect your blades at least once a season and anytime your mower
strikes a hard object. While your reel mower features Fiskars’ exclusive
StaySharp™Cutting System with hardened steel blades, blade damage
may still occur if rocks, concrete edges or other hard debris are struck.
Before checking for blade damage, ensure that the mower cannot roll
forward by positioning it on a firm, level surface with blocked rear wheels.
Examine the entire length of the ground edges on all five cutting reel
blades and the stationary blade. If a dent or ding is found, determine if the
ding causes the cutting reel blade and stationary blade to touch. To do
this, slowly pull the cutting reel downward while listening for scraping and
feeling for resistance in the area of the ding. If there is no contact, there is
no need to repair the ding. Simply treat it with rust preventative and
re-inspect periodically in case raised edges appear with continued use.
WARNING: The mower blades are sharp. Wear gloves when
performing this procedure, and keep fingers away from the interface
between the cutting reel blades and stationary blade.
To avoid further damage, repair any ding that causes the cutting reel
and stationary blade to touch as quickly as possible. With care, any
ding found can be repaired with little or no impact on your mower’s cutting
performance. Before beginning, get a narrow, fine file (like the one found
in the Fiskars Tool Care Kit, Model 7862) and position the mower on a firm,
level surface with blocked rear wheels to ensure that it cannot roll forward.
To remove the ding, file away only enough of the raised material to allow
the cutting reel to spin without making contact with the stationary blade.
File with long, straight strokes perpendicular
to the cutting edge of the blade, trying to
avoid removing material from the cutting
edge itself. When the raised edges are filed
down, check the cutting gap as described in
Checking Cutting Performance on page 10.
WARNING: The mower blades are sharp. Wear gloves when
performing this procedure, and keep fingers away from the interface
between the cutting reel blades and stationary blade.
ATTENTION: Do not use a power tool to repair blades. Too much steel
will be removed, resulting in severe blade damage and greatly reduced
cutting performance.
To Maintain Peak Cutting Performance. Your reel mower features a
non-contact StaySharp™Cutting System that cuts grass without the reel
and stationary blades actually touching. Under normal usage conditions,
StaySharp™blades should stay sharp for the life of the mower. In the
unlikely event that the blades on a heavily used reel mower begin to
show signs of wear, Fiskars recommends backlapping to restore the
blade edges (backlapping compound available in Fiskars’ Blade
Maintenance Kit, Model 6215).
ATTENTION: Fiskars does not recommend sharpening your reel mower.
The equipment and processes used in home sharpening kits, and even by
many professional sharpeners, will likely not be able to achieve the strict
tolerances required to maintain the non-contact nature of the StaySharp™
Cutting System.
Cutting Reel Bearings (A): Spray lubricant on both ends of the cutting reel
shaft where the grey cutting reel meets the black side plate.
Cut-height Adjustment: Spray lubricant in each of the adjustment holes (B) as
well as on the pin (C) that will be visible when the knob is pulled out.
Rear Wheel Axle Bolts (D): Spray lubricant on the rear wheel axle bolts on the
inside between the swing arm cover (E).
Front Wheel Axle Bolts: Use a flathead screwdriver to carefully pry off the
orange hubcap (F). Apply lubricant around the axle bolt.
16 17
Hint: It is recommended that a silicone-based lubricant be used.
A lubricant that leaves a dry film instead of an oily or tacky surface
is recommended in order to keep dirt, dust and grass clippings
from sticking to the reel blades.
F
StaySharp™
Plus
LAS PODADORAS DE
CESPED DE CARRETE
MAS AVANZADAS
DEL MUNDOTM

Línea de ayuda de Fiskars: 1-877-201-3260 videos y más material en: skars.com/reelmowersLínea de ayuda de Fiskars: 1-877-201-3260 videos y más material en: skars.com/reelmowers
LAS PODADORAS DE CESPED DE CARRETE MAS AVANZADAS DEL MUNDO™
StaySharp™
Plus(43,2 cm)Contenido:
Información de seguridad.................................................................... 21
Tecnologías StaySharp™Plus ............................................................. 22
Piezas de la podadora de césped ....................................................... 23
Ensamblado .......................................................................................... 24–25
Ajuste de la podadora de césped ....................................................... 26–27
Vericación del rendimiento de corte................................................. 28–30
Uso de la podadora de césped............................................................ 31–32
Resolución de problemas.................................................................... 33
Cuidado y mantenimiento.................................................................... 34–35
¿Tiene alguna pregunta? ¿Sugerencias?
No regrese a la tienda. Estamos aquí para asistirlo.
Llame a nuestro equipo de Servicio al Cliente al 1-877-201-3260
Visite nuestro sitio web en skars.com/reelmowers
Conserve este manual para referencia futura.
Número de modelo: 6207
Complete la siguiente información para referencia rápida.
Número de serie:________________________________
(ubicado en la parte trasera inferior de la podadora de césped)
Fecha de compra:______________________________
Información de seguridad
No utilice la podadora si se encuentra débil o enfermo.
No utilice la podadora si faltan los dispositivos de seguridad o están
dañados.
Use siempre gafas de seguridad, guantes y calzados de punta cerrada
cuando utilice o repare la podadora de césped.
No coloque las manos, los dedos ni los pies en el carrete. El carrete corta al
girar.
Quite siempre los residuos que se encuentren en el recorrido de la
podadora.
Asegúrese de hacer pie firmemente siempre que utilice la podadora, sobre
todo en césped húmedo o superficies en pendiente (desniveladas).
Utilice prácticas seguras para levantar la podadora de césped.
No permita que los niños menores de 12 años utilicen la podadora de
césped.
No utilice la podadora de césped en cercanía de los niños, otras personas o
mascotas.
No corra mientras utiliza la podadora.
No utilice la podadora en otras superficies que no sean césped.
Verifique que la podadora de césped esté en condiciones operativas
seguras; para ello, siga las recomendaciones de este manual.
No utilice la podadora de césped si está dañada. Llame al 1-877-201-3260.
Antes de ensamblar o poner en funcionamiento la podadora
de césped, lea atentamente todo el manual y asegúrese de
comprender la información de seguridad.
Fiskars le garantiza al consumidor original que sus productos de podadoras de césped están libres de defectos de material y fabricación que se manifiesten bajo uso normal dentro de los dos
(2) años a partir de la fecha de la compra. Esta garantía no contempla daños a los productos de podadoras de césped que sean ocasionados por mal uso, circunstancias de fuerza mayor,
incumplimiento de las instrucciones, manipulación indebida o reparación no autorizada. ESTA GARANTIA REEMPLAZA A TODAS LAS DEMAS GARANTIAS EXPRESAS; Y TODA GARANTIA
IMPLICITA, QUE INCLUYE PERO NO SE LIMITA A CUALQUIER GARANTIA IMPLICITA DE COMERCIALIZACION O APTITUD PARA UN PROPOSITO PARTICULAR, QUEDA LIMITADA A LA
DURACION DE ESTA GARANTIA. EN NINGUN CASO FISKARS BRANDS, INC. SE RESPONSABILIZARA POR NINGUN DAÑO EVENTUAL O RESULTANTE. Algunos estados no permiten las
limitaciones sobre la duración de la garantía implícita, ni la exclusión o limitación de los daños eventuales o resultantes, y por lo tanto, las limitaciones y exclusiones antes mencionadas podrían
no ser aplicables. Esta garantía le otorga derechos legales específicos, y puede ser que usted tenga además otros derechos, los cuales varían según el estado. Como única responsabilidad del
fabricante y único recurso por parte del comprador frente a defectos contemplados en la garantía, Fiskars Brands, Inc. reemplazará cualquier pieza de la podadora de césped que contenga un
defecto contemplado en la garantía, sin costo, si se lo presenta con el comprobante de la compra y una notificación dentro de un lapso razonable (no mayor que 6 meses) a partir de la detección
del defecto. Para obtener servicio de garantía, envíe un mensaje de correo electrónico a warranty@fiskars.com o llame al 1-877-201-3260.
GARANTIA LIMITADA DE DOS AÑOS
21
Regístrese: Visite skars.com/registration
para registrar su podadora de césped de
carrete StaySharp™Plus.
20
¡Felicitaciones!
Ahora usted es dueño de una de Las podadoras de césped
de carrete más avanzadas del mundo™. Si alguna vez ha
usado una podadora de césped de carrete, apreciará de
inmediato las ventajas propias de su nueva podadora
de césped. Si, en cambio, esta es su primera podadora
de césped de carrete, probablemente necesite un breve
período de transición para adaptarse a su uso. Para
obtener más información sobre cómo aprovechar todos los
benecios de la podadora de césped de carrete, consulte
Uso de la podadora de césped, en la página 31. Por otra
parte, no olvide que tanto el equipo de servicio al cliente
como el sitio web de Fiskars están a su disposición en
caso de que necesite ayuda adicional.
Información de seguridad

Línea de ayuda de Fiskars: 1-877-201-3260 videos y más material en: skars.com/reelmowers Línea de ayuda de Fiskars: 1-877-201-3260 videos y más material en: skars.com/reelmowers
Piezas de la podadora de césped
Componentes principales
El conocimiento de las piezas y de la tecnología
de la podadora de césped hará del ensamblado
y el mantenimiento algo mucho más sencillo.
Tome nota de los componentes que se muestran
en esta ilustración e inspecciónela según sea
necesario cuando siga los pasos de este manual.
Nota: si hay una cubierta del carrete transparente,
retírela antes de usar.
Carrete de corte*
Tolva de descarga
de césped
Cojinetes del carrete
de corte (2)*
Cuchilla fija*
Perilla de ajuste de la
altura de corte (2)
Brazo giratorio (2)
Placa lateral (2)
Tapa del eje (2)
Cubierta de las ruedas (2)
Rueda delantera (2)
Arandela de la rueda
trasera y perno de la
rueda trasera (2)
Rueda trasera (2)
Chaveta (2)
Mango de
elevación
Pernos (4) y tuercas
(4) del mango
Empuñadura
ergonómica
Recubrimiento
del mango
Mango
Tornillo de fijación
de ajuste (2)
Traba de ajuste de
la cuchilla (2)
Perno de ajuste de
la cuchilla (2)
*Ubicados debajo de la cubierta
(no se aprecian a simple vista)
Sistema de corte StaySharp™, exclusivo de Fiskars
¿De qué se trata?El sistema de corte StaySharp™, exclusivo de Fiskars,
utiliza cuchillas de acero templado de terreno de precisión diseñadas para
cortar el césped en forma eficiente sin entrar en contacto unas con otras,
lo que reduce en gran medida la fricción y el desgaste.
¿Por qué es diferente? Las podadoras de césped de carrete estándares
recurren al contacto entre el carrete de corte y la cuchilla fija para cortar.
El contacto de acero con acero crea una fricción que lleva al desgaste de
las cuchillas. Por consiguiente, las cuchillas de las podadoras de césped
de carrete estándares pierden el filo rápidamente, por lo que deben ser
afiladas una vez al año a un precio elevado para mantener un rendimiento
óptimo.
¿Por qué es importante?Debido a que el sistema de corte StaySharp™
corta el césped sin que las cuchillas entren en contacto, la fricción y
el desgaste de las cuchillas prácticamente se eliminan. Por lo tanto, se
garantiza un rendimiento más duradero sin el costo y la molestia de afilar
las cuchillas una vez al año.
Carrete InertiaDrive™, con patente en trámite
¿De qué se trata?El carrete InertiaDrive™de Fiskars, con patente en
trámite, combina el carrete de corte de gran diámetro con las gruesas
cuchillas para almacenar energía (al igual que un volante) para aquellos
momentos en que se precisa una ráfaga de potencia de corte adicional.
¿Por qué es diferente? Las podadoras de césped de carrete estándares
utilizan carretes de corte de diámetro pequeño con cuchillas de poco
espesor. Dichos carretes y podadoras carecen de potencia de corte y
suelen atascarse al cortar ramitas, malezas o césped tupido. Cuando
esto sucede, el carrete de corte se obstruye, lo que detiene por completo
el funcionamiento de la podadora. En dicha situación, se debe quitar la
obstrucción para poder reanudar la poda.
¿Por qué es importante? El carrete InertiaDrive™combina el carrete de
corte de gran diámetro de la podadora con las gruesas cuchillas para
almacenar energía (al igual que un volante) para aquellos momentos
en que se precisa una ráfaga de potencia de corte adicional. Ante una
dificultad en el terreno, el carrete InertiaDrive™proporciona el 75% más
de energía de corte para brindar mayor potencia sin que la podadora se
atasque, lo que garantiza un corte superior sin interrupción.
Diseño del carrete orientado hacia adelante
¿De qué se trata? El diseño del carrete orientado hacia adelante de
Fiskars con una exclusiva tolva de descarga de césped arroja la hierba
cortada hacia adelante.
¿Por qué es diferente? Las podadoras de carrete estándares presentan
descarga de césped posterior, lo que significa que arrojan los restos de
césped sobre los pies.
¿Por qué es importante? El diseño del carrete orientado hacia adelante
de Fiskars con una exclusiva tolva de descarga de césped arroja la hierba
cortada hacia adelante de manera impecable, lejos de los pies.
Corta todo tipo de césped
¿De qué se trata? La podadora de carrete StaySharp™Plus ofrece una
combinación de tecnologías de avanzada para cortar todo tipo de césped
residencial con facilidad.
¿Por qué es diferente? Las podadoras de carrete estándares tienen
dificultades para cortar ciertos tipos de césped residencial, ya que se
atascan o dejan franjas de césped sin cortar.
¿Por qué es importante? La podadora de carrete StaySharp™Plus corta
todo tipo de césped residencial con facilidad, incluso las variedades de
climas meridionales severos.
Tecnologías StaySharp™
Plus
40% más fácil de operar La mayoría de las podadoras de césped de carrete
son difíciles de operar, especialmente con el césped crecido. Las tecnologías
de avanzada se combinan para reducir la fuerza de empuje en un 40%.
23
22
Línea de ayuda de Fiskars: 1-877-201-3260 videos y más material en: skars.com/reelmowers Línea de ayuda de Fiskars: 1-877-201-3260 videos y más material en: skars.com/reelmowers
Ensamblado
4. Lleve el recubrimiento del mango (E) a su lugar desde abajo de modo que
el logo de Fiskars quede hacia abajo y apunte hacia la sección superior del
mango (B).
5. Alinee los orificios de las secciones del mango y el recubrimiento (E).
Deslice un perno del mango (F) desde la parte de adentro, de modo que
el extremo sobresalga por el orificio del recubrimiento del mango. Repita la
operación para los otros tres pernos del mango.
6. Alinee la cabeza del perno hexagonal con la marca en forma hexagonal de
la sección central del mango (A) y luego ajuste a mano una tuerca (G) sobre
el perno. Repita la operación para las otras tres tuercas del mango.
7. Con una llave o un casquillo de 11mm, ajuste las cuatro tuercas del mango
(G) hasta que queden bien firmes.
Ensamblado del mango
1. Coloque las piezas del mango al revés, tal como se indica en la figura,
para que sea más fácil ensamblarlas. Tenga en cuenta que la sección central
del mango (A) es simétrica, por lo que puede fijarse de cualquier lado.
2. Controle que el arco de la sección superior del mango (B) quede hacia
abajo. Luego, inserte los extremos libres de la sección superior del mango
(B) en la sección central del mango (A). Alinee los orificios en la medida de
lo posible.
3. Verifique que las secciones inferiores del mango, (C) y (D),estén
colocadas con las ranuras hacia arriba. Luego, inserte la sección inferior
izquierda del mango (marcada con una “L”) (C) y la sección inferior derecha
del mango (marcada con una “R”) (D) en la sección central del mango (A) tal
como se muestra. Alinee los orificios en la medida de lo posible.
Las siguientes piezas forman parte del juego de accesorios (empacadas por separado):
Ensamblado del mango
Tuercas del mango (4)
Pernos del mango (4)
Ensamblado de las ruedas traseras (página siguiente)
Ruedas traseras (2)
Pernos de las ruedas traseras (2)
Arandelas de las ruedas traseras (2)
Herramientas necesarias para el ensamblado:
Las únicas herramientas necesarias para el
ensamblado son llaves o casquillos de 11mm y 18mm.
L
R
A
BC
D
E
(izquierda)
(derecha)
F
G
Arco del mango
(apuntando
hacia abajo)
Ensamblado de las ruedas traseras
1. Ensamble el perno de la rueda trasera (A) a través de la
arandela de la rueda trasera (B) e inserte por la rueda trasera (C).
2. Atornille el conjunto de pernos al brazo giratorio (D) y ajuste
firmemente con una llave o un casquillo de 18mm.
3. Repita el procedimiento para la otra rueda trasera.
Fijación del mango
1. Retire las dos chavetas (A) de las clavijas de montaje del mango (B).
2. Deslice el orificio número 2 (C) del mango por sobre las clavijas de
montaje del mango (B). Es posible que sea necesario hacer fuerza para
separar las patas del mango para que se adapten a las clavijas. Suelte
el mango hasta que quede apoyado sobre la clavija de tope (D).
3. Inserte las chavetas (A) para sujetar el mango.
Ensamblado
A
B
C
D
A
BC
D
BA
C
D
123
25
24
Línea de ayuda de Fiskars: 1-877-201-3260 videos y más material en: skars.com/reelmowers Línea de ayuda de Fiskars: 1-877-201-3260 videos y más material en: skars.com/reelmowers
Cómo ajustar la altura de corte
1. De pie detrás de la podadora de césped, coloque la mano
izquierda en el mango de elevación (A) para sostener la podadora
durante el ajuste.
2. Use la mano derecha para jalar la perilla de ajuste de la altura
de corte (B) de la podadora y llevarla a la altura de corte deseada.
A continuación, libere la perilla asegurándose de que esta se trabe
nuevamente en su lugar.
3. Repita el proceso del otro lado, invierta la ubicación de la mano y
verifique que ambas ruedas estén colocadas de la misma manera. Si
no alinea las ruedas se producirá un corte irregular.
Importante: El rango de altura de corte configurado de fábrica es
de 3,8cm a 8,8cm. Para elevar el rango de altura de corte a 5,1cm
a 10,2cm, consulte Cómo ajustar el rango de altura de corte en la
página 27.
Ajuste de la podadora de césped
Low
Bajo
High
Alto
03-015271r1
1
2
3
4
5
6
7
Low
Bajo
High
Alto
03-015272r1
1
2
3
4
5
6
7
A
B
File Name: 03-015272r1_LEFT.ai
Package Part No.: 03-015272r1
Color Specs: 2/1: Black + PMS 144C
NOT FOR REPRODUCTION
Low
Bajo
High
Alto
03-015272r1
1
2
3
4
5
6
7
Ajuste de la altura del mango
1. Para las personas de altura promedio, el orificio del mango 2 puede
utilizarse para las configuraciones de altura de corte media, que son las
más comunes. Si es alto o si planea utilizar las configuraciones de altura de
corte más bajas, considere utilizar el orificio 3. Si es bajo o planea utilizar las
configuraciones de altura de corte más altas, considere utilizar el orificio 1.
2. Antes de ajustar la altura del mango, es importante regular la altura de
corte de la podadora que utilizará con mayor frecuencia (consulte Ajuste de
la altura de corte).
3. Empuje la podadora de césped varios metros hacia adelante y gírela
como lo haría al final de una pasada. Si puede empujar la podadora de
césped con comodidad sin que el extremo delantero se levante del suelo y
puede girar la podadora sin encorvarse, entonces el ajuste del mango es el
correcto.
• Si la parte delantera se levanta del suelo, entonces el mango está
demasiado alto. Baje el mango al orificio 1.
• Si se tiene que encorvar bastante para girar, entonces el ajuste del
mango está demasiado bajo. Coloque el mango en el orificio 3.
3. Cuando ajuste la altura de corte, la posición inferior del mango también se
moverá. Por consiguiente, es posible que deba ajustar la altura del mango
si hace un cambio drástico en la altura de corte. Es posible que también se
necesiten ajustes si comparte sus tareas de poda con otra persona.
IMPORTANTE: Para aumentar al máximo la comodidad y el control,
la podadora de césped viene con un mango de altura ajustable. Dicho
mango está diseñado para "oscilar" desde la posición inferior hasta la
posición de uso. La posición inferior se usa para girar al doblar. La posición
de uso debería estar entre 15,2cm y 25,4cm por encima de la posición
inferior. Si levanta el mango de este modo, evitará que el extremo delantero
se levante del suelo, lo que garantizará un corte uniforme. Debido a que
es muy importante seleccionar la altura correcta del mango, vale la
pena equivocarse en el intento de encontrar la altura ideal.
9
Ajuste de la podadora de césped
3. Saque el perno (B) con la llave de 17mm para mantener la tuerca
(C) en el interior de la placa lateral (D) mientras hace girar el perno
del eje (B) hacia la izquierda con la llave Allen de 8mm en la parte
exterior de la rueda.
4. Una vez que haya sacado la rueda,
haga girar la cubierta de plástico de la
rueda (G) desde el orificio superior (H)
hasta el orificio inferior (I) en la placa
lateral (D). Pasar al orificio inferior
ofrece un rango mayor de altura de
corte (5,1cm a 10,2cm). Pasar al
orificio más alto ofrece un rango menor
de altura de corte (3,8cm a 8,8cm).
5. Organice las piezas de la rueda para el reensamblado.
a. Ensamble el perno del eje (B) y la arandela (E) e inserte por la
parte exterior de la rueda.
b. Coloque la otra arandela (F) en el perno del eje en el interior de la
rueda.
6. Coloque el ensamblaje de la rueda del Paso 5 a través del orificio
inferior. Vuelva a colocar cuidadosamente la arandela (J) en el perno
del eje (B) y ajuste a mano la tuerca (C) desde el interior de la placa
lateral (D).
7. Mantenga la tuerca (C) en el lugar con la llave de 17mm y vuelva a
apretar con firmeza el perno del eje (B) con la llave Allen de 8mm.
8. Presione la tapa anaranjada del eje para trabarla a presión en el lugar.
9. Repita el procedimiento del otro lado.
E
F
B
Cómo ajustar el rango de altura de corte
Importante: El rango de altura de corte configurado de fábrica es
de 3,8cm a 8,8cm. Para elevar el rango de altura de corte a 5,1cm
a 10,2cm, siga estos pasos.
Las herramientas necesarias son una llave de 17mm, una llave Allen
de 8mm y un destornillador de cabeza plana.
1. Coloque la podadora de césped al revés de manera tal que
quede apoyada sobre el recubrimiento. Configure la podadora de
césped en la configuración de altura de corte más baja y mueva las
ruedas hacia afuera.
2. Desde cualquier lado, utilice el destornillador de cabeza plana
para hacer palanca y sacar la tapa anaranjada del eje (A).
CJ
D
E
F
G
I
H
B
A
ADVERTENCIA: las cuchillas de la podadora de césped son
filosas. Este ajuste exige trabajar cerca de las cuchillas del carrete de
corte. Debe usar guantes de cuero en todo momento.
27
26
Línea de ayuda de Fiskars: 1-877-201-3260 videos y más material en: skars.com/reelmowers Línea de ayuda de Fiskars: 1-877-201-3260 videos y más material en: skars.com/reelmowers
Preparación
Necesitará varias tiras de 2,5cm x 20,3cm de papel de impresión
estándar (no papel de diario) y un par de guantes de trabajo.
ADVERTENCIA: las cuchillas de la podadora de césped son
filosas. Use guantes cuando realice este procedimiento y mantenga
los dedos alejados de la superficie de contacto entre las cuchillas del
carrete de corte y la cuchilla fija.
Vericación N.º 1: ¿hay contacto entre las
cuchillas?
1. Asegúrese de que la podadora de césped no se desplace hacia
adelante; para ello, ubíquela sobre una superficie nivelada y firme
con calzos delante de las ruedas traseras. A continuación, lleve la
podadora de césped a la posición más alta para facilitar el acceso.
2. Para ver si las cuchillas están en contacto con la podadora de
césped que está apoyada sobre las cuatro ruedas, gire lentamente el
carrete de corte (A) hacia adelante, una cuchilla a la vez, hasta que
haga uno o dos giros completos. Si escucha un chirrido o detecta
resistencia, saltee el resto de esta sección y vaya a Ajuste de las
cuchillas en la página 29.
ATENCION: si el carrete de corte y la cuchilla fija están en contacto,
será más difícil desplazar la podadora, lo que puede hacer que las
cuchillas pierdan el filo.
Vericación N.º 2: ¿cortan bien las cuchillas?
1. Ponga la podadora de césped de costado.
2. Para ver si las cuchillas cortan bien tendrá que inspeccionar las
cuchillas en ambos extremos de la podadora de césped. Empezando
por el extremo más cercano al suelo, coloque una tira de papel entre
una cuchilla del carrete de corte (A) y la cuchilla fija (B), y mantenga el
corte de papel en contra del lateral (C) de la cuchilla fija (B). Deberían
verse aproximadamente 1,3 cm de la tira por debajo de la cuchilla fija.
IMPORTANTE: El sistema de corte StaySharp™está diseñado
para cortar el césped sin que haya contacto entre las cuchillas. Este
sistema de corte se reguló en forma precisa durante el ensamblado. No
obstante, como pueden producirse deslizamientos producto del envío,
la manipulación o el uso, es muy importante controlar el rendimiento de
corte antes del primer uso y, de allí en adelante, en forma periódica. Los
deslizamientos pueden ocurrir en ambas direcciones, por lo que se deberán
realizar dos vericaciones para evaluar el rendimiento de corte: del lado
izquierdo y derecho de la podadora. Vericar el rendimiento de corte
y ajustarlo según sea necesario es lo mejor que puede hacer para
garantizar que la podadora funcione siempre en condiciones óptimas.
A
A
CC
B
B
Vericación del rendimiento de corte
Vericación del rendimiento de corte
ADVERTENCIA: mantenga los dedos alejados del área de corte; debe
mantenerlos a la derecha de la cuchilla fija.
3. Haga girar lentamente el carrete de corte (A) hacia la cuchilla fija (B) y
observe si el papel se corta a medida que pasa la primera cuchilla del carrete
de corte.
4. Siga colocando el papel en el carrete horizontalmente 1,3cm a la vez para
verificar las otras cuchillas.
5. Ahora, para revisar el extremo opuesto del carrete, deslice el papel hacia
el extremo más alejado del suelo y verifique si las cuchillas cortan bien en ese
extremo.
6. Si la mayoría de las cuchillas cortan en ambos extremos, entonces el sistema
de corte está ajustado correctamente. Si todas o la mayoría de las cuchillas
no cortan en uno o ambos extremos, es necesario ajustar el sistema de corte.
Vaya a Ajuste de las cuchillas a continuación.
ATENCION: si no se corrige un sistema de corte mal ajustado, esto llevará a un
rendimiento de corte insuficiente, que dejará franjas de césped sin cortar.
Ajuste de las cuchillas
Las herramientas necesarias son una llave o un casquillo de 11mm y un
destornillador Phillips.
1. Con la podadora de césped apoyada sobre las cuatro ruedas, use el
destornillador Phillips para aflojar el tornillo de fijación de ajuste (C) en ambos
lados, luego levante las trabas de ajuste (D) sobre los dos pernos de ajuste.
2. Ponga la podadora de césped de costado.
3. Con las trabas de ajuste (D) levantadas y giradas hacia el costado, haga
girar los pernos de ajuste para ajustar la cuchilla fija (E) tal como se describe a
continuación.
ATENCION: Cuando se hacen ajustes, es muy importante girar ambos
pernos de ajuste (E) con los mismos ajustes pequeños (menos que 1/8 de
giro a la vez) para que la cuchilla fija esté sujetada de manera uniforme en
ambos lados. Nunca gire un perno de ajuste sin girar también el otro la misma
medida. Si gira un perno mucho más que el otro, uno de los pernos se aflojará
y no podrá sostener de manera adecuada la cuchilla fija. Si esto ocurre,
simplemente ajuste el perno que está flojo de manera que ambos pernos
tengan la misma tensión.
• Si las cuchillas no cortaron el papel:
Mueva toda la cuchilla fija más cerca del carrete de corte mediante giros
pequeños hacia la izquierda en los dos extremos hasta que las cuchillas
apenas entren en contacto. Luego, haga pequeños ajustes hacia la
derecha en cualquiera de los extremos hasta que las cuchillas ya no se
toquen. Gire los dos pernos por igual.
• Si las cuchillas entraron en contacto:
Aleje toda la cuchilla fija del carrete de corte mediante pequeños giros
hacia la derecha en ambos extremos y deténgase apenas las cuchillas
entren en contacto. Asegúrese de girar los dos pernos por igual. Luego,
pruebe que la mayoría de las cuchillas corten el papel en ambos extremos.
4. Después de que las cuchillas estén bien ajustadas, vuelva a colocar las
trabas de ajuste y apriete con firmeza los tornillos.
ATENCION: Si siguió las instrucciones para ajustar las cuchillas y todavía
no está cortando papel en uno o ambos lados de la podadora, elija la
configuración que maximice la cantidad de cuchillas que cortan papel
y pruebe la podadora de césped. Si la podadora de césped no corta
correctamente, es posible que la cuchilla fija y el carrete de corte no estén
alineados de manera paralela. En ese caso, vaya a la sección Alineación del
carrete de corte y la cuchilla fija en la página 12.
-- +
-- +
C
DE
29
28

Línea de ayuda de Fiskars: 1-877-201-3260 videos y más material en: skars.com/reelmowers Línea de ayuda de Fiskars: 1-877-201-3260 videos y más material en: skars.com/reelmowers
Vericación del rendimiento de corte
A
B
C
Alineación del carrete de corte y la cuchilla ja
Las herramientas necesarias son una llave o un casquillo de 11mm y
un destornillador Phillips, un clavo o un destornillador pequeño.
1. Apoye la podadora de césped sobre las cuatro ruedas. Utilice un
destornillador Phillips para aflojar los tornillos de fijación de ajuste a
ambos lados, luego levante las trabas de ajuste por encima de los dos
pernos de ajuste tal como se muestra en Ajuste de las cuchillas en la
página 29.
2. Haga girar la podadora de césped en su lado derecho y afloje (pero
no extraiga) el perno de fijación de la excéntrica de alineación (A) con
una llave o un casquillo de 11mm.
3. Ubique la ventana de ajuste de la excéntrica de alineación (B) en la
parte inferior de la placa lateral izquierda. A través de la ventana podrá
ver la excéntrica de alineación (C), un disco redondo con orificios.
4. Necesitará ajustar tanto la excéntrica de alineación (C) como los
pernos de ajuste de la cuchilla para volver a alinear la cuchilla fija con
el carrete de corte.
Nota: El movimiento de la cuchilla fija será muy leve, por lo que debe
observar el ajuste con atención.
6. Inicialmente, es posible que necesite alejar la cuchilla fija del carrete
de corte al hacer girar los pernos de ajuste de la cuchilla hacia la
derecha para crear espacio para que la cuchilla fija pueda moverse en
la posición correcta.
7. Mientras hace los ajustes, revise periódicamente el rendimiento de
corte, tal como se describe en Verificación del rendimiento de corte
en la página 28. Cuando la mayoría de las cuchillas corten papel
en ambos extremos sin hacer contacto, mantenga la excéntrica de
alineación (C) en el lugar con un clavo o un destornillador pequeño y
vuelva a ajustar el perno de fijación de la excéntrica (A).
8. Vuelva a colocar las trabas de ajuste y apriete con firmeza los
tornillos de fijación de ajuste.
El ajuste de la cuchilla aleja y
acerca toda la cuchilla fija del
carrete de corte.
El ajuste de la excéntrica cambia
el ángulo entre la cuchilla fija y el
carrete de corte.
5. Para ajustar la excéntrica de alineación (C), inserte un clavo o un
destornillador pequeño en uno de los orificios y hágalo girar lentamente
hacia adelante y hacia atrás para determinar en qué dirección vuelve a
llevar a la cuchilla fija en alineación paralela con el carrete de corte.
13
Uso de la podadora de césped
La podadora de césped ha sido diseñada para ofrecer un rendimiento
de corte de primera clase y una excelente experiencia de poda. No
obstante, hay varias cosas básicas que puede hacer al podar que
impactarán en gran medida en el rendimiento de su podadora y en
su experiencia de poda. Si alguna vez ha usado una podadora de
césped de carrete, apreciará de inmediato las ventajas propias de las
tecnologías de corte de avanzada y las características de diseño de
la podadora de césped. Si, en cambio, esta es su primera podadora
de césped de carrete, probablemente necesite un breve período de
transición para adaptar sus hábitos de poda y aumentar al máximo
la eficiencia y la eficacia. La siguiente información ayudará a los
usuarios nuevos y experimentados a obtener todos los beneficios de
la podadora de césped de carrete. Por otra parte, no olvide que tanto
el equipo de servicio al cliente como el sitio web de Fiskars están a su
disposición en caso de que necesite ayuda adicional.
Recomendaciones para la poda
Para un césped saludable, corte hasta 1/3 del largo del césped,
pero no más de eso. Para mantener un césped saludable y eliminar
las complicaciones propias de los trozos muy largos de hierba cortada,
no corte más de 1/3 del largo del césped por vez. Si corta más de 1/3
del largo, las raíces no podrán crecer y el césped deberá hacer mucho
esfuerzo, con lo cual se volverá susceptible a la invasión de malezas, las
plagas y el mal aspecto. Si su césped crece demasiado, corte 1/3 del
largo, espere un par de días, y vuelva a cortar otro 1/3.
Para evitar que la podadora de césped sufra daños, recoja los
residuos que se encuentren en su recorrido antes de ponerla en
funcionamiento. Antes de comenzar, inspeccione el área que va a
podar, y retire las piedras, las ramas medianas o grandes, la basura y
demás residuos.
No utilice la podadora si se encuentra débil o enfermo.
No utilice la podadora si faltan los dispositivos de seguridad o están
dañados.
Use siempre gafas de seguridad, guantes y calzados de punta cerrada
cuando utilice o repare la podadora de césped.
No coloque las manos, los dedos ni los pies en el carrete. El carrete
corta al girar.
Quite siempre los residuos que se encuentren en el recorrido de la
podadora.
Asegúrese de hacer pie firmemente siempre que utilice la podadora,
sobre todo en césped húmedo o superficies en pendiente
(desniveladas).
Utilice prácticas seguras para levantar la podadora de césped.
No permita que los niños menores de 12 años utilicen la podadora de
césped.
No utilice la podadora de césped en cercanía de los niños, otras
personas o mascotas.
No corra mientras utiliza la podadora.
No utilice la podadora en otras superficies que no sean césped.
Verifique que la podadora de césped esté en condiciones operativas
seguras; para ello, siga las recomendaciones de este manual.
No utilice la podadora de césped si está dañada. Llame al
1-877-201-3260.
31
30
Información de seguridad

Línea de ayuda de Fiskars: 1-877-201-3260 videos y más material en: skars.com/reelmowers Línea de ayuda de Fiskars: 1-877-201-3260 videos y más material en: skars.com/reelmowers
Uso de la podadora de césped
En caso de que se tope con algún residuo duro, deténgase e
inspeccione las cuchillas.Si las cuchillas de corte entran en contacto
con piedras, ramas grandes u otros objetos duros, deténgase de
inmediato y verifique que no haya atascos ni daños. Si las cuchillas
están dañadas, lleve la podadora hacia un área de trabajo adecuada
y siga las instrucciones detalladas en Cuidado y mantenimiento, en la
página 17. Si sigue podando con las cuchillas dañadas, la reparación
puede resultar imposible.
Para aumentar al máximo la potencia de corte, camine a paso
ligero. La potencia del carrete de corte InertiaDrive™aumenta con
la velocidad de la podadora. Esto significa que cuanto más rápido
camine, mejor funcionará la podadora. No es necesario correr, pero si
está acostumbrado a podar a un ritmo muy lento, trate de caminar un
poco más ligero.
Para que la poda sea ecaz, corte el césped en líneas largas y
rectas. Como las podadoras de césped de carrete solamente cortan
el césped cuando están en movimiento, diseñe su patrón de poda
de manera tal de aumentar al máximo la cantidad de pasadas largas
y rectas, y de reducir al mínimo los arranques y las detenciones.
La superposición de las guías de las ruedas garantizará un corte
completo y uniforme.
Corte previamente una zona para dar la vuelta, a n de evitar los
giros en áreas con obstrucciones. Si alguna de las pasadas termina
contra una obstrucción (canteros, cimientos, cercas, etc.), comience
por pasar la podadora una o dos veces a lo largo de la obstrucción
para proporcionar una zona de giro.
Scotts® Lawns:Your Guide to a Beautiful Yard, Second Edition,
recomienda las siguientes alturas de corte:
Césped de clima frío
Pasto azul de Kentucky (5 cm a 10 cm)
Festuca (5 cm a 10 cm)
Raygrás (5 cm a 10 cm)
¿Está obstruido el tren de transmisión? Si le resulta más difícil desplazar
la podadora, examine los extremos del carrete y las ruedas para ver si los
restos de césped u otros residuos han producido un atasco. Si hay alguna
obstrucción, retírela con una brocha de cerdas largas o una herramienta
blanda.
¿Hay contacto entre las cuchillas? Si bien el sistema de corte de la
podadora se ajustó en forma precisa durante el ensamblado, es posible
que se produzca algún deslizamiento durante el envío, la manipulación o
el funcionamiento. Para cerciorarse de que la separación de corte sea la
correcta, consulte la sección Verificación del rendimiento de corte en la
página 33.
Problema: es difícil hacer girar la podadora o es
necesario inclinarse para hacerlo.
¿Es la altura del mango la correcta? Si el mango ajustable está demasiado
bajo, deberá inclinarse para girar la podadora. Si esto sucede, consulte
la sección Ajuste de la podadora de césped en la página 26 para obtener
instrucciones sobre cómo levantar el mango.
Problema: la podadora de césped hace un ruido de
chirrido o tintineo.
¿Están dañados el carrete de corte o la cuchilla ja? Si bien la podadora de
césped tiene cuchillas templadas, pueden producirse daños en las cuchillas
si estas entran en contacto con piedras, bordes de concreto u otros residuos
duros. Si esto sucede, el área dañada de la cuchilla puede emitir un chirrido
agudo cuando pasa sobre la otra cuchilla. Consulte la sección Cuidado y
mantenimiento en la página 34 para conocer más detalles.
¿Hay contacto entre las cuchillas? Si bien el sistema de corte de la
podadora se ajustó en forma precisa durante el ensamblado, es posible
que se produzca algún deslizamiento durante el envío, la manipulación o
el funcionamiento. Para cerciorarse de que la separación de corte sea la
correcta, consulte la sección Verificación del rendimiento de corte en la
página 28.
Problema: la podadora deja algunas franjas de
césped sin cortar.
¿Está el césped demasiado largo o hay malezas crecidas? Si el césped
tiene más de 15 cm de alto o hay malezas crecidas, es posible que den contra
el frente de la podadora de césped. Si esto sucede, arranque estas malezas
con la mano o haga una segunda pasada con la podadora para cortarlas. Para
evitar todo esto, no deje crecer el césped más de 15 cm.
¿La parte delantera de la podadora se levanta del suelo? Si el mango
ajustable está demasiado alto, la fuerza que usted ejerce al empujar la
podadora puede hacer que las ruedas delanteras se levanten del suelo, lo que
puede propiciar cortes uniformes. Si esto sucede, consulte la sección Ajuste
de la podadora de césped en la página 26.
¿Están las cuchillas mal ajustadas? Si bien el sistema de corte de la
podadora se ajustó en forma precisa durante el ensamblado, es posible
que se produzca algún deslizamiento durante el envío, la manipulación o
el funcionamiento. Para verificar si el sistema de corte está bien ajustado,
consulte la sección Verificación del rendimiento de corte en la página 28.
Problema: la podadora ejerce resistencia o el carrete
no gira libremente.
¿Intenta cortar demasiada cantidad de césped? Si la altura de corte es
demasiado baja para la altura del césped que está cortando, es posible que la
podadora ejerza resistencia cuando intenta desplazarla o incluso se atasque.
En caso de que esto suceda, vuelva a ajustar la altura de corte de manera tal
que esta no supere 1/3 de la altura del césped.
¿La podadora ejerce resistencia cuando intenta desplazarla? Si el mango
ajustable está demasiado alto, puede que desplazar la podadora le resulte
difícil. Si esto sucede, consulte la sección Ajuste de la podadora de césped en
la página 26 para obtener instrucciones sobre cómo bajar el mango.
Resolución de problemas
15 33
32
Césped de clima cálido
Bermuda (1,3 cm a 5 cm)
San Agustín (5 cm a 10 cm)
Zoysia (2 cm a 5 cm)
Bahía (5 cm a 10 cm)

Línea de ayuda de Fiskars: 1-877-201-3260 videos y más material en: skars.com/reelmowers Línea de ayuda de Fiskars: 1-877-201-3260 videos y más material en: skars.com/reelmowers
entrar en contacto con la cuchilla fija. Lime con pasadas largas y rápidas
en forma perpendicular al borde cortante de la cuchilla, a fin de evitar
desprendimientos de material del propio borde. Al limar bordes levantados,
cerciórese de que la separación de corte sea la correcta, según se
describe en Verificación del rendimiento de corte en la página 28.
ADVERTENCIA: las cuchillas de la podadora de césped son filosas.
Use guantes cuando realice este procedimiento y mantenga los dedos
alejados de la superficie de contacto entre las cuchillas del carrete de
corte y la cuchilla fija.
ATENCION: no utilice una herramienta eléctrica para reparar las cuchillas.
Esto desprenderá gran cantidad de acero, lo que dañará severamente las
cuchillas y reducirá notablemente el rendimiento de corte de la podadora.
Para mantener un rendimiento de corte óptimo. La podadora de césped
de carrete dispone de un sistema de corte StaySharp™sin contacto que
corta el césped sin que la cuchilla del carrete y la cuchilla fija entren en
contacto. Bajo condiciones normales, las cuchillas StaySharp™deberán
mantenerse afiladas durante la vida útil de la podadora. En el improbable
caso que debido a un uso intensivo, las cuchillas de la podadora de
carrete comiencen a desgastarse, Fiskars recomienda el proceso de
esmerilado para restaurar los bordes de las cuchillas (compuesto de
esmerilado disponible en el kit de mantenimiento de cuchillas de Fiskars,
modelo 6215).
ATENCION: Fiskars no recomienda afilar la podadora de césped de
carrete. Los equipos y procesos utilizados en los kits para afilado
domésticos, incluso aquellos utilizados por diversos afiladores
profesionales, probablemente no puedan satisfacer las estrictas tolerancias
necesarias para preservar un sistema de corte sin contacto StaySharp™.
Inspeccione las cuchillas al menos una vez cada tres meses y siempre
que la podadora entre en contacto con un objeto duro. Si bien la
podadora de césped con carrete dispone del exclusivo sistema de corte
StaySharp™de Fiskars con cuchillas de acero templado, lo mismo puede
sufrir daños si entra en contacto con piedras, bordes de concreto u otros
residuos duros. Antes de inspeccionar las cuchillas en busca de daños,
asegúrese de que la podadora no pueda desplazarse hacia adelante. Para
ello, sitúela sobre una superficie firme y nivelada, y coloque un calzo para
bloquear las ruedas traseras. Examine los bordes de las cinco cuchillas
del carrete de corte y la cuchilla fija en su totalidad. Si encuentra alguna
abolladura o hendidura, determine si esto hace que la cuchilla del carrete
de corte y la cuchilla fija entren en contacto. Para ello, tire lentamente del
carrete de corte hacia abajo mientras escucha si se producen chirridos y
comprueba si hay resistencia en el área en cuestión. Si no hay contacto
entre el carrete de corte y la cuchilla, no es necesario reparar la hendidura.
Simplemente aplique un producto anticorrosivo y vuelva a inspeccionar el
lugar en forma periódica en caso de que los bordes se levanten con el uso
continuo.
ADVERTENCIA: las cuchillas de la podadora de césped son filosas.
Use guantes cuando realice este procedimiento y mantenga los dedos
alejados de la superficie de contacto entre las cuchillas del carrete de
corte y la cuchilla fija.
Para evitar daños adicionales, repare cuanto antes cualquier hendidura
que posibilite que el carrete de corte y la cuchilla ja entren en
contacto. Si obra con cuidado, podrá reparar cualquier hendidura con
poco o ningún impacto en el rendimiento de
corte de su podadora. Antes de comenzar,
consiga una lima fina y angosta (como la
del kit de cuidado de las herramientas de
Fiskars, modelo 7862), y coloque la podadora
sobre una superficie firme y nivelada con
las ruedas traseras bloqueadas para evitar
que se desplace hacia adelante. Para alisar
la hendidura, lime solamente lo necesario
para permitir que el carrete de corte gire sin
Cuidado y mantenimiento
IMPORTANTE: Para garantizar un rendimiento duradero,
proteja su podadora de los impactos durante el uso y el
almacenamiento, manténgala limpia y seca, y lleve a cabo tareas de
mantenimiento periódicas de la siguiente manera.
Lubrique las piezas móviles al menos una vez cada tres meses y
antes del invierno para mantener un rendimiento óptimo. La podadora
de césped será más fácil de operar y durará más tiempo si todas las
piezas móviles se lubrican en forma periódica. También se recomienda su
lubricación cada vez que la podadora se humedezca.
Mantenimiento general
Mantenga la podadora seca para evitar que se oxide. La podadora de
césped funcionará mejor durante más tiempo si se mantiene seca. Los
bordes de las cuchillas de terreno de precisión del carrete de corte, la
cuchilla fija, los cojinetes que sustentan el carrete de corte y el eje trasero
son más vulnerables al óxido. Si la podadora se humedece, séquela con
una toalla y rocíela lo antes posible con un producto anticorrosivo.
ATENCION: no utilice solventes como alcohol mineral o querosén para
limpiar la podadora de césped de carrete. Dichas sustancias pueden
dañar el plástico.
Mantenga limpia la podadora para prevenir atascos y evitar que la
humedad produzca óxido. La podadora de césped de carrete funcionará
durante más tiempo y tendrá un mejor aspecto si permanece limpia.
Después de podar, utilice una escoba o una brocha de cerdas largas
para quitar los restos de césped u otros residuos sueltos de la podadora,
especialmente alrededor del carrete de corte y en la parte inferior de la
cubierta del sistema de transmisión. Si quita los restos de césped, evitará
los atascos en el carrete de corte y el sistema de transmisión, a la vez que
evitará la acumulación de humedad y, con ello, el óxido.
ATENCION: no utilice una manguera de jardín para lavar la podadora.
Si guarda la podadora de césped húmeda, es posible que se oxide.
Cojinetes del carrete de corte (A): rocíe lubricante en los dos extremos del
eje del carrete de corte donde el carrete de corte gris se encuentra con la
placa lateral negra.
Ajuste de la altura de corte: rocíe lubricante en cada uno de los orificios de
ajuste (B) y en la clavija (C) que quedará visible cuando saque la perilla.
Pernos del eje de las ruedas traseras (D): rocíe lubricante en los pernos del
eje de la rueda trasera en el interior entre la cubierta del brazo giratorio (E).
Pernos del eje de las ruedas delanteras: utilice un destornillador de cabeza
plana para hacer palanca y sacar la tapa anaranjada del eje (F). Aplique
lubricante alrededor del perno del eje.
Recomendación: se recomienda el uso de un lubricante con base
de siliconas. A fin de mantener las cuchillas del carrete limpias de
suciedad, polvo y pasto, se recomienda un lubricante que deje una
capa fina seca en lugar de una superficie aceitosa o pegajosa.
Cuidado y mantenimiento
17 35
34
A
D
E
C
B
F

Model Number: 6207
Número de modelo: 6207
Fiskars Brands, Inc.
2537 Daniels Street
Madison, WI 53718
1-877-201-3260
fiskars.com/reelmowers
03-015265r1
StaySharp™
Plus
Table of contents
Languages:
Other Fiskars Lawn Mower manuals

Fiskars
Fiskars 6201 User manual

Fiskars
Fiskars Momentum User manual

Fiskars
Fiskars Momentum FIS113882 User manual

Fiskars
Fiskars StaySharp 362050 User manual

Fiskars
Fiskars StaySharp Plus Installation instructions

Fiskars
Fiskars StaySharp 6208 User manual

Fiskars
Fiskars Momentum User manual

Fiskars
Fiskars StaySharp Max 6201 User manual
Popular Lawn Mower manuals by other brands


Western Auto
Western Auto NOP7122A19 Operation and service instructions

Craftsman
Craftsman 917.383340 owner's manual

Craftsman
Craftsman 917.370780 owner's manual

Ventrac
Ventrac Ventrac HQ680 Owner's and operator's manual

Ariens
Ariens fairway 912000 series Parts and repair manual

Craftsman
Craftsman 917.377130 owner's manual