FLI LOADED 900s Parts list manual
FL900s-F1

We reserve the right to make needed changes or improvements to the product and
this manual , without informing the customer about this in advance.
Copyright
All content included in this manual such as text, graphics, logos, icons, images data, the selection and arrangement
thereof, are the property of FLI Audio (herein referred to as "FLI", "us" or "we") and its affiliate or their content and
technology providers, and are protected by United Kingdom and International copyright laws. All rights reserved.
Trademarks
FLI FrequencyTM, FLI IntegratorTM , FLI LoadedTM , FLI Trap PassiveTM, FLI Trap ActiveTM , and FLI Trap TwinTM and all
stylised representations of product names, or the abbreviations of product names, as logos are all trademarks of FLI.
Graphics and logos are trademarks or trade dress of FLI Audio or its subsidiaries.
FLI's trademarks and trade dress may not be used in connection with any product or service that is not FLI's, in any
manner that is likely to cause confusion among customers or in any manner that disparages or discredits FLI. All other
trademarks not owned by FLI or its subsidiaries that appear in this manual are the property of their respective owners,
who may or may not be affiliated with, connected to, or sponsored by FLI or its subsidiaries.
Limited Warranty
All FLI goods are covered by a full 12 months manufacturers warranty. Valid from
the date of the original receipt and proof of purchase. In order to
validate this warranty, the warranty card should be returned to FLI
within seven days of the original purchase date. The original receipt
and packaging should also be kept for this 12 month period.
If at any stage during the warranty period you have a problem with the
product then it should be returned to the point of purchase in its
original packaging, complete and with no items missing.
If the store is unable to fix the product it may have to be returned to
FLI this process takes around 7 working days.
A full description of FLI's warranty information can be found on our
website:
www.fliaudio.co.uk/warranty
A written version can also be obtained from
FLI warranty department
PO Box 11000
B75 7WG

CONTENTS
Mounting Guidelines.............................. 4
Connections........................................... 4
Setup Section........................................ 6
Applications............................................ 7,8
Trouble Shooting.................................... 9
Specification........................................... 10
Warranty................................................. 10
Accessories............................................ 11
INSTRUCTION &
INSTALLATION MANUAL
Thank you for purchasing this FLI amplifier. It will provide you with a lifetime of trouble free use
providing you follow a few simple guidelines.
Mounting Guidelines
YourFLIamplifierisdesignedwithaswiftinstallationroutineinmind.Pleasemounttheamplifierinadrylocationonasolid
surface.NEVERmounttheamplifierupsidedown,thiswillcausetheamplifiertooverheatandwilleventuallydamagethe
amplifier.Beforefixingtheamplifierinplacepleaseensurethatthereissufficientairflowaroundtheexteriorofthecasing,at
leasttwoincheswillbesufficient.
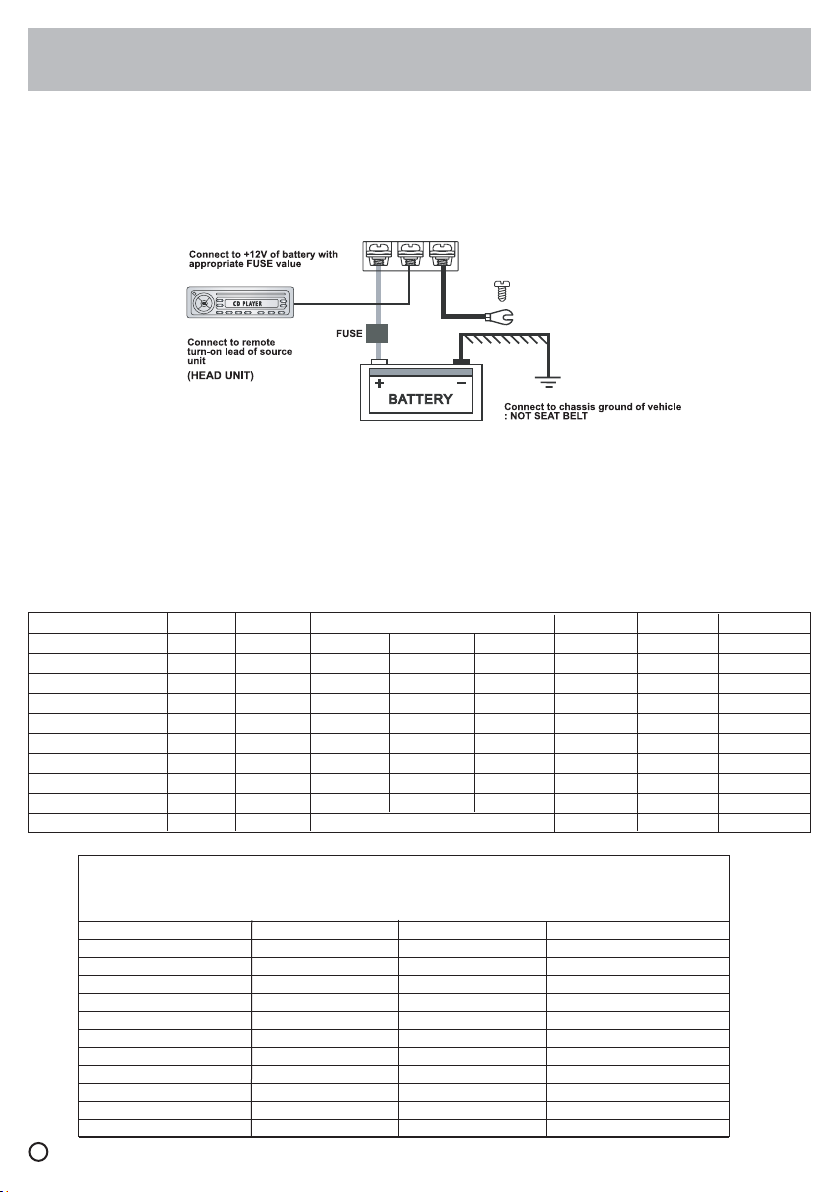
Connections
Power Cable
●Atleastan8gaugecableshouldbeusedforboththepowerandthegroundconnectionstotheamplifier.
●Thepowercableshouldbetakendirectlyfromthebattery.Rubbergrommetsshouldbeusedwhenpassingthroughany
bulkheadstopreventthecablefrombecomingchaffedorcut.
●Itisvitalthatafuse/circuitbreaker(ofatleastequalvaluetotheonefittedontheamplifier)isplacedinlinewiththe
powercableandisnofurtherthaneighteeninchesawayfromthebattery.
●Pleaseensurethatthefuseisnotfitteduntiltheentireinstallationprocedureiscomplete.
●Thetwotablesbelowaretohelpyoudecideonwhatcableiscorrectforyou.Thefirstenablesyoutoselectthesizeof
cabledependingonthelengthrequired.ThesecondwillhelpyouconvertthecablesizefromAmericanWireGaugeto
Metricifyouneedto.
LengthofRun
Currentdemand 0–4Ft 4–7Ft 7–10Ft 10–13Ft 13–16Ft 16–19Ft 19–22Ft 22–28Ft
0–20amps 1412 12 10 10 8 8 8
20–35amps 12 10 8 8 6 6 6 4
35–50amps 10 8 8 6 4 4 4 4
50–65amps 8 8 6 4 4 4 4 2
65–85amps 6 6 4 4 2 2 2 0
85–105amps 6 6 4 2 2 2 2 0
105–125amps 4 4 4 2 0 0 0 0
125–150amps 2 2 2 0 0 0 0 0
AWGtoMetricConversionChart
crosssectionalarea
AWGNumber Inch mm mm2
00.3258.2553.5
10.2897.3542.4
20.2586.5433.6
30.2295.8326.7
40.2045.1921.1
50.1824.6216.8
60.1624.1113.3
70.1443.6610.5
80.1283.268.36
90.1142.916.63
100.1022.595.26
4
1Metre–3.28Feet
Ground Cable
●Thegroundcableneedstocarrythesamecurrentasthepowercable.Atleastan8gaugecableshouldbeused.
●Theamplifiergroundshouldbeconnecteddirectlytothechassisofthevehicle,tobaremetal.
●Thecablelengthshouldbekepttoanabsoluteminimum.
(NB) Itisnotrecommendedthatyouconnectthegroundcabletothevehiclesseatbeltsanchorpoint.
Remote Turn On
●A minimumof18gaugecableshouldbeusedforthisconnection.
●Thecableshouldberunwithexactlythesamecareandattentionasthepowercableandtakenbacktothesource
(headunit)andjoinedtotheremotecableprovided.
●Ifthesource(headunit)doesnothavearemoteturnoncablethena12vsupplyshouldbeused.Thiswillrequirea
switchtobefittedinlinetoenabletheamplifiertobeturnedonandoff.Rememberthatifthisswitchisleftonyouwill
flattenthecarbattery.
RCA Cables
●Dependingonthemodelnumberofyouramplifierandthenumberofspeakersyouwishtopoweryouwillhavetorun
eitheroneortwoRCA cablesfromthesourcetotheamplifier.
●Pleasetakeextracarewhenrunningthesecablesfromthesourcetotheamplifier.Ensurethattheyareplacedaway
fromallitemsthatcangenerateanyinterference,wiringharnessesetc.
●ItisrecommendedthattheRCA cablesshouldberunontheoppositesiteofthecartothepreviouslyinstalledpower
cables,ifpossible.
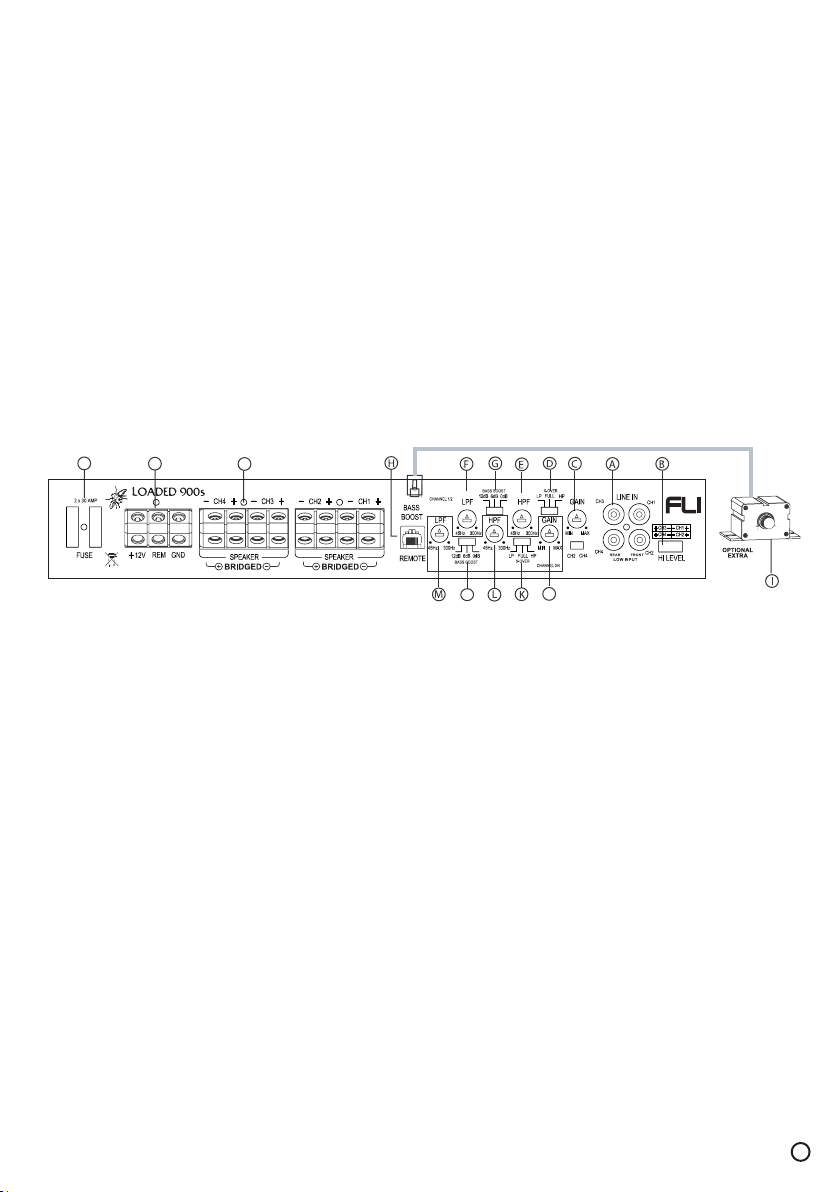
A. Low Level Input
Forconnectiontoanysource(headunit)withalowleveloutput.ThisisyourRCA outputfromthesource(headunit).
B. High Level Input
TobeusedwhennoRCA’sareavailable.Usetheprovidedloomtoconnecttoclosestspeakers.Theloomprovidedwillonly
fitonewayround.Oncepluggedinyoushouldconnectthewiresthiswayaround:
Grey–FrontRightSpeakerPositive
Grey/Black–FrontRightSpeakerNegative
Black/White–FrontLeftSpeakerNegative
White–FrontLeftSpeakerPositive
Purple–RearRightSpeakerPositive
Purple/Black–RearRightSpeakerNegative
Blue/Black–RearLeftSpeakerNegative
Blue–RearLeftSpeakerPositive
C. Channel 1 / 2 Gain Control
Usedtomatchtheinputsignalofthesource(headunit)totheamplifier.Seethesetupsectionformoredetails.
D. Channel 1 / 2 Cross Over Select Switch
UsedtoselectbetweenFlat,HighPassFilterandLowPassFilter.
Thehighpassfilterwillonlyallowhighfrequencyinformationtobepassedtothespeaker(s)whilethelowpassfilterwillonly
allowlowfrequencyinformationtobesent.
Ifnofilterneedstobeappliedthenplacetheswitchintheflatposition.
5
J
N
O
QP

6
E. Channel 1 / 2 High Pass Filter Control
High pass frequency control. The frequency ranges from 50hz to 1.2 KHz.
F. Channel 1 / 2 Low Pass Filter Control
Low pass frequency control. The frequency ranges from 50Hz to 300 Hz.
G. Channel 1 / 2 Bass Boost Switch
To provide up to an extra +12 dB of bass boost at 45 Hz. Use this boost to increase bass output from the amplifier.
H. Bass Remote Input Jack
Use to plug in the optional remote bass controller.
I. Optional Bass Remote Controller
This remote can be mounted in the front of the car and will give you the ability to raise the bass boost of the amplifier
remotely in the range of 0 to +12 dB.
They can be purchased separately from the FLI website www.fliaudio.co.uk, see back page for more details.
J. Channel 3 / 4 Gain Control
Used to match the input signal of the source (headunit) to the amplifier. See the setup section for more details.
K. Channel 3 / 4 Cross Over Select Switch
Used to select between Flat, High Pass Filter and Low Pass Filter.
The high pass filter will only allow high frequency information to be passed to the speaker(s) while the low pass filter will only
allow low frequency information to be sent.
If no filter needs to be applied then place the switch in the flat position.
L. Channel 3 / 4 High Pass Filter Control
High pass frequency control. The frequency ranges from 50hz to 1.2 KHz.
M. Channel 3 / 4 Low Pass Filter Control
Low pass frequency control. The frequency ranges from 50Hz to 300 Hz.
N. Channel 3 / 4 Bass Boost Switch
To provide up to an extra +12 dB of bass boost at 45 Hz. Use this boost to increase bass output from the amplifier.
O. Speaker Terminal Output
For connection to the speakers. See application section for wiring examples.
P. Fuse
Please ensure the following fuse rating is used when replacing fuses:
FLI Loaded 900s – 30 amp x 2
Q. Power Connections
Power connections. See connections section for details on correct connections.
7
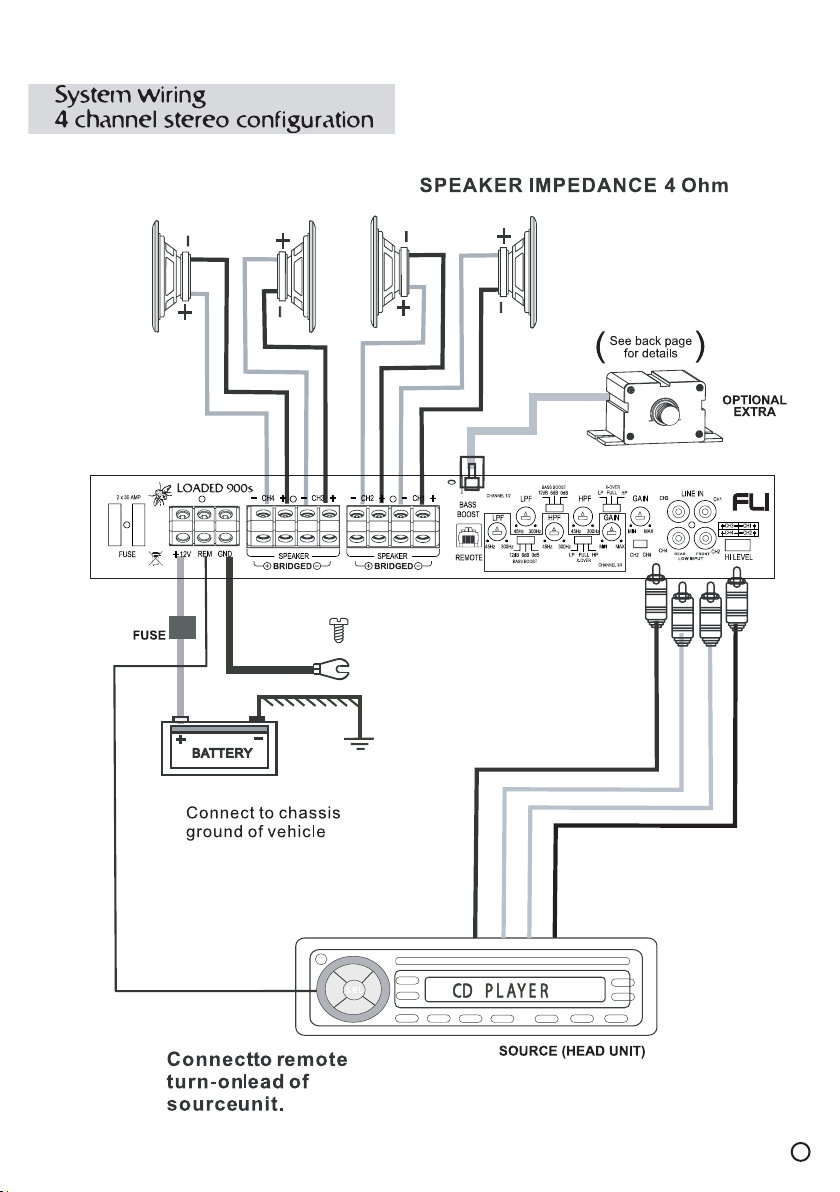
Applications

8
Applications

In order to protect your purchase and aid your
warranty please fill in the following form and
keep it safe for your future reference:
Model Number:
Serial Number:
Purchased From:
Date of Purchase:
KEEP IT SAFE
Staple your receipt here:
Specification
RMS Power @ 13.8v DC
Power @ 4 Ohms stereo 4 x 100 watts RMS
Power @ 4 Ohms bridged 2 x 225 watts RMS
MAX power 900 watts
Minimum speaker impendence 2 Ohms
THD Distortion 0.2%
IMD Distortion 0.2%
Frequency Response 20Hz - 20 Khz
Input Sensitivity 200 mV - 7V
Signal to Noise Ratio 92 dB
Channel Separation 54 dB
Crossover Network
Low pass filter 45 Hz – 300 Hz
Bass Boost 0 dB - +12 dB
High pass filter 45 Hz – 300 KHz
Fuse rating 30A x 2
Size length x width x height 400mm x 250mm x 55 mm

11
FLI Line Level Convertor
If your current head unit has no amplifier pre
outputs this FLI Line Level Convertor can be
connected directly to your rear speaker wires to
provide a stereo set of RCA connectors which
can be connected directly to an amplifier.
FLI Loaded In dash remote control
Allows 18db gain adjustment
of the bass boost feature which is present on all
FLI Loaded amplifiers. Comes complete with 5m
cable. Control can be mounted in-dash or
anywhere suitable.
dimensions: H:20mm
W:40mm D:45mm
FIREFLI 5/1 metre LED RCA
interconnect
High quality 2 Channel RCA interconnect
featuring FIREFLI mega brite LED RCA end
plugs
available in 1 metre and 5metre lengths
FLI RCA-Y interconnect
High quality RCA Y-lead interconnect
Converts stereo RCA output to 4channel output
2 female RCA plugs to 4 male RCA plugs
FLEECE
Black pull over fleece with front zip and arm
pocket features white FLI embroidery logos on
front and back
FLI Tshirts
Our heavy weight FLI T-shirts are a must have!
Featuring small FLI logo on front and big logo on
back. All sizes available
FLI Stickers
FLI stickers available in white or silver 5” 10”
15”

FLI Power Capacitor
The FLI powercap, a 1 farad, high
specification power capacitor is another great
addition to our range. This is an essential item
for maximum power delivery.
AK10- 10 Gauge FLI Wiring Kit
For use with Car audio systems up to 1000
watts. Kitcontents:
5 metre 10 AWG power cable
1 metre 10AWG ground cable
5 metre RCA interconnect
5 metre remote turn on cable
8 metre speaker cable
Inline ATC fuse holder, 30 amp ATC blade
fuse, Fitment pack,
AK8 – 8 AWG amplifier wiring kit
For use with Car audio systems up to 1500
watts Kit contents:
5 metre 8 AWG power cable
1 metre 8AWG ground cable
5 metre FIREFLI LED RCA interconnect
5 metre remote turn on cable
8 metre speaker cable
AGU glass fuse holder, 60 amp AGU glass
fuse, Fitment pack
AK4 – 4 AWG amplifier wiring kit
For use with Car audio systems up to 2000
watts Kit contents:
5 metre 4 AWG power cable
1 metre 4AWG ground cable
5 metre FIREFLI LED RCA interconnect
5 metre remote turn on cable
8 metre speaker cable
AGU glass fuse holder, 80 amp AGU glass fuse
Fitment pack
FLI GRILLS FG10, FG12 & FG15
For use with the FLI subwoofers the FLI Sub
Grill is a visually
appealing way to protect your subwoofer from
accidental damage. The FLI
shaped grill protects the cone and rubber
surround from other items in
your boot.
Accessories can be ordered separately from the
FLI website www.fliaudio.co.uk
Only available in the UK If out side uk please contact your dealer or distributer from the FLI website
Order online or call sales on 0870 765 8423 . All items above come with free next day delivery.
Stores
added power
for when your
system really
needs it
For
use with
Stereo
amplifier
systems
For
use with high
power stereo
amplifier
systems
For use
with Bass
amplifier
systems
For
use with all FLI
subwoofers and
enclosures
Other manuals for LOADED 900s
1
This manual suits for next models
1
Table of contents
Other FLI Amplifier manuals


