FM Jam TX3 User manual

TX3
Digital Amp/Effects Processor and FM Transmitter
Owner’s Manual - V1
WARNING FOR YOUR PROTECTION PLEASE READ THE FOLLOWING:
KEEP THESE INSTRUCTIONS! FOLLOW ALL INSTRUCTIONS!
The FM Jam TX3 shall not be exposed to any liquids, moisture, or excessive heat. Exposure to
liquids, moisture, or excessive heat may void your warranty.
Warning:
Do not leave the TX3 in an enclosed car in direct sunlight for long periods of time. Temperatures
under these conditions can exceed 150 degrees and may cause electrical damage and or damage
to buttons or display.
The FM Jam warranty does not cover damage to products due to high temperatures.
CLEAN ONLY WITH A DRY CLOTH. DO NOT STORE OR PLACE THE FM Jam TX3 NEAR ANY HEAT
SOURCES SUCH AS RADIATORS, HEAT REGISTERS, STOVES, OR OTHER APPARATUS
(INCLUDING AMPLIFIERS) THAT PRODUCE HEAT.
ONLY USE ATTACHMENTS/ACCESSORIES SPECIFIED BY FM Jam Inc.
UNPLUG THIS APPARATUS DURING LIGHTNING STORMS OR WHEN UNUSED FOR LONG
PERIODS OF TIME.
Do not defeat the safety purpose of the polarized or grounding-type plug on the FM Jam TX3 AC
Adaptor. A polarized plug has two blades with one wider than the other. A grounding type plug
has two blades and a third grounding prong. The wide blade or
third prong are provided for your safety. If the provided plug does not fit your outlet, consult an
electrician for replacement of the obsolete outlet.
Protect the power cord from being stepped on or pinched particularly at plugs, convenience
receptacles, and the point where it exits from the apparatus.
Avoid dropping the FM Jam TX3 as this may damage sensitive electronic components within the
unit.
Refer all servicing to qualified service personnel. Contact customer service at www.FM-Jam.com
for service instructions. All shipping expenses required to return the unit for service is the
responsibility of the owner of the device. A return shipping charge may apply.
DECLARATION OF CONFORMITY

Manufacturer’s Name: FM Jam, Inc.
Manufacturer’s Address: 2157 Newcastle Ave
Cardiff by the Sea, CA 92007 USA
www.fm-jam.com
Product name: TX3
Product option: all (requires Class II power adapter that conforms to the requirements of
EN60065, EN60742, or equivalent.) conforms to the following Product Specifications:
Safety: IEC 60065 (7th ed. 2001)
EMC: EN 55013 (2001 + A1)
EN 55020 (1991)
Supplementary Information:
The product herewith complies with the requirements of the Low Voltage Directive 72/23/EEC
and the EMC Directive 89/336/EEC as amended by Directive 93/68/EEC.
Contact: FM Jam Inc.
2157 Newcastle Ave
Cardiff by the Sea, CA 92007 USA
European/Asian Contact: Contact www.FM-Jam.com for further details.
This device complies with Part 15 of the FCC Rules. Operation is subject to the following two
conditions: (1) This device may not cause harmful interference, and (2) This device must accept
any interference received, including interference that may cause undesired operation.
This equipment has been tested and found to comply with the limits for Class B Digital Device,
pursuant to Part 15 of the FCC Rules. These limits are designed to provide reasonable protection
against harmful interference in a residential installation. This equipment generates and can
radiate radio frequency energy and, if not installed and used in accordance with the instructions,
may cause harmful interference to radio communications. However, there is no guarantee that
interference will not occur in a particular installation. If this equipment does cause harmful
interference to radio or television reception, which can be determined by turning the equipment
off and on, the user is encouraged to try to correct the interference by one or more of the
following measures.
•Reorient or relocate the receiving antenna
•Increase the separation between the equipment and receiver
•Connect the equipment into an outlet on a circuit different from that to which the receiver is
connected
Any changes or modifications not expressly approved by the party responsible for compliance
could void the user’s authority to operate the equipment.
------------
This device has been designed to operate with the antennas listed below, and having a maximum
gain of 2.2 dB. Antennas not included in this list or having a gain greater than [2.2] dB are
strictly prohibited for use with this device. The required antenna impedance is 50 ohms
Antenna Factor ANT-2.4-CW-RCT-xx
April 16, 2008

WARRANTY
We at FM Jam® are very proud of our TX3 product and back up each one we
sell with the following warranty:
1. The user must email or mail their proof of purchase to Fm Jam along with full
name, current address and phone number. Emails can simply be the payment
conformation that was sent to you from our online store. Return your purchase
email to confirm your receipt and be registerd. If you purchased your Tx3 from
another source, isend a copy of your sales receipt with Name, address, email
FM Jam Inc
2157 Newcastle Ave
Cardiff, Ca 92007
2. FM Jam warrants this product, when used solely within the U.S., to be free
from defects in materials and workmanship under normal use and service.
3. FM Jam liability under this warranty is limited to repairing or replacing
defective materials that show evidence of defect, provided the product is
returned to FM Jam WITH RETURN AUTHORIZATION, where all parts and labor
will be covered up to a period of one year. A Return Authorization number may
be obtained from FM Jam by telephone or email or through form submittal at
www.FM-Jam.com. The company shall not be liable for any consequential
damage as a result of the product’s use in any way.
4. Proof-of-purchase is considered to be the burden of the consumer.
5. FM Jam reserves the right to make changes in design, or make additions to, or
improvements upon this product without incurring any obligation to install the
same on products previously manufactured.
6. The consumer forfeits the benefits of this warranty if the product’s main
assembly is opened and tampered with by anyone other than a certified FM Jam
technician or, if the product is used with AC voltages outside of the range
suggested by the manufacturer.
7. The foregoing is in lieu of all other warranties, expressed or implied, and FM
Jam neither assumes nor authorizes any person to assume any obligation or
liability in connection with the sale of this product. In no event shall FM Jam, its
dealers, or affiliates be liable for special or consequential damages or from any
delay in the performance of this warranty due to causes beyond their control.
NOTE: The information contained in this manual is subject to change at any time without notification. Some
information contained in this manual may also be inaccurate due to undocumented changes in the product
or operating system since this version of the manual was completed. The information contained in this
version of the owner’s manual supersedes all previous versions.

Table of Contents
Section One - Introduction
Getting Acquainted...........................................................7
Basic Operation of the TX3................................................................8
Performance Mode........................................................8
Edit Mode.........................................................................8
Tuner Mode...................................................................8
Bypass Mode.....................................................................9
A Guided Tour of the TX3............................................10
Front Panel......................................................................10
Bottom Panel......................................................................12
Back Panel/Battery
Compartment......................................................................13
Getting Started................................................................14
Making Connections/Making Sounds.......................................................14
Using the TX3 with a Guitar Amplifier – Mono Operation...........................14
Using the TX3 with a Guitar Amplifier – Stereo Operation...............................14
Using the TX3 with Stereo Headphones.........................................................14
Using the TX3 with an FM Receiver.........................................................15
Using More Than One TX3 in a Chain...............................15
Using the TX3 with an iPod or Similar Audio Source...............................15
Section Two – Performance Mode
About Performance Mode................................................17

Scrolling Through the Presets................................................17
Section Three – Edit Mode
About Edit Mode................................................18
Editing and Creating Presets................................................18
How To Edit And Save A Preset..............................................18
How To Create And Save Your Own Preset..............................................18
About The Editable Parameters of the TX3..............................................18
P-LEVEL............21
COMP............21
AMP............21
NOTCH............22
N-GATE............23
TONE............24
MOD...25
CHORUS / FLANGE .......25
PHASE SHIFTER / TREMELO / PANNING ...26
VIBRATO / OCTAVE UP / OCTAVE DOWN ..27
DELAY............27
REVERB............29
BR/CAB............29
X-PEDAL............31
FM-SET............31

Section Four - Other Functions
Tuner Mode............................................33
Bypass Mode............................................34
Expression Pedal............................................34
Factory Default Reset......................................34
Low Battery / Power Saver / Battery Meter........35
Section Five - Appendix
Specifications....................................................................36
Disclaimer: FM Jam and TX3 are trademarks of FM Jam, Incorporated, in the U.S.
and other countries. Fender, Fender Twin Reverb, Marshall, Vox, Vox AC30,
Peavey, Roland, Roland JC-120, Boss DD-2, Boss RE-201 Space Echo, Electro-
Harmonix Memory Man, Roland Space Echo, Echoplex, Rat, Digitech Whammy,
iPod are products of FM Jam's competitors and trademarks of their respective
companies in the U.S. and other countries and are not associated or affiliated
with FM Jam, Incorporated. © 2008 FM Jam, Inc. All Rights Reserved.

Section One – Introduction
Getting Acquainted
Congratulations on your purchase of the FM Jam TX3! The TX3 offers you not
only an incredible combination of awesome guitar tones, but also the means to
take those incredible sounds with you wherever you roam: the studio, the stage,
the beach – even the parking lot on your lunch break!
The impressive collection of both vintage and modern amps and effects we've
modeled –and the ease with which the TX3 lets you combine or alter them –
gives you the freedom to easily create your own unique, signature tone, or to re-
create the classic sounds of your favorite guitar hero.
The TX3 is a new kind of "guitar amp and effects processor." Now you've got all
the classic guitar tones you could ever want in a device that works for you in
every possible scenario: with an amp, through headphones, or even transmitting
right through your boom box, home sound system, or car stereo.
Enjoy!
Included Items
Before you get started, please make sure that the following items have been
included:
• FM Jam TX3
• Quick Start Guide

Basic Operation of the FM Jam TX3
There are four basic modes of operation for the TX3: Performance Mode, Edit
Mode, Tuner Mode, and Bypass Mode. This section of the owner's manual gives
you a brief description of each mode and how to access that mode. More
detailed information about each mode is given elsewhere in this manual.
Performance Mode
To turn on the TX3, simply plug a -inch guitar cable into the TX3 input marked
"Guitar."
The unit will power up in Performance Mode. Performance Mode provides access
to all of the preset amp/effect sounds within the TX3 via the left and right bean
buttons. The TX3 powers up to preset 1 by default. You can then scroll through
the factory- and user-defined presets using the left and right bean buttons. With
your TX3 transmitting to an FM receiver, or plugged directly into a guitar
amplifier or other audio device (headphones, home stereo, PA system, etc.),
you're now ready to start jammin'!
Edit Mode
Press either the left or right wing button to enter Edit Mode. To exit Edit Mode
and return to Performance Mode, simply press either the left or right bean
button again.
Once in Edit Mode you can make changes and adjustments to any of the
parameters of the effects or amp settings for the factory- and/or user-defined
presets. From Edit Mode you'll be able to save these new settings, or exit Edit
Mode without saving the changes, so feel free to experiment and customize your
sound!
We'll discuss making and saving changes in more detail in Section Three – Edit
Mode, later in this owner's manual. The TX3 also has a function to return the
unit to its original default factory presets – which we'll discuss in Section Four –
Other Functions. Don't be afraid to try new sounds, you can always return the
unit to its original settings.
Tuner Mode
The Tuner in the TX3 allows you to quickly check the tuning on your guitar (or
other instrument plugged into the TX3 through the -inch input jack labeled
"Guitar").
Enter Tuner mode by simultaneously pressing and holding both the left and right
bean buttons for three (3) seconds, or until the main LED display reads “tu.”

(The display will briefly read "by," for bypass mode. Keep holding the buttons
and the display will then change to "tu.") You are now in tuner mode.
We'll discuss using the TX3's built-in tuner in more detail later in this owner's
manual, in Section Four – Other Functions, "Tuner Mode."
To exit tuner mode and return to Performance Mode, simply press either the left
or right bean button until you see the main LED display indicate that the TX3 is
now on amp/effect preset "1."
Bypass Mode
Bypass Mode allows you to completely bypass all amp and effect processing.
Press the left and right bean buttons simultaneously for one second to enter
bypass mode. When in Bypass Mode the main LED display will show "by" for
Bypass.
We'll discuss Bypass Mode in more detail later in this owner's manual, in Section
Four – Other Functions, "Bypass Mode."
To exit Bypass Mode, simply press either the left, right, up, or down bean
buttons and you'll return to Performance Mode.
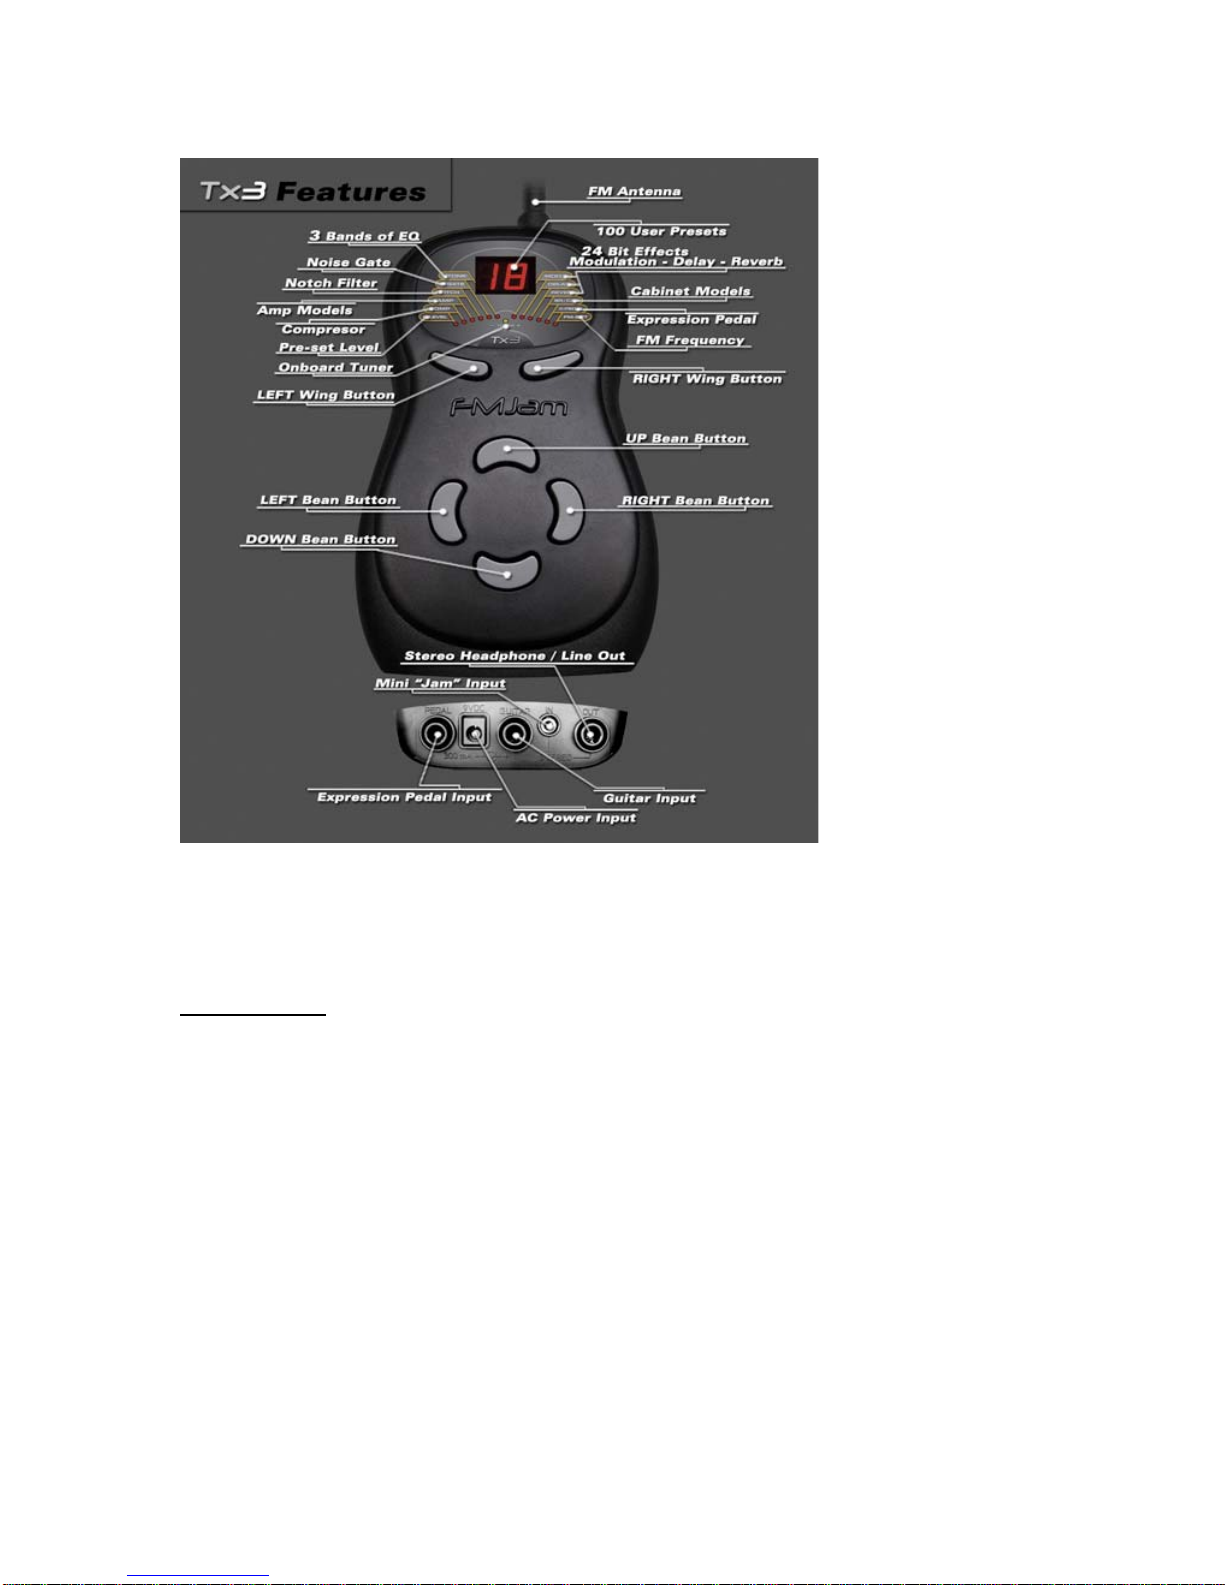
A Guided Tour of the FM Jam TX3
The TX3 was designed for a short learning curve. The large LED display and
oversized buttons make operating the unit easy. You'll be jamming with this
awesome device in minutes!
The Buttons
• The four large bean shaped buttons control up and down and left and right
navigation through the TX3's menu screens, as you would expect. When the unit
is on, pressing either of the left or right bean buttons scrolls through presets
0 to 99.
• Pressing the up or down bean buttons is usually reserved for the function of
editing tones and effects settings.
• These settings are initially accessed via the left and right wing shaped
buttons, which are found immediately below the LED screen. In other words, if
you want to edit an amp tone or effects setting, you'll first press one of the wing
buttons to choose which effect you want to edit, then you'll press either the up
or down bean button to change the settings of that effect. We'll explain how to
make changes such as these in more detail in another section of this manual.

The LED Display
The LED display and printed faceplate of the TX3 provide a lot of useful
information in an intuitive layout we think you'll find very easy to read and
understand.
• The TX3 faceplate includes 13 LEDs, one representing the Tuner function of
the TX3, and 12 others representing the editable features or functions of the
TX3. These twelve LEDs are labeled, in order from left to right: P-Level, Comp,
Amp, Notch, N-Gate, Tone, Mod, Delay, Reverb, BR/Cab, E-Pedal, and FM-Set.
We'll describe each of these features/functions in more detail in another section
of this manual.
For now, with the unit on, simply press the left or right wing buttons and notice
how the LEDs light up in sequence. Also, as each LED lights up, you'll notice the
information on the large LED display changes, according to the characteristics of
each of the 12 different features/functions. We'll explain these displays in more
detail when we describe each of the 12 features/functions of the TX3, in another
section of this manual.
As you scroll through these various LEDs, and by using the up and down bean
buttons (described above), you'll be able to edit the settings of each
feature/function (such as effects settings, amp models, FM broadcast frequency,
etc.).
Changes to these settings can then be saved, but don't make any changes at
this time!
The Tuner +/- LED
The guitar tuner in the TX3 is accessed by simultaneously holding the left and
right bean buttons for three seconds, or until the main LED display read "tu."
Playing a single string on your guitar will then cause the main LED display to
read out the pitch to which your string is tuned. As you adjust your tuning, the
single, small LED light immediately above the word "Tuner" will light up when
your guitar is in tune. See the section on tuning for more details.
The Antenna
The antenna on the TX3 is flexible, but that doesn't mean you should bend it.
Leave it alone and it will do its job just fine. Note: Do not store the unit in such a
way as to bend or put pressure on the antenna.

Bottom Panel
The bottom panel of the TX3 is where you'll plug in your guitar, your AC adaptor,
your iPod or other audio source, and your output cable (when running the TX3
into a guitar amp, headphones, or other sound source with a mono or stereo -
inch cord).
The Inch Input Jacks
There are three -inch input jacks on the TX3. The jacks labeled "Pedal" and
"Guitar" take regular guitar cables. The jack labeled "Output" can take either a
regular mono guitar cord, or a stereo -inch cord.
• The jack labeled "Guitar" is where you'll plug your guitar into the TX3, using a
regular (high-impedance, mono) guitar cord. This jack also serves as the ON/OFF
switch for the TX3. Plugging into this jack turns the device on (causing the main
LED panel to light up). Unplugging from this jack turns the TX3 off. Always
unplug from this jack when not using the TX3 to conserve battery life.
• The jack labeled "Output" is for running a mono or stereo -inch cord into a
guitar amplifier or other sound source, should you choose to use the TX3 as a
guitar processor without transmitting to an FM receiver. This jack also serves as
a stereo headphone jack. In addition, the Output jack can be used to chain two
or more TX3 units together. For more information on chaining TX3's together,
see the section titled "Using More Than One TX3."
• The jack labeled "Pedal" can be used with any brand of potentiometer-
operated pedal, such as a volume, wah, or Whammy pedal. Inserting such a
pedal would allow you to access the TX3's X-PEDAL function in Edit Mode or to
use the pedal in Performance Mode as either a volume or wah pedal. The TX3
has one built-in Volume and three built-in Wah pedal digital models, accessed via
the X-PEDAL tab. There's a world of sounds here, give them a try!
For more information on using the TX3 with such pedal, see Section Three – Edit
Mode "X-PEDAL."
Note: Any pedal with a potentiometer – such as a volume or wah pedal – will
work with the TX3. On/off button pedals, such as a distortion, overdrive, or other
typical effects stomp box, will not work. To use the "Pedal" jack with your
volume or wah pedal, simply run a regular guitar cord from the output of the
pedal into the "Pedal" jack on the TX3.

The Mini Input Jack
• The mini input jack is used when you want to play along with your iPod or CD
player, or with a friend who has a TX3. It is a passive throughput to the FM
transmitter and does not go to the digital signal processor. Simply plug a stereo
mini jack into this input and the sound from that device will be transmitted along
with your guitar signal.
The AC Adaptor Input
• The TX3 can be powered by any 9VDC, 300mA adaptor. Please note that using
the wrong type of adaptor can damage your TX3 and will void your warranty. An
AC adaptor will be available from www.FM-Jam.com.
Back Panel/Battery Compartment
The back panel of the TX3 is where you'll find the battery compartment.
The Battery Compartment
A simple squeeze on the latch on the top side of the battery compartment cover
will release the cover.
The TX3 requires four (4) AA batteries. The batteries must be inserted into the
TX3 in an alternating fashion as indicated inside the battery compartment.
Holding the unit with the antenna toward the ceiling, from left to right, the first
and third batteries should be inserted positive terminal up; the second and fourth
batteries should be inserted positive terminals down.
The TX3 should run for approximately 15 hours with a new set of AA batteries.

Getting Started
Once you plug your guitar into the TX3, and set up an FM receiver or guitar amp
to receive your signal, you're ready to rock! The TX3 powers up in Performance
Mode, so the second you turn on your amp or FM receiver, you should hear your
guitar. In Performance Mode, you can scroll through the preset sounds by simply
pressing the left or right bean buttons.
You can also plug your iPod (or CD player or similar audio device) into the TX3 to
play along with your favorite artists.
So plug in your guitar, connect your TX3 to an amp or start transmitting to your
FM receiver using one of the connection methods below, then CRANK IT UP!
Making Connections/Making Sounds
There are several different connection options available with the TX3. Before
connecting the TX3, make sure the power to your amplifier or FM receiver is
turned off. Make all necessary connections, and then turn on your amp or FM
receiver.
Note: There is no power switch on the TX3. To turn the TX3 on or off, simply
connect or disconnect a mono guitar cable to/from the bottom panel input jack
labeled "Guitar."
Using the TX3 with a Guitar Amplifier – Mono Operation
Connect your guitar to the input of the TX3. Connect a mono guitar cable from
the TX3 bottom panel jack labeled "Output" to the instrument input or effect
return on your amplifier. Turn on the amplifier and start playing. You'll get the
best results if you set your amp to its cleanest tone. Also, turn the volume on
your amp to zero until all connections are made and both the amp and the TX3
are powered up, and then adjust the volume upward as necessary.
Using the TX3 with a Guitar Amplifier – Stereo Operation
The TX3 can output a stereo signal through the bottom panel -inch jack
labeled "Output." To take advantage of this stereo output, plug a stereo -inch
cable into this output jack, then send that signal to two separate guitar amplifiers
using a stereo "Y" signal splitting cable. Again, set the amps to their cleanest
tone, and start with their volume on zero, adjusting upward after powering up.
Using the TX3 with Stereo Headphones
The same output jack used to send the TX3 signal to a guitar amplifier serves as
a stereo headphone jack. Simply plug a pair of headphones into the Output jack
on the bottom of the TX3 and enjoy playing your guitar without disturbing those

around you. You can adjust the volume being sent to your headphones in the
TX3. For more information on setting the volume, see the passage titled "P-
Level" in Section Three – Editing Mode.
Using the TX3 with an FM Receiver
One of the most unique features of the TX3 is its ability to transmit your guitar
signal via wireless signal sent to any FM receiver, such as your car or home
stereo system, or a boom box. To transmit from the TX3 to an FM receiver, you'll
need to match the frequency of the FM receiver with the frequency on which the
TX3 is transmitting. The TX3 has a transmission range of approximately 30 feet
(10 meters) but will work best within 5 to 15 feet (2 to 5 meters) of your FM
receiver. Also, set your receiver's volume to zero, then turn up after you've
powered up both the receiver and the TX3.
To determine which frequency the TX3 is transmitting on, click the left wing
button once, until the "FM-SET" LED lights up. If the main LED display reads 8.9,
the TX3 is transmitting on FM frequency 88.9. Set your FM receiver to this
frequency and you'll hear your guitar. You can change this frequency if you
desire. For more information on the FM transmission frequency, see Section
Three – Edit Mode, and the passage titled "FM-SET."
Using More Than One TX3 in a Chain
Another cool feature of the TX3 is its ability to be chained to another TX3. In
other words, you and a friend can both run your TX3's through the same FM
receiver or guitar amplifier while you jam together.
The preferred method of chaining two or more TX3's together is with a cable
that has a -inch jack on one end and a mini plug on the other. Using this type
of cable, plug the -inch end of the cable into the Output jack of one TX3, and
the mini plug into the mini "In" jack on the second TX3. This will allow both TX3
users to have independent control of their TX3's settings.
Should you choose to run a regular -inch guitar cord from the -inch output
jack of one TX3 into the -inch input (the jack labeled "Guitar") of a second
TX3, the second unit in the chain will be a slave to the first unit, and only the
first unit will be able to control tone, amp, effects, or volume settings.
Using the TX3 with an iPod or Similar Audio Source
The TX3 is one of the only guitar amp/signal processors available today which
allows you to plug your iPod or CD player into the unit, so you can play along
with your favorite artists. Simply connect a cable to your iPod (or similar audio
device) and plug that into the mini jack input on the bottom panel of the TX3.

The TX3 will then transmit (using the FM transmitter function) or output (using
the regular output jack, when plugged into headphones or a guitar amplifier)
both the sound of your iPod and the sound of your guitar.
The mini jack input is a "passive throughput," meaning the sound coming from
your iPod will simply be transmitted to your FM receiver or output to your
headphones or guitar amp without going through the processing chain your
guitar signal goes through. So you can choose any TX3 preset to get your
favorite guitar tone, while your iPod signal passes through the TX3 as is – clean
and unaltered.

Section Two – Performance Mode
About Performance Mode
You'll spend most of your time with the TX3 in Performance Mode. Performance
Mode allows you to scroll through the 49-factory defined presets – or those you
create yourself in Edit Mode (presets 50 through 99 are initially duplicates of
presets 1 through 49 and are awaiting your unique user-defined tonal
creations!).
The TX3 turns on when you plug a regular guitar cable into the bottom panel
input marked "Guitar." The device powers up in Performance Mode, so as soon
as you turn on your FM receiver, or plug in your headphones or guitar amp,
you'll be ready to jam!
Note: If the TX3 doesn't immediately power up when you insert a -inch guitar
cable into the input marked "Guitar," simply unplug, and then plug back in.
Scrolling Through the Presets
The TX3 powers up to preset 1 by default. To scroll through all the presets,
simply press the left or right bean buttons – right for higher numbered presets,
left for lower numbered presets. If you hold either the right or left bean button
down for a second or two, the presets will scroll by 10s, allowing you to more
quickly arrive at your favorite preset.
We've arranged the factory presets from clean to dirty to downright raunchy (low
to high), with every imaginable variation of effects thrown in for good measure.
Download the Factory Preset Chart from the Support Page of our
website
http://www.fm-jam.com/downloads/Tx3-Preset_Chart_1.0.pdf

Section Three – Edit Mode
About Edit Mode
Editing and creating presets on the TX3 is easy. Simply press either the left or
right wing button to enter Edit Mode, then either left or right bean button to exit
Edit Mode and return to Performance Mode.
Once in Edit Mode you can make changes to any of the factory-defined preset
sounds, or create your own, unique guitar tones! Saving your edits and/or
creating new presets is easy, so feel free to experiment – you can always just
exit Edit Mode without saving any changes at all. And if you decide that you've
really
messed up the factory-defined presets and want to return the TX3 to its
original state, there's an easy procedure for that too! (For more information on
restoring the TX3 to its factory default settings, see Section Four – Other
Functions, "Factory Default Restore.")
Editing and Creating Presets
Editing a preset means to make changes to the effects or other parameters that
give that preset its specific sound or tone. Presets 1 through 49 are factory-
defined, covering a wide variety of guitar tones, suitable for most players' needs.
Many TX3 owners will be satisfied simply using the TX3 in Performance Mode
and jamming with the preset sounds originally programmed into the TX3.
Many players, however, will want to alter the factory-defined presets, and that's
where Edit Mode comes in. Those changes can either be saved in place
(rewriting the factory-defined preset), or by creating a new preset. Presets 50
through 99 are programmed with duplicates of presets 1 through 49. Feel free to
overwrite them with your own tonal creations.
How To Edit And Save A Preset
By pressing either the left or right wing buttons you'll scroll through the TX3's
editable parameters. As you press these buttons you'll see the small LEDs
lighting up. Each of the small LEDs points to an effect, such as Delay or Reverb,
or to another editable parameter, such as the TX3's volume or FM transmission
frequency. As you scroll you'll also notice the main LED display showing a read-
out for each of the effects and other parameters.
These main LED read-outs can be either numeric (0 to 99), alphabetical (i.e., OF
or hA), or alpha-numeric (i.e., b4 or d9). The complete list of possible read-outs
is specific to each effect or editable parameter, and will be discussed in more
detail in the section on that specific parameter (below).

To edit a preset, follow these steps:
Step 1: With the TX3 powered up, scroll to the preset you'd like to start with.
Step 2: Enter Edit mode by pressing either the left or right wing button.
Step 3: Using the left or right wing button, scroll until the LED lights up for the
effect you'd like to edit.
Step 4: Use the up or down bean buttons to edit, or make changes, to the effect
or parameter's setting. (More details on each editable parameter are described
below, in the section for each parameter.)
NOTE: YOU CAN EXIT EDIT MODE AT ANY TIME WITHOUT SAVING YOUR
CHANGES BY SIMPLY PRESSING EITHER THE RIGHT OR LEFT BEAN BUTTON TO
RETURN TO PERFORMANCE MODE.
Step 5: If you'd like to save this change, simultaneously press both the right and
left wing buttons. The Main LED display should start flashing the number of the
preset you were editing. For example, if you started with preset 42, the number
42 would be flashing at this time.
Step 6: Simultaneously press both the left and right wing buttons again and the
main LED display will momentarily display "st" for "set." This means your edit has
been saved. At this time the TX3 will automatically return to Performance Mode
and the preset with which you started the Edit procedure.
NOTE: ANY CHANGES YOU MAKE TO A PRESET IN EDIT MODE MUST BE SAVED
BEFORE YOU EXIT EDIT MODE OR TURN OFF THE TX3 OR THOSE CHANGES
WILL BE LOST.
How To Create And Save Your Own Preset
To create your own preset, you must start with an existing preset – either a
factory-defined preset, or a preset you've previously created. Through personal
experience we've learned that it is best to actually create and save your new
preset to a new location (using a previously existing preset as your model)
before editing that preset to make changes to it. This way, if you end up with
something you don't like, you've still got the original preset in its original state,
and you can start over and try again.
Here's how to create your own preset by saving an existing preset to a new
location. Then, after you've created the new preset, you can edit it to your liking,
using the "Save" function described above in the section "How To Edit A Preset."

Step 1: With the TX3 powered up, scroll to the preset you'd like to start with.
Step 2: Enter Edit mode by pressing either the left or right wing button.
Step 3: Simultaneously press both the left and right wing buttons. The Main LED
display should start flashing the number of the preset you were editing. For
example, if you started with preset 42, the number 42 would be flashing at this
time.
Step 4: Using the left and right bean buttons, scroll to your desired new preset
number.
Step 5: Simultaneously press both the left and right wing buttons again and the
main LED display will momentarily display "st" for "set." This means your edit has
been saved. At this time the TX3 will automatically return to Performance Mode
and your new preset. If you'd now like to edit this newly created preset, press
either the left or right wing buttons to enter edit mode, then follow the steps in
the section "How To Edit A Preset" to make and save your changes.
TIME SAVING TIP: If you're knowledgeable about amps and effects and want to
create a new preset from scratch with the least amount of work – avoiding pre-
determined amp and effects settings completely – simply save preset 0 to a new
location and use that as the starting point for your new preset. Preset 0 is a
blank slate, with no amps or effects pre-defined. Doing so will allow you to
quickly make your own amp and effects choices, and will save you the time of
editing previous factory- or user-defined settings.
About The Editable Parameters of the TX3
The main display of the TX3 shows tabs labeled P-LEVEL, COMP, AMP, NOTCH,
N-GATE, TONE, MOD, DELAY, REVERB, BR/CAB, X-PEDAL, AND FM-SET. There is
a small LED light for each tab which lights up to indicate which of these
parameters is on (in Performance Mode) or ready for editing (in Edit Mode).
These are the effects and other editable parameters of the TX3, and there is a
wealth of information, and a guitar shop full of tonal possibilities within these
parameters. The following sections of this manual contain more detailed
information on each of these parameters, and suggestions for their use:
Other manuals for TX3
1
Table of contents


