Forest CKS User manual

78
Determine the cord length by pulling the cord. Pull at
the end to reduce the drop height, pull at the loop to
increase the drop height. Screw the half cord connector
tight to position the cord drop height (with CCS®:
the second cord connector in the double construction).
If necessary, cut the cord by heating it and make a knot
at the end of the cord. Tight this on the extension in
the middle of the master carrier overlap. This creates
a strong construction.
56
By pulling the cord through the big gap of the pulley,
it will hang straight down the curtain and a good
operation is guaranteed.
Ensure that the cord runs behind the metal pin in
the pulley. This avoids slack in the mechanism during
operation.
CKS®& CCS®Assemblage
Tips & Suggestions:
• The maximum length for cording / chaining CCS®is as follow:
6,10 mtr (20 Ft.) and for CKS®is 6 mtr (19.7 Ft.).
• The above sizes are without the pulleys! With pulleys, the sizes are as follow:
centredraw one-way draw
CCS®6,18 mtr (20.27’) 6,17 mtr (20.24’)
CKS®6,08 mtr (20’) 6,08 mtr. (20’)
Fix one cord connector onto the end of the cord
(CCS®facing outside, CKS®to the middle of the track).
Slide the half cord connector on the other end of the
cord (with CCS®, use a normal CCS cord connector),
but do not screw it.
Slide the master carrier, together with the two cord
connectors into the cord channel of the track.
The cord is lifting out of the track, through the first
gap of the master carrier overlap.
Fix the second cord connector on the opposite cord,
(CCS®facing outside, CKS®towards the middle of the
track).
Slide the master carrier underlap, together with the cord
connector into the cord channel of the track and fix the
second pulley onto the track.
1
34
CCS®& CKS®Assembly – cord adjustability.
Instructions for assembling CCS®& CKS®, with cord adjustability.
This application can be made for CCS®, as well for CKS®. The advantage is that the requested drop height can be deter-
mined at a later stage. This feature makes the system very suitable for pre-assembling. This application is also possible
for one-way draw. Start, repeating the first two steps of the instructions with cord and continue with the steps below.
Necessary items: Articlenumber:
CCS-track 30010.. ……
Nylon cord 1030401000
CCS Master Carrier Overlap R/L 30157…000
CCS Master Carrier Underlap R/L 30156…000
CCS End Pulley 30301…000
CCS End Pulley Small 30302…000
CKS Cord Connector 3030301000
Drill with bit 1
Lighter (for heathen the nylon cord)
Necessary items: Articlenumber:
CKS-track 1501001…..
Nylon cord 1030401000
CKS Master Carrier Overlap R/L 1515701000
CKS Master Carrier Underlap R/L 1515601000
CKS Pulley 1530101000
CKS Cord Connector 1530301000
CKS Cord Connector (half) 1530311000
Drill with bit 1
Lighter (for heathen the nylon cord)
2
03-2006
assemblageCKSCCSEng_210306 21-03-2006 13:47 Page 4

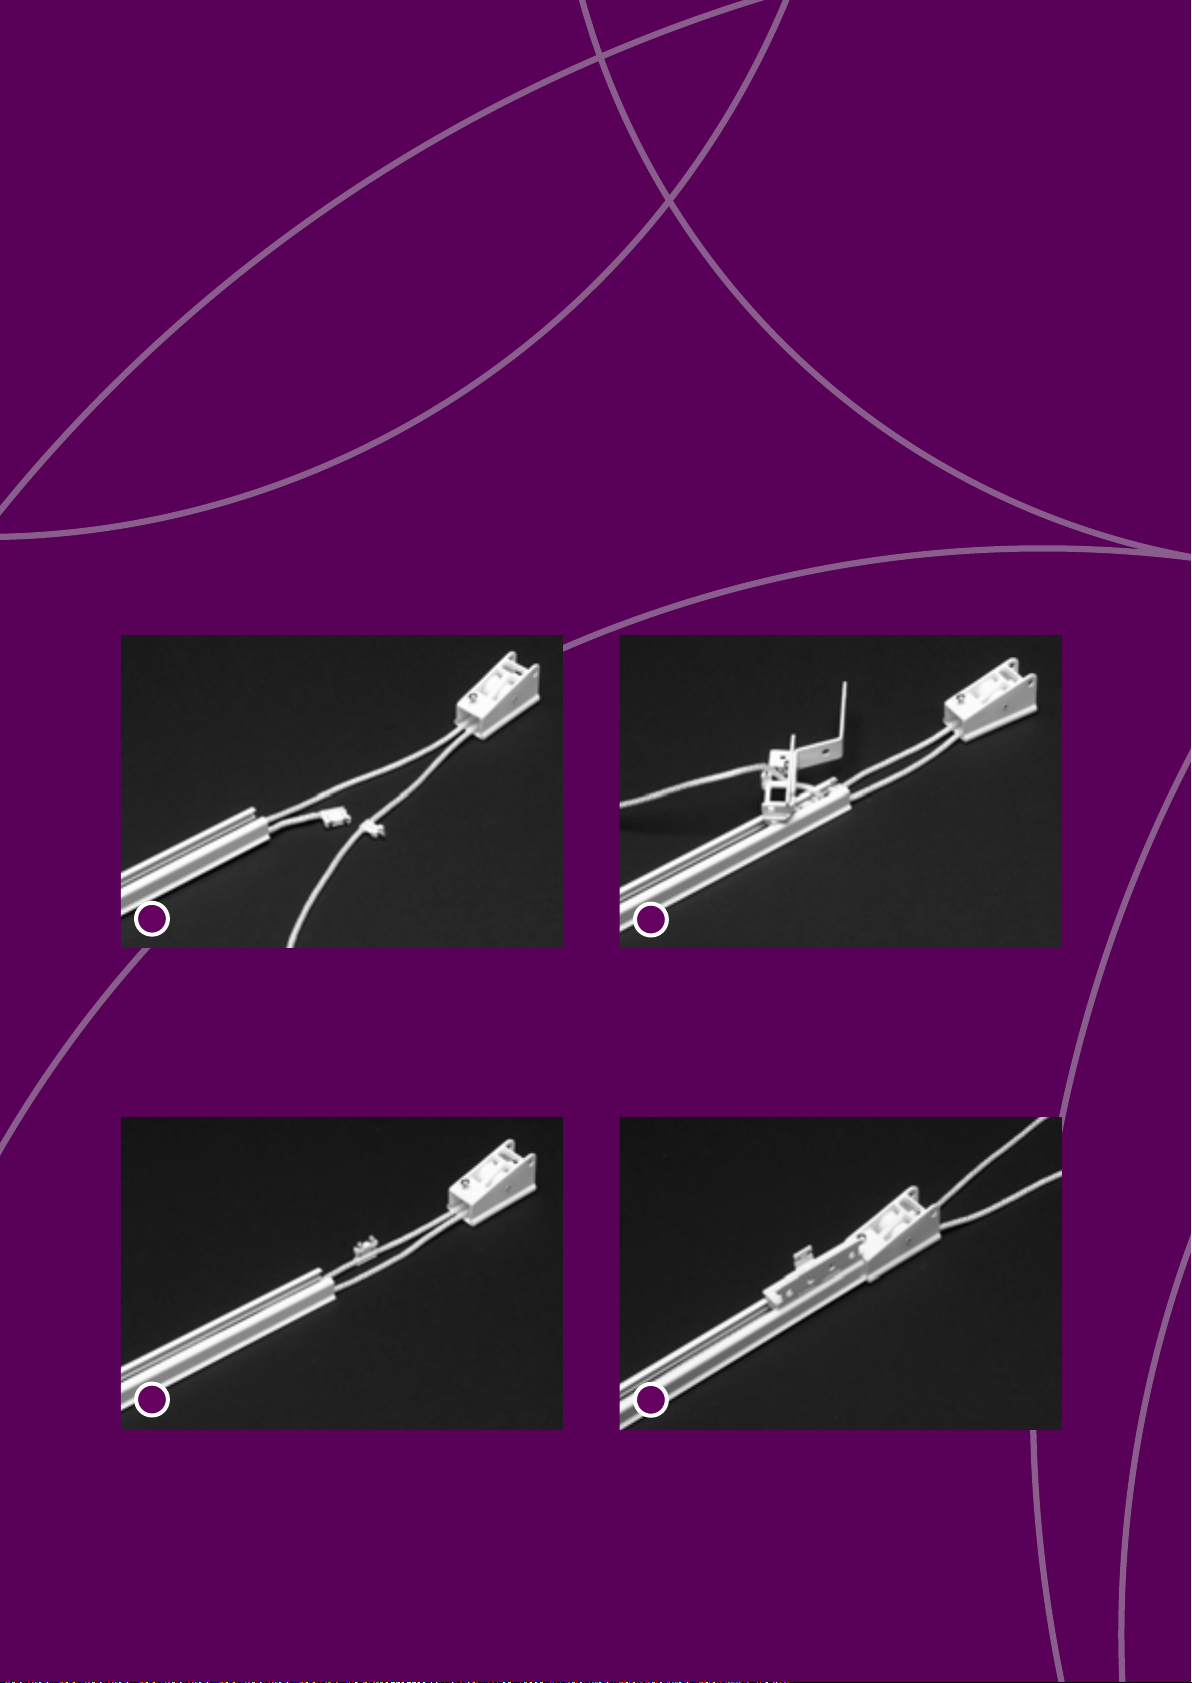
Pull one end of the cord through the holes of the first
pulley and slide the pulley over the track, like picture
shows. With one way draw of CCS®, the Small Pulley
has to be used.
Fix the pulley onto the track and continue next steps
on the other side of the track.
Fix the cord half into the cord connector. Ensure, with
CCS®that the gap of the cord connector is facing
outwards the track and with CKS®, the gap is facing
towards the middle of the track. The fixing is easy by
making a slide movement of the cord trough the gap
of the cord connector.
Pull the other end of the cord through the second
pulley and connect it into the other side of the first
cord connector.
12
34
CCS®& CKS®- Assemblage - cord
Instructions for assembling CCS®& CKS®center- and one-way draw, with cord.
Necessary items: Articlenumber:
CCS-track 30010.. ……
Nylon cord 1030401000
CCS Master Carrier Overlap R/L 30157…000
CCS Master Carrier Underlap R/L 30156…000
CCS End Pulley 30301…000
CCS End Pulley Small 30302…000
CKS Cord Connector 3030301000
Drill with bit 1
Lighter (for heathen the nylon cord)
Necessary items: Articlenumber:
CKS-track 1501001…..
Nylon cord 1030401000
CKS Master Carrier Overlap R/L 1515701000
CKS Master Carrier Underlap R/L 1515601000
CKS Pulley 1530101000
CKS Cord Connector 1530301000
Drill with bit 1
Lighter (for heathen the nylon cord)
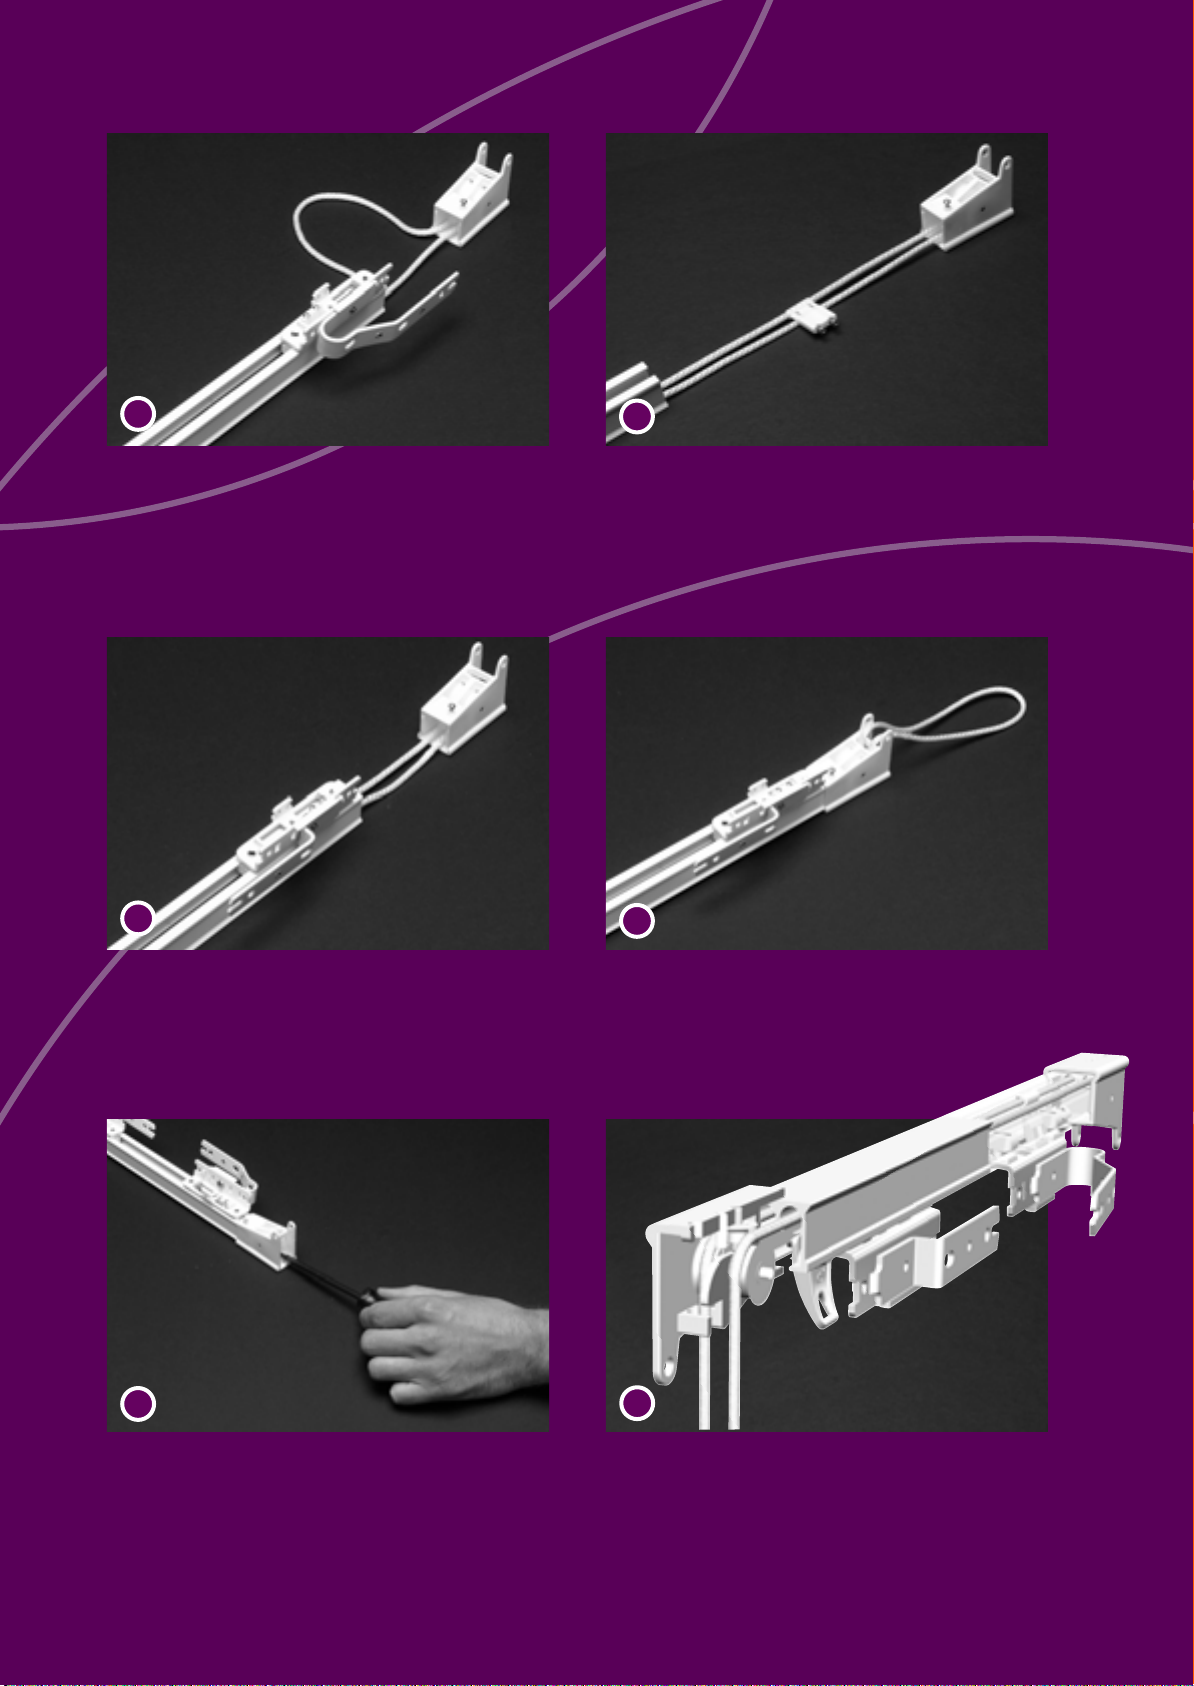
By pulling the cord, the side of operation can be deter-
mined. Slide the master carriers wide from each other
and screw the cord connectors tight. Now, the system
is balanced.
Ensure that the cord runs behind the metal pin in
the pulley. This avoids slack in the mechanism during
operation.
78
Slide the master carrier overlap, together with the cord
connector into the cord channel of the track.
Fix the second cord connector on the opposite cord,
(CCS®facing outside, CKS®to the middle of the track).
56
9
By pulling the cord through the big gap of the pulley,
it will hang straight down the curtain and a good
operation is guaranteed.
Slide this construction into the cord channels of the
track, against the first pulley. Leave seven balls out
of the cord channel, lifting up through the master
carrier. Now, determine side of operation.
Slide the second pulley onto the track (don’t screw it)
and mark the first ball on the opposite chain beside the
pulley. This must be done on the other side of the side
of operation! Take off the pulley and count eight balls
(with CCS®: nine balls) from the marked one. Cut the
chain after the ninth ball.
Fix the master carrier overlap on the chain by following
exactly the same procedure as described above.
Slide the master carriers wide from each other to check
that the system is balanced. For a solid construction,
use a tie rip on the extension of the master carrier.
By pulling the chain through the big gap of the pulley,
it will hang straight down the curtain and a good
operation is guaranteed.
1
34
Slide the master carrier underlap, together with the
second cord connector into the cord channel of the
track and fix the second pulley onto the track. Use the
screwdriver.
CCS®& CKS®Assembly - chain.
Instructions for assembling CCS®& CKS®, center- and one-way draw, with chain.
The system with chain is recommended in situations with one or more curves in the track. Steps 1 and 2 of the cord
instructions can be followed. Read ‘chain’ instead of cord.
On this page, the difference in assembling will be explained.
Necessary items: Articlenumber:
CCS-track 30010.. ……
BS Chain 4.5 x 6 3535501000
CCS Master Carrier Overlap R/L 30157…000
CCS Master Carrier Underlap R/L 30156…000
CCS End Pulley 30301…000
CCS End Pulley Small 30302…000
Drill with bit 1
Lighter (for heathen the nylon cord)
Necessary items: Articlenumber:
CKS-track 1501001…..
BS Chain 4.5 x 6 3535501000
CKS Master Carrier Overlap R/L 1515701000
CKS Master Carrier Underlap R/L 1515601000
CKS Pulley 1530101000
Drill with bit 1
Lighter (for heathen the nylon cord)
Determining track-length: CKS®minus 8 cm (3,2" for
center closing and one-way draw), CCS®minus 8 cm
(center closing) and minus 6,5 cm (one-way draw).
Determining cord-length: 2 times track length + 2 times
the desired drop height of the cord. Cut the nylon cord
by heating it with the lighter.
2
Remove the metal pins inside the both pulleys.
Pull the chain trough the second pulley and cross the
two ends of the chain through the master carrier under-
lap (overlap, when it’s a one-way draw). Leave two
balls space after the extension of the master carrier
and glue the last balls onto each other.
10
assemblageCKSCCSEng_210306 21-03-2006 13:47 Page 1
Pull one end of the cord through the holes of the first
pulley and slide the pulley over the track, like picture
shows. With one way draw of CCS®, the Small Pulley
has to be used.
Fix the pulley onto the track and continue next steps
on the other side of the track.
Fix the cord half into the cord connector. Ensure, with
CCS®that the gap of the cord connector is facing
outwards the track and with CKS®, the gap is facing
towards the middle of the track. The fixing is easy by
making a slide movement of the cord trough the gap
of the cord connector.
Pull the other end of the cord through the second
pulley and connect it into the other side of the first
cord connector.
12
34
CCS®& CKS®- Assemblage - cord
Instructions for assembling CCS®& CKS®center- and one-way draw, with cord.
Necessary items: Articlenumber:
CCS-track 30010.. ……
Nylon cord 1030401000
CCS Master Carrier Overlap R/L 30157…000
CCS Master Carrier Underlap R/L 30156…000
CCS End Pulley 30301…000
CCS End Pulley Small 30302…000
CKS Cord Connector 3030301000
Drill with bit 1
Lighter (for heathen the nylon cord)
Necessary items: Articlenumber:
CKS-track 1501001…..
Nylon cord 1030401000
CKS Master Carrier Overlap R/L 1515701000
CKS Master Carrier Underlap R/L 1515601000
CKS Pulley 1530101000
CKS Cord Connector 1530301000
Drill with bit 1
Lighter (for heathen the nylon cord)
By pulling the cord, the side of operation can be deter-
mined. Slide the master carriers wide from each other
and screw the cord connectors tight. Now, the system
is balanced.
Ensure that the cord runs behind the metal pin in
the pulley. This avoids slack in the mechanism during
operation.
78
Slide the master carrier overlap, together with the cord
connector into the cord channel of the track.
Fix the second cord connector on the opposite cord,
(CCS®facing outside, CKS®to the middle of the track).
56
9
By pulling the cord through the big gap of the pulley,
it will hang straight down the curtain and a good
operation is guaranteed.
Slide this construction into the cord channels of the
track, against the first pulley. Leave seven balls out
of the cord channel, lifting up through the master
carrier. Now, determine side of operation.
Slide the second pulley onto the track (don’t screw it)
and mark the first ball on the opposite chain beside the
pulley. This must be done on the other side of the side
of operation! Take off the pulley and count eight balls
(with CCS®: nine balls) from the marked one. Cut the
chain after the ninth ball.
Fix the master carrier overlap on the chain by following
exactly the same procedure as described above.
Slide the master carriers wide from each other to check
that the system is balanced. For a solid construction,
use a tie rip on the extension of the master carrier.
By pulling the chain through the big gap of the pulley,
it will hang straight down the curtain and a good
operation is guaranteed.
1
34
Slide the master carrier underlap, together with the
second cord connector into the cord channel of the
track and fix the second pulley onto the track. Use the
screwdriver.
CCS®& CKS®Assembly - chain.
Instructions for assembling CCS®& CKS®, center- and one-way draw, with chain.
The system with chain is recommended in situations with one or more curves in the track. Steps 1 and 2 of the cord
instructions can be followed. Read ‘chain’ instead of cord.
On this page, the difference in assembling will be explained.
Necessary items: Articlenumber:
CCS-track 30010.. ……
BS Chain 4.5 x 6 3535501000
CCS Master Carrier Overlap R/L 30157…000
CCS Master Carrier Underlap R/L 30156…000
CCS End Pulley 30301…000
CCS End Pulley Small 30302…000
Drill with bit 1
Lighter (for heathen the nylon cord)
Necessary items: Articlenumber:
CKS-track 1501001…..
BS Chain 4.5 x 6 3535501000
CKS Master Carrier Overlap R/L 1515701000
CKS Master Carrier Underlap R/L 1515601000
CKS Pulley 1530101000
Drill with bit 1
Lighter (for heathen the nylon cord)
Determining track-length: CKS®minus 8 cm (3,2" for
center closing and one-way draw), CCS®minus 8 cm
(center closing) and minus 6,5 cm (one-way draw).
Determining cord-length: 2 times track length + 2 times
the desired drop height of the cord. Cut the nylon cord
by heating it with the lighter.
2
Remove the metal pins inside the both pulleys.
Pull the chain trough the second pulley and cross the
two ends of the chain through the master carrier under-
lap (overlap, when it’s a one-way draw). Leave two
balls space after the extension of the master carrier
and glue the last balls onto each other.
10
assemblageCKSCCSEng_210306 21-03-2006 13:47 Page 1
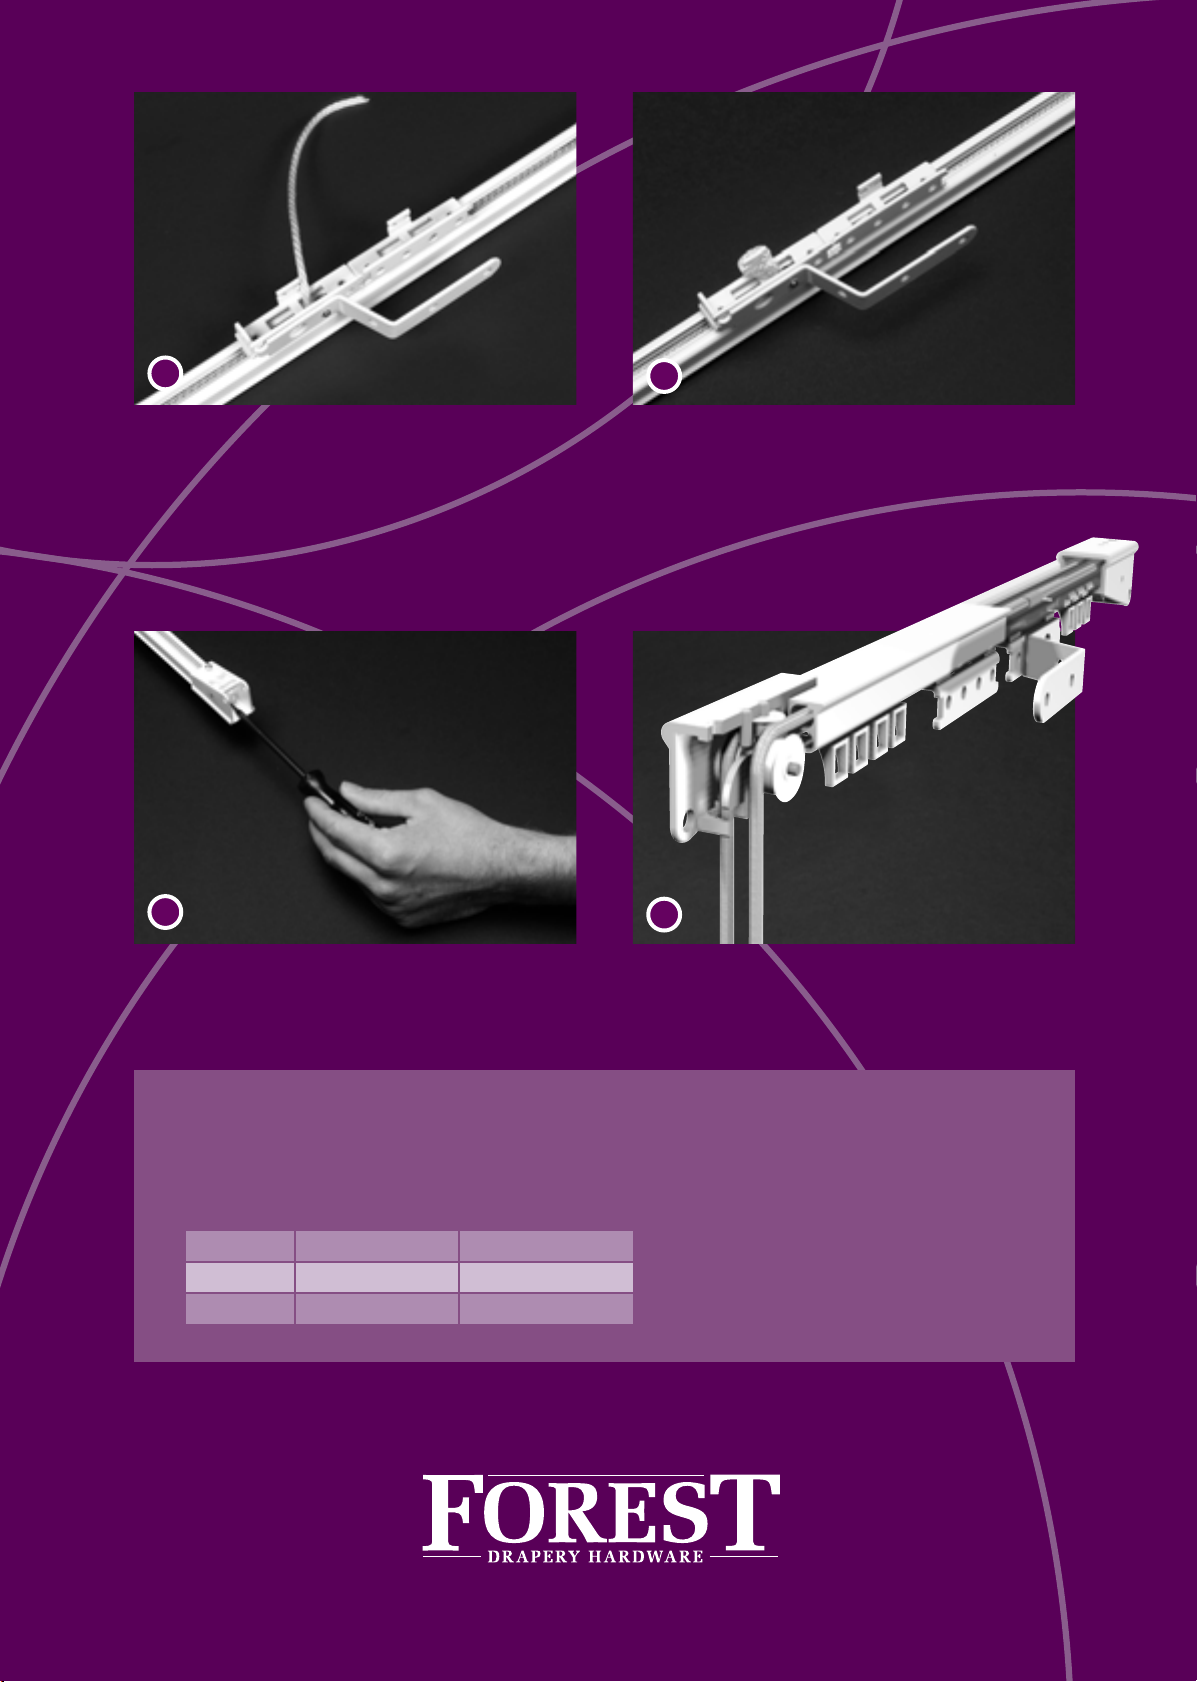
78
Determine the cord length by pulling the cord. Pull at
the end to reduce the drop height, pull at the loop to
increase the drop height. Screw the half cord connector
tight to position the cord drop height (with CCS®:
the second cord connector in the double construction).
If necessary, cut the cord by heating it and make a knot
at the end of the cord. Tight this on the extension in
the middle of the master carrier overlap. This creates
a strong construction.
56
By pulling the cord through the big gap of the pulley,
it will hang straight down the curtain and a good
operation is guaranteed.
Ensure that the cord runs behind the metal pin in
the pulley. This avoids slack in the mechanism during
operation.
CKS®& CCS®Assemblage
Tips & Suggestions:
• The maximum length for cording / chaining CCS®is as follow:
6,10 mtr (20 Ft.) and for CKS®is 6 mtr (19.7 Ft.).
• The above sizes are without the pulleys! With pulleys, the sizes are as follow:
centredraw one-way draw
CCS®6,18 mtr (20.27’) 6,17 mtr (20.24’)
CKS®6,08 mtr (20’) 6,08 mtr. (20’)
Fix one cord connector onto the end of the cord
(CCS®facing outside, CKS®to the middle of the track).
Slide the half cord connector on the other end of the
cord (with CCS®, use a normal CCS cord connector),
but do not screw it.
Slide the master carrier, together with the two cord
connectors into the cord channel of the track.
The cord is lifting out of the track, through the first
gap of the master carrier overlap.
Fix the second cord connector on the opposite cord,
(CCS®facing outside, CKS®towards the middle of the
track).
Slide the master carrier underlap, together with the cord
connector into the cord channel of the track and fix the
second pulley onto the track.
1
34
CCS®& CKS®Assembly – cord adjustability.
Instructions for assembling CCS®& CKS®, with cord adjustability.
This application can be made for CCS®, as well for CKS®. The advantage is that the requested drop height can be deter-
mined at a later stage. This feature makes the system very suitable for pre-assembling. This application is also possible
for one-way draw. Start, repeating the first two steps of the instructions with cord and continue with the steps below.
Necessary items: Articlenumber:
CCS-track 30010.. ……
Nylon cord 1030401000
CCS Master Carrier Overlap R/L 30157…000
CCS Master Carrier Underlap R/L 30156…000
CCS End Pulley 30301…000
CCS End Pulley Small 30302…000
CKS Cord Connector 3030301000
Drill with bit 1
Lighter (for heathen the nylon cord)
Necessary items: Articlenumber:
CKS-track 1501001…..
Nylon cord 1030401000
CKS Master Carrier Overlap R/L 1515701000
CKS Master Carrier Underlap R/L 1515601000
CKS Pulley 1530101000
CKS Cord Connector 1530301000
CKS Cord Connector (half) 1530311000
Drill with bit 1
Lighter (for heathen the nylon cord)
2
03-2006
assemblageCKSCCSEng_210306 21-03-2006 13:47 Page 4
This manual suits for next models
1
Table of contents


