Foxx FOXXD MIRO User manual

1

2
About this Manual
Thank you for choosing FOXXDTM MIROTM smartphone. In order
to keep your phone in its best condition, please read this
manual and keep it for future reference.
Table of Contents
1. About Your Phone-----------------------------------------------------4
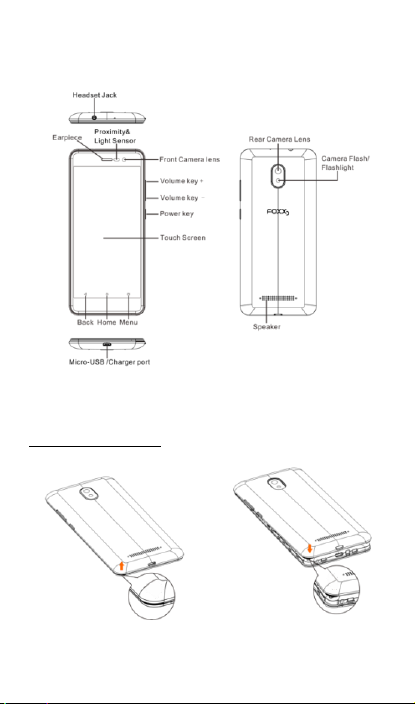
1.1 Overview-----------------------------------------------------------------4
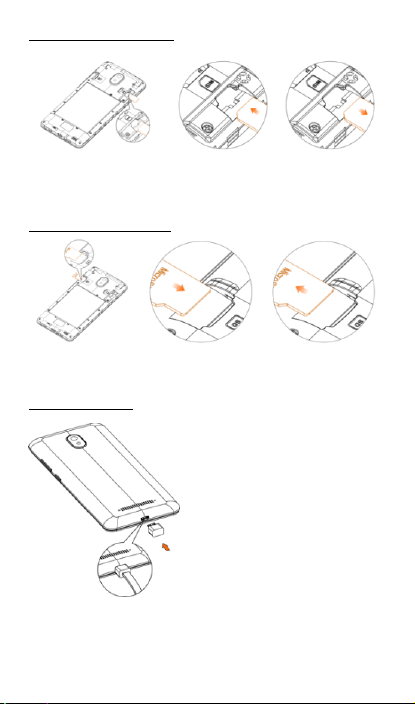
1.2 Getting started----------------------------------------------------------4
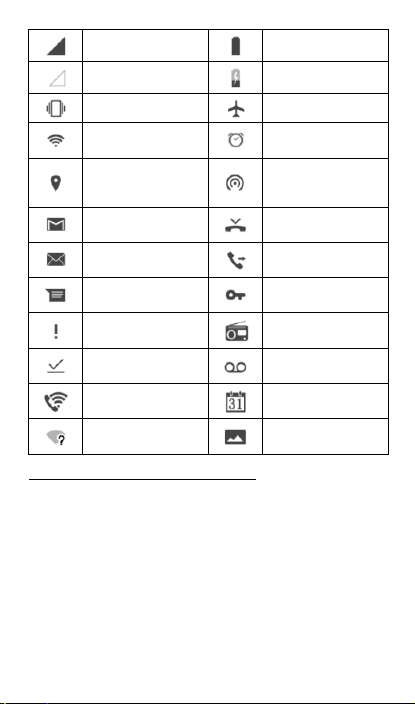
1.3 Home screen------------------------------------------------------------ 6
2. Applications ----------------------------------------------------------- 12
2.1 Camera----------------------------------------------------------------- 12
2.2 Photo gallery---------------------------------------------------------- 13
2.3 Clock-------------------------------------------------------------------- 14
2.4 Sound recording ----------------------------------------------------- 14
2.5 FM radio---------------------------------------------------------------- 15
2.6 Playing music--------------------------------------------------------- 15
2.7 Calendar --------------------------------------------------------------- 15
3. Text Input-------------------------------------------------------------- 16
3.1 Using on-screen keyboard ---------------------------------------- 16
3.2 Text editing------------------------------------------------------------ 16
4. Making a Call --------------------------------------------------------- 17
4.1 Wi-Fi Calling ---------------------------------------------------------- 17
4.2 Placing a call---------------------------------------------------------- 17
4.3 Answering or rejecting a call-------------------------------------- 18
4.4 Retrieving your call history ---------------------------------------- 18
4.5 Accessibility----------------------------------------------------------- 18
5. Contacts---------------------------------------------------------------- 21
5.1 Adding a contact----------------------------------------------------- 21
5.2 Importing, exporting and sharing contacts -------------------- 21
5.3 Accounts--------------------------------------------------------------- 22
6. Messaging------------------------------------------------------------- 23
6.1 Write a message----------------------------------------------------- 23
6.2 RCS Message -------------------------------------------------------- 24

3
7. Email-------------------------------------------------------------------- 26
7.1 Adding an email account------------------------------------------- 26
7.2 Sending an email ---------------------------------------------------- 26
8. Getting Connected -------------------------------------------------- 27
8.1 Connecting to the Internet----------------------------------------- 27
8.2 ChromeTM -------------------------------------------------------------- 27
8.3 Connecting to a computer----------------------------------------- 28
8.4 Sharing your phone's mobile data connection --------------- 28
9. Google Maps---------------------------------------------------------- 29
9.1 My Location ----------------------------------------------------------- 29
9.2 Search for a location------------------------------------------------ 30
9.3 Get directions--------------------------------------------------------- 31
10. Google Play Store--------------------------------------------------- 32
10.1 Find an application -------------------------------------------------- 32
10.2 APP download and install ----------------------------------------- 33
10.3 Manage your applications ----------------------------------------- 33
11. Data Backup ---------------------------------------------------------- 34
12. Factory Reset--------------------------------------------------------- 35
13. Applications & Internal Storage ---------------------------------- 36
13.1 Applications ----------------------------------------------------------- 36
13.2 Internal phone storage --------------------------------------------- 36
14. Safety and Use------------------------------------------------------- 37
15. General information------------------------------------------------- 47
16. One Year Limited Warranty--------------------------------------- 48
17. Troubleshooting------------------------------------------------------ 50

4
1. About Your Phone
1.1 Overview
1.2 Getting started
1.2.1 Setting up
Replacing the back cover

5
Inserting the Nano SIM card
Follow instructions illustrated inthe above picture, insert the nano SIM into
the SIM compartment with the gold contacts facing down. Remove the SIM
card by pushing the top of the SIM card from the opening and pulling it out.
Installing the microSD card
Install the microSD card with the gold contacts facing down. Remove the
microSD card by pulling out of the slot.
Charging the phone
Insert micro USB end of the charging cable into the charging port of your
phone. Plug the charger into a wall outlet or insert the regular end of the
charging cable into any external USB port.

6
1.2.2 Powering on the phone
Press and hold the Power key for a few seconds to power on.
Setting up your phone for the first time
The first time you power on the phone, you should set it up following these
steps:
1. Select the phone's language, and then press “START”.
2. Connect to Wi-Fi. When the "Learn about Wi-Fi Calling" pop-up
appears, you can either select "SKIP" or "LEARN MORE".
3. Choose “Copy apps & data” options by following the prompts.
4. Set up Gmail™ and Services by following the prompts, view Terms and
select “I agree”.
5. Set up the “Protect your phone feature”. This feature prevents others
from using your phone without your permission.
6. Next, the Google Services page will be displayed. Choose the services
you wish to use and select “Next” from the options at the bottom of
your screen.
Note: Even without a SIM card installed, your phone will still power on and
you will be able to connect to a Wi-Fi network and use some of the phone
features.
1.2.3 Powering off your phone
While the phone is on, press and hold the Power key until the pop-up menu
appears, select “Power off” to confirm.
1.3 Home screen
You can organize all of the items (applications, shortcuts, folders and
widgets) that you use most frequently to your Home screen for quick
access. Touch the Home key to get back to the Home screen. Swipe the
Home screen right to view additional screens.

7
1.3.1 Status bar
From the status bar youcan view notification icons and current call, Wi-Fi
and signal status icons. Details are in the following figures.
2G connected
Connected to a
Bluetooth device
2G in use
Bluetooth is on
4G connected
Speakerphone is on
4G in use
Headset connected
4G LTE connected
Battery is very low
4G LTE in use
Battery is low
No SIM card
inserted
Battery is partially
drained
Status bar
•Touch and drag down to open the notification
panel.
Search bar
•Touch text box to enter text search screen.
•Touch voice icon to enter voice search screen.
Application/Folder
•Touch an icon to open an application, folder,
etc.
Favorite tray applications
•Touch to open an application.
•Touch and hold to move an application.

8
Signal strength
Battery is full
No signal
Battery is charging
Vibrate mode
Airplane mode
Connected to a Wi-
Fi network
Alarm is set
GPS is on
Both USB tethering
and portable
hotspots are on
New Gmail message
Missed call
New Email message
Call forwarding is on
New text or
multimedia message
Connected to VPN
Problem with SMS
or MMS delivery
Radio is on
Download completed
New voicemail
Wi-Fi Calling
Upcoming event
An open Wi-Fi
network is available
Screenshot captured
Quick Setting panel and Notifications panel
Touch and swipe down the Status bar to open the Quick Settings panel,
the Notifications panel is also shown when there are pending notifications.
From the Quick Settings panel, touch a desired icon to make changes.

9
1.3.2 Search bar
The phone’s Home screen has a pre-installed Google search function bar.
As usual, enter the text/phrase to search by text, touch then speak the
word/phrase to search by voice.
1.3.3 Lock/Unlock screen
To protect your phone and privacy, a variety of patterns, PIN or Password
can be created to lock your phone screen.
To create a screen unlock pattern, touch Settings > Security & location >
Screen lock > Pattern, then draw your own pattern.
Quick Settings panel
•Touch to extend the Quick Settings panel.
Clear All
•Press to clear all displayed notifications.
Notifications panel

10
To create a screen unlock PIN or Password, touch Settings > Security &
location > Screen lock > PIN or Password, then set your PIN or Password.
To lock phone screen, press the Power key once. To unlock phone screen,
press the Power key once to light up the screen, then draw your unlock
pattern or enter PIN or Password.
Note: This phone provides quick access to the camera without unlocking
screen. When the screen is lit up by pressing the Power key, you can see
a camera icon at the right bottom corner. Swiping it to the left will open
the camera app. However, you have to unlock the screen to access other
functions.
1.3.4 Personalize your Home screen
Add
Touch and hold an item (a folder, an application, or a widget) to activate
the “Move” mode and drag the item to any Home screen you prefer.
Reposition
Touch and hold an item to be repositioned to activate the “Move” mode,
drag the item to the desired position and then release. You can move items
both on the Home screen and the Favorite tray. Hold the icon on the left
or right edge of the screen to drag the item to another panel.
Draw your unlock pattern
Touch to confirm

11
Remove
Touch and hold the item to be removed to activate the “Move” mode and
drag the item up to the top of the icon.
Create folders
To improve the organization of items (shortcuts or applications) on the
Home screen, you can add them to a folder by stacking one item on top of
another. To rename a folder, open it and touch the folder’s title bar to input
the new name.
Wallpaper customization
TouchSettings on the applications screen, then touchDisplay > Wallpaper
to customize wallpaper.
1.3.5 Volume adjustment
You can set the media, alarm and ring volume preferences by pressing the
Volume up/down key, or by touching Settings > Sound to set the volume.

12
2. Applications
2.1 Camera
Touchthe camera icon on the Home screen, you can use the camera
APP to take photos and videos, and then share with people, further you
can select a photo as your wallpaper.
2.1.1 Taking a picture
To take a picture, touch the camera icon on Home screen to open
camera APP, aim the lens at the subject, make necessary adjustments,
then touch or press volume key to take a photo.
2.1.2 Recording a video
To record a video, touch the camera icon on Home screen, touch
to switchto the video camera . Thentouch to startrecording
and touch again to stop recording. You can pause the recording by clicking
the icon in the upper right corner, click the icon to resume
Touch to
select scenes
Touch to enter
camera settings
Touch to select
special effects
Touch to switch
front/back
camera
Touch to view
picture/video
you have taken
Touch to turn
on/off HDR
Touch to take
a picture
Touch to switch between
video/panorama mode

13
recording, and touch the screen to take a photo during the recording, the
video is saved automatically when ending the recording.
2.2 Photo gallery
Touch the Gallery icon on Home screen, you can view, edit, share,
delete your pictures/videos saved on your phone or memory card.
2.2.1 Photo
When viewing photos, you can view photos in a slideshow, and view photo
details. You also have options to delete, share photos, set photos as
contact photos, or set photos as wallpapers, etc.
To edit, touch a picture and select to edit. When finishing changes,
touch “SAVE” to save changes or touch to discard changes.
To share, touch a picture and select , it brings up a menu for you to
choose: Messaging, Add to Maps, Bluetooth, Gmail, Save to Drive, Upload
to Photos etc.
To delete, touch a picture and select , then touch ”OK” to delete or
touch ”CANCEL”.
To make a slideshow, touch a picture > touch the menu , select
“Slideshow”, you can view photos in a slideshow mode.
To set picture as, touch a picture > touch the menu , select ”Set picture
as”, then you can set the picture as wallpaper or contact photo.
To see the photo details, touch a picture > touch the menu ,
select ”Details”, you can view details such as Title, Time, Location, File
size, Path, etc.
To print, touch a picture > touch the menu , select ”Print”, you can print
a photo via proper printer setting up.
2.2.2 Video
Similarly, when viewing video items, select a desired video, touch to
play the video. Further, touch the video, you can select or to either
share or delete the video, you can have more choices by touch the menu
, then pick an option, Slideshow, Trim, Mute, or Details for further action.

14
2.3 Clock
Touch clock on Home screen, you can set alarm, clock, timer,
stopwatch, etc.
2.3.1 Setting an alarm
Touch , select “ALARM” > touch to add an alarm. When done, you
should see an alarm icon in the status bar. When the alarm goes off, you
canclickSNOOZE or swipe left to snooze, or touch DISMISS or swipe
right to dismiss.
2.3.2 Setting a world clock
Touch , select “CLOCK” > touch to bring up a list of world cities,
touchthe checkbox to selectcities to be added, back to the clock interface
you will see those cities displayed.
2.3.3 Setting a timer
Touch , select “TIMER” > touch the number to enter time, when done
touch to start the timer. If the time entered is wrong, touch to delete.
When the time is up, you cantouch "STOP" to end the timer or touch "ADD
1 MIN " to add time.
2.3.4 Setting a stopwatch
Touch , select “STOPWATCH”, touch the time inside the circle or touch
to start. Once started, you can touch RESET to reset record, touch
“LAP” to record time, touch the time inside the circle again or touch to
pause, touch RESET to reset record, touch “SHARE” to share the record.
2.4 Sound recording
Touch on home screen to open the APP, touch to start recording,
touch to pause recording. Once done, touch to bring up you an
option to select “SAVE” or “DISCARD”. Other options can be found by
touching to display Recording list. You can replay any item on the list
by touching it. Long press any item on the list to bring up further options
for you to choose: to rename a recorded file, to share, and to
delete.

15
2.5 FM radio
Touch on home screen, you can listen to music and news on FM radio.
To use the FM Radio, you have to plug in a headset which serves as the
radio antenna.
2.6 Playing music
Touch on Home screen to play music or recorded files. Note some files
whichmay not support the format or exceed the limit may not play properly.
Select a music file and you can control playback with following icons.
Icons
Functions
Touch to pause playback
Touch to resume playback
Touch to skip backward, or scan backward
Touch to skip forward, or scan forward
Touch to change the repeat mode
Touch to activate shuffle mode
Touch to show the current playlist
2.7 Calendar
Touch the date on home screen, you can use the calendar to add events
and manage events. To delete or edit an event you have added, touch the
event to bring up options, to edit, “Save” to save the event, to
select “Delete” and confirm when prompted.

16
3. Text Input
3.1 Using on-screen keyboard
On-screen keyboard settings
Touch Settings > System > Language & input > Virtual keyboard, several
options become available for your selection. You can change the keyboard
orientation once Auto-rotate is enabled.
3.2 Text editing
To edit text:
•Touchand hold or double-tap within the text to edit.
•Drag the tabs to change the highlighted selection.
•The following options will be shown: CUT, COPY, PASTE, SHARE,
SELECT ALL.

17
4. Making a Call
4.1 Wi-Fi Calling
Wi-Fi Calling allows you to make and receive phone calls and messages
over a Wi-Fi connection. Once you see the Wi-Fi Calling icon in the
Status bar, your phone is ready for Wi-Fi Calling.
Important! You must have an E911 address registered with your account
in order to use Wi-Fi Calling. You can register an E911 address via the
myMetro®Android™ app that is either pre-installed on your phone, or
available for download from the Google PlayTM Store. If you do not have
an Android smartphone, you can call 611 to update the address.
4.2 Placing a call
Place a call using Call by touching the Application tab from the Home
screen and select Call .
To make a regular phone call, choose from the following options:
•Enter the desired number directly into the dial pad, then touch , or
tap on the contact to place a call.
•If an error is made when typing in a phone number, you can delete the
incorrect digit(s) by touching .
•To hang up a call, touch .
Touch to
display dial
pad
Slide to access
the call history
and contact
Touch and
hold to
access the
Voice Mail

18
International calling
To make an international call, you can long press to enter “+”, then
enter the international country prefix followed by the fullphone number and
tap .
Emergency calling
To make an emergency call, you can dial the emergency number (911)
and touch . Dialing 911 works without a SIM card and without
requiring the PIN or password to be entered.
4.3 Answering or rejecting a call
To receive an incoming call
•Swipe the icon up to answer;
•Swipe the icon down to reject;
•Swipe the icon to the lower left corner icon to reject the call
and send a text message.
To mute the ringtone volume of an incoming call, press the Volume up or
down key.
4.4 Retrieving your call history
You can access your call history by tapping call history icon from the call
screen to view full history or tapping to select call history.
4.5 Accessibility
4.5.1 TTY (used in USA)
This phone can be used in TTY (Teletype) mode to work with standard
teletype machines. (Please turn off Wi-Fi before use.) To set up, go to >
> Settings > Accessibility > TTY mode, then select a desired mode:
•TTY Full: type and read text on the TTY machine.
•TTY HCO (Hearing Carry Over): type on the TTY machine, and to
listen to voice replies on the phone receiver.
•TTY VCO (Voice Carry Over): speak into the phone and to read text
replies on the TTY machine.
Please connect the TTY machine to the phone’s 3.5mm jack and refer to
your TTY machine’s guide for further information.

19
4.5.2 Hearing aids (used in USA)
This phone is M4/T3 compatible for hearing aids. To set up: go to >
> Settings > Accessibility > Hearing aids.
4.5.3 RTT calling
To set this up, go to > > Settings > Accessibility > Real time text
calling Settings > RTT, then turn on the RTT Mode button. You can also
set the RTT operation mode and RTT on an outgoing call.
You may select “RTT operation mode” option which brings up either
“Visible During Call” or “Always Visible” for you to pick, or “RTT on an
outgoing call” option which brings up two options, “Manual” and “Auto” for
you to pick. Once done, you can click the dial icon and select
“OK“ when a pop-up message window showing up.
When “Always Visible” option is selected, the dial icon will change to
a T-letter pattern. You can click it to enter RTT calling. On the other hand,
when “Visible During Call” option is selected, the dial icon will remain

20
the same. You can click it to make a call, and as the call connection is
established, you can select “Upgrade to RTT” to enter RTT calling.
Placing an RTT call
RTT call operations are very similar to that of regular a call. Simply enter
the number and click the dial icon to make an RTT call or click dial icon,
select an entry from the call history to make a call. RTT call allows you to
send real time text simultaneously using text input window.
Touch the menu to show other
options
Text input window
Table of contents