FRITZ!WLAN Stick 1.1 Owner's manual

A
Computer
Access Point
Notebook
Package Contents
one FRITZ!WLANUSB Stick
LEDs on the FRITZ!WLANUSB Stick
During operation, the LEDs on the FRITZ!WLANUSB Stick indicate the follow-
ing:
WLAN
flashes during data exchange between WLAN devices
USB
remains lit as soon as the FRITZ!WLANUSB Stick has been detected by the
operating system
one FRITZ!WLANUSB Stick CD with
driver software
FRITZ!WLAN control software
comprehensive manual in PDF format
This Is the FRITZ!WLANUSBStick
With FRITZ!WLANUSB Stick you can establish WLAN connections to a variety of WLAN devices.
These include:
WLAN connections to WLAN access points
A WLAN access point can provide access to DSL and be used to connect computers to
form a wireless network.
direct WLAN connections between WLAN users
WLAN users with FRITZ!WLANUSB Sticks can establish a direct WLAN connection without
using an access point. This type of network is known as an ad-hoc network. one USB extension cable

AVM Stick&Surf Technology
With AVM Stick&Surf technology you can automatically transmit the WLAN secu-
rity settings of your FRITZ!Box to the FRITZ!WLANUSB Stick and to your computer.
For this, your FRITZ!Box must be equipped with a TypeA port for USB devices (cf.
the illustration in the margin).
If your FRITZ!Box is not equipped with such a port, you can use the FRITZ!WLAN control
software to change the WLAN security settings. For more information, see the “Establishing a
WLAN Connection” section.
In order to use the Stick&Surf technology, perform the following steps:
1. Insert the FRITZ!WLANUSB Stick into the USB port on your FRITZ!Box and wait until the
“INFO” LED remains lit.
Connecting the FRITZ!WLANUSBStick with a FRITZ!Box
2. Insert the FRITZ!WLANUSB Stick into the USB port on your computer.
Connecting the FRITZ!WLANUSBStick with a notebook
3. After successful transmission of the security settings, the Stick&Surf logo is displayed
on the screen.The WLAN connection between your FRITZ!Box and the FRITZ!WLANUSB
Stick is established automatically.

Installation in Windows7 / WindowsVista
Administrator rights are required for installation!
Please install the current Microsoft Service Packs and updates using Micro-
soft Windows Update and use a USB2.0 port for optimum performance of your
FRITZ!WLANUSB Stick.
If you are using a FRITZ!Box with a USB port, first use Stick&Surf to transmit the WLAN
security settings from your FRITZ!Box to your computer.
Perform the following steps to install the FRITZ!WLANUSB Stick:
1. Switch on the WLAN device you wish to connect to.
2. Switch on your computer.
3. Insert the FRITZ!WLANUSB Stick into the USB port on your computer.
Windows detects the FRITZ!WLANUSB Stick automatically. This process may take some
time.
4. In the dialog for running the “AVM FRITZ!WLANUSB Stick” CD, click the “Install or Run
‘AVM FRITZ!WLANUSB Stick’” entry.
5. Confirm any queries from Windows during installation by clicking "Yes" or "Continue".
The drivers and the control software for the FRITZ!WLANUSB Stick are installed automati-
cally.
A progress bar indicates the progress and the conclusion of the installation. Then follow the
instructions in the section “Establishing a WLAN Connection”.
Installation in WindowsXP
Administrator rights are required for installation!
Please install the current Microsoft Service Packs and updates using Micro-
soft Windows Update and use a USB2.0 port for optimum performance of your
FRITZ!WLANUSB Stick.
If you are using a FRITZ!Box with a USB port, first use Stick&Surf to transmit the WLAN
security settings from your FRITZ!Box to your computer.
Perform the following steps to install the FRITZ!WLANUSB Stick:
1. Switch on the WLAN device you wish to connect to.
2. Switch on your computer.
3. Insert the FRITZ!WLANUSB Stick into the USB port on your computer.
Windows detects the FRITZ!WLANUSB Stick automatically. This process may take some
time.
4. The drivers and the control software for the FRITZ!WLANUSB Stick are installed automati-
cally.
If you are prompted to do so, insert the FRITZ!WLANUSB StickCD and follow the instruc-
tions on the screen.
If an additional Windows dialog asks if you want to install software not digitally signed
by Microsoft, click the “Continue Anyway” button.
A progress bar indicates the progress and the conclusion of the installation. Then follow the
instructions in the section “Establishing a WLAN Connection”.
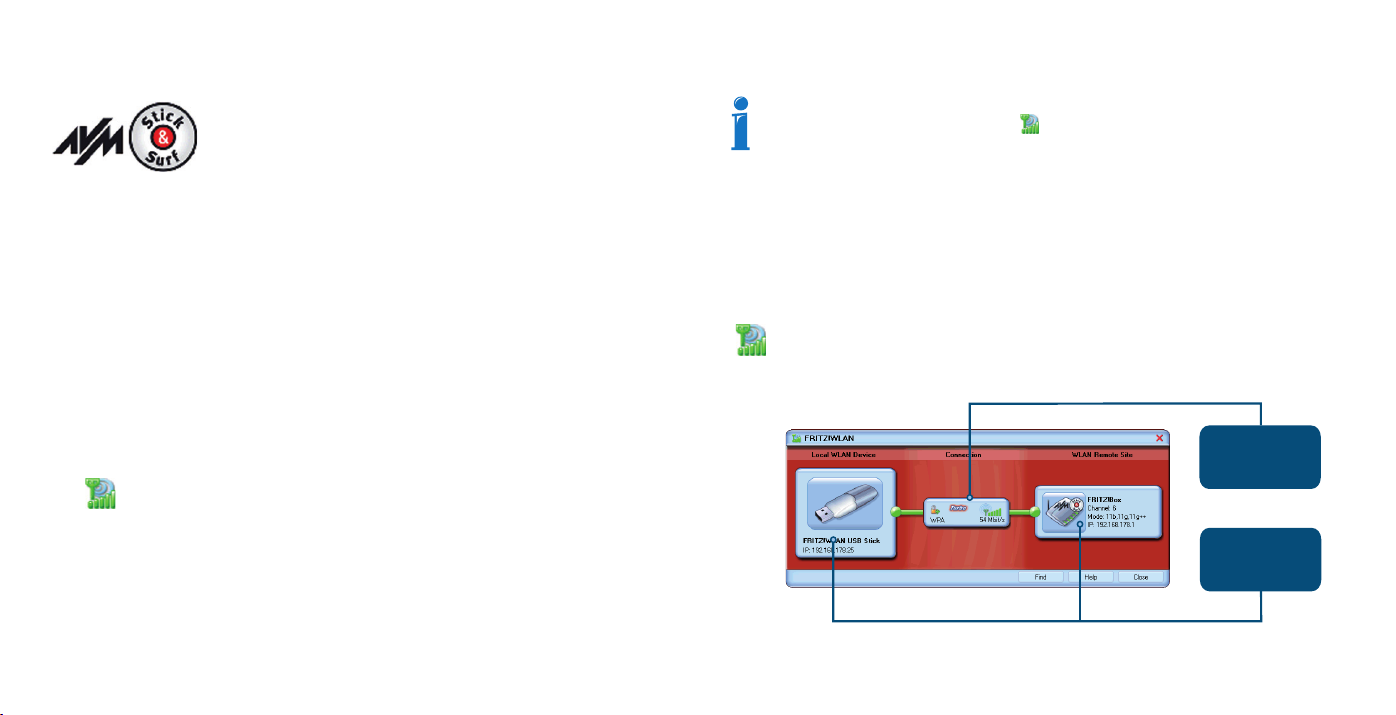
Click the connection icon to
display the connection properties
and to establish or clear the
connection.
Click the icon of a WLAN device to
display its properties or
manage the device.
Establishing a WLAN Connection
If you performed installation using Stick&Surf, no further steps
are necessary. You can now work with the automatically established
WLAN connection to your FRITZ!Box.
If you performed an installation without using Stick&Surf, you
have to select the WLAN remote site (the WLAN access point) to connect with manually in your
WLAN service program.
If the control software FRITZ!WLAN does not search automatically for WLAN remote sites at
your location, follow the instructions on the screen to search for WLAN remote sites using the
Microsoft WLAN Service.
Once a list of the WLAN access points found is displayed, proceed as follows:
1. Double-click the WLAN device (WLAN access point) to which you would like to establish a
connection.
2. Enter the network key of the WLAN access point. On the AVM FRITZ!Box family products,
the network key is printed on the underside of the device.
3. The WLAN connection is established.
Once the connection is established, the WLAN icon in the notification area of
the Windows taskbar turns green. Click the icon to display connection details.
Please see also the section “The FRITZ!WLAN ControlSoftware”.
The FRITZ!WLAN Control Software
If the FRITZ!WLAN control software has not been installed yet on your computer, you
can do this now: Click the WLAN icon in the notification area of the Windows task-
bar with the right mouse button. Select the command “Install AVM WLAN Software”
and follow the instructions on the screen.
With the FRITZ!WLAN control software you can establish WLAN connections to a variety of
WLAN devices, clear these connections and display them. Establishing connections with
FRITZ!WLAN is always based on the same principle: search, find and connect.
Every time the computer starts, the FRITZ!WLAN icon appears in the notification area of the
taskbar:
Clicking once opens a context menu with which you can establish, clear, and
display connections.
Double-click to open the FRITZ!WLAN control software.
FRITZ!WLAN control software
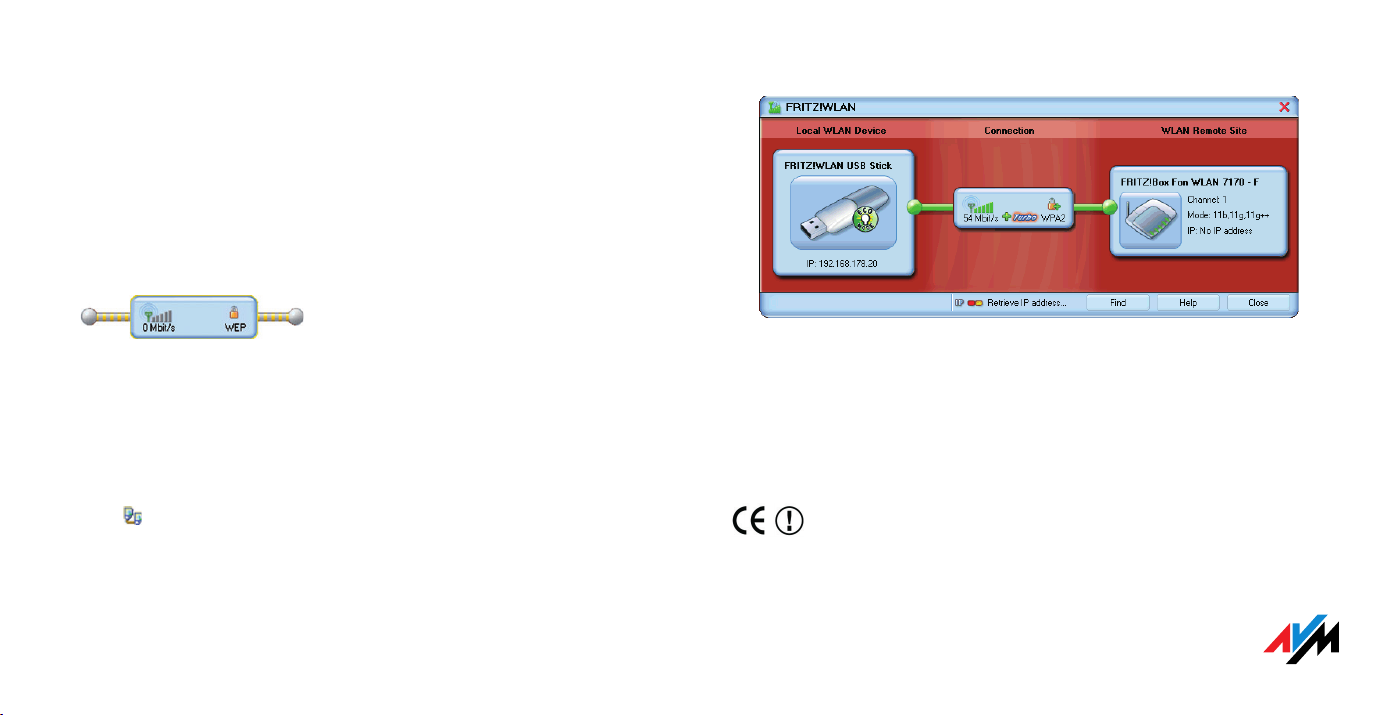
Direct Connections with Other WLAN Users
With a direct connection WLAN users can build a network quickly and directly (ad hoc) to
exchange data without an access point. An ad-hocnetwork of this nature is created by one
WLAN user; all other WLAN users can register at this network.
How to Create an Ad-hoc Network
1. Click the FRITZ!WLAN icon in the notification area of the taskbar and select the menu
command “Create New Ad-hocNetwork...”. The “Ad-hoc Network” window opens.
2. Assign a WLAN key.
3. Confirm your settings by clicking “OK”.
Yellow waves in the FRITZ!WLAN control software indicate
that the ad-hoc network is ready.
4. Now an ad-hoc network with the network name “ad hoc” has been created.
How to Join an Ad-hocNetwork
1. Click the FRITZ!WLAN icon in the notification area of the taskbar and select the menu
command “Find”.
The “Find and Select WLAN Devices” dialog opens.
2. FRITZ!WLAN searches for WLAN devices at your location. An ad-hoc network is displayed
by the icon.
3. Select the ad-hoc network and click “Select”.The “Ad-hoc Network” window opens.
4. Enter the shared WLAN key and confirm it with “OK”.
5. The ad-hoc network is displayed in the FRITZ!WLAN control software as a known device
and the WLAN connection is established.
FRITZ!WLAN control software: ad-hocnetwork
6. Use the Microsoft “Network” icon to access the network sharing enabled on the con-
nected computer.
Declaration of CE Conformity
The FRITZ!WLANUSB Stick satisfies the requirements of the EU directive 1999/5/EC(R&TTE Directive:
Radio Equipment and Telecommunications Terminal Equipment). TheCE symbol confirms that the
FRITZ!WLANUSB Stick conforms with the above mentioned regulation.
The detailed declaration of CE conformity is available in the manual (PDF) file in the “INFO”
folder on the FRITZ!WLANUSBStickCD included with delivery.
Indication of Countries
The FRITZ!WLANUSB Stick is designed for use in allcountries of the European Union and in Switzerland,
Norway and Iceland. In France only indoor operation is permitted.
© AVM GmbH 2007 – 2009. All rights reserved.
Documentation release 11/2009

FRITZ!WLAN
USB Stick 1.1
Installation and
Operation
System Requirements
Computer with a fast USB2.0 port or with a USB1.1 port
Pentium-class computer or notebook (500MHz or higher)
For installation without CD: Microsoft Windows7, Vista, XP (32-Bit edition)
For installation with CD: CD-ROM drive and Microsoft Windows7, Vista, XP (32- or 64-Bit
edition)
Product Information
Comprehensive manual (in pdf format) on the FRITZ!WLANUSB StickCD
Online Help on the FRITZ!WLAN control software
Technical Summary
Wireless USB2.0 WLAN adapter
Compatible to the 802.11g wireless standard (54Mbit/s), downward compatible to
802.11b networks (11Mbit/s)
With 802.11g++ up to 125Mbit/s (gross) for wireless high-speed access (LAN/DSL), so
that a data throughput 35% higher than with the 802.11g standard can be achieved
Maximum WLAN security with WPA2 (802.11i)/WPA/WEP (128/64)
Customer Service
E-mail support: www.avm.de/en/service
Updates: www.avm.de/en/download
Version1.1
Table of contents