Gaggenau BSP 250 User manual

2
Table of contents
Instructionmanual
Important safety information 3
Causes of damage 5
Environmental protection 5
Saving energy 5
Environmentally-friendly disposal 5
Getting to know the appliance 6
Steam oven 6
Display and operating controls 7
Symbols 7
Colours and display 7
Additional information (and )8
Cooling fan 8
Function selector positions 8
Accessories 9
Special accessories 10
Before using for the first time 10
Setting the language 10
Setting the time format 11
Setting the clock 11
Setting the date format 11
Setting the date 11
Setting the temperature format 11
Setting the water hardness 12
Ending initial set-up 12
Calibration 12
Grease filter 13
Cleaning the door panel 13
Cleaning accessories 13
Activating the appliance 13
Standby 13
Activating the appliance 13
Operating the appliance 14
Filling the water tank 14
Cooking compartment 14
Inserting accessories 15
Switching on 15
After every use 15
Safety shut-off 15
Timer functions 16
Calling up the timer menu 16
Timer 16
Stopwatch 16
Cooking time 17
End of cooking time 18
Long-term timer 18
Setting the long-term timer 18
Individual recipes 19
Recording a recipe 19
Programming a recipe 19
Entering names 20
Starting recipes 20
Change recipe 20
Deleting recipes 20
Core temperature probe 21
Inserting the core temperature probe in the food
to be cooked 21
Setting the core temperature 22
Core temperature guidelines 22
Child lock 23
Activate the child lock 23
Deactivating the child lock 23
Basic settings 24
Cleaning and maintenance 26
Cleaning agents 26
Cleaning aid 27
Drying programme 28
Descaling programme 28
Removing slide-in rails 29
Trouble shooting 30
Power cut 31
Demo mode 31
Replacing the oven light 31
Aftersales service 31
E number and FD number 31
Settings table and tips 32
Vegetables 33
Fish 34
Fish – low-temperature steaming 34
Meat – cooking at higher temperatures 35
Meat/poultry – low-temperature cooking 36
Poultry 37
Side dishes 37
Desserts 38
Miscellaneous 38
Baked items 39
Regenerating (reheating) 40
Dough proving (leaving to rise) 40
Defrosting 41
Preserving 42
Extracting juice (soft fruit) 42
Preparing yoghourt 43
Preparing bulky food 43
Acrylamide in foodstuffs 43
: Additional information on products, accessories,
replacement parts and services can be found at
www.gaggenau.com and in the online shop
www.gaggenau.com/zz/store

3
m Important safety information
Read these instructions carefully. Only then will
you be able to operate your appliance safely and
correctly. Retain the instruction manual and
installation instructions for future use or for
subsequent owners.
This appliance is only intended to be fully fitted
in a kitchen. Observe the special installation
instructions.
Check the appliance for damage after
unpacking it. Do not connect the appliance if it
has been damaged in transport.
Only a licensed professional may connect
appliances without plugs. Damage caused by
incorrect connection is not covered under
warranty.
This appliance is intended for domestic use
only. The appliance must only be used for the
preparation of food and drink. The appliance
must be supervised during operation. Only use
this appliance indoors.
This appliance may be used by children over the
age of 8 years old and by persons with reduced
physical, sensory or mental capabilities or by
persons with a lack of experience or knowledge
if they are supervised or are instructed by a
person responsible for their safety how to use
the appliance safely and have understood the
associated hazards.
Children must not play with, on, or around the
appliance. Children must not clean the
appliance or carry out general maintenance
unless they are at least 15 years old and are
being supervised.
Keep children below the age of 8 years old at a
safe distance from the appliance and power
cable.
Always slide accessories into the cooking
compartment correctly. See description of
accessories in the instruction manual.
Risk of fire!
▯Combustible items stored in the cooking
compartment may catch fire. Never store
combustible items in the cooking
compartment. Never open the appliance
door if there is smoke inside. Switch off the
appliance and unplug it from the mains or
switch off the circuit breaker in the fuse box.
Risk of fire!
▯A draught is created when the appliance
door is opened. Greaseproof paper may
come into contact with the heating element
and catch fire. Do not place greaseproof
paper loosely over accessories during
preheating. Always weight down the
greaseproof paper with a dish or a baking
tin. Only cover the surface required with
greaseproof paper. Greaseproof paper must
not protrude over the accessories.
Risk of burns!
▯The appliance becomes very hot. Never
touch the interior surfaces of the cooking
compartment or the heating elements.
Always allow the appliance to cool down.
Keep children at a safe distance.
Risk of serious burns!
▯Accessories and ovenware become very hot.
Always use oven gloves to remove
accessories or ovenware from the cooking
compartment.
Risk of burns!
▯Alcoholic vapours may catch fire in the hot
cooking compartment. Never prepare food
containing large quantities of drinks with a
high alcohol content. Only use small
quantities of drinks with a high alcohol
content. Open the appliance door with care.
Risk of burns!
▯Hot steam may escape during operation. Do
not touch the ventilation openings. Keep
children away.
Risk of burns!
▯Bulbs become very hot when switched on.
There is still a risk of burning for some time
after they have been switched off. Allow the
bulbs to cool down before cleaning the
appliance. Switch off appliance light during
cleaning.

4
Risk of scalding!
▯When you open the appliance door, hot
steam can escape. Steam may not be visible,
depending on its temperature. When
opening, do not stand too close to the
appliance. Open the appliance door
carefully. Keep children away.
Risk of scalding!
▯The water in the evaporator dish is still hot
even after the appliance has been switched
off. Do not empty the evaporator dish
immediately after switching off the
appliance. Allow the appliance to cool down
before cleaning it.
Risk of scalding!
▯Hot liquid may spill over the sides of the
accessory when it is removed from the
cooking compartment. Remove hot
accessories with care and always wear oven
gloves.
Risk of electric shock!
▯Incorrect repairs are dangerous. Repairs
may only be carried out and damaged power
cables replaced by one of our trained after-
sales technicians. If the appliance is
defective, unplug the appliance from the
mains or switch off the circuit breaker in the
fuse box. Contact the after-sales service.
Risk of electric shock and serious injury!
▯The cable insulation on electrical appliances
may melt when touching hot parts of the
appliance. Never bring electrical appliance
cables into contact with hot parts of the
appliance.
Risk of electric shock!
▯Do not use any high-pressure cleaners or
steam cleaners, which can result in an
electric shock.
Risk of electric shock!
▯A defective appliance may cause electric
shock. Never switch on a defective
appliance. Unplug the appliance from the
mains or switch off the circuit breaker in the
fuse box. Contact the after-sales service.
Risk of electric shock!
▯The insulation of an incompatible meat
probe may be damaged. Only use the meat
probe which is recommended for this
appliance.

5
Causes of damage
Caution!
– Do not place anything on the cooking compartment
floor. Do not cover it with aluminium foil. A build-up
of heat could damage the appliance.
The cooking compartment floor and the evaporator
dish must always be kept clear. Always place
ovenware in a perforated cooking container or on a
wire rack.
– Aluminium foil in the cooking compartment must not
come into contact with the door panel. This could
cause permanent discolouration of the door panel.
– We recommend you use a mineral water low in
chloride and without added carbonic acid if your
tap water contains large amounts of chloride
(>40 mg/l). You can inquire with your local water
supply company to obtain information about your
tap water.
– Ovenware must be heat and steam resistant.
Silicone baking tins are not suitable for combined
operation with steam.
– Use only original accessories in the cooking
compartment. Rusting material (such as serving
platters or knives and forks) can cause corrosion in
the oven interior.
– Use original small parts (e.g. knurled nuts) only.
Order small parts from our after-sales service if
these should be lost.
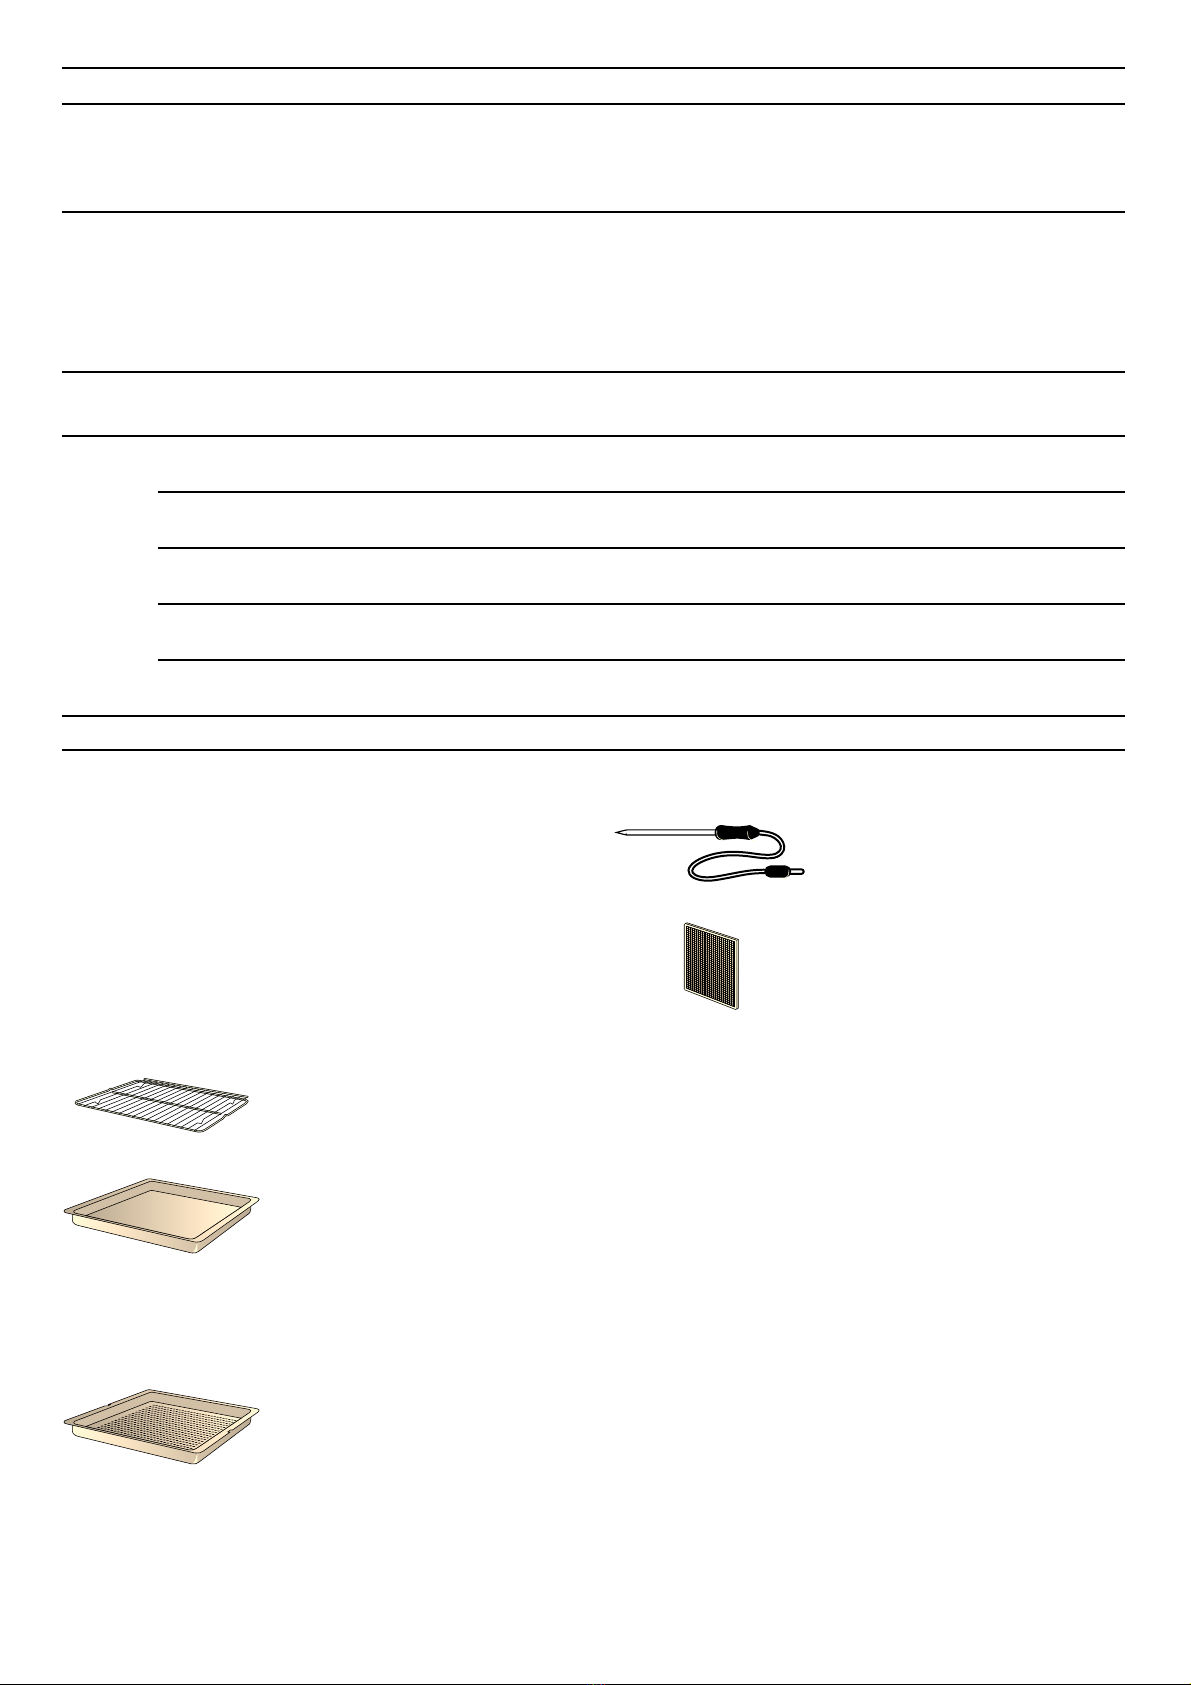
– Dripping liquids: When steaming with a perforated
cooking container, always insert the baking tray, the
universal pan or the solid cooking container
underneath. Dripping liquid is caught.
– Do not store moist food in the closed cooking
compartment for long periods. It can lead to
corrosion in the cooking compartment.
– Salt, spicy sauces (e.g. ketchup or mustard) or
salted dishes (e.g. cured roast) contain chloride
and acids. These corrode the surfaces of stainless
steel. Always remove residues immediately.
– Fruit juice may leave stains in the cooking
compartment. Always remove fruit juice immediately
and wipe the cooking compartment with a moist and
dry cloth.
– Improper care of the appliance may lead to
corrosion in the cooking compartment. Refer to the
care and cleaning instructions in the instruction
manual. Clean the cooking compartment each time
you use it as soon as the appliance has cooled
down. After cleaning the cooking compartment, use
the drying programme to dry it.
– Do not detach the door seal. The appliance door
will no longer close properly if the door seal is
damaged. The fronts of adjacent units could be
damaged. Have the door seal replaced.
– Do not carry or hold the appliance by the door
handle. The door handle cannot support the weight
of the appliance, and could break.
Environmental protection
Your new appliance is particularly energy-efficient. Here
you can find tips on how to save even more energy when
using the appliance, and how to dispose of your
appliance properly.
Saving energy
▯Open the appliance door as little as possible while
cooking.
▯Use dark, black lacquered or enamelled baking tins
for baking. They absorb the heat particularly well.
▯It is best to bake several cakes one after the other.
The oven will still be hot. This reduces the baking
time for the second cake. You can also place two
loaf tins next to each other.
▯For longer cooking times, you can switch off the
steam oven 10 minutes before the end of the
cooking time and you can use the residual heat to
finish cooking.
▯When steaming, you can cook simultaneously on
several levels. If dishes require different cooking
times, insert the dishes that require the longest
time first.
Environmentally-friendly disposal
Dispose of packaging in an environmentally-friendly
manner.
This appliance is labelled in accordance with
European Directive 2012/19/EU concerning
used electrical and electronic appliances
(waste electrical and electronic equipment -
WEEE). The guideline determines the
framework for the return and recycling of used
appliances as applicable throughout the EU.

6
Getting to know the appliance
Use this section to familiarise yourself with your new
appliance. The control panel and the individual
operating controls are explained. You will find
information on the cooking compartment and the
accessories.
Steam oven
1 Ventilation opening
2 Air flap
3 Socket for core temperature probe
4 Door seal
5 Water tank
6 Grease filter
7 Evaporating dish

7
Display and operating controls
These instructions are valid for different versions of the
appliance. There may be minor differences depending
on the appliance model.
All versions of the appliance are operated in an identical
manner.
--------
Symbols
--------
Colours and display
Colours
The different colours are used to guide the user in the
relevant setting situations.
Appearance
Depending on the situation, the appearance of symbols,
values or the entire display changes.
1 Control panel These areas are touch sensitive.
Touch a symbol to select the cor-
responding function.
2 Display The display shows, for example,
current settings and options.
3 Rotary selector You can use the rotary selector to
set the temperature and to make
further settings.
4 Function selector The function selector is used to
select the type of heating, the
cleaning function or the basic set-
tings.
Symbol Function
IStart
ØStop
HPause/End
'Cancel
ŽDelete
™Confirm/save settings
CSelection arrow
(Call up additional information
“Heating up with status indicator
iCall up individual recipes
gRecord menu
%Edit settings
4Enter name
lDelete letters
0Child lock
MCall up timer menu
/Call up long-term timer
°Demo mode
+Call up core temperature probe
Orange Initial settings
Main functions
Blue Basic settings
Cleaning
White Values which can be set
Zoom The setting that you are changing will
appear larger on the display.
If you have set a time and it is about to
run out, it will appear larger on the dis-
play just before it runs out (e.g. 60 sec-
onds before the end, if you have set the
timer).
Pared-down
display
After a short while, the amount of infor-
mation shown on the display will be
reduced and only the most important
information will remain.This function is
pre-set and can be changed in the basic
settings.

8
Additional information (and )
By touching the (symbol, you can call up additional
information. For example, information on the heating
function set or on the current temperature of the
cooking compartment.
Note: During continuous operation, small fluctuations in
temperature are normal after the oven has heated up.
The )symbol is displayed for important information
and action prompts.Important information on safety and
operation mode are occasionally shown automatically.
These messages either disappear automatically after a
few seconds or must be confirmed with ™.
Cooling fan
Your appliance has a cooling fan. The cooling fan
switches on during operation. Depending on the
appliance version, the hot air escapes above or under
the door.
After removing cooked food, keep the door closed until
the appliance cools down. The appliance door must not
be left ajar, as adjoining kitchen furniture may be
damaged. The cooling fan continues to run for a certain
time after operation and then switches off automatically.
Caution!
Do not cover the ventilation slots. Otherwise, the
appliance will overheat.
Function selector positions
Position Function/heating function Temperature Application
0 "Off" position
žLight
2\
Hot air + 100% humidity
30 - 230 °C
Default temperature 100 °C
Steaming at 70 °C - 100 °C: For vegetables, fish and
side dishes.
The food is completely surrounded by steam
Combination mode at 120 °C - 230 °C: For puff pastry,
bread and bread rolls.
Hot air and steam are combined.
3^
Hot air + 80% humidity
30 - 230 °C
Default temperature 170 °C
Combination mode: For puff pastry, meat and poultry.
Hot air and steam are combined.
4_
Hot air + 60% humidity
30 - 230 °C
Default temperature 170 °C
Combination mode: For yeast-risen baked goods and
bread.
Hot air and steam are combined.
5`
Hot air + 30% humidity*
30 - 230 °C
Default temperature 170 °C
Cooking without added liquid: For baked goods
With this setting, no steam is generated and the ventila-
tion flap is closed. Any moisture escaping from the food
therefore remains in the cooking compartment and pre-
vents the food from drying out.
6a
Hot air + 0% humidity
30 - 230 °C
Default temperature 170 °C
Hot air: For cakes, biscuits and bakes.
The fan in the back panel of the oven distributes the
heat evenly throughout the cooking compartment.
7V
Dough proving
30 - 50 °C
Default temperature 38 °C
Proving: For yeast dough and sourdough.
Dough will rise considerably more quickly than at room
temperature. Hot air and steam are combined so that
the surface of the dough does not dry out.
The optimal temperature setting for yeast dough is
38 °C.
* Heating function used to determine the energy efficiency class in accordance with EN60350-1.

9
Accessories
Use only the accessories supplied with the product or
available from the after-sales service. They are specially
designed for your appliance. Ensure that you always
insert the accessories into the cooking compartment
the right way round.
Your appliance is equipped with the following
accessories:
8W
Defrost
40 - 60 °C
Default temperature 45 °C
For vegetables, meat, fish and fruit.
The moisture transfers the heat to the food, gently
defrosting it without impairing its quality. The food does
not dry out or lose its shape.
9d
Reheat
60 - 180 °C
Default temperature 120 °C
For cooked food and baked goods.
Cooked food is gently reheated without impairing its
quality. The steam ensures that the food does not dry
out.
Reheat plated meals at 120 °C and baked goods at
180 °C.
10 ›
Low-temperature cooking
30 - 90 °C
Default temperature 70 °C
Low-temperature cooking for meat.
Gentle slow cooking for a particularly tender result.
StBasic settings Your appliance can be adjusted to your requirements in
the basic settings.
¢Cleaning aid You can use the cleaning aid to loosen dirt in the
cooking compartment with steam.
jDrying programme The drying programme dries the cooking compartment
after steaming or cleaning.
‘Descaling programme The descaling programme can be used to remove
limescale from the cooking compartment.
¥Cancel the descaling
notification
Cancel the notification on the display after descaling.
Position Function/heating function Temperature Application
* Heating function used to determine the energy efficiency class in accordance with EN60350-1.
Wire rack
for cookware, cake tins and
casseroles and for roasts
Stainless steel cooking
container, unperforated,
GN Z, 40 mm deep
for cooking rice, pulses and
cereals, for baking cake
baked on trays and for
collecting dripping liquid
during steaming
Stainless steel cooking
container, perforated,
GN Z, 40 mm deep
for steaming vegetables or
fish, for extracting juice and
for defrosting
Core temperature probe
for precise preparation of
meat, fish, poultry and bread
Grease filter
protects the fan of the back
panel of the cooking
compartment from becoming
dirty (e.g. from spattering)

10
Special accessories
You can order the following special accessories from
your specialist dealer:
Only use the accessories as specified. The
manufacturer accepts no liability if these accessories
are used incorrectly.
Before using for the first time
In this section, you can find out what you must do before
using your appliance to prepare food for the first time.
Read the section entitled 'Important safety information'
beforehand.
The appliance must be fully installed and connected to
the mains.
After connection to the mains, the "Initial settings" menu
appears in the display. You can now make settings for
your new appliance.
▯Language
▯Time format
▯Time
▯Date format
▯Date
▯Temperature format
▯Water hardness
Notes
‒The "Initial settings" menu will appear only after the
appliance has been connected to a power supply
and switched on for the first time, or if the
appliance has not been connected to a power
supply for a number of days.
Once the appliance has been connected to a power
supply, the GAGGENAU logo will appear first for
approximately 30 seconds. The "Initial settings"
menu will then appear automatically.
‒You can change the settings at any time (see
section entitled 'Basic settings').
Setting the language
The preset language appears in the display.
1Turn the rotary selector to select the required
display language.
2Confirm with ™.
Note: If the language is changed, the system restarts.
This takes a few seconds.
GN 114 130 Stainless steel cooking container
GN 1/3, perforated, 40 mm deep, 1.5 l
GN 114 230 Stainless steel cooking container
GN 2/3, unperforated, 40 mm deep, 3 l
GN 124 130 Stainless steel cooking container
GN 1/3, perforated, 40 mm deep, 1.5 l
GN 124 230 Stainless steel cooking container
GN 2/3, perforated, 40 mm deep, 3 l
GN 340 230 Cast aluminium roaster GN 2/3,
165 mm high, non-stick coated
GN 410 130 Stainless steel lid, GN 1/3
GN 410 230 Stainless steel lid, GN 2/3
GR 220 046 Wire rack, chrome-plated, with feet
'HXWVFK
6SUDFKH

11
Setting the time format
The two possible formats 24h and AM/PM appear in the
display. The default is the 24h format.
1Use the rotary selector to select the desired format.
2Confirm with ™.
Setting the clock
The time is shown in the display.
1Set the desired time using the rotary selector.
2Confirm with ™.
Setting the date format
The three possible formats D.M.Y, D/M/Y and M/D/Y
appear in the display. The default is the D.M.Y format.
1Use the rotary selector to select the desired format.
2Confirm with ™.
Setting the date
The preset date appears in the display. The day setting
is already active.
1Set the day using the rotary selector.
2Touch the Csymbol to switch to the month setting.
3Set the month using the rotary selector.
4Touch the Csymbol to switch to the year setting.
5Set the year using the rotary selector.
6Confirm with ™.
Setting the temperature format
The two possible formats °C and °F appear in the
display. The default setting is °C.
1Use the rotary selector to select the desired format.
2Confirm with ™.
7LPHIRUPDW
7LPH
'DWHIRUPDW
'DWH
7HPSHUDWXUHIRUPDW

12
Setting the water hardness
"Water hardness" appears in the display.
1Check the mains water with the included carbonate
hardness test: fill the small measurement tube with
mains water up to the 5 ml mark.
2Add drops of indicator solution until the color
changes from purple to yellow.
Important: count the drops and carefully swing the
measurement tube after every drop until the liquids
have mixed thoroughly. The number of drops
corresponds to the water hardness.
3Use the rotary selector to set the measured water
hardness. The value 12 is set by default.
4Confirm with ™.
Ending initial set-up
The display shows "Initial set-up complete. Calibrate the
appliance before cooking for the first time".
Confirm with ™.
The appliance enters standby mode and the standby
screen appears. The appliance is now ready to use.
Calibrate the appliance before steaming for the first
time. The appliance sets the boiling point.
Calibration
The boiling point of water depends on barometric
pressure. As air pressure drops with increasing
elevation, the boiling point drops as well. During
calibration, the appliance sets the boiling point to the
pressure conditions at the place where it is installed.
It is important that the appliance steams without
interruption for 20 minutes at 100°C. Do not open the
appliance door during this time.
Notes
‒Calibrate the appliance only when it is cold.
‒During calibration, the appliance generates more
steam than it normally would do.
1Turn the function selector to S.
2Select "Basic settings" using the rotary selector.
3Touch the ™symbol.
4Select "Calibration" using the rotary selector.
5Touch the %symbol.
6Fill the water tank with cold water and touch the ™
symbol.
7Remove all accessories from the oven interior and
touch the ™symbol.
8The duration of 20.00 minutes appears. Touch Ito
start calibration.
Calibration begins. The elapsing time is shown on the
display.
Note: Do not interrupt calibration. Do not turn the
function selector. Do not open the appliance door.
A message appears in the display once calibration has
ended. Touch ™ to confirm and turn the function
selector to 0.
:DWHUKDUGQHVV
3OHDVHFDOLEUDWHWKHDSSOLDQFH
EHIRUHILUVWFRRNLQJ
,QLWLDOVHWXSFRPSOHWH
&DOLEUDWLRQ
&$/
&$/

13
After moving house
Repeat calibration so that the appliance adapts
automatically to the new installation location.
After resetting to the factory settings
After resetting to the factory settings in the basic
settings menu, you must repeat calibration.
Following a power cut
The appliance saves the calibration settings even in the
event of a power cut or disconnection from the mains.
Recalibration is not necessary.
Grease filter
Hook the enclosed grease filter onto the hot air grille in
the back wall of the cooking compartment.
Leave the grease filter in the cooking compartment for
all applications. Clean the grease filter with hot soapy
water or in the dishwasher every time heavy dirt
deposits have been left behind after cooking.
Cleaning the door panel
The door seal has been greased in the factory to make it
leaktight. There may be traces of grease left on the door
panel.
Clean the door panel with glass cleaner and a window
cloth or microfibre cloth before using the appliance for
the first time. Do not use glass scrapers.
Cleaning accessories
Before using the accessories for the first time, clean
them thoroughly using hot detergent solution and a soft
cloth.
Activating the appliance
Standby
The appliance goes into standby mode if no function
has been set or the child lock is activated.
The brightness of the control panel is dimmed in
standby mode.
Notes
‒Different displays are available for standby mode.
The default setting is the GAGGENAU logo and the
clock. To change the display, refer to the Basic
settings section.
‒The brightness of the display depends on the
vertical viewing angle. You can adjust the display
using the "Brightness" setting in the basic settings.
Activating the appliance
To exit standby mode, you can either
▯Turn the function selector,
▯Touch a control panel,
▯Open or close the door.
You can now set the desired function. You can read
about how to set functions in the respective chapters.
Notes
‒When "Standby screen = off" is selected in the
basic settings, you must turn the function selector
to exit standby mode.
‒The appliance returns to the standby screen if you
have not made any settings for a long time after
activation.
‒When the door is open, the interior lighting
switches off after a short time.

14
Operating the appliance
Filling the water tank
When you open the appliance door, you will see the
water tank on the side.
Caution!
Use of unsuitable liquids may damage the appliance
‒Only use fresh tap water, softened water or
uncarbonated mineral water.
‒If your tap water is very hard, we recommend that
you use softened water.
‒Do not use distilled water, highly chlorinated tap
water (> 40 mg/l) or other liquids.
You can obtain information about your tap water from
your water supplier. The water hardness can be checked
with the test set enclosed.
Fill the water tank before every operation (except for
"Hot air + 30% humidity", "Hot air + 0% humidity" and
"Drying program"):
1Open the appliance door and take out the water
tank (fig. A).
2Fill the water tank with cold water up to the "max"
mark (fig. B).
3Close the tank cover until you feel it engage.
4Slide in the water tank all the way (fig. C).
The tank must be flush with the water tank recess
(fig. D).
Cooking compartment
The cooking compartment has four shelf positions. The
shelf positions are counted from the bottom up.
Note: When steaming, defrosting, dough proofing and
regenerating, you can use up to three insertion levels at
the same time (levels 2, 3 and 4). You can only bake on
one level, use level 2 when baking (or level 1 for higher
cake tins).
Caution!
– Do not place anything on the cooking compartment
floor. Do not cover it with aluminium foil. A build-up
of heat could damage the appliance.
The cooking compartment floor and the evaporator
dish must always be kept clear. Always place
ovenware in a perforated cooking container or on a
wire rack.
– Do not slide any accessories between the shelf
positions, or they may tip.
Always fully open the appliance door to the stop. In this
position, the open door will not swing back by itself.
$
PD[
%
&'

15
Inserting accessories
The wire rack and the perforated cooking container
feature a locking function. The locking function prevents
the accessories from tilting when they are pulled out.
The accessories must be inserted into the cooking
compartment correctly for the tilt protection to work
properly. When removing accessories, you must raise
them slightly.
When inserting the wire rack, check
▯that the engaging lug (a) is pointing upward
▯that the safety bar on the wire rack is at the back
and facing upwards.
When pushing in the perforated cooking container,
make sure that the recess (a) is pointing to the side.
Switching on
1Set the required heating mode using the function
selector. The chosen heating mode and the default
temperature are displayed.
2If you want to change the default temperature:
set the required temperature with the rotary
selector.
The preheating symbol “ appears on the display. The
bar continuously shows the preheating status. When the
set temperature is reached, a signal sounds and the
preheating symbol “goes off.
Note: The oven interior lighting stays switched off at a
temperature setting below 70°C
Topping up water:
A message appears in the display when the water tank is
empty. Fill the water tank up to the "max" mark and insert
it again.
Switching off:
Turn the function selector to 0.
After every use
Emptying the water tank.
1Open the appliance door carefully.
Hot steam will escape.
2Remove and clean the water tank.
3Thoroughly dry the seal in the tank cover and the
tank recess in the appliance.
Caution!
Do not dry the water tank in the hot cooking
compartment. This will damage the water tank.
Drying the cooking compartment
mRisk of scalding!
The water in the evaporator dish may still be hot. Let it
cool down before emptying it.
1Remove soiling from the cooking compartment as
soon as it has cooled down. Burnt-on remains will
be much harder to remove later.
2Empty the evaporator dish with the included
cleaning sponge.
3Once it has cooled down, wipe out the cooking
compartment and the evaporator dish with the
enclosed cleaning sponge and dry well with a soft
cloth.
4Wipe kitchen units or handles if condensation has
formed on them.
5Dry the cooking compartment with the drying
programme (see section entitled Drying programme) or
leave the appliance door open until the interior has
dried completely.
Safety shut-off
For your protection, the appliance is equipped with an
automatic safety shut-off. Any heating process is
switched off after 12 hours if the oven is not operated in
this time. A message appears in the display.
Exception:
The long-term timer has been programmed.
Set the function selector to 0, then the appliance can be
operated again as usual.
D
D
D
D

16
Timer functions
You use the timer menu to make the following settings:
ŠShort-term timer
pStopwatch
6Cooking time (not in standby mode)
5Cooking time end (not in standby mode)
Calling up the timer menu
You can call up the timer menu from any mode. Only
from the basic settings, function selector is set to S, the
timer menu is not available.
Touch the M symbol.
The timer menu is displayed.
Timer
The timer runs independently of the other appliance
functions. You can enter a maximum of 90 minutes.
Setting the timer
1Call up timer menu.
The "Timer" Šfunction is displayed.
2Turn the rotary selector to set the required cooking
time.
3Start with I.
The timer menu closes and the time begins to count
down. The Šsymbol and the countdown appear in the
display.
A signal sounds once the time has elapsed. Touch the
™symbol to silence.
You can exit the timer menu at any time by pressing the
' symbol. This erases the settings.
To stop the timer:
Call up timer menu. Touch Cto select the "Timer" Š
function and touch the Hsymbol. To allow the timer to
continue counting down, touch the symbol I.
Switching off the timer early:
Call up timer menu. Touch Cto select the "Timer" Š
function and touch the Žsymbol.
Stopwatch
The stopwatch runs independently of the other
appliance functions.
The stopwatch counts from 0 seconds up to 90 minutes.
It also has a pause function, which enables you to
temporarily stop the clock.
Starting the stopwatch
1Call up the timer menu.
2Touch Cto select the p"Stopwatch" function.
3Touch Ito start.
7LPHU
6WRSZDWFK

17
The timer menu is closed and the timing begins. The p
symbol and the elapsed time are shown in the display.
Pausing and restarting the stopwatch
1Call up the timer menu.
2Touch Cto select the p"Stopwatch" function.
3Touch the Hsymbol.
The time stops. The symbol changes to IStart.
4Touch Ito start.
The time continues to run. When 90 minutes is reached,
the display pulsates and signal sounds. The signal stops
when you touch the ™symbol. The psymbol on the
display goes out. The process has finished.
To switch off the stopwatch:
Call up the timer menu. Touch Cto select the p
"Stopwatch" function and touch the Žsymbol.
Cooking time
If you set a cooking time for your meal, the appliance
switches off heating automatically after the selected
time.
You can set a cooking time from 1 minute to 23 hours
59 minutes.
Setting a cooking time
You have set the heating mode and temperature and you
have placed your dish in the oven.
1Touch the Msymbol.
2Use Cto select the 6 "Cooking time" function.
3Set the desired cooking time using the rotary
selector.
4Press Ito start.
The appliance starts. The timer menu is closed. The
settings for temperature, heating mode, elapsing time
and cooking time end are shown in the display.
During the last minute of the cooking time the remaining
time is displayed in an enlarged format.
The appliance switches off after the cooking time has
elapsed. The 6symbol flashes and a signal sounds.
The signal stops when you touch the ™symbol, open
the appliance door, or switch the function selector to 0.
Changing the cooking time:
Call up the timer menu. Use Cto select the 6
"Cooking time" function. Change the cooking time using
the rotary selector. Press Ito start.
Clearing the cooking time:
Call up the timer menu. Use Cto select the 6 "Cooking
time" function. Clear the cooking time with Ž. Return to
normal operation with '.
Cancelling the entire operation:
Set the function selector to 0.
Note: You can also change the heating mode and
temperature during the cooking time.
6WRSZDWFK
&RRNLQJWLPH

18
End of cooking time
You can delay the cooking time end to a later time.
Example: it is 14:00. The dish requires a cooking time of
40 minutes. You want it to be ready at 15:30.
Enter the cooking time and delay the cooking time end
until 15:30. The electronics system calculates the start
time. The appliance starts automatically at 14:50 and
switches off at 15:30.
Bear in mind that food which spoils easily should not be
left in the cooking compartment for too long.
Delaying the cooking time end
You have set the heating mode, temperature and
cooking time.
1Touch the Msymbol.
2Use Cto select the 5"Cooking time end"
function.
3Set the desired cooking time end using the rotary
selector.
4Press Ito start.
The appliance switches to standby. The heating mode,
temperature, cooking time and cooking time end appear
in the display. The appliance starts at the calculated
time and switches off automatically when the cooking
time has elapsed.
Note: If the 6symbol flashes: You have not set the
cooking time. Always set the cooking time first.
Once the cooking time has elapsed, the appliance
switches off. The 5symbol flashes and an audible
signal sounds. The signal stops early if you touch the ™
symbol, open the appliance door, or set the function
selector to 0.
To change the cooking time end:
Call up the timer menu. Use Cto select the 5
"Cooking time end" function. Set the desired cooking
time end using the rotary selector. Press Ito start.
To terminate the whole procedure:
Set the function selector to 0.
Long-term timer
With this function, the appliance maintains a
temperature between 50 und 230°C with the "Hot air"
heating function.
You can keep food warm for up to 74 hours without
having to switch the appliance on or off.
Bear in mind that food which spoils easily should not be
left in the oven for too long.
Note: You must set the long-term timer to "available" in
the basic settings (refer to the Basic settings section).
Setting the long-term timer
1Set the function selector to ž.
2Touch the /symbol.
The default value 24 hrs at 85 °C appears in the
display. Press Ito start
–or–
Change the cooking time, the cooking time end, the
switch-off date and the temperature.
3Changing the cooking time 6:
Touch the $symbol. Set the required cooking
time using the rotary selector.
4Changing the cooking time end 5:
Touch the Csymbol. Set the required cooking
time end using the rotary selector.
5Changing the switch-off date q:
Touch the Csymbol. Set the required switch-off
date with the rotary selector. Confirm with ™.
6Changing the temperature:
Set the required temperature with the rotary
selector.
7Press I to start.
&RRNLQJWLPHHQG
/RQJWHUPWLPHU

19
The appliance starts. / and the temperature appear in
the display.
The oven and display lighting are switched off. The
control panel is locked; no key tone sounds when you
touch the touch keys.
Once the set time has elapsed, the appliance stops
heating. Turn the function selector to 0.
Switching off:
To end the process, turn the function selector to 0.
Individual recipes
It is possible to save up to 50 individual recipes. You
can record a recipe. These recipes can be given a name
so that they can be called up quickly and conveniently
when required.
Recording a recipe
It is possible to consecutively set up to 5 phases and to
record at the same time.
1Select the required heating mode using the
function selector.
The isymbol is displayed.
2Touch the isymbol.
3Select a free memory location by turning the rotary
selector.
4Touch the gsymbol.
5Select the required temperature using the rotary
selector.
6The cooking time is recorded.
7To record another phase:
Select the required heating mode using the
function selector. Set the temperature using the
rotary selector. This begins a new phase.
8If the dish has achieved the desired cooking result,
touch the & symbol to finish the recipe.
9Enter the name in "ABC" (refer to the Entering names
section).
Notes
‒Recording of a phase starts only once the selected
temperature has been reached.
‒The minimum duration of each phase is 1 minute.
‒During the first minute of a new phase it is possible
to change the heating mode or the temperature.
Programming a recipe
You can programme and save up to 5 preparation
phases.
1Turn the function selector to the desired type of
heating. Turn the rotary selector to set the desired
temperature.
The isymbol is displayed.
2Touch the isymbol.
3Use the rotary selector to select a free memory
location.
4Touch the %symbol.
5Enter the name in "ABC" (see chapter Entering
names).
6Use the Csymbol to select the first phase.
The initial type of heating and temperature is
displayed. You can change the type of heating and
the temperature by using the rotary selectors.
7Use the Csymbol to select the time setting.
8Turn the rotary selector to set the required cooking
time.
9Use the Csymbol to select the next phase.
- or -
If preparation is complete, finish making entries.
10 Save with ™.
- or -
Cancel with 'and exit the menu.
Setting the core temperature for a phase:
Use the Csymbol to select the next phase. Setting the
type of heating and temperature. Touch the +symbol.
Use the rotary selector to set the desired core
temperature and confirm with +.
Note: Cooking time can not be set for phases with a
programmed core temperature.

20
Entering names
1Enter the name of the recipe in "ABC".
2Save with ™.
- or -
Cancel with 'and exit the menu.
Note: For entering a name, Latin characters, certain
special characters and numbers are available.
Starting recipes
1Set the function selector to any heating mode.
The isymbol is displayed.
2Touch the isymbol. Use the rotary selector to
select the required recipe.
3Press Ito start.
Operation starts. The cooking time starts counting
down in the display.
The settings for each phase are shown in the
display.
Notes
‒The cooking time does not start counting down until
the appliance has reached the set temperature.
‒You can use the rotary selector to change the
temperature while the recipe is in progress. This
does not change the saved recipe.
Change recipe
You can change the settings of a recorded or
programmed recipe.
1Turn the function selector to the any type of heating.
The isymbol is displayed.
2Touch the isymbol.
3Use the rotary selector to select the desired recipe.
4Touch the %symbol.
5Use the Csymbol to select the desired phase.
The programmed type of heating, temperature and
cooking time are displayed. You can use the rotary
selector or function selector to change the settings.
6Save with ™.
- or -
Cancel with 'and exit the menu.
Deleting recipes
1Set the function selector to any type of heating.
The isymbol is displayed.
2Touch the isymbol.
3Use the rotary selector to select the desired recipe.
4Delete the recipe with Ž.
5Confirm with ™.
Rotary selec-
tor
Select letters
A new word always begins with a capital let-
ter.
4Press briefly: moves the cursor right
Press and hold: shifts to umlauts and spe-
cial characters
Press twice: accepts the change
5Press briefly: moves the cursor right
Press and hold: shift to normal characters
Press twice: accepts the change
lDeletes letters
$B
Other manuals for BSP 250
1
This manual suits for next models
1
Table of contents