Gale 30 Series User manual

Owners' Manual
AP12309/1 Gale 30 Series Owners' Manual (page 1)
Print Pantone Cool Grey 9C

English - Quick Setup .......................................................................................
Francais - Installation Rapide ...........................................................................
Deutsch - Aufbauanleitung ...............................................................................
Italiano - Installazione Veloce ..........................................................................
` ............................................................................................................
Introduction ........................................................................................................
Connecting your Loudspeakers .......................................................................
Positioning your Hi-Fi Loudspeakers ..............................................................
Positioning your Home Cinema Loudspeakers ..............................................
Taking Care of your Loudspeakers ..................................................................
Warranty Information..........................................................................................
Contents
3
4
5
6
7
8
9
10
11
12
13
2
AP12309/1 Gale 30 Series Owners' Manual (page 2)
Print Pantone Cool Grey 9C

Congratulations on purchasing these Gale loudspeakers. To ensure
optimum performance please read the following information, then sit
back, relax and enjoy!
Connections
Switch off your amplifier whenever making connections. Connect the
positive terminal on the amplifier left channel, marked + or coloured
red, to the positive terminal on the left loudspeaker. The negative
terminal on the amplifier left channel, marked - or coloured black,
must be connected to the negative terminal on the left loudspeaker.
Repeat connections for the right channel.
Listening
Switch on the amplifier with the volume turned down low. Check that
the bass and treble sounds come from both speakers. If not, switch off
and remake the connections.
Amplifier Matching
High peak power handling of Gale loudspeakers allows responsible use
with more powerful amplifiers. Avoid over driving any amplifier. Never
make or break connections to an amplifier when the volume is turned
up.
Stands
Small loudspeakers should not be used on the floor but can (if
necessary) be placed on shelves or tables. Locating your speakers on
rigid stands or, in the case of floorstanders, with floor spikes is
essential to get a detailed sound with 'fast' bass and accurate stereo
imaging.
Positioning
You should be able to see all your front speakers from your listening
position. Your listening position should be slightly further from each
speaker than they are apart. Symmetrical positioning and angling the
cabinets in towards the listening position will help firm up stereo
imaging. Try adjusting the loudspeaker positions and angles to obtain
the most satisfying sound and most convincing stereo image.
Remember there is no right or wrong - if it sounds good then it is good!
Running-In
Your new loudspeaker system will require a total of approximately 10
hours of normal use to allow the components to settle into their
working routine and reach their optimum performance.
Remember
Always lower the volume before making any adjustments to the
system.
Always switch off the amplifier before checking or making any changes
to any connections in the system.
Never try to find out how loud your system will go.
Never use your loudspeakers for any purpose other than domestic
listening.
For full installation instructions turn to page 8
English - Quick Set-up
3
AP12309/1 Gale 30 Series Owners' Manual (page 3)
Print Pantone Cool Grey 9C

Congratulation pour l'achat d'haut-parleurs Gale. Pour assurer une
performance optimale, veuillez lire les instructionssuivantes, puis
installez vous confortablement, relaxez vous et apprciez
Branchement
Eteignez votre amplificateur avant de commencer les branchements.
Reliez la bornepositive (marquée "+" ou de couleur rouge) du canal
gauche de l'amplificateur à la borne positive de l'enceinte de gauche.
La borne négative (marquée "-" ou de couleur noire) du canal gauche
de l'amplificateur sera reliée à la borne négative de l'enceinte de
gauche. Faites de même pour le canal de droite.
Ecoute
Mettez l'amplificateur sous tension, volume à zéro. Montez
modérément le volume juste pour contrôler que aiguës et basses
sortent de chaque enceinte. Si ce n'est pas le cas, éteignez
l'amplificateur et recommencez vos branchements.
Choix de l'amplificateur
La très haute tenue en puissance des enceintes Gale permet
l'utilisation raisonnable d'amplificateurs même très puissants. Prenez
toutefois garde que votre amplificateur, en dépassant sa puissance
nominale maximale, ou en utilisation poussée pendant un temps
anormalement prolongé, ne produise jamais de la distorsion
quipourrait causer des dommages irrémédiables à vos enceintes. De
tels dommages ne seraient pas couverts par notre garantie contre les
vices de fabrication. Ne modifiez pas vos branchements lorsque
l'amplificateur est sous tension
Supports
Les enceintes de taille modeste ne doivent pas être posées à même le
sol, mais peuvent se placer sur un rayonnage ou sur une table. Pour
obtenir un son détaillé avec des basses dynamiques et une image
stéréo précise, il peut être nécessaire de placer les enceintes sur des
pieds rigides, ou avec des pointes de découplage.
Positionnement
En position d'écoute vous devez être capable de voir les enceintes
(aucun obstacle). Votre meilleur emplacement pour l'écoute se
trouvera légèrement plus loin des enceintes que la distance qui les
sépare l'une de l'autre. Leur position symétrique, légèrement orientée
vers vous, améliorera encore l'image stéréophonique. Essayez de
régler la position des enceintes, pour l'obtention du son le plus
satisfaisant et une impression steréophonique des plus
convaincantes. Mais sachez qu'il n'y a pas de règle absolue; seul le
résultatcompte.
Rodage
Vos nouvelles enceintes auront besoin d'un rodage d'environ 10
heures d'utilisation normale afin de permettre aux éléments internes
de s'adapter à leurs fonctions, et atteindre leurs performances
maximales. Nous vous recommandons de conserver l'emballage
complet pour un transport futur éventuel.
Ne Pas Oublier
Abaisser le volume avant tout réglage sur le système
Eteindre l'amplificateur avant de vérifier ou de faire un changement de
connexions quelconque dans le système
.
Il faut jamais essayer de savoir à quel point on peut pousser le
système au niveau du volume
Il faut jamais utiliser vos haut-parleurs pour une autre utilisation que
l'écoute domestique.
Francais - Installation rapide
4
AP12309/1 Gale 30 Series Owners' Manual (page 4)
Print Pantone Cool Grey 9C

Vielen Dank, daß sie sich für einen Lautsprecher von Gale entschieden
haben, Um auch langfristig Freude an Ihren neuen Lautsprechern zu
haben, lesen Sie bitte diese kleine Anleitung sorgfältig durch.
Achten Sie auf folgende Punkte
Immer
Die Lautstärke herunterdrehen und den Verstärker ausschalten wenn
Sie Änderungen an Iher Anlage vornehmen möchten!
Niemals
Versuchen herauszufinden, wie laut Ihre Anlage spielen kann. Gerade
kleine Verstärker werden dabei sehr schnell übersteuert und zerstören
durch hochfrequente Verzerrungen den Lautsprecher.
Ihre Lautsprecher zu anderen Zwecken als dem Hörvergnügen zu
Hause zu benutzen
Anschluß an den Verstärker
Verbinden Sie den links von Ihrem Hörplatz stehenden Lautsprecher
mittels eines geeigneten Kabels mit den Lautsprecheranschlüssen für
den linken Kanal Ihres Verstärkers. In der Regel ist dieser durch ein
großes L oder left gekennzeichnet. An einigen Verstärkern kann auch
die Bezeichnung Kanal 1 oder CH1 benutzt werden.
Achten Sie bitte darauf, daß Sie den positiven Verstärkerausgang mit
dem positiven Eingang des Lautsprechers verbinden. Bei einer
Verpolung erhalten Sie ein deutlich schlechteres Kangbild. Die übilche
Bezeichnungen an den Verstärken für die positive Anschlußklemme
sind: +, pos, oder die Anschlußklemme ist rot, oder hat einen roten
Ring.
Für den rechten Kanal sind die Bezeichnungen R oder right, oder auch
Kanal 2 bzw. CH2
Geeignete Verstärker
Ihr Gale Lautsprecher kann durch hohen Wirkungsgrad und hohe
Impulsfestigkeit grundsätzlich an jedem HiFi_Verstärker betrieben
werden. Vermeiden Sie jedoch, wie schon Eingangs erwähnt, den
Verstärker zu weit aufzudrehen und dadurch zu übersteuern; Eine
Zerstörung des Lautsprechers währe die Folge.
Aufstellung
Stellen Sie Ihre Lautsprecher so auf , daß Sie beide Lautsprecher von
Iher Hörposition aus sehen können. Ihre Hörposition sollte etwas
weiter von jedem Lautsprecher entfernt sein als diese
auseinanderstehen.
Symmetrische Aufstellung und Anwinkelung in Richtung der
Hörposition kann das Stereobild verbessern.
Versuchen Sie Ihre Lautsprecher so zu positionieren, daß Sie eine
optimale Klangbühne erhalten. Es gibt hier kein ,richtig' oder ,falsch'.
Wenn es Ihen gefällt, dann ist es auch gut.
Stative
Kleinere Lautsprecher sollten nicht auf den Fußboden gestellt werden,
sie sind für Regal -oder Stativaufstellung konzipiert. Fragen Sie Ihren
fachhändler nach geeigneten Lausprecherstativen.
Wenn Sie Ihren Lautsprechen auf oder in ein Regal stellen müssen,
sollten Sie hierfür geeignete Spikes von Ihrem Fachhändler erwerben.
Hierdurch wird das klangbild stabiler und detailreicher.
Einspielphase
Ihre neuen Lautsprecher benötigen eine gewisse Einspielzeit.
Sie werden feststellen, daß die Lautsprecher sich in den ersten
Stunden stark verändern
.
Nach ca. 50 Spielstunden klingt Ihr Lautsprecher so wie Sie viele Jahre
Freude an ihm haben werden.
Wir empfehlen Ihnen, die komplette Verpackung fúr einen eventuellen
Transport aufzubewahren.
Deutsch - Aufbauanleitung
5
AP12309/1 Gale 30 Series Owners' Manual (page 5)
Print Pantone Cool Grey 9C

Congratulazioni per aver acquistato questi diffusori Gale. Per ottenere
prestazioni ottimali, vi preghiamo di leggere queste informazioni. Poi
potrete sedervi, rilassarvi e godervi la musica.'
Collegamenti Veloci
Prima di effettuare qualsiasi collegamento
assicurarsichel'amplificatore sia spento. Collegare il
terminalepositivodell'amplificatore del canale sinistro, colorato in
rosso ocon il simbolo +, al terminale positivo dell'altoparlante di
sinistra. Il terminale negativo dell'amplificatore del canale sinistro,
nero o col simbolo -, dovrà essere collegato con il terminale negativo
delle casse. Ripetere i collegamenti come sopra per la cassa di destra.
Ascolto
Accendere l' amplificatore avendo l'accortezza che la manopola del
volume sia nella posizione più bassa. Verificare che i suoni bassi ed
acuti provengano da entrambe le casse acustiche. In caso contrario
spegnere prontamente l'amplificatore e riverificare i collegamenti.
Accoppiamento con gli Amplificatori
La serie Mordaunt-Short permette l' impiego, accurato, anche con
amplificatori con potenza notevolmente superiore a quella
dell'altoparlante. Evitare comunque, in ogni caso, che sia
l'amplificatore ad arrivare al massimo della sua potenza (in alcuni casi,
"clipping", alla sua uscita arriverebbe della corrente continua che
potrebbe rovinare la bobina degli altoparlanti). Non effettuare o
cambiare i collegamenti con il volume dell' amplificatore in funzione.
Piedistalli
Le casse acustiche con dimensioni piccole non possono essere poste a
pavimento bensì appoggiate su mobili o mensole. La presenza di fori
nella parte inferiore dei piedistalli della serie Gale consente di fissare
che, abbinato all'impiego di piedini appuntiti, permette di scaricare a
terra tutte le vibrazioni impure con il risultato di migliorare i dettagli
del suono, incrementare la velocità dei bass irealizzando un' immagine
stereo più accurata.
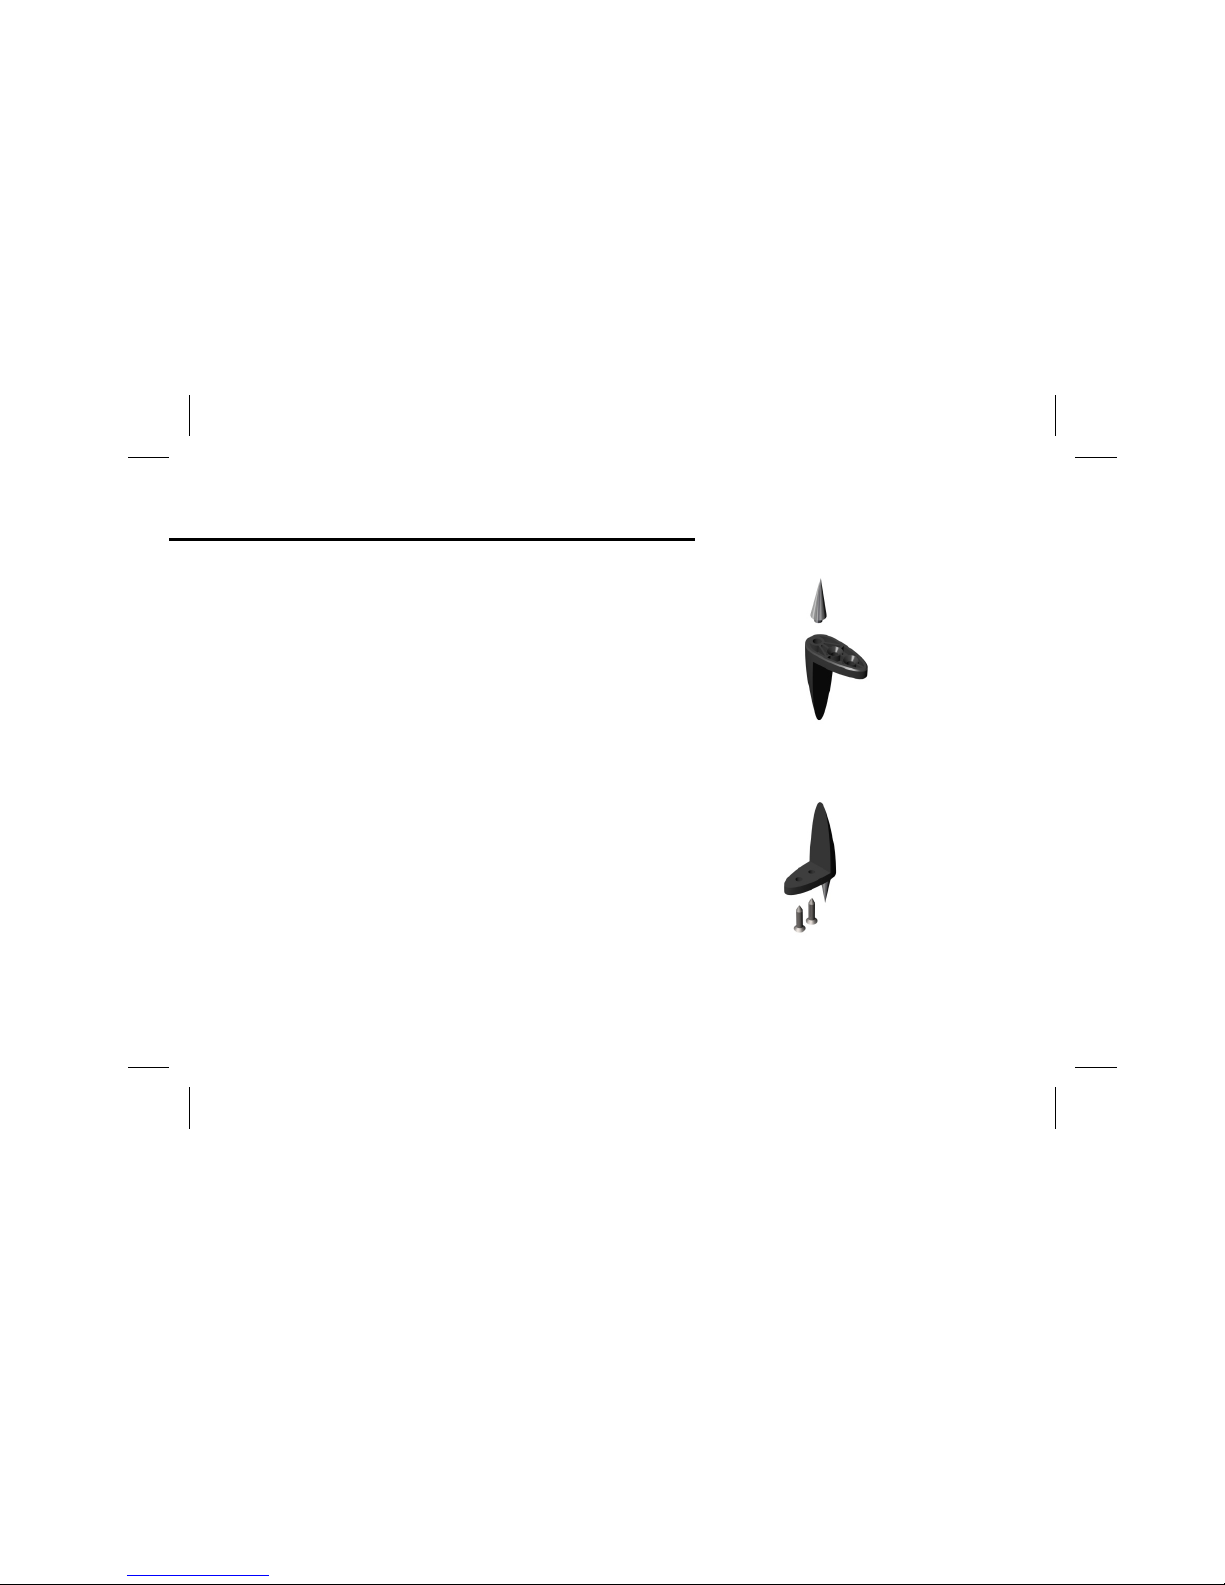
Posizionamento
Dalla posizione d'ascolto è indispensabile vedere le casse acustiche. Le
casse acustiche dovranno essere distanziate tra loro da 2 a 4 metri e
dovranno formare, nei limiti del possibile, un triangolo equilatero con
l'ascoltatore. Angolando poi il pannello frontale in modo da renderlo
parallelo verso l'ascoltatore migliorerà ulteriormente l'immagine
stereofonica. Provate a modificare le posizioni degli altoparlanti e le
loro angolature per ottenure il suono piú soddisfacente e l'immagine
stereo piú convincente. Difficilmente è possibile realizzare la posizione
ideale l'importante è che il suono risulti il più possibile soddisfacente.
Funzionamento
Il vostro sistema di altoparlanti richiede circa 10 ore di uso normale
per permettre ai componenti di entrare in funzione e di raggiungere il
massimo delle prestazioni. Suggeriamo, inoltre, di provvedere a
riporre gli imballi tenendoli per possibili impieghi futuri.
Ricordate
Sempre
Di abbassare il volume prima di fare qualsiasi cambiamento al
sistema.
Di spegnere l'amplificatore prima di controllare o di fare cambiamenti
a qualsiasi collegamento nel sistema.
Mai
Provare a mettere il voume al massimo.
Usare gli altoparlanti per scopi al di fuori dell'uso domestico.
Italiano - Installazione Veloce
6
AP12309/1 Gale 30 Series Owners' Manual (page 6)
Print Pantone Cool Grey 9C

7
Gale
Gale
AP12309/1 Gale 30 Series Owners' Manual (page 7)
Print Pantone Cool Grey 9C

These high performance Gale loudspeakers are designed to unlock the
full potential of your system with all types of program material. Used
wisely, they will give many years of trouble free enjoyment. We
recommend you retain the packaging for later transportation and keep
a note of the serial numbers. In the unlikely event that your
loudspeakers should ever need repair this information will help ensure
that you receive the appropriate advice and/or replacement parts.
Ballast Boxes
Some Gale models have ballast boxes in them for improved sound
quality. It is imperative that COMPLETELY DRY ballast or sand is used
to fill the cavity. If it contains any moisture then the cabinets are at
risk of serious damage.
Attaching Feet to your Loudspeakers
If you have purchased floorstanders they will come with feet and
spikes that will greatly improve stability and sound quality.
The spike attaches to the bottom of the foot with the aid of a
threaded guide (fig. a).
There are eight pilot holes on the bottom of your loudspeakers. The
feet are located and secured here with the wood screws supplied (fig.
b). Level as required.
Running In
Your new loudspeaker system will require approximately 10 hours of
normal use to allow the components to settle into their working routine
and reach their optimum performance.
Introduction
8
fig. a
fig. b
AP12309/1 Gale 30 Series Owners' Manual (page 8)
Print Pantone Cool Grey 9C

Do not compromise the performance of your system by using inferior
quality cables. Gale recommends that high quality cables of 16 gauge
or higher be used. Your professional dealer will give you good advice.
Always unplug all A.C. powered components before making any
loudspeaker or component connections. This will avoid the risk of
electric shock or damage to your equipment
If there are two pairs of terminals on the rear of your speakers then
bi-wiring is permitted if desired. For standard (non bi-wire) cable
connection leave links in place and use either pair of terminals (fig. c).
Observing polarity is of the utmost importance while connecting your
loudspeakers. Ensure that the red (+) terminals on your amplifiers
are connected to the red (+) on the speakers, and black (-) on your
amplifier to black (-) on your speakers.
If your speakers are wired incorrectly they will be out of phase and
sound hollow and indistinct, with a weak bass. Re-check your
connections for correct polarity and reverse the connections if
necessary.
Bi-wiring sends the bass and treble frequencies down separate
speaker cables, resulting in a clearer, more focussed sound. To bi-wire
each speaker loosen the upper pair of terminals and allow the binding
post links to disconnect (fig. d). Use two runs of cable, or specific bi-
wire cable, between the amplifier and each pair of terminals.
If your amplifier is equipped with PRE-OUT sockets then it is possible
to bi-amp your system using a further power amplifier. Bi-amping
uses two amplifiers to drive the bass and treble units in the
loudspeakers independently, resulting in even greater clarity coupled
with improved control and dynamics. In this case connect as in fig. e.
fig. c
fig. d
fig. e
Connecting your Loudspeakers
9
--++
--
++
++
--
--++
--
++
++
--
--++--++
--
++
++
--
AP12309/1 Gale 30 Series Owners' Manual (page 9)
Print Pantone Cool Grey 9C

Loudspeakers are significantly affected by both location within a room
and the surroundings. It is only possible therefore to offer general
advice. Please use this as a basis for experimentation. What sounds
right to you is right. Listen in particular for the depth and stability of
stereo images and the precision of bass lines and seamless integration
of the sound. If your amplifier is fitted with tone controls bypass them
or set them flat before adjusting the position of the speaker in the
room.
Firstly, follow the recommendations for stand height for stand
mounting loudspeakers. Floor standing models will get the tweeter up
to the right height by their design. The tweeter should be in your sight
line.
Ideally position the speakers in a triangular pattern with the listening
position at the apex. Beware, if the speakers are placed too far apart
in larger rooms this can create a 'hole in the middle' effect.
If possible, keep the speakers away from room corners and away from
side walls. The closer a speaker is to a wall the more bass it will reflect
back at the listener, twice as much again in a corner. Close to wall
positioning is recommended but the correct sound balance may be
found by moving the speakers out into the room.
Angling the speaker cabinets inwards can help firm up the stereo
image if the speakers are some distance apart. Imagine lines drawn
out from the speakers, and angle them so the lines would cross a
couple of feet in front of the listening position.
Using speakers too close to fabric, soft furnishings or drapes can
muffle the sound and degrade the stereo image. Conversely,
placement too close to reflective surfaces may create a harsher
balance.
EXPERIMENT !!
REMEMBER - IF IT SOUNDS RIGHT TO YOU, IT IS RIGHT !!
Positioning your Hi-Fi Loudspeakers
10
AP12309/1 Gale 30 Series Owners' Manual (page 10)
Print Pantone Cool Grey 9C

Properly placed, your Gale home cinema loudspeakers will provide an
excellent, wholly satisfying sound. However, with each room varying
in size, dimension and layout, it will be necessary to experiment with
the placement of your loudspeakers in order to gain optimum
performance. A typical home cinema set-up is shown below.
Front Left and Right Loudspeakers
These can be positioned using the same guidelines as detailed on the
previous page. They should be placed equidistant to the left and right
of your screen far enough apart to ensure good stereo imaging. If
they are too far apart or too close to the corners of the room they will
sound distracting and distant. It may be desirable to experiment with
the 'toe-in' of the units (angling them towards the listening position) to
optimize the front speaker soundstage and imaging.
Surround Loudspeakers
If you are using normal hi-fi loudspeakers as your surrounds they
should be situated roughly at listening height and facing into the
listening position. It is suggested that they are wall mounted or
alternatively placed on suitable speaker stands.
11
Positioning your Home Cinema Loudspeakers
1. Front Left & Right
2. Centre Channel
3. Surround
4. Subwoofer
11
22
11
3333
44
Bipolar-type surround speakers can be set up in much the same way
as standard 'monopole' types, so try positioning around listening
height and angle toward the listener
Dipoles diffuse the sound in a slightly different way, and therefore
have different positioning requirements: ideally they should be
mounted to the side of the listener, and up to 15 degrees above
listening height
Centre Channel Loudspeakers
Ideally your centre channel loudspeaker needs to be positioned
directly above or below your screen, facing the listening position.
Subwoofer
The location of any dedicated subwoofer will greatly effect the quantity
and also the quality of the low frequencies. Please see dedicated
subwoofer manual for detailed positioning information.
Final System Setup
Once all wiring connections are complete and you have positioned
your home cinema loudspeakers, turn on your amplification system
and run the relevant Level Calibration Sequence to establish the
correct individual volume level for each speaker channel.
Finally, play some test material and make final adjustments to the
Active Sub Frequency Cut-Off point that allows the best overall
integration within the system, sounding neither too boomy, or overly
thin. After this step, It may be necessary to run the Level calibration
again to make final level checks.
EXPERIMENT !!
REMEMBER - IF IT SOUNDS RIGHT TO YOU, IT IS RIGHT !!
AP12309/1 Gale 30 Series Owners' Manual (page 11)
Print Pantone Cool Grey 9C

By far the most common cause of loudspeaker failure, and one that
is understandably not covered by guarantee, is damage to the voice
coils caused by amplifier overload. This is generally due to the
common belief that if a speaker is rated at more than the
amplifier's output rating, there is no chance of blowing that
speaker.............
This is not the case!
A relatively small amplifier (i.e. 20 watts) can damage speakers like
these by "clipping" the signal, a symptom identified by lack of detail in
music and distortion. If this occurs TURN IT DOWN! If you don't want
to blow up your speakers but want louder sound, please purchase a
more powerful amplifier.
Taking Care of your Loudspeakers
12
Cabinet Care
Cabinets should be dusted and lightly polished as required. Do
not use solvent based cleaners, as they may damage the cabinet
surface. Do not expose the cabinets to strong, direct sunlight,
high temperatures, high humidity or allow them to become wet.
AP12309/1 Gale 30 Series Owners' Manual (page 12)
Print Pantone Cool Grey 9C

This Warranty does not cover cosmetic damage or damage due to acts
of God, accident, misuse, abuse, negligence, commercial use, or
modification of, or to any part of, the product. This Warranty does not
cover damage due to improper operation, maintenance or installation,
or attempted repair by anyone other than Gale or a Gale dealer or
authorised service agent, which is authorised to do Gale warranty
work. Any unauthorised repairs will void this Warranty. This
Warranty does not cover products sold AS IS or WITH ALL FAULTS.
REPAIRS OR REPLACEMENTS AS PROVIDED UNDER THIS WARRANTY
ARE THE EXCLUSIVE REMEDY OF THE CONSUMER. GALE SHALL NOT
BE LIABLE FOR ANY INCIDENTAL OR CONSEQUENTIAL DAMAGES FOR
BREACH OF ANY EXPRESS OR IMPLIED WARRANTY IN THIS PRODUCT.
EXCEPT TO THE EXTENT PROHIBITED BY LAW, THIS WARRANTY IS
EXCLUSIVE AND IN LIEU OF ALL OTHER EXPRESS AND IMPLIED
WARRANTIES WHATSOEVER INCLUDING, BUT NOT LIMITED TO, THE
WARRANTY OF MERCHANTABILITY AND FITNESS FOR A PRACTICAL
PURPOSE.
Some countries and US states do not allow the exclusion or limitation
of incidental or consequential damages or implied warranties so the
above exclusions may not apply to you. This Warranty gives you
specific legal rights, and you may have other statutory rights, which
vary from state to state or country to country.
Gale warrants this product to be free from defects in materials and
workmanship (subject to the terms set forth below). Gale will repair
or replace (at Gale's option) this product or any defective parts in this
product. Warranty periods may vary from country to country. If in
doubt consult your dealer and ensure that you retain proof of purchase
To obtain warranty service, please contact the Gale authorised dealer
from which you purchased this product. If your dealer is not equipped
to perform the repair of your Gale product, it can be returned by your
dealer to Gale or an authorised Gale service agent. You will need to
ship this product in either its original packaging or packaging affording
an equal degree of protection.
Proof of purchase in the form of a bill of sale or receipted invoice, which
is evidence that this product is within the warranty period, must be
presented to obtain warranty service.
This Warranty is invalid if (a) the factory-applied serial number has
been altered or removed from this product or (b) this product was not
purchased from a Gale authorised dealer. You may call Gale or your
local country Gale distributor to confirm that you have an unaltered
serial number and/or you purchased from a Gale authorised dealer.
Warranty Information
13
AP12309/1 Gale 30 Series Owners' Manual (page 13)
Print Pantone Cool Grey 9C

AP12309/1 Gale 30 Series Owners' Manual (page 14)
Print Pantone Cool Grey 9C

AP12309/1 Gale 30 Series Owners' Manual (page 15)
Print Pantone Cool Grey 9C

www.gale.co.uk
Made from recyclable material
Part No. AP12309/1
www.gale.co.uk
Made from recyclable material
Part No. AP12309/1
AP12309/1 Gale 30 Series Owners' Manual (page 16)
Print Pantone Cool Grey 9C
Table of contents