Garmin Portable echo Kit User manual

Portable echo™ Kit Instructions
WARNING
Pozrite si príručku Dôležité informácie o bezpečnosti a produkte v balení
zariadenia GPS s produktom, kde nájdete upozornenia spojené s produktom a
iné dôležité informácie.
Assembling the Mount
Before you can assemble the mount, ensure you have a Phillips screwdriver
available to complete the assembly.
1Insert the handle À into the two openings on the portable mount Á.
2Attach the handle to the portable mount using two M4×0.7×40 screws Â
and M4×7 mm nuts Ã.
3Press the M6×1 nut Ä into the bottom of the swivel-mount base Å.
4Place the swivel-mount base on the portable mount, route the echo device
power and transducer cables through the pass-through holes Æ, and
fasten the swivel-mount base using three M4×0.7×10 screws Ç.
5Place the swivel mount È on the swivel-mount base.
6Install the M6×1.0 screw É through the swivel-mount, and tighten to the
preferred position.
7If necessary, pull out enough slack from the power and transducer cables
so the mount can fully swivel to the preferred positions when the cables
are connected.
Transducer
The transducer can be configured two ways. You can configure the transducer
with the included suction cup mount for use on the side or bottom of your boat.
You can also configure the transducer with the included float for ice-fishing or
dockside use.
Floating the Transducer
1While holding the transducer arm in one hand, take a length of the
transducer cable and make a loop.
2Insert the loop into one end of the float until the loop extends out of the
opposite end of the float.
3Ensure the length of cable between the float and transducer is long
enough so the transducer can be suspended below the water or ice.
4Thread the transducer through the loop at the end of float and pull tight.
Mounting the Transducer with the Suction Cup
If you purchased the echo device separately from the portable kit, before you
can mount the transducer on the transducer arm, you must find the spacers
and washers that were packaged with the echo device.
1Attach the suction cup À to the transducer arm Á using the 1/4-20×0.750
screw Â.
2Insert the rubber washer and spacer à into the transducer.
3Pull the transducer cable back and slide the transducer into the transducer
arm.
You can route the transducer cable through the notch and opening in the
transducer arm.
4Place the washers Ä on the outside of the transducer arm.
5Insert the 10-32×1.75 screw Å through the transducer arm, transducer,
spacer, and washers.
6Fasten the screw with the 10-32 wing nut Æ.
January 2013 000-00000-00_0A
7Attach the suction cup to the side of your boat.
8Align the transducer parallel with the water line.
Connecting and Stowing the Cables
CAUTION
Ensure that you connect the correct connector to the correct battery terminal.
Damage to the battery, device, or bodily harm may occur if the device is
improperly connected to the battery.
1Using the cables you inserted through the pass-through holes on the
portable mount, compare the divot on the cable connector to the keying on
the echo device ports to identify the correct port.
2Push the cable connector into the correct port until the connector is fully
seated.
3Repeat steps 1 and 2 until all of the cables are connected to the device.
4Slide the positive (red) connector onto the positive (red) terminal on the
battery.
5Slide the negative (black) connector onto the negative (black) terminal on
the battery.
6If necessary, wrap excess power cable around the open section on the
underside of the portable mount.
7If necessary, wrap excess transducer cable around the hooks on the side
of the handle on the portable mount.
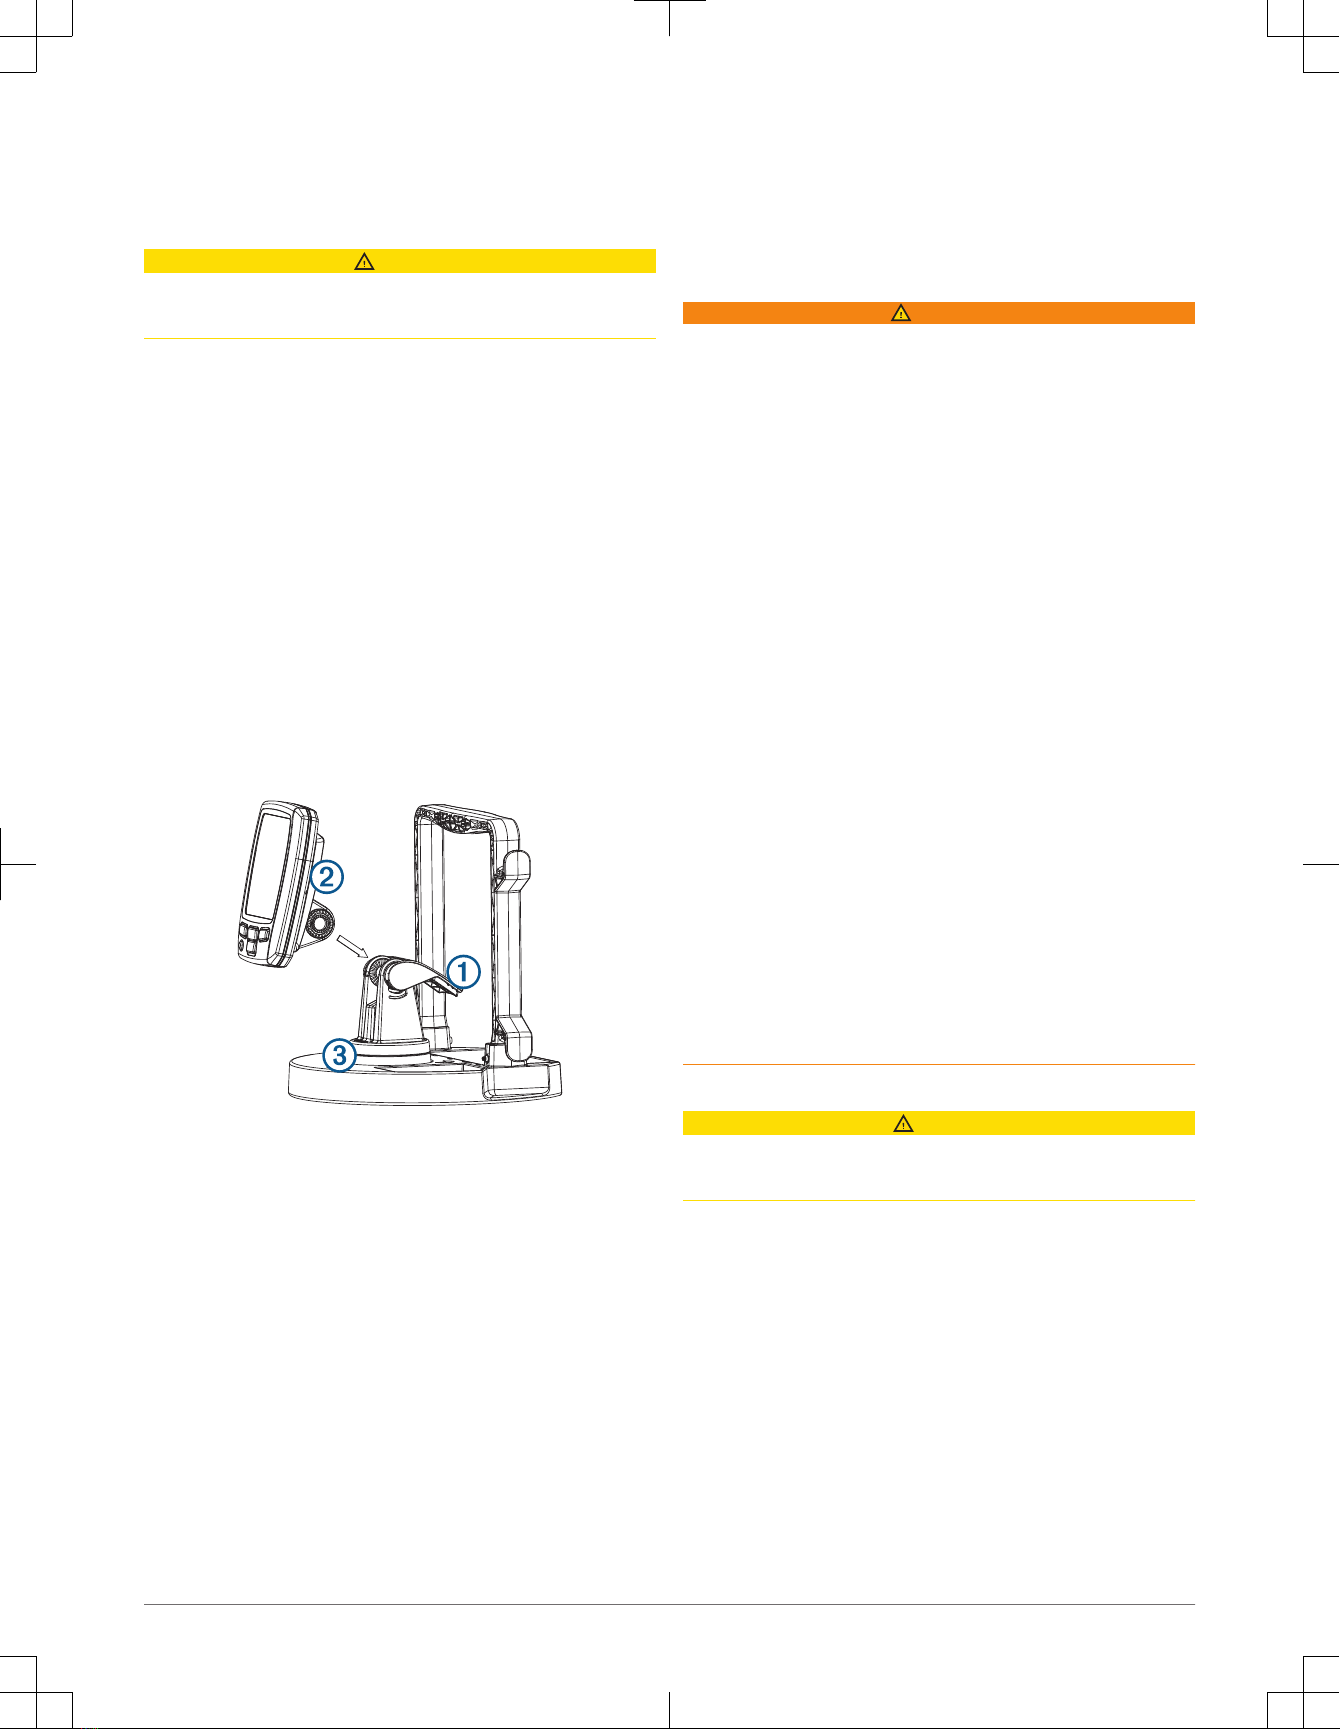
Installing the Device
1Connect the power and transducer cables to the device.
2With the locking arm À in the upward position, place the echo device Á
into the swivel mount Â.
3Tilt the mount for the preferred viewing angle and press down on the
locking arm.
Placing the Portable Kit in the Bag
After you have assembled the portable kit mount, you can place it in the bag,
which makes it easier to carry and protects it from the elements. The bag
contains hooks that allow you to tether the bag to a seat on your boat.
1Place the battery in the open space behind the swivel mount.
2Slide two of the included hook and loop straps through the narrow slots
near the battery.
3Pull the straps under and around the bottom of the portable mount, and
wrap them tightly around the battery.
4Place the transducer into the open space next to the swivel mount.
5Place the portable kit in the bag.
6Wrap the flap of nylon found inside the bag around the handle of the
portable base and secure it to the opening flap.
7Pull the opening flap over the handle.
8Zip up the opening flap to close the bag.
Battery Information
Battery Warnings
Your GPS device uses a user-replaceable sealed lead acid battery. If these
guidelines are not followed, the battery may experience a shortened life span
or may present a risk of damage to the device, fire, chemical burn, electrolyte
leak, and/or bodily injury.
WARNING
• When storing the battery for an extended time, store within the following
temperature range: from 5° F to 104°F (from -15° C to 40° C).
• Do not operate the battery outside of the following temperature range:
from 5° F to 122° F (from -15° C to 50° C).
• Do not place the battery near objects that may cause sparks, flames, or
heat.
• Do not incinerate the battery.
• Keep the battery tightly closed.
• Do not use a sharp object to remove the battery.
• Do not disassemble, puncture, or damage the battery.
• Do not swallow, touch, or inhale the contents of an open battery. Avoid
contact with internal acid. Contact with internal acid may cause irritation or
severe burns. Irritation may occur to the eyes, respiratory system, and
skin. Flush with water at once if contact is made with acid.
• Do not submerge the battery and avoid contact with water.
• Do not short the battery terminals.
• Do not drop or throw the battery.
• Keep the battery away from children.
• Only replace the battery with the correct replacement battery. Using
another battery presents a risk of fire or explosion of the device or charger.
• Only charge the battery with the included charger.
• Do not charge the battery in an unventilated area.
• Store in a cool, dry, and well-ventilated area.
• Do not charge the battery in a gas-tight container.
• Do not leave the device exposed to a heat source or in a high-temperature
location, such as in the sun in an unattended vehicle. To prevent damage,
remove the device from the vehicle or store it out of direct sunlight.
• Do not use organic solvents or other cleaners other than recommended
chemical cleaners on the battery.
• Contact your local waste disposal department to dispose of the battery in
accordance with applicable local laws and regulations.
Charging the Battery
CAUTION
Ensure that you connect the correct connector to the correct battery terminal.
Damage to the battery, device, or bodily harm may occur if the device is
improperly connected to the battery.
Before you can charge the battery using the charger, you must disconnect the
echo device power cable from the positive and negative terminals on the
battery.
The battery is rechargeable and can be charged by connecting the battery to a
wall charger.
1Connect the positive connector on the wall charger onto the positive
terminal on the battery.
2Slide the negative connector on the wall charger onto the negative
terminal on the battery.
3Connect the wall charger to the wall outlet.
Battery Tips
• The life expectancy of a sealed lead acid battery can be extended by
recharging often and not completely discharging the battery.
• Sealed lead acid batteries slowly lose their charge while in storage. For
best results, charge the battery prior to use.
2

• When used in cold temperatures, sealed lead acid batteries do not hold
the charge as long as in warmer temperatures.
• To avoid spilling the internal acid, keep the battery in the upright position.
• Sealed lead acid batteries are completely recyclable.
Specifications
Battery type Sealed lead acid
Battery shelf life after charging 1 month: 92%
3 months: 90%
6 months: 80%
Battery operating temperature range From 5° F to 122° F (from
-15° C to 50° C)
Battery charging temperature range From 5° F to 104° F (from
-15° C to 40° C)
Battery storage temperature range From 5° F to 104° F (from
-15° C to 40° C)
Physical size (assembled kit with device) L × W × H: 10.629 in. ×
10.629 in. × 11.02 in. (270
mm × 270 mm × 280 mm)
Weight (unassembled kit with device) 8.498 lb. (3855 g)
Industry Canada Compliance Statement
This Class B digital apparatus complies with Canadian ICES-003.
Declaration of Conformity
Hereby, Garmin® declares this product is in compliance with the essential
requirements and other relevant provisions of Directive 2004/108/EC.
Limited Warranty
The Garmin standard limited warranty applies to this accessory. For more
information, go to www.garmin.com/support/warranty.html.
3

Garmin International, Inc.
1200 East 151st Street
Olathe, Kansas 66062, USA
Garmin (Europe) Ltd.
Liberty House, Hounsdown Business Park
Southampton, Hampshire, SO40 9LR UK
Garmin Corporation
No. 68, Zhangshu 2nd Road, Xizhi Dist.
New Taipei City, 221, Taiwan (R.O.C.)
Garmin® and the Garmin logo are trademarks of Garmin Ltd. or its subsidiaries, registered in the USA and other countries.
echo™ is a trademark of Garmin Ltd. or its subsidiaries. These trademarks may not be used without the express permission of Garmin.
© 2013 Garmin Ltd. or its subsidiaries www.garmin.com/support
This Slovakian version of the Portable echo Kit English manual (Garmin part number 190-01312-92, revision A) is provided as a
convenience. If necessary, please consult the most recent revision of the English manual regarding the operation and use
of the Portable echo Kit.
GARMIN IS NOT RESPONSIBLE FOR THE ACCURACY OF THIS SLOVAKIAN MANUAL AND DISCLAIMS ANY LIABILITY
ARISING FROM THE RELIANCE THEREON.
Table of contents


