Gladiator FREEZERATOR GAFZ21XXMK01 User manual

i_i,li,i_ ="_,__ ,i_'!_ ,_,_i_i_iiil,i
-7 f+ Y,,.
FREEZERATORTMFREEZER
Use&Care Guide
FREEZERATORTMCONGELADOR
Manual de usoy cuida_
FREEZERATORTMCONGELATEUR
Gumded u_lB_on ef d entretlen
Table of Contents/Indite/Table des mati6res ............ 2
i
THE BEST GARAGE ON THE BLOCK. TM
EL MEJOR GARAGE DE LA CUADRA. TM
LE MEILLEUR GARAGE DU QUARTIER. TM

TABLEOF CONTENTS
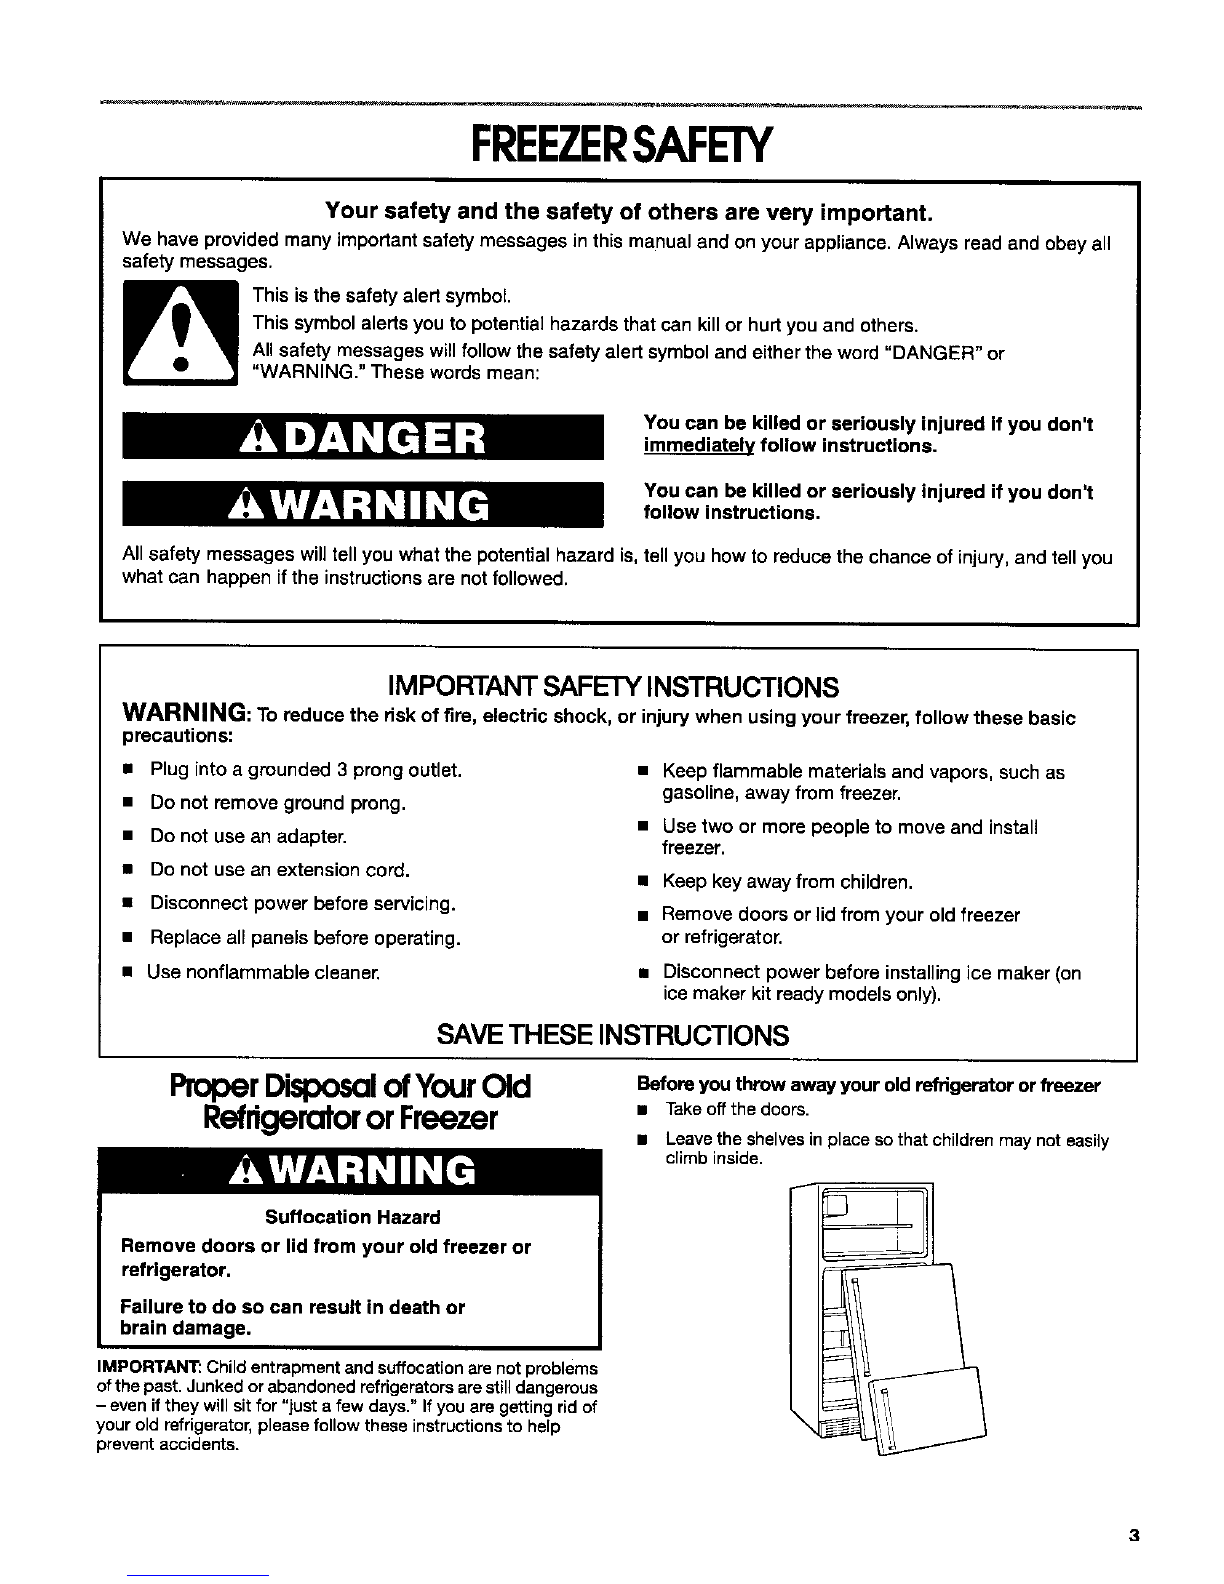
FREEZER SAFETY ......................................................................... 3
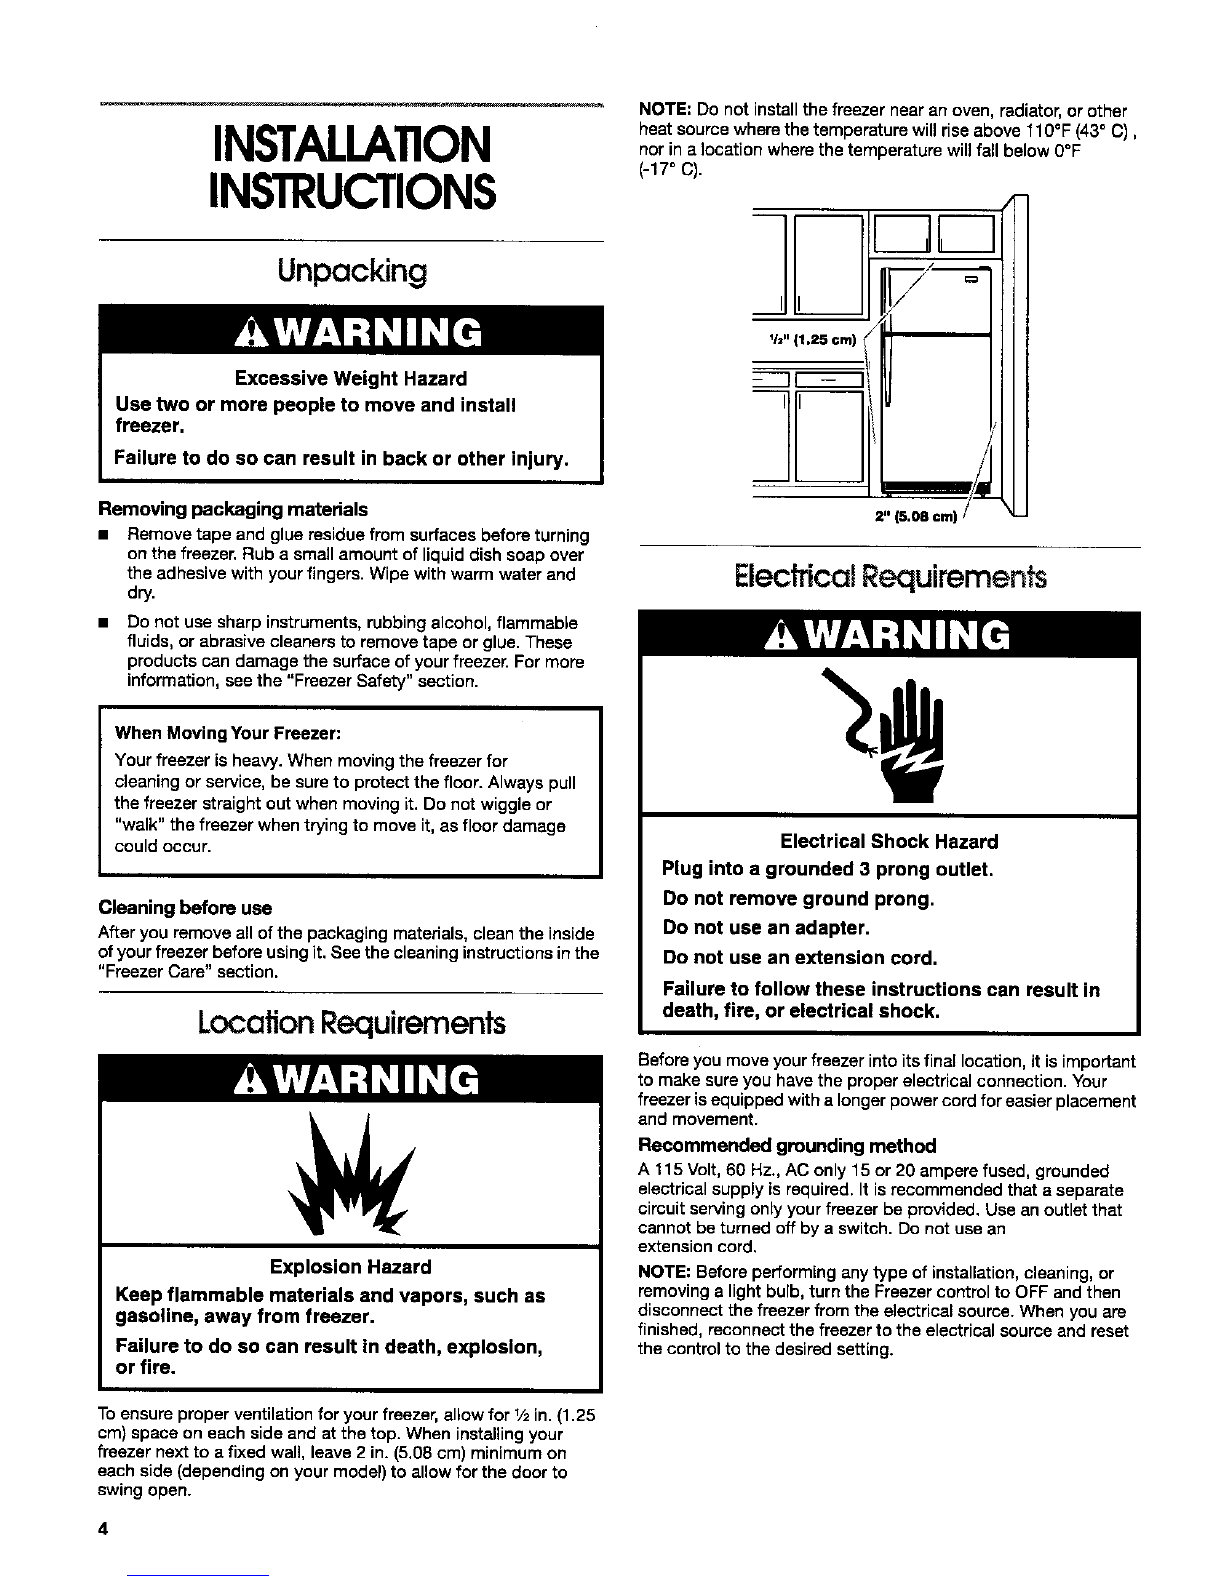
INSTALLATION INSTRUCTIONS .................................................. 4
Unpacking.................................................................................... 4
Location Requirements................................................................ 4
ElectricalRequirements............................................................... 4
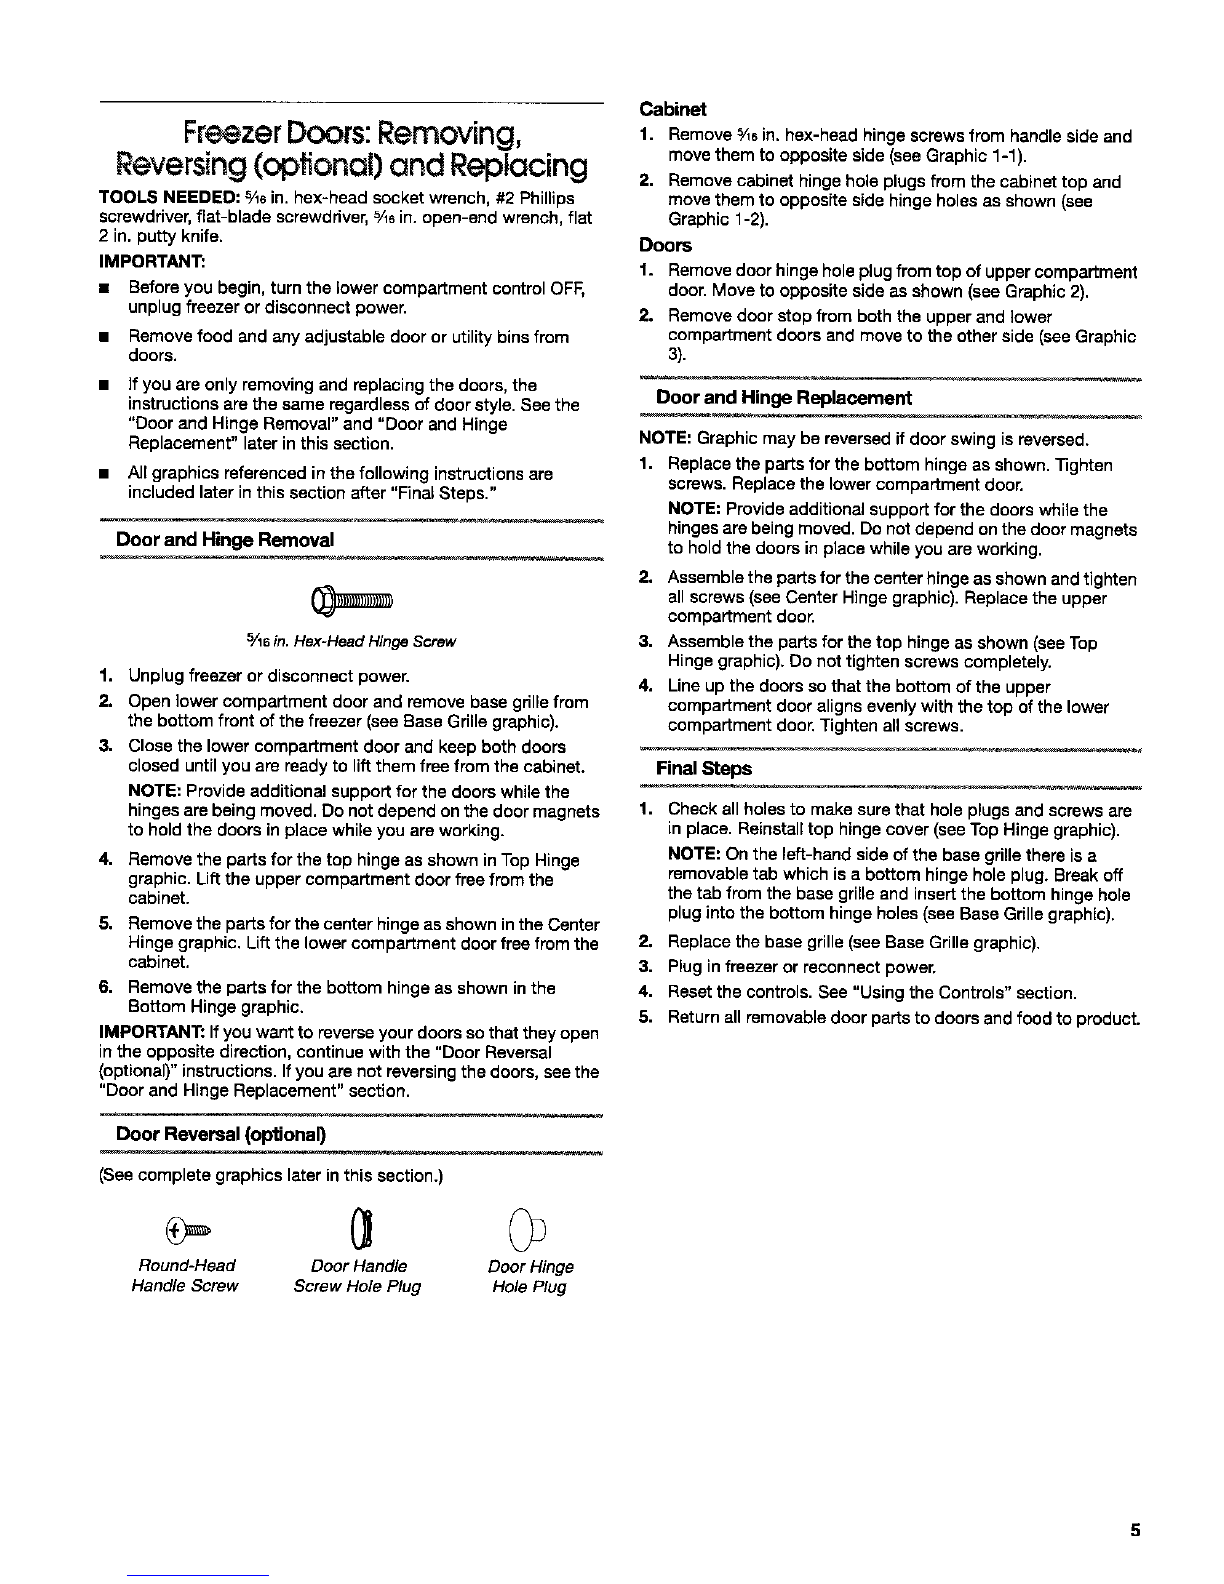
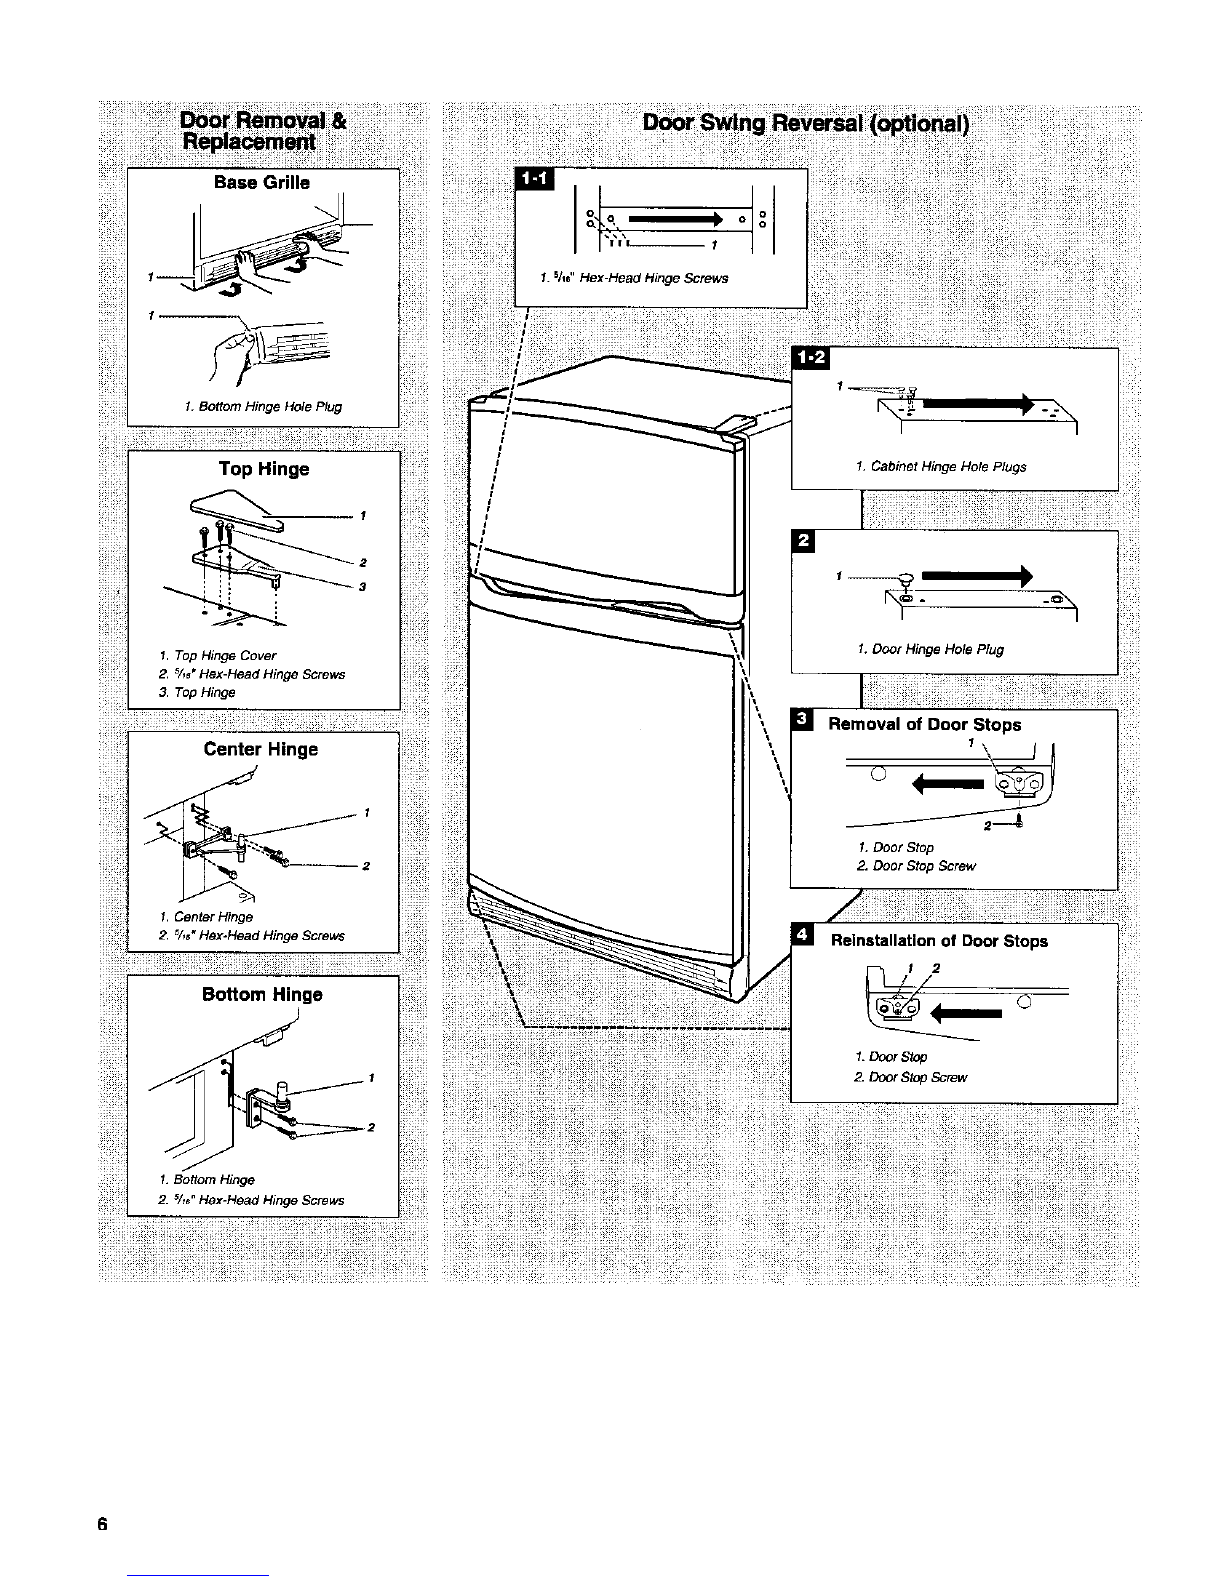
Freezer Doors: Removing,Reversing(optional)and Replacing..5
Door Closing and Alignment ........................................................ 7
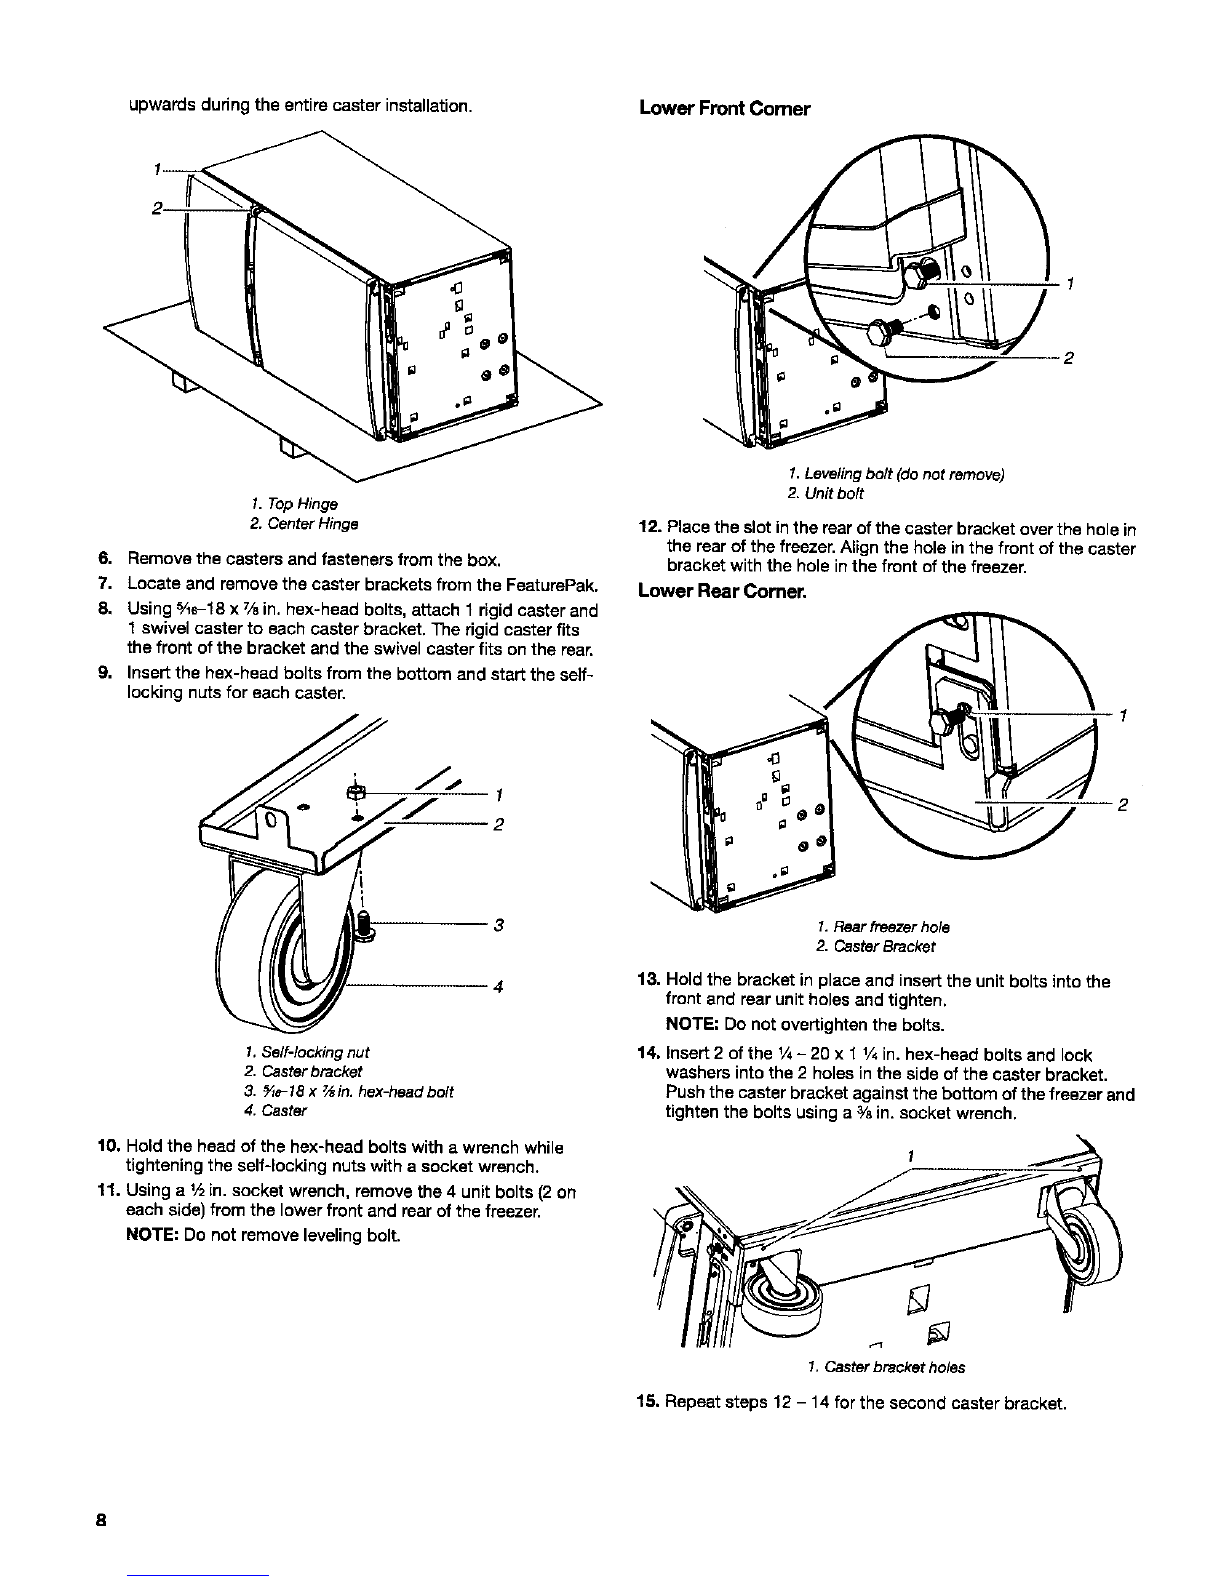
Caster Instanation......................................................................... 7
Normal Sounds ............................................................................ 9
FREEZER USE ................................................................................ 9
EnsuringProperAir Circulation.................................................... 9
Using the Controls....................................................................... 9
UPPER COMPARTMENT FEATURES ........................................ 10
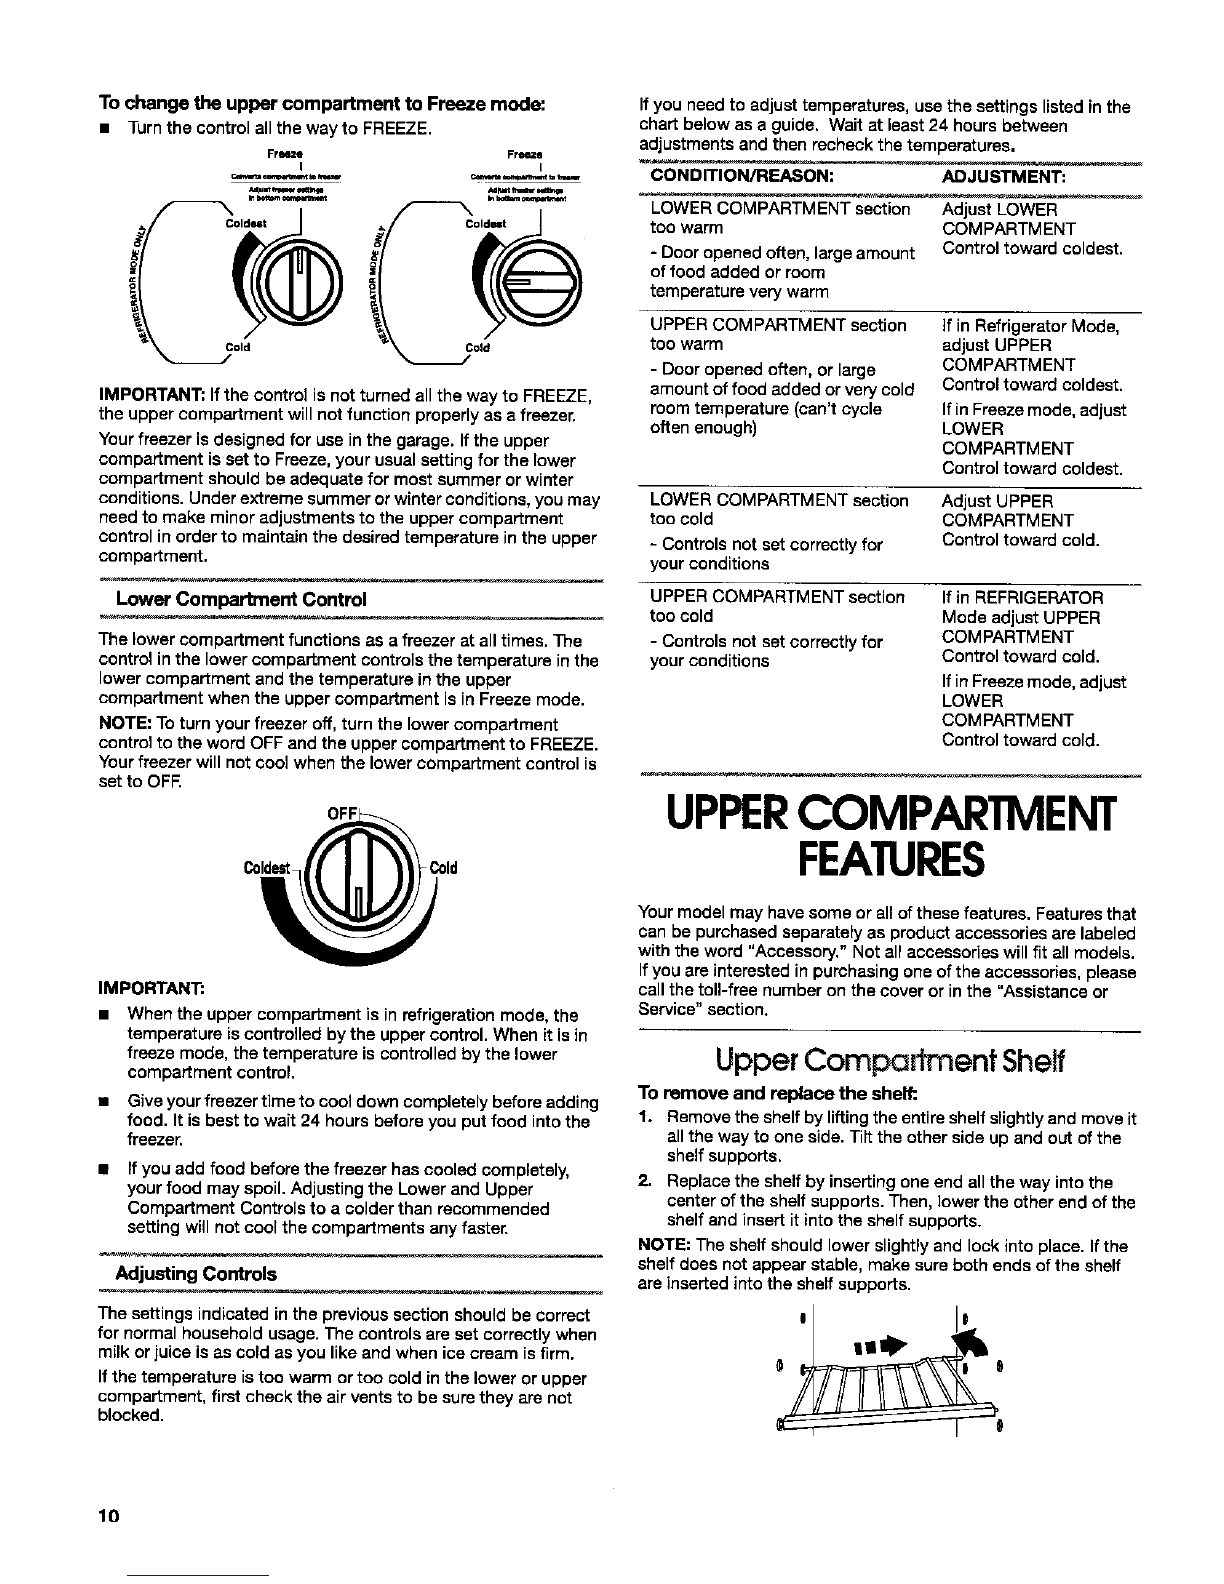
Upper Compartment Shelf ......................................................... 10
Upper Compartment Floor ......................................................... 11
LOWER COMPARTMENT FEATURES ....................................... 11
Shelves ....................................................................................... 11
Haft-Width Wire Baskets ............................................................ 11
Full-Width Wire Basket .............................................................. 11
Full-Width Shelf .......................................................................... 12
DOOR FEATURES ........................................................................ 12
Door Rails................................................................................... 12
Door Bins.................................................................................... 12
Wire Door Shelf .......................................................................... 12
Can Rack .................................................................................... 12
FREEZER CARE ........................................................................... 13
Cleaning ...................................................................................... 13
Changing the Light Bulbs ........................................................... 13
Power Interruptions .................................................................... 13
Vacation and Moving Care......................................................... 13
TROUBLESHOOTING .................................................................. 14
ASSISTANCE OR SERVICE ......................................................... 15
In the U.S.A. ............................................................................... 15
in Canada ................................................................................... 15
WARRANTY .................................................................................. 16
iNDICE
SEGURIDAD DEL CONGELADOR .............................................. 17
INSTRUCClONES DE INSTALACI6N ......................................... 18
Desempaque .............................................................................. 18
Requialtosde Iocalizaci6n.......................................................... 18
Requisitosal_&ctricos.................................................................. 19
Puertas del congelador:C6mo quitarlas, cambiarles el sentido
de apertura (opeional) y volver a ponedas en su lugar.............. 19
Cierrs y alineamiento de las puertas ......................................... 21
Instalaci6n de las ruedecillas ..................................................... 22
Sonidos normalee ...................................................................... 24
USO DEL CONGELADOR ........................................................... 24
C6mo asegurar la debida circulaci6n de aim ............................ 24
Uso de los controles.................................................................. 24
CARACTERfSTICAS DEL COMPARTIMIENTO SUPERIOR.....26
Estantedal compartimientosuperior......................................... 26
Base del compartimientosuperior............................................. 26
CARACTERfSTICAB DEL COMPARTIMIENTO INFERIOR ......26
Estantes ...................................................................................... 26
Canastillas de alambrede medio .............................................. 26
Canastiliade alambre................................................................. 26
Estante de anoho oompleto....................................................... 27
CARACTER|STICAS DE LA PUERTA ......................................... 27
Rieles de la puerta...................................................................... 27
Recipientes de la puerta ............................................................ 27
Estante de alambre para lapuerta ............................................. 28
Portalatas .................................................................................... 28
CUIDADO DEL CONGELADOR ................................................... 28
Limpieza ..................................................................................... 28
C6mo cambiar los focos ............................................................ 29
Cortes de oorriecte ..................................................................... 29
Cuidado durante las vacaciones y mudanzas ........................... 29
SOLUCION DE PROBLEMAS ...................................................... 29
AYUDA O SBRVICIO TI_CNICO................................................... 31
Enlos EE.UU.............................................................................. 31
EnCanada .................................................................................. 31
GARAN'rJA..................................................................................... 32
TABLEDESMATIERES
SI_CURITI_DU CONGIeLATEUR .................................................. 33
INSTRUCTIONS D'INSTALLATION ............................................. 34
D_baJ]age.................................................................................... 34
Emplacement d'installation........................................................ 34
Sp6cifications_lectriques .......................................................... 35
Portas du cong_lateur : D6montage, inversion(option)
et r_installation........................................................................... 35
Fermetureet alignementdes portes.......................................... 38
Installationdes roulettes............................................................ 38
Bruitsnormaux........................................................................... 40
UTILISATION DU CONGI_LATEUR ............................................. 40
Pourassurer une circulationd'alr correcte................................ 40
Utilisationdes commandes ........................................................ 40
CARACTt_RISTIQUES DU COMPARTIMENT SUPI_RIEUR,..,..42
Tablette du compartiment sup_rieur.......................................... 42
Fonddu eompartimentinf_deur................................................. 42
CARACTI-=RISTIQUES DU COMPARTIMENT INFERIEUR .......42
Tablettes..................................................................................... 42
Deux paniers en broche demi-largeur ....................................... 42
Panier m_tallique ........................................................................ 42
Tablette de pleine largeur........................................................... 43
CARACTE_RISTIQUES DE LA PORTE ......................................... 43
Tdnglesdans la porte................................................................. 43
Balconnets dans laporte ........................................................... 43
Tablette m_taHique de porte ...................................................... 44
Porte-cannettea .......................................................................... 44
ENTRETIEN DU CONGIeLATEUR ............................................... 44
Nettoyege ................................................................................... 44
Remplacement des ampoules d'Sclalrage ................................ 45
Pannes de courant..................................................................... 45
Entretien avant les vacances ou lore d'un dem_nagement.......45
DEPANNAGE ................................................................................. 46
ASSISTANCE OU SERVICE ......................................................... 47
GARANTI E ....................................................... .......................... 48

FREEZERSAFETY
Your safety and the safety of others are very important.
We have provided manyimportants•fety messages in this manualand on your appliance, Always read and obey all
safety messages.
I_ his isthe safety alert symbol
This symbolalerts you to potentialhazards that can killor hurtyou and others.
All safety messages willfollowthe safety alert symboland eitherthe word "DANGER" or
"WARNING," These words me•n:
You can be killed or seriously injured if you don't
immediateLv follow instruction•.
You can be killed or seriously injured if you don't
follow instruction•,
All safety messages willtell you whatthe potential hazard is,tell you howto reduce the chance of injury, and tell you
what can happen if the instructions are not followed.
IMPORTANT SAFETY INSTRUCTIONS
WARNING: To reduce the risk of fire, electric shock, or injurywhen using your freezer, follow these basic
precautions:
=Plug into a grounded 3 prong outlet.
•Do not remove ground prong,
•Do not use an adapter,
•Do not use an extension cord.
• Disconnect power before servicing.
• Replace all panels before operating.
• Use nonflammable cleaner.
Keep flammable materials and vapors, such as
gasoline, away from freezer.
Use two or more people to move and install
freezer.
Keep key away from children.
Remove doors or lid from your old freezer
or refrigerator.
Disconnect power before installingice maker (on
ice maker kitready modelsonly).
SAVETHESE INSTRUCTIONS
ProperDisposalofYourOld
RefdgerofororFreezer Before you throw away your old reffigerator or freezer
•Take off the doors.
•Leave the shelves in place so that children may not easily
climb inside.
Suffocation Hazard
Remove doors or lid from your old freezer or
refrigerator.
Failure to do so can result in death or
brain damage.
IMPORTANT: Child entrapment and suffocationare not problems
ofthe past. Junked or abandoned refrigeratorsare stilldangerous
-even ifthey will sit for "just a few days." Ifyou are getting rid of
your old refrigerator,please follow these instructionsto help
prevent accidents.
3

INSTALLATION
INSTRUCTIONS
Unpacking
Removing packaging materials
m Remove tape and glue residue from surfaces before turning
onthe freezer, Rub a small amount of liquid dish soap over
the adhesive with your fingers, Wipe with warm water and
dry,
= Do not use sharp instruments,rubbing alcohol, flammable
fluids, or abrasive cleaners to remove tape or glue. These
products can damage the surface of your freezer. For more
information, see the "Freezer Safety" section.
When Moving Your Freezer:
Your freezer is heavy. When moving the freezer for
cleaning or service, be sureto protect the floor. Always pull
the freezer straight out when moving it. Do not wiggle or
"walk" the freezer when trying to move it, as floor damage
could occur.
Cleaning before use
After you remove aJlof the packaging materials, clean the inside
ofyour freezer before usingit, See the cleaning instructionsin the
"Freezer Care" section.
LocationRequirements
Explosion Hazard
Keep flammable materials and vapors, such as
gasoline, away from freezer.
Failure to do so can result in death, explosion,
or fire.
NOTE: Do not installthe freezer near an oven, radiator, or other
heat sourcewhere the temperature will riseabove fIO°F (43° C),
nor in a location where the temperature will fallbelow O°F
(-17° C). A-
-],,IT
_ = .
11=,,11.25 ©m)
- H -- I
2" (5.08 cm) /
Electrical Shock Hazard
Plug into a grounded 3 prong outlet.
Do not remove ground prong.
Do not use an adapter.
Do not use an extension cord.
Failure to follow these instructions can result in
death, fire, or electrical shock.
Before you move your freezer into its final location, it isimportant
to make sure you have the proper electrical connection. Your
freezer is equipped with a longer power cord for easier placement
and movement.
Recommended grounding method
A 115 Volt, 60 Hz., AC only 15 or 20 ampere fused, grounded
electrical supply is required. It is recommended that a separate
circuit servingonly your freezer be provided. Use an outlet that
cannot be turned off by a switch. Do not use an
extension cord.
NOTE: Before performing any type of installation, cleaning, or
removing alight bulb, turn the Freezer control to OFF and then
disconnect the freezer from the electrical source. When you are
finished, reconnect the freezer to the electrical source and reset
the control to the desired setting.
Toensure proper ventilation for your freezer, allow for 1/2in. (1.25
cm) space on each side and at the top. When installing your
freezer next to afixed wall, leave 2 in. (5.08 cm) minimum on
each side (depending on your model) to allow for the door to
swing open.
4

FreezerDoors:Removing,
Reversing (optional) and Replacing
TOOLS NEEDED: `%6in. hex-head socket wrench, #2 Phillips
screwdriver,flat-blade screwdriver,`%6in. open-end wrench, flat
2 in. putty knife.
IMPORTANT:
• Before you begin, turn the lower compartment control OFF,
unplug freezer or disconnect power.
•Remove food and any adjustable door or utility bins from
doors.
•If you are only removingand replacing the doors, the
instructionsare the same regardlessof door style. See the
"Door and Hinge Removal" and "Door and Hinge
Replacement" later in this section.
• All graphics referenced in the following instructions are
included later in this section after "Final Steps."
Door and Hinge Removal
5A6in.Hex-HeadHingeScrew
1. Unplug freezer or disconnect power.
2. Open lower compartment door and remove base gdllefrem
the bottom front of the freezer (see Base Grillegraphic).
3. Close the lower compartment door and keep both doors
closed untilyou are ready to lift them free from the cabinet.
NOTE: Provide additional support for the doors while the
hinges are being moved. Do notdepend onthe doormagnets
to hold the doors in place while you are working.
4. Remove the parts for the top hinge as shown inTop Hinge
graphic. Lift the upper compartment door free from the
cabinet.
5. Remove the parts forthe center hinge as shown inthe Center
Hinge graphic. Lift the lower compartment door free fromthe
cabinet.
6. Remove the parts for the bottom hinge as shown in the
Bottom Hinge graphic.
IMPORTANT: If you want to reverse your doors so that they open
in the opposite direction, continue with the "Door Reversal
(optional)" instructions. If you are not reversing the doors, see the
"Door and Hinge Replacement" section.
Door Reversal (optional)
(See complete graphics later in this section.)
Round-Head Door Handle Door Hinge
Handle Screw Screw Hole Plug Hole Plug
Cabinet
1. Remove -%8in. hex-head hinge screws from handle side and
move them to opposite side (see Graphic 1-1).
2. Remove cabinet hinge hole plugs from the cabin_ top and
move them to opposite side hinge holes as shown (see
Graphic 1-2).
Doors
1. Remove door hinge hole plugfrom top ofupper compartment
door. Move to opposite side as shown (see Graphic 2).
2. Remove door stop from both the upper and lower
compartment doors and move to the other side (see Graphic
3).
Door and Hinge Replacement
NOTE: Graphic may be reversed if door swing is reversed.
1. Raplace the parts for the bottom hinge as shown. Tighten
screws. Replace the lower compartment door.
NOTE: Provide additional support for the doors whilethe
hingesare being moved. Do not depend onthe doormagnets
to hold the doors in place while you are working.
2. Assemble the partsfor the center hinge as shown andtighten
all screws (see Center Hinge graphic). Replace the upper
compartment door.
3. Assemble the partsfor the top hinge as shown (see Top
Hinge graphic).Do not tighten screws completely.
4. Line up the doors so that the bottom of the upper
compartment door aligns evenlywith the top of the lower
compartment door. Tighten all screws.
Final Steps
1. Check all holesto make surethat hole plugs and screws are
in place, Reinstalltop hinge cover (seaTop Hinge graphic),
NOTE: On the left-hand side ofthe base grillethere is a
removable tab which is abottom hinge hole plug. Break off
the tab from the base grilleand insertthe bottom hingehole
plug into the bottom hinge holes(see Base Grillegraphic),
2. Replace the base grille (see Base Grillegraphic),
3. Plug infreezer or reconnect power.
4. Reset the controls,See "Using the Controls" section,
5. Return all removable door partsto doore and food to product.
5

BaseGrille
1. Bottom Hinge Hole Plug
Top Hinge
1. Top Hinge Cover
2. 5/_, Hex-Head Hinge Screws
3. Top Hinge
Bottom Hinge
I. Bottom Hinge
2. 5/_6"Hez-Head Hinge Screws
1. Sl_e"Hex-Head Hinge Screws
_; _-;_
I. Cabinet Hinge Hole Plugs
,--_. =_o_
1. Door Hinge Hole Plug
ii!i!!_Jiiiiiii!_iiiii!iJi_ii!!i!_!ii_!_
Removal of Door Stops /
1
I. Door Stop
2. Door Stop Screw
Relnstallation of Door Stops
/2
(3
1. Door Stop
2. Door Stop Screw

NOTE: If you have the casters installed on your freezer, the
leveling screws will not work. Shims can be placed under the
casters to level afreezer that has casters installed.
Door Closing
Your freezer has two front adjustable rollers -one onthe rightand
one on the left. Ifyour freezer seems unsteady or you want the
doors to close easier, adjust the freezer's tilt using the
instructions below:
1. Plug into a grounded 3 prong outlet.
2. Move the freezer into its final position.
3. Remove the base grille (see Base Grillegraphic).The two
levelingscrews are part of the front rollerassemblies which
are at the base of the freezer on either side.
4. Use a screwdriver to adjust the leveling screws, Turn the
levelingscrew to the rightto raisethat side of the freezer or
turn the levelingscrew to the left to lower that side. It may
take severalturns ofthe leveling screws to adjust the tilt of
the freezer.
NOTE: Having someone push against the top ofthe freezer
takes some weight off the levelingscrews and rollers.This
makes it easier to adjust the screws.
5. Open both doors again and check to make surethat they
close as easily as you like. If not, tiltthe freezer slightlymore
to the rear by turning both levelingscrews to the right. It may
take several more turns, and you should turn both leveling
screws the same amount.
6. Replace the base grille.
Door Alignment
Ifthe space between your doors looks uneven, you can adjust it
using the instructionsbelow:
1. Pry off the top hinge cover.
2. Loosen the top hinge screws using a %6 in. socket or wrench,
3. Have someone hold the door in place or put a spacer
between the doors while you tighten the top hinge screws.
4. Replace the top hinge cover.
5. Place the frsezer on its side on top of the cardboard or
protective material. Make sure the door hinge is facing
upward.
IMPORTANT: It is important that the door hinge face
Check that you have everything necessary for correct assembly.
Proper assembly is your responsibility.
Tools Needed:
•_/_in. Socket wrench or nut •% in. Socket wrench or nut
driver driver
• 1/_in. Wrench
•V_20 X 1 1/4in. Hex-head
bolts (4)
•V_-20x 1 ¼ in. lock
washers (4)
Parts Supplied:
•Rigid Casters (2)
• Swivel Casters (2)
• sAe-18Self-locking
hex-nuts (16)
• _A6-18x % in. Hex-head bolts•
(16) Caster brackets (located in
FeaturePak) (2)
Plastic skids(shipped with
the freezer)
1. Before you begin, turn the lower compartment control to off,
unplug freezer or disconnect power.
2. Remove food and any adjustable shelves and bins from
freezer.
3.
4.
Open the lower compartment door and remove the base
grille. Remove the grilleby graspingthe grillewith both
hands, liftingup and pullingbottom of the grilletoward you.
Place the plastic skids (shipped with the freezer) on the floor
at least 3 ft. (91.44 cm) apart. Lay a piece of cardboard or
other protective material overthe skids. This will elevate the
freezer to allow for easier caster installation and also protect
it from scratches.
NOTE: Ifthe skids have been discarded or are not available,
2 in. x 4 in. boards may be used.
7

upwardsduring the entire caster installation. Lower Front Comet
2.
I. Top Hinge
2. Center Hinge
6. Remove the casters and fasteners from the box.
7. Locate and removethe caster brackets from the FeaturePak.
8, Using %s-18 x % in. hex-head bolts, attach 1 rigid caster and
1 swivel caster to each caster bracket. The rigid caster fits
the front of the bracket and the swivel casterfits onthe rear.
9. Insertthe hex-head bolts from the bottom and start the self-
locking nutsfor each caster.
I. Self-locking nut
2. Caster bracket
3. _a-18 x_in. hex-head bolt
4. Caster
10. Hold the head of the hex-head bolts with a wrench while
tightening the self-locking nuts with a socket wrench.
11. Using a 1/2in. socket wrench, remove the 4 unit bolts (2 on
each side)from the lower front and rearof the freezer.
NOTE: Do not remove levelingbolt.
2
I. Leveling bolt (do not remove)
2. Unit bolt
12. Place the slot inthe rear ofthe caster bracket over the hole in
the rear of the freezer. Align the hole in the front ofthe caster
bracket with the hole inthe front ofthe freezer.
Lower Rear Comer.
2
1. Rear freezer hole
2. Caster Bracket
13. Holdthe bracket in place and insertthe unitbolts into the
front and rear unit holes and tighten.
NOTE: Do not overtighten the bolts.
14. Insert 2 of the 1/__20 x11/4in. hex-head bolts and lock
washers into the 2 holes inthe side of the caster bracket.
Push the caster bracket against the bottom of the freezer and
tighten the bolts using a %in. socket wrench.
1.Cas_rbmcketho_s
15. Repeat steps 12 - 14 for the second caster bracket.

Complete the Assembly
1. Lookthe front caster wheels.
2, Insert a small piece of cardboard between the caster brake
and the floor,This willhelp prevent the brake from rubbingon
the floor.
You may hear water runninginto the drain pan during the
defrost cycle.
FREEZERUSE
3. Stand the freezer upright.
4. Replace the base grilleby placing the metal clips in the
openings inthe metal panel and rollingthe grilledownward
until it snaps intoplace.
5. Unlockthe wheels and move the freezer into its desired
location.
6. After the freezer is in position, relock the wheels.
7. Plug in freezer or reconnect power.
Normal Sounds
Your new freezer may make sounds that your old one didn't
make. Because the sounds are new to you, you might be
concerned about them. Most of the new sounds are normal Hard
surfaces, such as the floor, walls, and cabinets, can make the
sounds seem louder. The following describes the kinds of sounds
and what may be making them.
• Your freezer is designed to run more efficiently to keep your
food items at the desired temperatures and to minimize
energy usage. The high efficiency compressor and fans may
cause your freezer to run longer than your old one. You may
also hear apulsating or high-pitched sound from the
compressor or fans adjusting to optimize performance.
Your freezer will sound louder than regular refrigerators.This
is due to the highfan speed. This speed is necessary to keep
the freezer operating propedy inthe harsher environments of
most garages.
• You may hear a hissing noise after you closethe lower
compartment door, This isdue to the colder temperature of
the lower compartment and the strongerseal on the door.
• You may hear the evaporator fan motor circulating airthrough
the upper and lower compartments. The fan speed may
increase as you open the doors or add warm food.
•Rattling noises may come from the flow of refrigerant, or
items stored on top ofthe freezer.
• Water dripping on the defrost heater during adefrost cycle
may cause a sizzlingsound.
• As each cycle ends, you may hear a gurglingsound due to
the refrigerant flowing in your freezer.
• Contraction and expansionof the inside walls may cause a
popping noise.
•You may hear air being forced over the condenser by the
condenser fan.
In orderto ensure proper temperature, you need to permit airflow
between the lower and upper sections. As shown in the
illustration, the majority of the cold air enters the lower
compartment through vents behind the lower control box, flows
through the lower section and is recirculated through the opening
in the top of the lower compartment. The rest of the cold air
enters the upper compartment through the vent in the upper
control box, then flows through the upper section and is
recimulated through the rear wall.
Do not block any of these vents with food packages. If the vents
are blocked, airflow will be prevented and temperature and
moisture problems may occur.
IMPORTANT: Because aircirculates between both sections, any
odors formed inone section willtransfer to the other. You must
thoroughlyclean both sections to eliminate odors. To prevent
odor transfer and drying out offood, wrap or cover foods tightly.
UsingDe Controls
For your convenience, your freezer controlsare preset at the
factorywith the upper compartment set in refrigerationmode and
the lower compartment controls set at the mid-point. When you
first installyour freezer, make surethat the controls are stillpreset
to the factory settings.
Upper Compartment Control
The upper compartment of your freezer can function as eithera
refrigerator or afreezer. The control in the upper compartment
allows you to switch it from Refrigerator Mode to Freeze mode.
Ensure that the correct mode is selected depending upon your
storage requirements.
g

To change the upper compartment to Freeze mode:
• TurnthecontrolallthewaytoFREEZE,
IMPORTANT: Ifthe control isnot turned all the way to FREEZE,
the upper compartment will not function properly as afreezer.
Your freezer isdesigned for use in the garage. If the upper
compartment isset to Freeze, your usual setting for the lower
compartment should be adequate for most summer or winter
conditions. Under extreme summer or winter conditions,you may
need to make minor adjustments to the upper compartment
control in order to maintain the desired temperature in the upper
compartment.
Lower Compartment Control
The lower compartment functions as afreezer at alltimes. The
control inthe lower compartment controlsthe temperature inthe
lower compartment and the temperature in the upper
compartment when the upper compartment is in Freeze mode.
NOTE: Toturn your freezer off, turnthe lower compartment
control to the word OFF and the upper compartment to FREEZE.
Your freezer willnot cool when the lower compartment control is
set to OFF.
Co.Cold
IMPORTANT:
• When the upper compartment is in refrigerationmode, the
temperature iscontrolled by the upper control. When it isin
freeze mode, the temperature is controlledby the lower
compartment control.
•Give your freezer time to cool down completely before adding
food. It isbest to wait 24 hours before you putfood intothe
freezer.
•If you add food before the freezer has cooled completely,
your food may spoil. Adjusting the Lower and Upper
Compartment Controlsto a colder than recommended
setting will not cool the compartments any faster.
Adjusting Controls
The settings indicated inthe previous section should be correct
for normal household usage. The controlsare set correctlywhen
milk or juice isas cold asyou like and when ice cream isfirm.
If the temperature istoo warm or too cold in the lower or upper
compartment, first check the air vents to be sure they are not
blocked.
If you need to adjust temperatures, use the settings listedin the
chart below as a guide. Wait at least 24 hours between
adjustments and then recheck the temperatures.
CONDITION/REASON: ADJUSTMENT:
LOWER COMPARTMENT section Adjust LOWER
too warm COM PARTMENT
-Door opened often, largeamount Controltoward coldest.
offood added or room
temperature very warm
UPPER COMPARTMENT section
tOO warm
- Door opened often, or large
amount of food added or very cold
room temperature (can't cycle
often enough)
]fin R_riger_orMode,
adjust UPPER
COMPARTMENT
Controltowa_ coldest.
Ifin Freeze mode, adjust
LOWER
COMPARTMENT
Control toward coldest.
LOWER COMPARTMENT section Adjust UPPER
too cold COMPARTMENT
- Controls not set correctly for Control toward cold.
your conditions
UPPER COMPARTMENT section
too cold
- Controls not set correctly for
your conditions
If in REFRIGERATOR
Mode adjust UPPER
COMPARTMENT
Control toward cold.
Ifin Freeze mode, adjust
LOWER
COMPARTMENT
Control toward cold.
UPPERCOMPARTMENT
FEATURES
Your model may have some or all of these features. Features that
can be purchased separately as product accessories are labeled
with the word "Accessory," Not all accessories will fit all models.
Ifyou are interested in purchasing one of the accessories, please
call the toll-free number on the cover or in the "Assistance or
Service" section.
Upper Compa ent Shelf
To remove and replace the shelf:.
1. Remove the shelf by liftingthe entireshelfslightlyand move it
allthe way to one side. Tilt the other side up and out ofthe
shelfsupports.
2. Replace the shelfby insertingone end allthe way intothe
center of the shelf supports. Then, lower the other end of the
shelfand insert it intothe shelfsupports.
NOTE: The shelf should lower slightlyand lock into place. If the
shelf does not appear stable, make sure both ends ofthe shelf
are inserted intothe shelf supports.
10

Upper Compartment Floor
To remove and replace the upper compartment floor:
1, Remove all items from the compartment floor.
2, Remove the floor by raising the front and lifting it out.
3, Replace the floor by inserting the two rear tabs into the holee
in the rear of the lower compartment, Lower the floor onto the
liner of the lower compartment.
LOWERCOMPARTMENT
FEATURES
Your model may have some or all of these features. Features that
can be purchased separately as product accessories are labeled
with the word "Accessory." Not all accessories will fit all models.
If you are interested in purchasing one of the accessories, please
call the toll-free number on the cover or in the "Assistance or
Service" section.
Shelves
The shelves in your freezer are adjustable to match your
individual storage needs.
Storing similarfood items together in your freezer and adjusting
the shelves to fit different heightsof items will make finding the
exact item you want easier. It will also reduce the amount of time
the freezer door is open, and save energy.
To remove and replace a shelf:.
1. Remove the shelfby tilting it upat the front and liftingit out of
the shelf supports.
2, Replace the shelf by guiding the rear shelf hooksintothe
shelf supports, Tilt the front of the shelf up until rear shelf
hooksdrop into the shelf supports. Check to make surethat
the shelf issecurely in position.
Half-V dth wire Baskefs
There are two half-width wire baskets in your freezer.
To remove and replace a haft-width basket:
1. Remove all itemsfrom basket. Remove the basket by lifting
the front out of the slides, then liftingthe basket out,
2, Replacethe wire basket by loweringthe basket intothe slidee
then pushingthe basket backwards untilit is underthe shelf.
Full-width Wire Basket
To remove and replace full width wire basket:
1. Remove all items from basket. Remove the basket by lifting
the front out of the ball-bearing slides, then liftingthe basket
out.
2. Replace the wire basket by first extending the ball-bearing
slides, then lowering the tabs on the sides of the wire basket
into the slides.Push the basket backwards until it is under the
shelf.
Ii
I
I
11

FufI-Wid She
To remove and replace the shelf:
1. Remove all items from the shelf. Remove the shelfby raising
the front and pulling it forward.
2. Replace the shelfby lifting the front while slidingthe shelf
back until it locks into place.
i
II
iI
Frozen Food Storage Guide
Storage times will vary according to the quality and type offood,
the type of packaging or wrap used (should be airtight and
moisture-proof), and the storage temperature, Seal the package
or container securelyto prevent taste and odortransfer
throughoutthe product, Ice crystals inside a sealed package are
normal.
Put no more unfrozen food into the freezer than will freeze within
24 hours (no more than 2 to 3 Ibs. of food per cubic foot [907-
1,350 g per L] of freezer space). Leave enough space in the
freezer for air to circulate around packages. The freezer door
must close tightly. For more information on preparing food for
freezing, check a freezer guide or reliable cookbook.
DOOR FEATURES
Your model may have some or allof these features. Features that
can be purchased separately as product accessories are labeled
with the word "Accessory." Not all accessories will fit all models.
Ifyou are interested in purchasing one of the accessories, please
call the toll-free number on the cover or in the "Assistance or
Service" section.
DoorRails
The door rails may be removed for easier cleaning.
To remove and replace the rails:
1. Remove the rails by pulling straight up on each end of the rail.
2. Replace the rails by slidingthe shelfrail intothe slots onthe
door and pushingthe rail straight down untilit stops.
Door Bins
To remove and replace the bins:
1. Remove the bin by lifting it and pulling itstraight out,
2. Replace the bin by slidingitin above the desired supportand
pushing it down until itstops.
Wire DoorShe
To remove and replace the wire door shelf:.
1. Remove the wire door shelfby liftingit out ofthe door rail.
2. Replace the door shelf by sliding itinto the back ofthe door
rail and snapping it into place.
Can Rack
To remove the reck:
1. Remove the rack by lifting it and pulling straight out.
2. Replace the rack by slidingit in above the supports and
pushing it down until it stops.
12

FREEZERCARE
Cleaning
Explosion Hazard
Use nonflammable cleaner.
Failure to do so can result in death, explosion,
or fire.
Both the freezer and upper compartment sectionsdefrost
automatically. However, clean both sections about once a month
to prevent odors from building up. Wipe up spills immediately.
Cleaning your freezer
1. Unplug freezer or disconnect power.
2. Remove all removable parts from inside, such as shelves,
crispers, etc.
3. Hand wash, rinse, and dry removable parts and interior
surfaces thoroughly. Use a clean sponge or soft cloth and a
mild detergent in warm water.
• Do not use abrasive or harsh cleaners such as window
sprays, scouringcleansers, flammable fluids, cleaning
waxes, concentrated detergents, bleaches or cleansers
containing petroleum products on plastic parts, interior
and door liners or gaskets. Do not use paper towels,
scouring pads, or other harsh cleaning tools. These can
scratch or damage materials.
• To help remove odors, you can wash interior walls with a
mixture of warm water and baking soda (2 tbs. to 1 qt.
[26 g to .95 L] of water).
4. Wash exteriors with a clean sponge or soft cloth and amild
detergent in warm water. Do not usa abrasiveor harsh
cleaners, or cleaners designed for stainless steel. Dry
thoroughly with a soft cloth. For additional protection against
damage to painted metal exteriors, apply appliance wax (or
auto paste wax) with aclean, soft cloth. Do not wax plastic
parts.
5. Themeis no need for routine condenser cleaning in normal
operating environments. If the environment is particularly
greasy or dusty, or there is significantpet traffic in the home,
the condenser should be cleaned every 2 to 3 months to
ensure maximum efficiency.
if you need to clean the condenser:
• Remove the base grille. See "Freezer Doors: Removing,
Reversing(optional), and Replacing."
•Use a vacuum cleaner with a soft brush toclean the grille,
the open areas behind the grilleand the front surface area
ofthe condenser.
•Replace the base grille when finished.
6. Plug in freezer or reconnect power.
Changing the Ught Bulbs
NOTE: Not all bulbs will fit your freezer. Be sureto replace the
bulb with one of the same size, shape, and wattage.
1. Unplug freezer or disconnect power.
2. Remove the bulb from behind the control panel in the lower
compartment or from behind the light shield in the upper
compartment (on some models). Replace it with a bulb of the
same wattage.
3. Plug in freezer or reconnect power.
If the power will be out for 24 hours or less, keep both
compartment doors closed to help food stay cold and frozen.
If the power will be out for more than 24 hours, do one of the
following:
• Remove all frozen food and storeit in a frozen food locker.
•Place 2 Ibs (907 g) of dry ice in the freezer for every cubic foot
(28 L) of freezer space. This will keep the food frozen for 2 to
4 days.
•Ifneither a food locker nor dry ice isavailable, consume or
can perishable food at once.
REMEMBER: Afull freezer stays cold longer than apartially filled
one. Afreezer full of meat stays cold longerthan a freezer full of
baked goods. Ifyou see that food containsice crystals, it may be
refrezen, although the quality and flavor may be affected. If the
condition ofthe food is poor,dispose of it.
Vacationand Moving Care
Vacations
If you choose to leave the freezer on while you're away,
1. Use up any perishables and freeze other items,
If you choose to turn the freezer off before you leave:
1. Remove allfood from the freezer,
2. Turn the lower compartment control to OFE Turnthe upper
compartment control to FREEZE. See the "Using the
Controls"section.
3. Clean freezer,wipe it, and dry well.
4. Tape rubber or wood blocks to the tops of both doorsto prop
them open far enoughfor air to get in. This stops odor and
mold from building up.
Moving
When you are moving your freezer to a new home, follow these
steps to prepare itfor the move.
1. Remove allfood from the freezer and pack allfrozen food in
dry ice.
2. Turn the lower compartment control control to OFF.Turn the
upper compartment control to FREEZE. See the "Using the
Controls" section.
3. Unplug freezer.
13

4. Empty water from the defrost pan.
5. Clean, wipe, and dry thoroughly.
6. Take out all removable parts, wrap them well, and tape them
together so they don't shift and rattle duringthe move.
7. Unlock the casters so that the freezer rollseasily.
8. Ifyouhavenotinstalledthecasters, ralsethefrontofthe
freezer so it rolls more easily. See the "Door Closing and
Alignment" section.
9. Tape the doors closed and tape the power cord to the freezer
cabinet.
When youget to your new home, put everythingback and referto
the "Installation Instructions" sectionfor preparation instructions.
•Are the doors closed completely? Close the doors firmly, if
they do not close completely, see "The doors willnot close
completely" later in this section.
m Are the condenser coils dirty? This prevents airtransfer and
makes the motor work harder.Clean the condenser coils. See
the "Cleaning" section.
NOTE: Your new freezer will run longer than your old one due to
its high-efficiency motor,
The freezer seems to make too much noise
m The sounds may be normal for your freezer. See the
"Normal Sounds" section,
IROUBLESHOOTING The upper compartment front liner is warm
The warmth is probably due to normal operation ofthe automatic
Try the solutions suggested here first in order to avoid the exterior moisture control. Additionally, the freezer is equipped
cost of an unnecessary service cell. with a heater to keep the freezer operating properlywhen the
ambient temperature drops too low,
Your freezer will not operate _
•Is the power cord unplugged? Plug intoa grounded 3 prong
outlet.
•Has a household fuse blown or circuit breaker tripped?
Replace the fuse or reset the circuit breaker,
•Is the Lower Compartment Control turned to the OFF
position? See the "Using the Controls" section.
•Is the freezer defrosting? Recheck to see if the freezer is
operating in 30 minutes.Your freezer willregularly run an
automatic defrost cycle.
The lights do not work
•Is the power cord unplugged? Plug into agrounded 3 prong
outlet.
•Is a light bulb loose in the socket or burned out? See the
"Changing the Ught Bulbs" section.
There iswater inthe defrost drain pan
•Is the freezer defrosting? The water willevaporate. It is
normal forwater to drip intothe defrost pan.
•Is it more humid than normal? When it ishumid, expect that
the water in the defrost pan willtake longerto evaporate,
The motor seems to run too much
•Is the room temperature hotter than normal? The motor
will run longer under warm conditions. At normalroom
temperatures, your motor will run about 40% to 80% of the
time. Under warmer conditions, it will run even more.
Has a large amount of food just been added to the
h'eezer? Adding a large amount of food warms the freezer.
The motor normally will run longer to cool the freezer back
down.
Are the doors opened often? The motor will run longer
when this occurs. Conserve energy by getting all items outat
one time, keeping food organized, and closing the door as
soon as possible.
•Is the control set correctly for the surrounding
conditions? See the "Using the Control(s)"section.
Temperature istoo warm
Are the air vents blocked in either compartment? This
prevents cold air movement between the compartments,
Move objects away from the air vents, See the "Ensuring
ProperAir Circulation"section for air vent locations.
Are the door(s) opened often? The freezer will warm when
this occurs. Keep the freezer cool by getting all items out at
one time, keeping food organized, and closingthe door as
soon as possible.
Has a large amount of food just been added to the
freezer? Adding a large amount of food warms the freezen It
can take several hours for the freezer to returnto the normal
temperature.
•Are the controls set correctly for the surrounding
conditions? See the "Using the Control(s)"section.
There is interior moisture buildup
•Are the air vents blocked in the freezer? Remove any
objects from in front of the airvents, See the "Ensuring
Proper Air Circulation"section for air vent locations.
•Are the door(s) opened often? Avoid humidity buildup by
gettingall items out at one time, keeping food organized, and
closing the door as soon as possible.
•Is the room humid? It is normalfor moisture to build up
insidethe freezer when the room air ishumid.
•Is the food packaged correctly? Check that allfood is
securely wrapped. Wipe off damp food containers before
placing them inthe freezer.
•Is the control set correctly for the surrounding
conditions? See the "Using the Control(s)"section.
•Was a self-defTost cycle completed? It is normal for
droplets to form after the freezer self-defrosts,
The doors are difficultto open
•Are the gaskets dirty or sticky? Clean gaskets and the
surfacethat they touch. Rub athin coat of paraffin wax onthe
gaskets following cleaning.
•Have you opened the freezer door recently? Allow at least
10 seconds after closingthe freezer door before trying to
open the upper compartment.
14

Thedoorswillnotclosecompletely
aAre food packages blocking the door open? Rearrange
containers so that they fit more tightly.
Are the crisper cover, pans, shelves, bins, or baskets out
of position? Put these items into their correct positions. See
the "Lower Compartment Features" section for more
information.
•Are the gaskets sticking? Clean gaskets and the surface
that they touch. Rub a thin coat of paraffin wax onthe
gaskets following cleaning.
• Does the freezer wobble or seem unstable? Level the
freezer. See the "Door Closing and Alignment"section.
Were the doors removed during product installation and
not properly replaced? Remove and replace the doors
according to the "Freezer Doors: Removing, Reversing
(options)& Replacing" section, or call a qualified service
technician.
ASSISTANCEORSERVICE
Before calling for assistance or service, please check
"Troubleshooting." It may save you the cost of aservice call. If
you still need help, follow the instructions below.
When calling, please know the purchase date and the complete
model and serial number of your appliance. This information will
help us to better respond to your request.
If you need replacement parts
If you need to order replacement parts, we recommend that you
only usefactory specified replacement parts. Factory specified
replacement parts will fit rightand work right because they are
made with the same precisionusedto build every new Gladiator TM
GarageWorks appliance.
Tolocate factory specified replacement parts inyour area, call
our Customer Interaction Center telephone number or your
nearest designated service center.
in the U.S.A.
Call the Gladiator" GarageWorks Customer Interaction Center
toll free: 1-866-342-4089.
Our consultants provide assistance with:
•Features and specifications on ourfull line of products.
•InstallatJoninformation.
=Use and maintenance procedures.
•Accessory and repair partssales.
•Specialized customer assistance (Spanish speaking, hearing
impaired, limitedvision, etc.).
•Referralsto local dealers, repair parts distributore,and
service companies. Gladiator TM GarageWorks designated
service technicians are trained to fulfillthe product warranty
and provide after-warranty service, anywhere inthe United
States.
To locate the Gladiator" GarageWorks designated service
company inyour area, you can also look in your telephone
directory Yellow Pages.
For further assistance
If you needfurther assistance, you can write to Gladiator"
GarageWorks with anyquestions or concerns at:
Gladiator" GarageWorks
Customer InteractionCenter
553 Benson Road
Benton Harbor, MI 49022-2692
Please include adaytime phone number inyour correspondence.
inCanada
Call the Whirlpool Canada Inc. Customer InteractionCenter toll
free: 1-800-807-6777. Monday to Friday 8:00 a.m. - 6:00 p.m.
(EST). Saturday 8:30 a.m. - 4:30 p.m. (ES'I').
Our consultants provide assistance with:
•Features and specifications on our full line of appliances.
•Referrals to local dealers.
For further assistance
Ifyou need further assistance, you can writeto Whirlpool Canada
Inc. with any questions or concerns at:
Whirlpool Canada inc.
Customer interaction Center
1901 Minnesota Court
Mississauga, Ontario L5N 3A7
Please includea daytime phone number inyour correspondence.
15

GLADIATOR'"GARAGEWORKS
FREEZERATOR'"FREEZERWARRANTY
ONE-YEAR FULL WARRANTY
For one year from the date of purchase, when this freezer isoperated and maintained according to instructionsattached to or furnished
with the product, Gladiator TM GarageWorks will pay for FSP®replacement parts and repair labor costs to correct defects in materials or
workmanship. Service must be provided by a Whirlpool designated servicecompany.
SECOND THROUGH FIFTH YEAR FULL WARRANTY ON SEALED REFRIGERATION SYSTEM PARTS AS LISTED
in the second through fifth years from the date of purchase, when this freezer is operated and maintained according to instructions
attached to or furnished with the product, Gladiator TM GarageWorks will pay for FSP® replecement parts and repair labor costs to
correct defects in materials or workmanship in the sealed refrigeration system. These parts are: compressor, evaporator, condenser,
dryer, and connecting tubing. Service must be provided by a Whirlpool designated service company.
Gladiator TM GarageWorks will not pay for:.
1. Service ca__st_ c_rre_t the insta__ati_n_f y_ur freezer_t_ instnJcty_u h_w t_ use y_ur freezer_t_ rep_aceh_u_e fuses _r c_rrect
house wiring or plumbing, to replace light bulbs, or replacement water filters other than as noted above.
2. Repairs when your freezer is used in other than normal, single-family householduee.
3. Pickup and delivery. Yourfreezer is designed to be repaired in the home.
4. Damage resultingfrom accident, alteration, misuse, abuse, fire, flood, improper installation,acts of God, or useof products not
approved by Gladiator TM GarageWorks or Whirlpool Canada Inc.
5. Any food lossdue to product failure.
6. Repairs to parts or systems resultingfrom unauthorized modifications made to the appliance.
7. Repiacement parts or repair Jaborcosts for units operated outside the United States or Canada.
8. In Canada, travel or transportation expenses for customers who residein remote areas.
GLADIATOR TM GARAGEWORKS AND WHIRLPOOL CANADA INC. SHALL NOT BE LIABLE
FOR INCIDENTAL OR CONSEQUENTIAL DAMAGES
Some states or provincesdo not allow the exclusion or limitationof incidentalor consequential damages, so this exclusionor limitation
may not apply to you. This warranty gives you specific legal rights, and you may also have other rights whichvary from state to stateor
province to province.
Outside the 50 United States and Canada, this warranty does not apply. Contact your authorized Gladiator TM GarageWorks
dealer to determine if ano_er warranty applies.
Ifyou need service, first see the "Troubleshooting" section of this book. After checking "Troubleshooting," additional help can be found
by checking the "Assistance or Service" section or by callingthe GladiatorTM GarageWorks Customer Care Center, 1-866-342-4089
(toll-free), from anywhere in the U.S.A, In Canada, contact your Whirlpool Canada inc. designated service company or
call 1-800-807-6777. 9/03
Keep this book and your sales slip together for future
reference. You must provide proof of purchase or installation
date for in-warranty service.
Write down the following informationabout your freezer to better
help you obtain assistance or serviceif you ever need it. You will
need to know your complete model number and serial number.
You can find this information on the model and serial number
label located on the inside wall ofthe lower compartment.
Dealer name
Address
Phone number.
Model number.
Serial number
Purchase date
16

SEGURIDADDELCONGELADOR
Su seguridad y la seguridad de los demds es muy importante.
Hemos incluidomuchos mensajes imporLantesde seguridaden este manualy en su electredom6stico.
Leay obedezca siempre todoslos mensajes de seguridad,
Este es el simbolode advertancia de seguridad.
Este sfmbolole llama la atenci6n sobrepe]igrospotencialesque pueden ocasionarla muerte o una
lesi6n a usted y alos demas,
Todos losmensajes de seguridad iranacontinuaci6ndel sfmbolo de advertencia deseguridad
y de la palabra "PELIGRO" o"ADVERTENCIA", Estas palabras significan:
Si no sigue las inatrucciones de inmediato, usted
puede morir o sufrir una lesi6n grave.
Si no sigue las instrucciones, usted puede morir
o sufrir una lesi6n grave.
Todos los mensajes de seguridad le dir&n el peligro potencial, le dirdn c6mo reducir las posibilidades de sufrir
una lesi6n y Io que puede suceder si no se siguen las instruccionas.
INSTRUCCIONES IMPORTANTES DE SEGURIDAD
ADVERTENCIA :Para reducir el riesgo de incendio, choque el(_ctrico, o lesiones personales al usar su
congelador siga estas precauciones bdsicas:
a Conecte este aparato con conexi6n a tierra, a
n No use extensiones eldctricas.
aDesconecte el suministrode energfa antes de a
darle servicio.
aVuelva a colocar todos los paneles antes de
ponerlo a funcionar. •
aRemueva las puerlas o la tapa de su congelador a
o refrigerador viejo.
• Use un limpiador no inflamable.
• Mantenga los materiales y vapores inflamables,
tales como gasolina, alejados del congelador.
Use dos o m&s personas para mover e instalar
el cengelaclor.
Desconecte elsuministrode energfaantes de instalar
la fdbrica de hielo (enaquellos modelos que incluyen
eljuego de instalaci6nde la f_.bdca de hielo).
Mantenga fuera del alcance de los nifios.
Si el cordbn de alimentacibn es dafiado, (_stedebe
ser reemplazado porel fabricante o su agente de
servicioo por personalcalificado.
GUARDE ESTAS INSTRUCClONES
deshacersede surefrigerodor
viejoocongelodor
Peligro de Asfixia
Remueva las puertaa de su congelador o
refrigerador viejo.
No aeguir esta instrucci6n puede ocasionar
la muerte o da_o al cerebro.
IMPORTANTE: El atrapamiento y asfixia de ni_os no es un
problema del pasado. Los refrigeradorestirados y abandonados
son unpeligro...aL_nsivan aquedarahi "pot unos pocos dfas".Si
Ud. est,. por deshacerse de su refrigerador viejo, por favor siga
las instruccionesque se dan a continuaci6n para prevenir
accidentes.
Antes de timr su refrigerador viejo o congelador:
a Saquelas puertas.
=Deje los estantes en su lugar as[ los niSosno pueden meterse
adentro con facilidad.
17

INSIRUCCIONESDE
INSTALACION
De mpaque
Cdmo quitar los materiales de empaque
• Quite los residuos de cinta y goma de las superficies antes
de encender el congelador. Frote un poco de detergents
Ifquido para vajillassobre la cinta adhesiva con los dedos.
Limpie con agua tibia y seque.
No use instrumentosfilosos, alcohol para fricciones, liquidos
inflamables, o productos de limpieza abrasivos para eliminar
los restos de cinta o de goma. Estos productos pueden daSar
la superficie de su congelador. Para m_.s informacibn, vea la
seccibn "Seguridad del congelador".
C6mo mover su congelador:
Su congelador es muy pesado. Cuando mueva su
congelador para limpiarlo o darle servicio,proteja el piso.
AI mover el congelador, siempre tire directamente haeia
afuera. No menee el congelador de lado a lado ni Io haga
"caminar" euando Io trate de mover ya que podrfa daSar
el piso.
Limpieza antes del uso
Una vez que usted haya quitado todos losmateriales de
empaque, limpie el interiorde su conge]ador antes de usarlo.Vea
las instruccionesde limpieza en la seceibn "Cuidado del
congelador".
Requisitosde tocalizaciSn
Peligro de Explosi6n
Mantenga los materiales y vapores inflamables,
tales como gasolina, alejados del congelador.
No seguir esta instruccidn puede ocasionar
la muerte, explosi6n, o incendio.
Para asegurar la adecuada ventilacibn para su congelador, deje
un espacio de 1/2pulg. (1,25 cm) acada lado y por encima. Si Ud.
instala el congelador en una pared fija, deje como m[nimo 2 pulg.
(5,08 cm) acada lado (dependiendo del modelo) para permitir
que la puerta abra bien. Si su congelador tiene f._brieade hielo,
asegL_reseque hay espacio adicional atrds para las eonexiones
de la linea de agua.
NOTA: No instale el congelador cerca de un homo, radiador u
otra fuente de calor en donde la temperatura aumentard por
encima de los 110°F (43°C), ni en un lugar en donde Is
temperatura baje amenos de 0°F (-17°C).
2" (5,08 cm|
18

Requisitosel ctricos
Peligro de Choque Eldctrico
Conecte a un contacto de pared de conexi6n a
tierra de 3 terminales.
No quite el terminal de conexi6n a tierra.
No use un adaptador.
No use un cable eldctrico de extensidn.
No seguir estas instrucciones puede ocasionar
la muerte, incendio o choque eldctrico.
Antes de mover el congelador a su ubicaci6n final, es importante
asegurarse que tiene la conexi6n el_ctrica adecuada. Su
eongetador est_ equipado con un cable de suministro de energ{a
m_,slargo para facilitar la ubicaci6n y e] movimiento del
congelador.
M_todo de conexi6n a tierra recomendado
Se requiem una fuente de energfael_ctrica de 115 Voltios,60
Hz., CA solamente y con fusibles de 15 620 amperios,
debidamente conectados a tierra. Se recomienda que use un
circuito separado s61opara su congelador. Use untomacorriente
que no se pueda apagar con un interruptor. No use un cable de
extensibn.
NOTA: Antes de realizar cualquier tipo de instalacibn, limpieza o
de quitar un foco de luz, ponga el control del congelador en la
posici6n OFF (Apagado) y luego desconecta el congelador de la
fuente de energfa. Cuando haya terminado, reconecte el
congelador a la fuente de energ[a el_ctrica y vuetva a poner el
control en la posicion deseada.
Puerfasdel congelador: C6mo
ape ,Jra (opcional) y volver a
ponerlas en su lugar
HERRAMIENTAS NECESARIAS: Ilave tubular de cabeza
hexagonal de _/16pulg, destornillador Phillips No. 2, destornillador
de cabeza plana, Ilave ajustable de 5/_6pulg, cuchillo piano para
masilla de 2 pulg.
IMPORTANTE:
• Antes de empezar, gire el control del congelador a OFF
(apagado), desenchufe el congelador o desconecte el
suministrode energfa.
• Quite todos los alimentos ycualquier mcipiente ajustable o
de uso m_ltiple de las puertas.
• Si usted e61odesea quitar y volver acolocar lae puertas, yea
las seceiones "Cbmo quitar las puertas y las bisagras"y
"C6mo volveraponer la puerta ylas bisagrasen su lugar'.
•Dependiendo del modelo, ustecl puede tener puertas
estdndar (Estilo1) o puertas contorneadas (Estilo2). Si usted
vatambi_n a cambiar el sentidode laapertura de las puertas,
siga las instrucciones para el estilo de puerta apropiado.
• Todas las ilustraciones aque se hace referencia en las
instrucciones siguientes est&n incluidas m_.sadelante en esta
seccibn despuds de "Pasos finales."
C6mo quitar las puertas y las bisagms
I,
2.
3,
Tomillode bisagrade cabezahexagonalde _6"
Desenchufe el congelador odesconecte el suministrode
energia.
Abra la puerta del compartimiento inferiory quite larejillade
la base de la parte inferiordel congalador (vea la ilustracibn
Rejillade la base).
Cierm la puerta del compartimiento inferior y mantenga las
dos puertas cerradas basra que estd listo para levantarlas y
quitarlasdel gabinete.
NOTA: Mientras quita las bisagrassiempre disponga de un
soporte adicional para las puertas. No se confie de los
imanes de lapuerta para mantener las puertas en su sitio en
tanto que estd trabajando.
lg

4. Quiteloscomponentesde labisagra superior como se
muestra en la ilustracibn Bisagrasuperior. Levante yquite la
puerta del compartimiento superior del gabinete.
5. Quite loscomponentes de la bisagra central como se
muestra en la ilustracibnde la Bisagra central. Levante y
quite la puerta de] compartimiento inferiordel gabinete.
6. Quite los componentes de la bisagra inferiorcomo se
muestra en la ilustraci6n Bisagra inferior.
IMPORTANTE: Si usted desea cambiar elsentido de apertura de
las puertas para que se abran en el sentido opuesto, siga las
instruccionesen "Cambio del sentido de apertura de las puertas
(opcional)".Si usted no va a cambiar el sentido de apertura de
las puer_as,veala secci6n "Cbmo volver a poner lapuerta y las
bisagras en su lugar".
Cambio del sentido de apertura de las puertas (opcional)
(Las ilustraciones aparecen despu_s de estas instrucciones,)
Tomillo de TapSn de/agujero Tap6n de/agujero
Cabeza redonda de/tomillo de la manija de la bisagra
de la manija de la puerta de la puerta
Gabinete
1, Quite los tornillos de bisagra de cabeza hexagonal de 5/16
pulg del lado de la manijay colbquelos del lado opuesto (vea
la ilustracibn1-1).
2. Quite lostapones de los agujerosde las bisagras del
gabinete y col6quelos del lado opuesto (yea la ilustraci6n
1-2).
Puertas
1. Quite el tap6n del agujero de la bisagra de la parte superior
de la puerta del compartimiento superior.Col6quelo del lado
opuesto como se muestra (veala ilustracibn2).
2. Quite el retchde las puertas del compartimiento superiory
del compartimiento inferior(veala ilustraci6n3),
C6mo volver a poner la puerta y las bisagras en su lugar
NOTA: Si el sentido de apertura de la puerta se cambia, Is
imagen de la puerta pudiera quedar invertida.
1. VueIva a poner loscomponentes de la bisagra inferioren su
sitiocomo se indic& Apriete lostornillos. Vuelva a poner en
su lugarla puerta del eornpartimiento inferior.
NOTA: Mientras quita las bisagras siempre disponga de un
sopor_eadicional pars las puertas. No se conffe de los
imanesde la puerta pars mantener las puertas en su sitio en
tanto que estd trabajando.
2. Arme los componentes de la bisagra central come se indica y
atornille todos los tornillos (yea la ilustracibn Bisagra central).
Vuelva a poner en su lugar la puerta del compartimiento
superior.
3. Arme los componentes de la bisagra superior coma se indica
{yea la ilustraci6n Bisagra superior). No atomille
completamente los tornillos.
4, Alinee las puertas de tal manera que la parte inferior de la
puerta del compartimiento superiorest_ alineada
uniformemente con la parte superiorde la puerta del
compartimiento inferior. Apriete todos los tornillos.
Pasosflnale_s
1. Revise todos los agujeros para cerciorarse que lostapones
de los agujeros y los tornillosest6n en su lugar.Vuelva a
colocar en su lugar latapa de la bisagra superior (vea]a
ilustraci6n Bisagra superior).
2. Coloque en su lugarlarejillade Is base (yea ilustraci6n Rejilla
de la base).
3. Enchufe el congelador o reconecte el suministrode energfa.
4. Restaure loscontroles.Veala seccibn "Uso de loscontroles".
5. Regrese todas las partes movibles alas puertas y la comida
al producto.
2O
Table of contents
Languages:
Other Gladiator Freezer manuals