Haier HRZ-186S/U User manual

HR Z-186S/U
Under Counter Fridge
USER'S INSTRUCTIONS


Thank you for buying this Haier refrigerator. To ensure that you get the best results from your
new fridge, please take time to read through these simple instructions in this booklet.
Please ensure that the packaging material is disposal of in accordance with the current
environmental requirements.
If the appliance is visibly damaged, do not connect it to the power supply, contact the store from
where you purchased the appliance.
ELECTRICAL CONNECTION (UK ONLY)
For your safety please read the following information.
Warning: This appliance must be earthed.
The appliance must be connected to a 220 - 240 volts 50 cycle AC supply by means of a three pin
socket, suitably earthed and should be protected by a 13 amp fuse in the plug.
The appliance is supplied with a standard 13 amp 3-pin plug fitted with a 13-amp fuse.
Should the fuse require replacement, it must be replaced with a fuse rated at 13 amp and approved
to BS1362.
If the mains plug is unsuitable for the socket outlet in your home or is removed for any other
reason, then the cut off plug should be disposed of safely, do not insert the cut off plug into a
mains outlet to prevent the hazard of electric shock. Remove the fuse before disposal.
There is a danger of electric shock if the cut off plug is inserted into any 13-amp socket outlet.
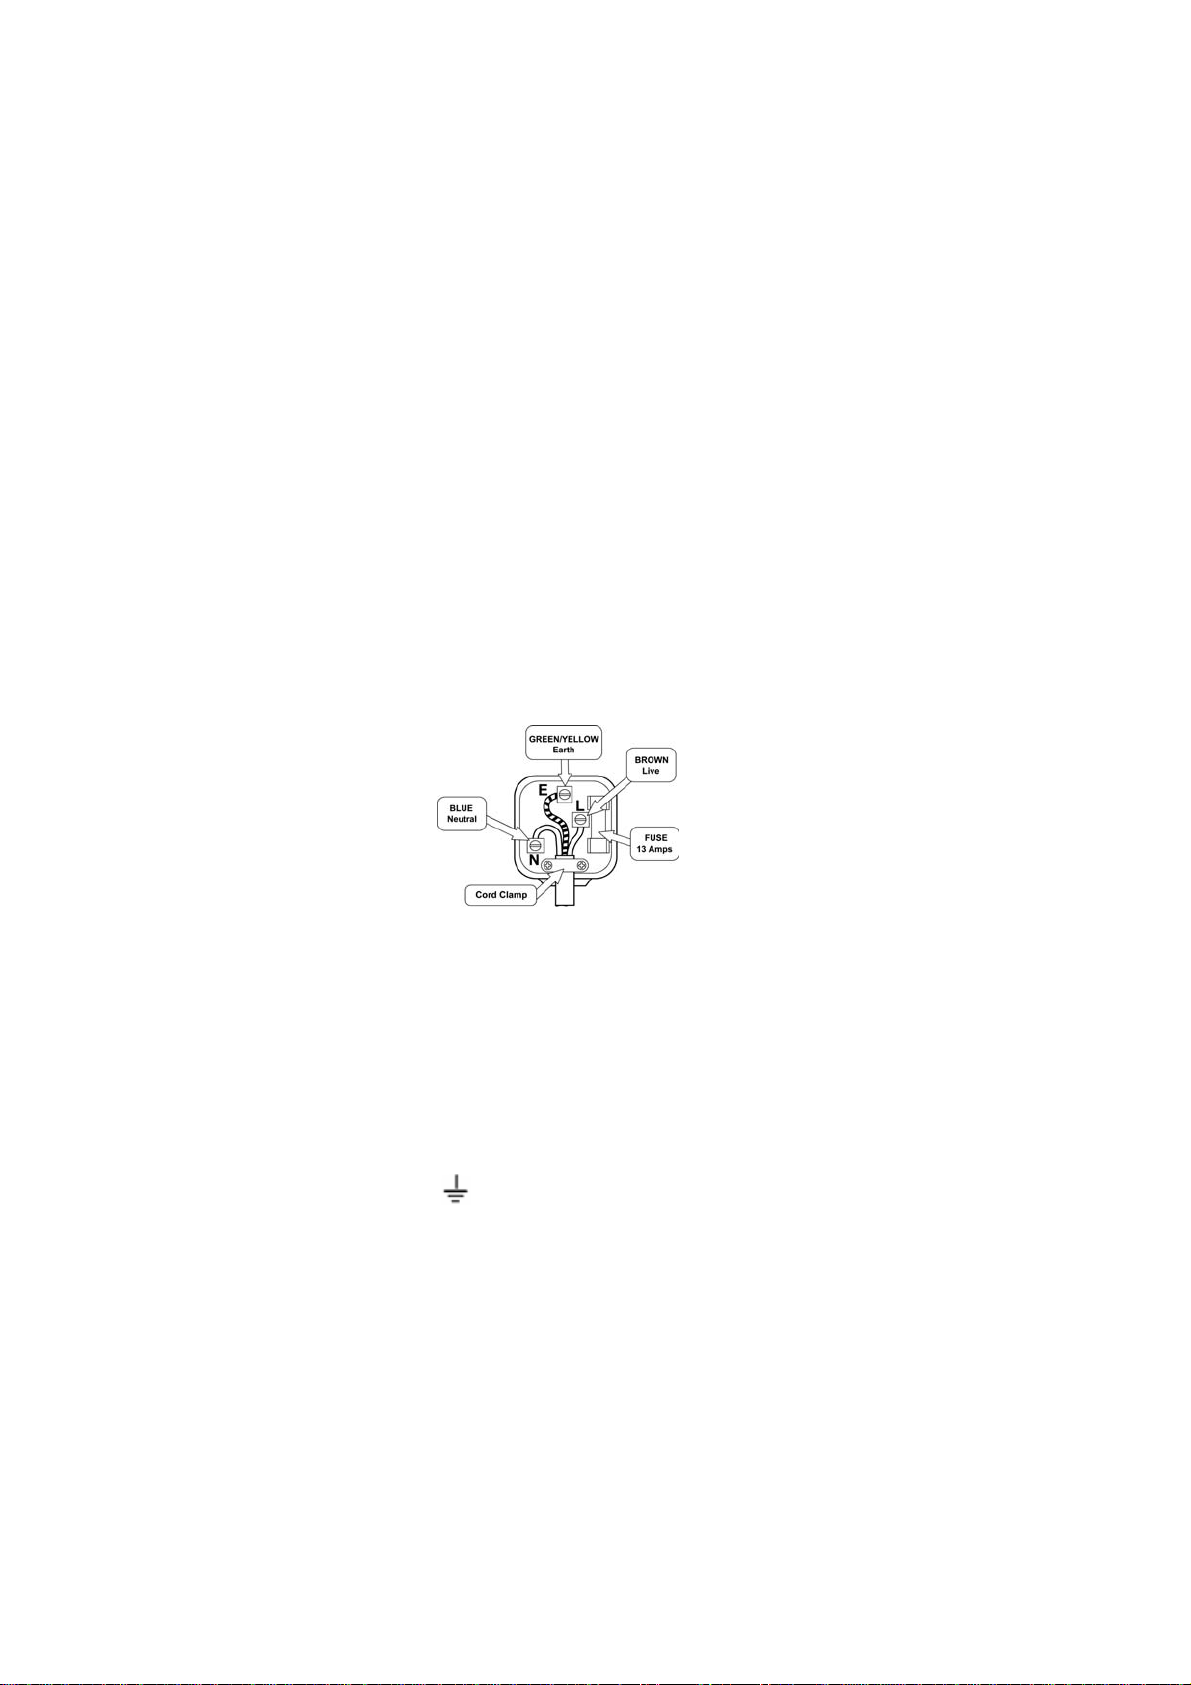
How to wire a 13 amp plug:
Important
The wires in the mains lead on this appliance are colored in accordance with the following code:
Green and Yellow - Earth
Blue – Neutral
Brown – Live
As the colours may not correspond with the markings identifying the terminals in your plug
proceed as follows.
The green and yellow wire must be connected to the terminal in the plug which is marked with the
letter E or with the earth symbol or colored green and yellow.
The blue wire must be connected to the terminal marked N.
The brown wire must be connected to the terminal marked L.
You must make sure the mains cord is firmly secured under the cord clamp.
Warnings:
Keep ventilation openings, in the appliance enclosure or in the built in structure,
clear of obstructions.
Do not use mechanical devices or other means to accelerate the defrost process,
other than those recommended by the manufacturer.
Do not damage the refrigerant circuit.
Do not use electrical devices inside the food storage compartments of the appliance,
unless they are of the type recommended by the manufacturer.
2

THANK YOU FOR PURCHASING THIS HAIER PRODUCT
This booklet contains the information you will require to install and operate your new
appliance.
It is important and worthwhile spending time to fully read this booklet so you will
understand how to operate the appliance safely and efficiently.
Please keep this booklet in a safe place so that you can refer to it when required.
Safety information
This information is provided in the interest of your safety. Please read the following
carefully before carrying out the installation or use of the appliance.
If you are discarding an old freezer or refrigerator with a lock / catch fitted to the
door, ensure that it is left in a disabled condition to prevent the entrapment of young
children when playing.
As old refrigeration equipment may contain CFC’s which will damage the ozone
layer, when disposing of any refrigeration equipment please contact your local waste
disposal department for advice on the correct method of disposal
This appliance must only be used for its intended purpose i.e. the storage of domestic
edible foodstuffs and should not be used for any other purpose
If the mains cable becomes damaged, it must be replaced by the manufacturer, its
service agent or a similarly qualified person to avoid a hazard.
Installation
Position the appliance and allow to stand for two to three hours before it is turned on
for the first time to allow the system to settle. Do not position next to any heat source
e.g. cooker, boiler or in direct sunlight etc.
A clearance of 10 cm must be left between the sides of the appliance and any adjacent
cabinets or walls to allow for adequate air circulation. The appliance is not designed
for recessed installation (“building in”).
Install on a good firm level surface, and any unevenness of the floor should be
corrected prior to installation, slight unevenness can be overcome by adjusting the
front feet.
NOTE: If the appliance is positioned on a carpet, soft floor covering you should re-
adjust the front feet once the appliance has had time to settle.
3

IMPORTANT SAFETY INFORMATION
This appliance must be used on the electric voltage shown on the rating plate,
failure to use the correct voltage will render the guarantee VOID and may cause
damage to the product.
This appliance is intended for domestic use only, any other use may invalidate
the warranty and might be dangerous.
This appliance is intended for indoor use only, do not use outdoors.
Accessible surfaces may get hot during operation, use handles and knobs at all
times.
To protect against electric shock do not immerse cord, plugs, or appliance in
water or other liquid.
Warning: Keep ventilation openings, in the appliance enclosure or in the
built-in structure, clear of obstruction.
Unplug from outlet when not in use and before cleaning. Remove food before
cleaning the appliance.
If the mains lead becomes damaged, it must be replaced by the manufacturer,
its service agent or similarly qualified person with a lead of the same type and
rating to avoid a hazard.
Do not operate the appliance with a damaged cord or plug or after the
appliance malfunctions or has been damaged in any way. Consult the retail
store where you bought the appliance for advice.
The cooling circuit must not be damaged in any way.
Warning: Do not use mechanical devices or other means to accelerate the defrost
process, other than those recommended by the manufacturer.
Warning: Do not damage the refrigerant circuit.
Do not place the appliance near hot surfaces, or in direct sunlight.
Extreme caution must be used when moving an appliance, the appliance may be
heavy.
Warning: Do not use electrical appliances inside the food storage compartment of
the appliance, unless they are of the type recommended by the manufacturer.
4

5
Temperature Control
The refrigerator is designed to maintain an internal storage temperature in the
refrigerator compartment between to + .
Instructions for use
Remove all packing materials and wash the interior of the appliance using lukewarm
water containing a little bicarbonate of soda in the proportion of 1 teaspoon to 1.2 liters
(2 pints) of water. Do not use detergents or soaps as they may taint the food. After
cleaning, dry all parts thoroughly.
Never place hot or warm foods into the cabinet or leave the doors open for longer than
necessary as this will raise the temperature and cause excessive amounts of moisture thus
increasing the amount of ice in the refrigerator / freezer compartment.
The Internal Light
The internal light will automatically switch ON and OFF whenever the refrigerator door
is opened or closed. To change the light bulb, please see the chapter on changing the light
bulb.
To obtain a lower internal temperature turn the thermostat temperature control to a
higher number. To obtain a higher internal temperature turn the thermostat control
to a lower number. However, the internal temperature and temperature control
setting is dependent on a number of factors:
1. Varying ambient temperatures.
2. The number of times the appliance doors are opened and how long the doors remain
open.
3. The amount and temperature of the food and drink introduced into the appliance.
4. The weather conditions and time of year e.g. summer / winter.
5. The positioning of the appliance and an adequate air circulation to the sides and
back of the cabinet.
To enable adjustment of the temperature in the appliance it is fitted with an adjustable
thermostat located in the fridge compartment, which can be adjusted from setting 1
(warmest) to 7 (coldest). For normal working temperature it is recommended to adjust
the thermostat control to the midway position, after a few hours readjust the thermostat
to the desired temperature. There is also an off position 0 . Which turns OFF the
refrigerator and freezer compartments. Please Note this dose not disconnect the
appliance from the mains supply. To do this you must remove the mains plug from the
socket.

6
Making ice cubes ( Ice tray not supplied )
Pour water into the ice cube tray until it is two thirds full and place into the freezer. Ice
cubes will form in approximately 2 to 3 hours. The ice cube can be easily removed by
twisting the ice cube tray or running under cold water for a short time.
Freezing fresh food (Freezer)
Ensure that your freezing operations are carried out under the most hygienic conditions,
as freezing alone does not sterilize the food. Never put hot or even warm foodstuffs into
the freezer. Prior to storing the food, pack it in plastic bags, aluminum foil or freezer
containers and place into the freezer without putting them in contact with food that has
already been frozen. See the technical data sheet at the rear of this booklet for the
maximum permissible amount in kilograms of fresh food that can be frozen in any 24
hour period with a room temperature of 25C.Never freeze more than the maximum
permissible.
Store frozen food
When using the freezer for the first time or after defrosting, turn the thermostat
temperature control to setting 7 for at least two hours before introducing the food to be
stored, Then adjust to your preferred setting.
All frozen food products you purchase should be placed in the freezer as soon as
possible to avoid the frozen food from defrosting.
Storage recommendations printed on the packaging of frozen food by the
manufactures should always be followed.
Storage of fresh food in the refrigerator
Food should always be covered tightly with foil, plastic film, placed in bags or stored in
airtight containers. This will prevent food from dehydrating and prevent the strong smell
of some foods transferring to milder ones.
To store raw meat wrap in polythene bags or airtight containers and place on the
lowest shelf.
Do not allow raw meat to come into contact with cooked foods. For safety, only store raw
meat for two or three days. Fruit and vegetables should be thoroughly cleaned and
placed in the vegetable/ salad bin.
Milk and other liquids should be sealed with lids and placed in the bottle shelf on the
door.

Refrigerator defrost process
The refrigerator defrosting process is carried out automatically every time the
compressor stops.
The defrost water drains from the cabinet into a tray placed on the top of the
compressor to the rear of the unit where it evaporates.
Aways ensure the drain hole does not become blocked with food, the drain hole is located inside the
refrigerator tot the rear of the unit just above the crisper cover.
Freezer defrost process
Small amounts of frost will accumulate inside the freezer depending upon the
length of time during which the door is left open or the amount of moisture
introduced. It is essential to ensure that no frost or ice is allowed to form at places
where it will affect the close fitting of the door seal. This might allow air to
penetrate the cabinet, thus encouraging continuous running of the compressor. Thin
frost formation is quite soft and can be removed with a brush or plastic scraper. Do
not use metal or sharp scrapers, mechanical devices or other means to accelerate the
defrosting process. Remove all dislodged frost from the cabinet floor .For the
removal of thin frost it is not necessary to switch off the appliance.
For the removal of heavy ice deposits disconnect the appliance from the mains
supply and empty the contents into cardboard boxes and wrap in thick blankets or
layers of paper to keep them cold. Defrosting will be most effective if carried out
when the freezer is empty, and place a pan of hot water on one of the shelves and
close the door for faster defrosting.Do not forget to put a container under the front
of the freezer cavity to catch the water as the ice melts.
An increase in temperature of frozen food packages during defrosting will shorten
the storage life. Provided that the contents are well wrapped and placed in a cool area
they should keep for several hours.
Examine the contents when replacing them in the freezer and if some of the
packages have thawed out it should be eaten within 24hours or be cooked and refrozen.
After defrosting has finished clean the inside with a solution of warm water with a
little bicarbonate of soda and then dry thoroughly. Wash all removable parts in the
same way and reassemble. Reconnect the appliance to the mains supply and leave
for 2 to 3 hours on setting number 7 before introducing the food back into the
freezer and setting the thermostat to your normal setting(usually setting 4).
7

8
Power Failure
If there is a power failure for a short time less than 7hrs keep the door closed
Frozen food should not be affected if the failure lasts for less than 7hrs.
Extra protection can be given by covering the appliancewith two or three thick blankets.
If a long power failure is anticipated, try to get the foodstuff into another applianceor
cold store, if possible.
Prolonged off periods
If the power cut is longer than 7hrs then check the content of the freezer.
If the food has defrosted, cook and refreeze thefood or it should be eaten immediately.
Never refreeze food that has been defrosted.
Cleaning The Condenser
The condenser is the wire pipe work fitted to the rear of the appliance, this condenser must
be cleaned periodically by using a stiff brush or vacuum clearner.
This will ensure correct operation and will save energy, always unplug the appliance before
any cleaning operation.
Disconnect the appliance from the mains supply.
Pull the lamp cover forwards, to gain accesses to the lamp . Unscrew the light
bulb in an anti-clockwise direction from the holder.
Replace the bulb with one of the correct type and size (10 watt E14 base).
Replace the cover by Pushing the cover Backwards.
Reconnect the appliance to the mains supply.
Changing the light bulb
Note. Light bulbs are not covered by the warranty
If the appliance is not to be used for a long period of time then it is recommended to
remove all the food stuff, clean the inside of the appliance and leave the door open to
allow the air to circulate thus avoiding unpleasant odors.
Cleaning and maintenance
Before any cleaning or maintenance is carried out youmust disconnect the appliance
from the mains supply by removing the plug, never remove the plug by pulling on the
mains cord. Remove the plug by pulling on the plug itself.
It is recommended that when cleaning the appliance, both the inside and outside, can be
cleaned using warm water and a little bicarbonate ofsoda. Use 1 teaspoon to 1.2 litres
of water.

If the appliance is not operating correctly:
Please check the following points.
Is there a power failure? (Check by turning on a house light)
Has the fuse blown or has the circuit breaker tripped.
Has the door been closed correctly?
Check the thermostat has been set correctly.
Check the mains plug is seated in the wall socket correctly and the socket switch is on.
Check the power outlet is working, Try another appliance.
Is the room temperature too cold or too hot. ( working temperature range 16 to 32 )
If the appliance is not used for a prolonged period
If the refrigerator is not in use for a long period of time, proceed as follows:
Disconnect the refrigerator from the main supply by removing the plug from the socket.
Clean and dry the inside as instructed under the heading of cleaning the appliance.
Leave the door open to prevent any unpleasant smells from building up while the
appliance is not in use.
Before calling for service
Please check the following points:
1. The refrigerator is noisy when running
Check the appliance is level and is not in contact with another appliance or kitchen
furniture.
2. The refrigerator does not cool sufficiently.
If the door has been opened too often, or it has been left open for a while it will take
time for the appliance to reach its set temperature.
Check the air flow around the refrigerator has not been reduced due to insufficient
clearance.
NOTE: The following characteristics should not be looked upon as a problem.
A gentle trickling sound caused by coolant flowing through the pipe.
Compressor operating at high temperature.
9

10
Don't- Cover the shelves with any protective materials which may obstruct air circulation.
Don't- Store poisonous or any dangerous substances in your fridge. It has been
designed for the storage of edible foodstuffs only.
Don't- Consume food which has been refrigerated for an excessive length of time.
Don't- Store cooked and fresh food together in the same container. They should be
packaged and stored separately.
Don't- Let defrosting food or food juices drip onto already stored food.
Don't- leave the door open for long periods, as this will make the appliance more costly
to run and cause excessive ice formation.
Don't- Use sharp edged objects such as knives or forks to remove the ice.
Don't- Use hairdryers, or electrical appliances for defrosting only use item
recommended by the manufacturer.
Don't- put hot food into the appliance. Let it cool down first.
Don't- put liquid-filled bottles or sealed cans containing carbonated liquids into the
freezer section, as they may burst.
Don't- Give children ice cream and water ices direct from the freezer section. The low
temperature may cause 'freezer burns' on the lips.
Don't- Try to keep frozen food which has thawed; it should be eaten within 24 hours or
cooked and refrozen.
Don't- Damage the refrigerant circuit at any time
Do's and Don'ts
Do- keep raw meat and poultry below cooked food and dairy products.
Do- Leave lettuce, cabbage, parsley and cauliflower on the stem.
Do- Wrap cheese firstly in greaseproof paper and then in a polythene bag, excluding As
much air as possible. For best results, take out of the fridge compartment an hour before
eating.
Do- Wrap raw meat and poultry loosely in polythene or aluminium foil. This prevents
drying.
Do- Wrap fish and offal in polythene bags.
Do- Wrap food with a strong odour or which may dry out, in polythene bags, or
aluminium foil or place in airtight container.
Do- Wrap bread well to keep it fresh.
Do- Chill white wines, beer, larger and mineral water before serving.
Do- Check contents of the low temp compartment every so often.
Do- Keep food for as short a time as possible and adhere to "Best before" and "Use by"
etc. dates.
Do- Store commercially prepared food in accordance with the instructions given on the
packets.
Do- Always choose high quality fresh food and be sure it is thoroughly clean before
Storing it.
Do- Wrap all food in aluminium foil or food quality polythene bags and make sure any
air is excluded.
Do-Keep ventilation openings, in the appliance enclosure clear of obstruction.
Do-ensure that frozen food does not rise in temperature while defrosting, a rise in
temperature during defrosting may shorten the storage life of your food.

Product:
Total storage volume:130L
Energy class: A
Energy consumption:150kWh/Year
Climate class: N
Thermostat adjust:manual
Reversible door
2 Front adjustable feet
Colour: silver
Refrigerant:R-600A
Max noise level: 41dB
Length of cable/incl.plug:1 metres
Dimensions:
Product H x W x D(cm): 84.5x55x58
Carton H x W x D(cm): 88.5x57x60
Weight net / gross: 32 / 35 kg
Power:
Voltage / frequency: 220-240V~/50Hz
Fridge HRZ-186S/U
11

IMPORTANT DISPOSAL INSTRUCTIONS
As a responsible retailer we care about the environment.
As such we urge you to follow the correct disposal procedure for your product
and packaging materials. This will help conserve natural recourses
and ensure that it is recycled in a manner that protects health and the
environment.
You must dispose of this product and its packaging according to local laws
and regulations. Because this product contains electronic components and
sometimes batteries, the product and its accessories must be disposed of
separately from household waste when the product reaches its end of life.
Contact your local authority to learn about disposal and recycling.
The product should be taken to your local collection point for recycling.
Some collection points accept products free of charge.
We apologise for any inconvenience caused by minor inconsistencies in these instructions,
which may occur as a result of product improvement and development.
12
Table of contents