Haier LE32N1620 User manual

LE32N1620
LE32N1620W
LED HDTV
Please READ this manual carefully before
operating yourTV, and retain it for future
reference.
OWNER’S MANUAL

Warning
EN-1 Haier LED HDTV
CAUTION
!
CAUTION: TO REDUCETHERISK OF ELECTRIC SHOCK,
DO NOT REMOVE COVER (ORBACK).
NO USER SERVICEABLEPARTS INSIDE.
REFER SERVICING TO QUALIFIED SERVICE
PERSONNEL.
RISK ELECTRIC SHOCK
DONOTOPEN
!
The lightning flash with arrowhead
symbol, within an equilateral triangle is
intended to alert the user to the presence
of uninsulated dangerous voltage within
the product’s enclosure that maybe of
sufficient magnitude to constitute a risk of
electric shock.
The exclamation point within an equilateral
triangle is intended to alert the user to
the presence of important operating and
maintenance (servicing)instructions in the
literature accompanying the appliance.
WARNING: TOPREVENT FIRE OR SHOCK HAZARD, DONOT EXPOSE THIS APPLIANCE TORAIN OR
MOISTURE.
CAUTION: TOPREVENT ELECTRIC SHOCK DONOT USE THIS POLARIZED PLUG WITHANEXTENSION
CORD, RECEPTACLE OR OTHER OUTLET UNLESS THE BLADESCANBE FULLY INSERTED TO
PREVENT BLADE EXPOSURE.
!
Caution:
These servicing instructions are for use byqualified service personnel only. To reduce the risk of electric shock, do
not performanyservicing other than that contained in the operating instructions unless you are qualified to do so.
Important Safety Instructions
1. Read these instructions.
2. Keep these instructions.
3. Heed all warnings.
4. Follow all instructions.
5. Do not use this television near water.
6. Clean onlywith drycloth.
7. Do not block anyventilation openings. Install in accordance with the manufacturer’s instructions.
8. Do not install near anyheat sources such as radiators, heat registers, stoves, or other apparatus (including
amplifiers)that produce heat.
9. Do not defeat the safetypurpose of the polarized or grounding-type plug. A polarized plug has two blades with one
wider than the other. A grounding type plug has two blades and a third grounding prong. The wide blade or the
third prong are provided for your safety. If the provided plug does not fit into your outlet, consult an electrician for
replacement of the obsolete outlet.
10. Protect the power cord frombeing walked on or pinched particularlyat plugs, convenience receptacles, and the
point where theyexit fromthe television.
11. Onlyuse attachments/accessories specified bythe manufacturer.
12. Use onlywith the cart, stand, tripod, bracket, or table specified bythe manufacturer, or sold with
the television. When a cart is used, use caution when moving the cart/ Television combination to
avoid injuryfromtip-over.
13. Unplug this television during lightning storms or when unused for long periods of time.
14. Refer all servicing to qualified service personnel. Servicing is required when the television has
been damaged in anyway, such as power-supplycord or plug is damaged, liquid has been spilled or objects have
fallen into the television, the television has been exposed to rain or moisture, does not operate normally, or has
been dropped.
15. The television shall not be exposed to dripping or splashing and that no objects filled with liquids, such as vases,
shall be placed on the television.
16. The mains plug or appliance inlet is used as the disconnect device, remain it readilyoperable during the television
normal use.
Warning

SafetyInstructions
Haier LED HDTV EN-2
FCC STATEMENT
This equipment has been tested and found to complywith the limits for a Class Bdigital device, pursuant
to Part 15 of the FCC Rule. These limits are designed to provide reasonable protection against harmful
interference in a residential installation. This equipment generates, use and can radiate radio frequencyenergy
and, if not installed and used in accordance with the instructions, maycause harmful interference to radio
communications. However there is no guarantee that interference will not occur in particular installation. If
this equipment does cause harmful interference to radio or television reception, which can be determined by
turning the equipment off and on, the user is encourage to tryto correct the interference byone or more of the
following measures:
*Reorient or relocate the receiving antenna.
*Increase the separation between the equipment and receiver.
*Connect the equipment into an outlet on a circuit different fromthat to which the receiver is connected.
*Consult the dealer or an experienced radio/TV technician for help.
This device compiles with Part 15 of the FCC Rules. Operation is subject to the following two conditions:
(1)This device maybe not cause harmful interference.
(2)This device must accept anyinterference received, including interference that maycause undesired
operation.
FCC CAUTION:
To assure continued compliance and possible undesirable interference, the provided ferrite cores must be used
when connecting this LED displayto video equipment; and maintain at least 40cmspacing to other peripheral
device.
CANADIAN NOTICE:
This Class Bdigital apparatus compiles with Canadian ICES-003.
The apparatus with CLASS Iconstruction shall be connected to a MAINS socket outlet with a protective earthing
connection.
By being EnergyStar compliant you are assured that your Haier model is helping the environment
byusing lessenergywhile saving you money. ENERGY STAR is a joint programof the U.S. Environmental
Protection Agencyand the U.S. Department of Energypromoting energyeciency.
SAVE THESE INSTRUCTIONS
Thank you for purchasing the Haier product. This easy-to-use manual will guide you in getting the best use of your
product. Remember to record the model and serial number. Theyare on label in back of the unit.
Model number
serial number
Date of purchase
Staple your receipt to your manual. You will need it to obtain warranty service.

Contents
EN-3 Haier LED HDTV
Contents
Channel menu....................................................16
Channel Scan....................................................................... 16
Channel Skip ........................................................................ 17
Time Shifting Mode........................................................... 17
Audio Language ................................................................. 17
Video menu........................................................18
How to select picture mode........................................... 18
How to customize video settings................................. 18
PCSet...................................................................................... 19
How to select audio mode.............................................. 19
How to customize audio settings................................. 19
Function menu...................................................20
Menu Language.................................................................. 20
Aspect Ratio ......................................................................... 20
OSD Timeout........................................................................ 20
DPMS ...................................................................................... 20
CECSetup Menu................................................................. 20
DCR.......................................................................................... 21
Blue Screen........................................................................... 21
Time Setup............................................................................ 21
Closed Caption ................................................................... 21
Network Setup ................................................................... 22
Yahoo!® Connected TV version info ........................... 23
Yahoo!® Connected TV Reset Default.......................... 23
Reset Default........................................................................ 23
LockMenu ..........................................................24
Parental Control rating and categories ...................... 24
Lock setup............................................................................. 24
Other Functions27
NET CONNECT....................................................27
Yahoo!Connected TV ........................................27
Screen Display..................................................................... 27
PROFILE Widget .................................................................. 28
Yahoo! Widget Gallery...................................................... 28
Yahoo!® Connected TV ......................................... 29
Guided Setup ..................................................................... 30
.................................................................34
Digital Living NetworkAlliance (DLNA)...........35
CCD(Closed Caption Display)........................................ 36
Youtube ................................................................................ 35
Media Playback..................................................37
Connecting a USB Device................................................ 37
USB Media Menu operation ........................................... 37
To play pictures................................................................... 37
To play music ....................................................................... 38
To play movies..................................................................... 38
To play text ........................................................................... 39
Warning 1
Safety Instructions2
Introduction5
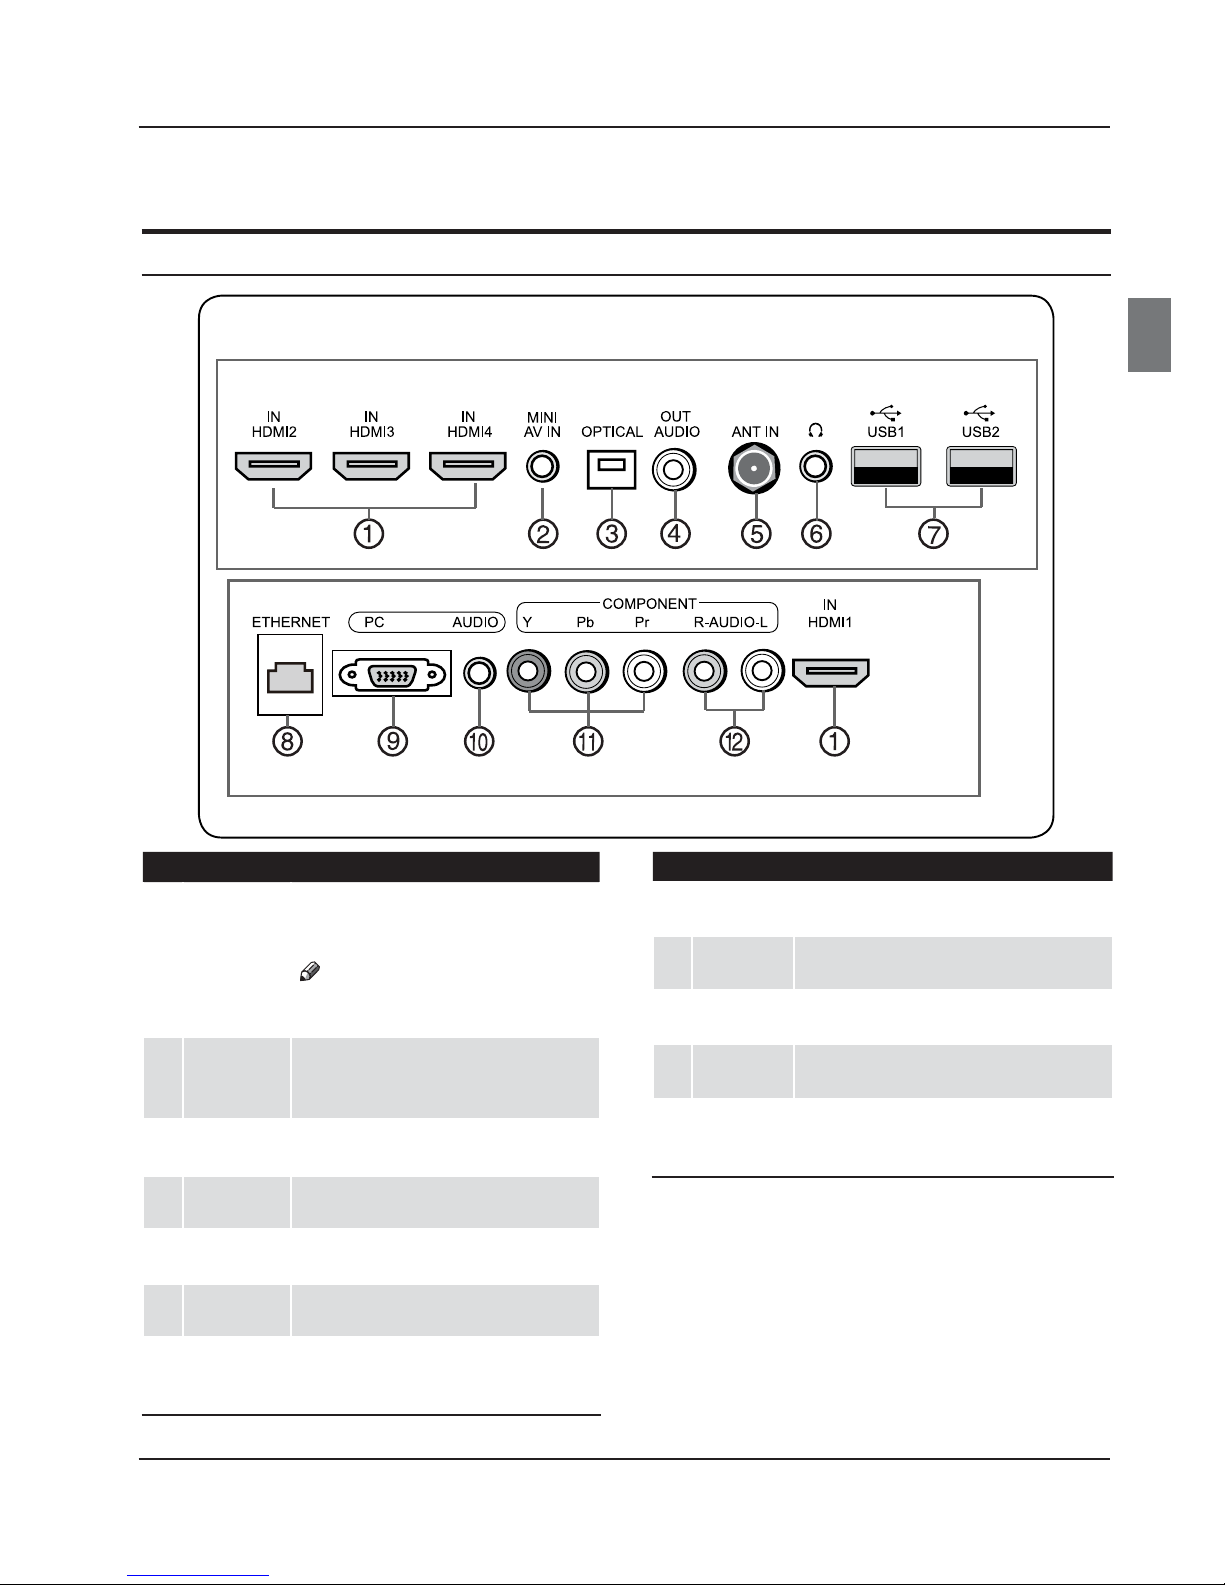
Controls ................................................................5
ConnectionOptions ............................................6
Universal Remote Control...................................7
Accessories...........................................................8
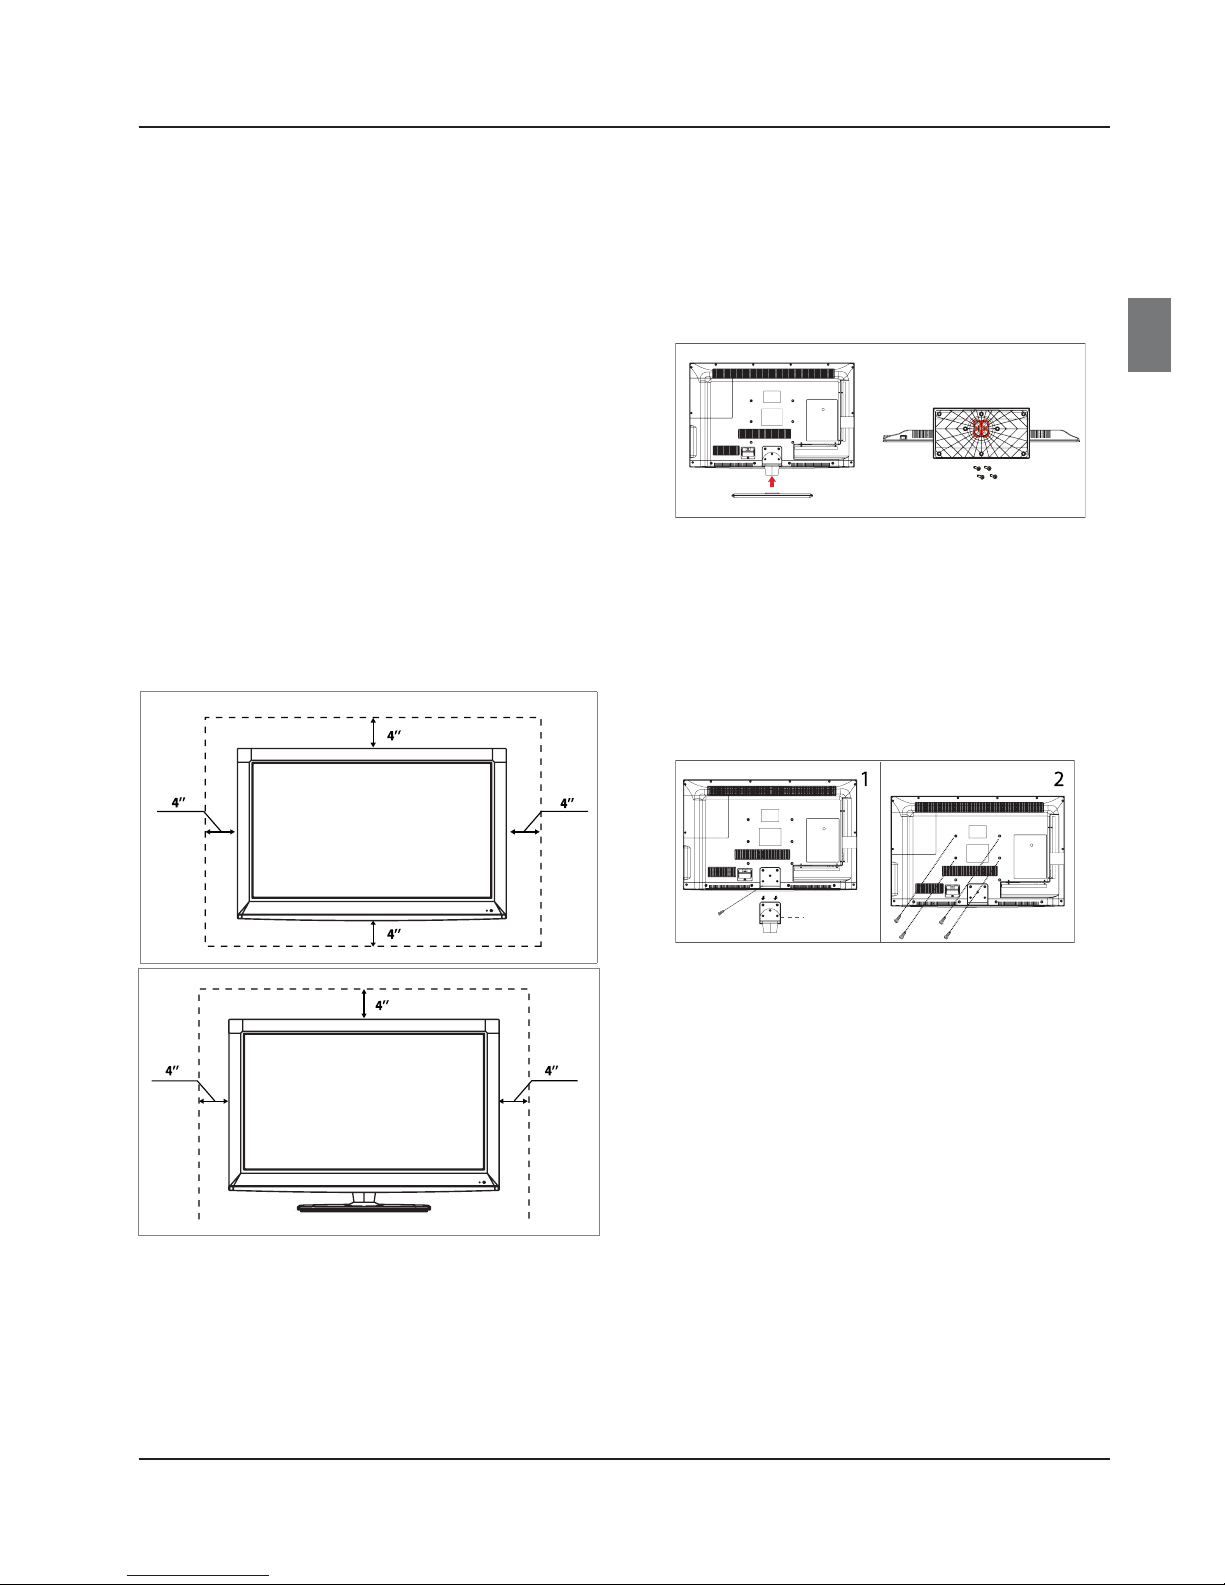
Choosing an Installation Space .........................8
Install theStand................................................... 8
Wall MountInstallation.......................................8
Installation9
Connecting to aPower Outlet ............................9
Connecting an Antenna ......................................9
Connecting an A/V Device ................................10
Choose Your Connection................................................. 10
Using an HDMI cable (HD)............................................... 10
Using a Component (HD)or
Composite A/V (SD)cable............................................... 11
Connecting to aPC ............................................11
Using a D-Sub Cable (HD).............................................. 11
Display Modes (D-Sub and HDMI/DVIInput)........... 12
Connecting to an Audio Device ........................12
Using an Analog Audio Cable........................................ 12
Connecting Headphones ................................................ 13
Connecting to aNetwork..................................13
Choosing a wireless or wired network
connection............................................................................ 13
Using the wireless network adapter............................ 13
Using a wired network cable.......................................... 14
Operation15
Getting Started ..................................................15
............................................ 15
Choose the menu language........................................... 15
Choose the Input source ................................................. 15
Select the desired program............................................ 15
Select the desired volume level.................................... 15
Mute........................................................................................ 16
SAP Broadcasts Setup....................................................... 16

Contents
Haier LED HDTV EN-4
Universal Remote Control 40
Setting Up Your Remote Control ......................40
Remote Control Codes ......................................42
Maintenance 47
Cleaning the Screen ..........................................47
Cleaning the Cabinet.........................................47
Extended Absence.............................................47
Specification 47
Troubleshooting 47
Net Connect 48
Services Policy 48
Warranty 52

Introduction
EN-5 Haier LED HDTV
Introduction
Controls
This is a simplified representation of the TV front panel, side panel control buttons and side inputs.
TV Side panel controls and connections
༃MENU Press to view the system menu on theTV screen.
Use the system menu to adjust theTV's options.
༄INPUT
Press to change the active input source. Each
successive press will change the input source
mode.
༅VOL +/-
Press to adjust the volume level.
༆CH +/- Press to change the channel. Press and hold to
scan quickly through channels.
༇POWER Press to turn the TV on or to place it in standby
mode (o).
༈Remote Sensor
Receives IR signals from the remote control.
Do not put anything near the sensor to avoid
blocking the remote control signal.
༉Power indicator
Lights red when theTV is o (standby).
Lights green when theTV is on.
Flashes green and red while the TV is turning on.
Note
In the MENU screen:
5INPUT serves as the ENTER button
5VOL +/- serve as left/right buttons
5CH +/- serve as up/down buttons.
CHVOL
INPUT MENU
7
6
1
2
4
5
3

Introduction
Haier LED HDTV EN-6
Connection Options
Backpanel connections
ETHERNET PC AUDIO Y Pb Pr R-AUDIO-L HDMI1
IN
COMPONENT
HDMI2 HDMI3 HDMI4 AV IN OPTICAL AUDIO ANT IN USB1 USB2
IN IN IN MINI OUT
༃HDMI In x4
Connect an HDMI device to receive digital audio
and uncompressed digital video. Input Modes:
HDMI1, HDMI2, HDMI3, HDMI4.
Note
5HDMI 1 supports ARC (Audio Return
Channel).
༄Mini AV In
Connect the composite video and audio signal
from a video device with the Mini AV Converter
cable. Input Mode:Video.
༅Optical Out
Connect to a surround sound receiver that supports
digital audio.
༆Audio Out Connect to audio equipment that supports
stereo audio.
༇Antenna
Input
Connect cable or antenna signals to theTV either
directly or through a cable box. Input Mode: TV.
༈Headphone
Jack
Connect to a headphone with a 3.5 mm
(1/8 in) plug.
༉USB Input x2
Connection for the included Wireless Network
Adapter. Connect a USB ash memory drive for
multimedia playback (music, movies, photos).
༊Ethernet Connect to a network with a CAT-5 LAN cable (or
better).
་PC Video In Connect video from a computer with a 15-pin
D-Sub VGA cable. Input Mode:VGA.
༌PC Audio In
Connect stereo audio from a computer with a 3.5 mm
stereo patch cable.
Input Mode: VGA.
།Component
Video In
Connect video from a component video device with an
RCA component cable. Input Mode: Component.
༎Component
Audio In
Connect audio from a component video device with
an RCA stereo cable. (Some component video cables
include stereo plugs.) Input Mode: Component.

Introduction
EN-7 Haier LED HDTV
Universal Remote Control
The remote control cannot be operated unless the batteries are properly loaded.
When using the remote control, aim it at the remote sensor on the TV.
15
16
17
18
19
20
21
22
23
24
25
26
1
2
3
4
5
6
7
8
9
10
11
12
13
14
Function introduction
1Power
2TV DVD CABLE VCR
Select the remote control's active system mode. (This remote
control can be set to work with other home theater components.
Refer to the Universal Remote Control section to learn more.)
3Number buttons
4tCVUton Press to tune to digital sub channels. For example, to enter“54-3”,
press“54”,“t”and“3”.
5VOLUME UP/DOWN Press to adjust the volume.
6CH.LIST Display the channel list in TV mode.
7CCD (Closed Caption
Display) Select the closed caption display mode.
8FAV.LIST Press to display the favorite channel list in TV mode.
9NETFLIX
10 MENU Press to display or exit menu.
11 Arrow keys (Up/Down/
Left/Right)
Navigate on-screen menus and adjust settings within the system
menu.
12 RETURN
13 R G Y B
Buttons used in the
Channel list, Media Play menu, etc.
14 Media Player Functions
MEDIA.P Launch the Media Player for USB and DLNA media
/ Skip (Previous/Next)
/ Scan (Reverse/Forward)
Stop
Play/Pause
15 MTS/SAP Select MONO, STEREO, SAP when watching aTV program that
supports multi-channel audio.
16 INPUT Change the active input source.
17 RECALL Press to jump back and forth between two channels.
18 CHANNEL UP/DOWN Press to browseTV channels. To scan quickly through channels,
press and hold either
/
.
19 MUTE Switches the sound on or off.
20 DISPLAY
Press to display the status information of the incoming signal. *
21 YAHOO! Launches Yahoo!® Connected TV
22 Net Connect YouTube and more.
23 TOOLS Make common adjustments to your TV settings quickly (e.g.,
aspect ratio, picture presets).
24 ENTER Open the selected item in an on-screen menu.
25 EXIT
26 REC
Press to start timeshift.The timeshift option must be enabled in
the system menu and a compatible USB drive must be connected
to the TV.
* DISPLAY indicates the incoming video signal the TV is receiving; the actual TV display resolution is 720p.
No function
Press to return to the previous menu.

Introduction
Haier LED HDTV EN-8
Install the Stand
Carefullyplace the TV screen side down on a table. We
suggest that you place the wrapping material fromthe
TV package on the table top to protect the screen from
damage. Use a cross-head screwdriver with the included
screws to connect the TV to the Stand as shown.
Wall Mount Installation
1. Removing the TV base support
When mounting the TV onto a wall, the TV base support
must be removed (step 1 below).
2. Installing the mounting bracket
Use screws to secure the bracket included with the
mount systemto the back of your TV (step 2 below).
12
base support
For more information on how to install a wall mount,
refer to the wall mount's user manual. Make sure that
you use a wall mount that meets the specications of
this TV.
Note
5The VESA size can be found in the Specications
section of this manual.
Accessories
Remote Control x1
Alkaline battery(AAA)x2
Owner’s manual x1
Wireless USB Adapter x1
Mini A/V converter cable x1
USB extension cable x1
Choosing an Installation
Space
Keep the required distances between the product and
other objects (e.g., walls)to ensure proper ventilation.
Failing to do so mayresult in re or a problemwith the
product due to an increase in the internal temperature
of the product.
Install the product so the required distances shown in
the gure are kept.
4’’
4’’
4’’
4’’
4’’
4’’4’’
Note
5The appearance maydier depending on the
product.

Installation
EN-9 Haier LED HDTV
Installation
Connecting to a Power Outlet
<To use an AC Power Supply
Connect the TV's power cable to the power outlet as
shown in the gure.
Connecting an Antenna
Over-the-air TV reception qualitywill depend on your
antenna type, antenna location and antenna positioning.
Note
5If you live in an area with poor signal reception,
you an improve the picture qualitybypurchasing
and installing a signal amplier.
5If the antenna needs to be split for two TVs, install
a “2-WaySignal Splitter” .
5To install the antenna properly, please contact a
professional in your area.

Installation
Haier LED HDTV EN-10
Connecting an A/V Device
Choose YourConnection
There are several ways to connect your television. Make your decision based upon the components you want to connect
and the best picture quality that those components can deliver.
fHDMI (Best quality)
fPC(Better quality)
fComponent (Better quality)
fComposite A/V (Good quality)
Using an HDMI cable (HD)
An HDMI connection can transmit video resolutions up to 1080p. Available devices:DVD, Blu-ray player, HD cable box,
HD STB(Set-Top-Box) satellite receiver.
W
R
HDMI IN/DVI AUDIOIN
1When using an HDMI to DVIcable connection for video, the PC/DVIAUDIO IN jack is required for audio.
2Haier TVs support HDMI 1.4 Audio Return Channel (ARC). However, the ARCfunction is only supported on HDMI 1
IN (ARC).
fThe ARCfunction enables digital output of sound using the HDMI 1 IN (ARC) port and will only work when the
TV is connected to an audio receiver that supports the ARCfunction.
fWhen the active Input source is TV, the ARCfunction allows audio to be heard from a receiver. The audio is sent
to a receiver from the TV via the HDMI cable without the need for a separate optical cable.
fARCSingle mode requires connecting with a Category 2 High Speed HDMI cable.
3
blank screen.
Non-certied HDMI device may cause the problem with no sound,

Installation
EN-11 Haier LED HDTV
Using aComponent(HD) or Composite A/V (SD) cable
A component connection can transmit HD video resolutions up to 1080p. A composite Audio/Video (AV)connection
Pr Pb Y
RG B R GBW R WR
WV
R
L R
V
L R
V
Device
Device
COMPONENT
IN
YPbPr L -AUDIO- R
COMPONENT OUT
AUDIO OUT
R-AUDIO-L
AUDIO OUT
R-AUDIO-L
VIDEO OUT
Audio Cable(Not Supplied)
Component Cable(Not Supplied)
Video= yellow
Audio left= white
Audio right= red
Component video cable:
Y=Green
Pb=Blue
Pr=Red
AV IN
mini
Note
When available, use a Component rather than A/V connection for better picture quality.
Connecting to aPC
Using aD-Sub Cable
A 15-pin D-Sub (VGA)connection can transmit video resolutions up to 1080p. You may also use an HDMI or DVIcable if
your PCsupports those connections. (A DVIconnection requires an optional DVIto HDMI adapter.)

Installation
Haier LED HDTV EN-12
Display Modes (D-SubandHDMI/DVI Input)
Optimal resolution is 1366X768 @ 60Hz.
Mode ResolutionHorizontal
Frequency (KHz)
Vertical
Frequency (Hz)
Pixel Clock
Frequency (MHz)
Sync
Polarity (H/V)
IBM 720x400 31.469 701.087 28.322 -/+
MAC640x480
832x624
35.000
49.726
66.667
74.551
30.240
57.284
-/-
-/-
VESA DMT 640x480
640x480
800x600
800x600
800x600
1024x768
1024x768
1024x768
1280x720
37.861
37.500
37.879
48.007
46.875
48.363
56.476
60.023
45.000
72.809
75.000
60.317
72.118
75.000
60.004
70.069
75.029
60.000
31.500
31.500
40.000
50.000
49.500
65.000
75.000
78.750
74.250
-/-
-/-
+/+
+/+
+/+
-/-
-/-
+/+
+/+
Note
The set may operate abnormally if a non-standard video format is selected.
Separate and Composite modes are supported. SOG (Sync On Green)is not supported.
Connecting to an Audio Device
Using an AnalogAudio Cable
An analog audio connection can transmit two-channel (stereo)sound. Available devices:Digital Audio System,
W
R
Amplifier/ DVD
Home Theater
Audio Cable(Not Supplied)
Audio left= white
Audio right= red
AUDIO IN
R-AUDIO-L
AUDIO OUT
Note
1An 3.5mm to RCA stereo audio adapter cable is required to make this connection and is sold separately.
2

Operation
EN-13 Haier LED HDTV
Connecting Headphones
Connect a set of headphones to your TV to watch
programs without disturbing the other people in the
room.
Back of TV
Plug a set of headphones into the 3.5 mm jack on the
back panel of the TV.
Note
Prolonged use of headphones at a high volume
may damage your hearing.
When headphones are connected, the TV's
speakers will remain active. To disable the
speakers:1)Select the Audio menu and press
the
/
ENTERbutton; 2)Press
the
/
button to
select Speaker and then pres
s the
/
button to
.
Connecting to aNetwork
Choosing awireless or wired net-
workconnection
A wireless connection is the easiest way to connect your
TV to the internet. Under ideal conditions, a wireless
connection is fast enough to display HD quality video on
your TV.
A wired connection can be a good choice if you have an
Internet router that is near your TV. A wired connection
provides a fast and stable connection to display HD
quality video on your TV.
Note
Your Haier TV includes a wireless network adapter,
but you will also need a Wi-Fi router with a
broadband connection to the Internet. Ifyou
do not have a Wi-Fi router, contact your Internet
Service Provider to help you obtain and install one.
The maximum speed supported by the wireless
adapter is 300 Mbps. Actual speeds are dependent
Using thewireless network adapter
To connect your TV to the Internet wirelessly, you will
need:
fA wireless (Wi-Fi)router connected to the Internet
fA wireless network adapter (included)
To install the wireless network USB adapter:
1
2Remove the cap from the adapter and plug it into
the USB1 or USB2 connectors on the side of the TV.
The LAN Port on the Wall
Wireless
Router
Wireless LAN Adapter
(WiFi Dongle)
LAN Cable
Side of TV
USB
1Turn the TV on and press MENUto access the system
menu.
2Press
/
to select Function and then press Enter.
3Press
/
to select Network and then press Enter.
4Press
/
to select and then press
Enter.
5Press
/
to select Interface and then press
/
to select Wireless.
6Press
/
to select Wireless Setting and then
press Enter.
7Press
/
to select Scan and then press Enter. A
list of available Wi-Fi networks will be displayed.
8Press
/
to select your Wi-Fi network and then
press Enter. Provide the password to your network if
it is required. Press
network.

Operation
Haier LED HDTV EN-14
To congure the network options:
1Turn the TV on and press MENU to access the system
menu.
2Press
/
to select Function and then press Enter.
3Press
/
to select Network and then press Enter.
4Press
/
to select Conguration and then press
Enter.
Lock
Network Upgrade ˚˚
Applications ˚˚
Enter Move Back
Video
Audio
Channel
Configuration
Enter
5Press
/
to select Interface and then press
/
to select Ethernet.
6Press
/
to select IP Setting and then press
Enter.
7Press
/
to select Address Type and then press
/
to select AUTO.
8Wait two minutes, and then press the BACK button
on the remote. Select Connection Test to check the
make sure that your TV is successfullyconnected to
the Internet.
Note
5If your modem/router is not congured to
automaticallyassign an IP address (DHCP), you will
need to manuallycongure the IP Setting option.
Refer to the Function Menu section of this manual
to learn more.
5There are manynetwork congurations that are
possible. For example, your modemmaynot have
a built-in router. In such a case, you mayneed to
purchase a separate router, or you mayconnect
the TV directlyto the modem. Please contact your
Internet Service Provider if you need network
setup assistance.
5The terminal port positions and types of your
modemmaydier between manufacturers.
5If you have an ADSL modem, it must support
automatic connections and DHCP.
Note
5Do not use symbols in your Wi-Fi network password.
You mayneed to change your network password on
your wireless router's administration page.
5If your wireless router is not congured to
automaticallyassign an IP address (DHCP), you will
need to manuallycongure the IP Setting option.
Refer to the Function Menu section of this manual
to learn more.
5If your wireless router is not congured to
broadcast the name of your network (SSID), you
will need to manuallythe Wireless Setting option.
5The included wireless network USB adapter will
work with IEEE 802.11 a/b/g/n Wi-Fi networks. An
802.11n Wi-Fi network is required for HD video
quality.
5Enable the "Ping" connection feature of your
router if possible.
5Select a channel for your wireless router that is
not being used to avoid signal interference and
connection failure.
5Video streamed froma DLNA device maynot play
smoothlyover 802.11 a/b/g networks.
Using a wired networkcable
To connect your TV to the Internet with a cable, you will
need:
A Cat-5 LANcable (or better)
A modemwith built-in router that is connected to the
Internet
Refer to the diagramto connect your TV to the Internet.
1Make sure that your modemis properlyconnected
to the Internet.
2Use a LANcable to connect one of the LANoutput
ports of the modemto the TV.
LAN
The Modem Port on the Wall External Modem
(ADSL / VDSL / Cable TV)
LAN Cable
(not supplied)
Modem Cable (not supplied)
Back of TV

Operation
EN-15 Haier LED HDTV
Operation
guided through an initial setup process. Please follow
the instructions provided on the screen to complete this
process.
There are several options in the system menu that you
may need to adjust in order for your TV to work properly.
Please read the instructions that follow carefully.
Note
The drawings of the screen menus found in this
on your TV. These drawings are for illustrative
purposes only and are intended to guide your TV
operation.
Getting Started
1Connect the power cord to a wall outlet and then
press Power to turn the TV on. The Power Indicator
turns on.
2Select the input source that you want to view by
pressing the INPUT button on the remote control.
3When you are nished using the TV, press the POWER
button on the remote control. The TV will return to
standby mode.
4If you will not use the TV for an extended period of
time, it is recommended to disconnect the power
plug from the wall power outlet.
Note
When the TV is powered on, an on screen display
will indicate the active input source for a few
moments. If a signal is not detected at that input,
"No Signal" will be displayed on the screen.
Choose themenu language
Select the language that will be used for displaying
system menus and messages as part of the initial TV
setup.
1Choose the TV input and then press the MENU
button.
2Press the
/
buttons to select the Function
menu.
3Press
the
/
ENTERbutton and then use
the
/
buttons to select Language.
4Press the
/
button to select a language
(English, Español or Français).
Lock
Language English
Aspect Ratio Normal
OSD Timeout Long
DPMS On
CEC Setup Menu
DCR Off
Enter Move Exit
Video
Audio
Channel
Choose theInputsource
Change the active input source to watch TV, or to watch
other devices that are connected to your TV (e.g., VCR,
DVD player, cable box).
fPress
the
INPUT button once to see the Input Source
display. Continue to press the INPUT button until
the input source that you want is active (e.g., HDMI1,
Component, Video, VGA).
Select thedesired program
1Using the CH/buttons.
Press the CHbutton to tune to a higher channel.
Press the CHbutton to tune to a lower channel.
2You can also tune to a channel directly by entering
the channel number using the number pad on the
remote control and then pressing ENTER.
Note
If skip is set to ON for a channel, pressing the
CH/buttons will not show the skipped
channel(s).
Select thedesired volume level
Press the VOL-/+ buttons on the remote or on the side of
the TV set to adjust the volume level. The range is 0~100.
When the volume buttons are pressed the volume level
is displayed automatically on the TV screen.
If you plug in a USB or wi, please wait for about 4
seconds to power indication start blinking.

Operation
Haier LED HDTV EN-16
Mute
1Press the MUTE button on the remote control and
an icon indicating the MUTE function is active will
display on the screen. At this time, the sound of the
TV set is turned o.
2To restore sound, press the MUTE button again or
press the VOL+ button.
SAP Broadcasts Setup
This TV can receive MTSstereo programs and SAP
(Secondary Audio Program)that accompanies the stereo
program if a station transmits an additional sound signal.
When the MTS button on the remote control is pressed,
the TV will only receive the signal if the TV station
transmits the proper signals.
Mono sound is automatically received if the broadcast is
only in Mono, even if Stereo or SAP has been selected.
Select Mono if you want to listen to mono sound during
stereo/SAP broadcasting. Stereo or SAP can be received
in an analog channel.
1Use the MTSbutton to select your desired MTS
mode in an analog signal.
Each time you press
the MTS
button, Mono,
Stereo or SAP appear. If other languages are
available in the digital signal, select them with
the
MTS
button.
2Press the EXIT button to save and return to TV
viewing.
Channel menu
1This TV set has two methods to set the channels:
Channel Scan and Channel Skip.
2In this section, using the remote control to set the
channels is explained. You can also use the buttons
on the TV to set the channels.
Note
The Channel Menu is only accessible when the
input source is set to TV.
Channel Scan
1Press the MENUbutton and then use the
/
button to select the TV menu.
2Press the
/ ENTERbutton to select Antenna.
3Press the
/
button to select Air or Cable mode.
4Press the
/
button to select Channel Scan.
5Press the
/ ENTERbutton to start searching.
6To cancel searching, press the EXIT button.
Note
When Air is selected, the TV will detect antenna
signals and will search for NTSC (analog)and ATSC
(digital)TV channels available in your local area.
When Cable is selected, the TV will detect signals
supplied by your cable company. It will search for
NTSC and QAMmodulated channels available in
your area.

Operation
EN-17 Haier LED HDTV
Channel Skip
A channel that has been set to skip will not be viewable
when using the
/
buttons to browse channels. A
skipped channel can be viewed by using the remote
control keypad to select the skipped channel. Default
unscanned analog channels are set to skip. Channels
with a check mark icon are skipped channels..
1Press the MENUbutton and then use the
/
button to select the Channel menu.
2Press the
/ ENTERbutton and then use the
/
button to select Channel Skip.
3Press the
/
button to select a channel, then
press the ENTERbutton to toggle between and .
Function
Lock
2 Analog
3 Analog
4 Analog
5 Analog
6 Analog
7 Analog
8 Analog
9 Analog
10 Analog
Set Select Back
Video
Audio
Time Shifting Mode
Time Shift works in TV mode, only. To use Time Shift, it
must be enabled in the Function menu. A compatible
USB drive must also be installed.
To set up your installed USB drive, press REC.Follow the
instructions provided on the screen to complete the Disk
Setup guide.
After the Disk Setup guide has been completed
successfully:
1Press PLAY/PAUSE to play or pause the program. If
you want to stop the time shift function, press the
EXIT button.
-00:00:01
1x
7:00 7:30
-00:00:01 7:00 7:30
1. Time shift time. The time delay to the current
program time.
2. Playback status:Shows the current status (Play,
Pause, Fast Forward, Rewind).
Play/Pause Fast forward
Stop Fast backward
3. Playback speed:Shows the current playback
speed (1x,2x,4x,8x,16x,32x).
4. Playback position:Shows the current playback
position. The playback position is always at the
center of the time bar.
5. Time scale:shows the time in half hour
increments.
Note
Time Shift function is only available in TV mode.
Please connect the TV antenna or Cable TV coaxial
cable to the Antenna input on the TV. Then,
complete the channel scan. The Time Shift feature
only is available when using your ATSC tuner and
QAMcable tuner.
The maximum recording duration is determined
by the memory size of the USB drive and the signal
resolution. Please use a high-speed USB 2.0 drive
with a minimum capacity of 1 GB.
Time shift is only supported on USB drives
Time shift supports recordings larger than 4 GB by
When the maximum recording duration is reached,
the oldest program will be deleted and replaced by
the newest program.
When changing channels or changing input
source, the time shift will stop automatically.
Time shift will store video, audio and data service.
Maximum allowed:
Video streams:Max1 stream
Audio streams:Max8 streams
CC stream:Unlimited.
Recordings are not guaranteed to be stored on the
disk. If the timeshift playback plays a corrupted
data block, it will show “Data lost” message
to indicate that the current data is not stored
correctly.
If the phenomenon of TV crashes, please re-power-
on boot.
5
5
Do not quickly and repeatedly change operations
between play/pause/stop/fast forward/fast
backward

Operation
Haier LED HDTV EN-18
Video menu
Press the MENUbutton and then use the
/
button
to select the Video menu.
Audio
Channel
Function
Lock
Picture Mode User
Brightness 50
Contrast 50
Color 50
Tint 0
Sharpness 10
Enter Move Exit
Note
Depending on the active input mode, one or more
menu items may not be selectable.
How to select picture mode
settings:User, Mild, Standard, Vivid and Movie.
1Press the MENUbutton and then use the
/
button to select the Video menu.
2Press the
/ENTERbutton and then use the
/
button to select PictureMode.
3Press the
/
button to select the option User,
Mild, Standard, Vivid
and Movie.
How to customizevideo settings
1Press the MENUbutton and then use the
/
button to select Video menu.
2Pressthe
/ENTERbutton and then use the
/
button to select the desired items.
3Pressthe
/ENTERbutton and then use the
/
button to adjust the setting.
Picture Mode
Select the picture mode (User/
Mild/Standard/Vivid/
Movie).
Brightness
This will adjust the light output of the complete
picture. This will mainly aect the darker areas of the
picture.
Contrast
This will adjust the intensity of bright parts in the
picture but keep the dark parts unchanged.
Color
This will adjust the saturation level of the colors to suit
your personal preference.
Tint
Allows you to select the color mix(Tint)of the picture.
Sharpness
This will adjust the sharpness of ne details in the
picture.
Note
Video adjustments are only available in the User
mode.
If adjustments are attempted in any of the other
Picture modes the system will automatically switch
to the User mode.
Only when the picture mode is set to User can the
Brightness, Contrast, Color, Tint, Sharpness and
Color Temperature be adjusted. All other Picture
Modes are preset.
Color temperature
This will increase or decrease Warm (red)and Cool
(blue)colors to suit your personal preference.
Select Cool to give the white colors a blue tint, Normal
to give the white colors a neutral tint, Warm to give
the white colors a red tint.
Advanced Video
To adjust the picture in advanced:DNR, MPEGNR,
Adaptive Luma Control, Flesh Tone, DIFilm Mode, Blue
Stretch, Game Mode, HDMI Mode and Overscan.
xDNR: Digital Noise Reduction. Adjust to reduce
the appearance of errors caused by compression:
Low.
xMPEGNR: Adjust the MPEGNoise Reduction level:
xAdaptive Luma Control: Adjust changes in the
luminance of the picture:.
xFleshTone:
Low or Medium.
x
xBlueStretch:Set Blue Stretch:On or
5
5
5
5
5
Over Scan:xThis function is active and visible in
menu only when the signal is ELA timing (480i/480p/
720p/1080i/1080p)in RGB color space in HDMI/DVI
input
The function could only be selected when you input
the HDMI RGB signal by the HDMI source.

Operation
EN-19 Haier LED HDTV
PCSet
These options are available when the VGA input source
mode is active.
Audio
Channel
Function
Lock
H.Position 64
V.Position 50
Phase 5
Clock 12 0
Enter Move Back
Auto Adjust
Enter
Auto Adjust:Automatically adjust the display of the
picture (only available with a PCsource).
H.Position:Press the
/
button and then press
the
/
button to adjust the horizontal position of
the picture.
V.Position:Press the
/
button and then press
the
/
button to adjust the vertical position of the
picture.
Phase:Adjust the phase of the pixel clock.
Clock:Adjust the clock of the input signal.
Audio menu
How to select audio mode
1Press the MENUbutton and then use the
/
button to select the Audio menu.
2Press the
/ENTERbutton and then use the
/
button to select SoundMode.
Channel
Function
Lock
Balance 1
Bass 50
Treble 50
Sound Suround On
Sound Mode On
Speaker On
Enter Move Exit
Video
3Press the
/ENTERbutton to select the audio
and Soft).
How to customizeaudio settings
1Press the MENUbutton and then use
the
/
button to select the Audio menu.
2Press the
/ENTERbutton and then use the
/
button to select desired items.
3Press the
/ENTERbutton and then use the
/
button to adjust the setting.
Balance:Adjust to emphasize left or right speaker
balance.
Bass:Adjust to increase or decrease lower-pitched
sounds.
Treble:Adjust to increase or decrease higher-pitched
sounds.
SoundMode:To adjust the equalizer:O, Rock, Pop,
Live, Dance, Techno, Classic and Soft.
Speaker
SPDIF Type: To adjust the SPDIF type of the Optical
AVL (AutoVolume Leveler):This will reduce the
dierences in volume level during commercials or
when changing the channel.
Please manual adjusting the picture when its’ position
is prejudiced.
5
This manual suits for next models
1
Table of contents
Other Haier HDTV manuals