HANLIM P10 User manual

User Manual
P10
DVD SPEAKER SYSTEM
To assure the product to work in best status
Please read the user’s manual carefully before operation and keep it well for future use


English.........................................................................01
Deutsch........................................................................15
Français.......................................................................29
Español........................................................................43
Italiano.........................................................................57

1
Danger! High Voltage! Electric Shock If Opened!
Operation with Caution! Please refer to the related
operating instructions.
Safety Information
Label for Class II Products (Dual Insulation)
To avoid fire and electric shock, never attempt to put the
System in the rain or in a place with high humidity.
WARNING:
Precautions: Do not modify or use accessories not recommended by
the manufacturer.
Use the right power cord and insert it properly to avoid
electric shock.
Laser parts are used in this System. If instructions
described in this manual are not followed in operating or
adjusting the System, personnel may be exposed to
radiation.
Do not open or repair the System. Such work should be
done by qualified technicians.
Hazardous
Operation: Do not open the System so as to avoid radiation.

2
Safety Information and Maintenance
Read the instructions fully before use. Retain this Instruction Manual for future
reference.
Power supply: Follow the
descriptions on the label and
use the power cord properly.
Keep all parts away from
moisture.
Avoid direct sunshine and
high temperature.
Do not stretch, bend, or pull on
the power cord. Grip the plug
and not the power cord when
unplugging.
Do not open the cover. No user-
serviceable parts inside. Also
leaving the cover open may
allow foreign objects to fall into
the unit.
Remove the power cord from
outlet if you are not using the
unit for a long time.
Disc Protection
To clean a dirty disc, you should use a clean rag and clean it
in a linear way.
Keep the player, battery and disc away from environment with
moisture, rain, dust or high temperature. Keep the disc tray
closed so as to avoid dust.
When the player is suddenly moved from a cold environment
to a warm one, water can be condensed on the lens of the
player, which may lead to a problem. In this case, put the player
in the warm environment till the condensed water on the lens
is totally evaporated.
Important:
- This device is not a toy. Do not allow young children to play with the unit.
- When moving the unit, make sure that the power is turned off and the cord is
removed from the power outlet.

3
Dear Customer,
Congratulations on your purchase of a high-quality product.
Your P10 is designed for reliable and trouble free performance, we wish you
great satisfaction in future.
Main Features:
Playback sources: DVD/USB/AUX/FM Radio/Bluetooth
Output: HDMI, Audio (R+L) +Video
FM Radio Frequency: 87.5-108MHz
USB 2.0 port: up to 32GB, fat 16/32 file system
Microphone input
Music-sensitive LED lights (can be turned off)
Disc Formats: DVD-R/RW, DVD+R/RW, DVD-Video, VCD, CD, CD-R/RW
Video Formats: DIVX, XVID, VXID, MPEG-4, MPEG-2, MPEG-1
Audio Formats: MP3, AC3, MP2, WMA, PCM
Music: MP3/WMA
Photos: JPEG/JPG/PNG
Power output: 60W RMS (30W+15W*2)
Max. Power output: 80W
Woofer: 6.5 inch
Treble: 2.5 inch*2
Power supply: AC 110-240V-50/60Hz (detachable AC cord)
Power consumption:≤60W
Accessories: Remote control
HDMI Cable
FM Antenna
Composite Audio& Video Cable
User Manual
Quick start guide

4
System Connection
Note: Connect only ONE of the video cables to your TV to avoid picture interference.
FM ANT
VIDEO OUT
AUDIO OUT
HDMI OUTPUT
FM ANT
VIDEO OUT
AUDIO OUT
HDMI OUTPUT
HDMI OUT
LINE OUT

5
Product Overview
Back Panel
Front Panel
12
FM ANT VIDEO OUT AUDIO OUT HDMI OUTPUT
1
2
5
6
3
4
50/60Hz
1. Disc tray
2. Remote control sensor
1. Video output
2. FM Antenna jack
Note: Need put the FM Antenna
in FM ANT Jack, to provide an
improved FM signal)
3. Audio output (L/R)
4. HDMI output
5. Power switch
Important: Set the ON/OFF Switch
to “ON” before using.
6. AC in jack
Connect the AC cord (included) to
this jack, to cooperate your unit

6
Top Panel
USB
SOURCE LED
MODE
DVD/USB
MIN
MIC VOL
MASTER VOL
LINE IN
MIC 1 MIC 2
ECHO
MAX MIN MAX
TONE
1
2
3
4
5
6
7
8
9
10
11
12
13
14
15
16
17
18
19
1. Volume +/-
2. Line in (AUX In)
3. USB port
4. Microphone Volume +/-
5. Treble/Bass adjustment
(Step 1: Press Treble/Bass button Step 2: Turn Volume+/- knob)
6. Switch between DVD and USB
7. LED Mode (LED 1, LED 2, LED 3, LED4, LED 5, OFF)
8. Source/Mode button (DVD/Blue tooth/ Line in/ Radio)
9. Standby/ Power button
(Step 1: Press the Power switch to “ON” on the rear Step 2: Press the
Standby/Power button on the top)

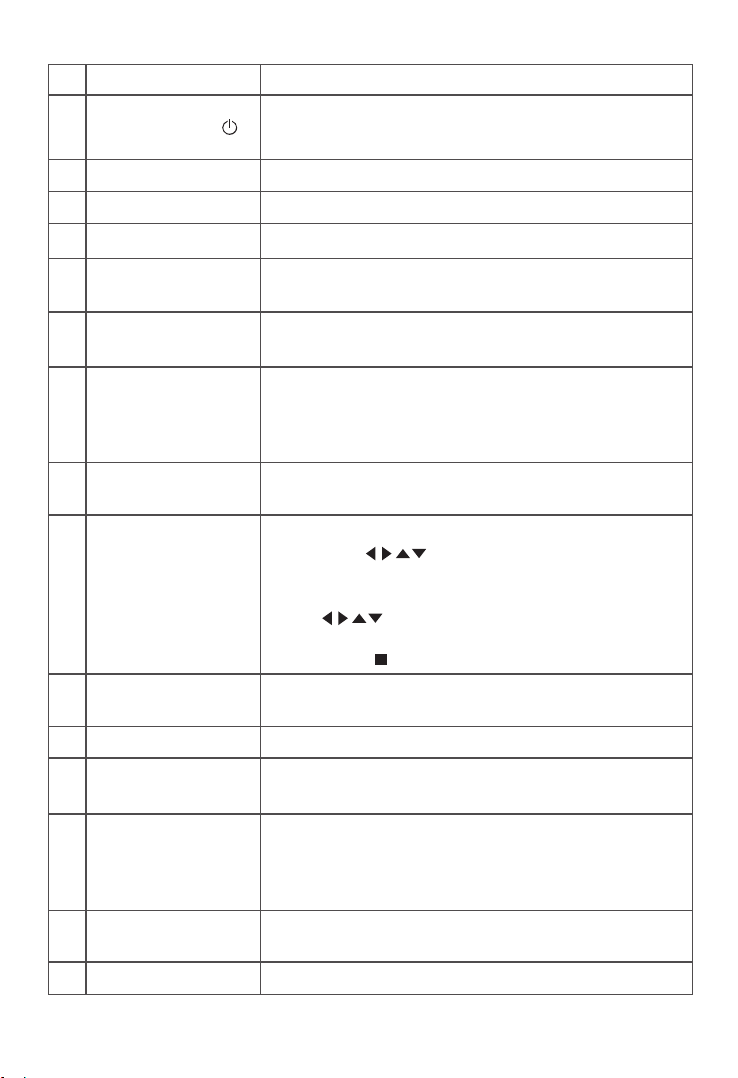
7
10. Red Power indicator
11. Headphone
12. Microphone input
13. Echo Volume+/- (For Microphone)
14. Previous/Backward
In radio Mode, press to skip to the previous lower preset station,
or press and hold to tune to the previous lower station.
In disc or USB mode, press to skip to the previous track,
Or press and hold to backward.
In Bluetooth mode, press to skip to the previous track.
15. Next/ Forward
In radio Mode, press to skip to the next higher preset station,
or press and hold to tune to the next higher station.
In disc or USB mode, press to skip to the next track,
Or press and hold to forward.
In Bluetooth mode, press to skip to the next track.
16. Stop (the total number of tracks appears on the display)
17. Play/ Pause/ Scan
Press to begin DVD, USB, or blue tooth playback.
Press again to pause playback.
In radio mode, press to search FM stations from low to high, the searched
stations are saved automatically as presets.
18. Open/ Close the Disk Tray
19. LED Display

8
Remote Control Function Keys
Note: Use 2 x 'AAA' batteries (Don't included).keep away from children.
OPEN/CLOSESTANDBY
PROGRAM
PBCCLEAR
GO-TO
RETURN OSD
ANGLE MODE
SUB/COPY
ZOOM
A-B REPEAT
VOL+VOL-REPEAT
SET UP DVD/USB
MENU
SCAN
FM-
FM+
CH-
CH+
STOP
ENTER
TOP MENU
LANGUAGE
MUTE
L/R
1 2 3
4 5 6
7 8 9
10 10+
12
3
4
7
8
11
12
15
16
18
5
6
9
10
13
14
17
19
20
21
23
25
26
27
28
29
22
24
First, press PROGRAM to enter program status
Then press to select the item.
Press 0-9 to specify the 3-digit order
To cancel, press CLEAR
Press to select start,
Press OK to start programmed playback.
Press STOP twice to clear the whole program.
9
Item Description
Open/Close the disc tray.
Press to enable/disable the audio output.
Magnifies/Shrinks the screen image size
Set PBC of VCD equipped with playback.
Control (PBC) Function to ON/OFF
Press to top menu (only for DVD discs)
Choose the different languages in DVD discs
(only support have multi-languages discs)
When use PROGRAM feature, Press CLEAR to
clear the input number
Press to cycle through the sound sources
(DVD>>AUX>BT>RADIO).
Press subtitle button to displays the subtitles in
DVD mode (only support have multi-subtitle discs)
Copy music contents from loaded CD disc to
inserted USB drive
Choose the different angles in the same image
(only support have multi-angle discs)
STANDBY/ON
OPEN/CLOSE
MUTE
Press OSD on the remote control to display single
elapsed time, single remaining time, total elapsed
time, total remaining time and other information
about the disc.
OSD
L/R
REPEAT Repeat chapter, title, All, OFF
Press to set: Stereo, Mono L, Mono R, Mix Mono in
SVCD, VCD or CD format
ZOOM
ANGLE
MODE
SUBTITLE/COPY
CLEAR
PROGRAM
PBC
RETURN
LANGUAGE
1
2
3
4
6
5
7
8
9
10
11
12
13
14
15
Press to turn on your DVD Micro System.
Press again to return your DVD Micro System to
standby mode.

/SCAN
(Play/pause/scan)
button
10
Item Description
VOLUME+/- Raise/lower the volume
SET UP Enter or exit the system setup menu
Confirm menu selection
DVD/USB Press DVD/USB Button to directly switch between
DVD and USB Mode.
ENTER
Stops playback (the total number of tracks
appears on the display)
STOP
In radio mode, Press to skip to the previous/next
preset station.
In CD/USB mode, press for previous/next.
CH-/CH+/ /
Display the Menu
In radio mode,Press to search FM stations from
low to high, the searched stations are
automatically saved as presets.
MENU
1-10+ (to select track numbers etc.)
Number Keypad
Specifies the point of time where you would like to
start playback.
GOTO
Press to begin CD, USB, or Bluetooth playback.
Press again to pause playback.
Display the top Menu
TOP MENU
In radio mode, press to tune to a Low/ Higher
frequency. Press and hold to tune to the
previous/next station.
In CD or USB mode, press for Fast rewind/ Fast
forward.
FM-/FM+/ /
Select items, input position, etc.
--For moving the display position of enlarged
images
--For rotating JPEG images
A-B REPEAT
Specifies the parts you want to play repeatedly.
1. During playback, press A-B REPEAT to specify
starting point (point A).
2. When you reach the ending point (Point B),
press it again
16
17
19
18
20
21
22
24
23
25
26
27
29
28
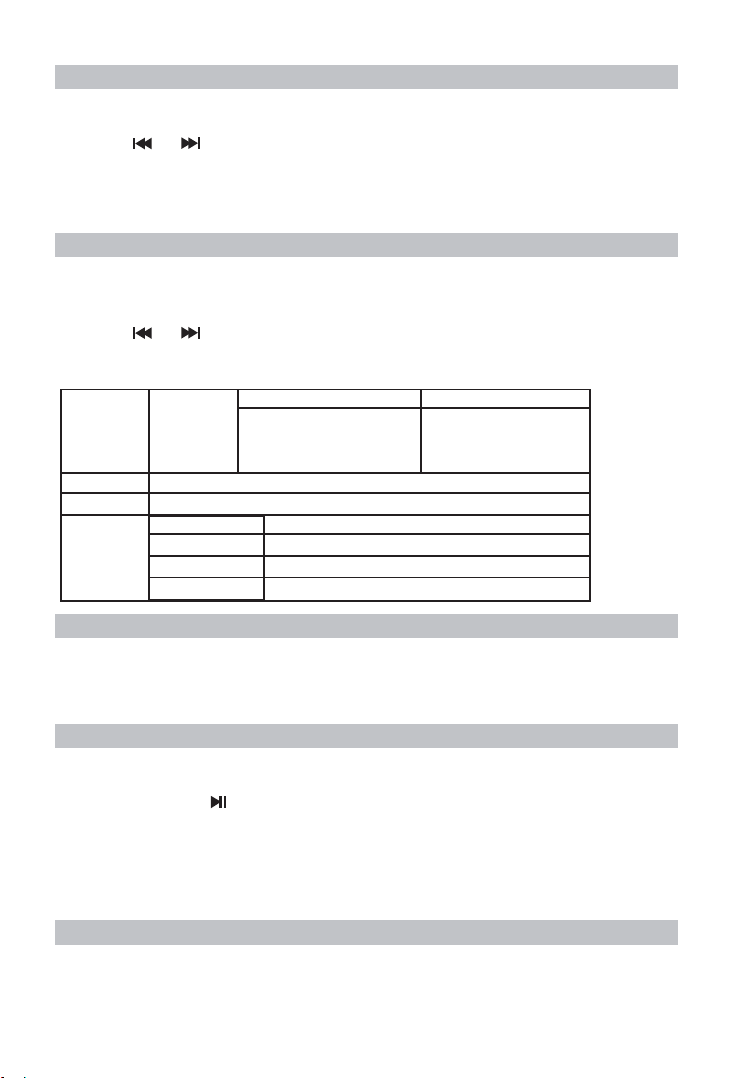
11
Using the USB port
1. Insert a USB device.
2. Press “USB/DVD” button to come directly.
3. Press or button to select the next or Previous song.
Note: The USB 2.0 port plays music files from your USB devices up to
32GB(FAT/FAT 32 format only, NTFS not supported).
Play a Disk:
1. Open the disk Tray and place a Disk.
2. Adjust the Function to DVD mode with SOURCE button.
Or Press “USB/DVD” button to come directly.
3. Press / button for Previous/Next
Using the Line in (AUX) input
1. Connect a 3.5mm Audio Cable to the AUX input and Audio output to
the external device (Smart phone etc.)
2. Adjust the Function to Line in (AUX) mode with SOURCE button.
Tuning the FM Radio
1. Put the FM Antenna on “FM ANT Jack”
2. Adjust the Function to FM mode with SOURCE button.
3.Press and hold / SCAN to automatically scan stations from low to high,
the searched stations are automatically saved as presets.
4. Press CH-/CH+ to skip to the previous/ next preset station.
Press FM-/FM+ to tune to a lower/ higher frequency.
Press and hold FM-/ FM+ to tune to the previous/ next station
For Bluetooth Connection:
1. Adjust the Function to BLUETOOTH with SOURCE Button
2. Search and choose bluetooth name “P10” on your device.
Supported multimedia formats:
Audio
MP3, AC3, MP2,
WMA, PCM
Movie
Music
Disc
Photo
AVI
MP3 / WMA
JPG / JPEG
DVD
VCD
CDDA
CDROM
Video
DivX 3.11/4.x/5.x/6.x,Xvid,
vxid,MPEG-4 MPEG-1
MPEG-2
DVD/DVD-RW/DVD-R/DVD+R/DVD-9/DVD+RW
VCD/VCD1.0/VCD2.0
CDDA/HDCD/CDG
CD-R/CD+RW

12
TV system
Europe:PAL
USA:NTSC
System Setup
TV SYSTEM
AUTO PLAY
HD OUTPUT
NTSC
PAL
AUTO
VIDEO
TV TYPE
PASSWORD
RATING
NEXT PAGE
TV TYPE
4:3PS (TV is 4:3 aspect radio),
show wide-screen images,
some parts cropped automatically.
4:3/LB-(4:3 aspect radio),
show wide screen with a black band
on top and bottom.
16:9(16:9 aspect radio)show full screen.
PASSWORD
Set your personal 4-digit password,
The default password is “0000”
RATING
Choose to restrict viewing for children
The options available correspond
to the film ratings on the disc.
Resume
Set “ON” to memory display or read
from last time.
TV SYSTEM
AUTO PLAY
HD OUTPUT
VIDEO
TV TYPE
PASSWORD
RATING
4:3PS
4:3LB
16:9
NEXT PAGE
TV SYSTEM
AUTO PLAY
HD OUTPUT
VIDEO
TV TYPE
PASSWORD
RATING
NEXT PAGE
TV SYSTEM
AUTO PLAY
HD OUTPUT
VIDEO
TV TYPE
PASSWORD
RATING
NEXT PAGE
1 KID SAFE
2 G
3 PG
4 PG13
5 PG-R
6 R
7 NC-17
8 ADULT
DEFAULT
RESUME
PREV PAGE
ON
OFF
EXIT SETUP

13
LANGUAGE SETUP
Select different on- Screen Display
(OSD) language.
AUDIO SETUP
Use this menu to select your audio
output.
Key
Use UP/DOWN arrows to adjust
the key (use it on Karaoke).
BRIGHTNESS/CONTRAST/HUE/
SATURATION/SHARPNESS
Use UP/Down arrows to adjust.
Speaker Set up
Downmix
If two channels are required, select
the stereo option.
Digital Set up
OP MODE
For night time playing, select LINE
OUT to set volume at lower level For
daytime playing, select RF REMOD
to set volume at a higher level.
OSD LANGUAGE
AUDIO LANG
SUBTITLE LANG
ENGLISH
GERMAN
SPANISH
MENU LANG FRENCH
DUTCH
AUDIO OUT
KEY
SPDIF / OFF
SPDIF / RAW
SPDIF / PCM
AUDIO OUT
KEY +4
#
+2
0
- 2
- 4
b
BRIGHTNESS
CONTRAST 10
12
8
6
4
2
0
HUE
SATURATION
SHARPNESS
DOWNMIX LT / RT
STEREO
OP MODE
DYNAMIC RANGE
DUAL MONO
LINE OUT
RF REMOD

14
Troubleshooting
Refer to the table below for a few common problems and how to solve them.
If you are still experiencing issues, contact Customer Service for assistance.
Failure Solution
Not turning on
No image
Can’t play the disk
Remote control doesn’t work
Poor image
Not working properly
Unable to connect to Bluetooth
● Check whether the power cord is connected to a suitable
power outlet and turned on.
● Check if the ON/OFF switch on the rear of the unit is set
to the ON position.
● Check whether the player is properly connected to
the TV;
● Check whether the TV works well;
● Adjust the Video mode setting on the TV until image is
displayed correctly.
● Check whether the player is properly
connected to other equipment.
● Check if the audio cables have been connected properly
and the correct mode has been chosen.
● Check whether the disk is properly inserted;
Clean the disk.
● Remove the barrier between the remote control and
the device;
● Point the remote control to the IR receiver on the front
panel (near the disk door).
● Try replacing the batteries in the remote control.
● Check whether the disk is dirty or scratched;
● Clean the disk or replace it;
● Turn off the unit and restart it after a few seconds.
● Turn off the unit and restart it after a few seconds.
● Make sure there are no obstacles between the unit and
your device. Move closer to the unit during pairing.
● Try clearing the list of Bluetooth devices from your
smartphone or tablet.
No sound
● Check if the file is in a compatible format. Only jpeg,
avi, wma and mp3 files can be played.
● Remove any disc from the disc tray. USB files can be
played only when there is no disc in the disc tray.
Can't play files from USB
Table of contents


