HeadsetsBank HBX-275 IP User manual
Telephone Headset
Amplifier
Owner’s Manual
HBX-275 IP

Introduction
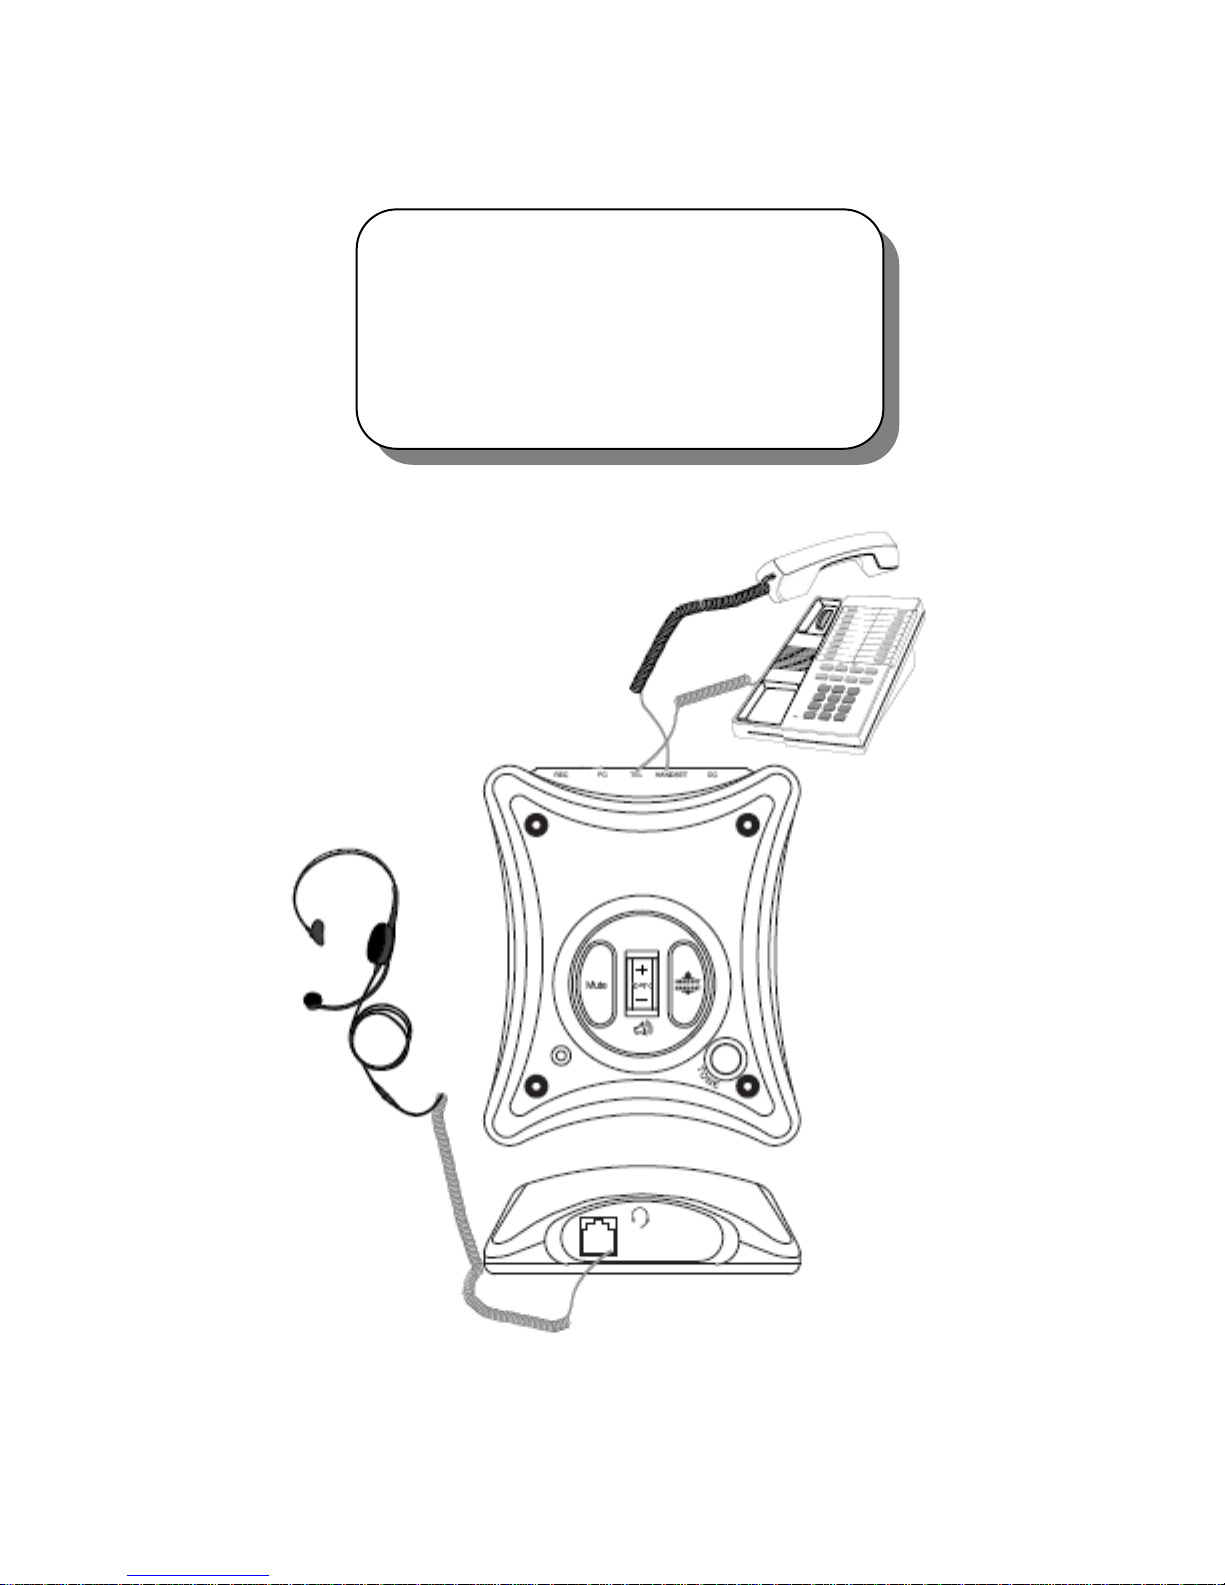
Your new headset amplifier is a device that helps you to use your telephone through
a headset. It gives you hands free, fatigue-free conversation through a headset at
the same time.
Please read this manual carefully that you can quickly learn the functions provided.
1. Feature & overview
2. How to install
Stage 1. Installing batteries
Stage 2. Connecting to your telephone, headset
3. How to test before use
Stage 1. Checking for Compatibility
1. Compatibility setting between telephone and amplifier
2. Compatibility setting between headset and amplifier
Stage 2. Checking for optimal sound
1. Adjustment of Listening/Transmission Volume
2. Adjustment of dip switch(Transmission Level)
4. Operation
5. Troubleshooting
6. Warranty
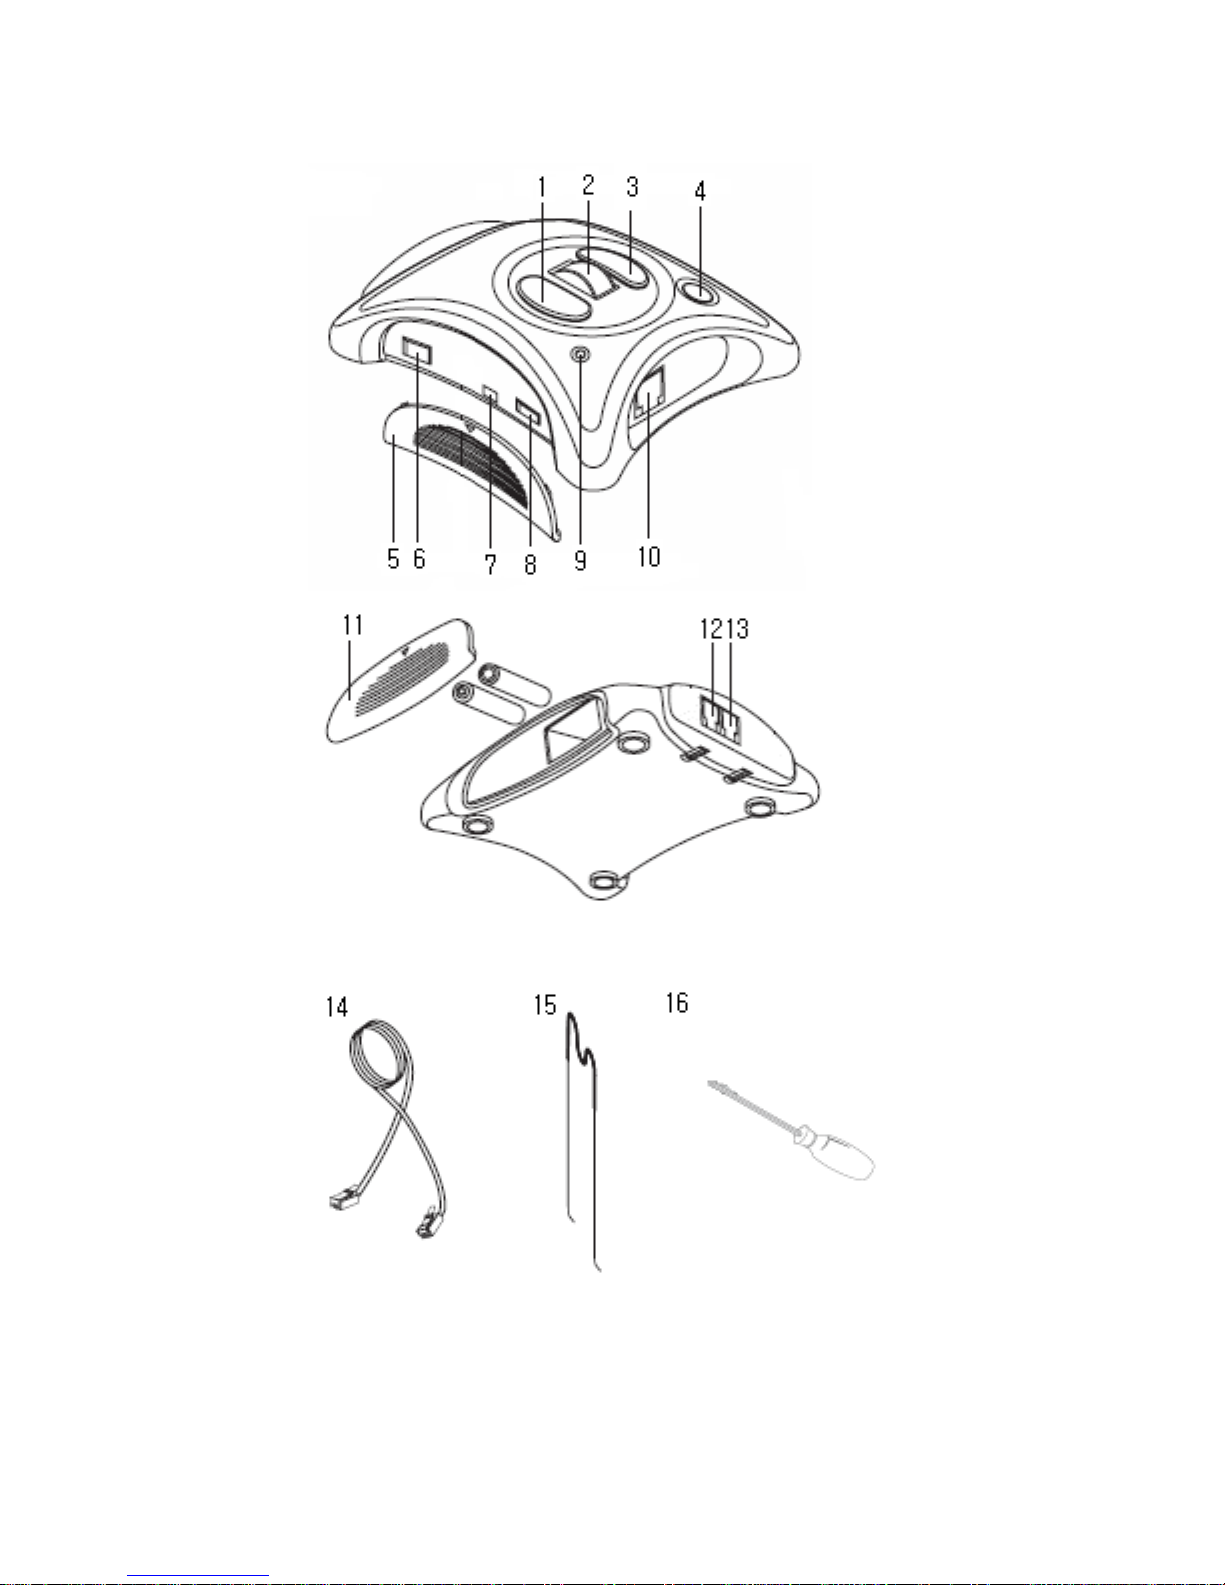
1. Features & Overview

Features
1. Mute Button (=Battery Test)
Press the button to cut off the microphone temporarily. Just depress the button
to resume communication with your caller. If the battery test indicator does not
light by pressing mute button, replace all the batteries. (Operational battery life :
not less than 2,000 hours)
2. Listening Volume Contoller
You can increase or reduce the volume of your caller’s voice.
3. Handset/Headset Button
Press it for handset use and epress it for headset use.
4. Tone control switch
Set the tone Control Switch to be soften or normal.
5. Security Cover
6. Telephone Compatibility Switch
Compatibility setting between telephone and amplifier.
7. Headset Compatibility Switch
Select the knob to the left or right until you can hear.
8. Transmission volume controller
Set the volume controller by sliding the knob when it becomes optimal sound
for your caller.
9. Battery test indicator
Press mute button, if it does not light, replace all batteries.
10. Headset Jack
Connect your headset to this jack.
11. Battery cover
12. Handset Jack(HANDSET)
Connect your handset to this jack.

13. Telephone jack(TEL)
Connect a telephone curly cord supplied between the handset jack of your
telephone and amplifier.
14. Telephone curly cord
Connect this cord between telephone and amplifier.
15. Headset Hanger
16. Driver for adjusting switch
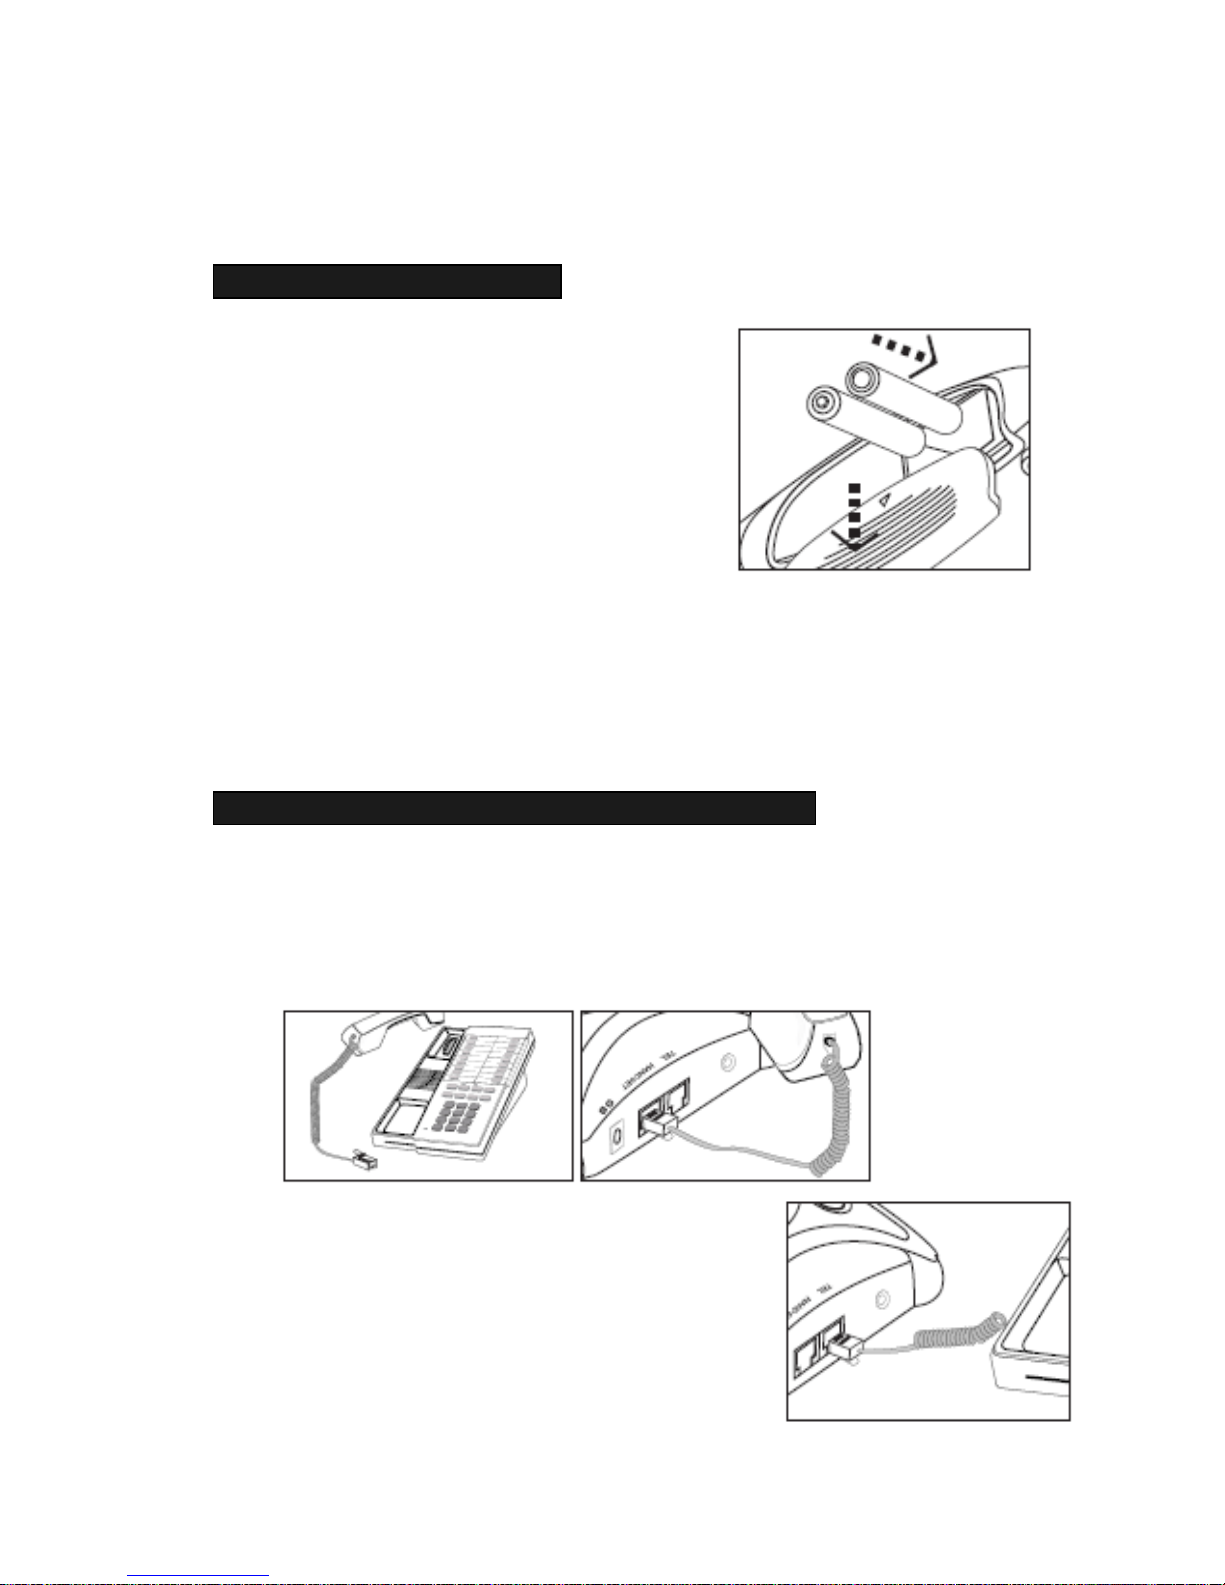
2. How to install
Stage 1. Installing Batteries
We recommend two “AA”alkaline
batteries (Not included) for installation.
Operational battery life are about 2,000
hours.
- Remove the battery cover on the side
of amplifier.
- Install two “AA”alkaline batteries and
replace the battery cover
- Press the Mute button to confirm if the batteries are well fitted or not.
Stage 2. Connecting to your telephone, headset
1. Unplug your telephone;s handset cord from
the telephone base and plug it into the handset jack
of amplifier(Feature no.12)
2. Connect a telephone curly cord(Feature no.14)
between the handset jack of your telephone and
Telephone jack of amplifier(Feature no.13)

3. Plug one complete headset to the headset
jack of amplifier (Feature no.10) located on the
front side of the cabinet

REVISION
3. HOW TO TEST BEFORE USE
Stage 1. Checking for Compatibility
Wearing the headset, lift the handset from its
cradle, position it off-hook and listen.
1. Compatibility setting between
telephone and amplifier
If you can’t hear dial tone at factory setting,
adjust
the compatibility switch between
telephone and amplifier
as follows
1) Remove the Security cover which is
located on the side of amplifier.
2) Slide the compatibility switch by clicks
until you can hear a clear dial tone.

Telephone compatibility Switch
PIN NO. Mode plug wiring Matching Telephone
M-,R,R,M+ STANDARD(Most Common)
R,M-,M+,R CISCO 7900
R,M+,M-,R ASCOM OFFICE, PHILIPS
M+,R,R,M- NEC, NITSUKO
M-,R,R,M+ NORTEL
R,M-,M+,R CALL MASTER, CISCO
M+,R,R,M- AVAYA 1616
C
E
6
5
5
4
4
4
3
2
1
C
M+,R,R,M- AVAYA 9620, PANASONIC
“CAUTION –Risk of explosion if battery is replaced by an incorrect type
dispose of used batteries according to the instruction”
1
2 3 4 5 6 E C
4
3
3

Stage 2. Checking for Optimal Sound
1. Adjustment of listening
/ Transmission volume
Firstly, place the digit no.5 of listening volume
controller to the center and set the white marking
part of microphone volume controller to the center.
After the above setting, if the unit is not working
properly, use the following adjustments for
the best set-up.
1) If there is beep sound, slide the Transmission
volume controller to the right side(-) for
low volume. And if Listening / Transmission
is low, slide Transmission volume controller
to the left(+) and increase Listening volume
controller at the same time until they are
increased for proper level for your caller.
2) If there is humming tone, adjust both Listening
and Transmission volume controller to the low
volume side at the same time.
3) If there si high pitched feedback when the
volume is set to normal usage levels, adjust the
distance of headset boom between the microphone
head cap and your mouth. The proper distance is
one inch apart from your mouth.

2. Mute
If you press Mute button during telephone call,
the other party cannot hear your voice until you
push up mute button.

4. Operation
Receiving by headset : Depress the headset/handset button(feature no.3), wear
the headset. Lift the handset from its cradle and place it “off hook”when the
telephone rings. You can answer the telephone by headset.
Making a call by headset : Depress the headset/handset button(feature no.3),
wear the headset.
Lift the handset from its cradle and place it “off hook”and dial after listening
tone signal. To terminate a call, hang up the telephone handset.
Handset use : Press the headset/handset button(feature no.3), lift the handset,
dial after listening dial tone.
Off hook lever use(option): “Off-hook Lever”eliminates the need for you
to lift the handset, just pull the lever when the telephone rigs, you can
talk with the caller without completely removing the handset from its
cradle.
Remarks : If your telephone has a program for “headset”use or a switch that
can be used by headset, you won’t need to lift the handset every receiving or
call. Just press a button for making or receiving a call. The telephone that has
the headset-use button will vary from one telephone to another, but most often
it it the “line button”.
Check your telephone’s manual for details. Most of key phone systems have
this program.

5. TROUBLESHOOTING
The following information covers common problems and suggests solutions. If
the amplifier and headset are not operating properly, follow the suggestions in
this section
CALLERS CAN’T HEAR ME AND I CAN’T HEAR MY CALLERS
1. Check the installation. Check all cords are properly connected.
2. Check the Handset / Headset button. Push the button down for handset
use, and push-up for headset operation.
CALLER’S VOICE IS LOW OR DISTORTED.
1. Adjust the Listening Volume Controller on the amplifier.(feature no.2)
2. Replace your batteries. For best results, use Duracell alkaline batteries.
CALLERS CAN’T HEAR ME, BUT I CAN HEAR THEM.
1.
Be sure the microphone is properly positioned, about one inch from the
corner of your mouth.
2.
Adjust the Transmission volume controller(Feature no.13)
THE PEOPLE I’M TALKING TO SAY I SOUND UNCLEAR OR TOO FAR
AWAY.
Adjust the position of your microphone. The best place for the microphone is
not directly in front of your mouth, but near the corner of it, similar to the way
you position the telephone handset. In this position, you can pick up the sound
waves from your speech, but not the air moving from your mouth and nose.
MY VOICE ECHOES OR I SOUND LIKE I’M IN A TUNNEL
Slide the Transmission volume Controller to the left side for a lower volume.

WARRANTY
We will repair or replace, at our opinion, this product if found defective due to
materials or workmanship within the warranty period beginning from the original
date of purchase. This product is warranted by authorized representative for the
period specified.
The Original dated purchase receipt must be presented to the authorized
service center when service is rendered. On all carry-in models, transportation
to and from the service station is the responsibility of the purchaser.
This warranty does not cover damages due to accident, fire, flood, earthquake
and/or other acts of God; misuse, incorrect line voltage, improper installation,
improper or unauthorized repairs, commercial use or damages occurred in
shipping. Exterior and interior finish, lamps, glass, plastics parts and
temperature probes are not covered under this warranty. Customer adjustment
according to the owner’s manual are not covered under this warranty. This
warranty is automatically void if the serial number is missing or altered.

Table of contents
Popular Amplifier manuals by other brands


Sansui
Sansui AU-777A Operating instructions and service manual

Cayin
Cayin iHA-6 user manual

Crest Audio
Crest Audio CPA manual

Infranor
Infranor XtrapulsPac user guide

Ground Zero
Ground Zero TITANIUM owner's manual

Kollmorgen Seidel
Kollmorgen Seidel SERVOSTAR 600 Series Assembly, Installation and Commissioning Instructions