Healthware Fit CP-375R User manual
RECUMBENT MAGNETIC BIKE
Owner’s Manual
CP-375R
UPC: 62248859703-4
IMPORTANT !
Please read all instructions in this manual carefully before using this product.
Retain this manual for future reference.
The specifications of this product may vary slightly from the illustrations and are subject to change without
notice.

1 YEAR WARRANTY
This product is warranted for one year on parts from the date of original purchase at retail.
This warranty:
a) is conditional on the product being set-up, installed and used as directed in the instruction
manual;
b) does NOT cover damage, malfunction or failure which, in Club Piscine’s sole opinion, is the
result of
•normal wear and tear, accident, misuse, abuse, neglect, negligence, abnormal
environmental conditions, improper maintenance, or unauthorized service
•handling, transportation, unpacking, set-up, installation
•modifications, adjustments or repairs by the customer or any unauthorized service provider
•fire, flood or any other natural disasters
c) does NOT apply to the appearance of the product
d) does NOT apply to any accessory items
e) applies to the original owner or gift recipient only
f) becomes void upon commercial or rental use, or if any serial numbers are altered, defaced
or removed, or any repair or alteration outside the terms of this warranty
Repair or replacement is your exclusive remedy. Club Piscine will not be liable for any special,
incidental or consequential damages for any reason whatsoever, including arising from the use of
this product, or for any delay in the performance of this warranty due to causes beyond our control.
We may change the product design after this product was purchased, and if we do we are not
obligated to make any modifications whatsoever to this product. This warranty is in lieu of all
other warranties express or implied. Club Piscine neither assumes nor authorizes any person or
entity to assume for it or on its behalf any other obligation or liability in connection with this
product.
The purchaser may have other rights under existing provincial or federal laws, and where such
laws prohibit or modify any terms of this warranty, the corresponding terms herein are deemed
modified or null and void as appropriate, but the remainder of the warranty remains unchanged
and in effect.

Important Safety Information
This Healthware exercise equipment is built for optimum safety. However, certain
precautions apply whenever you operate a piece of exercise equipment. Be sure to
read the entire manual before you assemble or operate your machine. In particular,
note the following safety precautions:
1. Keep children and pets away from the machine at all times. DO NOT leave
children unattended with the machine.
2. Only one person at a time should use the machine.
3. If the user experiences dizziness, nausea, chest pain, or any other abnormal
symptoms, STOP the workout at once. CONSULT A PHYSICIAN
IMMEDIATELY.
4. Position the machine on a clear, level surface. DO NOT use the machine near
water or outdoors.
5. Keep hands away from all moving parts.
6. Always wear appropriate workout clothing when exercising. DO NOT wear
robes or other clothing that could become caught in the machine. Running or
aerobic shoes are also required when using the machine.
7. Use the machine only for its intended use as described in this manual. DO NOT
use attachments not recommended by the manufacturer.
8. Do not place sharp objects around the machine.
9. Disabled persons should not use the machine without a qualified person or
physician in attendance.
10. Before using the machine to exercise, always do stretching exercises to
properly warm up.
11. Never operate the machine if the machine is not functioning properly.
12. Ensure that all nuts and bolts are tightened properly before each use.
13. The equipment is suitable for domestic and home use only. Maximum
weight of user is 80kgs/175lbs.
WARNING: BEFORE BEGINNING ANY EXERCISE PROGRAM, CONSULT YOUR
PHYSICIAN. THIS IS ESPECIALLY IMPORTANT FOR INDIVIDUALS OVER THE
AGE OF 35, OR PERSONS WITH PRE-EXISTING HEALTH PROBLEMS. READ
ALL INSTRUCTIONS BEFORE USING ANY FITNESS EQUIPMENT.
SAVE THESE INSTRUCTIONS.
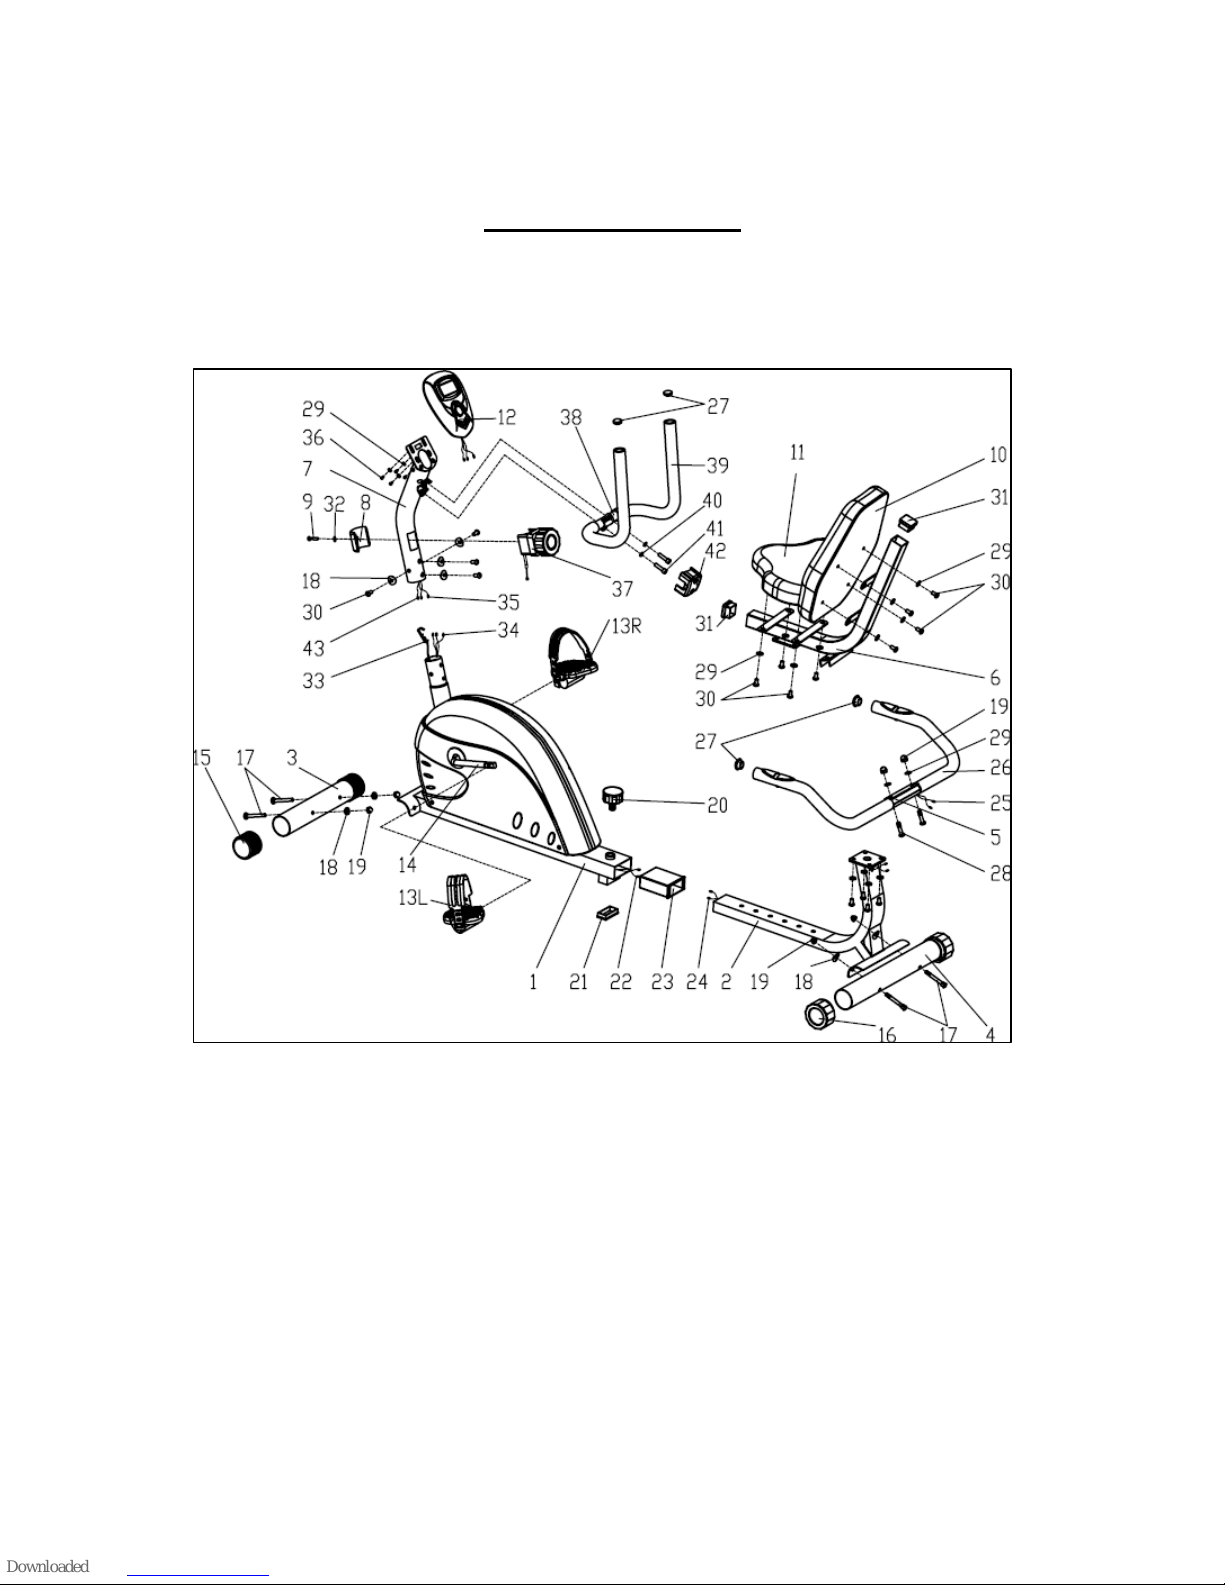
Exploded Diagram

Parts List
Part
No. Description Qty Part
No. Description Qty
1 Front main frame 1 22 Pulse wire 2
2 Rear main frame 1 23 Bushing 1
3 Front bottom tube 1 24 Pulse wire 2
4 Back bottom tube 1 25 Handlebar wire 2
5 handlebar 1 26 Handlebar foam 2
6 Seat frame 1 27 End cap 4
7 Handlebar post 1 28 Bolt 2
8 Tension control end
cap 1 29 Flat washer 18
9 Screw 1 30 Screw 16
10 Backrest 1 31 Square End cap 2
11 Seat 1 32 Flat washer 1
12 Computer 1 33 Tension wire 1
13L Left Pedal 1 34 Sensor wire 1
13R Right Pedal 1 35 Pulse wire 1
14 Crank 1 36 Screw 4
15 Front end cap 2 37 Tension control 1
16 Rear end cap 2 38 Handlebar 1
17 Bolt 4 39 Handlebar foam 2
18 Arc washer 8 40 Spring washer 2
19 Nut 6 41 Screw 2
20 Spring knob 1 42 Handle Clamp 1
21 Square End cap 1 43 Pulse wire 2
NOTE:
Most of the listed assembly hardware has been packaged separately, but some hardware items

have been preinstalled in the identified assembly parts.
In these instances, simply remove and reinstall the hardware as assembly is required.
Please reference the individual assembly steps and make note of all preinstalled hardware.
Assembly Instructions
Prior to assembly of this product, remove all components from the package and verify all the
listed parts are supplied. Once certain, begin with the first assembly step.
Step 1
:
::
:
Attach the Front (3) and the Rear Bottom Tubes (4)
to the Front (1) and Rear Main Frames (2) using the
Bolt (17), Arc Washer (18) and Nut (19) as shown.
Step 2
:
::
:
Connect the Pulse Wires (22) (24) and remove the
Spring Knob (20). Insert the Rear Main Frame (2)
into the Front Main Frame (1) using the Spring Knob
to fasten (20), as shown.

Step 3:
Attach the Seat (11) and the Backrest (10) to the Seat Frame (6) using the Screw (30) and Flat
Washer (29) as shown.
Step 4:
Attach the Seat Frame (6) to the Rear Main Frame (2) using
the Screw (30) and Flat Washer (29) as shown.
Step 5:
Connect the Handlebar Wire (25) and Pulse Wire (24).
Attach the Handlebar (5) to the Seat Frame (6) using the
Bolt (28), Flat Washer (29) and the Nut (19) as shown.

Step 6:
Attach the Left and Right Pedals (13L/13R)
to Crank (14).
Note: Tighten the Left Pedal (13L)
counterclockwise, and tighten Right Pedal
(13R) clockwise.
Step 7:
First, insert the Tension Wire (33) into the
Handlebar Post (7). Attach the Tension Control
(37) to the Handlebar Post (7) using the Tension
Control End Cap (8), Flat Washer (32) and the
Screw (9).
Next, connect the Pulse Wires (35) (43) and
Sensor Wire (34). Connect the Tension Wire (33)
to the Tension Control (37) as shown in the below.
Finally, attach the Handlebar Post (7) to the Front
Main Frame (1) using the Screw (30) and Arc Washer (18) as shown.

Step 8:
Using the Screw (41) and Spring Washer (40), attach the
Handlebar (38) to the Handlebar Post (7), and place the
Handle Clamp (42) to the Handlebar (5) as shown.
Step 9:
Connect the Pulse Wires (35) (43) to the Computer (12), then
attach the Computer (12) to the plate in the Handlebar Post (7)
using the Flat Washer (29) and Screws (36) as shown.
COMPUTER OPERATION BUTTONS:

BUTTON:
1. MODE: Press to select all functions in sequence. Hold the button for 2 seconds to total reset
all function values.
2. SET: Press to set function value.
3. RESET: Press to reset function value and back to last setting stage. Hold the button for 2
seconds to reset all function values and clear all functions.
FUNCTIONS:
1. SCAN: Automatically scan through all functions.
2. TIME: Automatically count up exercise time during exercise. Automatically countdown
exercise time from target during exercise.
3. SPEED: Display current exercise speed during exercise.
4. DISTANCE: Automatically count up exercise distance during exercise. Automatically
countdown exercise distance from target during exercise.
5. CALORIES: Automatically count up calories consumption during exercise. Automatically
countdown calories consumption from target during exercise.
6. ODO: Automatically count up total distance from different work out sessions. You will not be
able to reset this function value by RESET button.
7. PULSE: Display current heart rate (beat per minute).
NOTE:
1. Computer automatically stops calculation after 4 minutes without any signal input.
2. Computer automatically shut down after 4 minutes without any signal input.
3. Replace the batteries while the computer displays improperly.
Maintenance and Treatment
1. Verify that all the bolts and nuts are locked properly and all turning parts should be turning
freely without any damage to those parts.
2. Clean the equipment with soap and slightly damp cloth only. Please do not use any solvent
to clean the equipment.
Malfunctions and Treatment Solutions
Malfunction Reason Treatment

Warm Up Exercises
A successful exercise program consists of a warm-up, aerobic exercise, and a cool-down.
Do the entire program at least two and preferably three times a week, resting for a day between
workouts. After several months, you can increase your workouts to four or five times per week.
Warming up is an important part of your workout, and should begin every session. It prepares
your body for more strenuous exercise by heating up and stretching out your muscles,
increasing your circulation and pulse rate, and delivering more oxygen to your muscles.
At the end of your workout, repeat these exercises to reduce sore muscle problems.
We suggest the following warm-up and cool-down exercises:
Inner Thigh Stretch
Sit with the soles of your feet together with your knees pointing
outward. Pull your feet as close into your groin as possible. Gently
push your knees towards the floor. Hold for 15 counts
.
Base is unstable
1. Floor is not flat or there is
small object under the front
or rear stabilizer.
2. The rear stabilizer end caps
have not been leveled when
assembling.
1. Remove the object.
2. Adjust the rear stabilizer end
caps.
Handlebar or
seat cushion is
shaking
The bolts and saddle post knob
are loose.
Tighten the bolts and saddle post
knob.
Loud noise from
the moving parts
The parts are improperly
tightened.
Open the covers to adjust.
No resistance
when riding the
upright bike
1. The interval of the magnetic
resistance increases.
2. Tension control is damaged.
3. Running belt slips.
4. The bearing set is damaged.
1. Open the covers to adjust.
2. Change the tension control.
3. Open the covers to adjust.
4. Change the bearing set.

Hamstring Stretch
Sit with your right leg extended. Rest the sole of your left foot
against your right inner thigh. Stretch toward your toe as far
as possible. Hold for 15 counts. Relax and then repeat with
left leg extended.
Head Roll
Rotate your head to the right for one count, feeling
the stretch up the left side of your neck. Next, rotate
your head back for one count, stretching your chin to
the ceiling and letting your mouth open. Rotate your
head to the left for one count, and finally, drop your
head to your chest for one count.
Calf-Achilles Stretch
Lean against a wall with your left leg in front of the right and
your arms forward. Keep your right leg straight and the left
foot on the floor; then bend the left leg and lean forward by
moving your hips toward the wall. Hold, then repeat on the
other side for 15 counts.
Shoulder Lift
Lift your right shoulder up toward your ear for one count. Then lift
your left shoulder up for one count as you lower your right shoulder.
Toe Touch
Slowly bend forward from your waist, letting your back
and shoulders relax as you stretch toward your toes.
Reach down as far as you can and hold for 15 counts.

Side Stretch
Open your arms to the side and continue lifting them until
they are over your head. Reach your right arm as far
upward toward the ceiling as you can for one count. Feel
the stretch up your right side. Repeat this action with your
left arm.
Table of contents
Other Healthware Fit Exercise Bike manuals


Popular Exercise Bike manuals by other brands


SCIFIT
SCIFIT REX Orbi-Linear Owner's operation manual

NordicTrack
NordicTrack Gx 3.1 Bike MANUEL DE L’UTILlSATEUR

Keys Fitness
Keys Fitness 835R owner's manual

BH FITNESS
BH FITNESS H8705 Instructions for assembly and use

Sole Fitness
Sole Fitness LCR owner's manual

NordicTrack
NordicTrack Sl730 Bike user manual


