hecht 860 Service manual

CZ – Gratulujeme Vám
k nákupu výrobku
značky HECHT. Před
prvním uvedením
do provozu si prosím
pozorně přečtěte tento
návod k obsluze!
SK – Gratulujeme
Vám k nákupu výrobku
značky HECHT. Pred
prvým uvedením do
prevádzky si prosím
pozorne prečítajte
návod na obsluhu!
GB – Congratulations
on your purchase of
the product brand
HECHT. Before the first
operation, please read
the owner‘s manual
carefully!
DE – Wir gratulieren
Ihnen zum Kauf eines
HECHT Produktes.
Bitte lesen Sie die
Bedienungsanleitung
vor der ersten
Verwendung sorgfältig
durch!
PL –
Gratulujemy
zakupu produktu
marki HECHT. Przed
pierwszym użyciem
należy dokładnie
przeczytać
instrukcję
obsługi!
860
860
PÙVODNÍ NÁVOD K POUŽITÍ:
PÙVODNÍ NÁVOD K POUŽITÍ:
MOTOROVÝ ROTAÈNÍ KARTÁÈ
MOTOROVÝ ROTAÈNÍ KARTÁÈ
PÔVODNÝ NÁVOD NA POUŽITIE:
PÔVODNÝ NÁVOD NA POUŽITIE:
MOTOROVÁ ROTAÈNÁ KEFA
MOTOROVÁ ROTAÈNÁ KEFA
ORIGINAL INSTRUCTIONS FOR USE:
ORIGINAL INSTRUCTIONS FOR USE:
PETROL SWEEPER
PETROL SWEEPER
ORIGINALBETRIEBSANLEITUNG:
ORIGINALBETRIEBSANLEITUNG:
MOTOR KEHRMASCHINE
MOTOR KEHRMASCHINE
INSTRUKCJA U¯YTKOWANIA:
INSTRUKCJA U¯YTKOWANIA:
BENZYNOWA ZAMIATARKA
BENZYNOWA ZAMIATARKA
Doporučený olej Castrol Magnatec 5W-40 C3
Zalecany olej Castrol Magnatec 5W-40 C3
Recommended oil Castrol Magnatec 5W-40 C3
Odporúčaný olej Castrol Magnatec 5W-40 C3
Empfohlenes Öl Castrol Magnatec 5W-40 C3
860 HECHT MANUAL 2012b.indd 1860 HECHT MANUAL 2012b.indd 1 30.7.2012 17:15:5030.7.2012 17:15:50

made for garden
SK
CZ
GB
PL
DE
2 / 80
CZ Tento návod obsahuje důležité informace o bezpečnosti, montáži, provozu, údržbě,
uskladnění a řešení případných problémů, proto jej dobře uschovejte pro možnost
vyhledání informací v budoucnu a pro další uživatele. Vzhledem k stálému vývoji a přizpůsobování
nejnovějším náročným normám EU mohou být na výrobcích prováděny technické a optické
změny bez předchozího upozornění. Fotografie použité v manuálu jsou pouze ilustrační
a nemusí se přesně shodovat s dodaným výrobkem. Nelze uplatňovat jakékoli právní nároky
související s tímto návodem k obsluze. V případě nejasností kontaktujte dovozce nebo prodejce.
SK Tento návod obsahuje dôležité informácie o bezpečnosti, montáži, prevádzke, údržbe,
uskladnení a riešení prípadných problémov preto ho dobre uschovajte pre možnosť
vyhľadania informácií v budúcnosti a pre ďalších užívateľov. Vzhľadom k stálemu technickému
vývoju a prispôsobovaniu najnovším náročným normám EÚ môžu byť robené technické a optické
zmeny bez predchádzajúceho upozornenia. Fotografie použité v manuáli sú len ilustračné
a nemusia sa presne zhodovať s dodaným výrobkom. Nie je možné uplatňovať akékoľvek právne
nároky súvisiace s týmto návodom k obsluhe. V prípade nejasností kontaktujte dovozcu alebo
predajcu.
GB This manual contains important information about safety, installation, operation,
maintenance, storage, and troubleshooting. The instructions in a safe place to be able to
find information in the future or for other users. Given the constant technological development
and adaptation to the latest exacting standards of the EU technical and design changes may be
carried out without prior notice. Photographs are for illustrative purposes only, and may not
exactly match the product itself. It is not possible to exercise any legal claims associated with this
operator’s manual. In case of doubt, contact the importer or retailer.
DE Dieses Handbuch enthält wichtige Hinweise zur Sicherheit, Installation, Betrieb, Wartung,
Lagerung und Fehlerbehebung. Bewahren Sie diese Anleitung als Nachschlagewerk für
alle Benutzer an einem sicheren Ort auf. Aufgrund der ständigen technischen Weiterentwicklung
und Anpassungen an erhöhte Standards der EU können technische und gestalterische
Änderungen ohne vorherige Ankündigung durchgeführt werden. Abbildungen dienen nur
illustrativen Zwecken und müssen nicht mit dem tatsächlichen Produkt übereinstimmen.
Rechtliche Ansprüche in Verbindung mit dieser Bedienungsanleitung bestehen nicht. Im
Zweifelsfall kontaktieren Sie den Importeur oder Händler.
PL Niniejsza instrukcja obsługi zawiera ważne informacje dotyczące bezpieczeństwa, mon-
tażu, eksploatacji, konserwacji i przechowywania, rozwiązania ewentualnych proble-
mów, dlatego należy ją dobrze zachować, dla możliwość odszukania potrzebnych informacji w
przyszłości oraz dla innych użytkowników. W związku z ciągłym rozwojem i dostosowaniem
według najnowszych standardów wymogów UE na produktach mogą być przeprowadzane
zmiany techniczne i optycznych bez uprzedzenia. Fotografie wykorzystane w instrukcji mają
charakter poglądowy i nie muszą się dokładnie zgadzać z dostarczonym produktem. Dlatego nie
można wznosić jakichkolwiek roszczeń związanych z niniejszą instrukcją obsługi. W razie wąt-
pliwości skontaktuj się ze sprzedawcą lub importerem.
860 HECHT MANUAL 2012b.indd 2860 HECHT MANUAL 2012b.indd 2 30.7.2012 17:15:5430.7.2012 17:15:54

made for garden
SK
CZ
GB
PL
DE
3 / 80
ČESKY
OBRAZOVÁ PŘÍLOHA................................................................................................................................4
BEZPEČNOSTNÍ SYMBOLY ........................................................................................................................7
SPECIFIKACE............................................................................................................................................11
NÁVOD K POUŽITÍ ..................................................................................................................................12
ES PROHLÁŠENÍ O SHODĚ......................................................................................................................76
DOPORUČENÉ PŘÍSLUŠENSTVÍ
..........................................................................................................79
SLOVENSKY
OBRAZOVÁ PRÍLOHA................................................................................................................................4
BEZPEČNOSTNÉ SYMBOLY .......................................................................................................................7
ŠPECIFIKÁCIA ..........................................................................................................................................11
NÁVOD NA POUŽITIE..............................................................................................................................25
ES VYHLÁSENIE O ZHODE......................................................................................................................76
DOPORUČENÉ PRÍSLUŠENSTVO
........................................................................................................79
ENGLISH
PICTURE ANNEX........................................................................................................................................4
SAFETY SYMBOLS.....................................................................................................................................7
SPECIFICATIONS ......................................................................................................................................11
INSTRUCTIONS FOR USE.........................................................................................................................38
CE CONFORMITY DECLARATION............................................................................................................76
RECOMMENDED ACCESSORIES
........................................................................................................79
POLSKI
ZDJĘCIE ZAŁĄCZNIK ...........................................................................................................................................4
ZNAKI BEZPIECZEŃSTWA...................................................................................................................................7
SPECYFIKACJE ...................................................................................................................................................11
INSTRUKCJA OBSŁUGI......................................................................................................................................51
DEKLARACJA ZGODNOŚCI WE.......................................................................................................................76
ZALECANE AKCESORIA.................................................................................................................. 79
DEUTSCH
ILLUSTRIERTEN ANHANG...................................................................................................................................4
VERWENDETEN SYMBOLE.................................................................................................................................7
TECHNISCHE DATEN.........................................................................................................................................11
ORIGINALBETRIEBSANLEITUNG......................................................................................................................64
KONFORMITÄTSERKLÄRUNG..........................................................................................................................76
EMPFEHLENSWERTES ZUBEHÖR .................................................................................................. 79
860 HECHT MANUAL 2012b.indd 3860 HECHT MANUAL 2012b.indd 3 30.7.2012 17:15:5430.7.2012 17:15:54
made for garden
SK
CZ
GB
PL
DE
4 / 80
ZDJĘCIE ZAŁĄCZNIKILLUSTRIERTEN ANHANGPICTURE ANNEXOBRAZOVÁ PRÍLOHAOBRAZOVÁ PŘÍLOHA
1
32
OBRAZOVÁ PŘÍLOHA / OBRAZOVÁ PRÍLOHA / PICTURE ANNEX /
ILLUSTRIERTEN ANHANG / ZDJĘCIE ZAŁĄCZNIK
A
2
1
6
7
3
5
4
860 HECHT MANUAL 2012b.indd 4860 HECHT MANUAL 2012b.indd 4 30.7.2012 17:15:5430.7.2012 17:15:54
made for garden
SK
CZ
GB
PL
DE
5 / 80
1
2
3
ON
CHOKE
OFF
RUN
5 6
7
4
8 9
START
STOP
860 HECHT MANUAL 2012b.indd 5860 HECHT MANUAL 2012b.indd 5 30.7.2012 17:15:5630.7.2012 17:15:56

made for garden
SK
CZ
GB
PL
DE
6 / 80
10
11 12
13 14 (a)
(b)
860 HECHT MANUAL 2012b.indd 6860 HECHT MANUAL 2012b.indd 6 30.7.2012 17:15:5830.7.2012 17:15:58

made for garden
SK
CZ
GB
PL
DE
7 / 80
VERWENDETEN SYMBOLEZNAKI BEZPIECZEŃSTWASAFETY SYMBOLSBEZPEČNOSTNÉ SYMBOLYBEZPEČNOSTNÍ SYMBOLY
BEZPEČNOSTNÍ SYMBOLY / BEZPEČNOSTNÉ SYMBOLY / SAFETY
SYMBOLS / ZNAKI BEZPIECZEŃSTWA /
VERWENDETEN SYMBOLE
CZ SK GB PL DE
Štítek na stroji
obsahuje symboly.
Tyto symboly
nám sdělují
důležité informace
o výrobku nebo
instrukce pro
používání:
Štítok na stroji
obsahuje symboly.
Tieto symboly
nám oznamujú
dôležité informácie
o výrobku alebo
inštrukcie pre
používanie:
The rating plate on
your tool may show
symbols. These
represent important
information about
the product or
instruction its use.
Umieszczona
na maszynie
tabliczka zawiera
symbole. Symbole
te przekazują
różne informacje
dotyczące
a maszyny
lub instrukcji
użytkowania:
Symbole vermit-
teln wichtige
Informationen
über das Produkt
oder Hinweise zum
Gebrauch. Es sind
besondere Sicher-
heitsmaßnahmen
beim Umgang mit
dem Gerät
erforderlich!
A
Následující
varovné symboly
připomínají
preventivní
bezpečnostní
zásady, které
je nutno při
provozu stroje
dodržovat.
Nasledujúce
varovné
symboly
pripomínajú
preventívne
bezpečnostné
zásady,
ktoré je nutné pri
prevádzke stroja
dodržovať.
The following
warning
symbols are to
remind
you of the safety
precautions you
should
take when
operating
the machine.
Podane poniżej
symbole
ostrzegawcze
przypominają
o prewencyjnych
zasadach
bezpieczeństwa,
które
muszą być
przestrzegane
podczas pracy
maszyny.
Symbole vermitteln
wichtige Informa-
tionen über das
Produkt. Achtung:
Es sind beson-
dere Sicherheits-
maßnahmen beim
Umgang mit dem
Gerät erforderlich!
Nichtbeachten der
Bedienungshinwei-
se kann lebensge-
fährlich sein!
BČtěte návod na
použití.
Čítajte návod
na obsluhu.
Read the
instruction
manual.
Proszę przeczytać
instrukcję obsługi.
Lesen Sie die Ge-
brauchsanweisung
Handbuch.
860 HECHT MANUAL 2012b.indd 7860 HECHT MANUAL 2012b.indd 7 30.7.2012 17:16:0230.7.2012 17:16:02

made for garden
SK
CZ
GB
PL
DE
8 / 80
CZ SK GB PL DE
C
Používejte
ochranu očí,
sluchu. V pří-
padě prašného
prostředí použij-
te respirátor.
Používajte ochranu
očí,
sluchu. V prí-
pade prašného
prostredia použite
respirátor.
Use eyes and ears
protection. If dusty,
use a respirator.
Używać ochronę
oczu,
słuchu. Jeśli
zakurzone, używać
respiratora.
Bei der Arbeit mit
dem Gerät eine
Schutzbrille tragen
und Gehörschutz
tragen. In stau-
bigen Umgebun-
gen ein Atem-
schutzgerät
D
Před prací na stroji
vypněte motor
a odpojte kabel
svíčky!
Pred pracou na
stroji
vypnite motor a
odpojte
kábel sviečky!
Before repairing,
turn the engine
off and
disconnect spark
plug.
Przed rozpoczęciem
pracy
przy urządzeniu,
wyłączyć
silnik i odłączyć
przewód
świecy zapłonowej!
Bevor die Repa-
ratur, den Motor
abstellen und
trennen Sie wecken
Stecker.
EPozor! Nebezpečné
napětí!
Pozor! Nebezpečné
napätie!
Attention! Danger-
ous
voltage!
Uwaga! Niebez-
pieczne
napięcie!
Achtung! ge-
fährlich
Spannung!
F
Udržujte ruce
v bezpečné vzdále-
nosti od pohybují-
cích se částí stroje.
Udržujte ruky v bez-
pečnej vzdialenosti
od pohybujúcich sa
častí stroja.
Keep hands away
from the mov-
ing parts of the
machine.
Trzymaj ręce z dala
od ruchomych
części maszyny.
Hände weg von den
beweglichen Teilen
der Maschine.
G
Udržujte nohy
v bezpečné vzdále-
nosti od pohybují-
cích se částí stroje.
Udržujte nohy
v bezpečnej
vzdialenosti od
pohybujúcich sa
častí stroja.
Keep foot way from
the moving parts of
the machine.
Nigdy nie trzymać
nóg w pobliżu
ślimaków obroto-
wych.
Halten Füße weg
von den bewegli-
chen Teilen der
Maschine.
H
Jednotlivých dílů
stroje se dotýkejte
až po jejich úplném
zastavení.
Jednotlivých dielov
stroja sa dotýkajte
až po ich úplnom
zastavení.
Do not touch
individual parts of
the machine before
they fully stops.
Individual parts
touch the machines
after they full stop.
Berühren Sie nicht
die einzelnen
Teile der Maschine,
bevor sie zum
vollständigen
Stillstand.
IPozor toxické
výpary!
Pozor toxické
výpary!
Attention toxic
fumes!
Uwaga na tok-
syczne
opary!
Achtung! giftige
Dämpfe!
J
Nebezpečí pora-
nění vymrštěnými
částmi.
Hrozí nebezpečen-
stvo
poranenia odletu-
júcimi
časťami.
Risk of injury by
ejected parts.
Niebezpieczeństwo
urazu odrzuconymi
częściami.
Verletzungsgefahr
durch ausgestoße-
ne Teile.
K
Udržujte osoby
a domácí zvířata
v bezpečné vzdá-
lenosti.
Udržujte osoby
a domáce zvieratá
v bezpečnej
vzdialenosti.
Keep other people
and domestic
animals at a safe
distance.
Osoby i zwierzęta
domowe muszą
przebywać w
bezpiecznej odle-
głości.
Halten Sie andere
Personen und Hau-
stieren in einem
sicheren Abstand.
860 HECHT MANUAL 2012b.indd 8860 HECHT MANUAL 2012b.indd 8 30.7.2012 17:16:0330.7.2012 17:16:03

made for garden
SK
CZ
GB
PL
DE
9 / 80
CZ SK GB PL DE
L
Pozor! Nepoužívej-
te stroj v uzavře-
ných nebo špatně
větraných prosto-
rách!! Nebezpečí
otravy.
Pozor! Nepouží-
vajte
stroj v uzavretých
priestoroch!!
Nebezpečenstvo
otravy!
Warning! Do not
use the appliance
in closed or poorly
ventilated environ-
ments. Risk
of breathing in
toxic gases!
Uwaga! Nie należy
używać urządzenia
w miejscach
zamkniętych lub
mało wentylowa-
nych! Grozi ryzyko
zatrucia.
Warnung!
Verwenden Sie
nicht das Gerät in
geschlossenen oder
schlecht belüfteten
Räumen. Risiko des
Einatmens giftiger
Gase!
MMax. výkon motoru Max. výkon motora Max. engine power Max. performance
silnika Max. Motorleistung
NMax. otáčky
nástroje
Max. otáčky
nástroje Max. rpm of tool Maksymalna pręd-
kość narzędzia
Max. Geschwindig-
keit des Werkzeug
OPracovní šířka Pracovná šírka Working width Szerokość spulch-
niania Arbeitsbreite
PPrůměr pracovního
nástroje
Priemer pracovné-
ho nástroja
Diameter of work-
ing tools
Średnica narzędzi
pracy
Durchmesser der
Arbeitswerkzeuge
QHmotnost Hmotnosť Weight Masa Gewicht
R
Výrobek odpovídá
příslušným standar-
dům EU.
Výrobok zodpovedá
príslušným štan-
dardom
EU.
Product conforms
to relevant EU
standards.
Maszyna spełnia
wymagania odno-
śnie norm UE.
Produkt ist mit den
einschlägigen
Normen der
Europäischen
Gemeinschaft
konform.
S
Údaj o hladine
akustického výkonu
Lwa v dB.
Údaj o hladine
akustického výkonu
Lwa v dB.
LWA Data Lwa
noise level in dB.
LWA – parametr
poziomu ciśnienia
akustycznego
Lwa wyrażony w
jednostkach dB.
Schallleistungspe-
gel (LWA)
TSytič Sýtič Choke Ssanie Würgen
UPalivový kohout Palivový kohútik The fuel cock Kranik paliwa Kraftstoffventil
VRuční startováníí Ručné štartovanie Recoil starter
symbol Start manualny Manueller Start
W
Pojezd - po stisknu-
tí horní páky-vpřed,
dolní páky-vzad
Pojazd - po stlačení
hornej páky-vpred,
dolnej páky-vzad
Drive - when you
press the top-lever
forward, the lower
lever-back
Napęd - po na-
ciśnięciu najwyż-
szego dźwignię
do przodu, dolna
dźwigniao-brońca
Antrieb - wenn Sie
die Top-Hebel nach
vorne drücken, wird
der untere Hebel-
back
860 HECHT MANUAL 2012b.indd 9860 HECHT MANUAL 2012b.indd 9 30.7.2012 17:16:0330.7.2012 17:16:03

made for garden
SK
CZ
GB
PL
DE
10 / 80
CZ SK GB PL DE
X
Nebezpečí
výbuchu! Pohonné
hmoty je zakázáno
doplňovat pokud je
motor v chodu.
Nebezpečenstvo
výbuchu! Pohonné
hmoty
sa nesmú doplňo-
vať pri
bežiacom motore!
Risk of explosion!
Do not top up with
fuel with engine
running.
Niebezpieczeństwo
wybuchu! Nie
wolno uzupełniać
paliwa, gdy silnik
jest uruchomiony.
Explosionsgefahr!
Kein Nachfüllen
mit Kraftstoff mit
laufendem Motor.
YPozor toxické
výpary!
Pozor toxické
výpary!
Attention toxic
fumes!
Uwaga na toksycz-
ne opary!
Achtung giftige
Dämpfe!
Z
Benzín je hořlavina
a může explodovat.
Kouření a používání
otevřeného ohně je
zakázáno.
Benzín je horľavina
a môže explodovať.
Fajčenie a použí-
vanie
otvoreného ohňa je
zakázané.
Petrol is a fire
hazard and can
explode. Smoking
and open fire are
prohibited.
Benzyna jest
łatwopalna i może
eksplodować.
Palenie i używanie
otwartego ognia
jest zabronione.
Benzin ist feuer-
gefährlich und
kann explodieren.
Rauchen und
offenes Feuer sind
verboten.
1
Riziko popálenin.
Udržujte bezpeč-
nou vzdálenost
od horkých částí
stroje.
Riziko popálenín.
Udržujte bezpečnú
vzdialenosť od
horúcich
častí stroja.
Risk of burns. Keep
safety distance
from
hot parts of the
machine.
Ryzyko poparzenia.
Zachowuj bez-
pieczną
odległość od
gorących
części urządzenia.
Achtung heiße
Flächen, Verbren-
nungsgefahr!
2
Pozor, nebezpečí
popálení o motor
a výfuk.
Pozor, nebezpe-
čenstvo
popálenia o motor
a výfuk.
Attention, danger
of burns by engine
and exhaust pipe.
Uwaga, niebezpie-
czeństwo
poparzenia od
silnika i układu
wydechowego.
Achtung, Gefahr
von Verbrennungen
durch Motor und
Auspuff.
3Ovládání rotačního
kartáče
Ovládanie rotačnej
kefy
Control of rotating
brushes
Kontrola szczotki
obrotowe
Steuerung der
rotierenden Bürsten
4
ZAJÍC - pracovní
otáčky / pozice
START
ZAJAC - pracovné
otáčky / pozícia
START
Rabbit - working
speed / START
position
Rabbit - Prędkość
robocza / pozycja
START
Rabbit - Arbeits-
geschwindigkeit /
START-Position
5
ŽELVA - pomalé
otáčky / pozice
STOP
KORYTNAČKA -
pomalé otáčky /
pozícia STOP
Turtle - slow speed
/ STOP position
Turtle - Niska
prędkość / STOP
pozycja
Schildkröten
- langsamer
Geschwindigkeit /
STOP-Position
860 HECHT MANUAL 2012b.indd 10860 HECHT MANUAL 2012b.indd 10 30.7.2012 17:16:0330.7.2012 17:16:03

made for garden
SK
CZ
GB
PL
DE
11 / 80
TECHNISCHE DATEN
Parametr Parameter Parameter Parametr Parameter
Typ motoru -
4-takt, OHV Typ motora -
4-takt, OHV Engine type -
4-stroke, OHV Typ silnika -
4-suwowy, OHV Motortyp -
4-Takt, OHV
Max. výkon
motoru při 3600
ot./min.
Max. výkon
motora pri 3600
ot./min.
Max. engine
power at 3600
rpm
Max. perfor-
mance
/ 3600 obroty
silnika
Max. Leistung
/ 3600 der
Umsatz Motor6,5 HP
Hmotnost Hmotnosť Weight Masa Gewicht 67 kg
Pracovní šířka Pracovná šírka Working width Szerokość spulch-
niania Arbeitsbreite 60 cm
Doporučený
olej: CASTROL
MAGNATEC
5W-40 nebo jiný
klasifikace API
SN/CF
Odporúčaný
olej: CASTROL
MAGNATEC
5W-40 alebo iný
klasifikácie API
SN / CF
Recommended
oil: Castrol
MAGNATEC
5W-40 or other
meeting clas-
sification API SN
/ CF
Zalecany olej:
Castrol MAG-
NATEC 5W-40
lub inne spot-
kanie klasyfikacji
API SN / CF
Empfohlenes
Öl: Castrol
Magnatec
5W-40 oder
andere Treffen
Klassifizierung
API SN / CF
Provozní pod-
mínky Prevádzkové
podmienky Operating condi-
tions Warunki użytko-
wania Betriebsbedin-
gungen -5°C - +35°C
Průměr válce Priemer valca Cylinder diam-
eter Średnica
cylindra Zylinderdur-
chmesser 35 cm
Otáčky nástroje Otáčky ná-
stroja Tool speed Prędkość
obrotowa
narzędzia
Die Ge-
schwindi-
gkeit des
Werkzeugs
500/min
Rychlosti Rýchlosti Gears Prędkości Geschwindi-
gkeiten
1 vpřed, 1 vzad
/ 1 do przodu,
1 do tyłu /
1 gear forward,
1 gear reverse /
1 bieg do
przodu,
1 bieg do tyłu /
1 Vorwärts-
gang
1 Rückwärts-
gang
Rozměry Rozmery Dimensions Wymiary Abmessun-
gen
1150 × 650
× 750 mm
Tlak v pneu-
matikách Tlak v pneu-
matikách Tire pressure Ciśnienie w
oponach Reifendruck 30 Psi
Specifikace se mohou měnit bez předchozího oznámení. / Špecifikácie sa môžu meniť bez pre-
došlého oznámenia. / Specifi
cations are subject to change without notice. / Specyfikacje mogą
być zmienione bez uprzedniego powiadomienia. / Die Spezifikationen können ohne Ankündi-
gung geändert werden.
SPECIFICATIONS
SPECYFIKACJE ŠPECIFIKÁCIASPECIFIKACESPECIFIKACE / ŠPECIFIKÁCIA / SPECIFICATIONS /
SPECYFIKACJE / TECHNISCHE DATEN
860 HECHT MANUAL 2012b.indd 11860 HECHT MANUAL 2012b.indd 11 30.7.2012 17:16:0330.7.2012 17:16:03

made for garden
38 / 80
SK
CZ
GB
PL
DE
INSTRUCTIONS FOR USE
Read all instructions before using this product. The instructions in a safe place to be
able to find information in the future or for other users. Please familiarize yourself
with the following information to prevent damage to your machine and injury to the
operator, property damage, or death.
iWARNING! This machine is not intended for use by persons (including children)
with reduced physical, sensory or mental capabilities, or lack of experience and
knowledge, unless they have been given supervision or instruction concerning
use of the machine by a person responsible for their safety.
CONTENT
PURPOSE OF USE.................................................................................................................... 39
SAFETY INSTRUCTIONS.......................................................................................................... 39
General Safety Instructions.................................................................................................................. 39
Preparation measures.......................................................................................................................... 39
Operator Requirements....................................................................................................................... 40
MACHINE DESCRIPTION ........................................................................................................ 41
INSTALLATION ....................................................................................................................... 41
OPERATION............................................................................................................................. 41
Charge pressure for tyres .................................................................................................................... 41
Checking the oil level.......................................................................................................................... 41
Refuelling............................................................................................................................................ 42
Starting the engine ............................................................................................................................. 42
Switching the engine off..................................................................................................................... 42
OPERATING MODE .................................................................................................................43
Supporting wheel and brush height adjustment .................................................................................. 43
Finishing your work or breaks.............................................................................................................. 43
MAINTENANCE AND STORAGE ............................................................................................. 43
Safety instructions for inspections and maintenance............................................................................43
General instructions ............................................................................................................................ 44
Disassembly/assembly/change of sweeping brushes:............................................................................ 44
Cleaning ............................................................................................................................................. 44
Storage and transport ......................................................................................................................... 44
TROUBLESHOOTING ............................................................................................................... 45
ENVIRONMENT....................................................................................................................... 46
DEVICE WARRANTY............................................................................................................... 46
SELECTABLE ACCESSORIES TO THE MACHINE HECHT 860................................................... 48
860 HECHT MANUAL 2012b.indd 38860 HECHT MANUAL 2012b.indd 38 30.7.2012 17:16:1230.7.2012 17:16:12

made for garden
39 / 80
SK
C
Z
GB
PL
DE
PURPOSE OF USE
This appliance is approved solely for use in accordance with description and safety
instructions specified in this user´s manual.
This device is intended for clearing an adequate layer of snow on a flat surface free of rocks and
similar obstacles. Any other use is not as intended. Improver use is not covered by the warranty
and the manufacturer will reject any liability. The user is liable for all damage caused to third
parties and their property. Unauthorized modifications made to mower rule out any liability on
the part of the manufacturer for damage resulting therefrom.
Please note that our equipment has not been designed for use in commercial, trade or industrial
applications. Our warranty will be voided if the machine is used in commercial, trade or industrial
businesses or for equivalent purposes.
JCAUTION Do not overload machine – use it only within the performance range it
was designed for.
SAFETY INSTRUCTIONS
GENERAL SAFETY INSTRUCTIONS
• Please read carefully the Operating Instructions.
• Familiarise with the settings and appropriate use of the appliance.
• You should primarily learn to switch off the engine quickly and safely in case of emergency
• Staying in the dangerous area of the sweeper is prohibited.
• Never let children or other persons not familiarised with the Operating Instructions use the
appliance.
• Local regulations may lay down minimum age of the user.
• Never sweep if there are other persons, especially children or pets, around.
• Keep in mind the operator and user are responsible for accidents involving other persons and
their property.
PREPARATION MEASURES
• Solid boots and long trousers should always be worn when sweeping. Never sweep when
barefooted or in light sandals.
• Check the area on which the appliance is being used and remove all items that could get
caught or thrown off.
Caution: Petrol is highly flammable
• Store petrol in containers designated for that purpose.
• To be refuelled outdoors only.
• Never smoke when refuelling.
• Refuel before switching the engine on.
• The tank cap must not be opened and refuelling must not take place if the engine is running
or is heated to operating temperature.
• Do not try to start the engine if petrol overflows. Take the appliance off the area polluted by
petrol instead. Any attempt at operation, open fire or formation of sparks are prohibited until
petrol fumes have evaporated.
• The petrol tank and other tank caps must for safety reasons be replaced if damaged. Replace
any faulty noise suppressors. A visual inspection should always be carried out to check whether
the sweeping roll, fastening components or the entire unit are not worn out or damaged
before each use.
860 HECHT MANUAL 2012b.indd 39860 HECHT MANUAL 2012b.indd 39 30.7.2012 17:16:1230.7.2012 17:16:12

made for garden
40 / 80
SK
CZ
GB
PL
DE
Safety instructions for first start-up
• Safe operating height should always be adjusted on the guide bar!
Do not let the combustion engine run in closed rooms as dangerous carbon monoxide could
accumulate there.
• Sweeping should only take place in broad daylight and good artificial lighting.
• Stable posture, especially in steep terrain must always be ensured.
• Move the appliance at a step pace.
• Be especially careful when changing the movement direction when going up. Do not sweep
in too steep positions. (max. 30° )
• Stop the sweeping roll during transport. Stop the sweeping roll if the appliance must be
tipped over.
• Never use the sweeper if any protective guards or grids are damaged or when not fitted.
• Never adjust the guide rods when working – risk of accident!
• The operator must keep distance delimited by rods when using the sweeper for any purpose,
especially when turning! It is prohibited to stay in an area that is dangerous.
• Do not change the engine setting and do not overspeed the engine.
• Start the engine carefully, following the manufacturer instructions. Ensure sufficient distance
of your legs from the sweeping brush.
• Never put hands or legs on or under rotating parts.
Switch the engine off and pull out the socket plug
• before unlocking or releasing the sweeping roll
• when encountering a foreign item.
Search for any damage to the sweeping roll and perform all necessary repairs and then
continue working with the sweeper. Stop the sweeper and switch it off immediately if there are
any operating failures. Have the failure removed at once. If there is a risk of slip on slopes, the
sweeper must be held by a rod or rope by an accompanying person. The accompanying person
must be above the appliance in sufficient distance from the operating tools! Work should
always be taking place across the slopes if possible!
Switch the engine off:
• when leaving the sweeper,
• before refuelling.
Tyres and air pressure in tyres
It is necessary to make sure the sweeper is safely put out of operation and secured against
travelling when working on wheels. Repairs of tyres can only be performed by professionals
with appropriate assembly tools. Check regularly the air pressure in tyres. There is a risk of
explosion when it is too high.
OPERATOR REQUIREMENTS
The operator shall read the instruction manual carefully before using the unit.
Qualification
No special qualification is required for use of the unit except for detailed direction by a
professional.
Minimum Age
Only persons above 16 years of age are allowed to work with the unit. Exempted from the
provision is the use of the juvenile trainees if they work in the course of their professional
training with an aim to obtain the skill under a trainer supervision.
860 HECHT MANUAL 2012b.indd 40860 HECHT MANUAL 2012b.indd 40 30.7.2012 17:16:1330.7.2012 17:16:13

made for garden
41 / 80
SK
C
Z
GB
PL
DE
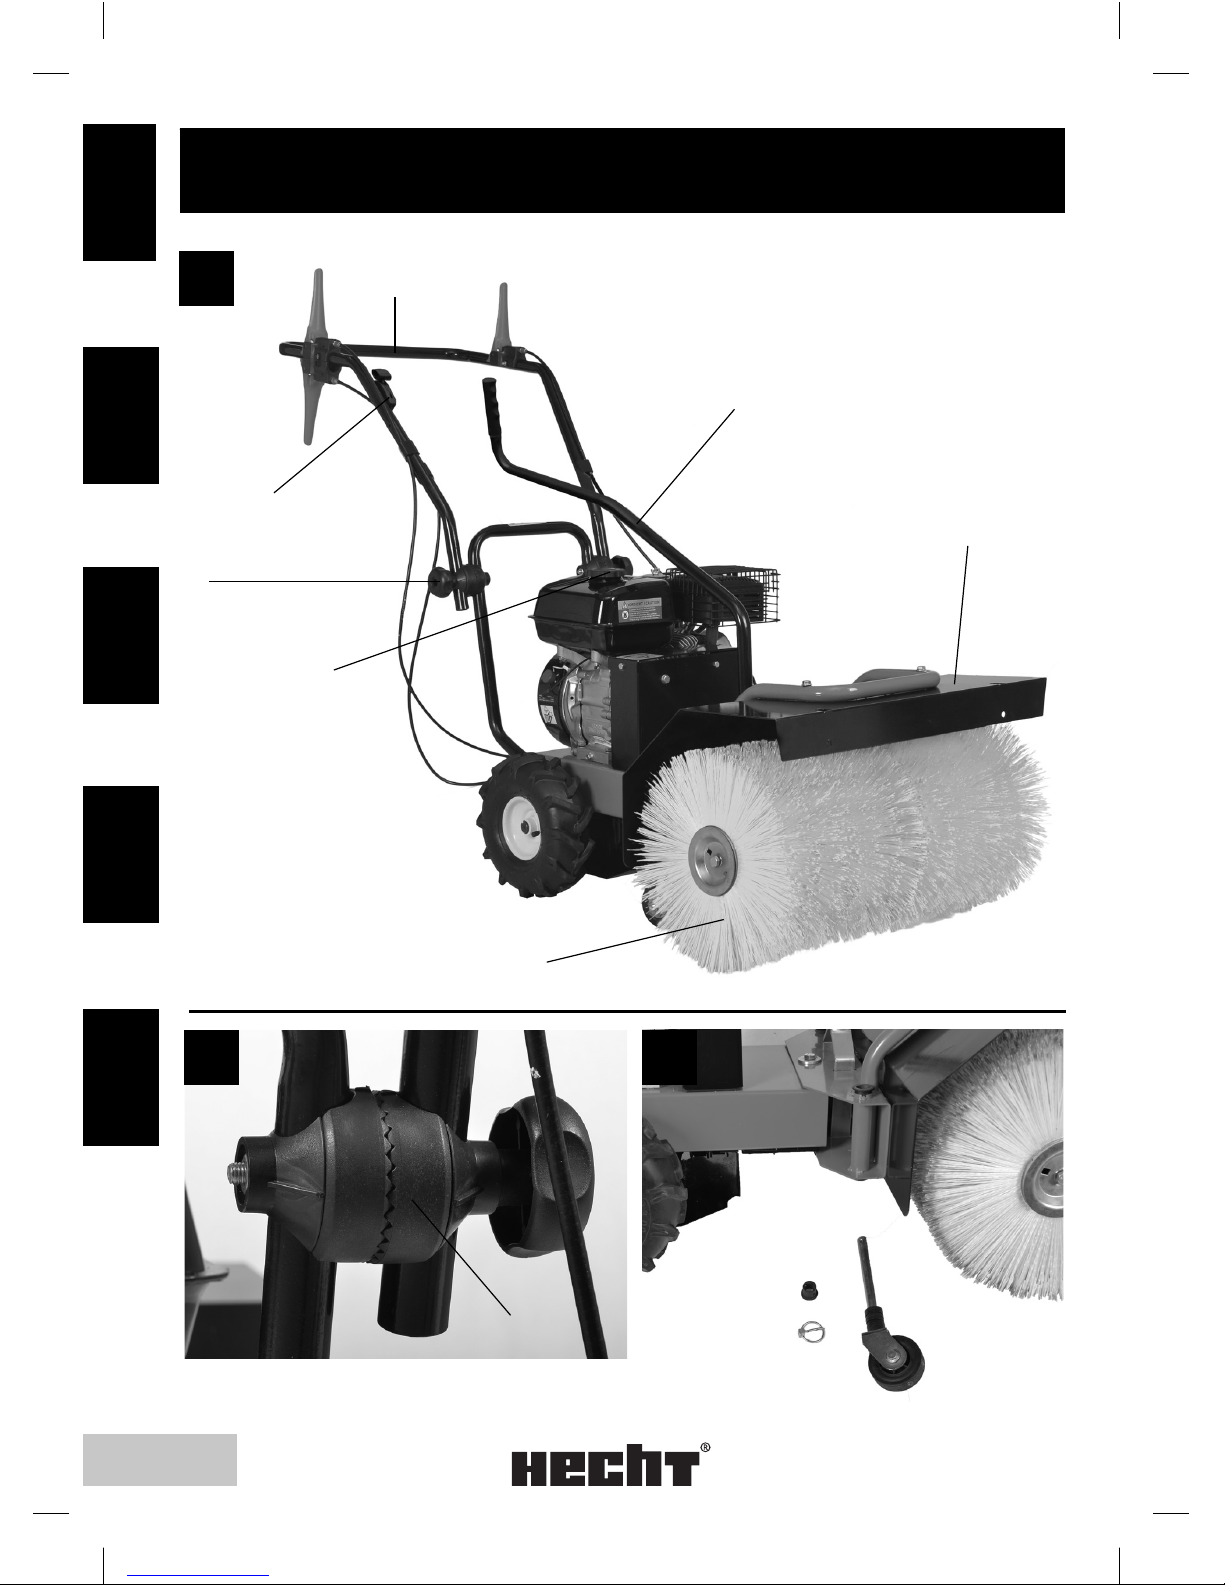
MACHINE DESCRIPTION
Figure 1
1. Speed control lever
2. The upper handle
3. The lever to adjust the angle sweeping war
4. sweeping cylinder
5. Guard sweeping war
6. gripping the handle
7. Fuel tank lid
INSTALLATION
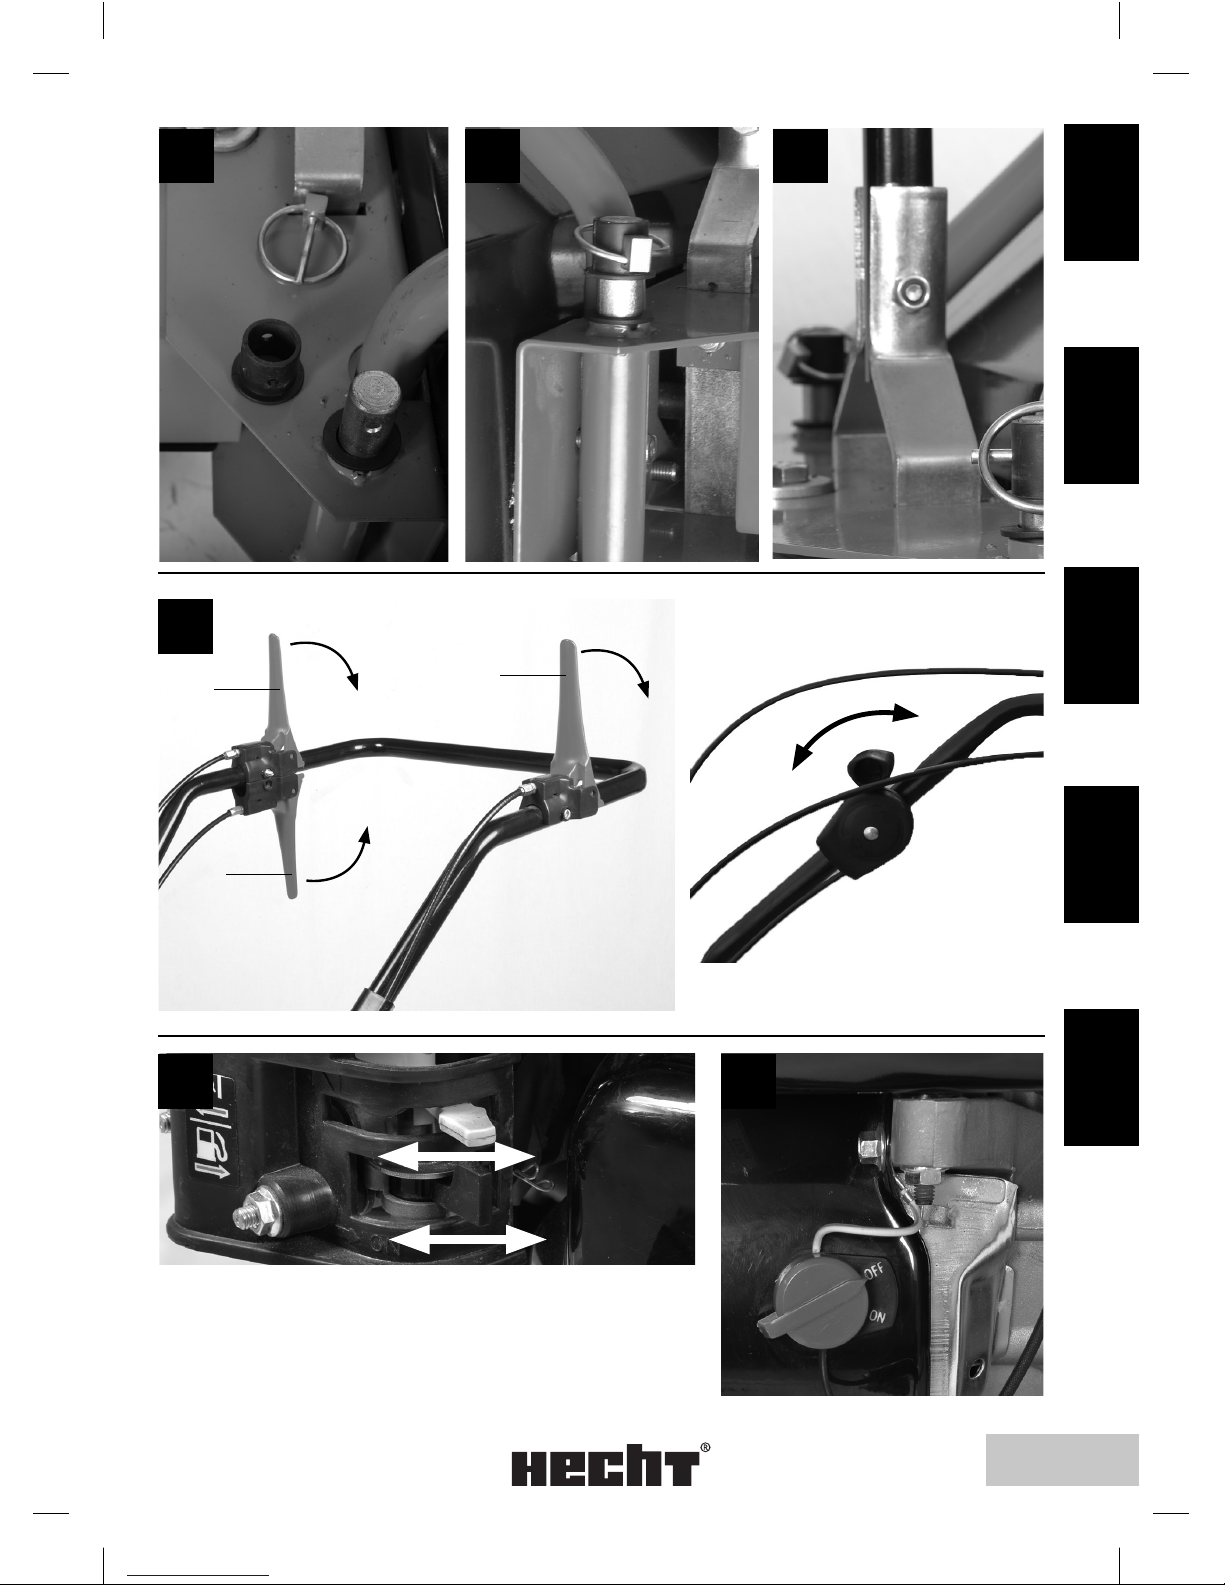
Take the sweeper out of package and fit the upper handle (pic. 1; pos. 6) first using the
supplied binder screws (pic. 1; pos. 2). The binder screws can be fitted according to
pic. 2 pos. A. If the binder screws are locked, safe operating height can be adjusted for the
given user. Now install the guide bar pic. 1; pos. 3. according to pic. 6
Now attach the retaining pin (pic. 3, 4, 5) to the protective sheet to sweeping roller (use screws
/ nuts)
OPERATION
CHARGE PRESSURE FOR TYRES
Make sure there is the right tyre inflation pressure (1.5 bar). If the pressure is too low, the hose
may slip down on the casing and get damaged.
CHECKING THE OIL LEVEL
The engine oil quality is decisive for correct output of the drivingunit and operation life. Use
only suitable and high-quality lubricants; unsuitable lubricants cause damage to the appliance
and lead to immediate warranty expiry (we recommend Castrol Magnatec 5W-40 C3). There
might be no engine oil or just a small amount of it (filling for factory test) when dispatching
the appliance.
Oil level must necessarily be checked before the appliance is put into operation! The appliance
should always be put to a flat surface when inspecting the oil level. Always consider the
environment when filling and emptying the engine oil and fuel: use appropriate filling and
emptying tools. Prevent uncontrolled fuel or oil leak in any case!
Screw the oil dipstick (pic. 14, a) out or pull it out. Add oil between marks min. and max. on
the dipstick and check the correct level (engine oil level must touch the final oil filling neck
thread). Make sure not to overfill the appliance when standing on an uneven surface! Screw,
or push, the oil dipstick again.
If you want to empty the engine oil (oil change, maintenance,
etc.), pull the oil dipstick out (pic. 14) and screw the oil
drainage screw out (pic. 14, b). Keep the oil dipstick, oil filling hole, oil drainage hole and
oil drainage screw clean at all times! Use appropriate containers and prevent environment
pollution by lubricants and fuels.
Recommended oil Castrol Magnatec 5W-40 C3
860 HECHT MANUAL 2012b.indd 41860 HECHT MANUAL 2012b.indd 41 30.7.2012 17:16:1330.7.2012 17:16:13

made for garden
42 / 80
SK
CZ
GB
PL
DE
REFUELLING
The engine is maintenance-free and common unleaded Normal and Super petrol is added in it.
If environment-friendly unleaded petrol is used, fuel must be completely drained at engines put
out of operation for more than 30 days to prevent resinous deposits in the carburettor, fuel
filter and tank or fuel stabilizer mixed to the fuel.
Do not add oil to petrol.
Refuelling is done by removing the tank lid (pic. 1; pos. 7) and adding the fuel up to the fuel
screen marking as maximum (the fuel screen is located in the tank filling hole). Prevent fuel
from contacting your skin! Make sure fuel is always clean with no dirt! Close the tank lid
appropriately after each refuelling or inspection.
Take the appliance to the surface you want to sweep. Check all components if tightened
well and not damaged. Check the entire air filter (pic. 11) for any dirt. Pic. 12 shows air filter
components from the engine with the air filter lid being unscrewed. All air filter components,
especially the air filter insert must be clean – cleaning agent: cleaning petrol (adhere to the
safety sheet of the given manufacturer!).
Open the fuel tap (pic. 8; pos. “ON“). Check if the socket plug is tightened.
STARTING THE ENGINE
Put the engine switch to the “ON“ position (pic. 9) Make sure the engine is cold when being
started. Turn on the engine choke (pic. 8; pos. “CHOKE“)
Turn the speed control lever (pic. 7; pos. “START“) to full speed.
First, pull shortly the starting cable so that it is stretched. Now pull the starting cable slowly to
the stretched position with your left hand resting on the engine and one more strong pulling
the starting cable. Turn the engine choke off as soon as the engine gets started (pic. 8; pos.
“RUN“)
To be provided
The starting cable must not reel automatically. It must always be reeled back by hand. If the
engine fails to start even after several attempts, check whether the tank has been refuelled
properly. Maybe there is too much fuel in the roll, which has caused the spark plug to get
damp.
SWITCHING THE ENGINE OFF
Put the speed control lever to position (pic. 7; pos. “STOP“) and switch the engine off by the
engine switch (pic. 9; pos. “OFF“). Never let the appliance run unattended if the engine is
running.
WARNING! Never switch the engine off if the choke is on as it could damage the
engine.
Close the fuel tap (pic. 8; pos. “OFF“). Pull slowly the starter handle so that there is some
resistance. Valves will get closed. This step is necessary to prevent damp air from getting in the
combustion chamber.
860 HECHT MANUAL 2012b.indd 42860 HECHT MANUAL 2012b.indd 42 30.7.2012 17:16:1330.7.2012 17:16:13

made for garden
43 / 80
SK
C
Z
GB
PL
DE
OPERATING MODE
Ensure good stability!
Pressing the guide rod down will enable to turn the sweeping broom in both directions by app.
20° and lock the bar in those positions.
The appliance is moving forward when the right lever 1 (pic. 7) is pressed. The appliance is
moving backward when the right lever 2 (pic. 7) is pulled. Brushes are activated when the left
lever 3 (pic. 7) is pressed.
The cleaning appliance is fitted with a safety switch: brushes and appliance are disabled as
soon as levers are released. The speed control lever must in dangerous situations and accidents
be put to “TOP“ and engine switched off by the engine switch (pic. 9; pos. “OFF“).
In the operating mode, make always sure that the cooling and combustion air is exhausted
without interruption (leaves may block the exhaust channels). Flue gas exhaust without
interruption should be ensured, too.
SUPPORTING WHEEL AND BRUSH HEIGHT ADJUSTMENT
As soon as the brushes are slightly worn out, distance of brushes from the ground must
be adjusted again. For that purpose, plastic rings of the brush supporting wheel must be
calibrated again.
Remove the lock rings of the supporting wheels and the required number of plastic rings (see
pic. 3) from the bottom side. Fit the supporting wheels again (pic. 4). The supporting wheel
goes up and brushes are nearer to the ground. Fit the plastic rings to the upper side and fix
them using a spacing bushing and locking ring so that the hole distance towards the bushing
remains constant (pic. 5) Note: The adjust of excessive pressure reduce brush life.
FINISHING YOUR WORK OR BREAKS
After final sweeping is completed, let the appliance run free with no load for 1 to 2 minutes
(engine cooling phase)
MAINTENANCE AND STORAGE
Make sure all nuts, pins and screws are tightened firmly and the appliance is in a safe operating
condition. Never store the sweeper with petrol in tank in a building where petrol fumes can get
in touch with open fire or sparks. Allow the engine to cool down before putting the sweeper
out of operation in closed rooms.
To prevent a risk of fire, there must be no moss, grass, leaves or leaked fat (oil) around the
engine, exhaust and area near the fuel tank.
Check regularly the functionality of the sweeper, collection container and snow shield. For
safety reasons, replace any worn-out and damaged component. If the fuel tank needs to be
emptied, do so outdoors! Consider the environment!
Have any repairs necessarily performed by trained professional staff only.
The socket plug must be pulled out before any appliance changeover, adjustment or
maintenance.
SAFETY INSTRUCTIONS FOR INSPECTIONS AND MAINTENANCE
- Make sure petrol or oil do not leak – wear protective gloves when working near the sweeping
brush! The sweeper, especially the sweeping brush, must be cleaned after each use..
860 HECHT MANUAL 2012b.indd 43860 HECHT MANUAL 2012b.indd 43 30.7.2012 17:16:1330.7.2012 17:16:13

made for garden
44 / 80
SK
CZ
GB
PL
DE
GENERAL INSTRUCTIONS
Safety instructions in particular should be followed.
Regular maintenance is necessary for perfect working of your sweeper.
Sweeping brushes and driving components in particular must be carefully treated to prevent
damages or accidents in general.
Before maintenance:
- pull down the socket plug,
- put the appliance to a stable position,
- wait until the engine cools down.
DISASSEMBLY/ASSEMBLY/CHANGE OF SWEEPING BRUSHES:
Disassemble the external carrying disk. The brush and spacer segments can now be individually
removed.
CLEANING
To clean/splash of machine with water (especially using a high-pressure cleaner):
• lubricate all spots that need lubrication and let the sweeper run for 1 to 2 minutes to allow
water that has got inside to get away.
• clean the engine with just a cloth. Splash with strong current of water as water can get in the
ignition system, fuel system and lubricating oil system, which may lead to failures.
STORAGE AND TRANSPORT
Do not transport the sweeper, put it out of operation and store when tilted forward, backward
or sideways.
Do not store the sweeper in damp rooms, in rooms where fertilizers are stored, in stables
or near them. Tilting may cause the engine oil to get to the combustion space, which in
consequence may bring problems wit starting and oil carbonization – risk of strong corrosion
formation.
If the sweeper has not been used for a long time, the following steps need to be taken:
• thorough cleaning and repair of damaged varnish
• lubricating of spots that need lubrication and sweeper run for 1 – 2 minutes
• applying anti-corrosive oil on the sweeping brush and chassis.
SERVICE AND SPARE PARTS
• Have your petrol tool serviced by a authorized service using only original replacement parts.
This will ensure that the safety of the petrol tool is maintained.
• Whether you need technical advice, repair, or genuine factory replacement parts, contact the
WERCO authorized service nearest you. Information on service locations, visit www.hecht.cz.
• When ordering spare parts, please quote the part number, this can be found at
www.hecht.cz
860 HECHT MANUAL 2012b.indd 44860 HECHT MANUAL 2012b.indd 44 30.7.2012 17:16:1330.7.2012 17:16:13

made for garden
45 / 80
SK
C
Z
GB
PL
DE
TROUBLESHOOTING
iRisk of injury! Improper repairs can result in the product functioning unsafely. This
endangers yourself and your environment.
Malfunctions are often caused by minor faults. You can easily remedy most of these yourself.
Please consult the following table before contacting authorized service center. You will save
yourself a lot of trouble and possibly money too
Porucha Příčina Opatření
Engine not starting
Engine switch not in “I“
position (ON)
Put the engine switch to “I“
position
Fuel tap closed Open the fuel tap
Non-correct position of
choke lever
Cold engine - put choke lever
into position CHOKE
Hot engine - put the choke
lever into position RUN
Socket plug not fitted Fit the socket plug
Spark plug dirty or faulty Clean or replace the spark plug
Incorrect spark plug
electrodes distance
Set the electrodes distance to
0.7 – 0.8 mm
Fuel tank empty Add fuel
Old fuel Replace old fuel with new one
Engine switching off
after being started
Air filter dirty Clean the air filter
Too big distance of spark
plug electrodes
Set the electrodes distance to
0.7 – 0.8 mm
Spark plug dirty or faulty Clean or replace the spark plug
Engine failing
Socket plug or cable
released
Fix the socket plug firmly on
the spark plug. Fix the spark
plug cable
Fuel screen dirty Clean the fuel screen
Air hole in the tank lid
blocked Change the tank lid
Air filter dirty Clean the air filter
Old fuel Replace old fuel with new one
Engine failing in high
revolutions
Engine with too low
output
Too small distance of
spark plug electrodes
Set the electrodes distance to
0.7 – 0.8 mm
Air filter dirty Clean the air filter
Sweeping brush blocked
by foreign items
Remove foreign items off the
sweeping brush
860 HECHT MANUAL 2012b.indd 45860 HECHT MANUAL 2012b.indd 45 30.7.2012 17:16:1330.7.2012 17:16:13

made for garden
46 / 80
SK
CZ
GB
PL
DE
Engine getting too
much heated
Cooling air system
blocked
Clean the ventilation louvers
and cooling fins
Too little of engine oil Add engine oil
Air filter dirty Clean the air filter
Sweeping brush not
working
Sweeping brush blocked
with foreign items Set the Bowden cable
Bowden cable set too
freely
Remove foreign items and
check whether the sweeping
brush is not damaged
Sweeping depth too
small
Sweeping brush setting
too small Set the sweeping brush
Worn-out brushes Replace the brushes
ENVIRONMENT
Petrol tools that are no longer usable should not be disposed of with household waste
but in an environmentally friendly way. Please recycle where facilities exist. Check with
your local council authority for recycling advice.
Recycling packaging reduces the need for landfill and raw materials. Reuse of
recyclable material decreases pollution in the environment. Please recycle packaging where
facilities exist. Check with your local council authority for recycling advice.
Petrol and oil is hazardous waste. Dispose it in right way. It does not belong to house garbage.
Regarding oil and fuel disposal contact local authorities, service center or your dealer.
DEVICE WARRANTY
• Our warranty period for this device is 24 months.
• For corporate, commercial, municipal and other than private use the warranty period is
reduced for 12 months, according to statutory provisions.
• All products are designed for home use, unless there is another information in the instruction
manual or operation description.
• When using otherwise or in contradiction with instruction manual the claim is not recognized
as legitimate.
• Inappropriate product selection and the fact that the product does not meet your
requirements can not be a reason for complaint.
• Buyer has the right to ask the seller to check the functionality of the product and become
familiar with its operation.
• A prerequisite for receiving warranty claims is that the guidelines for operating, servicing,
cleaning, storage and maintenance were followed.
• Damage caused by natural wear and tear, overloading, improper use or incompetent
interference are excluded from the guarantee.
• Warranty does not cover wear and tear caused by the usual usage and components known
as consumables. (Eg. service charges, filters, blades, V-belts and toothed belts, chains,
carbons, seals, spark plugs ...)
• By the goods sold at a lower price, the warranty does not cover defects for which the lower
860 HECHT MANUAL 2012b.indd 46860 HECHT MANUAL 2012b.indd 46 30.7.2012 17:16:1430.7.2012 17:16:14
Table of contents


