Herth+Buss ELPARTS 51305650 User manual
ELPARTS
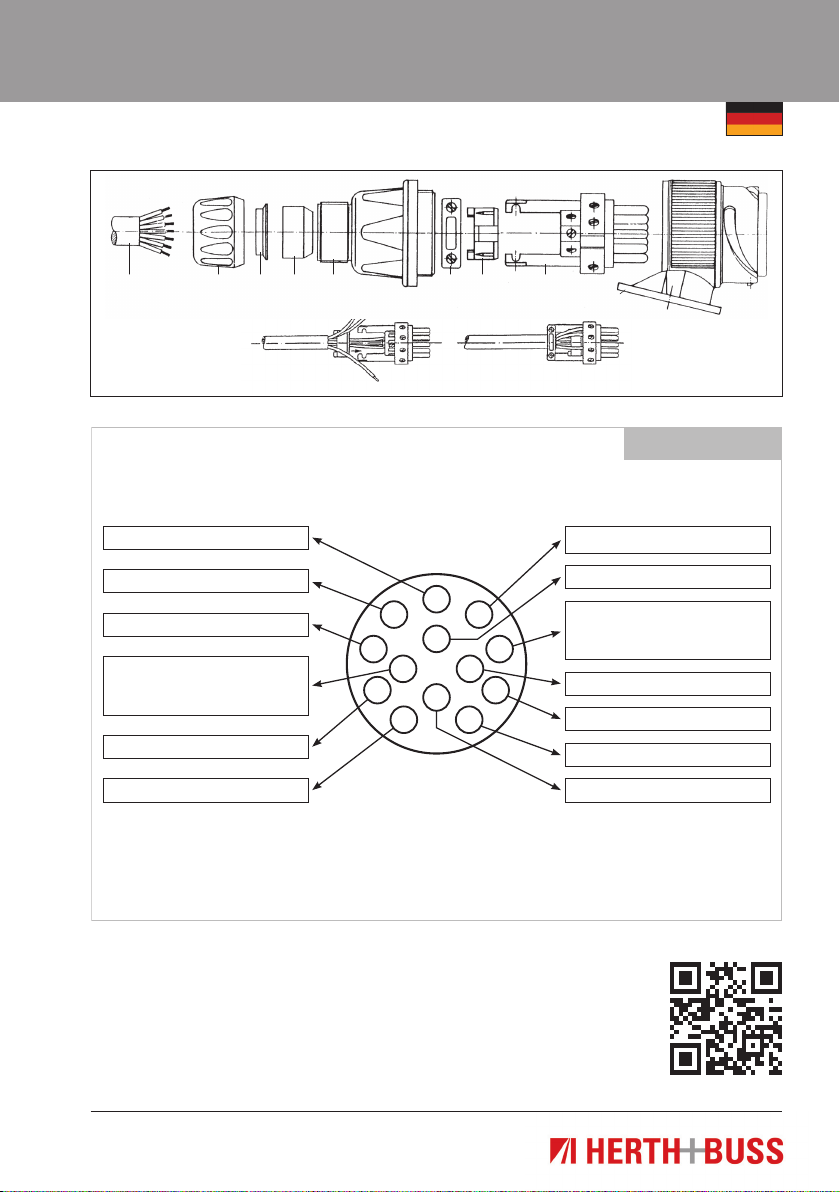
Einbauhinweis
Steckdose

Einbauhinweis 51305650
www.herthundbuss.com 2
Stecker
Pol-Anzahl: 13
Spannung: 24 V
1. Mehradriges Kabel (Teil 1) ca. 30 mm ab-
manteln, Einzeladern 7 mm abisolieren
und verzinnen.
2. Stecker (Teile 2–9) demontieren und Tei-
le 2–5 lagerichtig in der dargestellten Rei-
henfolge (s. Abb.) auf Kabel schieben.
3. Kontaktschrauben für benötigte Pole zum
Einführen der Einzeladern in Stifteinsatz
(Teil 8) lösen.
4. Die 2 Schrauben der Zugentlastung
(Teil 6) lösen. Zugentlastung vom Stiftein-
satz abziehen und über Kabel schieben.
5. Innere Einzeladern Nr. 1–4 in zugehörige
Kontakte stecken und Kontakt-schrauben
festziehen.
6. Isolierring (Teil 7) über die 4 inneren
Einzeladern schieben, auf den Stiftein-
satz stecken und ganz niederdrücken bis
eine spürbare Verrastung erfolgt. (Abbil-
dung A)
7. Äußere Einzeladern Nr. 5–13 in zugehöri-
ge Kontakte stecken und Kontaktschrau-
ben festziehen. Dabei ist unbedingt
darauf zu achten, dass jede Einzelader
vollständig in die Kontaktbohrung einge-
führt wird.
8. Kabel ausrichten, Zugentlastungsschelle
in den Stegen des Stifteinsatzes positio-
nieren und festziehen. (Abbildung B)
9. Den so montierten Stifteinsatz in Körper
für Stifteinsatz (Teil 9) einstecken.
Achtung! Kodierstellung beachten. Kor-
rekter Sitz ist nur in einer Stellung mög-
lich.
10. Anschließend Kappe (Teil 5) mit dem
Körper für Stifteinsatz verschrauben und
mit einem Gabelschlüssel SW 36 festzie-
hen. (Nach „Überdrehung“ ist richtiger
Festsitz erreicht.)
11. Gummitülle (Teil 4) an Kappe (Teil 5) an-
fügen (Gleitmittel empfehlenswert).
12. Überwurfmutter (Teil 2) mit Gleitring
(Teil 3) auf Kappe (Teil 5) fest anschrau-
ben.
Einbauhinweis 51305650
3
Technische Daten:
1 2 3 4
A
5 6
B
7 8
9
8
1
9
10
11
12
3
7
6
5
13
2 4
ähnlich ISO 11446
13-polig, 24 Volt
1) Die Kennzeichenbeleuchtung muss so angeschlossen weden, dass keine Lampe dieser Einrichtung mit den beiden Kontakten
2 und 6 verbunden ist.
2) Der Kontakt wird heute oftmals für andere Funktionen genutzt
3) Die Kontakte 11 und 12 sind nur bei einem ADR-System angeschlossen
Steuerung Anhängerbremse 2)
Bremsleuchten
Rechte Schlussleuchte, Umriss-
leuchte, Begrenzungsleuchte und
Kennzeichenleuchte 1)
Abfüllsicherung 3)
Linke Schlussleuchte, Umriss-
leuchte, Begrenzungsleuchte und
Kennzeichenleuchte 1)
Armaturenschrankbeleuchtung 3)
Nebelschlussleuchte
Fahrtrichtungsanzeiger, rechts
Achsanhebung
Fahrtrichtungsanzeiger, links
Reifenwächter
Masse
Rückfahrleuchte
Belegungsplan

Fitting Instructions 51305650
www.herthundbuss.com 4
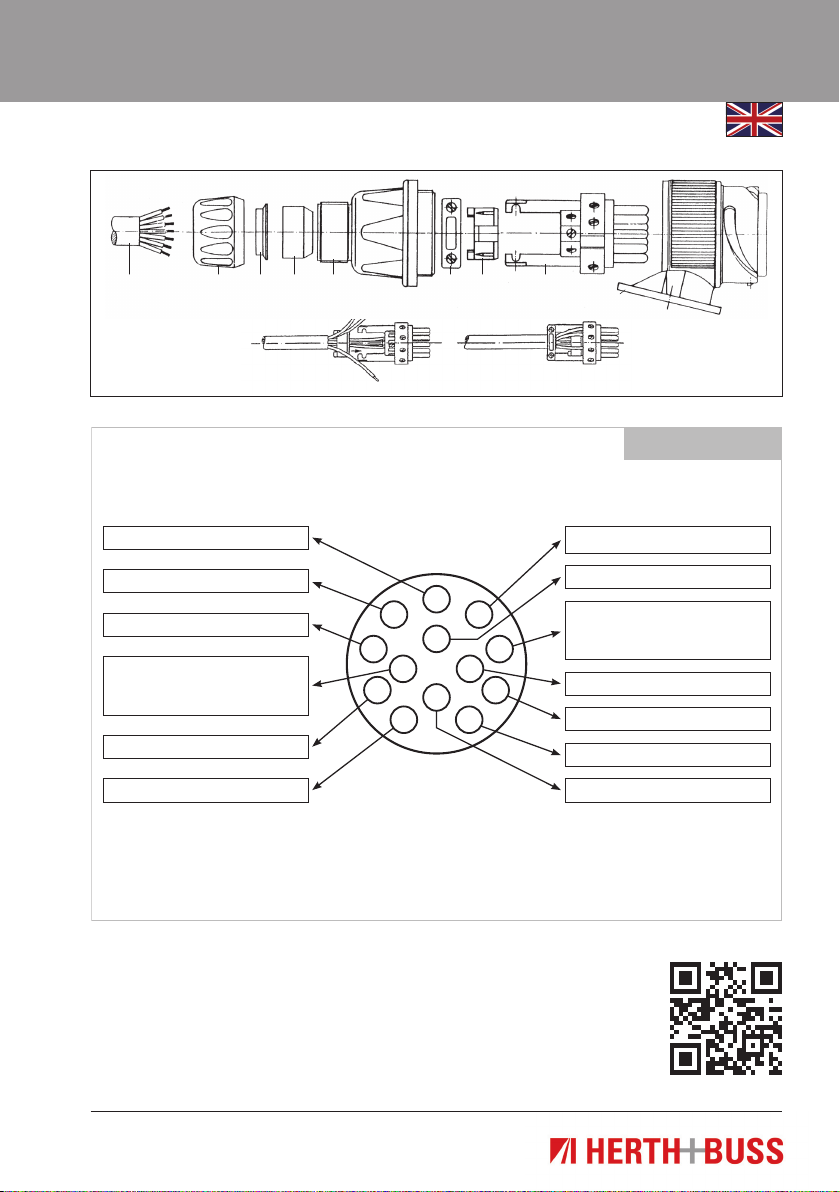
Plug
Number of pins: 13
Voltage: 24 V
1. Dismantle the multicore cable (piece
no. 1) by about 30 mm, strip the insula-
tion of the single cores by 7mm and tin-
plate them.
2. Dismount the plug (pieces nos. 2–9) and
slide the pieces nos. 2–5 on the cables in
the represented order (see. Fig.).
3. Loosen the contact screws for the poles
required in order that the single cores
can be entered into the pin insert (piece
no. 8).
4. Loosen both screws of the strain relief
clip (piece no. 6). Remove the strain relief
clip from the pin insert and slide it over
the cable.
5. Plug the internal single cores nos. 1–4
and tighten them by the contact screws.
6. Slide the insulation ring (piece no. 7)
over the 4 internal single cores, put it on
the pin insert and press it down until a
lock is felt (Fig. A).
7. Plug the external single cores nos. 5–13
into the associated contacts and tighten
them by the contact screws. By all means
it must be ensured that each single core
is entered into the contact bore com-
pletely.
8. Centre the cables, position the strain re-
lief clip in the links of the pin insert and
tighten them (Fig. B).
9. Put the pin insert mounted so far into the
frame (piece no. 9) of the pin insert.
Attention! The coded position must be
observed. Correct fit is possible only with
one position.
10. Then screw the cap (piece no. 5) to the
frame of the pin insert and tighten it us-
ing a SW 36 open-end wrench. (A tight fit
is reached when the screw is overturned).
11. Attach the rubber bushing (piece no. 4) to
the cap (piece no. 5). (A lubricant may be
helpful.)
12. Screw the nut (piece no. 2) with the slide
ring (piece no. 3) tightly to the cap (piece
no. 5)
Fitting Instructions 51305650
5
Technical data:
8
1
9
10
11
12
3
7
6
5
13
2 4
similar to ISO 11446
13-pin, 24 Volt
1) The number plate lighting must be connected so that no lamp from this lighting is connected with the two contacts 2 and 6.
2) The contact is often used for other functions today
3) Contacts 11 and 12 are only connected in an ADR system
Trailer brake control 2)
Stop lights
Right-hand taillight,
position light, marker light
and licence plate light 1)
Overspill protection 3)
Left-hand taillight,
position light, marker light
and licence plate light 1)
Fittings cabinet lighting 3)
Rear fog light
Right-hand direction indicator light
Axle lifting device
Left-hand direction indicator light
Tyre monitors
Common return
Reverse light
Allocation plan
1 2 3 4
A
5 6
B
7 8
9

Consignes d’installation 51305650
www.herthundbuss.com 6
Fiche
Nombres de pôles : 13
Tension : 24 V
1. Dénuder le câble à plusieurs fils (pièce 1)
sur env. 30 mm, dénuder les fils indivi-
duels sur 7 mm et les étamer.
2. Démonter la fiche (pièces 2 à 9) et enfiler
les pièces 2 à 5 en position correcte dans
l’ordre indiqué (voir fig.) sur le câble.
3. Desserrer les vis de contact pour les
pôles requis pour insérer les fils indivi-
duels dans l’insert mâle (pièce 8).
4. Desserrer les 2 vis de la décharge de
traction (pièce 6). Retirer la décharge de
traction de l’insert mâle et la faire passer
par-dessus le câble.
5. Insérer les fils individuels intérieurs n° 1
à 4 dans les contacts correspondants et
les fixer en serrant les vis de contact.
6. Faire passer la bague isolante (pièce 7)
par dessus les 4 fils individuels intéri-
eurs, la faire glisser sur l’insert mâle et
l’enfoncer jusqu’à sentir l’encliquetage.
(illustration A)
7. Insérer les fils individuels extérieurs n° 5
à 13 dans les contacts correspondants et
les fixer en serrant les vis de contact. Il
est important de veiller à ce que chaque
fil individuel soit complètement inséré
dans l’alésage de contact.
8. Aligner les câbles, positionner le collier
de décharge de traction dans les tiges de
l’insert mâle et le serrer. (illustration B)
9. Mettre l’insert mâle monté de cette façon
en place dans le corps de l’insert mâle
(pièce 9).
Attention ! Respecter la position codée.
Une mise en place correcte est possible
uniquement dans une position.
10. Visser ensuite le capuchon (pièce 5) sur
le corps de l’insert mâle et serrer les vis
avec une clé à fourche SW 36. (Après le
« foirage », le serrage adapté est atteint.)
11. Ajuster la gaine en caoutchouc (pièce 4)
sur le capuchon (pièce 5) (l’utilisation
d’un lubrifiant est recommandée).
12. Visser fermement l’écrou de raccord
(pièce 2) avec la bague d’étanchéité
(pièce 3) sur le capuchon (pièce 5).

Consignes d’installation 51305650
7
1 2 3 4
A
5 6
B
7 8
9
Caractéristiques
techniques :
8
1
9
10
11
12
3
7
6
5
13
2 4
similaire à ISO 11446
13 broches/24 volts
1) L'éclairage de plaque doit être raccordée de façon à ce qu’aucune lampe de cette installation ne soit raccordée aux deux
contacts 2 et 6.
2) Le contact est aujourd’hui souvent utilisé pour d’autres fonctions.
3) Les contacts 11 et 12 sont raccordés uniquement dans le cas d’un système ADR.
Commande du frein de la remorque
2)
Feux stop
Feu arrière, feu de gabarit, feu
d’encombrement et feu éclaireur de
plaque côté droit1)
Limiteur de remplissage 3)
Feu arrière, feu de gabarit, feu
d’encombrement et feu éclaireur de
plaque côté gauche1)
Éclairage de l’armoire à connexions
3)
Feu antibrouillard arrière
Clignotant, côté droit
Soulèvement de l’essieu
Clignotant, côté gauche
Indicateur de pression des pneus
Masse
Feu de recul
Schéma d’affectation

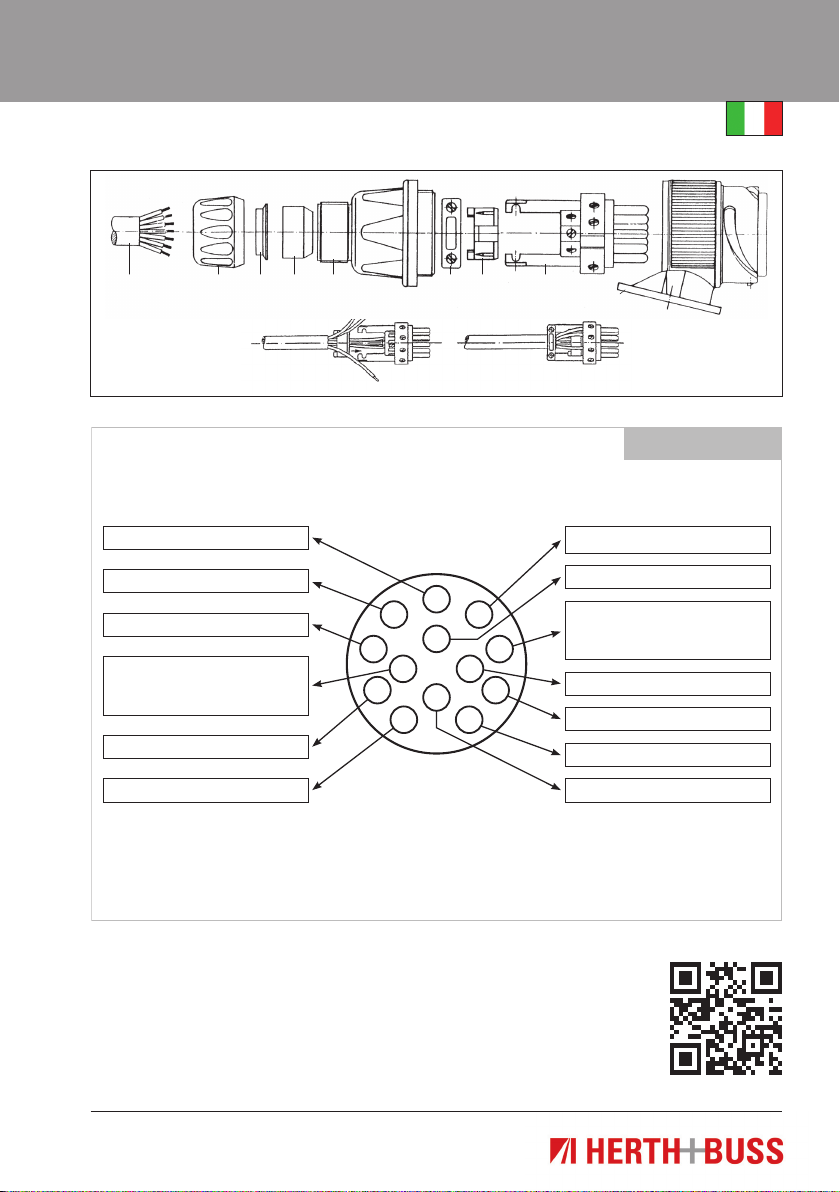
Avvertenza di montaggio 51305650
www.herthundbuss.com 8
Spina
Numero poli: 13
Tensione: 24 V
1. Togliere la guaina dal cavo multipolare
(parte 1) per ca. 30 mm. Spelare i condut-
tori singoli per 7 mm e stagnarli.
2. Smontare la spina (parti 2–9) e spingere
sul cavo le parti 2–5 nella stessa direzio-
ne dell'impianto nella sequenza raffigu-
rata (vedere fig.).
3. Allentare le viti di contatto per i poli ne-
cessari per inserire i conduttori singoli
nell'inserto a spina (parte 8).
4. Allentare le 2 viti dello scarico della tra-
zione (parte 6). Togliere lo scarico della
trazione dall'inserto a spina e spingerlo
sul cavo.
5. Inserire i conduttori singoli interni n. 1–4
nei relativi contatti e serrarli con le viti di
contatto.
6. Spingere l'anello di isolamento (parte 7)
sopra i 4 conduttori singoli interni, inserir-
lo nell'inserto a spina e spingerlo comple-
tamente verso il basso fino a quando non
si blocca in modo percepibile (figura A).
7.
Inserire i conduttori singoli esterni n. 5–13
nei relativi contatti e serrare le viti di con-
tatto. Fare assolutamente attenzione che
ogni conduttore singolo sia inserito com-
pletamente nel foro di contatto.
8. Allineare il cavo, posizionare la fascet-
ta scarico della trazione nei traversini
dell'inserto a spina e serrarla (figura B).
9. Inserire l'inserto a spina montato nel cor-
po per l'inserto a spina (parte 9).
Attenzione! Attenersi alla posizione di
codifica. L'alloggiamento corretto è pos-
sibile solo in una posizione.
10. Successivamente avvitare la calotta (par-
te 5) con il corpo per l'inserto a spina e
serrare con una chiave fissa (apertura 36)
(dopo la "spanatura" si raggiunge l'allog-
giamento fisso corretto).
11.
Aggiungere il passante in gomma (parte 4)
sulla calotta (parte 5) (si consiglia l'uso di
lubrificante).
12. Serrare bene il dado a calotta (parte 2)
con l'anello scorrevole (parte 3) sulla ca-
lotta (parte 5).
Avvertenza di montaggio 51305650
9
1 2 3 4
A
5 6
B
7 8
9
Dati tecniche
8
1
9
10
11
12
3
7
6
5
13
2 4
Simile a ISO 11446
13 poli, 24 volt
1) L'illuminazione targa deve essere collegata in modo che nessuna lampadina del dispositivo sia collegata
ai due contatti 2 e 6.
2) Il contatto viene oggi utilizzato spesso per altre funzioni
3) I contatti 11 e 12 sono collegati solo in un sistema ADR
Comando freno rimorchio 2)
Luci posteriori di stop
Luce di posizione posteriore destra,
luce perimetrale, luci d'ingombro e
luce targa 1)
Valvola di travaso 3)
Luce di posizione posteriore
sinistra, luce perimetrale,
luci d'ingombro e luce targa 1)
Illuminazione armadio di comando 3)
Retronebbia
Indicatore di direzione, destro
Sollevamento asse
Indicatore di direzione, sinistro
Spie controllo pneumatici
Massa
Luce retromarcia
Schema di occupazione

Instrucciones de montaje 51305650
www.herthundbuss.com 10
Conector
N.º de polos: 13
Tensión: 24 V
1. Quitar el aislamiento del cable multifi-
lar (parte 1) aprox. 30 mm, desnudar los
alambres individuales 7 mm y estañar.
2. Desmontar el conector (parte 2–9) y des-
lizar las partes 2–5 en la posición correcta
en el orden indicado (v. Fig.) en el cable.
3. Aflojar los tornillos de contacto necesa-
rios para los polos, para introducir los
alambres individuales en el inserto de
clavijas (parte 8).
4. Aflojar los 2 tornillos de descarga de trac-
ción (parte 6). Quitar la descarga de trac-
ción del inserto de clavijas y deslizar en
el cable.
5. Insertar alambres individuales interiores
n.º 1–4 en el contacto correspondiente y
apretar los tornillos de contacto.
6. Deslizar el anillo aislante (parte 7) en los
4 alambres interiores individuales, inser-
tar en el inserto de clavijas y empujar ha-
cia abajo del todo hasta que se produzca
un encastre audible. (Figura A)
7. Änsertar los alambres individuales
exteriores n. 5–13 en los contactos
correspondientes y apretar los tornillos
de contacto. Al hacerlo es imprescindible
que tenga cuidado para que cada alam-
bre individual se introduzca del todo en
el orificio de contacto.
8. Orientar el cable, posicionar la abrazade-
ra de descarga de tracción en los resaltes
del inserto de clavijas y apretar. (Figura B)
9. Insertar el inserto de clavijas así monta-
do en el cuerpo para el inserto de clavijas
(parte 9).
¡Atención!Tener en cuenta la posición de
codificación. El asiento correcto es posi-
ble solo en una posición.
10.
Por último, enroscar el capuchón (parte 5)
con el cuerpo para el inserto de clavijas y
apretar con una llave fija de entrecaras
36. (Después de "sobregirar" se logra el
asiento fijo correcto.)
11. Unir la boquilla de goma (parte 4) al
capuchón (parte 5) (es aconsejable usar
producto deslizante).
12. Apretar la tuerca de racor (parte 2) con
tubo deslizante (parte 3) en la caperuza
(parte 5).

Instrucciones de montaje 51305650
11
1 2 3 4
A
5 6
B
7 8
9
Datos técnicos
8
1
9
10
11
12
3
7
6
5
13
2 4
similar ISO 11446
13 polos, 24 voltios
1) La iluminación de la matrícula tiene que estar conectada de forma que ninguna bombilla de este dispositivo esté conectada
con los dos contactos 2 y 6.
2) El contacto se utiliza con frecuencia actualmente para otras funciones
3) Los contactos 11 y 12 están conectados solo con un sistema ADR
Control del freno de remolque 2)
Luces de freno
Luz trasera derecha, lámpara de
gálibo, luz de posición y luz de la
matrícula 1)
Fusible de descarga 3)
Luz trasera derecha, lámpara de
gálibo, luz de posición y luz de la
matrícula 1)
Iluminación de los instrumentos 3)
Luz trasera antiniebla
Intermitente, derecho
Elevación de eje
Intermitente, izquierdo
Alarma de pinchazo
Masa
Luz de marcha atrás
Esquema de ocupación

Указание по монтажу 51305650
www.herthundbuss.com 12
Вилка
Количество полюсов: 13
Напряжение: 24 В
1. Удалите оболочку с многожильного ка-
беля (поз. 1) прим. на 30 мм, зачистите
жилы на 7 мм и покройте оловом.
2. Демонтируйте вилку (поз. 2-9) и на-
деньте детали 2–5 в показанной после-
довательности (см. рис.) на кабель.
3. Ослабьте контактные болты необходи-
мых полюсов для ввода жил в штифто-
вую вставку (поз. 8).
4. Ослабьте 2 болта приспособления для
уменьшения растягивающего усилия
(поз. 6). Снимите приспособление для
уменьшения растягивающего усилия с
штифтовой вставки и наденьте на ка-
бель.
5. Вставьте внутренние жилы 1-4 в соот-
ветствующие контакты и затяните кон-
тактные болты.
6. Проведите изоляционное кольцо
(поз. 7) через 4 внутренних жилы, уста-
новите на штифтовую вставку и при-
жмите до ощутимой фиксации. (рису-
нок A)
7. Вставьте внешние жилы 5-13 в соответ-
ствующие контакты и затяните контакт-
ные болты. Учтите, что каждую жилу
необходимо полностью ввести в кон-
тактное отверстие.
8. Выровняйте кабель, расположите хо-
мут приспособления для уменьшения
растягивающего усилия в перемычках
штифтовой вставки и затяните. (рис. B)
9. Вставьте смонтированную таким спо-
собом штифтовую вставку в корпус для
штифтовой вставки (поз. 9).
Внимание! Учитывайте кодировку.
Правильная посадка возможна только
в одном положении.
10. Затем свинтите крышку (поз. 5) с кор-
пусом штифтовой вставки и затяните
вилочным ключом размера 36. (Пра-
вильная фиксация достигается после
«перекручивания».)
11. Присоедините резиновую втулку
(поз. 4) к крышке (поз. 5) (рекомендует-
ся использовать смазку).
12. Прочно привинтите накидную гайку
(поз. 2) с кольцом (поз. 3) к крышке
(поз. 5).
Указание по монтажу 51305650
13
1 2 3 4
A
5 6
B
7 8
9
Технические
характеристики
8
1
9
10
11
12
3
7
6
5
13
2 4
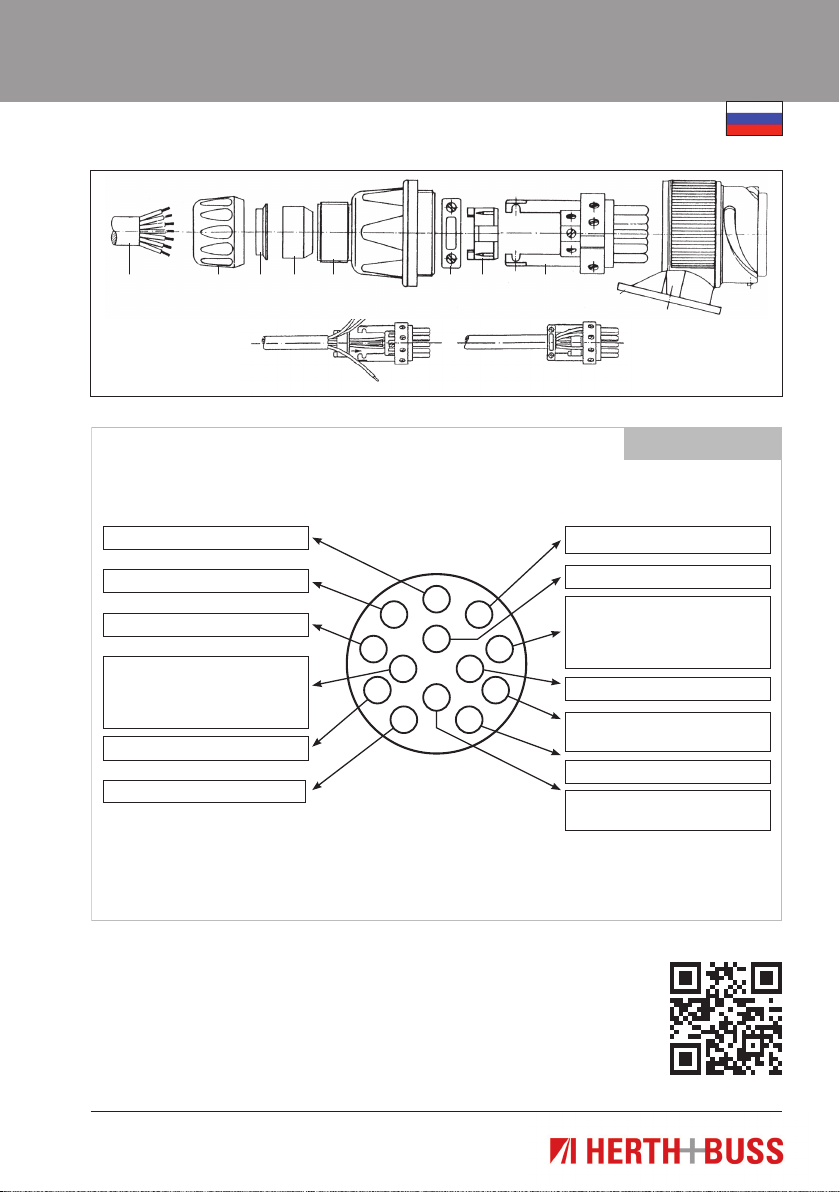
аналогично ISO 11446
13 контактов, 24 В
1)
Подсветка номерного знака должна быть подключена так, чтобы ни одна из ее лампочек не была соединена с обоими
контактами 2 и 6.
2) В настоящее время контакт часто используется для других функций
3) Контакты 11 и 12 подключены только при использовании системы ADR
Управление тормозом прицепа 2)
Фонари сигнала торможения
Правый задний габаритный огонь,
габаритный фонарь, габаритные
огни и фонарь освещения номер-
ного знака 1)
Предохранитель переполнения 3)
Левый задний габаритный огонь,
габаритный фонарь, габаритные
огни и фонарь освещения номер-
ного знака 1)
Подсветка приборного шкафчика 3)
Задний противотуманный фонарь
Индикатор направления движе-
ния, справа
Поднятие моста
Индикатор направления движе-
ния, слева
Датчик контроля шин
Заземление
Фара заднего хода
Схема назначения

Instrukcja montażu 51305650
www.herthundbuss.com 14
Wtyczka
Liczba biegunów: 13
Napięcie: 24 V
1. Zdjąćpłaszczzprzewoduwielożyłowego
(część 1) na długości ok. 30mm, zdjąć
izolacjęzżyłkablowychna7mmi ocy-
nowaćje.
2. Zdemontować wtyczkę (części2–9) i na-
sunąć części 2–5 na przewód zgodnie
zprzedstawionąkolejnością(zob.rys.).
3. Odkręcićśrubystykowepotrzebnychbie-
gunówwceluumieszczeniażyłwewkładce
męskiej(część8).
4. Odkręcić 2 śruby uchwytu kablowego
odciążającego (część6). Zdjąć uchwyt
kablowy odciążający z wkładki męskiej
iwsunąćprzezkabel.
5. Umieścić wewnętrzne żyły nr1–4 w od-
powiednichstykachidokręcićśrubysty-
kowe.
6. Przeprowadzić pierścień izolacyjny
(część7) przez 4 wewnętrzne żyły, nało-
żyćnawkładkęmęskąidocisnąć,ażna-
stąpiodczuwalnezatrzaśnięcie.(rys.A)
7. Umieścić zewnętrzneżyłynr5–13wod-
powiednichstykachidokręcićzapomocą
śrub stykowych. Koniecznie należy przy
tymzwrócićuwagę,bykażdażyłabyław
całości wprowadzona do otworu styko-
wego.
8. Wyrównać przewód, umie-
ścić opaskę kablową odciążają-
cą w przekładkach wkładki męskiej
idocisnąć.(rys.B)
9. Zmontowaną w ten sposób wkładkę
umieścićwkorpusie(część9).
Uwaga! Należy przestrzegać pozycji
oznaczeń. Prawidłowe dopasowanie
możliwe jest tylko wjednej pozycji.
10.Następnie przykręcić pokrywę (część5)
do korpusu wkładki męskiej i dokręcić
przypomocykluczawidełkowegoSW36.
(Prawidłowepasowaniemocnowciskane
osiąganejestpo„przekręceniu”.)
11. Nałożyć tuleję gumową (część4) na po-
krywę(część5)(zalecasięzastosowanie
środkasmarującego).
12.Dokręcićnakrętkęłączącą(część2)zpier-
ścieniem ślizgowym (część3) do pokry-
wy(część5).
Instrukcja montażu 51305650
15
1 2 3 4
A
5 6
B
7 8
9
Dane techniczne:
8
1
9
10
11
12
3
7
6
5
13
2 4
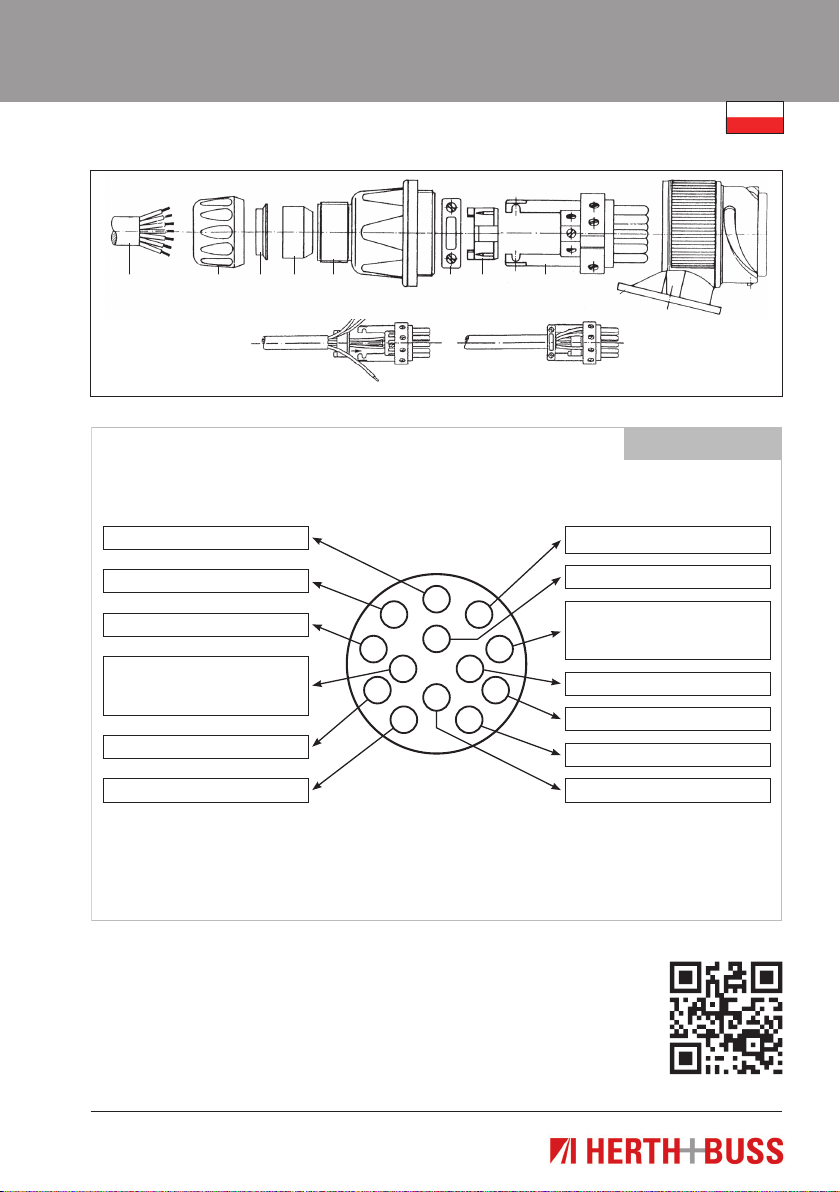
podobnie do ISO 11446
13-biegunowy, 24 V
1) Oświetlenietablicyrejestracyjnejmusibyćpodłączonewtakisposób,byżadnalampaztejinstalacjiniebyłapołączonaze
stykami2i6.
2) Tenstykjestobecnieczęstowykorzystywanydoinnychfunkcji.
3) Styki11i12sąpodłączonetylkowprzypadkusystemuADR.
Sterowaniehamulcemprzyczepy2)
ŚwiatłaSTOP
Prawatylnalampa,światłoobryso-
we,światłapostojoweioświetlenie
tablicyrejestracyjnej1)
Ochronaprzelewowa3)
Lewatylnalampa,światłoobryso-
we,światłapostojoweioświetlenie
tablicyrejestracyjnej1)
Oświetlenietablicyrozdzielczej3)
Tylnalampaprzeciwmgłowa
Kierunkowskaz,prawy
Systempodnoszeniaosi
Kierunkowskaz,lewy
Kontrolkaciśnieniawogumieniu
Masa
Światłocofania
Schemat połączeń

Herth+Buss Fahrzeugteile GmbH & Co. KG
Dieselstraße 2-4 ı DE-63150 Heusenstamm
Herth+Buss France S.A.
270 Rue Col de La Chau ı FR-26300 Chateauneuf sur Isere
Herth+Buss Belgium
Rue de Fisine 9 ı BG-5590 Achene
KOF01474 ı Stand: 03-2013
Table of contents
Languages:
Popular Industrial Electrical manuals by other brands

ARCAIR
ARCAIR N6000 Automatic System Safety and operating instructions

Murata
Murata GRM219R61C225KA88 Series Reference sheet

Murata
Murata GRM0335C1H8R2BA01 Series Reference sheet

Murata
Murata GRM1555C1H7R5CA01 Series Reference sheet

Eaton
Eaton CI-K2 Series Instruction leaflet

nvent
nvent TR-400A instruction sheet


