Hyundai WFB 1025 M7 User manual

WFB 1025 M7
FULL ELECTRONIC
WASHING MACHINE
USER MANUAL
Hyundai Cor oration, Seoul, Korea

THE CONTENTS
SECTION 1:BEFORE USING
• Safety warnings
• Recommendations
SECTION 2:INSTALLATION
• Removal of transportation screws
• Adjustment of feet
• Electrical connection
• Water supply connection
• Water drain connection
SECTION 3:TECHNICAL SPECIFICATIONS
SECTION 4:CONTROL PANEL
• Start/Pause button
• Function indicator lights
• Function buttons
• Spin speed selector
• Program nob
SECTION 5:WASHING YOUR LAUNDRY
• Before washing
• Running the machine
SECTION 6:MAINTENANCE AND CLEANING
• Water inlet filters
• Pump filter
• Detergent drawer
• Siphon plug
• The cabinet
• The drum
• Remove of your machine from lime
SECTION 7: PRACTICAL INFORMATION
SECTION 8:AVOIDING MINOR FAULTS
SECTION 9:AUTOMATIC FAILURE DETECTION SYSTEM
SECTION 10:INTERNATIONAL WASHING SIGNS
1

SECTION 1:BEFORE USING
SAFETY WARNINGS
•
••
•
Do not use a multiple soc et or extension cord.
• Do not insert a plug with damaged or bro en cord into the soc et.
• If the cord is damaged it should be replaced by the manufacturer or
appointed service agent in order to avoid a hazard.
•
••
•
Never remove the plug from the soc et by pulling from the cord
section. Remove the plug by holding.
•
••
•
Do not plug the power supply with wet hands.
•
••
•
Never touch the machine with wet hands or feet.
•
••
•
Never open the detergent drawer while the device is running.
•
••
•
Never force to open the door of the machine while the machine is
running.
•
••
•
Since the machine can reach high temperatures wh
ile running, do not
touch the drain hose and water during draining.
•
••
•
In case of any failure, first unplug the device and close the water tap.
Do not attempt to repair.Please apply to the nearest authorized
service station.
•
••
•
Do not forget that the pac ing material of your machine may be
hazardous for children.
•
••
•
Do not let your children play with the washing machine.
•
••
•
Keep your pet away from your machine.
•
••
•
Your machine should only be used by adults within the information
written in this manual.
•
••
•
Your machine is designed for use in house environment. Warranty
will be invalid if you use it for commercial purposes.
•
••
•
The appliance should not be put on a carpet which can bloc the air
ventilation on the bottom side.
RECOMMENDATIONS
•
••
•
The detergent or softener in contact with air for a long time will dry
and stic to your detergent drawer.To avoid this put your detergent
and softener into the detergent drawer just before washing.
•
••
•
It is recommended that you use pre-washing program for only very
dirty clothes.
•
••
•
Please do not exceed the maximum loading capacity.
2

•
••
•
If you will not use your machine for a long time, unplug your machine,
close the water supply and leave the door open in order to eep the
inside of the machine dry and for prevention from unpleasant odour.
•
••
•
As a result of the quality control procedures, a certain amount of
water may remain in your machine. This is not harmful for your
machine.
SECTION 2: INSTALLATION
You must pay attention to the following issues before using your washing
machine.
REMOVAL OF TRANSPORTATION SCREWS
•
••
•
Transportation screws, which are located at the bac side of the
machine, must be removed before running the machine.
•
••
•
Loosen the screws by rotating countercloc wise by a suitable wrench.
(DIAGRAM-1)
•
••
•
Remove the screws by pulling them.(DIAGRAM-2)
•
••
•
To the holes where the transport screws have been removed, insert
the plastic transport screw taps found in the accessories bag.
(DIAGRAM-3)
•
••
•
The transportation screws, that have been removed from the machine
should be ept in hand for any other transportation necessities.
DIAGRAM-2
DIAGRAM-1 DIAGRAM-3
ADJUSTMENT OF FEET
•
••
•
Do not install your machine on rugs or similar surfaces.
•
••
•
For your machine to wor silently and without any vibration, it should
be settled on a flat, non-slippery and tough ground.
3

•
••
•
You can adjust the balance of your machine from its feet.
•
••
•
First, loosen the plastic adjustment nut.
•
••
•
Adjust by rotating the feet upwards or downwards.
•
••
•
After the balance has been reached, tighten the plastic adjustment
nut again by rotating it upwards.
•
••
•
Never put cartons, wooden bloc s or similar materials under the
machine to balance the irregularities on the level of the ground.
ELECTRICAL CONNECTION
•
••
•
Your washing machine wor s with 220-240V and 50Hz.
•
••
•
A special grounded plug has been attached to the networ cable of
your washing machine. This plug must definitely be inserted to a
grounded soc et with 10 ampere. The fuse flow value of the
electricity line attached to this should also be 10 ampere. If you have
no such soc ets and fuses in your house,
let it be made by a qualified
electrician.
• Our com any will not be res onsible for any damages that may
occur as a result of usage without grounding.
• Insert the machine’s lug to a grounded socket which you can
easly reach.
WATER SUPPLY CONNECTION
• Depending on the features your machine,may be with single water
inlet(cold) or double water inlet (cold/hot). The white headed hose is
for cold water inlet and red headed hose is for hot water inlet (valid
for machines with hot&cold water inlet).
• To prevent lea age from the connection joints, 1 (valid for cold water
inlet) or 2 (valid for machines with hot&cold water inlet) seals are
included in the hose pac ing. Fit these seals at the end of water inlet
hoses on the tap side.
• Connect the white headed hose to the water inlet valve with white
filter and connect the red headed hose to the water inlet valve with
red filter (latter is valid in machines with hot&cold water inlet). Tighten
the plastic parts of the connections with your hand.Please call a
qualified plumber for safer connections.
4

• Water pressure of 1-10 bars from your tap will enable your machine
to wor more efficiently.(1 bar pressure means water flow of more
than 8 liters in 1 minute from a fully opened tap).
• After connections are completed, chec for the non-lea age of the
connection joints by turning on your tap completely.
• Be sure that water inlet hoses are not folded, bro en or crushed.
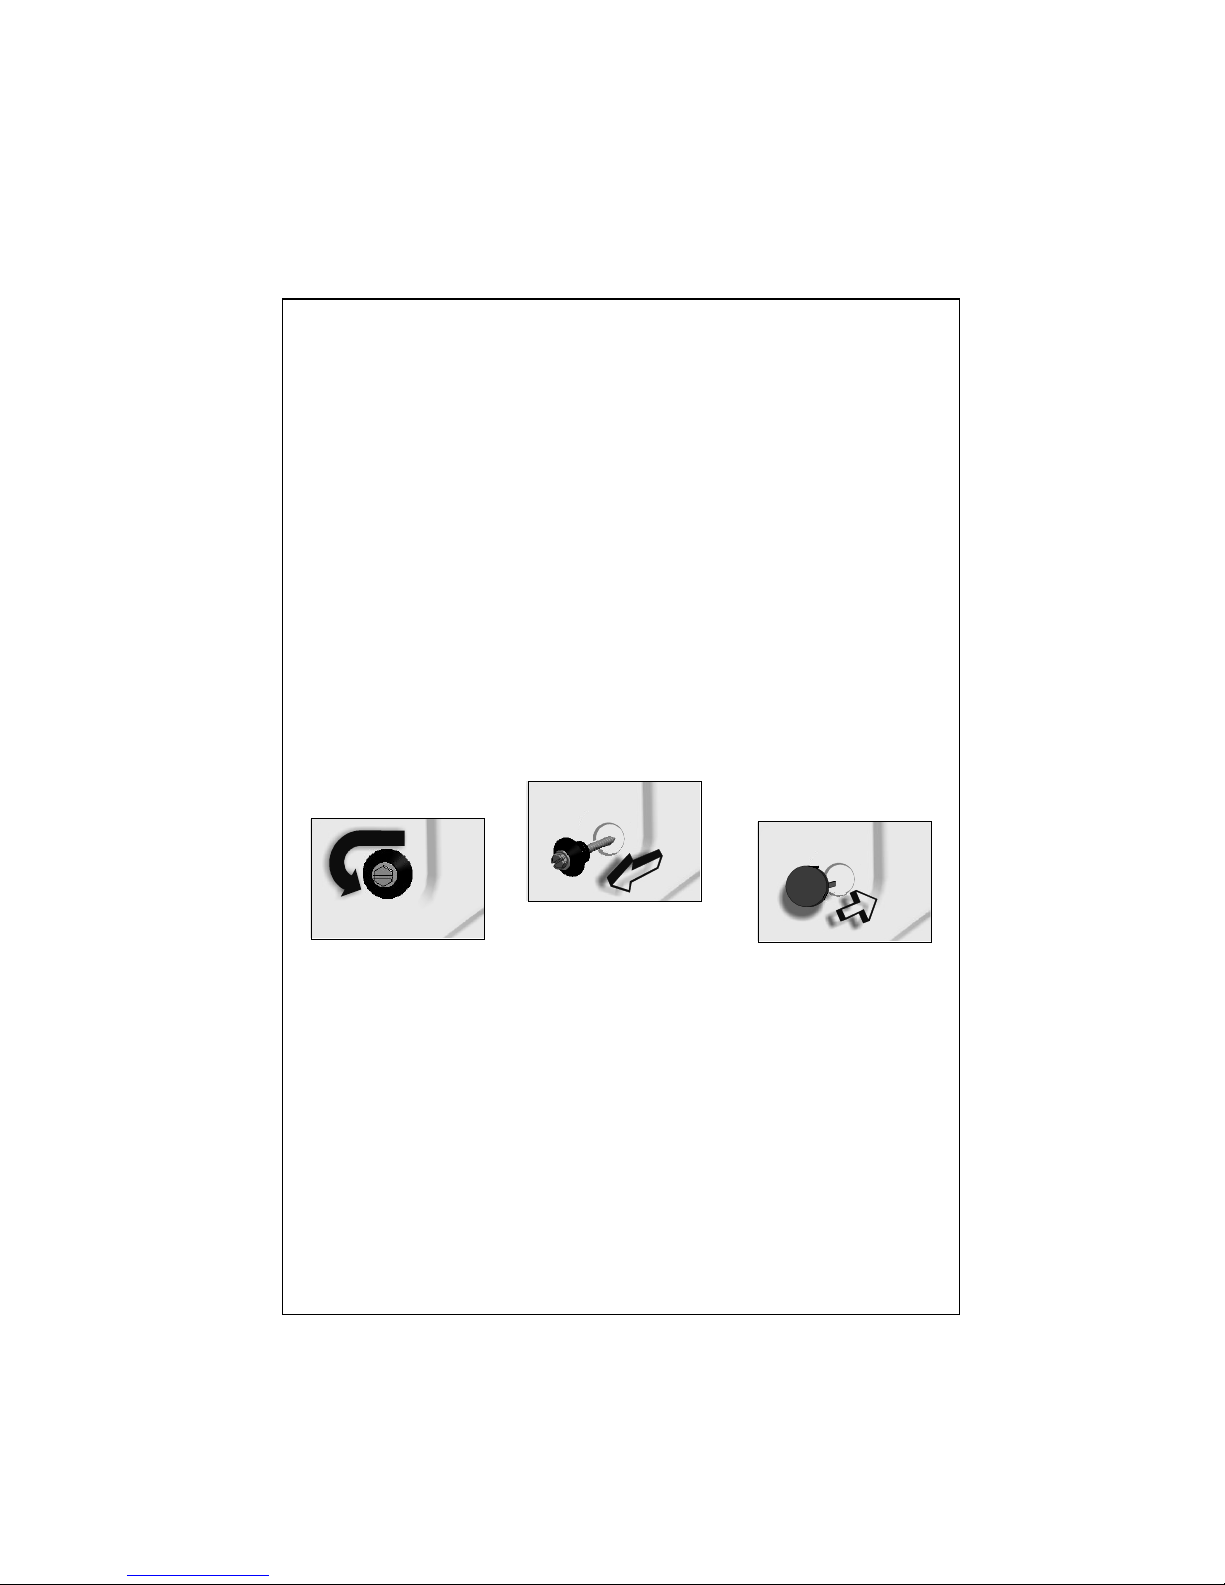
• Mount the water inlet hoses to a 3”/4, geared water tap.
Cold water inlet (White filter valve)
Hot water inlet (Red filter valve)
WATER DRAIN CONNECTION
• Be sure that water inlet hoses are not folded, twisted, crushed or
elongated by stretching.
• Water drain hose should be mounted at a height of minimum 60 cm,
maximum 100 cm from the ground.
• The end of the water drain hose may directly be fitted to the dirty
water outlet hole or a special apparatus mounted on the outlet
brac et of the wash-stand.
• Never attempt to extend the water drain hose by adding extra parts.
5

SECTION 3:TECHNICAL SPECIFICATIONS
WFB825M7/
WFB1025M7
WFB826M7/
WFB1026M7
Maximum dry laundry ca acity (kg) 5 6
Recommended loading (kg) 4,5 5,5
Height (cm) 85 85
Width (cm) 59,6 59,6
De th (cm) 51 54
Maximum s in cycle ( r m ) 800/ 1000 800/ 1000
6

SECTION 4:CONTROL PANEL
A3( 4 buttons, s in s eed selector )
1 2 3 4 5 6
7 8 9
1-Detergent drawer 6-Program nob
2-Start/pause light 7-Start/pause button
3-Function indicator lights 8-Function buttons
4-Spin speed selector 9-Program end light
5-Program ready light
7

START/PAUSE BUTTON
Used to start a selected program or pause during running.
WARNING!
It is required for the program nob to be brought to O(off)
position before selecting the program or changing a continuing
program.
FUNCTION INDICATOR LIGHTS
When the start/pause button or any function button is pressed,the
corresponding light turns on.The light turns off when the function
button or start/pause button is re-pressed, or when the process
the selected function is completed.
The function indicator lights are also used in failure detection system
mentioned in section 9.
FUNCTION BUTTONS
Rinse hold
This function is recommended to be used when the clothes cannot
be ta en immediately after the end of the program.This will
prevent occurrence of wrin les. When this button is pressed, the
last rinsing water is not drained. For the program to continue from
the same point, repress the same button.
8

If you do not want your sensitive clothes to be spinned or you
want them to be spinned sensitively, turn the program knob to O
(off) position. ring the program knob on one of the draining or
spinning programs you desire and press the start/pause
button. If the program you have selected is a drain program, your
machine will draining the water inside.If you have selected a
spinning program, your machine will perform a spinning operation
and then end the program.
Extra rinse
Yo
u can have one more rinsing done in addition to the rinses
which your machine has made in all washing programs by using
this function.
Easy ironing
By using this function, you can ensure your clothes to come out
less wrin led after the washing.
9

WARNING!
Functions vary depending on the model you have chosen.If you
forgot to use additional function and your machine starts to wash
push the additional function button if the indicator light is on.
Additional function will be activated.If the indicator light is not
on,additional function will not be activated.
SPIN SPEED SELECTOR (Valid for A3 models)
By the spin speed selector nob, you can ma e the adjustment of speed for
the process of spinning your clothes.The speed adjustment interval is
between O (No spin) and the maximum spinning speed of your machine.
NOTE: Do the spinning process of your sensitive and delicate clothes in the
most appropriate mode.
PROGRAM KNOB
With the program nob, you can select the program with which you desire to
wash your clothes. You can adjust the program selection process by turning
the program nob in both directions. You must be careful that the adjustment
sign of the program nob is exactly on the program you want to select. When
you bring the program nob to O(off) position, while your machine is running,
your program will remain incomplete.
10

SECTION 5: WASHING YOUR LAUNDRY
• Plug the machine.
• Open the tap water.
First wash cycle
There may be water left inside your machine after factory tests and trials.It is
recommended that the first wash cycle should be made without any laundry
so that carry out this water; pour half a measuring cup of normal allpurpose
detergent into compartment 2 and select cotton program at 90°C.
BEFORE WASHING
Discrimination of your laundry
• Discriminate your clothes according to their types (cotton, synthetic,
sensitive, woolen, etc.),washing temperatures and level of dirtiness.
• Never wash your white and coloured clothes together.
• Since your new coloured clothes may shed dye on the first wash,
wash them separately.
• Be careful that no metal pieces are found on or in the poc ets of your
clothes, remove if there is any.
• Zip and button your clothes.
• Remove the plastic or metal hoo s of the curtains and laces or place
them inside a washing bag and tie.
11

• Pull the textiles li e trousers, nitted fabric,t-shirt and sweat shirt
inside out.
• Wash your small clothes li e soc s and hand erchiefs in a washing
bag.
Wash up tol 90 ˚C Wash up to 60 ˚C Wash up to 30 ˚C Not washable in
washing machine
Placement of the clothes into the machine
• Open the door of your machine.
• Fill your clothes in your machine in a well-spread manner.
• Place each cloth separately.
• When you shut the door of your machine, be careful that no cloth is
jammed between the cover and the gas et.
• Shut the door of your machine tightly otherwise your machine will not
start the washing process.
Filling detergent in the machine
The quantity of the detergent that you will fill in your machine depends on the
following criteria:
• Your detergent consumption will change according to the dirtiness
level of your clothes. For your slightly dirty clothes, do not pre-wash
and put a small amount of detergent in the compartment no.2 of the
detergent drawer.
• For your excessively dirty clothes, select a program with pre-
washing, fill ¼ portion of the detergent you will put in compartment
1 in the detergent drawer and the remaining portion in compartment
2.
• In your machine,use the detergents developed especially for
automatic washing machines. The quantities that will be used for
your clothes are written on the pac ing of the detergents.
• As the hardness of your water increases, the amount of the
detergent to be consumed will also increase.
• As the amount of your clothes increases, the amount of the
detergent to be consumed will also increase.
• Fill your softener in the softener compartment in your detergent
drawer. Do not exceed the MAX level. Otherwise, the softener will
diffuse in the washing water via the siphon.
• The softeners with high density should be diluted with some water
before filling in the drawer. That is because the softener with high
density obstructs the siphon and prevents the flow of the softener.
12

• You can use fluid detergents in all programs without pre-washing.
For this, mount the fluid detergent level plate in the second
compartment of the detergent drawer and arrange the amount of
fluid detergent according to the levels on this plate.
RUNNING THE MACHINE
Program selection and features
Select the program and additional functions appropriate for your clothes from
Table-1.
Start/Pause
By pressing this button, you can start the program you have selected or
pause a running program.
Starting the rogram
• Adjust the program nob to a program you desire.
• The program ready light will be on.
• If you want, you can select one or more additional functions.
• Run the program which you have selected by pressing the
Start/Pause button.
Changing the rogram
If you have selected a program and you do not want if to continue:
• Press the start/pause button.
• Bring the program nob to O(off) status.
• Adjust the program nob to the program you desire.(You can select
the program that you desire from Table-1).
• The program ready light will be on.
• By pressing the start/pause button, run the program which you have
selected.
Cancellation of the Program
If you desire to end a running program early:
• Press the start/pause button.
• Turn the program nob to O(off) status.
• Turn the program nob to “Draining” or “Spinning” programs.
• The program ready light will be on.
• Run the program you have selected by pressing the start/pause
button.
Program ending
• Your machine will automatically stop when the program you have
selected ends.
• The program end light will be on.
• Turn the program nob to O(off) position.
13

• The door will be unloc ed in approximately two minutes after the
program ends.You can open the door by pulling the handle of the
door towards yourself and ta e out your clothes.
• After you unload your clothes leave the door open to dry the interior
of your machine.
• Unplug your machine.
• Close the water tap.
WARNING!
If the power is off end on again after a while on any stage of the washing
program, your machine will continue the program from the point where it was
interrupted. This is not harmful for your machine.
Child lock
Child loc is used in order to protect the washing cycle from the effects of
unwanted button activations during the cycle.Child loc is activated by
pressing the first and third button on the control panel at the same for more
than 3 sec.When child loc is activated,LEDs on the function buttons blin to
indicate that child loc is active.In order to deactive child loc , the same
buttons (1st and 3rd) should be pressed again for more than 3
seconds.Deactivation of child loc is shown by blin ing of LED on Start/Pause
button.
SECTION 6: MAINTENANCE AND CLEANING
• Unplug your machine.
• Close the water tap.
WATER INLET FILTERS
On the tap part of your machine’s water inlet hose and at the ends of water
inlet valves, there are filters to prevent entrance of the dirt and foreign
materials in the water to the machine. If the machine is unable to receive
sufficient water although your water tap is opened, these filters should be
cleaned.
14

MAX DRY LOAD CAPACITY (kg)
PROGRAM DETERGENT
COMPART. WFB 825 M7/
WFB 1025 M7
WFB 826 M7 /
WFB 1026 M7
TYPE OF LAUNDRY EXPLANATIONS
90˚ COTTON 90˚ 2 5 6 Dirty, boil, cotton and linen
textile
COTTON 60˚
(PREWASH) 1+2 5 6 Very dirty, cotton, coloured
and linen textile
60˚ COTTON 60˚ 2 5 6 Dirty, cotton, coloured and
linen textile
40˚ COTTON 40˚ 2 5 6
Slightly dirty, paint to get
out, cotton, coloured and
linen textile
ECO
WASH 2 5 6 Dirty, cotton, coloured and
linen textile
30˚ COTTON 30˚ 2 5 6 Slightly dirty, cotton,
coloured and linen textile
QUICK QUICK WASH 2 2,5 3 Slightly dirty, cotton,
coloured and linen textile
COTTON
COLD 2 5 6
Slightly dirty cotton,
coloured and linen textile.
Washed without heating the
tap water.
MIX MIX
WASH 2 5 6
Dirty or very dirty, stain ,
cotton, coloured and linen
textile
Underwears, sheet, table
cloth, t-shirt, shirt, towel
60˚ SYNTHETIC 60˚ 2 3 3 Dirty, synthetic or synthetic
mixture textile Nylon soc s, blouse
BABY
WASH 2 3 3 Baby laundry All baby laundry
40˚ SYNTHETIC 40˚ 2 3 3 Slightly dirty, synthetic or
synthetic mixture textile Nylon soc s, blouse
TABLE-1
15

MAX DRY LOAD CAPACITY (kg)
PROGRAM DETERGENT
COMPART. WFB 825 M7/
WFB 1025 M7
WFB 826 M7/
WFB 1026 M7
TYPE OF LAUNDRY EXPLANATIONS
SPORT
CLOTHES 2 3 3 Sport clothes All spore clothes and
jeans
SYNTHETIC
COLD 2 3 3
Slightly dirty, synthetic or synthetic
mixture sensitive laundry.Washed
without heating the tap water.
Nylon soc s, blouse
CURTAIN
WASH 1+2 2 2 Tulle and curtain as sensitive laundry Tulle, curtain, diolen,
dralon
30˚ DELICATE 30˚ 2 2 2 Slightly dirty, cotton, coloured, synthetic
or synthetic mixture sensitive laundry
DELICATE
COLD 2 2 2
Very slightly dirty, cold water with to
wash cotton, coloured, synthetic or
synthetic mixture sensitive laundry
Sil mixture, shirt,
blouse, polyester,
poliamid, mixture
textile
HAND
WASH 2 2 2
Slightly dirty, wash in hand cotton,
coloured, synthetic or synthetic mixture
laundry
Hand wash to all
laundry
30˚ WOOL 30˚ 2 2 2 Dirty, hand and machine to wash wool
laundry
WOOL COLD 2 2 2 Very slightly dirty, cold water, hand and
machine to wash wool laundry
All wool laundry
RINSING When you need an additional rinsing to be done to your clothes after the washing process, you can use this program for all
inds of clothes.
SPINNING When you need an additional spinning to be done to your clothes after the washing process, you can use this program for all
inds of clothes.
DRAINING This program is used to drain the dirty water inside after the washing process of your machine. If you want the water inside
your machine to be drained before the program ends, you can use this program.
TABLE-1 CONTINUE
(*) You can use softeners in all programs (except spinning and draining programs) optionally. When you arrange the quantity of the softener, comply with the warning of
the softener producer. Fill your softener in its (softener) compartment of the detergent drawer.
16

• Remove the water inlet hose.
• Remove the filters found on the water inlet valves by using a pincer
and wash thoroughly with a brush.
• Clean the filters of the water inlet hoses located on the tap side by
removing manually together with the seal.
•
After you clean the filters, you can fit them the same way as you have
removed.
PUMP FILTER
The pump filter system elongates the life of your pump, which is used to drai
n
the dirty water. It prevents lint to enter the pump. Cleaning of your pump filter
in every 2-3 months is recommended. To clean your pump filter:
• Open the ic plate’s cover, by pulling the handle.
• Before opening the filter cover,place a cup in front of the filter cover
to prevent flow of the remaining water in the machine.
• Loosen the filter cover by rotating it counter cloc wise and drain the
water.
• Remove the foreign materials from the filter.
• Chec for the rotation of the pump manually.
• After you have cleaned the pump, fit the filter cover by rotating
cloc wise.
• Put the ic plate cover into the place.
• Do not forget that if you do not fit in the filter cover properly, it will
lea water.
17

WARNING!
Danger of being scalded!
Since the water inside the pump maybe hot, wait for it to cool.
DETERGENT DRAWER
Detergents may form a sediment in your detergent drawer or in housing of the
detergent drawe
r in time. To clean the sediment, pull out the detergent drawer
from time to time.To pull out the detergentdrawer:
• Pull the detergent drawer to the end.(DIAGRAM-1)
• Lift the front of the drawer, continue to pull until the drawer is pull
out.(DIAGRAM-2)
• Wash will an old toothbrush and excessiveamount of water.
• Ta e off the leftover detergent avoid to drop into your machine.
•
After drying the detergentdrawer put into the housing in the same manner
you pull out.
DIAGRAM-1 DIAGRAM-2
18

SIPHON PLUG
Pull out the detrgent drawer. Remove the siphon plug and clean the residues
of the softener thoroughly. Fit the cleaned siphon plug in its location. Chec if
it placed properly.
THE CABINET
Clean the exterior surface of the cabinet of your machine with lu ewarm water
and a cleaning substance that will not irritate the cabinet. After rinsing with
clean water, wipe it with a soft and dry cloth.
WARNING!
If the machine is installed in a location where the ambient temperature can fall
below 0 ˚C, do the following when it will not be in use:
• Plug in the machine.
• Close the water tap and pull out the water inlet hose or hoses from
the tap.
• Place the ends of the water drain and water inlet hoses in a cup on
the ground.
• Adjust the program nob to “Draining” program.
• The program ready light will be on.
• Run the program by pressing the start/pause button.
• Unplug your machine when the program is over (program end light is
on).
When you complete these proces, the remaining water inside the machine will
be drained and thus formation of ice in the machine will be prevented. When
you operate your machine again, be sure that the ambient temperature is
above 0 ˚C.
THE DRUM
Do not leave metal parts li e needles, staples or coins inside your machine.
These pieces cause formation of rust stains in the drum. To eliminate these
stains of rust, use a cleaning substance without chlorium and follow the
warnings of the cleaning substance producer. For cleaning of the rust stains,
never use dish-washing wires or similar rough objects.
REMOVE OF LIME FROM YOUR MACHINE
If you arrange the amount of the detergent you use in your machine properly,
there will be no need for lime removal. However, if you desire to apply the
removal procedure, use the lime protectors in the mar et and pay attention to
their warnings.
WARNING!
The lime eliminating substances contain acids and this may cause colour
modifications in your clothes along with an adverse effect on your machine.
19
Table of contents
Other Hyundai Washer manuals