IDEETRON Nexus LoRaWAN User manual

Manual Nexus LoRaWAN
Date: 13-04-2017
Version: 2.0
Title: Manual Nexus LoRaWAN

Pa ina 2 of 20 14-4-2017
Nexus LoRaWAN
1 Revision history
Version Date Changes
1.0 16-02-2017 First release
2.0 13-04-2017 Added OTAA for TTN
1.1 Contact
Ideetron B.V.
Dropsstraat 81
3941 JL Doorn
Nederland
Tel: +31 (0)343 769094
E-mail: info@ideetron.nl
2 Table of contents
1
REVISION HISTORY 2
1.1
Contact 2
2
TABLE OF CONTENTS 2
3
INTRODUCTION 4
4
DEFAULT SETTINGS 4
5
LORAWAN INTRODUCTION 5
6
OPERATION 5
7
COMMANDS 6
7.1
mac data [data] 7
7.2
mac join 7
7.3
mac set/get devaddr 7
7.4
mac set/get nwkskey 7
7.5
mac set/get appskey 8
7.6
mac set/get drrx 8

Pa ina 3 of 20 14-4-2017
Nexus LoRaWAN
7.7
mac set/get drtx 8
7.8
mac set/get chrx 9
7.9
mac set/get chtx 9
7.10
mac set/get pwridx 9
7.11
mac set/get cnf 10
7.12
mac set/get chop 10
7.13
mac set/get class 10
7.14
mac set/get appkey 11
7.15
mac set/get deveui 11
7.16
mac set/get appeui 11
8
EXAMPLES 11
8.1
Activation By Personalisation (ABP) 11
8.2
Over The Air Activation with Semtech (OTAA) 15
8.3
Over The Air Activation with The Things Network (OTAA) 17

Pa ina 4 of 20 14-4-2017
Nexus LoRaWAN
3 Introduction
This document describes the commando’s that are implemented in the Nexus_LoRaWAN sketch for
the Nexus board from Ideetron. The sketch is desi ned for test and demonstration purposes. If you
want to build an autonomous LoRaWAN mote, without a command structure you can use most of
this sketch also.
Find it here: https:// ithub.com/Ideetron/Nexus_LoRaWAN
4 Default settings
The followin settin s are the default settin on start-up of the Nexus board.
Radio connection
Modulation LoRa
Channel Tx 868.100 MHz
Datarate Tx SF12 BW 125 kHz
Channel Rx 869.525 MHz
Datarate Rx SF9 BW 125 kHz
Device Address DS2401 unique number
Network session key 2B7E151628AED2A6ABF7158809CF4F3C
Application session key 2B7E151628AED2A6ABF7158809CF4F3C
Mote Class A
Confirm No
Channel Hoppin No
DevEUI 00 00 00 00 00 00 00 00
AppEUI 00 00 00 00 00 00 00 00
Application key 2B7E151628AED2A6ABF7158809CF4F3C
Table 1: Default settings
See chapter 7 if you want to chan e these settin s.
Serial co unication
Datarate 9600 bps
Number of data bits 8
Parity None
Number of stop bits 1
Table 2: Serial co unication specifications
Pa ina 5 of 20 14-4-2017
Nexus LoRaWAN
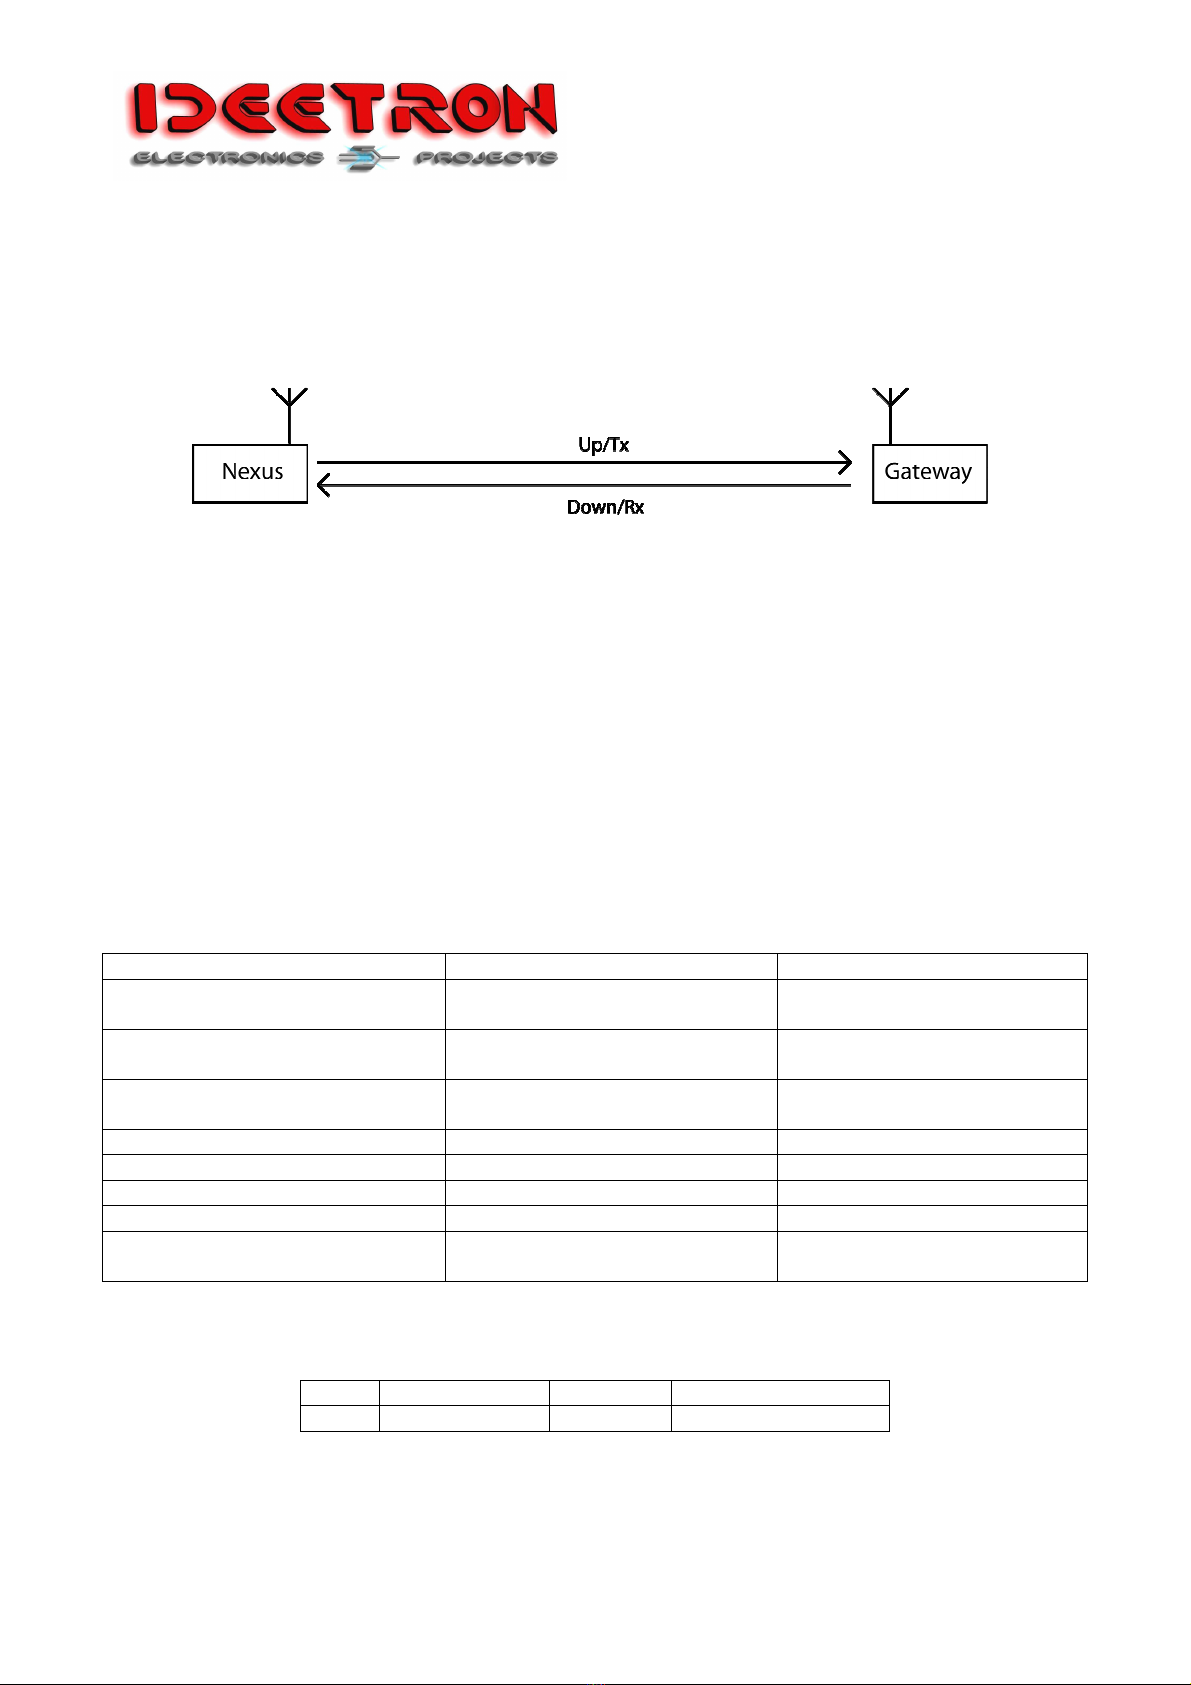
5 LoRaWAN introduction
The LoRaWAN communication takes place in two directions, up (from Nexus to ateway) and
down (from ateway to Nexus). This sketch can transmit messa es in the up direction and receive
messa es in the down direction.
Figure 1: LoRaWAN co unication
The channel and datarate for the both directions can be set.
Also the class of the Nexus board can be set to type A or C.
A type A mote can only receive messa es from the ateway in a specific timeslot after sendin a
messa e.
A type C mote can receive a messa e from the ateway any time, except when the mote is
transmittin a messa e.
6 Operation
If the Nexus receives a messa e it will check if the CRC and MIC is ok and if it is a messa e for this
device. Then it will be broken down in the different fields. The Nexus will send the followin
information usin to serial communication:
Message Value Description
CRC OK/NOK If the CRC of the received
radio messa e is ok.
MIC OK/NOK If the MIC calculation of the
LoRaWAN packa e is ok.
Address OK/NOK If the packa e contains the
address for this mote
MAC Header See Table 5 LoRaWAN MAC header
Sensor 4 bytes in Hex Device address
Frame counter 2 bytes in Hex Number of frame
Frame control 00 or 20 LoRaWAN Fctrl field
Data Bytes in Hex Data send from mote or
ateway
Table 3: Message infor ation
The MAC Header specifies the messa e type and the version of the LoRaWAN protocol used.
Bits 7 – 5 4 – 2 1 – 0
Field Messa e type Reserved LoRaWAN protocol
Table 4: MAC Header fields
The LoRaWAN protocol field will always be 00.
The reserved field bits will always be 0.

Pa ina 6 of 20 14-4-2017
Nexus LoRaWAN
The messa e type filed can have several values, in Table 5 the different values for the MAC header
are listed.
MAC Header value Hex Message type
60 Unconfirmed data down
A0 Confirmed data down
Table 5: Message types
The frame control field consists of different bits, the most important is bit 5 containin the ACK.
Most of the times the other bits will be 0, so the frame control field can have the followin values:
00 – No ACK
20 – ACK
For a full description of the frame control field see the LoRaWAN specification.
When the Nexus receives a Join Accept messa e after sendin a Join request the followin data
will be shown:
-Device address
-Network session key
-Application session key
7 Commands
This chapter describes the commands that can be used to communicate with the Nexus usin a
terminal pro ram. All commands and data is sent as ASCII characters. All data is one or more bytes
of hexadecimal numbers represented by 2 ASCII characters. So all data exist of 2 ASCII characters
that can be 0 – F. All other characters will be set to 0.
The followin command structure is used
Co and type Para eter 1 Para eter 2 Value Description
mac
data Maximum of 51 bytes Send LoRaWAN
messa e with this data
join - Send a Join Request
messa e
et/set
devaddr 4 bytes The the device address
nwkskey 16 bytes The network session key
appskey 16 bytes The application session
key
drrx 1 byte Transmit datarate
drtx 1 byte Receive datarate
chrx 1 byte Transmit channel
chtx 1 byte Receive channel
pwridx 1 byte Power index
cnf 1 byte Confirmation
chhop 1 byte Channel hoppin
class 1 byte Mote class
appkey 16 bytes Application key
deveui 8 bytes Device EUI
appeui 8 bytes Application EUI
Table 6: Co and structure

Pa ina 7 of 20 14-4-2017
Nexus LoRaWAN
The command type, parameters and values are separated by a space.
7.1 mac data [data]
This command is used to send a LoRaWAN data messa e containin the data that is included in
this command. The maximum number of bytes that a LoRaWAN messa e can contain is 51 bytes.
Example: mac data 00FF
The answer form the Nexus on this command will be:
Data: [data]
7.2 mac join
This command is used to send a LoRaWAN join request messa e. The join request messa e will used
the followin parameters:
-appkey
-deveui
-appeui
The join request messa e will use the set Datarate and Channel for transmit. And it will listen on the
set receive Datarate and Channel for a Join accept messa e.
When a join accept messa e is received it will show the followin
DevAddr: [device addresss]
NwkSKey: [network session key]
AppSKey: [application session key]
7.3 mac set/get devaddr
This command is used to read or write the device address.
To read the device address sent: mac et devaddr
To write the device address sent: mac set devaddr [device address]
[device address] is 4 bytes lon : 00112233
The answer form the nexus is:
DevAddr: [device address]
7.4 mac set/get nwkskey
This command is used to read or write the network session key.
To read the key sent: mac et nwkskey
To write the key sent: mac set nwkskey [key]
[key] is 16 bytes lon : 00112233445566778899AABBCCDDEEFF
The answer form the nexus is:
NwkSKey: [key]

Pa ina 8 of 20 14-4-2017
Nexus LoRaWAN
7.5 mac set/get appskey
This command is used to read or write the application session key.
To read the key sent: mac et appskey
To write the key sent: mac set appskey [key]
[key] is 16 bytes lon : 00112233445566778899AABBCCDDEEFF
The answer form the nexus is:
AppSKey: [key]
7.6 mac set/get drrx
This command is used to read or write the receive datarate.
To read the datarate sent: mac et drrx
To write the datarate sent: mac set drrx [datarate]
[datarate] can have to values shown in Table 7.
[datarate]
Description
00 SF 12 BW 125 kHz
01 SF 11 BW 125 kHz
02 SF10 BW 125 kHz
03 SF9 BW 125 kHz
04 SF8 BW 125 kHz
05 SF7 BW 125 kHz
06 SF7 BW 250 kHz
Table 7: Datarate values
The answer form the nexus is:
Datarate Rx: [Datarate description]
7.7 mac set/get drtx
This command is used to read or write the transmit datarate.
To read the datarate sent: mac et drtx
To write the datarate sent: mac set drtx [datarate]
[datarate] can have to values shown in Table 7.
The answer form the nexus is:
Datarate Tx: [Datarate description]

Pa ina 9 of 20 14-4-2017
Nexus LoRaWAN
7.8 mac set/get chrx
This command is used to read or write the receive channel.
To read the channel sent: mac et chrx
To write the channel sent: mac set chrx [channel]
[channel] can have to values shown in Table 8.
The answer form the nexus is:
Channel Rx: [channel description]
Value Channel (MHz)
00 868.100
01 868.300
02 868.500
03 867.100
04 867.300
05 867.500
06 867.700
07 867.900
10 869.525
Table 8: Channel values
7.9 mac set/get chtx
This command is used to read or write the transmit channel.
To read the channel sent: mac et chtx
To write the channel sent: mac set chtx [channel]
[channel] can have to values shown in Table 8.
The answer form the nexus is:
Channel Tx: [channel description]
7.10 mac set/get pwridx
This command is used to set the transmit power. A hi her transmit power will use more ener y but
you can communicate over reater distance.
To read the transmit power sent: mac et pwridx
To write the transmit power sent: mac set pwridx [power]
[power] can have a value from 00 to 0F, where 00 is the lowest power and 0F the hi hest power.
The answer form the nexus is:
Power: [power]

Pa ina 10 of 20 14-4-2017
Nexus LoRaWAN
7.11 mac set/get cnf
With this command you can set the messa e type of the LoRaWAN messa e. It can be set to a
confirmed or unconfirmed messa e. This determines if you request an acknowled e from the
LoRaWAN service.
To read confirmation sent: mac et cnf
To write confirmation sent: mac set cnf [Confirm]
[Confirm] can have the followin values:
00 Unconfirmed messa e type
01 Confirmed messa e type
The answer form the nexus is:
Confirm: [Confirm]
7.12 mac set/get chop
With this command you can chose if channel hoppin is activated. When channel hoppin is
activated every data messa e will be send on the next channel. If the last messa e was sent on
channel 07 it will o back to channel 00. See Table 8 for the different channels
To read channel hoppin sent: mac et chhop
To write channel hoppin sent: mac set chhop [Channel hoppin ]
[Channel hoppin ] can have the followin values:
00 No channel hoppin
01 Channel hoppin active
The answer form the nexus is:
Channel Hoppin : [Channel hoppin ]
7.13 mac set/get class
With this command you can set the device class for the Nexus. This sketch supports type A and C.
A type A device will be inactive until you sent a messa e. After sendin a messa e the type A
device will switch on the receiver in the listen for a possible messa e in receive slot 2.
In a type C device the receiver is always switched on, and can receive a messa e any time.
To read the class sent: mac et class
To write the class sent: mac set class [Class]
[Class] can have the followin values:
00 Class A
01 Class C
The answer form the nexus is:
Mote Class: A/C

Pa ina 11 of 20 14-4-2017
Nexus LoRaWAN
7.14 mac set/get appkey
This command is used to read or write the application key.
To read the key sent: mac et appkey
To write the key sent: mac set appkey [key]
[key] is 16 bytes lon : 00112233445566778899AABBCCDDEEFF
The answer form the nexus is:
AppKey: [key]
7.15 mac set/get deveui
This command is used to read or write the device EUI.
To read the EUI sent: mac et deveui
To write the EUI sent: mac set deveui [EUI]
[EUI] is 8 bytes lon : 0011223344556677
The answer form the nexus is:
DevEUI: [EUI]
7.16 mac set/get appeui
This command is used to read or write the application EUI.
To read the EUI sent: mac et appeui
To write the EUI sent: mac set appeui [EUI]
[EUI] is 8 bytes lon : 0011223344556677
The answer form the nexus is:
AppEUI: [EUI]
8 Examples
The examples written in this chapter are usin the Semtech development site: iot.semtech.com and
the site of The Thin Network: https://account.thethin snetwork.or /users/lo in.
This site is free and can be fully used after re istration.
The terminal pro ram used is RealTerm, that can be downloaded here:
https://sourcefor e.net/projects/realterm/files/Realterm/2.0.0.70/
8.1 Activation By Personalisation (ABP)
Activation by personalisation means that the followin parameters are set in the mote:
-DevAddr
-NwkSKey
-AppSKey
To add a mote whit ABP to semtech follow these steps:

Pa ina 12 of 20 14-4-2017
Nexus LoRaWAN
1. Si n in or create an account on iot.semtech.com
2. On the left side o to applications
3. Then click the number behind the defaultApp.
Figure 2: Selecting default app
4. To add the device you need to know the NwkSKey, AppSKey and DevAddr. For this
example we use the default key’s
NwkSkey: 2b7e151628aed2a6abf7158809cf4f3c
AppSkey: 2b7e151628aed2a6abf7158809cf4f3c
5. To et the Device addres from the nexus you need to connected the nexus and start
realterm.
6. Then oto the tab port and make the followin settin s:
Set baudrate to 9600
Select the ri ht port
To le the open button
Figure 3: Opening a port with realter

Pa ina 13 of 20 14-4-2017
Nexus LoRaWAN
7. Then oto the tab Send.
8. Type the command: “mac et devaddr” in the field
9. Hit the Send ASCII button
Figure 4: Sending co and
10. Now you have all the information you need
11. Go back to the Semtech site and fill in the information into the correct fields
12. Then hit the add button
Figure 5: Add to se tech
13. Your mote is now added to the list below, find it and click on the number
14. Now o back to Realterm and send a messa e by usin the mac data command

Pa ina 14 of 20 14-4-2017
Nexus LoRaWAN
Figure 6: Send data co and
15. Now o back to the semtech site and check if the messa e has arrived. This may take some
time +/- 1 min
16. To see the data you can click “View data from application defaultApp”
17. To see the radio settin s for a messa e click “View transmission performance”
Figure 7: View essage
Figure 8: Received data
Figure 9: Trans ission prefor ance

Pa ina 15 of 20 14-4-2017
Nexus LoRaWAN
8.2 Over The Air Activation with Semtech (OTAA)
Over the Air Activation means that the followin parameters are set in the mote:
-AppKey
-DevEUI
-AppEUI
Durin the activation the mote will receive this session data:
-DevAddr
-NwkSkey
-AppSkey
Use the followin settin s to join
Description Setting Value
Transmit channel chtx 00
Transmit datarate drtx 00 – 02
Receive channel chrx 10
Receive datarate drrx 03
Table 9: Channel and datarate settings Se tech
To add a mote whit OTAA to semtech follow these steps:
1. Si n in or create an account on iot.semtech.com
2. On the left side o to applications
3. Now add a new application to fill in the fields and press add
Figure 10: Create new application
4. Now click the number behind the new application
5. Now add an over the air mote. The DevEUI and AppEUI are enerated with the website
www.random.or
Figure 11: Add a ote
6. Now start up realterm term and set the parameters
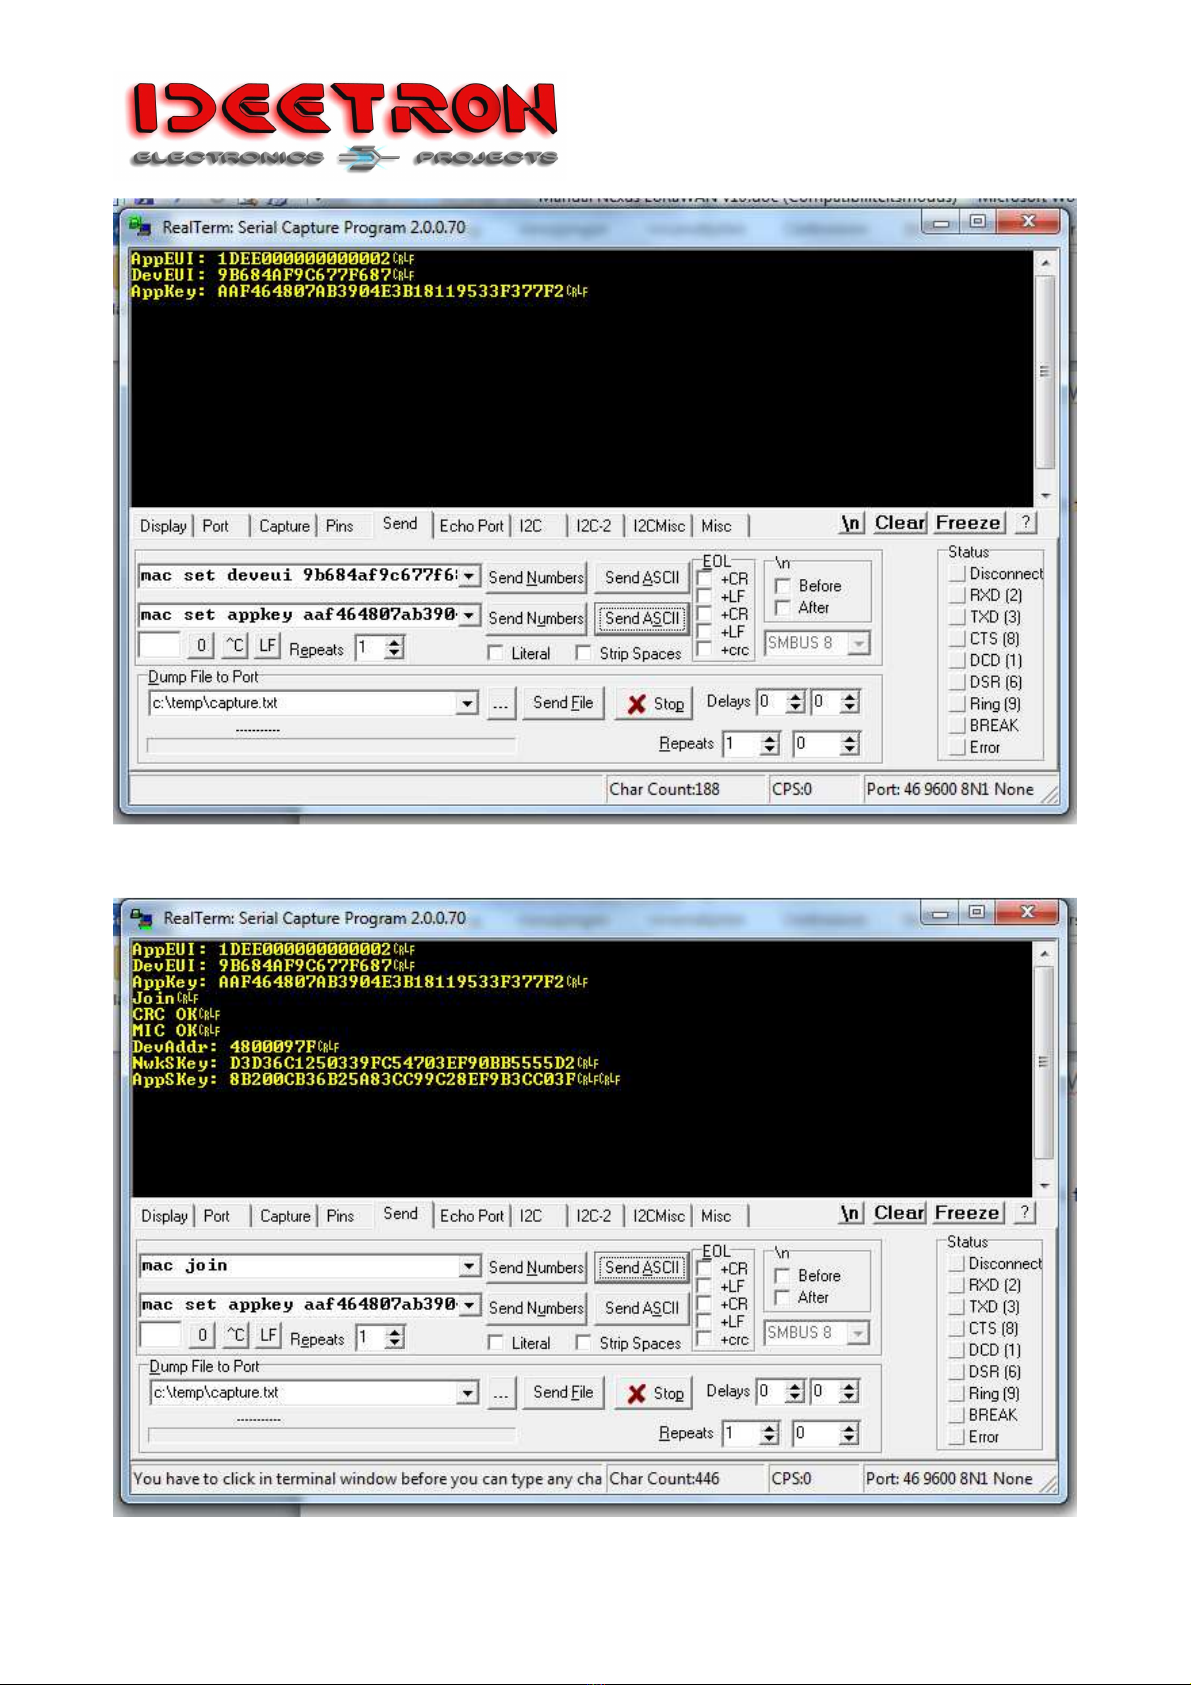
Pa ina 16 of 20 14-4-2017
Nexus LoRaWAN
Figure 12: Set para eters
7. Send the join command and wait for a reply
Figure 12: OTAA response

Pa ina 17 of 20 14-4-2017
Nexus LoRaWAN
8. Now the mote is joined, try to send some data with the data command
9. Check the received data in semtech
8.3 Over The Air Activation with The Things Network (OTAA)
Over the Air Activation means that the followin parameters are set in the mote:
-AppKey
-DevEUI
-AppEUI
Durin the activation the mote will receive this session data:
-DevAddr
-NwkSkey
-AppSkey
Use the followin settin s to join:
Description Setting Value
Transmit channel chtx 00
Transmit datarate drtx 00 – 02
Receive channel chrx 10
Receive datarate drrx 00
Table 10: Channel and datarate settings TTN
To add a mote whit OTAA to TTN follow these steps:
1. Sin in or create an account on the TTN site.
2. Goto Applications.
3. Click “add application”.
Figure 13: Create new application
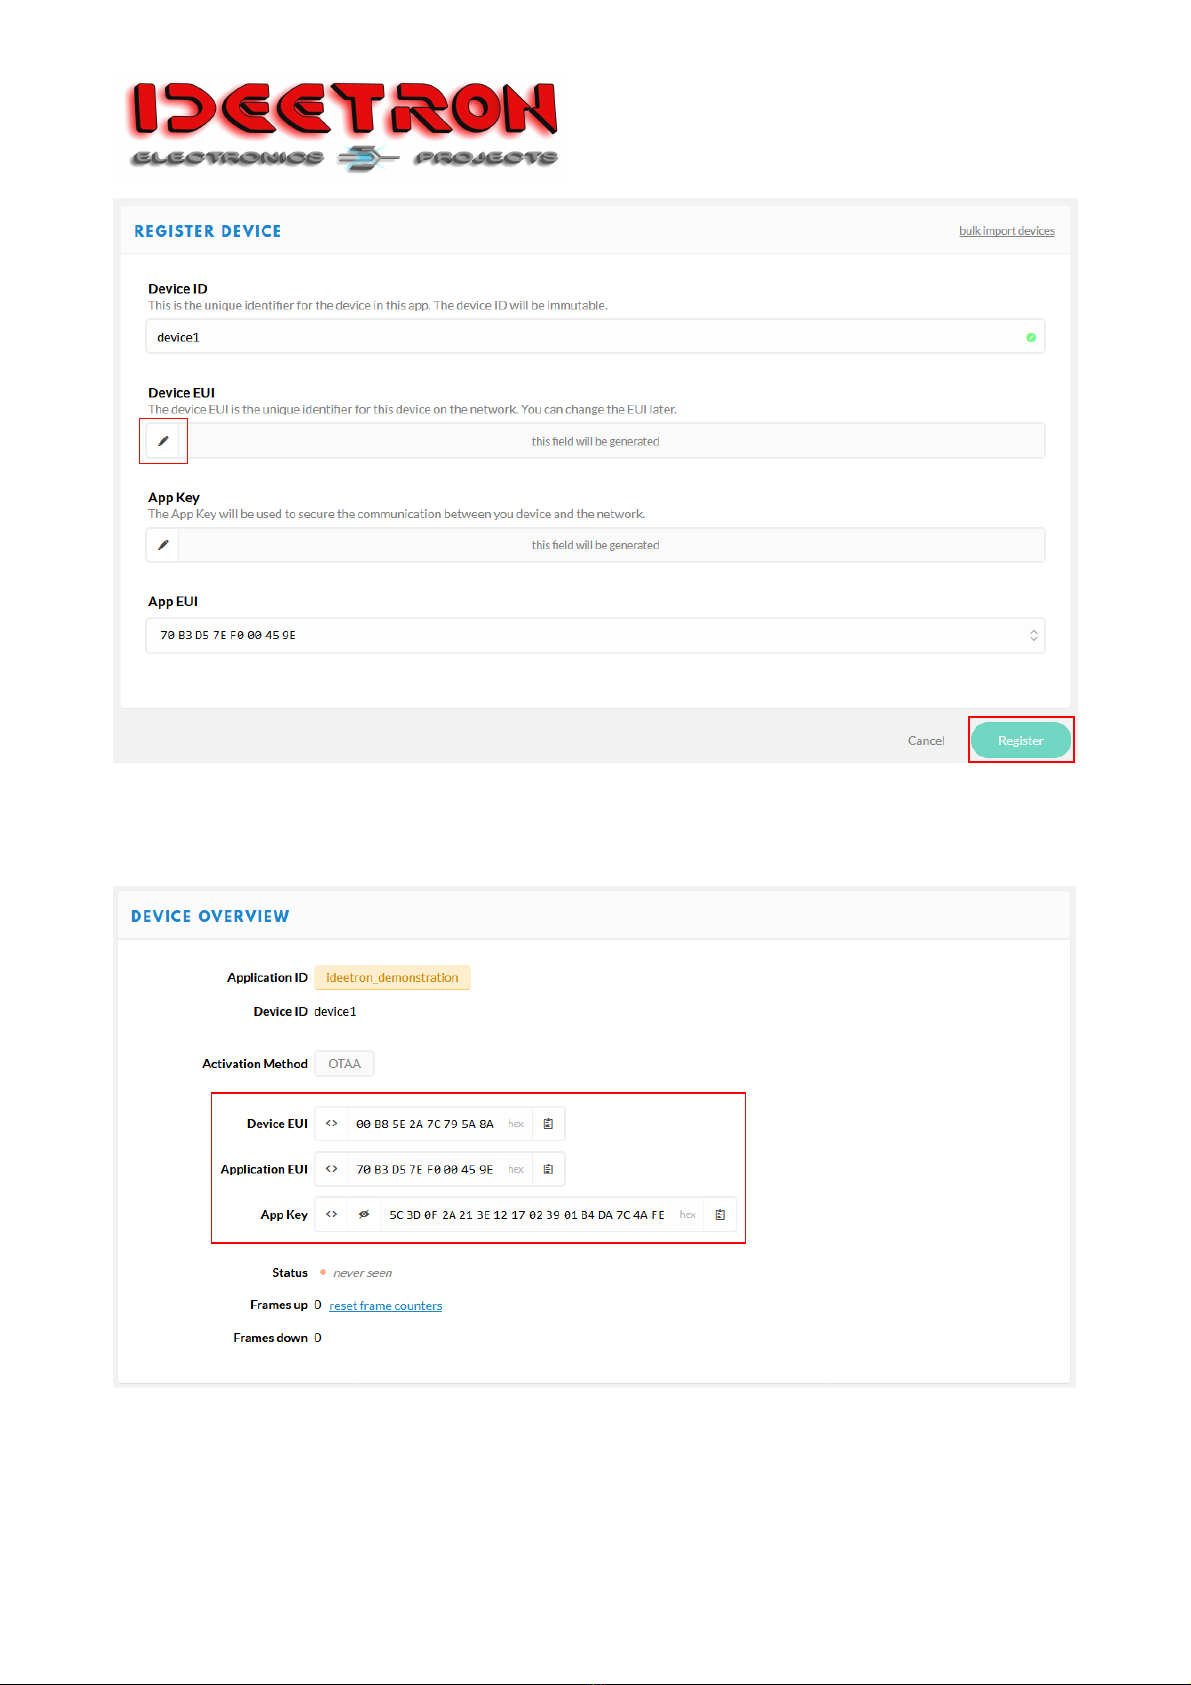
4. Fill in the fields and press “Add application”.
5. After re isterin the application you will see a screen with all the information re ardin the
application. Now click “re ister device”.
Figure 14: Register a device
6. Fill in the Device ID. Set the Device EUI to be enerated.
Pa ina 18 of 20 14-4-2017
Nexus LoRaWAN
Figure 15: Device for
7. After re isterin the device, you will see an overview of the device settin s. You will see the
Device EUI, Application EUI and Application Key.
Figure 16: Device overview
Pa ina 19 of 20 14-4-2017
Nexus LoRaWAN
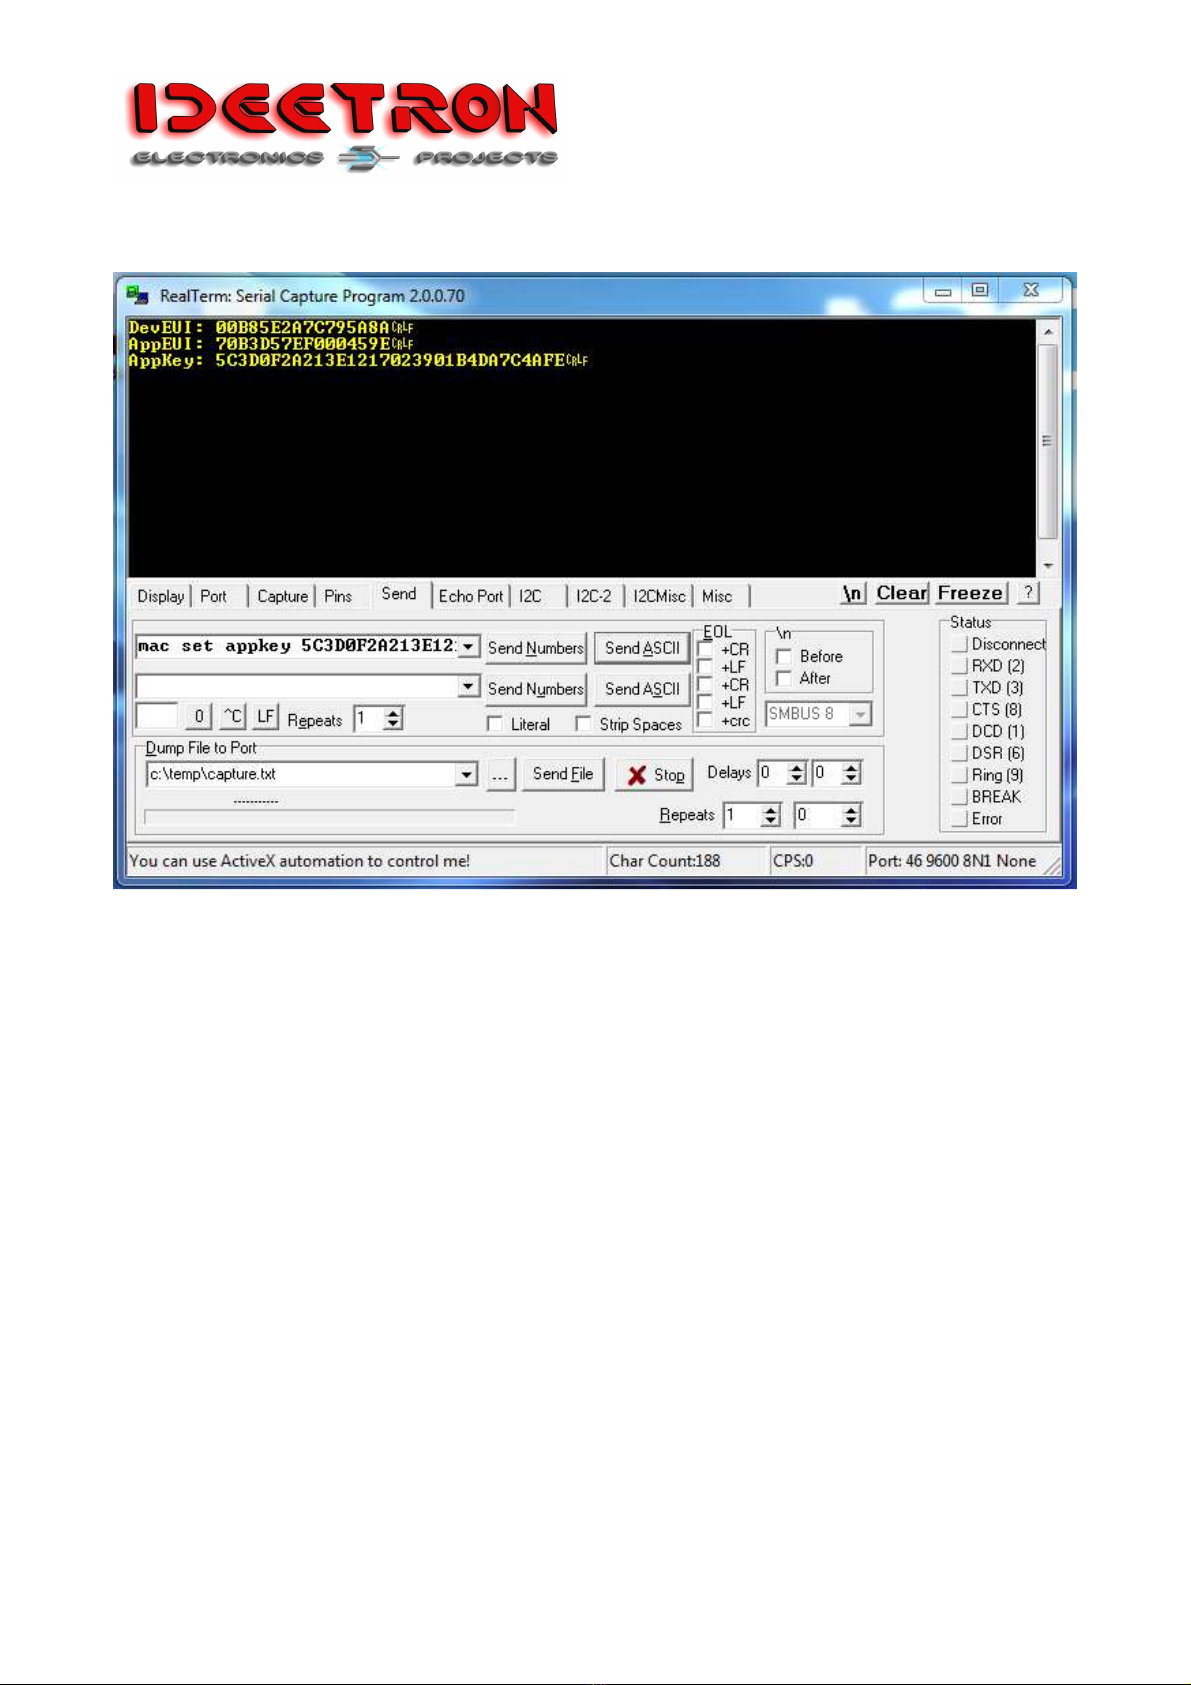
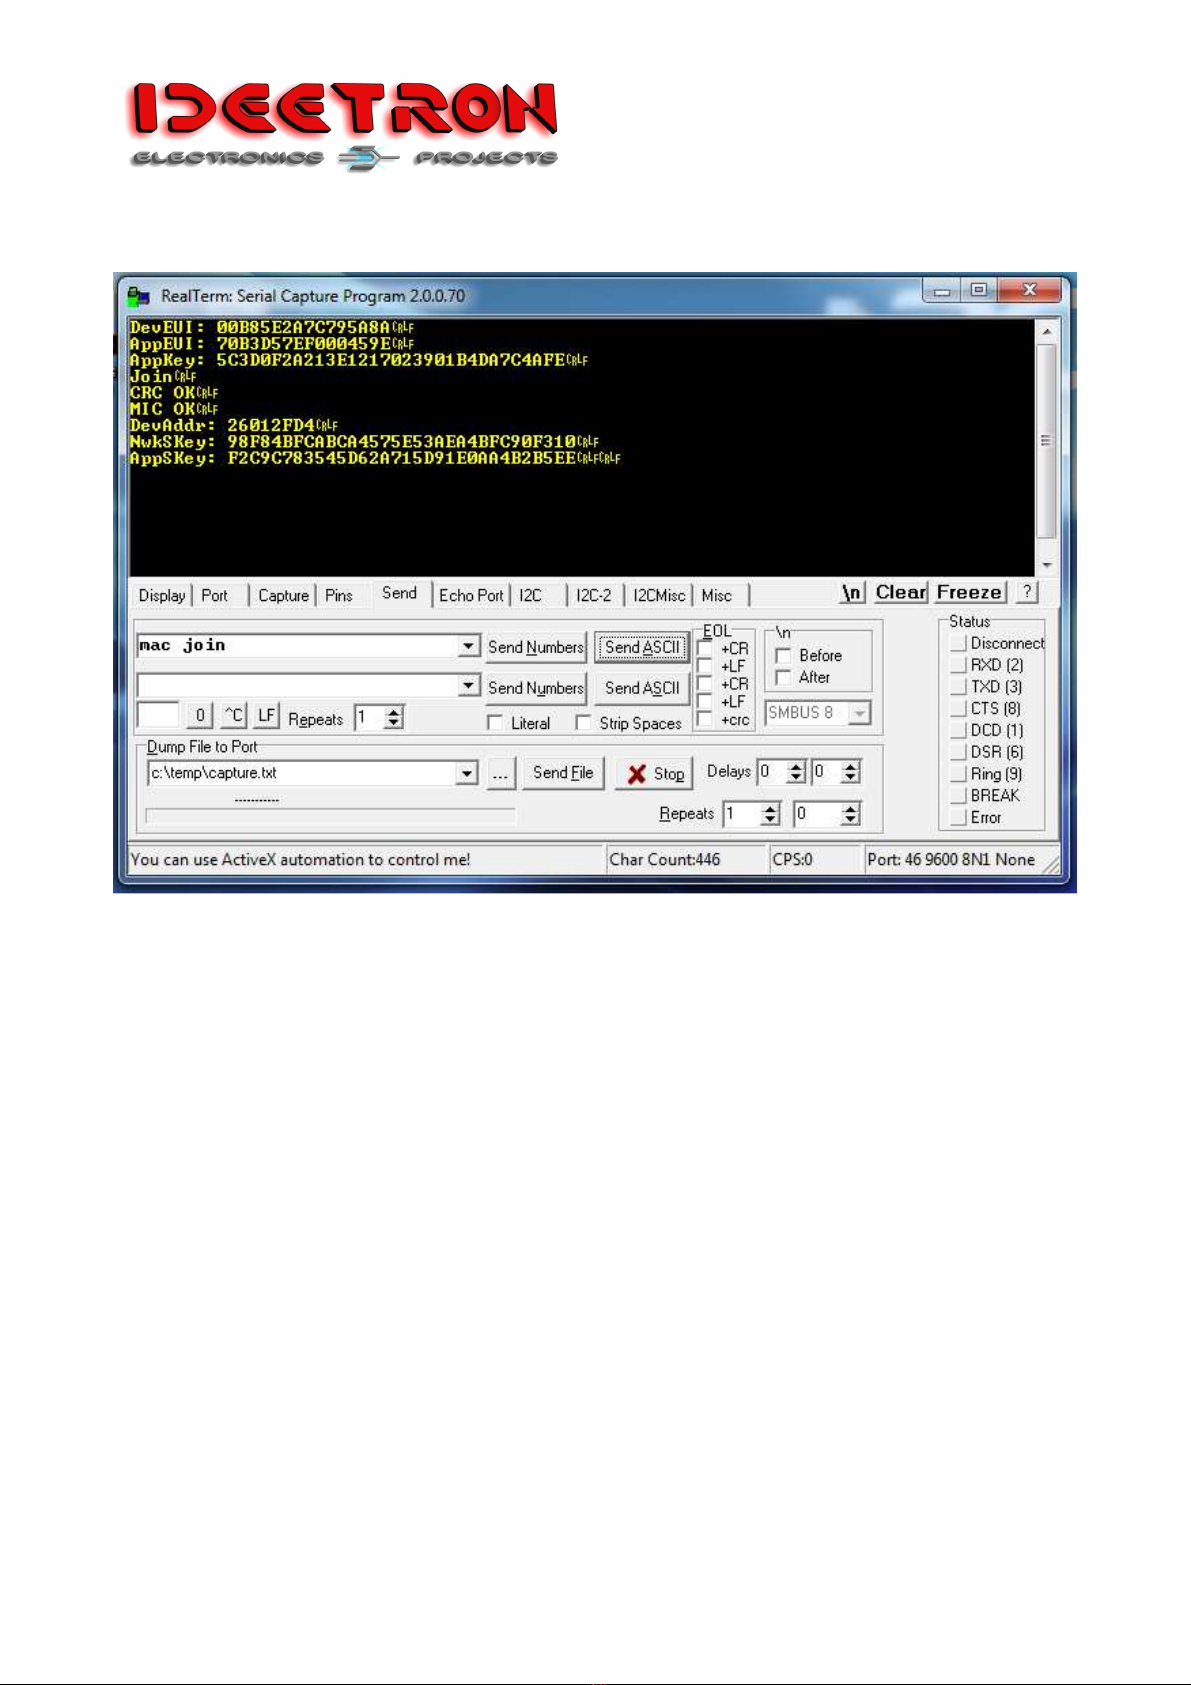
8. Start up realterm and set the parameters.
Figure 17: Set para eters
Pa ina 20 of 20 14-4-2017
Nexus LoRaWAN
9. Send the join command and wait for reply.
Figure 18: OTAA response
This manual suits for next models
1
Table of contents


