Iluv I1255 User manual

V10M10_IM_EN_02142008
www.i-Luv.com- 1 -
5.1 - Channel Slim Desktop iPod / DVD Player
Instruction Manual
Model: i1255

V10M10_IM_EN_02142008
www.i-Luv.com- 2 -

V10M10_IM_EN_02142008
www.i-Luv.com- 3 -
INTRODUCTION
Thank you for purchasing the i1255. Unpack the unit and make sure all the accessories are put
aside so they will not be lost. We recommend that you retain the original carton and packaging
materials for future use, should you transport or ship the unit in the future.
5.1 - Channel Slim Desktop iPod / DVD Player
AUDIO AND
VIDEO
MP3 CD
AUDIO AND
VIDEO iPod®
DIGITAL MEDIA
PLAYER
AUDIO CD
Kodak®Picture CD
DOLBY® DIGITAL
DECODING
* Please refer to the safety instructions on page 24 in this manual

V10M10_IM_EN_02142008
www.i-Luv.com- 4 -
TABLE OF CONTENTS
Getting Started
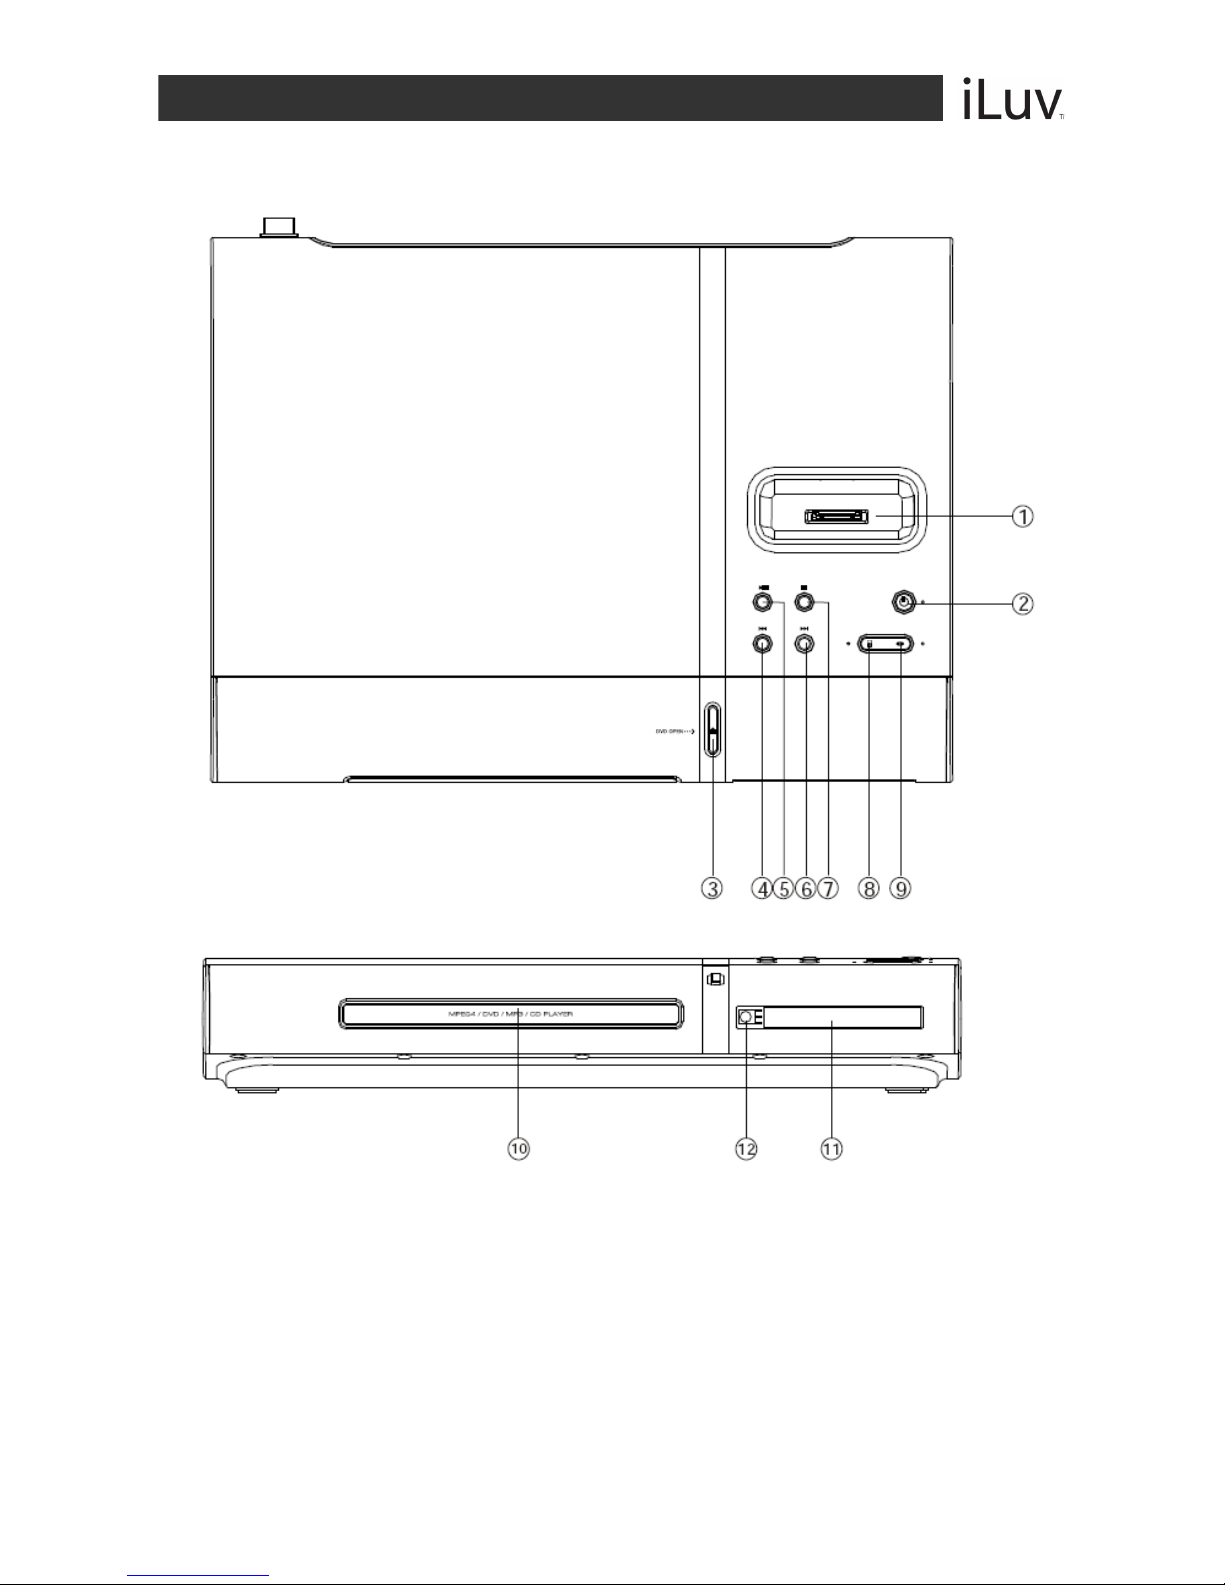
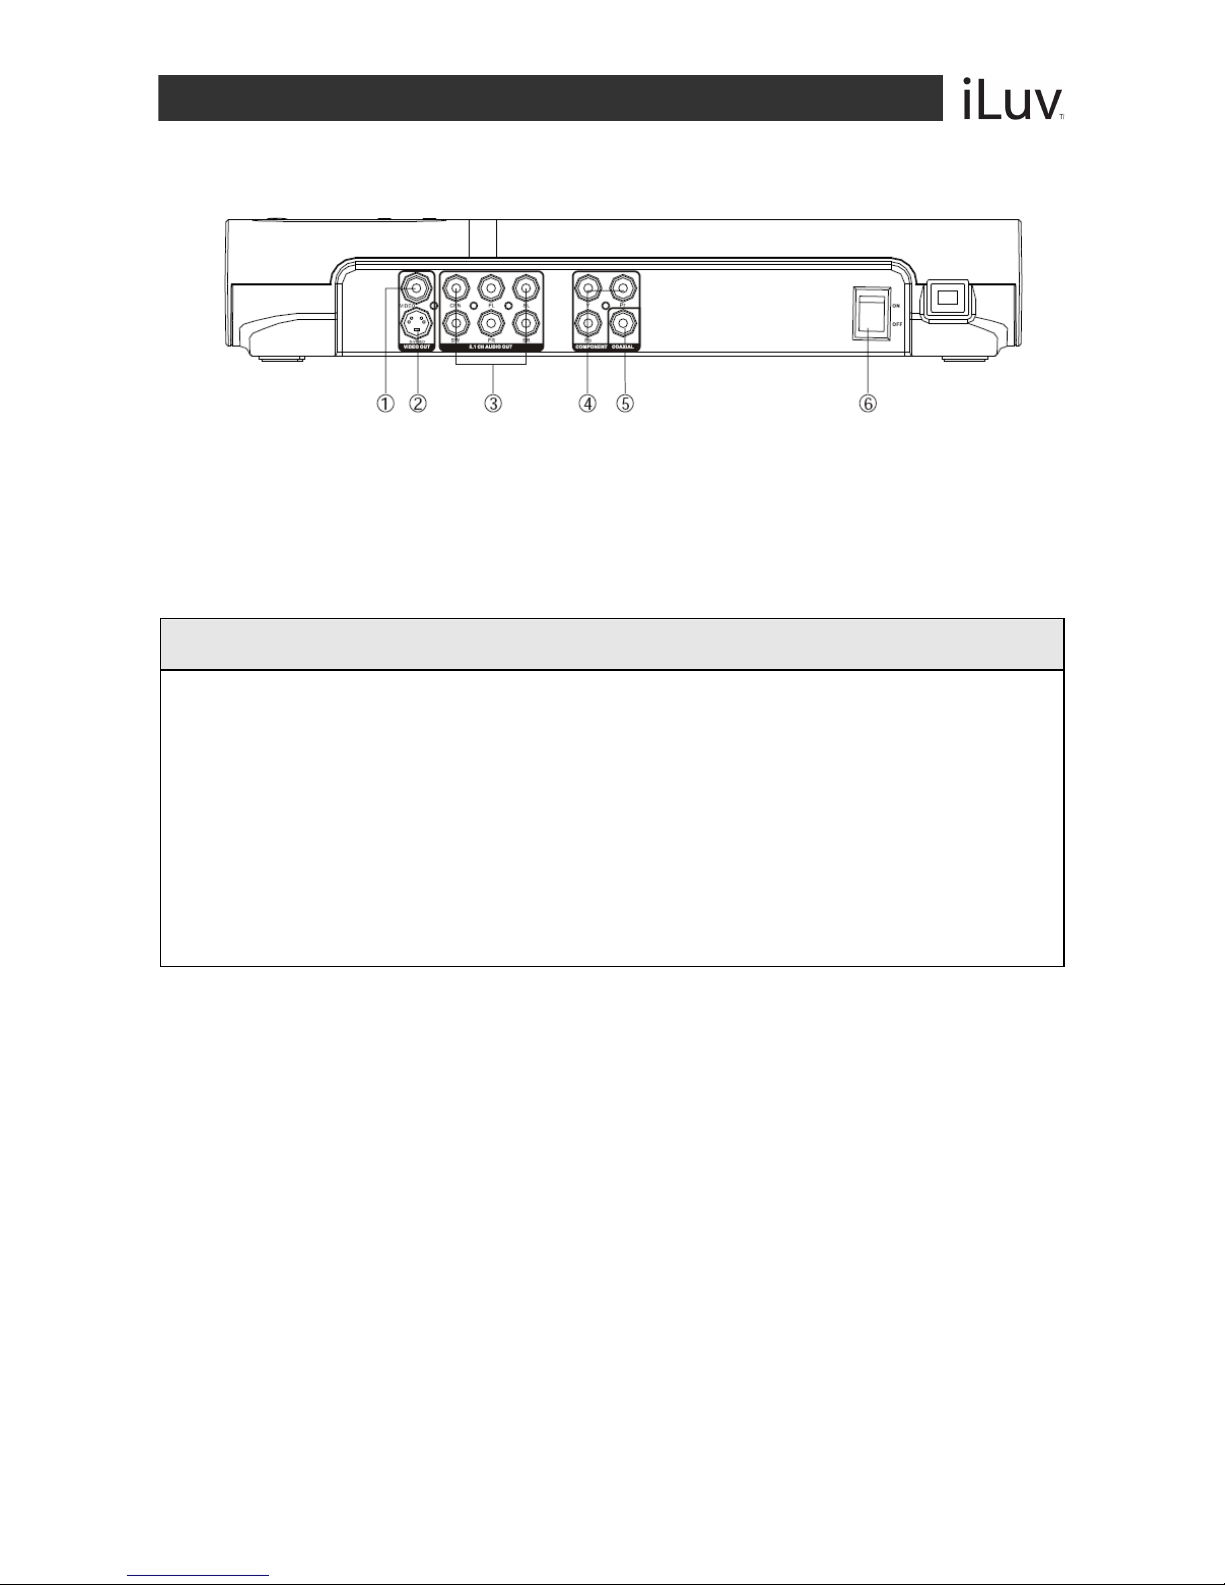
Location of Controls on the Main Unit ……………………………………………………....... 5
Location of Controls on the Remote Control ………………………………………………… 7
Preparing the Remote Control for Use …………………………………………………….…. 8
Using the Remote Control ……………………………………………………………………... 8
Setting up the Player …………………………………………………………………………… 9
Connecting the Unit to a TV …………………………………………………………………… 9
Connecting External Audio ………………………………………………………………….…. 9
Operational Instructions
Using Your iPod ………………………………………………………………………………… 10
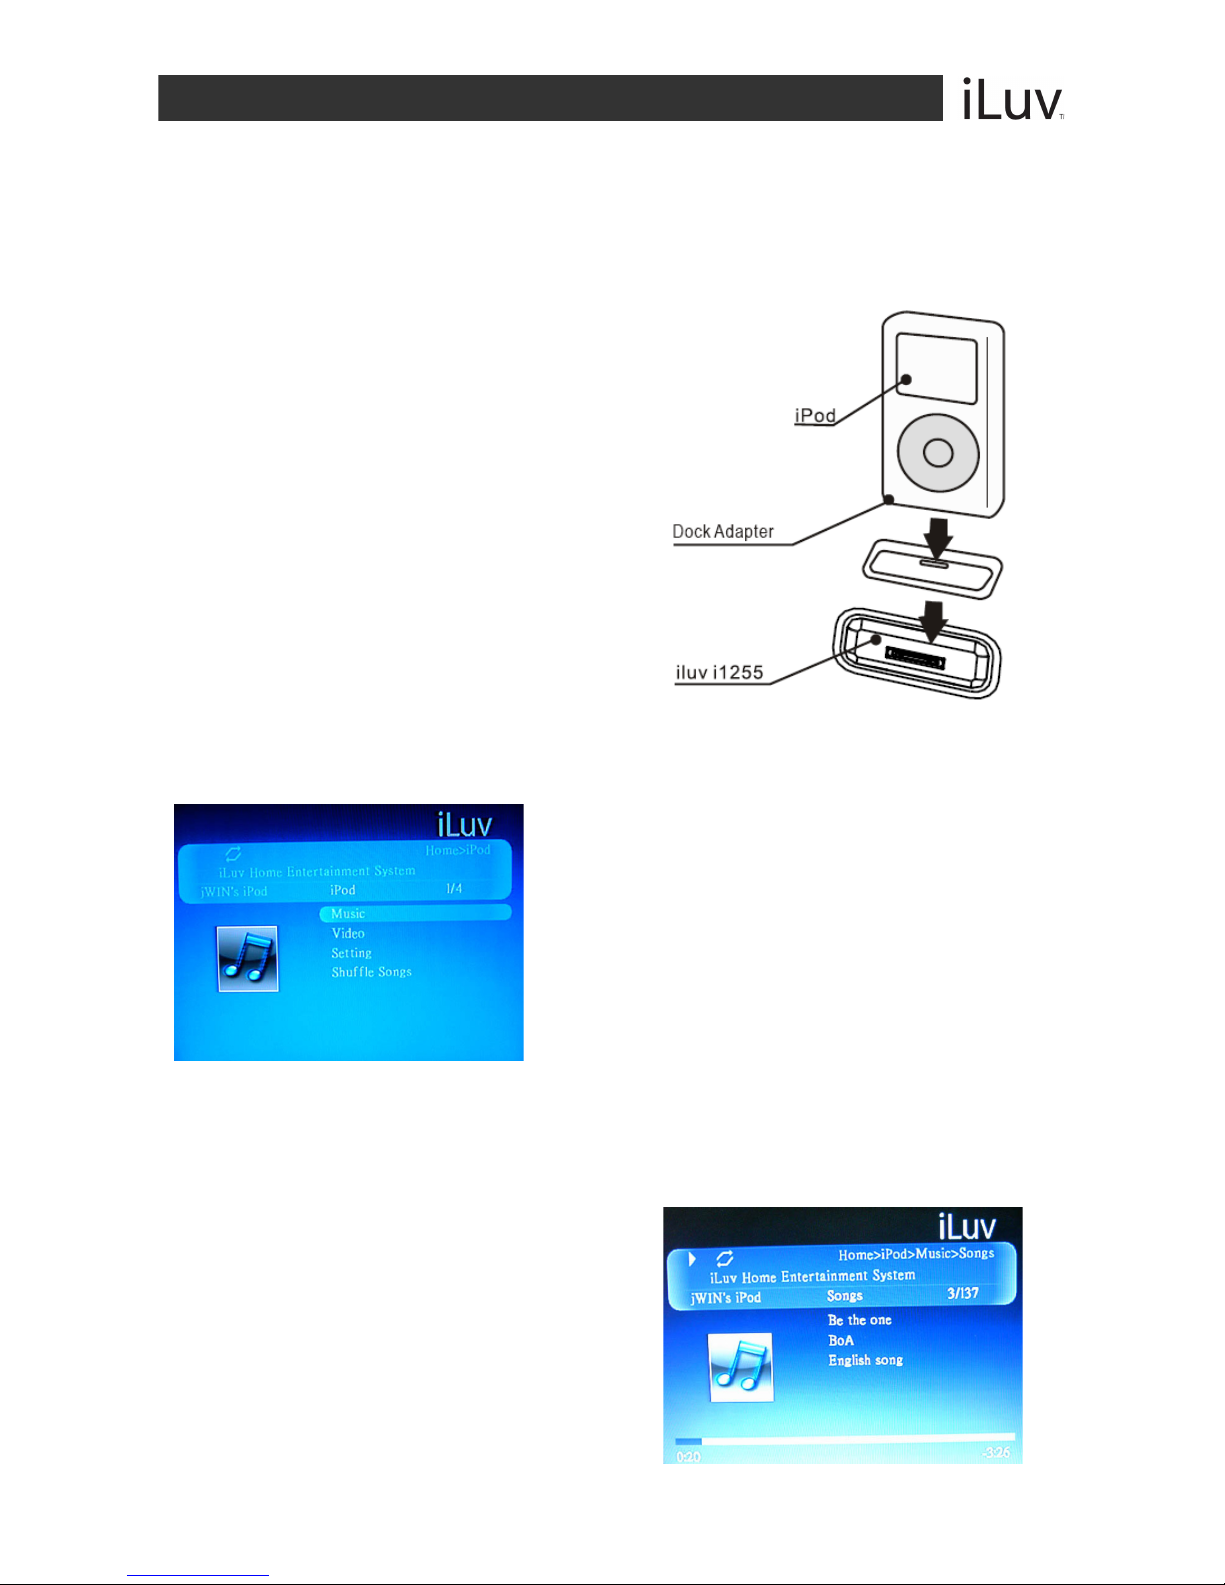
Connecting your iPod to the Dock …………………………………………………………. 10
Playing your iPod Contents on TV …………………………………………………………. 10
Music Menu …………………………………………………………………………………... 10
Video Menu …………………………………………………………………………………... 11
Changing the Settings ……………………………………………………………………..... 11
Changing the Screen Mode ………………………………………………………………… 11
Tips for iPod Video Playing …………………………………………………………………. 11
System Setup …………………………………………………………………………………… 12
Navigating the Setup Menu ……………………………………………………………………. 12
Language Setup ………………………………………………………………………………… 13
Audio Setup ……………………………………………………………………………………... 14
Video Setup ……………………………………………………………………………………... 15
Speaker Setup ………………………………………………………………………………….. 16
Digital Setup …………………………………………………………………………………….. 16
Basic DVD Operation …………………………………………………………………………... 17
Menu Play …………………………………………………………………………………….. 17
Title Play ……………………………………………………………………………………… 18
Sequence Play ……………………………………………………………………………….. 18
Program Play ………………………………………………………………………………… 18
Volume Control …………….…………………………………………………………………… 19
Mute ……………………………………………………………………………………………… 19
JPEG / MP3 Playback ………………………………………………………………………….. 19
Troubleshooting Guide
iPod Problems – Possible Solutions ………………………………………………………….. 20
DVD Player Problems – Possible Solutions …………………………………………………. 20
Features and Specifications
Features for your iPod ………………………………………………………………………. 21
Features for your DVD Player ……………………………………………………………… 21
Specifications ………………………………………………………………………………… 21
User Safety Guide …………………………………………………………. 24

V10M10_IM_EN_02142008
www.i-Luv.com- 5 -
GETTING STARTED
Location of Controls on the Main Unit
1. iPod DOCK 5. PLAY / PAUSE BUTTON 9. DVD BUTTON
2. POWER BUTTON 6. NEXT BUTTON 10. DISC TRAY
3. OPEN / CLOSE BUTTON 7. STOP BUTTON 11. LED SCREEN
4. PREV BUTTON 8. iPod BUTTON 12. REMOTE SENSOR
Top
Front

V10M10_IM_EN_02142008
www.i-Luv.com- 6 -
GETTING STARTED
Location of Controls on the Main Unit-continued
1. COMPOSITE VIDEO OUTPUT 3. 5.1-CH AUDIO OUTPUT (FL,
FR, SL, SR, CEN, SW)
5. DIGITAL AUDIO COAXIAL
OUTPUT
2. S-VIDEO OUTPUT 4. COMPONENT VIDEO
OUTPUT (Y, Pb, Pr)
6. POWER SWITCH
DISC ERROR
This DVD player has built-in error compensation circuits to correct minor defects in a disc.
There are limits, however, to the amount of correction available. In some cases, the DVD player
may skip some tracks, or parts of tracks, on a disc during disc play. This problem may be
caused by defects (such as scratches) on the disc being played which are too large for the
error compensation circuits to handle. If you encounter this problem, try a new disc before
having this unit serviced. If the DVD player operates normally, the skipping problem is probably
due to a defective disc.
Note: Only the above types of discs can be played on this unit. Some CD-R, CD-RW discs cannot be
played depending on the condition of the disc.
Back

V10M10_IM_EN_02142008
www.i-Luv.com- 7 -
GETTING STARTED
Location of Controls on the Remote Control
1. OPEN / CLOSE BUTTON
2. NUMBER 0 TO 10+ BUTTONS
3. SLOW BUTTON
4. ZOOM BUTTON
5. PAUSE BUTTON
6. MENU BUTTON
7. NAVIGATION (W/ X/ S/ T) BUTTONS*
8. iPod MODE BUTTON
9. ENTER BUTTON
10. FWD BUTTON
11. REV BUTTON
12. A-B BUTTON
13. REPEAT BUTTON
14. PROG BUTTON
15. P / N BUTTON
16. STANDBY BUTTON
17. SUBTITLE BUTTON
18. LANGUAGE BUTTON
19. TITLE BUTTON
20. GOTO BUTTON
21. ANGLE BUTTON
22. VOLUME - / + BUTTONS
23. STOP BUTTON
24. PLAY BUTTON
25. SETUP BUTTON
26. iPod / DVD BUTTON
27. PREV BUTTON
28. NEXT BUTTON
29. RETURN BUTTON
30. MUTE BUTTON
31. DISPLAY BUTTON
32. VIDEO MODE BUTTON
IMPORTANT NOTE: The included remote control both your iPod and DVD player.
* NAVIGATION W/ XButtons = Page Down / Page Up Buttons
1
2
3
4
5
6
7
8
9
10
11
12
13
14
15
16
17
18
19
20
21
22
23
24
25
26
27
28
29
30
31
32

V10M10_IM_EN_02142008
www.i-Luv.com- 8 -
GETTING STARTED
Preparing the Remote Control for Use
Installing the Batteries
1. Push down and out on the battery Compartment cover to remove it.
2. Insert two AAA batteries into the battery compartment of the remote control, making sure
the polarity (+ and – signs) on the batteries and matches the polarity marked inside the
battery compartment.
3. Replace the battery compartment cover.
Notes:
•Do not mix batteries from different manufacturers, nor old ones with new.
•If the remote control will not be used for an extended period of time, remove the batteries
to prevent damage-causing corrosion.
•Remove dead batteries immediately to prevent damage-causing corrosion.
•If battery leakage occurs, wipe the battery liquid from the battery compartment, then
replace both batteries. Always replace both batteries at the same time, using new, fully
charged batteries.
•Life expectancy of batteries may vary depending on amount of use.
Using the Remote Control
1. Point the remote control directly at the player's remote sensor.
2. Do not leave the remote control in an extremely hot or humid place.
3. Avoid spilling water or put any liquid on the remote control.
4. Battery life is ~1 year under normal conditions.

V10M10_IM_EN_02142008
www.i-Luv.com- 9 -
GETTING STARTED
Setting up the Player
It is recommended that you keep the unit unplugged and disconnected from the wall unit while
connecting the unit.
Connecting the Unit to a TV
Composite Video (iPod and DVD) – Connect the video cable from the Video Out
jack on the back of the player to the Video In jack on your television set.
S-Video (iPod and DVD) – For better video quality, connect the player to your
television set using an S-Video cable (not included). Connect the cable from the S-
Video Out jack on the back of the player to the S-Video In jack on the television set.
SCART Video (European version, DVD only) – If you connect the unit to your
television set using a SCART cable, set the [Video] to TV-RGB.
Y, Pb, Pr (DVD only) – Use a Component cable (not included) to connect the unit to
a television set. Set the [Video] to Interlace YUV. If the television supports
Progressive Scan, set the [Video] to P-Scan Y, Pb, Pr.
Connecting External Audio
The back panel of the iPod/DVD player provides:
COAXIAL Out: Connects to an external audio decoder.
Note on iPod connections
Video connection: Your iPod does not support component (Y, Pb, Pr) video output,
so always connect to composite video or S-Video for iPod play.
Audio connection: Your iPod does not support 5.1 channel audio output and digital
audio output, so always connect to audio FR, FL channels for iPod play.
Before plugging the power cord into the AC outlet, check to make sure all of the connections
have been properly completed. When they have been, carefully plug power cord into outlet.
Press the POWER switch on the rear side to turn on the unit, the power indicator will light up. If
unit is in standby state, press the POWER button on the front panel to power the unit. The
display panel will light.
When the unit is initially powered, a brief surge of electricity may cause interference with other
electronic equipment on the same circuit. If this occurs, connect the unit to an outlet on a
different circuit.

V10M10_IM_EN_02142008
www.i-Luv.com- 10 -
OPERATIONAL INSTRUCTIONS
Using Your iPod
Before playing iPod, always connect the video to TV through composite video or S-Video, and
connect the audio through FR/FL analog audio output.
When unit is in iPod play mode, does not support component video output and 5.1 channel /
digital audio output.
Connecting your iPod to the dock:
1. Connect you iPod to the dock, make
sure right dock adapter is installed
before docking your iPod into the
machine.
2. Turn on the player, Select your iPod
using the remote control and press the
ENTER button or press the iPod button
on the unit.
Note: If your iPod is not inserted to dock, a "Please
insert iPod" message will display on screen.
After inserting your iPod and selecting iPod mode,
unit will verify your iPod and the "Initializing..."
message will appear on the screen.
Please wait until the process finishes. The unit cannot be operated during this time.
Playing your iPod contents on TV:
When your iPod has been properly verified, the
following will be displayed: The supported menu and
screen may vary depending on the type of iPod
connected to the dock. Select the desired menu and
press the ENTER button on the remote control to view
the contents on your iPod, Selected the file and press
the ENTER button to play the selected music or video.
Music Menu:
Music menu is sorted by playlists, Artists, Albums, Songs, Genres, or Composers.
Use the NAVIGATION S/ Tbuttons to select a playlist and press ENTER on the remote
control to confirm your selection.
When music is playing, information on the music
will be displayed on the TV screen.

V10M10_IM_EN_02142008
www.i-Luv.com- 11 -
OPERATIONAL INSTRUCTIONS
Using Your iPod– Continued
Video Menu:
The Video Menu is sorted by Movie, Music Video, TV shows, and Video podcasts.
Press the ENTER button after selecting the desired videos from the list to start
playing the selected Video.
Press the PAUSE button during playback to pause playback and press the PLAY
button to resume play.
Press the REV or FWD buttons during playback allow you to move quickly forward or
backward.
Press the PREV or NEXT buttons during playback to move to the next or previous
chapter/movie.
Note: iPod touch does not support video browsing, you need to change from “iPod” to "iPod
Screen" mode by pressing the iPod MODE button of remote control, using the screen on your
iPod touch for video play.
Changing the Settings:
A variety of options can be changed directly
from the TV on the TV Screen during playback.
Background color can be changed as well as
playback settings like Shuffle, Repeat, Skin, TV
System, TV Screen, Caption and Language.
Changing the Screen Mode:
Press the iPod MODE button while your iPod is searching the contents on the TV to switch to
iPod Screen Mode. At this time, the message on the TV screen will disappear, then contents
can be searched on your iPod screen using the remote control or click wheel of your iPod.
The "iPod Screen" mode is useful for iPod functions not supported by this iPod/DVD player,
such as photo playing, iPod touch video playing, and other features.
In "iPod Screen" mode, set [TV Out] setting to ON for video playing.
Press the iPod MODE button again to return to "TV Screen" mode.
Tips for iPod video playing: Before insert your iPod into the dock, you can set your iPod
settings for different movie and TV Aspect ratios (4:3 or 16:9), such as TV Screen, Fit to
Screen, and Captions.

V10M10_IM_EN_02142008
www.i-Luv.com- 12 -
OPERATIONAL INSTRUCTIONS
System Setup
Press the SETUP button to display the Main menu.
Press the NAVIGATION W/ Xbuttons to
highlight the icon of the desired page.
Press the NAVIGATION S/ Tbuttons to
activate that page.
Press the NAVIGATION Tbutton to
highlight the desired option.
Press the ENTER button or the
NAVIGATION Xbutton to select from the
options that appear on the right of the
screen.
Navigating the Setup Menu
TV SYSTEM
Choose the TV System according to the
color specifications of your TV.
VIDEO
According to the output jack of TV set,
you can choose S-VIDEO, YUV, P-
SCAN, YPbPr, or TV RGB.
Notes: Only choose PSCAN if your DVD player is
connected to a Progressive Scan TV with Y,Cb,Cr
cables. Choose TV RGB if the SCART socket is
used.

V10M10_IM_EN_02142008
www.i-Luv.com- 13 -
OPERATIONAL INSTRUCTIONS
Navigating the Setup Menu-continued
TV TYPE
Choose the aspect ratio according to
your TV type. (16:9, 4:3LB or 4:3PS)
DEFAULT
Choose this option to return the unit
to factory settings.
Language Setup
OSD LANGUAGE
Highlight the OSD Language option
and use the NAVIGATION W/ X/ S
/ Tbuttons to choose the language
you prefer for the on-screen display.
Press the ENTER button to confirm.
AUDIO LANGUAGE
Highlight the Audio Lang option and
use the NAVIGATION W/ X/ S/ T
buttons to choose the audio language
you prefer.
Press the ENTER button to confirm.
If the disc supports the language
chosen, audio output will be in the
chosen language.

V10M10_IM_EN_02142008
www.i-Luv.com- 14 -
OPERATIONAL INSTRUCTIONS
Language Setup-continued
SUBTITLE LANGUAGE
Highlight the Subtitle Lang option and use
the NAVIGATION W/ X/ S/ Tbuttons
to choose the subtitle language you prefer.
Press the ENTER button to confirm.
If the disc supports the language chosen, it
will display subtitles in that language.
MENU LANGUAGE
Highlight the Menu Lang option and
use the NAVIGATION W/ X/ S/ T
buttons to choose the menu language
you prefer.
Press the ENTER button to confirm.
If the disc supports the language
chosen, the menu will display in the
chosen language. If the disc does
NOT support the chosen language,
the default language programmed
into the disc will display.
Audio Setup
Highlight the Audio Out option using the NAVIGATION W/ X/ S/ Tbuttons to choose the
audio output you prefer. Press the ENTER button to confirm. There are three output modes.
SPDIF / OFF
SPDIF / RAW: Choose this setting if
your DVD player is connected to a
power amplifier with Dolby digital
decoder and Coaxial cable.
SPDIF / PCM: Choose this setting if
your DVD player is connected to a 2-
channel digital stereo amplifier.

V10M10_IM_EN_02142008
www.i-Luv.com- 15 -
OPERATIONAL INSTRUCTIONS
Video Setup
SCREEN SAVER
The Screen Saver protects your screen from
damage and is activated when the DVD player
is in Stop mode, Open, No-disc state, or when
there is a frame frozen for more than 60
seconds.
ON: Activates the Screen Saver
OFF: Deactivates the Screen Saver
Note: The default setting is ON
BRIGHTNESS
Use the NAVIGATION S/ Tbuttons to adjust
the brightness of the screen.
CONTRAST
Use the NAVIGATION S/ Tbuttons to adjust
the contrast of the screen.
SATURATION
Use the NAVIGATION S/ Tbuttons to adjust
the saturation of the screen.

V10M10_IM_EN_02142008
www.i-Luv.com- 16 -
OPERATIONAL INSTRUCTIONS
Speaker Setup
DOWNMIX
LT / RT: Choose this setting to
obtain a movie-theater sound is the
original video was recorded with
Pro Logic Dolby Digital format.
STEREO: Choose this setting
when 5.1-Channel sound is playing.
5.1-CH: Choose this option when
the player is connected to a 5.1-
Channel audio amplifier and a 5.1-
Channel disc is playing. Enjoy Dolby 5.1-Channel Surround Sound.
Digital Setup
DYNAMIC RANGE
When Line Out is selected, choose this
setting to adjust the line out ratio for
different effects.

V10M10_IM_EN_02142008
www.i-Luv.com- 17 -
OPERATIONAL INSTRUCTIONS
Basic DVD Operation
1. Turn on your TV and your iPod / DVD Player
Press the POWER button on the remote control or on the player itself. The
iPod/DVD selection interface will display on TV screen.
Press the NAVIGATION S/ Tbuttons to select DVD
Press the ENTER button to enter to DVD work mode.
2. Place disc in the player
Press the OPEN / CLOSE button on the remote control or on the front
panel of the player itself. “OPEN” will display on the screen.
Carefully place a DVD into the disc tray with the label facing up (double-
sided discs have content on both sides and can be placed in any direction).
Press the OPEN / CLOSE button again. “CLOSE” will display on the
screen.
The disc will begin playback immediately.
Note: There are some discs which will not play immediately. When this happens,
press the PLAY button or ENTER button to initiate playback.
3. Play
The contents a disc may vary depending on how it was programmed and what features
are offered. Selections made from the menu will only function if the disc is designed for
such operation. The following play modes are offered.
Menu Play (DVD, SDVD, VCD20)
1. Press the MENU button.
oTV screen displays the DVD root menu when there is a disc
loaded.
oPBC is initialized when an SVCD or VCD2.0 disc is loaded.
2. With a DVD loaded, press the NAVIGATION S/ Tbuttons to
choose the menu item you desire.
3. Press the ENTER or PLAY button to confirm.
4. During DVD playback, press MENU (PBC) button to return to the
root menu.
5. During SVCD or VCD playback, when PBC is activated, press the
RETURN button to return to the menu.
6. Stop
oPress the STOP button once to stop and hold playback.
oPress the PLAY button to resume playback from the place
where it stopped.
oPress the STOP button twice to stop playback completely.
Note: for the protection of the disc, press the STOP button before pressing the OPEN / CLOSE
button to eject the disc from the tray. After removing the disc from the tray, press the OPEN /
CLOSE button to close the disc tray.

V10M10_IM_EN_02142008
www.i-Luv.com- 18 -
OPERATIONAL INSTRUCTIONS
Basic DVD Operation-continued
Title Play (DVDs only)
1. During DVD playback, press the TITLE button to display the DVD
title content.
2. Press the NAVIGATION S/ Tbuttons to select the preferred title.
3. Press the ENTER button to confirm.
4. Playback will begin at Chapter 1 of the title chosen.
Sequence Play
1. Press the MENU button once during SVCD or VCD playback (PBC
is on) to switch PBC off. The player will enter sequence mode.
2. Press the MENU button twice to switch PBC on.
3. Press the PLAY button when an SVCD or VCD is in Stop mode, to
enter Sequence playback.*
* This function is not available on all discs.
Program Play
The Program Play option allows you to program the order in which you want the
chapters to play (up to 16).
oProgram menu (DVD, MP3, JPEG discs)
Note: If PBC is on, this operation will turn PBC off while chapters or tracks play in programmed
order.
oAccording to the highlight, use the NUMERIC buttons to enter the
chapters or tracks in the order you want them to play. Press the
PLAY button or use the NAVIGATION W/ Xbuttons to highlight
the “Play” item and press ENTER. The chapters or tracks will now
play in the programmed order.
Note: You can program a maximum of 16 titles, chapters or tracks.
oAccording to the Direction Indicator on the menu, use the
NAVIGATION W/ X/ S/ Tbuttons to highlight your desired entry.
oDuring Program Playback, press the PROGRAM button to display
the programmed order on the screen. This will also stop the
program playback. Press the STOP button or the PLAY button to
resume playback.
Notes: To clear the programmed order, use the NAVIGATION W/ X/ S/ Tbuttons to
highlight the “Clear” option. Press the ENTER button to confirm. To modify the programmed
order, use the NAVIGATION W/ X/ S/ Tbuttons to highlight the item you wish to modify and
enter the number of the new chapter or track using the NUMERIC buttons.

V10M10_IM_EN_02142008
www.i-Luv.com- 19 -
OPERATIONAL INSTRUCTIONS
Volume Control
Press the VOL + or VOL- buttons to adjust the sound level.
Mute
Press the MUTE button to temporarily mute the speakers. Press the MUTE button again to
resume audio.
JPEG / MP3 Playback
When a JPEG or an MP3 disc is loaded, the screen will display as follows:
1. Press the NAVIGATION S/ Tbuttons to select the file when the cursor appears in
the file window.
2. Press the ENTER button to play the current file selected by the cursor.
3. Press the NAVIGATION W/ Xbuttons to switch between the directory window and
the file window.
Note: The player will not function correctly under the following conditions:
oThe disc is badly scratched, damaged or dirty.
oThe disc is not finalized.
oThe recording format is not supported by the player.
Current
directory
name
Current
MP3/JPEG file
name. If a
JPEG file is
playing, the
name should
have a JPEG
extension.
File Switch
Region:
Displays the
type of file
playing and
the switching.
The Playing
file is an MP3
audio file
The Playing
file is a JPEG
audio file

V10M10_IM_EN_02142008
www.i-Luv.com- 20 -
TROUBLESHOOTING GUIDE
iPod Problems - Possible Solutions
Can’t switch to iPod mode
Wait until the iPod has been initiallized.
Make sure the iPod is connected securely to the integrated dock.
Confirm that your iPod has been recharged with a depleted battery.
Upgrade your iPod firmware to the latest version.
If the TV screen continues to be frozen for 80 seconds, after inserting your iPod, your iPod
has to be reset. Press and hold Menu and Center buttons of your iPod for about six to ten
seconds until the Apple logo appears on your iPod screen. When your iPod starts to
operating normally again, connect it to i1255.
Do not hear any sound from AV Device
Make sure the AV device is properly connected to i1255.
Make sure the TV or audio amplifier is connected to the FR/FL jacks of i1255.
Nothing shows when playing a video
Make sure the TV is properly connected to i1255.
If connected to S-Video, make sure you have the i1255 set to S-Video mode. To Set up,
press the VIDEO MODE button continuously until “S-Video” is displayed on the screen.
Confirm that the video output on your iPod has been set to ON.
Make sure i1255 video is connected to TV through composite video or S-video jack.
The iPod buttons on the remote control don’t respond
Make sure your iPod is connected securely to the integrated dock.
Reset i1255 by taking your iPod out of the integrated clock and putting it back into the
integrated dock.
Press the iPod/DVD button on the remote control twice to reconnect your iPod.
My iPod is frozen
Reset your iPod by pressing and holding the ENTER button on your iPod to reset.
Refer to the instruction manual for your Ipod itself.
DVD Problems - Possible Solutions
No power
Check to ensure that the power plug is securely in the wall outlet.
No sound and POWER switch is turned on.
Check the connection between the DVD player and the TV set, amplifier, or any other unit
it is connected to.
Check to ensure the TV and amplifier are in the correct mode.
No picture
Check the connection between the DVD player and the TV set or any other unit it is
connected to.
Check to make sure TV is turned on.
Check to make sure TV system or Video mode is correctly set.
Other manuals for I1255
1
This manual suits for next models
1
Table of contents
Other Iluv DVD Player manuals