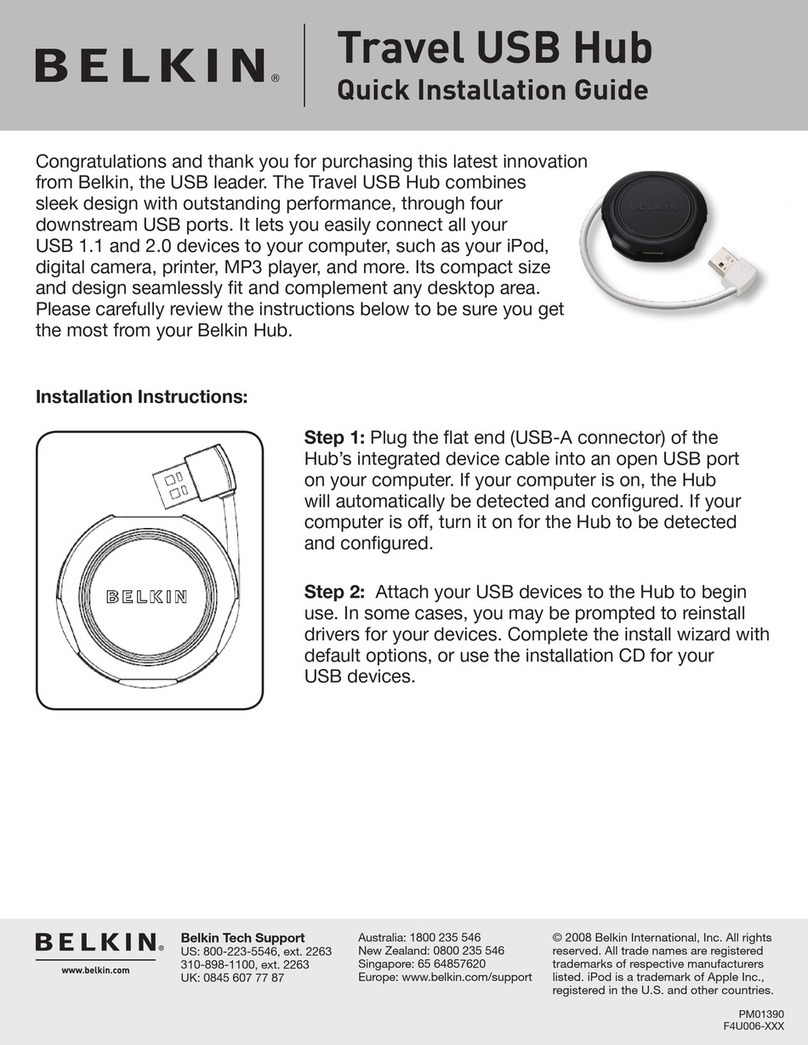
INNOVATIVE CIRCUIT TECHNOLOGY ICT200-LVD User manual

ICT200-LVD LOW VOLTAGE DISCONNECT SWITCH
This automatic LVD switch is designed to protect your battery
from excessive discharge that may cause permanent
degradation of the cells. The ICT200-LVD disconnect switch may
be wired in series with the battery positive or negative lead for
use with any dc grounding configuration.
The intelligent back-lit LCD display makes set up simple.
Selecting your nominal battery voltage at first power up will
automatically set the disconnect and reconnect voltages to
standard levels for the battery voltage chosen. Custom voltage
thresholds may be set for specialized applications, and the
internal contactor may be manually set to an open or closed
state if required. The display also shows the battery voltage and
the current drawn by the load, along with the operating state of
the LVD and any alarm conditions.
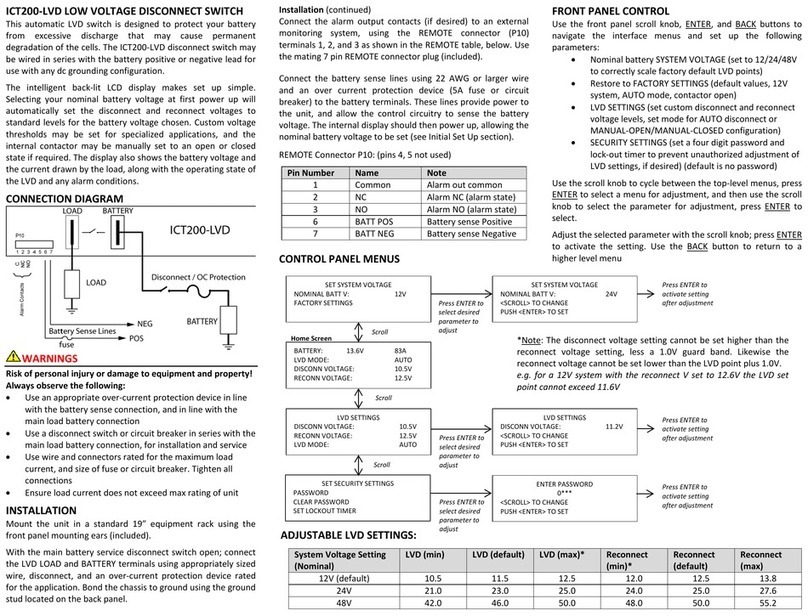
CONNECTION DIAGRAM
WARNINGS
Risk of personal injury or damage to equipment and property!
Always observe the following:
Use an appropriate over-current protection device in line
with the battery sense connection, and in line with the
main load battery connection
Use a disconnect switch or circuit breaker in series with the
main load battery connection, for installation and service
Use wire and connectors rated for the maximum load
current, and size of fuse or circuit breaker. Tighten all
connections
Ensure load current does not exceed max rating of unit
INSTALLATION
Mount the unit in a standard 19” equipment rack using the
front panel mounting ears (included).
With the main battery service disconnect switch open; connect
the LVD LOAD and BATTERY terminals using appropriately sized
wire, disconnect, and an over-current protection device rated
for the application. Bond the chassis to ground using the ground
stud located on the back panel.
Installation (continued)
Connect the alarm output contacts (if desired) to an external
monitoring system, using the REMOTE connector (P10)
terminals 1, 2, and 3 as shown in the REMOTE table, below. Use
the mating 7 pin REMOTE connector plug (included).
Connect the battery sense lines using 22 AWG or larger wire
and an over current protection device (5A fuse or circuit
breaker) to the battery terminals. These lines provide power to
the unit, and allow the control circuitry to sense the battery
voltage. The internal display should then power up, allowing the
nominal battery voltage to be set (see Initial Set Up section).
REMOTE Connector P10: (pins 4, 5 not used)
CONTROL PANEL MENUS
FRONT PANEL CONTROL
Use the front panel scroll knob, ENTER, and BACK buttons to
navigate the interface menus and set up the following
parameters:
Nominal battery SYSTEM VOLTAGE (set to 12/24/48V
to correctly scale factory default LVD points)
Restore to FACTORY SETTINGS (default values, 12V
system, AUTO mode, contactor open)
LVD SETTINGS (set custom disconnect and reconnect
voltage levels, set mode for AUTO disconnect or
MANUAL-OPEN/MANUAL-CLOSED configuration)
SECURITY SETTINGS (set a four digit password and
lock-out timer to prevent unauthorized adjustment of
LVD settings, if desired) (default is no password)
Use the scroll knob to cycle between the top-level menus, press
ENTER to select a menu for adjustment, and then use the scroll
knob to select the parameter for adjustment, press ENTER to
select.
Adjust the selected parameter with the scroll knob; press ENTER
to activate the setting. Use the BACK button to return to a
higher level menu
Pin Number
Name
Note
1
Common
Alarm out common
2
NC
Alarm NC (alarm state)
3
NO
Alarm NO (alarm state)
6
BATT POS
Battery sense Positive
7
BATT NEG
Battery sense Negative
SET SYSTEM VOLTAGE
NOMINAL BATT V: 12V
FACTORY SETTINGS
BATTERY: 13.6V 83A
LVD MODE: AUTO
DISCONN VOLTAGE: 10.5V
RECONN VOLTAGE: 12.5V
LVD SETTINGS
DISCONN VOLTAGE: 10.5V
RECONN VOLTAGE: 12.5V
LVD MODE: AUTO
SET SECURITY SETTINGS
PASSWORD
CLEAR PASSWORD
SET LOCKOUT TIMER
SET SYSTEM VOLTAGE
NOMINAL BATT V: 24V
<SCROLL> TO CHANGE
PUSH <ENTER> TO SET
LVD SETTINGS
DISCONN VOLTAGE: 11.2V
<SCROLL> TO CHANGE
PUSH <ENTER> TO SET
ENTER PASSWORD
0***
<SCROLL> TO CHANGE
PUSH <ENTER> TO SET
Press ENTER to
activate setting
after adjustment
Press ENTER to
activate setting
after adjustment
Press ENTER to
activate setting
after adjustment
Scroll
Scroll
Scroll
Press ENTER to
select desired
parameter to
adjust
Press ENTER to
select desired
parameter to
adjust
Press ENTER to
select desired
parameter to
adjust
Home Screen
System Voltage Setting
(Nominal)
LVD (min)
LVD (default)
LVD (max)*
Reconnect
(min)*
Reconnect
(default)
Reconnect
(max)
12V (default)
10.5
11.5
12.5
12.0
12.5
13.8
24V
21.0
23.0
25.0
24.0
25.0
27.6
48V
42.0
46.0
50.0
48.0
50.0
55.2
ADJUSTABLE LVD SETTINGS:
*Note: The disconnect voltage setting cannot be set higher than the
reconnect voltage setting, less a 1.0V guard band. Likewise the
reconnect voltage cannot be set lower than the LVD point plus 1.0V.
e.g. for a 12V system with the reconnect V set to 12.6V the LVD set
point cannot exceed 11.6V

INITIAL SET UP
Wire the unit per the installation instructions and connect
power to the battery sense terminals. The SET SYSTEM
VOLTAGE screen should be displayed on the front panel. Press
ENTER to select that screen, then use the scroll wheel to select
the NOMINAL BATT V line, press ENTER to select, and then
adjust the encoder knob to select 12, 24 or 48V as required.
Press ENTER to select. The unit disconnect and reconnect
thresholds will now be set to the factory default levels for that
battery voltage.
Normally this is the only setting required on the unit unless
custom disconnect or reconnect points are desired, or the
internal LVD contactor is to be manually set to open or closed.
The external battery service disconnect switch may now be
closed, allowing the load to be powered through the LVD unit.
ALARMS
The Form-C alarm contact on the back panel is triggered for LVD
trip, Over Current trip, or internal Over Temperature trip. The
main LVD contactor will open for all alarm conditions, and must
be manually re-set for an Over Current event by setting the LVD
Mode back to AUTO.
Alarm Screens: (any button press will return to home screen)
SPECIFICATIONS
Battery Voltage: 10 to 65V
Maximum Load Current: 200A (12/24V), 100A (48V)
Auto Overload Disconnect Current: (+/- 5%)
12/24V System setting 220A
48V System setting 110A
Display Accuracy (V): +/- 2%
(Amps): +/- 5%
LVD Delay (approx. time to switch state) 3s
Operating power (Tare loss): < 1W
Alarm Contact (Form-C): 0.5A, 125Vac/dc max
Dimensions: (inches)
LIMITED WARRANTY
ICT Ltd. warrants to the original consumer purchaser that this
product shall be in good working order, free from defects in
materials and workmanship, for a period of three (3) years from
the date of purchase. Should failure occur during the above
stated time period, then ICT will, at its option, repair or replace
this product at no additional charge except as set forth below.
All parts, whether for repair or replacement, will be furnished
on an exchange basis. All exchange pieces become the property
of ICT. This limited warranty shall not apply if the ICT product
has been damaged by unreasonable use, accident, negligence,
disaster, service, or modification by anyone other than the ICT
factory.
Limited warranty service is obtained by delivering the product
during the above stated three (3) years warranty period to an
authorized ICT dealer or ICT factory and providing proof of
purchase date. If this product is delivered by mail, you will
insure the product or assume risk of loss or damage in transit,
and prepay shipping charges to the factory.
Every reasonable effort has been made to ensure that ICT
product manuals and promotional materials accurately describe
ICT product specifications and capabilities at the time of
publication. However, because of ongoing improvements and
updating of ICT products, ICT cannot guarantee the accuracy of
printed materials after the date of publication and disclaims
liability for changes, errors or omissions.
If this ICT product is not in good working order, as outlined in
the above warranty, your sole remedy shall be repair or
replacement as provided above. In no event will ICT be liable for
any damages resulting from the use of or the inability to use the
ICT product, even if an ICT employee or an authorized ICT
dealer has been advised of the possibility of such damages, or
for any claim by any other party.
ICT reserves the right to make changes without further notice to
any products or documentation for improvement of reliability,
function, or design.
ICT Ltd. does not recommend use of its products in life support
applications wherein a failure or malfunction of the product
may directly or indirectly threaten life or cause injury. The user
of ICT products, which are to be used in life support applications
as described above, assumes all risks of such use and
indemnifies ICT against all damages.
INNOVATIVE CIRCUIT TECHNOLOGY LTD.
26921 Gloucester Way
Langley, British Columbia, Canada V4W 3Y3
T 604.856.6303 F604.856.6365 www.ict-power.com
ALARM
BATT LOW 10.5VDC
BATT DISCONN BY LVD
ICT200-LVD
LOW VOLTAGE DISCONNECT
INSTRUCTION MANUAL
855-341-000
INNOVATIVE CIRCUIT TECHNOLOGY LTD.
ALARM
OVER CURRENT
BATT DISCONN BY LVD
Other INNOVATIVE CIRCUIT TECHNOLOGY Switch manuals
