innoXplore iX-C90 User manual

innoXplore iX-C90 HD Digital Video Camera
User Manual
Please read through this user manual before using the product and keep the manual for
future use.
This manual is for reference, any later alteration of technical specification and product
appearance are without further notice.
Contents
Camera Precaution…………………
Accessories………………………
Camera Description……………
Camera mounting description………
Battery installation………………….
Insert and take out storage card……
Battery charge…………………
Button function…………………
Turn on/Off the camera……………..
Turn on the camera……………………
Turn Off the camera……………………
Taking video footage……………….
Menu setting………………………
720P/VGA Switching……………
Deleting video footage……………………
TV System Switching………… ………

Time setting
Set the Year/Month/Date/Hour/Minute…
Playing back video footage on TV……………
TV OUT mode……………………
HDMI mode…………………………
Connecting to PC&PC CAM……………….
Playing back video footage…………
PC camera…………………………
Troubleshooting ……………………….
Technical Specification……………………
Camera Precaution
Notice the following guidelines when you using your camera
* Before using the camera, please operate it correctly. Or it will cause damage to the
internal components.
*Do not fall or hit the cam, Rough handling may damage the internal components.
* Do not open the battery cover when recording. Otherwise not only it is unable to save the
current video recording document, also possibly damages other video recording
document s which already have stored.
*Make sure install the battery correctly, the error direction of batteries may cause damage
to this cam and cause the fire.
* For your safety, please keep the camera from the children and animals, in order to avoid
accident
* Do not place the camera in a damp or dusty location for extended periods of time. This
may cause a fire or an electrical shock.
* Do not leave the camera in places exposed to extremely high temperatures, such as
under direct sunlight for extended periods of time. This may affect the camera housing
and internal components
* We recommend using Alkaline batteries in temperatures between 0 ℃to 40℃.
* Turn off the camera before removing the batteries and the memory card. The card and
the data may be damaged if the memory card is inserted or removed while the camera is
still on.
* Remove the batteries and memory card before storing the camera for long periods of
time, to avoid power loss and camera damage
* Clean the lens with a blower (typically a small device with a rubber bulb attached to one
end that you pump to produce a stream of air out the other end), or wipe it with a soft cloth
in a spiraling motion to remove fingerprints or dust.
* The temperature rise is normal when digital cameras in use for a long time
* Do not touch the lens when use the camera, so as to avoid the poor effect
* Please use the air blower (special lens blowing equipment) to clean lens or use special
lens-cleaning cloth to clean fingerprint or dust on the surface.

Accessories
1. Rubber strap
2. Rubber gasket
3. Velcro
4. USB cable
5. TV cable
6. HDMI cable
7. Battery
8. Charger
9. Charge pedestal
10. User manual
11. Driver Disk
12. Remote controller
13. Short Velcro strap
14. Long Velcro strap
15. Helmet grip
16. Handlebar grip
17. Suction cup bracket
Interface introduction
1. Lens
2. LCD screen
3. Shutter key
4. Setting key
5. Mode key

6. Power key
7. Laser light key
8. Laser light
9. Microphone
10. Radiating screw
11. Mini-USB port
12. AV port
13. HDMI port
14. Battery cover knob
15. Battery cover
16. SD card slot
17. Charge indicator light
18. Working indicator light
Camera Mounting Description
The camera can be mounted in a number of ways. (Turn it anti-clockwise to screw tight)
Please follow the methods of mounting as suggested below:
Fixing the position of the camera
a) Turn it anti-clockwise to screw the camera tight and fix it into position.
b) Turn it clockwise to unscrew the camera.
Mounting the camera onto the helmet using the silicon rubber strap
1+2. Thread the silicon rubber strap through the helmet grip.
3. Mount the helmet grip to the helmet using the silicon rubber strap.
4. Slide the camera into the helmet grip. Turn it anti-clockwise
5. Adjust the angle of the camera making sure it's tight.
To avoid damaging the camera, the mount lock at the base must
be loosened before twisting the camera.

Mounting the camera using the Velcro strap:
1+2.Place the helmet grip on the helmet, and thread the Velcro strap through the helmet
grip.
3. Secure the Velcro strap by fastening it through the helmet vents.
4. Slide the camera into the helmet grip, then adjust the angle of the camera and make
sure it's tight.
Mounting the camera using the handlebar grip:
1. Place the handlebar grip on the handlebar.
2. Add the screw and nut to hold the handlebar grip securely.
3. Slide the camera into the handlebar grip and make sure the handlebar grip is locked
with the camera.
4. Adjust the angle of the camera.
Install and take out battery
Please use the appropriate lithium-ion battery (above 3.7V 1700mAH), any inferior
batteries will severely damage the camera.
1) Unscrew the cover at the end of the unit.
2) Open the battery slot door according to the direction of arrow.
3) Insert battery into the battery slot according to the polarity direction as shown.
4) Close the battery slot door and twist the clasp.
5) Unscrew the cover at the end of the unit and open the battery slot door according to
the direction of arrow, when take out the battery.

Important: When the battery is low, the low battery icon will appear on the LCD display.
Always upload video footage to your PC prior to replacing batteries to avoid memory loss
Insert and take out storage card
1. Insert storage card
1) Open the cover at the end of the unit
2) Insert the card according to the direction as show
3) Close the cover
2. Take out the storage card
1) Turn off the camera and open the cover at the end of the unit.
2) Press the end of the storage card slightly, it will automatically eject.
3) Close the cover
Notice:
a) Before using the SD card, please check whether the key lock on it is locked;
b) Please confirm the inserting direction of the SD card because reversed inserting
may cause damage to the camera and the SD card;

Battery charging
1. Install the battery into the battery slot according to the above methods and close the
cover, then connect the charger to the USB port and plug in the power. When
charging, the red light on, full it off.
2. Take out the battery, put it into the charger pedestal according to "+", "-" poles, connect
the charger pedestal to the charger, and then connect the charger to the power socket.
When the battery is being charged, the light on the charger pedestal is red. When the
battery is fully charged, the light changes to green.
Notice:
a) In order to improve the efficiency of the charge, please charge under the
shutdown state
b) Please make sure the charger and the plug power
Button functions description
Laser light key: positioning and tracking the object during taking the video, under TV mode
it can be applied as delete key to the current file and also TV screen icon clearing key.
On/Off key: power on and off
Shutter key: Under standby statues for taking video or stopping; in menu setting mode to
adjust; in the TV playback mode used to play and pause; when connected to PC used to
shift PC cam and Disk.
Setting key: Under standby statues to enter into menu setting; in the TV playback mode

used to select the next file
Mode key: In menu mode, used to confirm and exit the menu setting; in the TV playback
mode used to stop playback.
Operation description
Turn On the Camera
Press the power key , The LCD screen and the blue light will light up (one beeping
sounds). It enters into video mode, the time displayed on screen is the remaining time for
taking video, the first two digits display hours, the last two digits display minutes.
Turn Off the Camera
Press and hold the power key for 2 seconds, The LCD display OFF (you will hear
beeping sounds), and then the camera will turn off.
Memo: If there is no operation under standby status, camera will turn off automatically.
Take videos
1. Turn the camera on,
Press the 'Shutter key ' to start recording. The blue light flickers
The LCD will display the recorded time. The “H” means hours, “M” means minutes; “S”
means seconds.
2. Press again the Shutter key ' to stop recording,
The video remaining record time will be shown on LCD screen, (The remaining record
Laser lightOn/Off keyShutter key Setting keyMode key

time is an estimate only).
The system will stop taking video if the built in memory or external memory is full, the LCD
screen will display “Full”.
3. When it starts recording, the digits display on LCD are Minutes and Seconds
(changing per second); after recording exceeds 1 hour, the digits display on LCD
are Hours and Minutes (changing per Minute).
4. When video footage size reaches to 2GB, system will save a section video footage
automatically and continuous creating a new section video footage.
5. When camera is saving the video footage, LCD will display “SAVE”.
Remark: 1) If inserted with a mass storage card, it may take a bit longer time waiting to
get started recording or to save video footage
Laser Light
The laser light is designed to help you to aim at the object you want to shoot.
1. Under any mode press the laser light key will light up the laser light, loosen the pressing
the laser light turns off.
2.Under the video mode, to aim at the object/direction you want to take video, press the
laser light for positioning and tracking, the direction of laser light is where the camera lens
shooting at.
Remote controller instruction
1. Turn Camera power on, press “■” key the camera laser light will light up; loose pressing the
laser light turns off.
2. Press “●” key once to start video recording, press again to pause video recording.
Menu Setting
Press and hold the “SET” key for 2 seconds to enter into setting mode, press the
“shutter” key for selection,press the “SET” key to confirm and come to next menu. Or
press “MODE” key to confirm and quit the setting.
1. Setting the resolution (720P / VGA Shifting)
Turn on the camera, press and hold the "SET" key for 2 seconds, when the 720P icon
flickers, press “shutter” key to select the resolution (720P/VGA) you need, press “SET”
key to confirm and enter into the delete mode, or press “MODE” key to confirm and quit
the setting.
2. Deleting video footage
Turn on the camera, press and hold the “SET” key for 2 seconds, the 720P icon

flickers, press “SET” key into the delete mode, and press the “shutter” key to select “ NO、
ONE、ALL”, press “SET” key to confirm and enter TV System switching mode, or press
“MODE” key to confirm and quit the setting.
3. TV System switching
Turn on the camera, press and hold the “SET” key for 2 seconds, the 720P icon
flickers, press “SET” key to enter into the delete mode, press again “SET” key into TV
system switching mode, the letter “P” displayed on the LCD screen flickers, press
“ SHUTTER” key to select “P”-PAL, “N”-NTSC, press “SET” key to confirm and it will enter
into time setting afterwards, or press “MODE” key to confirm and quit the setting.
Memo: The default TV system is NTSC.
Time Setting
Turn the camera on, Press the “ SET” key for 2 seconds, when the 720P icon flickers,
press “SET” key for one time enter delete mode, press another time enter TV system
switching mode, press again the “SET” key into time setting mode, then the 3rd digit of
Year flickers, press the “shutter” key to adjust number (0-9), press “SET” key enter the last
digit of the year flickers, press the “shutter” key to adjust number (0-9), press “SET” key to
confirm and enter the first digit (flickers) of the month setting, press “SET” key to confirm
and enter the second digit (flickers) setting, press “shutter” key to adjust (0-9); press
“SET” key enter the first digit of hour (flickers) setting, press “shutter” key adjust number
(0-2),press ”SET” key to confirm and enter the second digit (flickers) of the hour setting,
press ”shutter” key to adjust (0-9); press “SET” key to confirm and enter the first digit
(flickers) of minute setting, press the “shutter” key to adjust number (0-6), press “SET” key
to confirm and enter second digit setting, press the “shutter” key to adjust number (0-9),
press “SET” key to confirm and quit the time setting mode, and return to video mode.
Remark: 1. Under any mode, press “MODE” key will quit menu setting and save the
current setting.
2. If you want to skip the year, months, or other settings, press the “SET” key
to enter into next setting. e.g. when set the year, if there is no need setting the third
digit, press the “SET” key once, then it will skip to next setting the forth digit of
year.
Playing back video footage on TV

1. TV OUT mode
Turn on the camera, connect to video input port and audio input port of TV by using one
side of the AV cable provided. (Remark: video plug is yellow, audio plug is red / white).
The other side connect to the action camera, “AV” will appears on the Cam LCD, TV is
under the playback status, press “SET” key, you could select next video footage, press the
“shutter” key to begin to playback the video, press again the “shutter” key to pause
playback, to continuous video playing press the “shutter” key again; Under playback or
stop status, press the laser light key to clear all the characters on TV. Press again the
laser light key to resume normal; Then long press the menu key for 3 seconds, it will
delete the current video footage. When there is no files in camera memory, TV will display
“NO IMAGE”
Note: Under AV status, pull out the AV cable, camera will shut off automatically.
2. HDMI mode
Turn on the camera, connect action cam to TV by using the HDMI cable provided, choose
AV mode on TV. “HD” appears on LCD display, TV is under the playback the video, press
“SET” key to choose next file, press “shutter” key to playback current file, and press again
“shutter” key to pause playback, to continuous video playing press the “shutter” key;
Under playback or stop status, press the laser light key to clear all the characters on TV.
Press again the laser light key to resume normal; long press the laser light key for 3
seconds, it will delete the current video footage. When there is no file in camera memory,
TV will display”NO FILE”.
Pull out the AV cable, the camera will shut off automatically.

To view the image on computer
1. Check out the video file.
1) Turn on the camera, connect the Action Cam to PC via the USB cable provided. “PC”
appears on the Action Cam LCD screen, open “My computer” check a new disk on your
computer, open the new disk you will see the video footages,( Remark: If there is no
external memory card. PC will display the built in Memory disk, if there is SD card. PC will
display SD card, storage disk.) Open the Disk and view the image.
2) Pull out the USB cable, the camera will shut off automatically.
Remark:
1. When the voltage below 3.6V, low battery icon will displayed in left corner of LCD
screen, you should prepare to change the battery, the camera will shut off automatically
when it runs out of battery.
2. When system detects that there is SD card inserted, SD icon will display on LCD
screen.
2. PC cam
a) Install the driver
Before using the PC cam, install the driver required, put the CD ROM provided into the
computer driver, the following icon will show on the display:
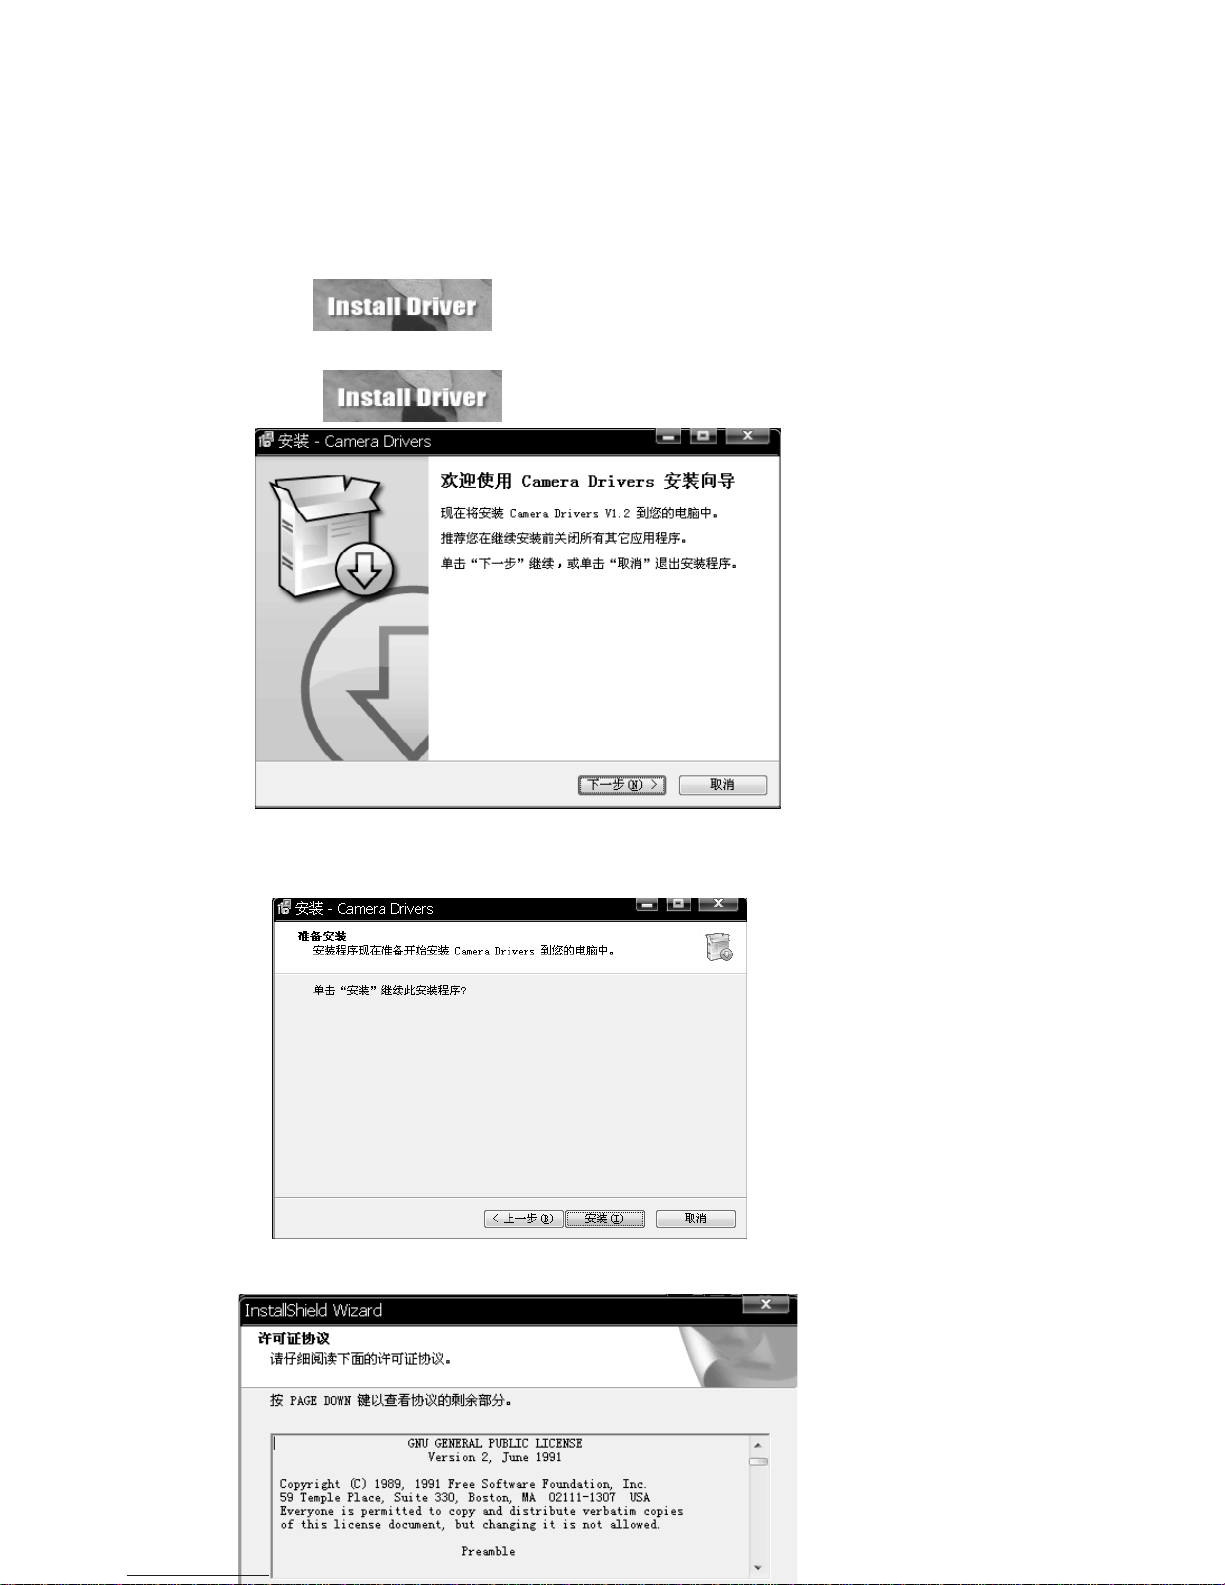
再点击:“ ”,出现:
then click “ ” icon, will display
点击下一步,出现:
click the “next” icon, display:
点击“安装”;出现:
click “Install” icon; display:
点击“是”,出现:
click “YES” icon, display:
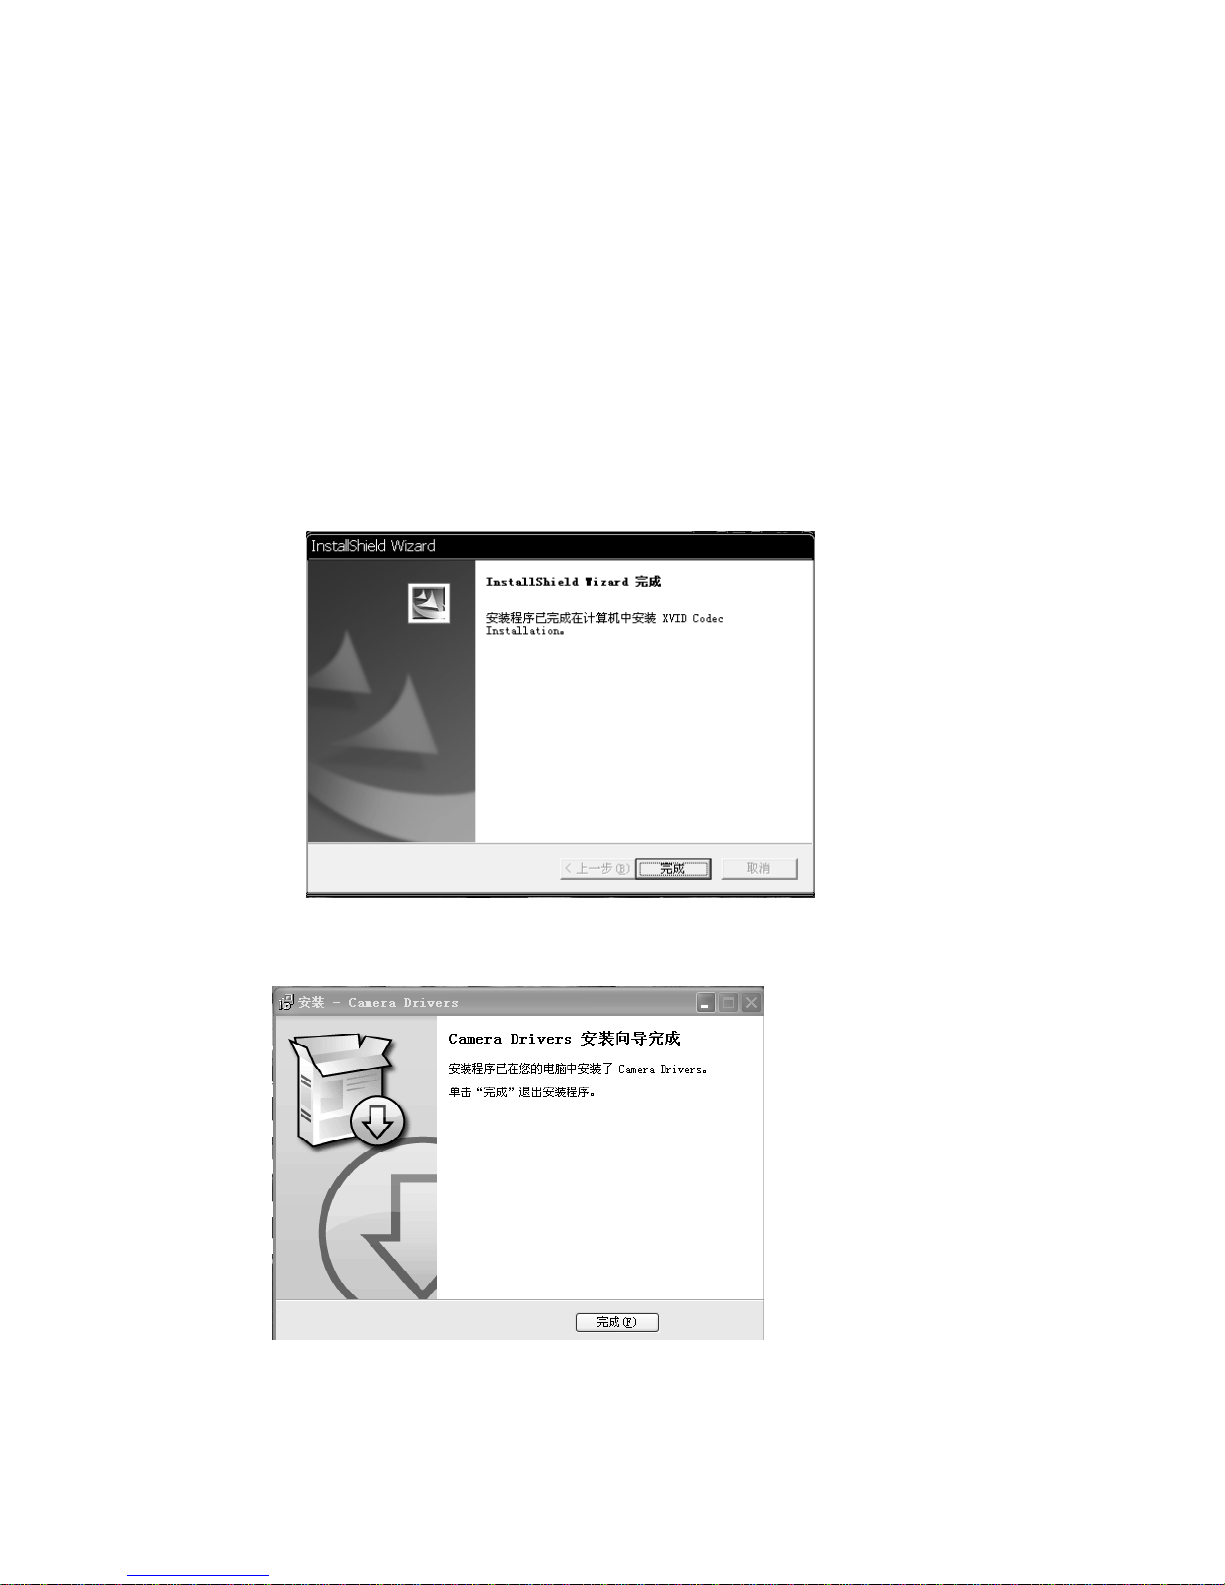
再点击“完成”出现:
then “FINISH” icon display:
再点击“完成”即可。
Click the “FINISH” icon, and then it is ok!
b) Check out the camera

Turn on the camera, connect the Action Cam to PC via the USB cable provided, “PC”
appears on the Action Cam LCD screen, short press “shutter” key enter into Pc cam mode,
open “My computer”, click “ ” icon, the Pc cam will appear
Troubleshooting
There is no display?
zAre batteries property installed?
zDo the batteries need replacing?
After the Action Cam is connected to my PC, it cannot find the New drive in the “My
computer’s folder.
zMake sure each end of the Action Cam USB cable is properly and firmly connected。
zMake sure your USB port works. Try connecting other USB device to check if USB
port has a malfunction.
zMake sure connect to the PC cam.
I can’t capture the video footage.
zMake sure there’s enough space on the internal memory of Action cam of the SD
card. The display will tell you how much time left for video recording.
zMake sure the SD card is not locked if you have inserted the SD card. It can’t take
video footage if the SD card is locked.
Memo:
This machine is HD camera, guarantee to capture high-quality video/ Image
zRecommend using high speed SD card.
zRecommend formatting the card before recording.
The remaining time is not accurate.
zThe remaining time is not always accurate, it’s an estimate.
zThe remaining time depends not only on the time recorded, but on he color density of
the video footage, Under conditions with high contrast, such as outdoor, the actual
time available will be less than under low-contrast conditions, such as indoors.
I can’t play the video footage on my television.
zMake sure the camera have been turn on;
zMake sure each end of the AV cable is properly and firmly connected to Action cam
and your television;
zPlease confirm the TV have been turn to the AV or HDMI mode.
The image is not clear or dim.
zCheck out the lens whether there has any stain or finger print; use the Lens cloth to
wipe up the Lens before shooting.
I can’t view the PC cam.

zMake sure the driver has been installed;
zMake sure it has switch to PC cam mode。
Remote controller doesn’t work.
●Please replace the inside battery(3V 600mAh) in remote controller.
Technical Specification
Sensor 5.0 Mega pixels low-light sensitivity COMS sensor.
Resolution 720P(1280*720)/30FPS、VGA(640*480)/60FPS
Video PAL/NTSC/HDMI output
Audio Built-in microphone, Stereo audio output
Storage Built-in Memory 64MB.SD memory Card slot support up to 32 G
(Not included)
Remote controller High frequency 2.4G, all direction remote control within 8 meters in open
areas
Lens 120 degree 5G All glass Lens
Movie format AVI
Battery Rechargeable lithium battery 3.7V/1700mAh
Port USB2.0/TV OUT/HDMI
Dimension 129*53.5*72mm
Table of contents
Popular Camcorder manuals by other brands

Samsung
Samsung VP-D6040 Owner's instruction book

Panasonic
Panasonic AJD810 - DVCPRO DIG CAMERA operating instructions

Canon
Canon VIXIA HF R11 instruction manual

JVC
JVC EverioR GZ-R405 Detailed user guide

Dante
Dante DLS1101 Installation and operation manual
 operating guide")
Sony
Sony Handycam 2-887-515-14(1) operating guide


