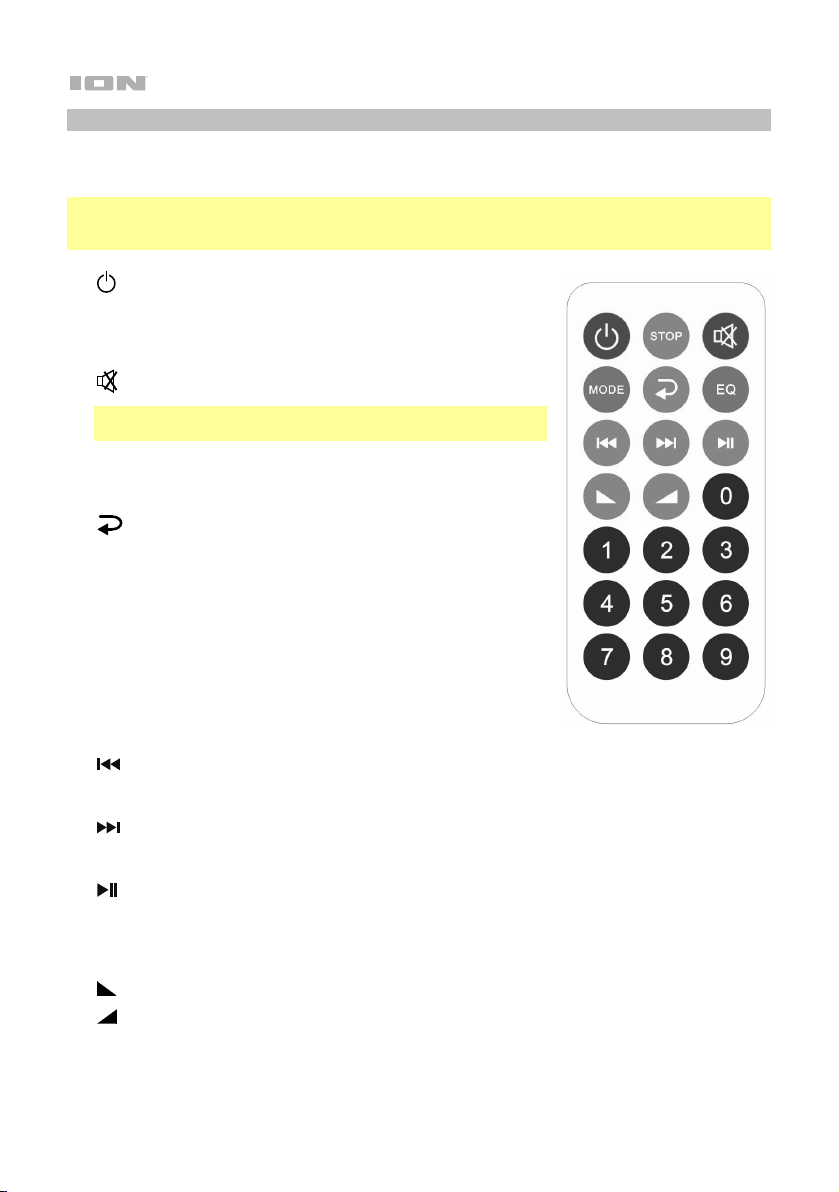
ION POWER GLOW 200 User manual

2

3
Quickstart Guide (English)
Introduction
Thank you for purchasing the Power Glow 200. At ION, your entertainment is as important to us as it is
to you. That’s why we design our products with one thing in mind—to make your life more fun and more
convenient.
Box Contents
Power Glow 200 Wireless Remote Control
Microphone with Cable Quickstart Guide
Power Cable Safety & Warranty Manual
Support
For the latest information about this product (documentation, technical specifications, system
requirements, compatibility information, etc.) and product registration, visit ionaudio.com.
For additional product support, visit ionaudio.com/support.
Rechargeable Batteries
Note: Before you first use the product, please fully charge the battery. Your unit was purposely shipped
with a reduced battery charge to ensure safe transit. Use the included power cable to connect the unit
to a power outlet and let it charge for up to 9 hours. This helps ensure the longest life for your battery.
Rechargeable lead-acid batteries are the same type used in automobiles. As with your car battery, how
you use this battery has a significant impact on its lifespan. With proper use and treatment, a lead-acid
battery can last for years. Here are some recommendations for getting the longest life from the internal
battery.
General Usage Fully charge the battery before using it.
Charge the battery completely after each use.
Storage For best product longevity, do not store at exceedingly hot (greater than 90°F/32°C) or
exceedingly cold (less than 32°F/0°C) temperatures.
It is acceptable to leave your sound system plugged in. This will not overcharge the
battery.
If you leave the battery level low and do not charge it for 3 months, it may permanently
lose capacity.
Repair If the battery fails to charge, check your fuse near the power cable input. If your fuse is
intact and it still will not charge, contact ION Audio at ionaudio.com.
Disposal Bring the unit to a recycling center or dispose of in accordance with local ordinances.
Caution: Do not expose Power Glow 200 to rain or standing water.

4
Setup
1. Make sure all items listed in the Box Contents are included in the box. Look in the box under the
foam sheet for the power cable and microphone.
2. Read the Safety & Warranty Manual before using the product.
3. Study the Connection Diagram.
4. Make sure all input devices (such as microphones, CD players, or digital media players) are turned
off with their volume settings set to “zero.”
5. Connect all devices as shown in the Connection Diagram.
6. Switch everything on in the following order:
• Audio input devices (e.g. microphones, instruments, CD players)
• Power Glow 200
7. When you are finished using Power Glow 200, switch everything off in the following order:
• Power Glow 200
• Audio input devices
Connection Diagram
Items not listed under the Box Contents are sold separately.
Microphone
SD Card
USB drive
Smartphone
Tablet
Power

5
Features
Rear Panel
1. Media Panel Buttons: Controls for
the USB/SD, FM radio, and
Bluetooth audio sources. These
controls include mode selection
and music playback options. See
Media Panel for more information.
2. USB Port: Connect your USB flash
drive here to play music. You can
also use this port for charging the
USB device.
3. SD Card Slot: Insert your SD card
here to play music.
4. Display: Shows the Media Panel
modes: USB/SD, FM radio, and
Bluetooth. The icon for the
currently selected mode will be
illuminated on the Display.
Note: The Display comes with a
plastic protector on it. Remove this
for optimal viewing.
5. Mic Inputs (1/4”/6.35 mm & XLR):
Connect a dynamic microphone to
the 1/4” (6.35 mm) or XLR inputs.
Control the volume of the inputs
using the Mic Input Volume knob.
6. Mic Input Volume: Turn this knob to adjust the input volume of the Mic Input.
7. Aux Inputs (1/8”/3.5 mm and 1/4”/6.35 mm):Connect a CD player, digital media player, or other
audio source to the 1/8” (3.5 mm) and 1/4” (6.35 mm) stereo auxiliary inputs. Control the volume
using the Aux Input Volume knob.
8. RCA Inputs: Connect a CD player, digital media player, mixer, or other media source to these
inputs. Control the volume using the Aux Input Volume knob.
9. Aux Input Volume: Turn this knob to adjust the input volume of the Aux Input, XLR Input, and
RCA Inputs.
10. Mix Out (1/4” / 6.35 mm):Connect this output to another active (powered) speaker.
11. Mic Echo: Use this knob to increase or decrease the echo effect on the Mic Inputs.
12. High EQ: Increases or decreases the high (treble) frequencies for the Mic Inputs, Aux Inputs, RCA
Inputs, and Media Panel audio sources at a range between -12 dB to +12 dB.
13. Low EQ: Increases or decreases the low (bass) frequencies for Mic Inputs, Aux Inputs, RCA
Inputs, and Media Panel audio sources at a range between -12 dB to +12 dB.
14. Master Volume: Turn this knob to adjust the overall output volume of the loudspeaker.
1
2
34
5
6
7
8
9
10
11 12
13
14
15 16
17
18
19
20

6
15. Power/Clip LEDs: The Power LED will be lit green when Power Glow 200 is powered on. The Clip
LED will flash red if the signal from the input jacks or Media Panel audio source is clipping. If this
happens, decrease the setting of the Master Volume knob or the volume knob for the Aux/Mic
Input (if a loud device is plugged into either).
16. Light Mode Button: Press this button to toggle between three modes for the lights on the front
panel:
• Color Cycle: The lights slowly glow and cycle through colors. This is the default mode when
Power Glow 200 is first powered on. Press and hold the light mode button to freeze the lights on
one color. Press and release the button to unfreeze.
• Beat Sync: The lights flash and change colors according to the tempo of the music playing on
the speaker.
• Off: The lights turn off.
17. Power Cable Input (IEC):Insert the included power cable here to charge the unit.
18. Battery Level LEDs: Use these LEDs to check the current battery level. When the battery is fully
charged, it can deliver a life of up to 25 hours (depending on how you’re using the Power Glow 200).
The 3, 2, and 1Battery Level LEDs (which light up in green) correspond respectively to 75%, 50%,
and 25% battery life. The Low LED will be lit red when the battery has less than 25% of its life left.
When the battery is fully charged, the 3, 2, and 1Battery Level LEDs will all be lit.
When Power Glow 200 is connected to wall power and the battery is charging, the Charging LED
will be lit green.
19. Fuse Holder: If the unit’s fuse is broken, remove the Fuse Holder and replace the broken fuse with
one that has the correct rating (as indicated on the Fuse Holder). Using a fuse with an incorrect
rating can damage the unit and/or fuse.
20. Power Switch: Turns Power Glow 200 on or off.

7
Media Panel
Use the following buttons on the Media Panel to control the USB/SD, FM Radio, and Bluetooth audio
sources.
MODE
Mode: Press this button to switch the audio source between USB/SD, FM radio, and
Bluetooth. The default mode when powering on Power Glow 200 is Bluetooth. The USB/SD
mode is only selectable if a USB drive or SD card is plugged into Power Glow 200;
otherwise, the Mode button will toggle between Bluetooth and FM radio only.
Note: Your USB drive or SD card cannot be more than 16 GB and it must contain
playable files in order for its data to appear properly in the Display. It can have MP3,
WAV, FLAC, or APE files. When you connect a USB drive or SD card with playable files,
Power Glow 200 will order the files alphabetically by folder on the root directory and then
by track name in the folder.
When FM Radio is selected as the audio source, press and hold the Mode button in
order to access your preset radio stations. See Using the Radio for more information.
When USB/SD, FM Radio, or Bluetooth is selected as the audio source, double-press
this button cycle through the digital EQ presets.
Play/Pause: When USB/SD is selected as the audio source, press this button to
play/pause the currently selected track or press and hold this button to cycle through the
five repeat/shuffle options: 1) play the USB/SD folder’s tracks in order with repeat/shuffle
off (OFF), 2) play the tracks in random order (Rd0), 3) play the current USB/SD track on
repeat (ONE), 4) play all the tracks on the USB drive or SD card on repeat (ALL), and 5)
play the current folder’s tracklist on repeat (F0d).
When Bluetooth is selected as the audio source, press this button to play/pause the
currently selected track or press and hold this button to disconnect the currently paired
Bluetooth device.
When FM radio is selected as the audio source, press and hold this button to save the
currently selected radio station as a preset. See Using the Radio for more information.
If you have turned off the Media Panel with the remote control, you can double-press this
button to turn the Media Panel back on.
V
OL-
Previous / Vol-: When USB/SD or Bluetooth is selected as the audio source, press this
button to go to the previous track in the playlist or press and hold this button to lower the
volume of the audio source.
When listening to the FM radio, press this button to decrease the radio frequency or
press and hold this button to seek backward.
V
OL+
Next / Vol+: When USB/SD or Bluetooth is selected as the audio source, press this
button to go to the next track in the playlist or press and hold this button to increase the
volume of the audio source.
When listening to the FM radio, press this button to increase the radio frequency or press
and hold this button to seek forward.
Note: In some apps on Bluetooth devices, pressing the (Previous) or (Next) buttons may
change the playlist or music genre rather than the track.

8
Media Panel Remote
Aim the remote straight at the front of the speaker woofer. Room lighting and battery life can affect the
operating range of the remote control.
Note: In order to use the remote control for the first time, first pull out the tab attached to the battery
compartment. To change the remote battery, follow the diagram located on the back of the remote. Use
a 3 V DC CR2025 lithium button cell battery for replacement.
• (Power): Press this button to turn the media panel on or off.
• Stop: When USB/SD is selected as the audio source, press this
button to stop the USB drive or SD card from playing and return to
the beginning of its tracklist.
• (Mute): Silences music playback from media panel sources.
Note: Press and hold this button to reset your Power Glow 200 to
the factory default settings.
• Mode: Selects the media panel audio source: USB/SD, FM radio,
or Bluetooth. Press and hold this button to access the saved radio
presets. See Using the Radio for more information.
• (Repeat/Shuffle): When USB/SD is selected as the audio
source, press this button to cycle through these five playback
options: play the USB/SD folder’s tracks in order with
repeat/shuffle off (OFF), play the tracks in random order (Rd0),
play the current USB/SD track on repeat (ONE), play all the tracks
on the USB drive or SD card on repeat (ALL), and play the current
folder’s tracklist on repeat (F0d). When you select an option, the
Display will temporarily update to show your selection.
• EQ: Selects one of the following digital EQ presets to use with a
media panel source: No EQ (OFF, factory default setting), Pop
(POP), Rock (rOC), Jazz (JA2), Classical (CLA), Country (COU),
Bass (BAS).
• (Previous): When USB/SD or Bluetooth is selected as the audio source, press this button to go
to the previous track in the playlist. When listening to the FM radio, press this button to decrease the
radio frequency or press and hold this button to seek backward.
• (Next): When USB/SD or Bluetooth is selected as the audio source, press this button to go to
the next track in the playlist. When listening to the FM radio, press this button to increase the radio
frequency or press and hold this button to seek forward.
• (Play/Pause): When USB/SD is selected as the audio source, press this button to play/pause the
currently selected track. When Bluetooth is selected as the audio source, press this button to
play/pause the currently selected track or press and hold this button to disconnect the currently
paired Bluetooth device. When FM radio is selected as the audio source, press and hold this button
to save the currently selected radio station as a preset. See Using the Radio for more information.
• (Volume Down): Decreases the media panel source volume.
• (Volume Up): Increases the media panel source volume.
• Number Keys (0-9): Provides channel selection for FM radio stations and track selection for USB
and SD card sources. When selecting a track, enter the number corresponding to the desired
track’s alphabetical position in the USB drive or SD Card’s list of files.

9
Operation
Pairing with a Bluetooth Device
1. Turn on your Bluetooth device.
2. Power on Power Glow 200.
3. Use the Mode button to select Bluetooth mode, which appears as "bt" in the display. Power Glow
200 will automatically go into pairing mode to search for Bluetooth devices.
Note: You will know you are in pairing mode when the Bluetooth icon (bt) is flashing on the Display.
Also, automatic voice prompts from the speaker will alert you of the device’s status.
4. Navigate to your Bluetooth device’s setup screen. Then find and select POWER GLOW 200. The
Bluetooth icon (bt) will be solidly lit on the Display.
Note: Users should consider updating their device’s operating system if experiencing trouble with
pairing or playing music.
To pair Power Glow 200 with a different Bluetooth device, press and hold the Play/Pause button on
the unit or remote control, which will disconnect the currently paired Bluetooth device and restart the
pairing process. The Bluetooth icon (bt)will flash on the Display to indicate that Power Glow 200 is
searching for a Bluetooth device to pair with. You should move the Bluetooth device you were
previously paired to out of range, disable its Bluetooth capacity, or choose to “Forget” Power Glow 200
in its settings menu.
To stop using Bluetooth with Power Glow 200, switch out of Bluetooth mode by pressing the Mode
button.
If you would like to disable (or enable) the voice prompts, press and hold the Mode button for two
seconds.
Note: Bluetooth must be selected as the audio source in order to disable (or enable) the voice prompts.

10
Using the Radio
Selecting a Radio Station:
1. Press the Mode button on the unit or remote control until the FM Radio is selected as the audio
source.
2. Adjust the radio frequency by pressing the (Previous) or (Next) button on the unit or the
remote control. To “seek” (skip to a radio frequency with a clear signal), press and hold the
(Previous) or (Next) button on the unit or the remote control.
Saving a preset:
1. Select the radio station that you want to save as a preset.
2. Press and hold the (Play/Pause) button on the unit or the remote control. The Display will show
one of the 30 available preset numbers (P01–P30).
3. Use the (Previous) or (Next) buttons on the unit or remote control to scroll through the
preset numbers and find the one that you would like to save the station to. The preset numbers will
update on the Display as you scroll through them.
4. Once you’ve found the preset number that you would like to save the station to, press the
(Play/Pause) button. The preset will then be saved.
Selecting a preset station:
1. While the radio is on, press and hold the Mode button on the unit or the remote control.
2. Use the (Previous) or (Next) button on the unit or the remote control to cycle through the
saved presets. The Display will show the preset numbers as you cycle through them (P01–P30).
3. Once you find the preset number for the station you want to hear, press the (Play/Pause) button
on the unit or the remote control to play the preset station.
Connecting Two Speakers
To link two Power Glow 200 speakers:
1. With the Power Switch on each speaker turned to the off position, connect each speaker to a
power outlet.
2. Plug a 1/4” cable into the Mix Out located on the rear panel of one Power Glow 200 speaker. This
speaker (the master) is the one to which you will connect audio sources such as a Bluetooth device,
microphone, or USB flash drive.
3. Plug the other end of the 1/4” cable into the 1/4” Aux Input on the rear panel of your second Power
Glow 200 speaker. This second speaker will receive the audio from any devices connected to the
first speaker (the master).
4. Power on both speakers using their Power Switches.
5. Connect your audio sources to the first speaker (the master).
6. Make sure that each speaker’s Master Volume control is set to the same position.
7. With one of your audio sources playing, gradually turn up the Aux Input Volume on the second
Power Glow 200 speaker until the volume of this speaker matches the volume of the first speaker
(the master).

11
Troubleshooting
If the sound is distorted: Try lowering the volume control of your sound source, musical instrument, or
microphone. Also, try to reduce the overall volume of Power Glow 200 using the Master Volume knob.
If there is too much bass: Try adjusting the tone or EQ control on your sound source to lower the bass
level. This will allow you to play the music louder before clipping (distortion) occurs.
If there is a high-pitched whistling noise when using microphones: This is probably feedback. Point
the microphone away from the speaker.
If you can’t hear the microphone over the music volume: Turn down the music volume from your
source.
The Display shows “NONE”:If a USB drive or SD card is already properly inserted, make sure it
contains playable files (MP3s, WAVs, and WMA files).
If you cannot connect your audio device to Power Glow 200 via Bluetooth:
• Have your audio device (e.g., smartphone or tablet) and Power Glow 200 as close together as
possible while trying to connect. Make sure both the audio device and Power Glow 200 are
unobstructed by walls, furniture, etc.
• Reset the Bluetooth connection on Power Glow 200 to disconnect Power Glow 200 from any other
audio device and restart the search process. If this does not work right away, power off Power Glow
200 and then power it back on.
• Reset the Bluetooth connection on your audio device by turning Bluetooth off and back on. You can
find this under the Bluetooth menu in the Settings for your phone or other audio device.
If this does not work, and you have connected to Power Glow 200 before, find Power Glow 200 in
the list of available or previously connected devices in your audio device's Bluetooth menu, tap the
"gear" or “i” icon located next to it and then select Unpair or Forget. Turn Power Glow 200 off and
back on and try pairing again once it reappears in your available devices list.
Note: If Power Glow 200 has been paired to another audio device recently that is still within range,
you may need to repeat this process with that audio device to fully disconnect.

12
Guía de inicio rápido (Español)
Introducción
Gracias por comprar el Power Glow 200. En ION, su entretenimiento es tan importante para nosotros como
para usted. Por eso es que diseñamos nuestros productos con una sola cosa en mente—hacer que su vida sea
más divertida y cómoda.
Contenido de la caja
Power Glow 200
Micrófono y cable
Cable de alimentación
Control remoto inalámbrico
Guía de inicio rápido
Manual sobre la seguridad y garantía
Soporte
Para obtener la información más reciente acerca de este producto (documentación, especificaciones técnicas,
requisitos de sistema, información de compatibilidad, etc.) y registrarlo, visite ionaudio.com.
Para obtener soporte adicional del producto, visite ionaudio.com/support.
Baterías recargables
Nota: Antes de utilizar por primera vez el producto, cargue completamente la batería. Su unidad se despachó
intencionalmente con una carga reducida de la batería por razones de seguridad en el tránsito.
Utilice el cable de alimentación incluido para conectar la unidad a una toma de corriente y permita que la
unidad se cargue durante hasta 9 horas. Esto contribuye a asegurar la vida útil más larga de su batería.
Las baterías de plomo-ácido recargables son del mismo tipo que se usa en los automóviles. Al igual que con la
batería del vehículo, la forma en que se usa tiene una influencia significativa en la duración de su vida útil. Con un
uso y tratamiento correctos, una batería de plomo-ácido puede durar varios años. He aquí algunas
recomendaciones para prolongar la vida útil de la batería interna.
Uso general Cargue completamente la batería antes de usarla.
Cargue la batería completamente después de cada uso.
A
lmacenamiento Para lograr la mayor longevidad del producto, no lo almacene a temperaturas muy altas
(superiores 32°C/90°F) o muy frías (inferiores a 0°C/32°F).
Es aceptable dejar su sistema de sonido enchufado. No sobrecargará la batería.
Si deja que el nivel de la batería baje y no la carga durante 6 meses, puede perder
permanentemente su capacidad.
Reparación Si la batería no se carga, compruebe su fusible cerca de la entrada del cable de
alimentación. Si el fusible está intacto y la batería sigue sin cargarse, póngase en contacto
con ION Audio en ionaudio.com.
Disposición final Lleve la unidad a un centro de reciclaje o deséchela de acuerdo a las ordenanzas locales.
Precaución: No exponga el Power Glow 200 a lluvia ni lo coloque en agua.

13
Instalación
1. Asegúrese de que todos los artículos indicados en Contenido de la caja estén incluidos en ella. Localice
el cable de alimentación y el micrófono en la caja bajo la hoja de espuma de poliestireno.
2. Lea el Manual sobre la seguridad y garantía antes de utilizar el producto.
3. Estudie el Diagrama de conexión.
4. Asegúrese de que todos los dispositivos de entrada (tales como micrófonos y reproductores de CD o
reproductores de otros medios digitales) estén apagados y con sus ajustes de volumen en “cero”.
5. Conecte todos los dispositivos como se muestra en el Diagrama de conexión.
6. Encienda todo en el siguiente orden:
• Dispositivos de entrada de audio (por ejemplo, micrófonos, instrumentos, reproductores de CD)
• Power Glow 200
7. Cuando haya terminado usar el Power Glow 200, apague todo en el siguiente orden:
• Power Glow 200
• Dispositivo de entrada de audio
Diagrama de conexión
Los elementos que no se enumeran en Contenido de la caja se venden por separado.
Tableta
Micrófono
Tarjeta SD
Unidad flash USB
Teléfono inteligente
(smartphone)
Alimentación

14
Características
Panel trasero
1. Botones del panel de medios:
Controles para las fuentes de audio
USB/SD, radio FM y Bluetooth.
Estos controles incluyen selección
del modo y opciones para
reproducción de la música.
Consulte en Panel de medios a
continuación las descripciones de
los controles.
2. Puerto USB: Conecte su unidad
flash USB para reproducir música.
También puede utilizar este puerto
para cargar un dispositivo USB.
3. Ranura para tarjeta SD: Inserte su
tarjeta SD aquí.
4. Pantalla: Muestra los modos del
panel de medios: USB/SD, radio
FM (si es aplicable) y Bluetooth. El
símbolo del modo actualmente
seleccionado se iluminará en la
pantalla.
Nota: La pantalla viene con un
protector de plástico adherido.
Quítelo para visualizar el LCD de
manera óptima.
5. Entradas micrófono (6,35 mm/1/4 pulg. yXLR): Conecte un micrófono dinámico a las entradas de
XLR o 6,35 mm (1/4 pulg.). Controle el volumen de las entradas XLR y 6,35 mm (1/4 pulg.) mediante
la perilla de volumen de entradas micrófono.
6. Volumen de entradas micrófono: Gire esta perilla para ajustar el volumen de las entradas
micrófono.
7. Entradas auxiliar (3,5 mm/1/8 pulg / 1/4”/6,35 mm): Conecte a esta entradas auxiliar estéreo de el
3,5 mm (1/8 pulg.) y 1/4” (6,35 mm) un reproductor de CD, un reproductor de medios digitales u
otra fuente de audio. Controle el volumen de salida mediante la perilla de volumen de entrada
auxiliar.
8. Entradas RCA: Conecte a estas entradas un reproductor de CD, un reproductor de medios
digitales, un mezclador u otras fuentes de medios. Controle el volumen de salida mediante la perilla
volumen de entrada auxiliar.
9. Volumen de entrada auxiliar: Gire esta perilla para ajustar el volumen de la entrada auxiliar, la
entrada línea y las entradas RCA.
10. Salida de mezcla (1/4” / 6,35 mm): Conecte esta salida a otro altavoz activo (alimentado).
1
2
34
5
6
7
8
9
10
11 12
13
14
15 16
17
18
19
20

15
11. Micrófono Eco: Use esta perilla para agregar o quitar un efecto de eco a las entradas de
micrófono.
12. Ecualización de agudos: Aumenta o disminuye las frecuencias altas (agudos) para las entradas
micrófono y línea y las fuentes del panel de medios en un rango entre -12 dB y +12 dB.
13. Ecualización de graves: Aumenta o disminuye las frecuencias bajas (graves) para las entradas
micrófono y línea y las fuentes del panel de medios en un rango entre -12 dB y +12 dB.
14. Master Volume (volumen maestro): Gire esta perilla para ajustar el volumen de salida del altavoz
Power Glow 200.
15. LED de alimentación/recorte ("clip"): El LED de encendido se iluminará con luz verde cuando el
Power Glow 200 esté encendido. El LED de recorte destella con luz roja si la señal de las entradas
o de la fuente del panel de medios se está recortando. Si esto ocurre, disminuya el ajuste de la
perilla Master Volume (volumen maestro) para la entrada Aux/Mic (si se conecta un dispositivo
de volumen elevado en cualquiera de ellos).
16. Botón de modo de luz: Pulse este botón para alternar entre tres modos de las luces del panel
delantero:
• Color Cycle (Ciclo de color): Las luces brillan suavemente y cambian de un color a otro. Este
es el modo predeterminado la primera vez que se enciende el Power Glow 200. Mantenga
pulsado el botón de modo para congelar las luces en un color. Pulse y suelte este botón
alternar los colores.
• Beat Sync (sincronizado con el ritmo): La luz parpadea y cambia de color en función del ritmo
de la música que se reproduce por el altavoz.
• Off: Las luces se apagan.
17. Entrada del cable de corriente (IEC):Inserte aquí el cable de corriente incluido para cargar la
unidad.
18. LEDS indicadores de nivel de la batería: Utilice estos LED para verificar el nivel actual de la
batería. Cuando la batería está completamente cargada, puede durar hasta 25 horas (dependiendo
en el uso que le esté dando al Power Glow 200).
Los LED Battery Level (nivel de la batería) 3, 2, y 1, que se encienden de verde, corresponden
respectivamente al 75, 50 y 25% de carga de la batería. El LED Low se encenderá de rojo cuando a
la batería le quede menos del 25% de carga. Cuando la batería esté completamente cargada, los
LED Battery Level 3, 2, y 1estarán encendidos al mismo tiempo.
Cuando el Power Glow 200 esté conectado a una toma de corriente y la batería se esté cargando,
el LED Charging (carga) se encenderá de verde.
19. Portafusibles: Si el fusible de la unidad está quemado, retire el portafusibles y reemplace el
fusible quemado por uno que sea de la clasificación correcta (como se indica en el portafusibles).
Si utiliza un fusible de especificación incorrecta, puede dañarse la unidad y/o el fusible.
20. Interruptor de encendido/apagado: Enciende y apaga el Power Glow 200.

16
Panel de medios
Utilice los siguientes botones del panel de medios para controlar las fuentes de audio USB/SD, radio
FM y Bluetooth.
MODE
Modo: Pulse este botón para conmutar la fuente de audio entre USB/SD, radio FM y
Bluetooth. El modo predeterminado al encender el Power Glow 200 es Bluetooth. El
modo USB/SD solo es seleccionable si hay una unidad de memoria USB o tarjeta SD
insertada en el Power Glow 200; de lo contrario, el botón Mode (modo) conmutará solo
entre Bluetooth y radio FM.
Nota: Su unidad de memoria USB o tarjeta SD no puede superar los 16 Gb de
capacidad y debe contener archivos reproducibles para que sus datos aparezcan
correctamente en la pantalla. Pueden almacenar archivos MP3, WAV, FLAC o APE.
Cuando conecte una unidad de memoria USB o tarjeta SD con archivos reproducibles, el
Power Glow 200 ordenará los archivos alfabéticamente por carpeta en el directorio raíz y
luego por el nombre de la pista en la carpeta.
Cuando seleccione la radio FM como la fuente de audio, mantenga pulsado el botón
Mode a fin de acceder a sus estaciones de radio predefinidas. Consulte Uso de la radio
para obtener más información.
Cuando seleccione USB/SD, Bluetooth, o la radio FM como la fuente de audio, presione
dos veces este botón para alternar entre los presets de ecualización.
Reproducción/Pausa: Cuando seleccione USB/SD como la fuente de audio, pulse este
botón para reproducir/poner en pausa la pista actualmente seleccionada o mantenga
pulsado este botón para alternar entre las cinco opciones de repetir/aleatorio:
1) reproducir las pistas de la carpeta USB/SD en orden con repetición/reproducción
aleatoria desactivado (OFF), 2) reproducir las pistas en orden aleatorio (Rd0), 3)
reproducir la pista USB/SD actual con repetición (ONE), 4) reproducir todas las pistas en
la unidad flash USB drive o tarjeta SD con repetición (ALL), y 5) reproducir la lista de
pistas de la carpeta actual con repetición (F0d).
Cuando seleccione Bluetooth como la fuente de audio, pulse este botón para
reproducir/poner en pausa la pista actualmente seleccionada o manténgalo pulsado para
desconectar el dispositivo Bluetooth actualmente conectado.
Cuando se seleccione la radio FM como la fuente de audio, mantenga pulsado este
botón para guardar la estación de radio actualmente seleccionada como preset.
Consulte Uso de la radio para obtener más información.
Si ha apagado el Panel de medios con el control remoto, puede presionar dos veces
este botón para volver a encenderlo.
V
OL-
Anterior / Vol-: Cuando se seleccione USB/SD o Bluetooth como la fuente de audio,
pulse este botón para pasar a la pista anterior en la lista de reproducción o mantenga
pulsado este botón para bajar el volumen de la fuente de audio.
Al escuchar la radio FM, pulse este botón para disminuir la frecuencia de la estación
radio o mantenga pulsado este botón para buscar estaciones hacia atrás.
V
OL+
Siguiente / Vol+: Cuando se seleccione USB/SD o Bluetooth como la fuente de audio,
pulse este botón para pasar a la siguiente pista en la lista de reproducción o mantenga
pulsado este botón para subir el volumen de la fuente de audio.
Al escuchar la radio FM, pulse este botón para aumentar la frecuencia de la estación
radio o mantenga pulsado este botón para buscar estaciones hacia atrás.
Nota: En algunas aplicaciones de dispositivos Bluetooth, al pulsar los botones (Previous) o
(Next) es posible que se cambie la lista de reproducción o género musical en lugar de la pista.

17
Control remoto del panel de medios
Apunte el control remoto hacia la parte frontal del altavoz. La iluminación de la sala y la vida útil de la pila
pueden afectar al alcance operacional del control remoto.
Nota: A fin de usar el control remoto por primera vez, extraiga primero la lengüeta fijada al compartimiento de
las pilas. Para cambiar la batería del control remoto, siga el diagrama ubicado en el reverso del mismo. Utilice
una pila de celda tipo botón de litio CR2025 de 3 VDC como reemplazo.
• (Encendido): Pulse este botón para encender y apagar el panel
de medios.
• Stop (Parar): Cuando se seleccione USB/SD como la fuente de
audio, pulse este botón para detener la reproducción de la unidad
de memoria USB o tarjeta SD y regresar al comienzo de la lista de
pistas.
• (Silenciar): Silencia la reproducción de música de las fuentes
del panel de medios.
Nota: Mantenga pulsado este botón para restaurar el Power Glow
200 a sus ajustes predeterminados de fábrica.
• Mode (Modo): Selecciona la fuente del panel de medios: USB/SD,
Bluetooth o radio FM. Mantenga pulsado este botón para acceder a
los presets de radio guardados. Consulte Uso de la radio para
obtener más información.
• (Repetir/Aleatorio): Cuando se selecciona USB/SD como la
fuente de audio, pulse este botón para alternar entre estas cinco
opciones de reproducción: reproducir las pistas de la carpeta
USB/SD en orden con repetición/reproducción aleatoria desactivado
(OFF), reproducir las pistas en orden aleatorio (Rd0), reproducir la
pista USB/SD actual con repetición (ONE), reproducir todas las
pistas en la unidad flash USB drive o tarjeta SD con repetición (ALL),
y reproducir la lista de pistas de la carpeta actual con repetición
(F0d). Cuando seleccione una opción, la pantalla se actualizará
momentáneamente para mostrar su selección.
• EQ (Ecualizador): Selecciona uno de los siguientes presets de
ecualización digital para utilizar con una fuente del panel de medios:
Sin ecualización (OFF, ajuste predeterminado de fábrica), Pop
(POP), Rock (rOC), Jazz (JA2), Clásica (CLA), Country (COU),
Graves (bAS).
• (Anterior): Cuando se seleccione USB/SD o Bluetooth como la fuente de audio, pulse este botón
para pasar a la pista anterior en la lista de reproducción. Al escuchar la radio FM, pulse este botón para
disminuir la frecuencia de la estación radio o mantenga pulsado este botón para buscar estaciones hacia atrás.
• (Siguiente): Cuando se seleccione USB/SD o Bluetooth como la fuente de audio, pulse este botón
para pasar a la siguiente pista en la lista de reproducción. Al escuchar la radio FM, pulse este botón para
aumentar la frecuencia de la estación radio o mantenga pulsado este botón para buscar estaciones hacia
atrás.
• (Reproducción/Pausa): Cuando seleccione USB/SD como la fuente de audio, pulse este botón para
reproducir/poner en pausa la pista actualmente seleccionada. Cuando seleccione Bluetooth como la
fuente de audio, pulse este botón para reproducir/poner en pausa la pista actualmente seleccionada o
manténgalo pulsado para desconectar el dispositivo Bluetooth actualmente conectado. Cuando se
seleccione la radio FM como la fuente de audio, mantenga pulsado este botón para guardar la estación
de radio actualmente seleccionada como preset. Consulte Uso de la radio para obtener más información.
• (Bajar volumen): Disminuye el volumen de la fuente del panel de medios.
• (Subir volumen): Aumenta el volumen de la fuente del panel de medios.
• Teclas numéricas (0-9): Permite la selección de canales para estaciones de radio FM y la selección de
pistas para fuentes de tarjeta SD/USB. Al seleccionar una pista, introduzca el número correspondiente a la
posición alfabética de la pista deseada en la lista de archivos de la unidad de memoria USB o tarjeta SD.

18
Funcionamiento
Apareamiento de un dispositivo Bluetooth
1. Encienda su dispositivo Bluetooth.
2. Encienda el Power Glow 200.
3. Use el botón Mode para seleccionar el modo Bluetooth, el cual se muestra como "bt" en la
pantalla. Power Glow 200 entrará automáticamente al modo de apareamiento para buscar
dispositivos Bluetooth.
Nota: Se dará cuenta de que está en modo de apareamiento cuando el icono Bluetooth (bt) esté
parpadeando en la pantalla. Además, los avisos de voz automáticos del altavoz le avisarán (en
inglés) sobre el estado del dispositivo.
4. Navegue a la pantalla de configuración de su dispositivo Bluetooth. Luego busque y seleccione
POWER GLOW 200. El icono Bluetooth (bt) permanecerá encendido en la pantalla.
Nota: Los usuarios deben considerar la actualización del sistema operativo (OS) de su dispositivo si
experimentan problemas con el apareamiento o la reproducción de música.
Para aparear el Power Glow 200 con un dispositivo Bluetooth diferente, mantenga pulsado el
botón Play/Pause de la unidad o el control remoto, el cual desconectará el dispositivo Bluetooth
actualmente apareado y reiniciará el proceso de apareamiento. El icono Bluetooth (bt)parpadeará en la
pantalla para indicar que el Power Glow 200 está buscando dispositivos Bluetooth con los cuales
aparearse. Deberá alejar al dispositivo Bluetooth que estaba previamente apareado fuera del alcance,
desactivar su función Bluetooth o seleccionar "Olvidar" Power Glow 200 en su menú de ajustes.
Para dejar de utilizar Bluetooth con el Power Glow 200, salga del modo Bluetooth pulsando el botón
Mode.
Si desea desactivar (o activar) los avisos de voz, mantenga pulsado el botón Mode durante 2
segundos.
Nota: Power Glow 200 tiene que estar en el modo Bluetooth al desactivar o activar los avisos de voz.

19
Uso de la radio
Selección de una estación de radio:
1. Pulse el botón Mode de la unidad o el control remoto hasta que quede seleccionada la radio FM
como la fuente de audio.
2. Ajuste la frecuencia de la radio pulsando el botón (Anterior) o (Siguiente) en la unidad o el
control remoto. Para buscar estaciones de radio (recorrer las frecuencias de radio hasta encontrar
una estación con señal fuerte), mantenga pulsado el botón (Anterior) o (Siguiente) de la
unidad o el control remoto.
Guardado de presets:
1. Seleccione la estación de radio que desea guardar como preset.
2. Mantenga pulsado el botón (Reproducción/Pausa) de la unidad o el control remoto. La
pantalla mostrará uno de los 30 números disponibles para presets (P01–P30).
3. Utilice los botones (Anterior) o (Siguiente) en la unidad o el control remoto para recorrer
los números de presets y encontrar aquel en donde le gustaría guardar la estación. Los números de
presets se actualizarán en la pantalla a medida que los recorre.
4. Una vez que haya encontrado el número de preset en el cual desea guardar la estación de radio,
pulse el botón (Reproducción/Pausa). En ese momento el preset se guardará.
Selección de un preset de una estación de radio:
1. Con la radio encendida, mantenga pulsado el botón Mode de la unidad o el control remoto.
2. Utilice el botón (Anterior) o (Siguiente) de la unidad o el control remoto para recorrer los
presets guardados. La pantalla mostrará los números de preset a medida que los recorre (P01–
P30).
3. Una vez que haya encontrado el número de preset correspondiente la estación que desea
escuchar, pulse el botón (Reproducción/Pausa) de la unidad o el control remoto para la
estación del preset.
Conexión de dos altavoces
Cómo enlazar dos altavoces Power Glow 200:
1. Con el Interruptor de encendido/apagado de cada altavoz apagado, conecte cada altavoz a una
toma de corriente.
2. Conecte un cable de 1/4 pulg. en la salida de mezcla ubicada en el panel trasero de uno de los
altavoces Power Glow 200. Este altavoz (el altavoz maestro) es al cual se deberán conectar las
fuentes de audio tales como dispositivos Bluetooth, micrófonos o unidades de memoria USB.
3. Conecte el otro extremo del cable de 1/4 pulg. a la entrada Aux de 1/4 pulg. del panel trasero de
su segundo altavoz Power Glow 200. Este segundo altavoz recibirá el audio proveniente de
cualquier dispositivo conectado al primer altavoz (el altavoz maestro).
4. Encienda ambos altavoces utilizando sus Interruptores de encendido/apagado.
5. Conecte sus fuentes de audio al primer altavoz (el altavoz maestro).
6. Asegúrese de que el control Master Volume (volumen maestro) de cada altavoz se encuentre
ajustado al mismo nivel.
7. Con una de sus fuentes de audio reproduciéndose, aumente gradualmente el Volumen de entrada
auxiliar del segundo altavoz Power Glow 200 hasta que el volumen de este altavoz coincida con el
volumen del primer altavoz (el altavoz maestro).

20
Solución de problemas
Si el sonido está distorsionado: Pruebe bajando el control de volumen de su fuente de sonido o
instrument musical. Pruebe también reduciendo el Master Volume (volumen maestro) del Power Glow
200.
Si los graves son demasiado fuertes: Intente ajustando el control de tono o ecualización de su Power
Glow 200 o fuente de sonido para reducir el nivel de graves. De esta forma podrá reproducir la música
con más volumen antes de que se produzca el recorte (distorsión).
Si hay un silbido agudo cuando se usa un micrófono: Probablemente sea realimentación. Apunte el
micrófono apartándolo del altavoz.
Si no puede oír el micrófono por arriba del volumen de la música: Disminuya el volumen de la
música en su fuente.
Aparece “NONE”en la pantalla: Si ya hay una unidad USB o tarjeta SD insertada correctamente,
asegúrese de que contenga archivos reproducibles (MP3, WAV, y WMA).
Si no puede conectar su dispositivo de audio al Power Glow 200 mediante Bluetooth:
• Mantenga su dispositivo de audio (por ej., teléfono inteligente [smartphone] o tableta) y el Power
Glow 200 lo más cerca posible entre sí al realizar la conexión. Asegúrese que tanto el dispositivo
de audio como el Power Glow 200 no estén obstruidos por paredes, muebles, etc.
• Reinicie la conexión Bluetooth del Power Glow 200 para desconectarlo Power Glow 200 de
cualquier otro dispositivo de audio y reinicie el proceso de búsqueda. Si esto no funciona en
seguida, apague el Power Glow 200 y luego vuelva a encenderlo.
• Reinicie la conexión Bluetooth de su dispositivo de audio apagando el Bluetooth y luego volviendo
a encenderlo. Puede encontrar esta opción dentro del menú Bluetooth en los ajustes de su
teléfono o dispositivo de audio.
Si esto no funciona y ya se había conectado al Power Glow 200 anteriormente, busque Power
Glow 200 en la lista de dispositivos disponibles o previamente conectados en el menú Bluetooth
de su dispositivo de audio, toque el icono de engranaje o "i" ubicado junto a él y luego seleccione
Desaparear u Olvidar. Apague el Power Glow 200, luego vuelva a encenderlo e intente aparearlo
nuevamente una vez que vuelva a aparecer en su lista de dispositivos disponibles.
Nota: Si Power Glow 200 ya ha sido recientemente apareado con otro dispositivo de audio que
aún se encuentre dentro del alcance, es posible que tenga que repetir este proceso con ese
dispositivo de audio para desconectarlo completamente.
Table of contents
Languages:
Other ION Speakers System manuals

ION
ION BLOCK ROCKER BLUETOOTH User manual

ION
ION Block Party Live User manual

ION
ION Total PA Premier User manual

ION
ION Game Day Party User manual

ION
ION Sport XL User manual

ION
ION TOTAL PA GLOW 3 User manual

ION
ION TOTAL PA PRIME User manual

ION
ION Game Day Lights User manual

ION
ION TOTAL PA TITAN User manual

ION
ION Total PA Premier User manual

ION
ION Explorer Outback User manual

ION
ION TOTAL PA GLOW User manual

ION
ION EXPLORER EXTREME User manual

ION
ION Pathfinder User manual

ION
ION Game Day Lights User manual

ION
ION Total PA Live User manual

ION
ION Block Rocker iPA76C User manual

ION
ION TAILGATER BLUETOOTH User manual

ION
ION Offroad User manual

ION
ION EXPLORER EXTREME User manual