J.P. SELECTA TEMPLOW-M User manual

INSTRUCTION MANUAL CODE 80177 REV A July/2009 (They can be modied without notice) Page: 1
J.P. SELECTA s.a.u. Ctra. NII Km 585.1 Abrera 08630 (Barcelona) España Tel 34 937 700 877 Fax 34 937 702 362
TEMPLOW-M 2101279
ARMARIO CONGELADOR
UPRIGHT FREEZER

MANUAL DE INSTRUCCIONES CODIGO 80177 REV A Julio 2009 (Sujetas a modicaciones sin previo aviso) Pag.: 2
J.P. SELECTA s.a.u. Ctra. NII Km 585.1 Abrera 08630 (Barcelona) España Tel 34 937 700 877 Fax 34 937 702 362
Indice
1. INFORMACIÓN GENERAL................................................................................... 3
2. DESCRIPCIÓN DEL EQUIPO................................................................................ 3
3. ESPECIFICACIÓN TÉCNICA ................................................................................ 4
4. INSTALACIÓN........................................................................................................ 4
5. CONEXIÓN A LA RED ELÉCTRICA .................................................................... 4
6. PANEL DE CONTROL............................................................................................ 4
7. PUESTA EN MARCHA Y PARADA DEL EQUIPO............................................... 5
8. AJUSTE DE LA TEMPERATURA.......................................................................... 5
9. INDICADOR DE TEMPERATURA........................................................................ 5
10. AVISADOR ACÚSTICO........................................................................................ 5
11. FUNCIONES ADICIONALES............................................................................... 6
12. CERRADURA DE SEGURIDAD.......................................................................... 7
13. DESCONGELACIÓN ............................................................................................ 7
14. LIMPIEZA.............................................................................................................. 7
15. DESCONEXION POR AUSENCIA PROLONGADA.......................................... 7
16. AVERÍAS................................................................................................................ 8
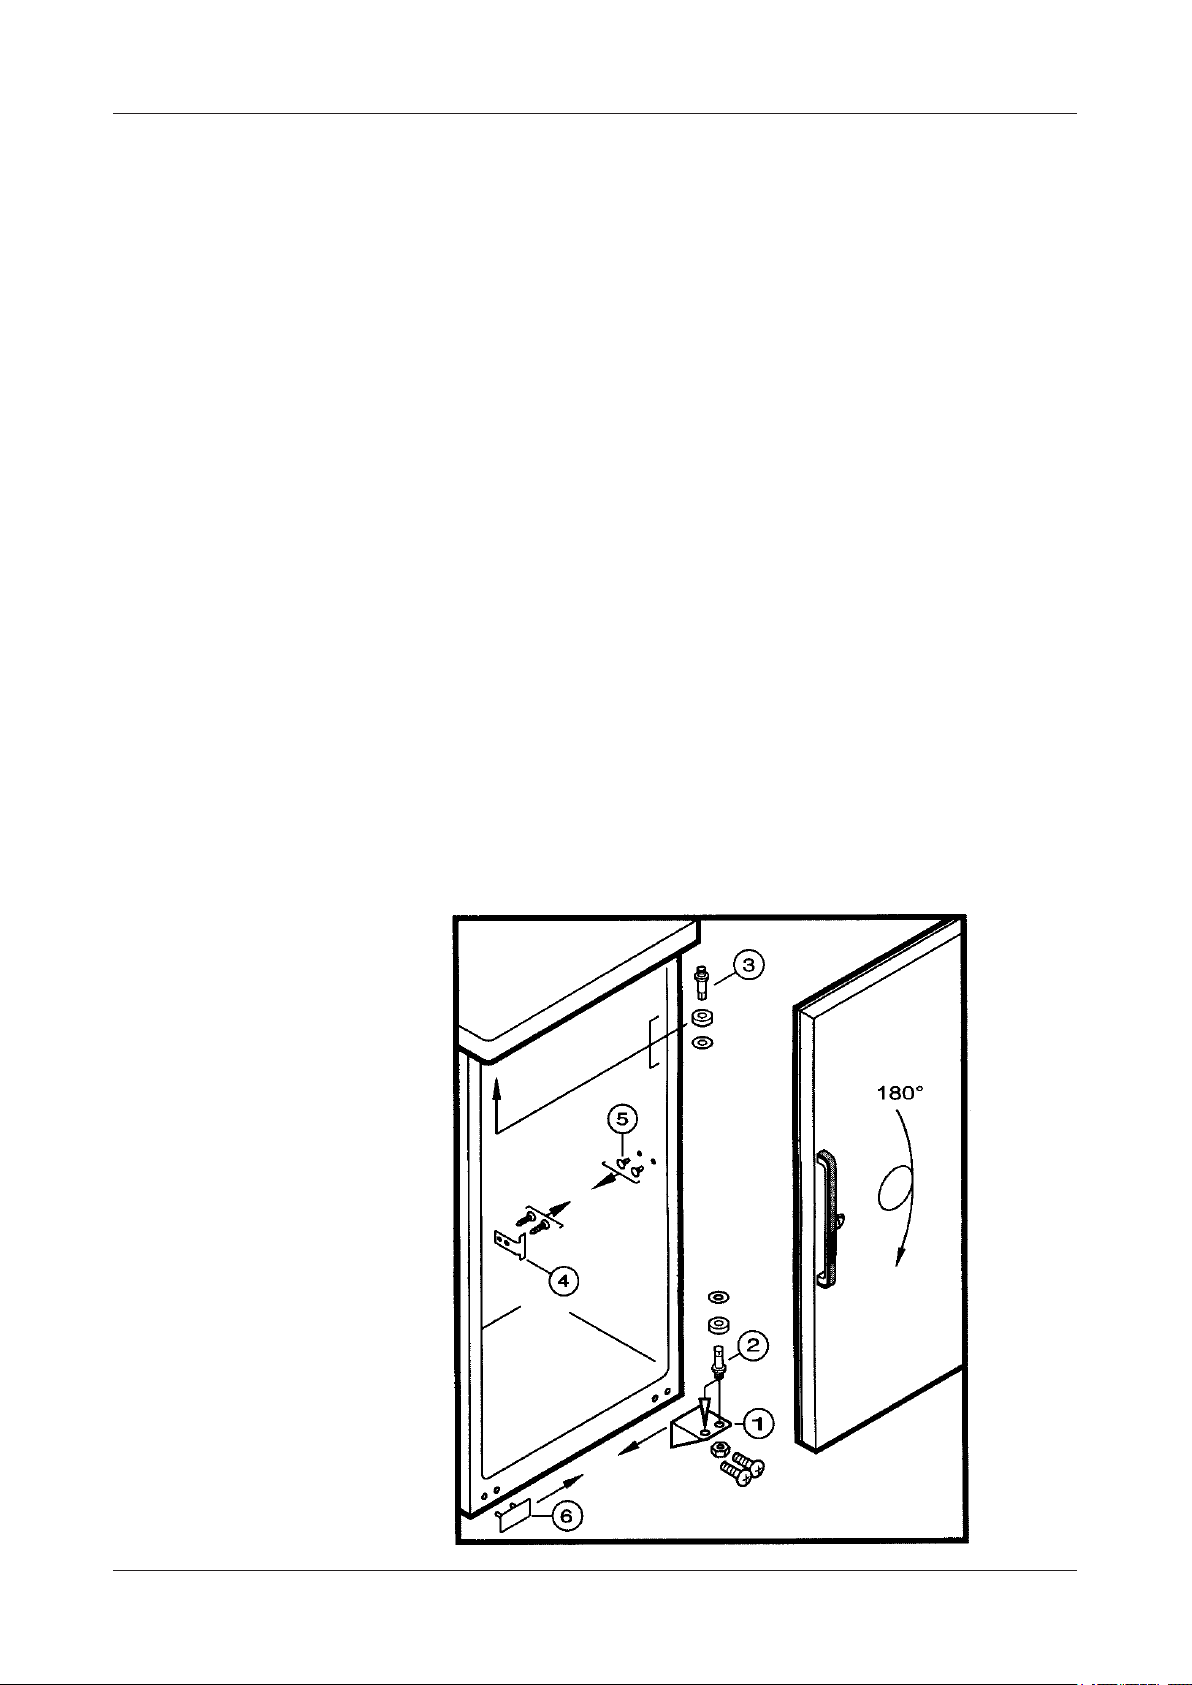
17. CAMBIO DE LADO DE LAS BISAGRAS .......................................................... 8
Index
1. GENERAL INFORMATION ................................................................................. 10
2. EQUIPMENT DESCRIPTION .............................................................................. 10
3. TECHNICAL FEATURES ..................................................................................... 11
4. INSTALLATION .................................................................................................... 11
5. CONNECTION TO THE MAINS.......................................................................... 11
6. CONTROL PANEL ................................................................................................ 11
7. SWITCHING THE EQUIPMENT ON AND OFF................................................. 12
8. SETTING THE TEMPERATURE.......................................................................... 12
9. TEMPERATURE DISPLAY................................................................................... 12
10. WARNING SIGNAL ............................................................................................ 12
11. ADDITIONAL FUNCTIONS............................................................................... 13
12. SAFETY LOCK.................................................................................................... 14
13. DEFROSTING...................................................................................................... 14
14. CLEANING .......................................................................................................... 14
15. LONG TIME DISCONNECTION ....................................................................... 14
16. MALFUNCTIONS ............................................................................................... 15
17.CHANGING OVER DOOR HINGES .................................................................. 15

INSTRUCTION MANUAL CODE 80177 REV A July/2009 (They can be modied without notice) Page: 3
J.P. SELECTA s.a.u. Ctra. NII Km 585.1 Abrera 08630 (Barcelona) España Tel 34 937 700 877 Fax 34 937 702 362
1. INFORMACIÓN GENERAL
1) Manipular el paquete con cuidado. Desembalarlo y comprobar que el contenido coincide
con lo indicado en el apartado de la “Lista de embalaje”. Si se observa algún componente
dañado o la ausencia de alguno, avisar rápidamente al distribuidor. Para prevenir lesiones
o daños en el equipo, éste debe ser desembalado por dos personas.
2) Si recibe un equipo dañado, contacte con su distribuidor inmediatamente antes de co-
nectarlo a la red.
3) No instalar ni utilizar el equipo sin leer, previamente, este manual de instrucciones.
4)Paragarantizarunfuncionamientoseguro,veriquequeseconectaenelmodoquese
indica en este manual.
5) Para desconectar el equipo, tire de la clavija del enchufe. Nunca del cable.
6) Estas instrucciones forman parte inseparable del aparato y deben estar disponibles a
todos los usuarios del equipo.
7) Cualquier duda puede ser aclarada por su distribuidor o con el servicio técnico de J.P.
SELECTA, s.a.u.
8) Cualquier reparación o trabajo sobre el equipo debe ser encargado por el servicio del
distribuidor.
9) ¡ATENCIÓN! NO SE ADMITIRÁ NINGUNA MÁQUINA PARA REPARAR QUE NO
ESTÉ DEBIDAMENTE LIMPIA Y DESINFECTADA.
10) Todamodicación,eliminaciónofaltademantenimientodecualquierdispositivode
la máquina, transgrede la directiva de utilización 89/655/CEE y el fabricante no se hace
responsable de los daños que pudieran derivarse.
11) NO UTILIZAR EL EQUIPO CON FUIDOS QUE PUEDAN DESPRENDER VAPORES
SUSCEPTIBLES DE FORMAR MEZCLAS EXPLOSIVAS.
12) NO USE LLAMAS VIVAS O FUENTES DE IGNICIÓN EN EL INTERIOR DEL
EQUIPO.
13) NO USE EQUIPOS ELÉCTRICOS EN EL INTERIOR DEL APARATO.
14) UTILIZAR EL EQUIPO EN UNA HABITACIÓN VENTILADA PORQUE EN CASO
DE FUGA DE REFRIGERANTE PODRÍA PRODUCIRSE UNA EXPLOSIÓN.
2. DESCRIPCIÓN DEL EQUIPO
El armario congelador Templow-M está destinado al almacenaje de productos que requie-
ran ser conservados a bajas temperaturas. Puede alcanzar desde -9ºC hasta -26ºC aunque
la temperatura mínima alcanzada depende en gran medida de la temperatura ambiente.
Está construido con un mueble exterior recubierto de epoxi y un recinto interior moldeado
en ABS resistente a los agentes químicos. Dispone de cestillos fabricados en acero tratado
con rilsan.

MANUAL DE INSTRUCCIONES CODIGO 80177 REV A Julio 2009 (Sujetas a modicaciones sin previo aviso) Pag.: 4
J.P. SELECTA s.a.u. Ctra. NII Km 585.1 Abrera 08630 (Barcelona) España Tel 34 937 700 877 Fax 34 937 702 362
3. ESPECIFICACIÓN TÉCNICA
Tensión de alimentación 115/230V 50/60 Hz según se indica en la placa de ca-
racterísticas de la máquina.
Capacidad (litros): 520L
Potencia (W): 345W
Medidas interiores (cm): Alto Ancho Fondo
150 64 53
Medidas exteriores (cm): Alto Ancho Fondo
172 75 72
4. INSTALACIÓN
- Evitar la instalación del aparato expuesto a la luz solar o a fuentes de calor como radia-
dores o cocinas.
- El suelo sobre el que se instala el equipo debe ser horizontal y nivelado. Para compensar
posibles desniveles ajustar la altura de las patas.
- Las rejillas de ventilación deben dejarse libres. Asegúrese siempre de que haya una buena
ventilaciónyqueexistaunbuenujodeairedesalida.
- No colocar aparatos emisores de calor encima del armario congelador.
- LanormaEN378especicaquelahabitacióndondeseinstaleelaparatodebetenerun
volumen de 1 m3por cada 8 gr de refrigerante R600a usado en el aparato, para evitar
la formación de mezclas explosivas de gas y aire en la habitación en caso de fuga del
refrigerante del circuito. La cantidad de gas refrigerante usado en su aparato se indica
en la placa impresa que se encuentra en el interior del mismo.
EL VOLUMEN MÍNIMO EN ESTE CASO SERÁ DE 5 m3.
5. CONEXIÓN A LA RED ELÉCTRICA
El suministro eléctrico debe estar de acuerdo con lo que se indica en la placa de caracterís-
ticas que está colocada en la parte izquierda del departamento del congelador. La base de
enchufe debe tener un fusible de 10A o más. Debe estar apartado de la parte trasera del
aparato y en un lugar fácilmente accesible.
Conectar el equipo a una base de enchufe y una clavija debidamente conectadas a la toma
de tierra.
Si usted tiene que cambiar la clavija del enchufe, tenga presente lo siguiente:
Cable azul: Neutro
Cable marron: Fase
Cable amarillo/verde: Tierra
6. PANEL DE CONTROL
1. Indicador de temperatura
2. Teclas de ajuste de temperatura
3. Tecla encendido/apagado
4. Tecla alarma
5. Protección contra manipulación por parte de niños

INSTRUCTION MANUAL CODE 80177 REV A July/2009 (They can be modied without notice) Page: 5
J.P. SELECTA s.a.u. Ctra. NII Km 585.1 Abrera 08630 (Barcelona) España Tel 34 937 700 877 Fax 34 937 702 362
8. AJUSTE DE LA TEMPERATURA
- Pulse la tecla UP para subir la temperatura (frío menos intenso) y la tecla DOWN para
bajar la temperatura (frío más intenso).
- Durante la selección de temperatura, el sistema indicará el valor parpadeando.
- Al pulsar las teclas de ajuste de temperatura por primera vez, se indicará la última tem-
peratura seleccionada.
- El valor de ajuste se irá incrementado en pasos de 1ºC.
- Aproximadamente a los 5 seg. de haber pulsado la última tecla, se mostrará la tempe-
ratura real del equipo.
- La temperatura se podrá ajustar de -9ºC a -26ºC.
9. INDICADOR DE TEMPERATURA
El termómetro muestra la temperatura más alta del material congelado. Está ajus-
tado y diseñado para indicar la temperatura por debajo de 0ºC.
La temperatura puede aumentar de forma temporal debido al inujo del aire tibio
cuando se almacena o reordena el material a temperatura ambiente.
Si aparece la indicación F3, se trata de una anomalía del sistema. Será preciso
contactar con el servicio técnico y comunicar este fallo.
10. AVISADOR ACÚSTICO
Este equipo viene equipado con una función de alarma.
- Se puede disparar la alarma cuando la puerta permanece abierta más de 60 seg. La señal
acústica se puede desconectar pulsando la tecla ALARM. Al cerrar la puerta, la alarma
estará otra vez en disposición de funcionar.
- Sepuededisparartambiéncuandolatemperaturadelcongeladorresulteinsuciente.
La indicación de temperatura parpadea simultáneamente. La señal acústica se silencia
pulsando la tecla ALARM. La indicación de temperatura parpadeará hasta que se haya
eliminado la situación «de alarma».
7. PUESTA EN MARCHA Y PARADA DEL EQUIPO
Puesta en marcha: Se recomienda limpiar el aparato antes de poner en marcha
por primera vez (ver apartado ‘Limpieza’). Pulsar la tecla ON/OFF de modo que
el indicador de temperatura se encienda/parpadee. Cada vez que se encienda
aparecerán unos guiones hasta que el nivel de temperatura baje de los 0ºC.
Conectar el aparato 4 horas antes de cargarlo con material congelado por
primera vez.
Desconexión: Pulsar la tecla ON/OFF durante unos dos segundos. El indicador
de temperatura se apagará.

MANUAL DE INSTRUCCIONES CODIGO 80177 REV A Julio 2009 (Sujetas a modicaciones sin previo aviso) Pag.: 6
J.P. SELECTA s.a.u. Ctra. NII Km 585.1 Abrera 08630 (Barcelona) España Tel 34 937 700 877 Fax 34 937 702 362
11. FUNCIONES ADICIONALES
Existendosfuncionesadicionales:modicacióndelaintensidadluminosadelindicadory
protección contra la manipulación por parte de niños, para evitar la desconexión no deseada
olamodicacióndelatemperaturadelequipo.
Activación del modo ajuste:
- Pulse la tecla ALARM durante unos 5 seg. En el display aparecerá una c parpadeante.
- Mediante las teclas UP/DOWN seleccione la función deseada:
c = protección contra la manipulación por parte de niños,
h = intensidad luminosa.
- Pulse brevemente la tecla ALARMparaseleccionar/conrmar.
Si selecciona c = protección contra la manipulación por parte de niños, pulse las
teclas UP/DOWN para cambiar de c0 (función desconectada) a c1 (función conectada) y
conrmepulsandoALARM.
Si este símbolo aparece iluminado es que se ha activado la protección.
Si selecciona h = intensidad luminosa, pulse las teclas UP/DOWN para cambiar entre h1
(mínima intensidad) y h5(máximaintensidadluminosa)yconrmepulsandolateclaALARM.
Salir del modo ajuste:
Para salir del modo ajuste, pulse la tecla ON/OFF. Pasados 2 minutos, el sistema volverá
al modo de funcionamiento normal.

INSTRUCTION MANUAL CODE 80177 REV A July/2009 (They can be modied without notice) Page: 7
J.P. SELECTA s.a.u. Ctra. NII Km 585.1 Abrera 08630 (Barcelona) España Tel 34 937 700 877 Fax 34 937 702 362
12. CERRADURA DE SEGURIDAD
La cerradura del armario congelador está dotada de un mecanismo de seguridad. Para cerrar
con llave el equipo, introdúzcala en la dirección 1 y gire la llave 90º hacia la izquierda (2).
Para abrir el equipo, proceda de nuevo en el mismo orden.
13. DESCONGELACIÓN
Después de un largo período de funcionamiento, en el congelador se forma una capa de
escarchaohielosobrelassuperciesgeneradorasdefríoqueaumentaelconsumoenergé-
tico. Por lo tanto, se deberá descongelar regularmente.
- Para descongelar, desconecte el aparato sacando la clavija de la base del enchufe.
- Guardar el material congelado envuelto en varias capas de papel (de diario) o mantas en
unlugarfrío(porejemplo,elfrigoríco).
- Para acelerar el proceso de descongelación, coloque un recipiente con agua muy caliente
(pero no hirviendo) en uno de los compartimentos.
- Dejar la puerta abierta del equipo durante el proceso de descongelación. Ir recogiendo
el agua y limpiar el interior del congelador.
- Nousarutensiliosmecánicosuotrasayudasarticialesparadescongelaryaquepodrían
causar serios daños.
14. LIMPIEZA
Antes de limpiar, desconecte el aparato de la red. Limpie el equipo con un producto de lim-
pieza del hogar disuelto en agua templada. No emplee productos abrasivos, ni limpiadores
quecontenganácidosodisolventesquímicos,yaquepodríandañarlasupercieyprovocar
corrosión. Recomendamos el uso de un limpiador con pH neutro. No utilice tampoco limpia-
dores a vapor por el riesgo que conllevan de causar averías y lesiones.
- Vaciar el refrigerador y almacenar el material como se indica en el apartado sobre des-
congelación.
- Quitar los estantes y las guías.
- Asegúrese de que el agua de limpieza no penetre en los componentes eléctricos o las
rejillas de ventilación.
- No deteriorar ni quitar la placa de características que se encuentra en el interior del
equipo. Contiene información importante para el servicio técnico.
- Alnalizar,secartodobienconunpaño.
- Una vez al año deberá limpiar el polvo del compresor y de la rejilla metálica del conden-
sador en la parte posterior del equipo.
15. DESCONEXIÓN POR AUSENCIA PROLONGADA
Siempre que no se utilice el equipo durante un periodo prolongado, conviene desconectarlo
de la red y limpiarlo. Es recomendable dejar la puerta abierta para evitar la formación de
malos olores.

MANUAL DE INSTRUCCIONES CODIGO 80177 REV A Julio 2009 (Sujetas a modicaciones sin previo aviso) Pag.: 8
J.P. SELECTA s.a.u. Ctra. NII Km 585.1 Abrera 08630 (Barcelona) España Tel 34 937 700 877 Fax 34 937 702 362
16. AVERÍAS
En caso de avería, usted podría hacer las siguientes comprobaciones:
* El aparato no funciona, las lámparas de control no se encienden:
- ¿Está el aparato conectado?
- ¿Está el enchufe correctamente colocado?
- ¿Está el fusible fundido?
* Latemperaturanobajalosuciente:
- ¿La temperatura seleccionada es correcta?
- ¿Está el aparato excesivamente cargado de material a temperatura ambiente?
Comprobar la temperatura transcurridas 24 horas.
- ¿Trabaja apropiadamente el sistema de ventilación?
- ¿Está el aparato demasiado cerca de una fuente de calor?
En el caso de no darse ninguna de las anomalías anteriormente descritas, diríjase
al servicio técnico, indicando el modelo del aparato y el número de serie que podrá
encontrar en la placa de características.
17. CAMBIO DE LADO DE LAS BISAGRAS
- Cerrar la puerta y desatornillar el soporte de la bisagra inferior (1).
- Levantar la puerta, girarla hacia la derecha y sacarla.
- Girar 180º y extraer el eje de la bisagra (2) e insertarlo en el lado opuesto.
- Cambiar los elementos de la bisagra superior (3) al lado opuesto.
- Cambiar la bisagra (4) y los tapones (5) al lado opuesto.
- Cambiar de lugar el soporte de la bisagra inferior y la placa protectora (6).
- Insertar la puerta en el eje de bisagra superior (3).
- Girarlapuertadesdelaizquierdahaciaelinterioryjarelejedelabisagra(2)conel
tornillo.
- Cambiar de lugar en la puerta el tirador y los tapones .

INSTRUCTION MANUAL CODE 80177 REV A July/2009 (They can be modied without notice) Page: 9
J.P. SELECTA s.a.u. Ctra. NII Km 585.1 Abrera 08630 (Barcelona) España Tel 34 937 700 877 Fax 34 937 702 362
English version

MANUAL DE INSTRUCCIONES CODIGO 80177 REV A Julio 2009 (Sujetas a modicaciones sin previo aviso) Pag.: 10
J.P. SELECTA s.a.u. Ctra. NII Km 585.1 Abrera 08630 (Barcelona) España Tel 34 937 700 877 Fax 34 937 702 362
2. EQUIPMENT DESCRIPTION
The upright freezer Templow-M is useful to preserve products that require being
stored at low temperatures. It can reach temperatures from -9ºC until -26ºC although
the minimum temperature reached depends on the room temperature.
It is built of an epoxy covered external case and an internal ABS molded chamber
which is high chemical resistant. And it also has rilsan coated steel baskets.
1. GENERAL INFORMATION
1) Handle the parcel with care. Unpack and check that the contents coincide with the
packing-list. If any part is damaged or missing, please inform the supplier immediately.
To prevent injury or damage to the unit, it must be unpacked and set by two people.
2) If you get an equipment damaged on delivery, please contact the supplier immediately
before connecting to the power supply.
3) Do not install or use the equipment without reading this handbook before.
4) To guarantee a safety operation, make sure that the equipment is set up and connected
as described in this operating instructions.
5) When disconnecting the appliance, pull out from the plug, not from the cord.
6) This handbook must always be attached to the equipment and it must be available for
all users.
7) Any doubt you have can be clarify by your supplier or the technical service of J.P. Selecta,
s.a.u.
8) Any repairing or work on the appliance must only be carried out by the customer service.
9) IMPORTANT! J.P. SELECTA WILL NOT ACCEPT ANY EQUIPMENT TO BE REPAI-
RED IF IT IS NOT DULY CLEANED.
10) Ifanymodication,eliminationorlackinginmaintenanceofanydeviceoftheequipment
by the user transgress the directive 89/655/CEE, the manufacturer is not responsible for
the damage that can occur.
11) DO NOT USE THE EQUIPMENT WITH FLUIDS WHICH CAN GIVE OFF VAPOURS
CAPABLE OF MAKING EXPLOSIVE MIXTURES.
12) DO NOT ALLOW NAKED FLAMES OR IGNITON SOURCES INSIDE THE APPLIAN-
CE.
13) DO NOT USE ELECTRICAL EQUIPMENT INSIDE THE APPLIANCE.
14) USE THE APPLIANCE IN A VENTILATED ROOM BECAUSE IN CASE OF REFRI-
GERANT LEAKAGE IT MIGHT CAUSE AN EXPLOSION.

INSTRUCTION MANUAL CODE 80177 REV A July/2009 (They can be modied without notice) Page: 11
J.P. SELECTA s.a.u. Ctra. NII Km 585.1 Abrera 08630 (Barcelona) España Tel 34 937 700 877 Fax 34 937 702 362
3. TECHNICAL FEATURES
Voltage supply 115-230V 50/60 Hz according to the characteristics plate
indications.
Capacity (litres): 520L
Power (W): 345W
Inner dimensions (cm): Height Width Depth
150 64 53
External dimensions (cm): Height Width Depth
172 75 72
4. INSTALLATION
- Avoid placing the appliance in direct sunlight or near cookers, heat radiators or similar
heat sources.
- Theooronwhichtheappliancestandsshouldbehorizontalandlevelled.Tocompensate
for any unevenness, please adjust the height of the legs.
- The ventilation grilles should not be obstructed. Always make sure that there is good
ventilationandthattheoutwardowingairisabletoescape.
- Do not place heat-emitting appliances on top of the freezer.
- StandardEN378speciesthattheroominwhichyouinstallyourappliancemusthave
a volume of 1m3 per 8g of R600a refrigerant used in the appliance, so as to avoid the
formationofammablegas/airmixturesintheroomwheretheapplianceislocatedin
case of leakage in the refrigerant circuit. The quantity of the refrigerant used in your
appliance is indicated on the type plate inside the equipment.
THE MINIMAL VOLUME IN THIS CASE IS 5 m3.
5. CONNECTION TO THE MAINS
Power supply and voltage at the operating point must meet the details on the featu-
res plate, which is located in the freezer compartment on the left side. The socked
must be fused with a 10A fuse or higher, it must be away from the rear part of the
appliance and must be easily accessible.
Connect the equipment with a properly earthed plug and socket.
If you have to change the plug cap, keep in mind the following:
Blue wire: Neutral.
Brown wire: Phase.
Yellow/green wire: Earth.
6. CONTROL PANEL
1. Temperature display.
2. Temperature buttons.
3. On/Off button.
4. Audible warning button.
5. Child-proof lock.

MANUAL DE INSTRUCCIONES CODIGO 80177 REV A Julio 2009 (Sujetas a modicaciones sin previo aviso) Pag.: 12
J.P. SELECTA s.a.u. Ctra. NII Km 585.1 Abrera 08630 (Barcelona) España Tel 34 937 700 877 Fax 34 937 702 362
7. SWITCHING THE EQUIPMENT ON AND OFF
Switching on: It is recommended to clean the appliance before switching it on for
the rst time (see “Cleaning” section). Press the ON/OFF button so that the tem-
perature display lights up/ashes. When the appliance is switch on and while it is
still warm, the display will contain dashes until the temperature falls below 0ºC.
Switch the appliance on 4 hours before loading it with frozen materials for rst time.
Switching off: Press the ON/OFF button for approximately 2 seconds. The tempe-
rature display will switch off.
8. SETTING THE TEMPERATURE
Push UP button to increase temperature (less temperature) and DOWN button to
reduce the temperature (more temperature).
- Whileyouselectthetemperature,thevaluewillbeashing.
- Whenyoupushthesettingbuttonsforthersttime,themostrecentsettingwillbe
displayed.
- The setting value will be increased in increments of 1ºC.
- After 5 seconds after having pressed the last button, real temperature will be displayed
in the equipment.
- Temperature can be set between -9ºC to -26ºC.
9. TEMPERATURE DISPLAY
The thermometer shows the highest temperature of the frozen material. It is adjusted
and designed so that only temperature below 0ºC is displayed.
The temperature can rise temporally because inowing warm air when room
temperature material is stored or when frozen goods are removed or rearranged.
If F3 appears in the display, the appliance has a system fault. Please contact the
technical service and indicate this fault number.
10. WARNING SIGNAL
This equipment comes equipped with an alarm function.
- The warning signal sounds when the door has been left open for more than 60 seconds.
Press the ALARM button to cancel it. When the door is shut, the warning signal is again
in standby mode.
- When the freezer temperature is not cold enough, the warning signal will sound and the
temperaturedisplaywillash.PresstheALARM button to cancel it. The temperature
indicationwillcontinueashinguntilthealarmsituationhasbeenrectied.

INSTRUCTION MANUAL CODE 80177 REV A July/2009 (They can be modied without notice) Page: 13
J.P. SELECTA s.a.u. Ctra. NII Km 585.1 Abrera 08630 (Barcelona) España Tel 34 937 700 877 Fax 34 937 702 362
11. ADDITIONAL FUNCTIONS
There are two additional functions: adjusting brightness of display and child-proof
lock, to avoid the machine being disconnected or modied accidentally.
Activate set-up mode:
- Press the ALARM button for about 5 seconds. The display will show a ashing c.
- Select the required function by pressing the UP/DOWN button.
c = child-proof lock,
h = display brightness.
- Press the ALARM button briey to select/conrm.
If you select c = child-proof lock, push UP/DOWN button to change from c0 (child-
proof lock off) to c1 (child-proof lock on) and conrm by pushing the ALARM button.
When the symbol is lit, the child-proof lock is activated.
If you select h = brightness, push UP/DOWN button to change from h1 (minimum)
to h5 (maximum brightness) and conrm by pushing the ALARM button.
Exit set-up mode:
To exit the set-up mode, push the ON/OFF button. After 2 seconds, the system will
return to its normal operating mode.

MANUAL DE INSTRUCCIONES CODIGO 80177 REV A Julio 2009 (Sujetas a modicaciones sin previo aviso) Pag.: 14
J.P. SELECTA s.a.u. Ctra. NII Km 585.1 Abrera 08630 (Barcelona) España Tel 34 937 700 877 Fax 34 937 702 362
12. SAFETY LOCK
The appliance lock is equipped with a safety mechanism. To lock the freezer, please
insert the key in the 1 direction and turn it 90º to the left (2).
To unlock the equipment, proceed in the same order.
13. DEFROSTING
After a long period of operation, a layer of frost or ice builds up on the cooling plates
of the freezer compartment. This increases the energy consumption of the freezer.
The cooling plates should therefore be defrosted regularly.
- To defrost, switch the appliance off. Pull out the mains plug.
- Wrap the frozen goods in paper (newspaper) or blankets and store them in a cool place
(in the refrigerator, for instance).
- To speed up the defrosting process put a saucepan of hot (but not boiling) water on one
of the cooling elements.
- Leave the door of the appliance open while defrosting. While defrosting, mop out the
remaining water and clean the appliance.
- Donotusemechanictoolsorotherarticialaidstodefrostasitmayproduceserious
damages.
14. CLEANING
Before cleaning, disconnect the appliance from mains. Clean the equipment with
warm water and a little detergent. Do not use abrasive or acid cleaners or chemical
solvents, as they could damage the surface and cause corrosion. We recommend
the use of a neutral pH cleaner. Do not use steam cleaners because of the risk of
injury and damage.
- Empty the refrigerator and store the goods as it is indicated on the “Defrosting” section.
- Remove the storage shelves and support rails.
- Make sure that no cleaning water penetrates into the electrical components or ventilation
grille.
- Do not damage or remove the type plate from the inside of the appliance. It is important
for servicing purposes.
- Dryallpartswellwithacloth,whennishing.
- Once a year, the dust should be removed from the refrigeration unit and the heat ex-
changer - metal grid at the back side of the appliance.
15. LONG TIME DISCONNECTION
If you must shut down the appliance for a long time period, switch it off and discon-
nect the plug. Also, clean it and leave the door open in order to prevent bad smells.

INSTRUCTION MANUAL CODE 80177 REV A July/2009 (They can be modied without notice) Page: 15
J.P. SELECTA s.a.u. Ctra. NII Km 585.1 Abrera 08630 (Barcelona) España Tel 34 937 700 877 Fax 34 937 702 362
16. MALFUNCTIONS
In case of malfunction, you may be able to check the following:
* The appliance does not function, the control lamps do not lit:
- Is the appliance switched on?
- Is the plug correctly tted in the mains socket?
- Is the fuse burned out?
* The temperature is not low enough:
- Is the temperature setting correct?
- Have excessive amounts of material been placed in the appliance?
Check the displayed temperature after 24 hours.
- Is the ventilation system working properly?
- Is the appliance set up too close to a heat source?
If none of the above causes apply and you cannot rectify the fault yourself, please
contact the technical service.
17.CHANGING OVER DOOR HINGES
- Close the door and unscrew the lower hinge bracket (1).
- Lift the door, tilt it to the right and remove it.
- Rotate 180º and remove the lower hinge spin (2) and screw it on the opposite side.
- Unscrew upper hinge elements (3) and screw them on the opposite side.
- Attach the hinge (4) and the plugs (5) to the opposite side.
- Transfer lower hinge bracket and cover plate (6) to the opposite side.
- Locate door on upper pin.
- Tilt door inwards from the left and secure the hinge pin with a screw.
- Transfer handle and plugs to the opposite side of the door.

MANUAL DE INSTRUCCIONES CODIGO 80177 REV A Julio 2009 (Sujetas a modicaciones sin previo aviso) Pag.: 16
J.P. SELECTA s.a.u. Ctra. NII Km 585.1 Abrera 08630 (Barcelona) España Tel 34 937 700 877 Fax 34 937 702 362
This manual suits for next models
1
Table of contents
Languages: