JBM 52980 User manual
MYJKA DO CZĘŚCI . . . . . . . . . . . . . . . . . . . . . . . . . . . . . . . . . . . . . . . . . . . . . . . . . . . . . 12
MÁQUINA LIMPIADORADE PIEZAS 150L . . . . . . . . . . . . . . . . . . . . . . . . . . . . . . . . . . . . . 2
MÁQUINA LIMPADORA DE PEÇAS 150L . . . . . . . . . . . . . . . . . . . . . . . . . . . . . . . . . . . . . . .7
ALKATRÉSZMOSÓ150L. . . . . . . . . . . . . . . . . . . . . . . . . . . . . . . . . . . . . . . . . . . . . . . . . .10
FONTAINE DE NETTOYAGE 150L électrique . . . . . . . . . . . . . . . . . . . . . . . . . . . . . . . . . . . 4
150L PARTS WASHER. . . . . . . . . . . . . . . . . . . . . . . . . . . . . . . . . . . . . . . . . . . . . . . . . . . 3
WASCHMASCHINE FÜRTEILE 150 L . . . . . . . . . . . . . . . . . . . . . . . . . . . . . . . . . . . . . . . . 5
MASINA DE SPALAT PIESE 150L . . . . . . . . . . . . . . . . . . . . . . . . . . . . . . . . . . . . . . . . . . . .8
150 . . . . . . . . . . . . . . . . . . . . . . . . . . . . . . . . . . . 11
PULITRICE DI PEZZI 150L . . . . . . . . . . . . . . . . . . . . . . . . . . . . . . . . . . . . . . . . . . . . . . . . 6
150 L ONDERDELEN WASMACHINE . . . . . . . . . . . . . . . . . . . . . . . . . . . . . . . . . . . . . . . . . .9
52980
MANUAL DE INSTRUCCIONES · INSTRUCTION MANUAL · GUIDE D’UTILISATION ·BEDIENUNGSANLEITUNG ·
MANUALE D’USO ·MANUALDE INSTRUÇÕES ·MANUALDE INSTRUCŢIUNI ·INSTRUCTIEHANDLEIDING·
ÜZEMELTETÉSI UTASÍTÁS · ·INSTRUKCJA OBSŁUGI

· 2 ·
REF. 52980
MANUAL DE INSTRUCCIONES
ES
PRESENTACIÓN DEL PRODUCTO
Esta máquina limpiadora de piezas es la ayuda ideal
para la limpieza profesional de piezas, componentes o
herramientas pequeñas y medianas.
INSTRUCCIONES DE SEGURIDAD
¡ATENCIÓN! Lea todas las advertencias de seguri-
dad y todas las instrucciones. El incumplimiento de las
advertencias e instrucciones enumeradas a continua-
ción puede provocar daños personales y/o lesiones
graves.
1. Mantenga limpia y libre de estorbos el área de
trabajo
2. Mantenga a los niños fuera del alcance de la
máquina.
3. Nunca utilice la máquina si se encuentra bajo los
efectos del alcohol o drogas.
4. Lea toda la información referente al líquido que
utilice para limpiar. No utilice líquidos que sean
inamables a temperaturas inferiores a 150ºC.
5. Utilice las protecciones pertinentes para evitar
quemaduras al tocar las piezas calientes.
6. Si la máquina se encuentra dañada, o si ha caí-
do, no la utilice hasta que sea revisada por per-
sonal cualicado.
7. No permita que el cable de corriente entre en
contacto con partes calientes de la máquina ni
con las aspas del ventilador.
8. Si es necesaria una extensión para conectar la
máquina a la corriente eléctrica, asegúrese de
que la corriente de ésta es igual al que requiere
la máquina. Si utilizara una extensión con una
capacidad de corriente inferior pueden sobre-
calentarse. Tome las precauciones pertinentes
para que la extensión no quede tensada, cha-
fada o encima de otros aparatos eléctricos, etc.
9. Desconecte siempre la máquina cuando no esté
en uso. Nunca estire del cable para desconectar.
10. Para reducir el riesgo de incendios, no utilice la
máquina cerca de galones u otros objetos fácil-
mente inamables.
11. Coloque la máquina en un lugar ventilado, tenga
en cuenta que el funcionamiento de la máquina
es de combustión interna.
12. Procure recogerse el cabello y evite utilizar ropas
amplias y cualquier objeto colgante.
13. Para evitar electrocutarse, no trabaje nunca so-
bre supercies húmedas.
14. Utilice siempre gafas protectoras. Tenga en
cuenta que las gafas para corrección de la vista
no son gafas protectoras.
MONTAJE
1. Extraiga todas las piezas del embalaje y asegú-
rese de que no están en mal estado.
2. Retire las piezas que vienen dentro de la máqui-
na.
3. Coloque un cartón limpio en el suelo y coloque
la máquina sobre su tapa. (Asegúrese de mante-
ner la tapa cerrada cuando coloque la máquina
sobre su tapa).
4. Monte las cuatro patas en los soportes con torni-
llos Phillips M6x12 y tuercas M6. Nota: no apre-
tar demasiado.
5. Coloque la plataforma entre las patas con la su-
percie plana hacia abajo y fíjela a las patas con
tornillos Phillips M6x12 y tuercas M6.
6. Con las patas apretadas contra el estante infe-
rior, apriete todos los tornillos del estante inferior.
7. Apriete todos los tornillos instalados en el paso
4.
8. Ponga la máquina de pie; tenga cuidado de man-
tener la tapa cerrada.
9. Coloque la plataforma de trabajo y la cesta en
la máquina.
10. Monte el conjunto de la bomba en la ranura del
lateral de la máquina. Coloque el ltro colador
en su posición.
11. Conecte la máquina a la toma estándar de 220v
50hz y llene el líquido con la cantidad adecuada.
12. Encienda el interruptor de encendido, el líquido
no debe uir desde el grifo exible.
SOLUCIÓN DE PROBLEMAS
El único problema que podría experimentar con su la-
vadora de piezas es un ujo de volumen reducido o
la ausencia de ujo de líquido de limpieza desde la
boquilla de la manguera exible. La causa probable
es la presencia de cuerpos extraños en la manguera
exible.
POSIBLES SOLUCIONES:
1. Compruebe que la luz indicadora de la caja de
interruptores está encendida.
2. Usando un destornillador de mango aislado tocar
ligeramente la punta de la carcasa del motor. Un
ligero tirón magnético de oscilación indica que la
energía está llegando al motor.
3. Desconecte el enchufe de alimentación, retire la
manguera exible de la línea de ujo de salida
de la bomba.
4. Retire la parte delantera de la carcasa de la bom-
ba quitando 3 tornillos. Limpie cualquier materia
extraña alojada alrededor del impulsor.
5. Volver a montar en orden inverso.
ESPECIFICACIONES TÉCNICAS
Cap. Tanque .............................150L
Caudal . . . . . . . . . . . . . . . . . . . . . . . . . . . . . . . . . .25L
Medidas interiores depósito . . . . . 1060x490x270mm
Medidas totales máquina . . . . . . . . 1090x520x890mm
Peso .................................. 45 kg

· 3 ·
REF. 52980
INSTRUCTION MANUAL
EN
PRODUCT PRESENTATION
This parts cleaning machine is the ideal aid for pro-
fessional cleaning of small and medium-sized parts,
components or tools.
SAFETY INSTRUCTIONS
CAUTION! Read all safety warnings and instruc-
tions. Failure to follow the warnings and instructions lis-
ted below may result in personal injury and/or serious
injury.
1. Keep the work area clean and free of obstruc-
tions.
2. Keep children away from the machine.
3. Never use the machine if you are under the in-
uence of alcohol or drugs.
4. Read all information regarding the liquid you use
for cleaning. Do not use liquids that are am-
mable at temperatures below 150ºC.
5. Use the pertinent protections to avoid burns
when touching hot parts.
6. If the machine is damaged, or if it has fallen
down, do not use it until it is checked by qualied
personnel.
7. Do not allow the power cord to come in contact
with hot parts of the machine or fan blades.
8. If an extension cord is necessary to connect the
machine to the power supply, make sure that the
current rating of the extension cord is equal to
that required by the machine. If an extension cord
with a lower current capacity is used, overheating
may occur. Take precautions to ensure that the
extension cord is not strained, crushed, or placed
on top of other electrical appliances, etc.
9. Always unplug the machine when not in use. Ne-
ver pull on the cord to unplug.
10. To reduce the risk of re, do not use the machine
near gallons or other easily ammable objects.
11. Place the machine in a ventilated place, keep in
mind that the operation of the machine is internal
combustion.
12. Try to tie up your hair and avoid wearing loose
clothing and any hanging objects.
13. To avoid electrocution, never work on wet sur-
faces.
14. Always wear protective goggles. Please note that
glasses for vision correction are not protective
goggles.
ASSEMBLY
1. Remove all parts from the packaging and ensure
that they are not in poor condition.
2. Remove the parts that come inside the machine.
3. Place clean cardboard on the oor and lay the
machine on its lid. (Make sure you keep the co-
ver closed when laying the machine on its lid).
4. Mount four legs on brackets with M6x12 Phillips
screws and M6 nuts. Note: do not tighten too
much.
5. Place the platform between the legs with the at
surface facing down and attach to the legs with
M6x12 Phillips screws and M6 nuts M6.
6. With the legs tight against the bottom shelf, tigh-
ten all bottom shelf screws.
7. Tighten all screws installed in step 4.
8. Stand machine up; be careful to keep lid closed.
9. Place work platform and basket on machine.
10. Mount the pump assembly in the slot on the side
of the machine. Place the lter strainer in posi-
tion.
11. Connect the machine to 220v 50hz standard soc-
ket and ll liquid with the appropriate amount.
12. Turn the power switch on, liquid should not ow
from the exible tap.
TROUBLE SHOOTING
The only trouble you could ever experience with your
parts washer is reduced volume ow or no ow of cle-
aning liquid from the ex hose nozzle. The probable
cause is foreign matter in the ex hose.
POSSIBLE SOLUTIONS:
1. Check that indicator light on switch box is lit.
2. Using an insulated handle screw driver to lightly
touch tip of housing of motor. A light oscillation
magnetic pull indicates power is reaching the
motor.
3. Disconnect power plug, remove ex hose from
pump ow - out line.
4. Remove front of pump housing by removing 3
screws. Clear any foreign matter lodged around
impeller.
5. Resemble in reverse order.
TECHNICAL SPECIFICATIONS
Tank capacity . . . . . . . . . . . . . . . . . . . . . . . . . . . .150L
Volume . . . . . . . . . . . . . . . . . . . . . . . . . . . . . . . . . . 25L
Inner measures deposit . . . . . . . . 1060x490x270mm
Total machine measures.........1090x520x890mm
Weight . . . . . . . . . . . . . . . . . . . . . . . . . . . . . . . . 45 kg

· 4 ·
REF. 52980
GUIDE D’UTILISATION
FR
PRÉSENTATION DU PRODUIT
Cet appareil de nettoyage de pièces est idéal pour le
nettoyage professionnel de petites et moyennes piè-
ces, composants et outils.
CONSIGNES DE SÉCURITÉ
ATTENTION ! Avant d’utiliser l’appareil, veuillez lire
attentivement la notice et les consignes de sécurité.
Le non-respect de ces consignes peut entraîner des
blessures et/ou des blessures graves.
1. Gardez la zone de travail propre et exempte
d’obstacles.
2. Tenez les enfants éloignés de l’appareil.
3. N’utilisez pas l’appareil sous l’inuence d’alcool
ou de drogues.
4. Lisez toutes les informations sur le liquide de ne-
ttoyage. N’utilisez pas de liquides inammables à
des températures inférieures à 150 ºC.
5. Utilisez des équipements de protection appro-
priés pour éviter les brûlures lorsque vous tou-
chez des pièces chaudes.
6. Si le produit est endommagé ou est tombé, ne
l’utilisez qu’après vérication par un personnel
qualié.
7. Ne laissez pas le cordon d’alimentation entrer en
contact avec des parties chaudes de l’appareil
ou des pales de ventilateur.
8. Si vous avez besoin d’une rallonge pour connec-
ter l’appareil à une source d’alimentation, assu-
rez-vous que le courant nominal de la rallonge
correspond au courant nominal consommé par
l’appareil. L’utilisation d’une rallonge avec un
courant nominal inférieur peut provoquer une
surchaue. Ne tendez pas trop la rallonge, ne la
pincez pas, ne la placez pas sur d’autres appa-
reils électriques, etc.
9. Débranchez toujours un appareil inutilisé. Ne ti-
rez pas sur le l pour déconnecter.
10. Pour éviter tout incendie, n’utilisez pas l’appareil
à proximité de bouteilles ou d’autres objets in-
ammables.
11. Installez l’appareil dans un endroit ventilé, en
gardant à l’esprit qu’il utilise une combustion in-
terne.
12. Rassemblez vos cheveux et ne portez pas de vê-
tements amples ni d’accessoires pendants.
13. Pour éviter les chocs électriques, ne travaillez
pas avec des surfaces humides.
14. Portez toujours des lunettes de sécurité. Veuillez
noter que les verres correcteurs ne sont pas des
lunettes de sécurité.
ASSEMBLAGE
1. Retirez toutes les pièces de l’emballage et véri-
ez qu’elles sont en bon état.
2. Retirez les pièces fournies à l’intérieur de l’appa-
reil.
3. Placez un morceau de carton vierge sur le sol et
posez l’appareil avec le couvercle vers le bas (en
vous assurant que le couvercle est fermé).
4. Installez quatre pieds sur les supports à l’aide
des vis Phillips M6x12 et des écrous M6. Remar-
que : ne serrez pas excessivement.
5. Placez le côté plat de la plate-forme entre les
pieds et xez-le aux pieds à l’aide de six vis Phi-
llips M6x12 et des écrous M6.
6. Appuyez fermement les pieds contre la tablette
inférieure et serrez toutes les vis de la tablette
inférieure.
7. Serrez toutes les vis installées au cours de l’éta-
pe 4.
8. Placez l’appareil en position verticale ; assu-
rez-vous que le couvercle est fermé.
9. Placez la plate-forme de service et le panier sur
l’appareil.
10. Installez l’ensemble de pompe dans le trou sur le
côté de l’appareil. Réinstallez la maille de ltre.
11. Branchez l’appareil à une prise standard (220 V,
50 Hz) et remplissez de liquide jusqu’au niveau
requis.
12. Allumez l’interrupteur d’alimentation de l’appa-
reil ; le liquide ne doit pas s’écouler du robinet
exible.
DÉPANNAGE
Le seul problème qui peut avoir lieu lors du fonction-
nement du dispositif de nettoyage de pièces est une
diminution du débit volumétrique ou l’absence de la
sortie de uide de nettoyage de la buse du tuyau exi-
ble. Une cause possible est la pénétration d’un corps
étranger dans le tuyau exible.
SOLUTIONS POSSIBLES:
1. Vériez que le voyant de la boîte de distribution
est allumé.
2. Touchez doucement l’extrémité du capot du mo-
teur avec un tournevis isolé. Une légère attrac-
tion magnétique indique que la puissance atteint
le moteur.
3. Débranchez l’alimentation électrique et décon-
nectez le tuyau exible de la conduite de sortie
de la pompe.
4. Retirez l’avant du corps de pompe en retirant 3
vis. Retirez les objets étrangers qui se sont accu-
mulés autour de la roue de service.
5. Remontez dans l’ordre inverse.
CARACTÉRISTIQUES TECHNIQUES
Capacité du réservoir ......................150L
Capacité ................................25L
Dimensions intérieures......... 1060x490x270mm
Dimensions hors tout de l’appareil 1090x520x890mm
Poids . . . . . . . . . . . . . . . . . . . . . . . . . . . . . . . . . 45 kg

· 5 ·
REF. 52980
BEDIENUNGSANLEITUNG
DE
PRODUKTPRÄSENTATION
Dieses Gerät zum Reinigen von Teilen stellt ein ideales
Mittel professioneller Reinigung von kleinen und mittle-
ren Teilen, Bauelementen und Werkzeugen dar.
ARBEITSSCHUTZVORSCHRIFTEN
ACHTUNG! Vor dem Einsatz des Gerätes aufmer-
ksam die Anleitung und Sicherheitsbestimmung dur-
chlesen. Die Nichteinhaltung von diesen Vorschriften
kann zu Verletzungen und/oder Totalschäden führen.
1. Den Arbeitsbereich sauber halten und keine Hin-
dernisse zulassen.
2. Kein Zugang für Kinder.
3. Kein Zugang unter Alkoholeinuss und im Raus-
chzustand.
4. Alle Informationen über die eingesetzte Reini-
gungsüssigkeit durchlesen. Kein Einsatz von
Flüssigkeiten, die bei Temperaturen unter 150ºC
entammbar sind.
5. Geeignete Schutzmittel zum Vermeiden von
Verbrennungen bei Berührung mit heißen Teilen
verwenden.
6. Bei Beschädigung oder Sturz das Gerät nur
nach der Prüfung durch ausgebildetes Personal
einsetzen.
7. Kein Kontakt des Stromkabels mit heißen Teilen
des Gerätes oder Lüfterügeln zulassen.
8. Gegebenenfalls sich von der Übereinstimmung
des Nennstroms des Verlängerungskabels mit
dem Nennstrom des Gerätes im Stromverlän-
gerungskabel überzeugen. Der Einsatz eines
Verlängerungskabels mit niedrigerem Nenns-
trom kann zu einer Übererwärmung führen.
Übermäßige Spannung des Verlängerungska-
bels, seine Klemmung, Platzierung auf anderen
elektrischen Geräten usw. vermeiden.
9. Das unbenutzte Gerät immer ausschalten.
Stromkabel zum Trennen nicht ziehen.
10. Zum Feuervermeiden das Gerät in der Nähe von
Flaschen oder anderen entammbaren Gegens-
tänden nicht nutzen.
11. Das Gerät in einem belüfteten Raum platzieren,
ohne zu vergessen, dass es mit interner Verbren-
nung funktioniert.
12. Haare sammeln und keine lose Kleidung oder
hängende Accessoires tragen.
13. Um einen elektrischen Schlag zu vermeiden, mit
keinen feuchten Oberächen arbeiten.
14. Schutzbrille immer tragen. Beachten Sie, dass
Sehkorrekturbrille keine Schutzbrille ist.
AUFBAU
1. Alle Teile aus der Verpackung entnehmen und
sich davon überzeugen, dass sie in einem nor-
malen Zustand sind.
2. Die im Gerät gelieferten Teile entnehmen.
3. Ein leeres Blatt Karton auf den Boden legen und
das Gerät mit der Abdeckung nach unten legen
(dabei darauf achten, das der Deckel geschlos-
sen bleibt).
4. Die untere Palette auf Trägern mit Hilfe von Kreu-
zschlitzschrauben M6x12 und Müttern M6aufste-
llen. Bemerkung: nicht zu stark festziehen.
5. Plattform mit der achen Seite nach unten zwis-
chen den Stützen anordnen und mit sechs Kreu-
zschlitzschrauben M6x12 und Müttern M6 auf
Stützen xieren.
6. Nach dem festen Drücken der Stütze gegen die
untere Ablage alle Schrauben der unteren Abla-
ge festziehen.
7. Alle im Schritt 4 eingesetzten Schrauben festzie-
hen.
8. Das Gerät senkrecht aufstellen; sich davon über-
zeugen, dass der Deckel geschlossen ist.
9. Arbeitsplattform und Korb auf dem Gerät aufs-
tellen.
10. Komplette Pumpe in die Önung auf der Seite
des Gerätes installieren. Filtersieb am Ort plat-
zieren.
11. Das Gerät an eine Standardsteckdose (220 V, 50
Hz) anschließen und Flüssigkeit auf das erfor-
derliche Niveau auüllen.
12. Stromversorgungsschalter einschalten; dabei
muss die Flüssigkeit aus dem Schlauch nicht
ießen.
FEHLERBESEITIGUNG
Das einzige Problem, das bei Betrieb des Teilreini-
gungsgerätes auftreten kann, besteht in der Senkung
des Volumendurchusses oder in dem fehlenden Aus-
lauf der Reinigungsüssigkeit aus dem Schlauchan-
satz. Eine Ursache dafür können Fremdkörper im
Schlauch sein.
MÖGLICHE LÖSUNGEN:
1. Sicherstellen, dass Lichtanzeige am Verteiler-
kasten leuchtet.
2. Mit einem Schraubenzieher mit isoliertem Gri-
das Ende der Motorhaube berühren. Leichte
magnetische Anziehung zeigt, daß die Leistung
den Motor erreicht.
3. Gabel vom Versorgungsnetz ausziehen und
Schlauch von der Pumpenausgangslinie tren-
nen.
4. Vorderteil der Motorhaube durch Herausziehen
von 3 Schrauben entfernen. Fremdkörper um
das Laufrad entfernen.
5. Montage in umgekehrter Reihenfolge durch-
führen.
TECHNISCHE DATEN
Tankvolumen . . . . . . . . . . . . . . . . . . . . . . . . . . . .150L
Volumen .................................25L
Innenmasse . . . . . . . . . . . . . . . . . 1060x490x270mm
Hauptabmessungen des Gerätes 1090x520x890mm
Gewicht . . . . . . . . . . . . . . . . . . . . . . . . . . . . . . . 45 kg

· 6 ·
REF. 52980
MANUALE D’USO
IT
PRESENTAZIONE DEL PRODOTTO
Questo dispositivo di pulizia delle parti è ideale per la
pulizia professionale di parti, componenti e strumenti di
piccole e medie dimensioni.
ISTRUZIONI DI SICUREZZA
ATTENZIONE! Leggere attentamente le istruzioni
e le norme di sicurezza prima di utilizzare il dispositivo.
Il mancato rispetto di queste regole può provocare le-
sioni e/o danni gravi.
1. Mantenere l’area di lavoro pulita e libera da os-
tacoli.
2. Tenere i bambini lontani dal dispositivo.
3. Non utilizzare il dispositivo in stato di ebbrezza o
sotto l’eetto di droghe.
4. Leggere tutte le informazioni sul liquido utilizzato
per la pulizia. Non utilizzare liquidi inammabili a
temperature inferiori a 150 ºC.
5. Utilizzare dispositivi di protezione adeguati per
evitare ustioni da contatto con parti calde.
6. In caso di danni o cadute del dispositivo, utiliz-
zarlo solo dopo aver controllato da personale
qualicato.
7. Non permettere che il cavo di alimentazione entri
in contatto con parti calde del dispositivo o con le
pale del ventilatore.
8. Se avete bisogno di una prolunga per collegare
il dispositivo alla fonte di alimentazione, assi-
curarsi che la corrente nominale della prolunga
corrisponda alla corrente nominale consumata
dal dispositivo. L’uso di una prolunga con una
corrente nominale inferiore può causare il surris-
caldamento. Evitare il tensionamente eccessivo
della prolunga, lo schiacciamento, il posiziona-
mento su altri dispositivi elettrici, ecc.
9. Scollegare sempre il dispositivo che non è in uso.
Non tirare il lo per scollegare.
10. Per evitare incendi, non utilizzare il dispositivo
vicino a bombole o altri oggetti inammabili.
11. Installare l’apparecchio in un locale ventilato, ri-
cordando che durante il suo funzionamento vie-
ne utilizzata la combustione interna.
12. Raccogliere i capelli e non indossare abiti larghi
o accessori penzolanti.
13. Per evitare scosse elettriche, non lavorare con
superci bagnate.
14. Indossare sempre occhiali di sicurezza. Si prega
di notare che gli occhiali per la correzione della
vista non sono occhiali di sicurezza.
ASSEMBLAGGIO
1. Togliere tutte le parti dall’imballaggio e assicurar-
si che siano in buone condizioni.
2. Rimuovere le parti fornite all’interno del disposi-
tivo.
3. Mettere un foglio di cartone pulito sul pavimento
e posizionare l’apparecchio con il coperchio ri-
volto verso il basso (assicurarsi che il coperchio
sia chiuso).
4. Montare i quattro supporti sulle stae usando viti
con scanalature a croce M6x12 e dadi M6. Nota:
non stringere troppo forte.
5. Posizionare la piattaforma con il lato piatto rivol-
to verso il basso tra i supporti e ssarla ai su-
pporti utilizzando sei viti con scanalature a croce
M6x12 e dadi M6.
6. Premendo bene tutti i supporti contro il ripiano
inferiore, serrare tutte le viti del ripiano inferiore.
7. Stringere tutte le viti installate al passaggio 4.
8. Posizionare il dispositivo in posizione verticale;
assicurarsi che il coperchio sia chiuso.
9. Posizionare la piattaforma di lavoro e il cesto su-
lla macchina.
10. Installare la pompa completa nell’apertura sul
lato del dispositivo. Reinstallare la rete del ltro.
11. Collegare il dispositivo alla presa standard (220
V, 50 Hz) e riempire di liquido no al livello ri-
chiesto.
12. Accendere l’interruttore di alimentazione del dis-
positivo; allo stesso tempo, il liquido non deve
fuoriuscire dal rubinetto essibile.
ELIMINAZIONE GUASTI
L’unico problema che può sorgere durante il funzio-
namento del dispositivo per la pulizia delle parti è la
diminuzione del consumo volumetrico o la mancanza
d’uscita del liquido di pulizia dall’ugello del tubo essi-
bile. La possibile causa è un corpo estraneo nel tubo
essibile.
POSSIBILI SOLUZIONI:
1. Assicurarsi che sulla scatola di congiunzione l’in-
dicatore luminoso sia acceso.
2. Toccare delicatamente l’estremità del carter del
motore con il cacciavite con il manico isolato.
Una leggera attrazione magnetica indica che la
potenza raggiunge il motore.
3. Togliere la spina dalla rete di alimentazione e
scollegare il tubo essibile dalla linea d’uscita
della pompa.
4. Togliere la parte anteriore del carter della pompa
rimuovendo le 3 viti. Eliminare i corpi estranei ac-
cumulati intorno alla girante.
5. Eettura l’assemblaggio in ordine inverso.
CARATTERISTICHE TECNICHE
Capacità del serbatoio . . . . . . . . . . . . . . . . . . . . . 150L
Volume . . . . . . . . . . . . . . . . . . . . . . . . . . . . . . . . . . 25L
Dimensioni interne . . . . . . . . . . . . 1060x490x270mm
Dimensioni complessive del dispositivo ............
1090x520x890mm
Peso .................................. 45 kg

· 7 ·
REF. 52980
MANUAL DE INSTRUÇÕES
PT
APRESENTAÇÃO DO PRODUTO
Este limpador de peças é ideal para a limpeza pros-
sional de peças, componentes e ferramentas peque-
nas e médias.
INSTRUÇÕES DE SEGURANÇA
ATENÇÃO! Antes de usar o dispositivo, leia aten-
tamente as instruções e regras de segurança. O não
cumprimento dessas diretrizes pode resultar em feri-
mentos e/ou ferimentos graves.
1. Mantenha a área de trabalho limpa e sem obs-
truções.
2. Mantenha as crianças afastadas do dispositivo.
3. Não use o dispositivo sob a inuência de álcool
ou drogas.
4. Leia todas as informações sobre o uido de lim-
peza. Não use líquidos inamáveis em tempera-
turas abaixo de 150 ºC.
5. Use equipamento de proteção adequado para
evitar queimaduras ao tocar em partes quentes.
6. Se o produto estiver danicado ou cair, use-o so-
mente após vericação por pessoal qualicado.
7. Não permita que o cabo de alimentação entre
em contato com partes quentes do dispositivo ou
pás do ventilador.
8. Se você precisar de um cabo de extensão para
conectar o dispositivo a uma fonte de alimen-
tação, certique-se de que a corrente nominal
do cabo de extensão corresponda à corrente no-
minal consumida pelo dispositivo. Usar um cabo
de extensão com uma corrente nominal inferior
pode causar superaquecimento. Não estique
demais o cabo de extensão, aperte-o, coloque-o
em cima de outros aparelhos elétricos, etc.
9. Sempre desconecte um dispositivo não utilizado.
Não puxe o o para desconectar.
10. Para evitar incêndio, não use o dispositivo perto
de cilindros ou outros itens inamáveis.
11. Instale a máquina em local ventilado, lembrando
que utiliza combustão interna.
12. Prenda o cabelo e não use roupas largas ou
acessórios soltos.
13. Para evitar choque elétrico, não trabalhe em su-
perfícies molhadas.
14. Sempre use óculos de segurança. Observe que
os óculos corretivos não são óculos de segu-
rança.
MONTAGEM
1. Remova todas as peças da embalagem e veri-
que se estão em boas condições.
2. Remova as peças fornecidas dentro do disposi-
tivo.
3. Coloque um pedaço de papelão em branco no
chão e coloque o aparelho com a tampa para
baixo (certicando-se de que a tampa está fe-
chada).
4. Instale os quatro pés nos suportes usando os pa-
rafusos Phillips M6x12 e porcas M6. Nota: Não
aperte demais.
5. Coloque a plataforma com o lado plano volta-
do para baixo entre os pés e prenda-a nos pés
usando seis parafusos Phillips M6x12 e porcas
M6.
6. Pressione os pés rmemente contra a prateleira
inferior e aperte todos os parafusos na prateleira
inferior.
7. Aperte todos os parafusos instalados na etapa 4.
8. Coloque o dispositivo na posição vertical; certi-
que-se de que a tampa está fechada.
9. Coloque a plataforma de impressão e a cesta na
máquina.
10. Instale o conjunto da bomba no orifício na lateral
da unidade. Substitua a malha do ltro.
11. Conecte o dispositivo a uma tomada padrão (220
V, 50 Hz) e encha com líquido até o nível ne-
cessário.
12. Ligue o botão ON/OFF do dispositivo; o líquido
não deve uir para fora da torneira exível.
SOLUÇÃO DE PROBLEMAS
O único problema que pode surgir durante o funcio-
namento do dispositivo para limpeza de peças é a di-
minuição da vazão volumétrica ou a falta de uido de
limpeza do bico da mangueira exível. Uma possível
causa é a entrada de um corpo estranho na mangueira
exível.
SOLUÇÕES POSSÍVEIS:
1. Verique se a luz indicadora na caixa de junção
está acesa.
2. Toque suavemente na extremidade da tampa do
motor com uma chave de fenda isolada. Uma
leve atração magnética indica que a energia está
a alcançar o motor.
3. Desconecte a fonte de alimentação e desco-
necte a mangueira exível da linha de saída da
bomba.
4. Remova a parte frontal da carcaça da bomba pu-
xando 3 parafusos. Remova os objetos estran-
hos que se acumularam ao redor do impulsor.
5. Remonte na ordem inversa.
ESPECIFICAÇÕES
Volume do tanque.........................150L
Volume . . . . . . . . . . . . . . . . . . . . . . . . . . . . . . . . . . 25L
Dimensões interna . . . . . . . . . . . . 1060x490x270mm
Dimensões gerais do dispositivo 1090x520x890mm
Peso .................................. 45 kg

· 8 ·
REF. 52980
MANUAL DE INSTRUCŢIUNI
RO
PREZENTAREA PRODUSULUI
Acest aparat pentru curățarea pieselor este un produs
ideal potrivit pentru curățarea profesională a pieselor,
componentelor și sculelor mici și mijlocii.
INSTRUCȚIUNI DE SIGURANŢĂ
ATENȚIE! Înainte de a începe utilizarea dispoziti-
vului, citiți cu atenție instrucțiunile de siguranță. Neres-
pectarea acestor instrucțiuni poate duce la traume și/
sau la leziuni severe.
1. Păstrați zona de lucru curată și liberă de obsta-
cole.
2. Țineți copiii departe de dispozitiv.
3. Nu utilizați dispozitivul sub inuența alcoolului
sau a drogurilor.
4. Citiți toate informațiile despre lichidul de curăța-
re. Nu utilizați lichide inamabile la temperaturi
sub 150 ° C.
5. Folosiți echipament de protecție adecvat pentru
a evita arsurile la atingerea pieselor erbinți.
6. Dacă dispozitivul este deteriorat sau a căzut, uti-
lizați-l numai după vericarea de către personalul
calicat.
7. Nu permiteți cablului de alimentare să intre în
contact cu părțile erbinți ale dispozitivului sau
ale paletelor ventilatorului.
8. În caz dacă aveți nevoie de un cablu prelungi-
tor pentru a conecta dispozitivul la o sursă de
alimentare, asigurați-vă că curentul nominal al
cablului prelungitor corespunde curentului nomi-
nal consumat de dispozitiv. Utilizarea unui cablu
prelungitor cu un curent nominal mai mic poate
cauza supraîncălzire. Nu întindeți prea mult ca-
blul prelungitor, nu îl ciupiți, nu îl așezați deasu-
pra altor aparate electrice, etc.
9. Deconectați întotdeauna dispozitivul neutilizat.
Nu trageți rul pentru a deconecta dispozitivul.
10. Pentru a evita incendiu, nu utilizați dispozitivul
lângă butelii sau alte articole inamabile.
11. Instalați dispozitivul într-o zonă ventilată, amin-
tindu-vă că în timpul funcționării se folosește ar-
derea internă.
12. Strângeți părul și nu purtați haine largi sau bijute-
rii care se spânzură.
13. Pentru a evita șocurile electrice, nu lucrați pe su-
prafețe umede.
14. Purtați întotdeauna ochelari de protecție. Vă
rugăm să rețineți că ochelarii corectori nu sunt
ochelari de protecție.
ASAMBLARE
1. Scoateți toate piesele din ambalaj și vericați
dacă acestea sunt în stare bună.
2. Scoateți piesele furnizate în interiorul dispoziti-
vului.
3. Aşterneți o bucată de carton curat pe podea și
așezați dispozitivul cu capacul în jos (asigurân-
du-vă că capacul este închis).
4. Instalați patru picioare pe consolă folosind șuru-
burile crestate M6x12 și piulițele M6.. Notă: Nu
strângeți prea mult.
5. Așezați platforma cu fața plană în jos între pi-
cioare și xați-o pe picioare folosind șase șuru-
buri crestate M6x12 și piulițe M6.
6. Apăsați ferm picioarele pe raftul de jos și strân-
geți toate șuruburile de pe raftul de jos.
7. Strângeți toate șuruburile instalate la pasul 4.
8. Așezați dispozitivul în poziție verticală; asigu-
rați-vă că capacul este închis.
9. Instalați platforma de lucru și coșul pe dispozitiv.
10. Instalați pompa asamblată în oriciul de pe par-
tea laterală a unității. Așezați crepina ltrului la
loc.
11. Conectați dispozitivul la o priză standard (220 V,
50 Hz) și umpleți cu lichid la nivelul dorit.
12. Porniți comutatorul de alimentare al dispoziti-
vului; lichidul nu trebuie să curgă din robinetul
exibil.
ÎNLĂTURAREA DEFECŢIUNILOR
Unica problemă care poate apărea în timpul funcționării
dispozitivului pentru curățarea pieselor este scăderea
debitului volumetric sau lipsa uidului de curățare din
duza furtunului exibil. O cauză posibilă poate că un
corp străin a intrat în furtunul exibil.
SOLUȚII POSIBILE:
1. Asigurați-vă că indicatorul luminos de pe cutia de
distribuție este aprins.
2. Atingeți ușor marjina capacului motorului cu o
șurubelniță izolată. O ușoară atracție magnetică
indică faptul că puterea ajunge la motor.
3. Deconectați sursa de alimentare și deconectați
furtunul exibil de la conducta de evacuare a
pompei.
4. Scoateți partea din față a carcasei pompei
deșurubând 3 șuruburi. Îndepărtați obiectele
străine care s-au acumulat în jurul rotorului.
5. Reasamblați în ordine inversă.
SPECIFICAȚII TEHNICE
Volumul rezervorului.......................150L
Volum . . . . . . . . . . . . . . . . . . . . . . . . . . . . . . . . . . . 25L
Dimensiuni interioare . . . . . . . . . . 1060x490x270mm
Dimensiunile totale ale dispozitivului . . . . . . . . . . . . . .
1090x520x890mm
Greutate . . . . . . . . . . . . . . . . . . . . . . . . . . . . . . . 45 kg

· 9 ·
REF. 52980
INSTRUCTIEHANDLEIDING
NL
PRODUCTPRESENTATIE
Deze onderdelenreinigingsmachine is het ideale hul-
pmiddel voor het professioneel reinigen van kleine en
middelgrote onderdelen, componenten of gereedscha-
ppen.
VEILIGHEIDSINSTRUCTIES
WAARSCHUWING!! Lees alle veiligheidswaar-
schuwingen en instructies. Het niet opvolgen van de
onderstaande waarschuwingen en instructies kan per-
soonlijk letsel en / of ernstig letsel tot gevolg hebben.
1. Houd het werkgebied schoon en vrij van obs-
takels.
2. Houd kinderen uit de buurt van de machine.
3. Gebruik de machine nooit als u onder invloed
bent van alcohol of drugs.
4. Lees alle informatie over de vloeistof die u ge-
bruikt voor het reinigen. Gebruik geen vloeisto-
en die ontvlambaar zijn bij temperaturen onder
150ºC.
5. Gebruik de juiste beschermingen om brandwon-
den te voorkomen bij het aanraken van hete on-
derdelen.
6. Als de machine is beschadigd of gevallen is, mag
u deze niet gebruiken totdat deze is nagekeken
door gekwaliceerd personeel.
7. Zorg ervoor dat het netsnoer niet in contact komt
met hete delen van de machine of ventilatorbla-
den.
8. Als een verlengsnoer nodig is om de machine op
de stroomvoorziening aan te sluiten, zorg er dan
voor dat de stroomsterkte van het verlengsnoer
gelijk is aan de stroom die door de machine wor-
dt vereist. Als een verlengsnoer met een lagere
stroomcapaciteit wordt gebruikt, kan er overver-
hitting optreden. Tref voorzorgsmaatregelen om
ervoor te zorgen dat het verlengsnoer niet wordt
gespannen, bekneld raakt of op andere elektris-
che apparaten, enz. Wordt geplaatst.
9. Haal altijd de stekker uit het stopcontact wanneer
u de machine niet gebruikt. Trek nooit aan het
snoer om de stekker uit het stopcontact te halen.
10. Om het risico op brand te verkleinen, mag u de
machine niet gebruiken in de buurt van liters of
andere licht ontvlambare voorwerpen.
11. Plaats de machine op een geventileerde plaats,
houd er rekening mee dat de werking van de ma-
chine interne verbranding is.
12. Probeer uw haar vast te binden en vermijd het
dragen van losse kleding en hangende voorwer-
pen.
13. Werk nooit op natte oppervlakken om elektrocu-
tie te voorkomen.
14. Draag altijd een veiligheidsbril. Houd er rekening
mee dat een bril voor zichtcorrectie geen veili-
gheidsbril is.
BIJEENKOMST
1. Haal alle onderdelen uit de verpakking en zorg
ervoor dat ze niet in slechte staat verkeren.
2. Verwijder de onderdelen die in de machine ko-
men.
3. Leg schoon karton op de grond en leg de auto-
maat op het deksel. (Zorg ervoor dat u het deksel
gesloten houdt wanneer u de machine op het
deksel legt).
4. Monteer vier poten op beugels met M6x12 kruis-
kopschroeven en M6 moeren. Let op: niet te
strak aandraaien.
5. Plaats het platform tussen de poten met het
platte oppervlak naar beneden en bevestig aan
de poten met M6x12 kruiskopschroeven en M6
moeren M6.
6. Draai alle schroeven van de onderste plank vast
met de poten strak tegen de onderste plank.
7. Draai alle schroeven vast die u in stap 4 hebt
aangebracht.
8. Zet de machine op; wees voorzichtig om het de-
ksel gesloten te houden.
9. Plaats het werkplatform en de mand op de ma-
chine.
10. Monteer de pompassemblage in de sleuf aan de
zijkant van de machine. Plaats de lterzeef op
zijn plaats.
11. Sluit de machine aan op een 220v 50hz stan-
daard stopcontact en vul vloeistof met de juiste
hoeveelheid.
12. Zet de stroomschakelaar aan, er mag geen
vloeistof uit de exibele kraan stromen.
PROBLEEMOPLOSSEN
Het enige probleem dat u ooit kunt ondervinden met
uw onderdelenwasser, is een verminderde volumes-
troom of geen stroom reinigingsvloeistof uit het exi-
bele slangmondstuk. De waarschijnlijke oorzaak is
vreemd materiaal in de exibele slang.
MOGELIJKE OPLOSSINGEN:
1. Controleer of het indicatielampje op de
schakelkast brandt.
2. Gebruik een schroevendraaier met geïsoleerde
handgreep om de punt van de behuizing van de
motor lichtjes aan te raken. Een magnetische tre-
kkracht met lichte trilling geeft aan dat de stroom
de motor bereikt.
3. Haal de stekker uit het stopcontact, verwijder de
exibele slang van de pompuitstroomleiding.
4. Verwijder de voorkant van het pomphuis door de
3 schroeven te verwijderen. Verwijder al het vre-
emde materiaal dat zich rond de waaier bevindt.
5. Lijken in omgekeerde volgorde op.
TECHNISCHE SPECIFICATIES
Tankinhoud ..............................150L
Volume . . . . . . . . . . . . . . . . . . . . . . . . . . . . . . . . . . 25L
Binnenste maatregelen......... 1060x490x270mm
Totale machinematen ...........1090x520x890mm
Gewicht................................ 45 kg

· 10 ·
REF. 52980
ÜZEMELTETÉSI UTASÍTÁS
HU
TERMÉK BEMUTATÁSA
Ez az alkatrésztisztító-készülék ideális a kis és köze-
pes alkatrészek, összetevők és szerszámok pro-
fesszionális tisztításához.
BIZTONSÁGI ELŐÍRÁSOK
FIGYELMEZTETÉS! A készülék használata előtt
gyelmesen olvassa el az utasításokat és a biztonsági
előírásokat. Ezen irányelvek be nem tartása traumát
és / vagy súlyos sérülést okozhat.
1. Tartsa a munkaterületet tisztán és akadályoktól
mentesen.
2. Tartsa távol a gyermekeket a készüléktől.
3. Ne használja a készüléket alkohol vagy kábí-
tószer hatása alatt.
4. Olvassa el a tisztításhoz használt folyadékra vo-
natkozó összes információt. Ne használjon 150
° C alatti hőmérsékleten gyúlékony folyadékot.
5. Használjon megfelelő védőfelszerelést, hogy
elkerülje a forró alkatrészekkel való érintkezést.
6. Ha a készülék sérült vagy leesik, csak akkor
használja, ha azt szakképzett személyzet
ellenőrizte.
7. Ne engedje, hogy a tápkábel érintkezzen a
készülék vagy a ventilátorlapátok forró részeivel.
8. Ha hosszabbító kábelre van szüksége az eszköz
áramforráshoz való csatlakoztatásához, ellenőri-
zze, hogy a hosszabbító kábel névleges áramja
megfelel-e az eszköz által fogyasztott névleges
áramnak. Az alacsonyabb névleges áramerőssé-
gű hosszabbító kábel használata túlmelegedést
okozhat. Kerülje a hosszabbító kábel túlfeszí-
tését, befogását, más elektromos készülékekre
történő elhelyezését stb.
9. Mindig húzza ki a nem használt eszközt. A kihú-
záshoz ne rántsa meg a vezetéket.
10. A tűz elkerülése érdekében ne használja a
készüléket ballonok vagy más gyúlékony tárgyak
közelében.
11. Telepítse a készüléket szellőztetett helyre, szem
előtt tartva, hogy az működés közben belső
égést használ.
12. Gyűjtse össze a haját, ne viseljen laza ruhát vagy
lógó tartozékokat.
13. Az áramütés elkerülése érdekében ne dolgozzon
nedves felületeken.
14. Mindig viseljen biztonsági szemüveget. Felhív-
juk gyelmét, hogy a látásjavító szemüveg nem
minősül biztonsági szemüvegnek.
ÖSSZESZERELÉS
1. Távolítsa el az összes alkatrészt a csomagolás-
ból, és ellenőrizze, hogy azok normál állapotban
vannak-e.
2. Távolítsa el a készülék belsejében található alka-
trészeket.
3. Helyezzen egy tiszta kartondarabot a padlóra, és
fedéllel lefelé fektesse e a készüléket (ügyelve
arra, hogy a fedél zárva legyen).
4. Szerelje fel a négy tartót a tartóelemekre az
M6x12 keresztmetszetű csavarokkal és az M6
anyákkal. Megjegyzés: ne húzza túl szorosan.
5. Helyezze a platformot a tartók közé, lapos olda-
lával lefelé, majd rögzítse a tartókhoz hat m6x12
keresztmetszetű csavarral és M6 anyával.
6. Nyomja erősen a tartókat az alsó polcra, majd
húzza meg az alsó polcon lévő összes csavart.
7. Húzza meg a 4. lépésben telepített összes
csavart.
8. Helyezze a készüléket függőleges helyzetbe;
győződjön meg róla, hogy a fedél zárva van.
9. Szerelje fel a munkaállványt és a kosarat a gé-
pre.
10. Szerelje be az összeszerelt szivattyúegységet a
készülék oldalán lévő lyukba. Helyezze a helyére
a szűrőhálót.
11. Csatlakoztassa a készüléket egy szabványos alj-
zathoz (220 V, 50 Hz), majd töltse fel folyadékkal
a kívánt szintre.
12. Kapcsolja be a készülék tápkapcsolóját; a folya-
dék nem áramolhat ki a rugalmas csapból.
MEGHIBÁSODÁSOK ELHÁRÍTÁSA
Az egyetlen probléma, amely az alkatrészek tisztításá-
ra szolgáló gép működése során előfordulhat, a térfo-
gatáram csökkenése vagy a mosófolyadék kilépésé-
nek hiánya a rugalmas tömlő fúvókájából. Lehetséges
ok az idegen test bejutása a rugalmas tömlőbe.
LEHETSÉGES MEGOLDÁSOK:
1. Győződjön meg róla, hogy a csatlakozódoboz
jelzőfénye be van kapcsolva.
2. Óvatosan érintse meg a motorház végét szigetelt
fogantyúval ellátott csavarhúzóval. Egy enyhe
mágneses húzás azt jelzi, hogy a teljesítmény
eléri a motort.
3. Távolítsa el a dugót a tápegységről, majd húzza
ki a rugalmas tömlőt a szivattyú kimeneti veze-
tékéből.
4. Távolítsa el a szivattyúház elejét a 3 csavar kihú-
zásával. Távolítsa el a járókerék körül felhalmo-
zódott idegen tárgyakat.
5. Végezze el az összeszerelést fordított sorrend-
ben.
MŰSZAKI ELŐÍRÁSOK
Tartály kapacitás..........................150L
Térfogat . . . . . . . . . . . . . . . . . . . . . . . . . . . . . . . . .25L
Belső méretek................ 1060x490x270mm
A készülék teljes mérete.........1090x520x890mm
Tömeg . . . . . . . . . . . . . . . . . . . . . . . . . . . . . . . . 45 kg

· 11 ·
REF. 52980
РУКОВОДСТВО ПО ЭКСПЛУАТАЦИИ
RU
ПРЕЗЕНТАЦИЯ ПРОДУКТА
Данный аппарат для очистки деталей представляет
собой идеальное средство для профессиональной
очистки малых и средних деталей, компонентов и
инструментов.
ИНСТРУКЦИИ ПО ТЕХНИКЕ БЕЗОПАСНОСТИ
ВНИМАНИЕ! Перед началом использования
устройства внимательно прочитайте инструкцию и
правила техники безопасности. Невыполнение данных
правил может стать причиной травм и/или тяжелых
повреждений.
1. Содержите зону выполнения работ в чистоте и не
допускайте наличия в ней препятствий.
2. Не подпускайте детей к устройству.
3. Не используйте устройство в состоянии
алкогольного или наркотического опьянения.
4. Прочтите всю информацию о жидкости,
используемой для очистки. Не используйте
жидкости, воспламеняющиеся при температурах
ниже 150 ºC.
5. Используйте соответствующие защитные
средства во избежание ожогов при
соприкосновении с горячими деталями.
6. При повреждении или падении устройства
используйте его только после проверки
квалифицированным персоналом.
7. Не допускайте соприкосновения провода питания
с горячими частями устройства или лопастями
вентилятора.
8. При потребности в удлинителе для подключения
устройства к источнику питания убедитесь, что
номинальный ток удлинителя соответствует
номинальному току, потребляемому устройством.
Использование удлинителя с более низким
номинальным током может привести к перегреву.
Избегайте чрезмерного натяжения удлинителя,
его зажатия, помещения на другие электрические
приборы и т. д.
9. Всегда отключайте неиспользуемое устройство.
Не дергайте за провод для отключения.
10. Во избежание пожара не используйте
устройство вблизи баллонов или других
легковоспламеняющихся предметов.
11. Установите аппарат в вентилируемом
помещении, помня о том, что при его работе
используется внутреннее сгорание.
12. Соберите волосы и не надевайте свободную
одежду или свисающие аксессуары.
13. Во избежание поражения электрическим током не
работайте с влажными поверхностями.
14. Всегда надевайте защитные очки. Обратите
внимание, что очки для коррекции зрения не
являются защитными очками.
СБОРКА
1. Извлеките все детали из упаковке и убедитесь,
что они находятся в нормальном состоянии.
2. Извлеките детали, поставляемые внутри
устройства.
3. Поместите на пол чистый лист картона и положите
аппарат крышкой вниз (при этом необходимо
следить, чтобы крышка была закрыта).
4. Установите четыре опоры на кронштейны с
помощью винтов с крестовыми шлицами M6x12
и гаек M6. Примечание: не затягивайте слишком
сильно.
5. Поместите платформу между опорами плоской
стороной вниз и закрепите ее на опорах с
помощью шести винтов с крестообразными
шлицами M6x12 и гаек M6.
6. Плотно прижав опоры к нижней полке, затяните
все винты нижней полки.
7. Затяните все винты, установленные в ходе шага
4.
8. Установите устройство в вертикальное
положение; убедитесь, что крышка закрыта.
9. Установите рабочую платформу и корзину на
аппарат.
10. Установите насос в сборе в отверстие на боку
устройства. Установите сетку фильтра на место.
11. Подключите устройство к стандартной розетке
(220 В, 50 Гц) и заполните жидкостью до
необходимого уровня.
12. Включите выключатель питания устройства; при
этом жидкость не должна вытекать из гибкого
крана.
УСТРАНЕНИЕ НЕИСПРАВНОСТЕЙ
Единственная проблема, которая может возникнуть
в процессе работы аппарата для очистки деталей,
заключается в снижении объемного расхода или
отсутствии выхода моющей жидкости из насадки
гибкого шланга. Возможной причиной является
попадание инородного тела в гибкий шланг.
ВОЗМОЖНЫЕ РЕШЕНИЯ:
1. Убедитесь, что на распределительной коробке
горит световой индикатор.
2. Осторожно дотроньтесь до конца кожуха
двигателя отверткой с изолированной ручкой.
Легкое магнитное притяжение указывает на то,
что мощность достигает двигателя.
3. Извлеките вилку из сети питания и отсоедините
гибкий шланг от выходной линии насоса.
4. Снимите переднюю часть кожуха насоса,
вытянув 3 винта. Удалите инородные объекты,
скопившиеся вокруг рабочего колеса.
5. Выполните сборку в обратном порядке.
ТЕХНИЧЕСКИЕ ХАРАКТЕРИСТИКИ
Объем резервуара . . . . . . . . . . . . . . . . . . . . . . . 150 л
Объем.................................. 25 л
Внутренние размеры............ 1 060x490x270 мм
Общие размеры аппарата.........1 090x520x890 мм
Вес . . . . . . . . . . . . . . . . . . . . . . . . . . . . . . . . . . . . 45 кг

· 12 ·
REF. 52980
INSTRUKCJA OBSŁUGI
PL
PREZENTACJA PRODUKTU
To urządzenie do czyszczenia części jest idealnym
narzędziem do profesjonalnego czyszczenia małych i
średnich części, komponentów i narzędzi.
INSTRUKCJA BEZPIECZEŃSTWA
UWAGA! Przed użyciem urządzenia należy dokład-
nie przeczytać instrukcję i zasady bezpieczeństwa.
Nieprzestrzeganie tych instrukcji może spowodować
obrażenia ciała lub poważne uszkodzenia.
1. Utrzymuj miejsce pracy w czystości i wolne od
przeszkód.
2. Trzymaj dzieci z dala od urządzenia.
3. Nie należy używać urządzenia pod wpływem
alkoholu lub narkotyków.
4. Przeczytaj dokładnie informację na temat płynu,
którego używasz do czyszczenia. Nie należy
stosować płynów łatwopalnych w temperaturach
poniżej 150 ºC.
5. Należy stosować odpowiednie wyposażenie
ochronne, aby uniknąć poparzeń w wyniku kon-
taktu z gorącymi częściami.
6. Jeśli urządzenie jest uszkodzone lub upadło,
należy go używać tylko po sprawdzeniu przez
wykwalikowany personel.
7. Nie wolno dopuścić do kontaktu przewodu za-
silającego z gorącymi częściami urządzenia lub
łopatkami wentylatora.
8. Jeśli do podłączenia urządzenia do źródła zasi-
lania potrzebny jest przedłużacz, należy upew-
nić się, że jest on przystosowany do natężenia
prądu pobieranego przez urządzenie. Użycie
przedłużacza o niższym natężeniu prądu może
spowodować przegrzanie. Unikaj nadmierne-
go rozciągania przedłużacza, ściskania go,
umieszczania na innych urządzeniach elektrycz-
nych itp.
9. Zawsze wyłączaj urządzenie, które nie jest
używane. Nie wolno ciągnąć za przewód, gdy
chcesz go odłączyć.
10. Ze względu na niebezpieczeństwo pożaru nie
należy używać urządzenia w pobliżu butli lub in-
nych łatwopalnych przedmiotów.
11. Ustaw urządzenie w wentylowanym miejscu, pa-
miętając, że pracuje ono ze spalaniem wewnę-
trznym.
12. Upnij włosy, nie noś luźnych ubrań ani wiszących
akcesoriów.
13. Aby uniknąć porażenia prądem, nie należy pra-
cować z mokrą powierzchnią.
14. Zawsze używaj okularów ochronnych. Należy
pamiętać, że okulary korygujące wzrok nie są
okularami ochronnymi.
MONTAŻ
1. Wyjmij wszystkie części z opakowania i sprawdź,
czy są w dobrym stanie.
2. Wyjmij części znajdujące się wewnątrz urządze-
nia.
3. Połóż na podłodze czysty arkusz tektury i umieść
urządzenie z pokrywą skierowaną w dół (uważaj,
aby pokrywa była zamknięta).
4. Zamontuj cztery podpory na wsporniki za po-
mocą śrub z krzyżowym wgłębieniem M6x12 i
nakrętek M6. Uwaga: Nie należy dokręcać zbyt
mocno.
5. Umieść pomost między wspornikami, płaską
stroną do dołu, i przymocuj go do podestu za
pomocą sześciu śrub z krzyżowym wgłębieniem
M6x12 i nakrętek M6.
6. Dokręć wszystkie śruby półki dolnej, mocno przy-
ciskając podporę do półki dolnej.
7. Dokręć wszystkie śruby zainstalowane w kroku
4.
8. Umieść urządzenie w pozycji pionowej; upewnij
się, że pokrywa jest zamknięta.
9. Zamontuj podest roboczy i kosz na urządzeniu.
10. Zamontuj pompę do otworu z boku urządzenia.
Zainstaluj sito ltra na miejsce.
11. Podłącz urządzenie do standardowego gniazdka
(220 V, 50 Hz) i napełnij płynem do wymaganego
poziomu.
12. Włącz przełącznik zasilania urządzenia; z elas-
tycznego zaworu nie powinna wypływać ciecz.
USUWANIE USTEREK
Jedynym problemem, który może wystąpić podczas
pracy urządzenia do czyszczenia części, jest zmniejs-
zony przepływ lub brak wypływu płynu czyszczącego z
dyszy elastycznego węża. Możliwą przyczyną jest ciało
obce w wężu elastycznym.
MOŻLIWE ROZWIĄZANIE:
1. Upewnić się, że kontrolka na skrzynce przyłącze-
niowej jest zapalona.
2. Ostrożnie dotknij końca osłony silnika izolowan-
ym uchwytem śrubokręta. Lekkie przyciąganie
magnetyczne wskazuje, że do silnika dociera
prąd.
3. Wyjmij wtyczkę z zasilacza i odłącz elastyczny
wąż od przewodu wylotowego pompy.
4. Odkręć 3 śruby i zdejmij przednią część osłony
pompy. Usuń ciała obce zgromadzone wokół
wirnika.
5. Wykonaj ponownie montaż w odwrotnej kolej-
ności.
CHARAKTERYSTYKI TECHNICZNE
Pojemność zbiornika . . . . . . . . . . . . . . . . . . . . . . 150L
Pojemność zbiornika . . . . . . . . . . . . . . . . . . . . . . . 25L
Wymiary wewnętrzne .......... 1060x490x270mm
Wymiary całkowite urządzenia 1090x520x890mm
Waga . . . . . . . . . . . . . . . . . . . . . . . . . . . . . . . . . 45 kg
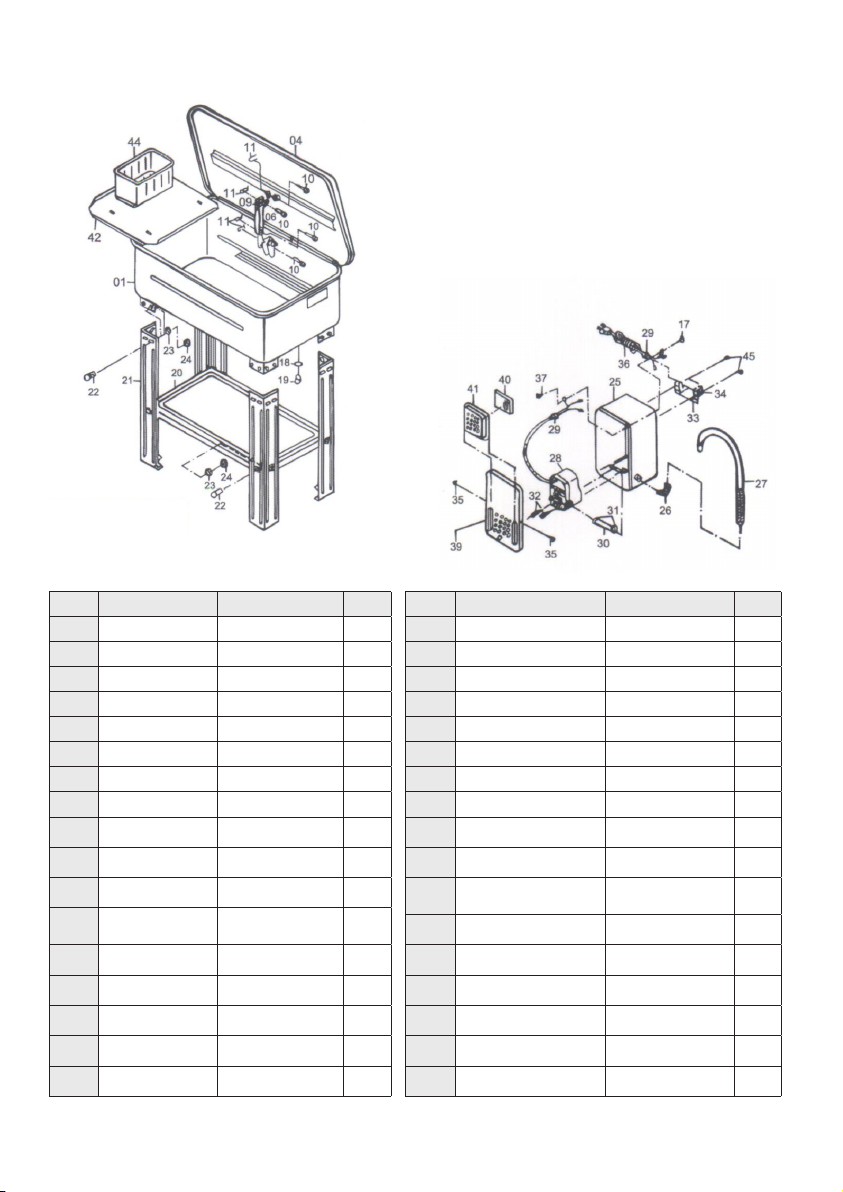
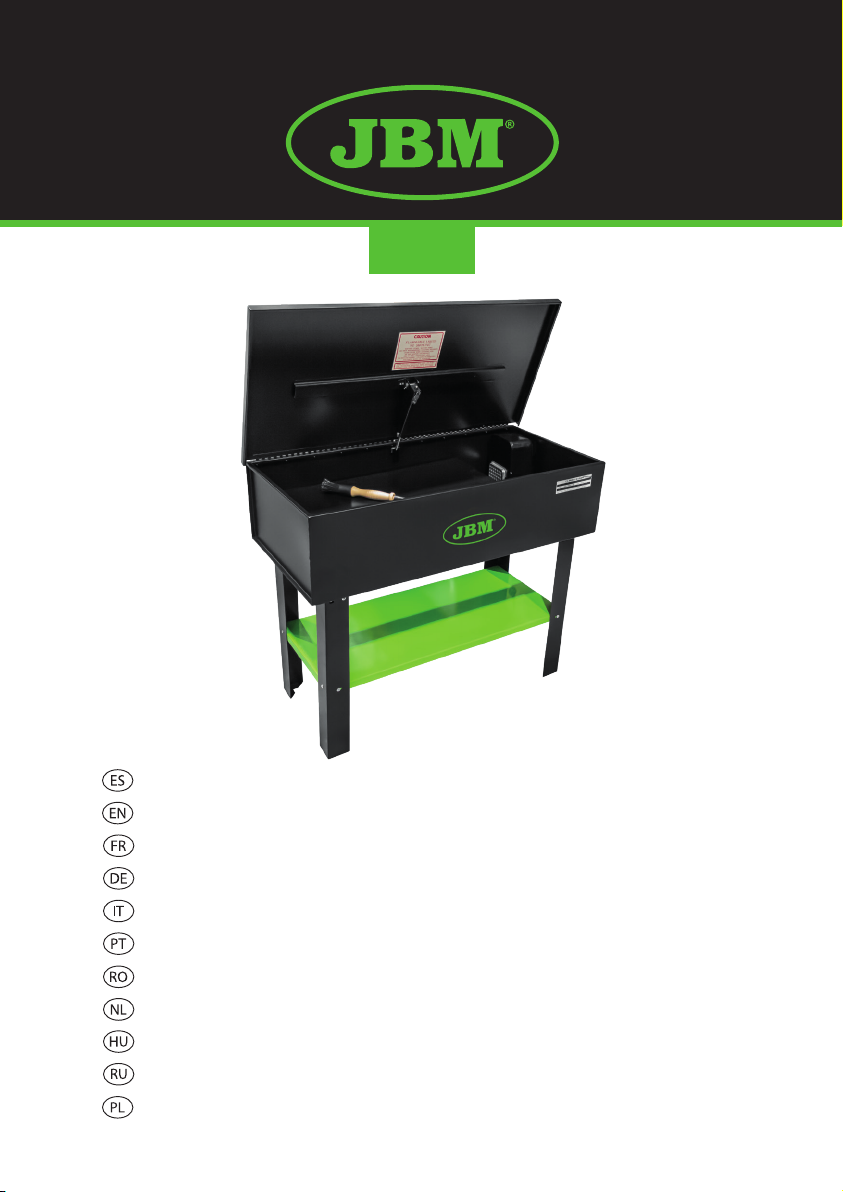
Nº DESCRIPTION DESCRIPTION QTY
01 Bañera Tub 1
04 Tapa Cover 1
06 Palanca de seguridad Safety Lever 1
09 Placa de seguridad Safety Plate 1
10 Pasador Pin 4
11 Pasador de resorte Spring Pin 4
17 Tuerca Nut 1
18 Junta tórica O-Ring 1
19 Tapón de drenaje Drain Plug 1
20 Estante Shelf 1
21 Pata Leg 4
22 Tornillo de cabeza pla-
na M6x12
Pan Head Screw M6x12 24
23 Arandela de presión Spring Washer 24
24 Tuerca M6 Nut M6 24
25 Carcasa de la bomba Pump Housing 1
26 Gancho Elbow 1
27 Tubo exible Flexible Pipe 1
Nº DESCRIPTION DESCRIPTION QTY
28 Bomba Pump 1
29 Alimentación Feed Through 2
30 Manguera Hose 1
31 Abrazadera de manguera Hose Clamp 2
32 Tornillo de rosca Tapping Screw 2
33 Caja de conmutación Switch Box 1
34 Interruptor Switch 1
35 Tornillo de rosca Tapping Screw 2
36 Cable de alimentación Power Cord 1
37 Tornillo de cabeza plana Pan Screw 1
39 Tapa de la carcasa de la
bomba
Pump Housing Cover 1
40 Malla del ltro Filter Screen 1
41 Malla de la cubierta del ltro Filter Cover Screen 1
42 Estante de trabajo Work Shelf 1
43 Pata del estante de trabajo Work Shelf Leg 2
44 Cesta (no incluida) Basket (not included) 1
45 Tornillo de rosca Tapping Screw 2
LISTADO DE PARTES/PARTS LIST

www.jbmcamp.com
C/ Rejas, 2 - P5, Ocina 17
28821 Coslada (Madrid)
jbm@jbmcamp.com
Tel. +34 972 405 721
Fax. +34 972 245 437
52980
Table of contents
Languages:
Other JBM Washer manuals


