KinAn LH1708 User manual

Rackmount LCD Console
(8 Port /16 Port)
User Manual
www.kinankvm.com
@ All rights reserved Shenzhen Kinan Technology Co. Ltd.
Print date:2019/10
Version:V1.0

8 Port /16 Port User Manual
- 2-
Contents
Overview............................................................................................................3
Product Description ................................................................................... 3
Product Features....................................................................................... 3
Switch Functions........................................................................................ 3
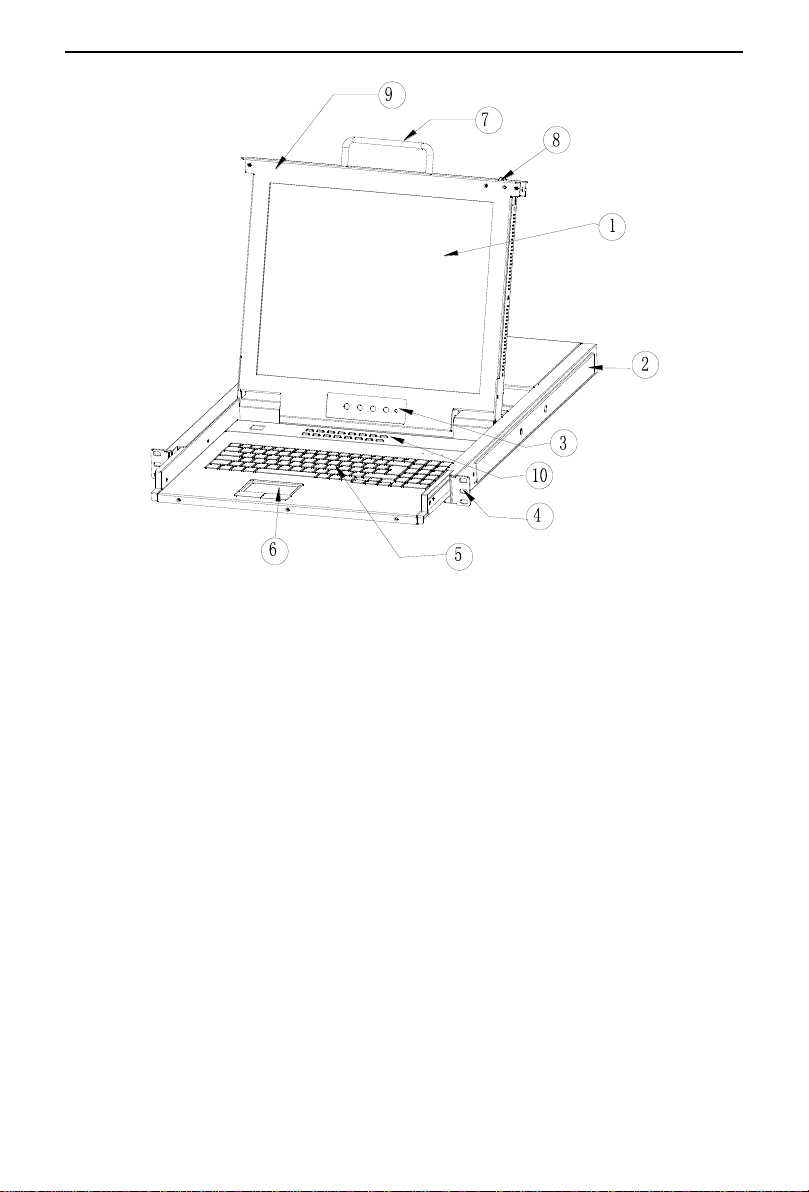
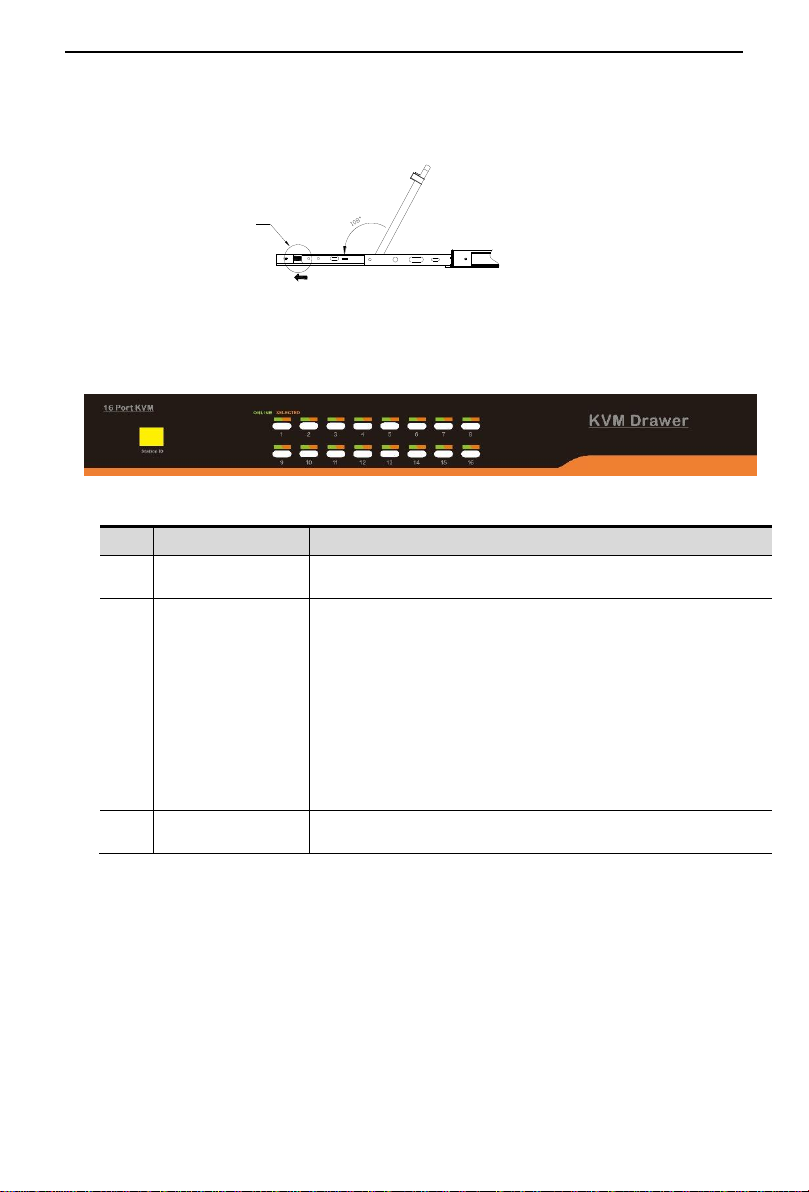
Front view .................................................................................................. 4
Structure and Size(17.3″)........................................................................ 5
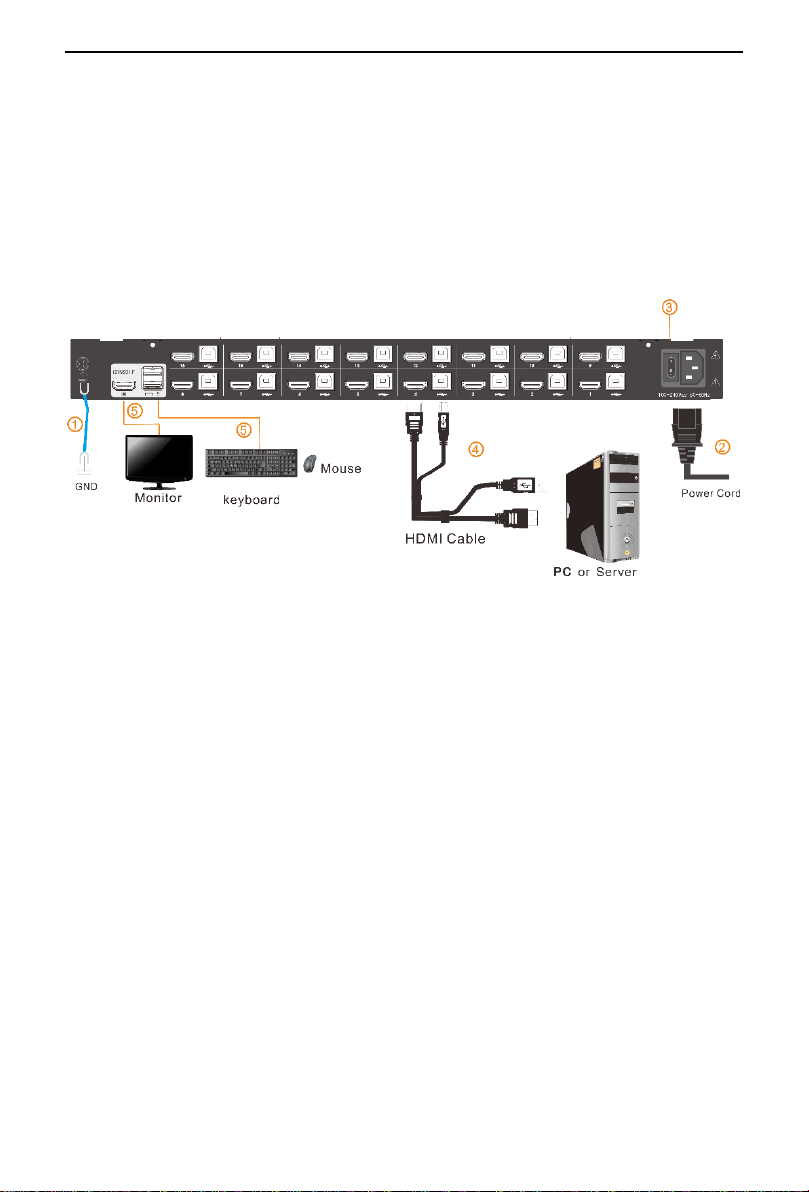
Hardware Installation ......................................................................................6
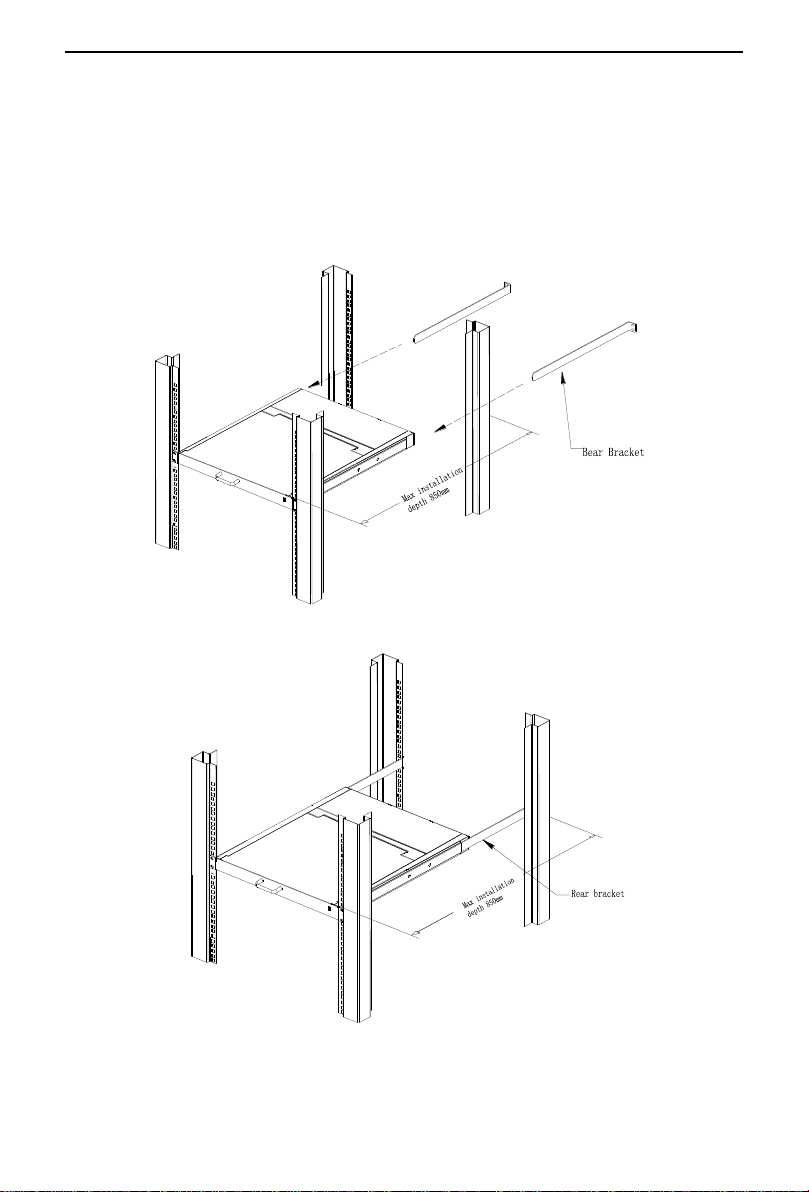
Rack Mounting........................................................................................... 6
Installation instruction................................................................................ 7
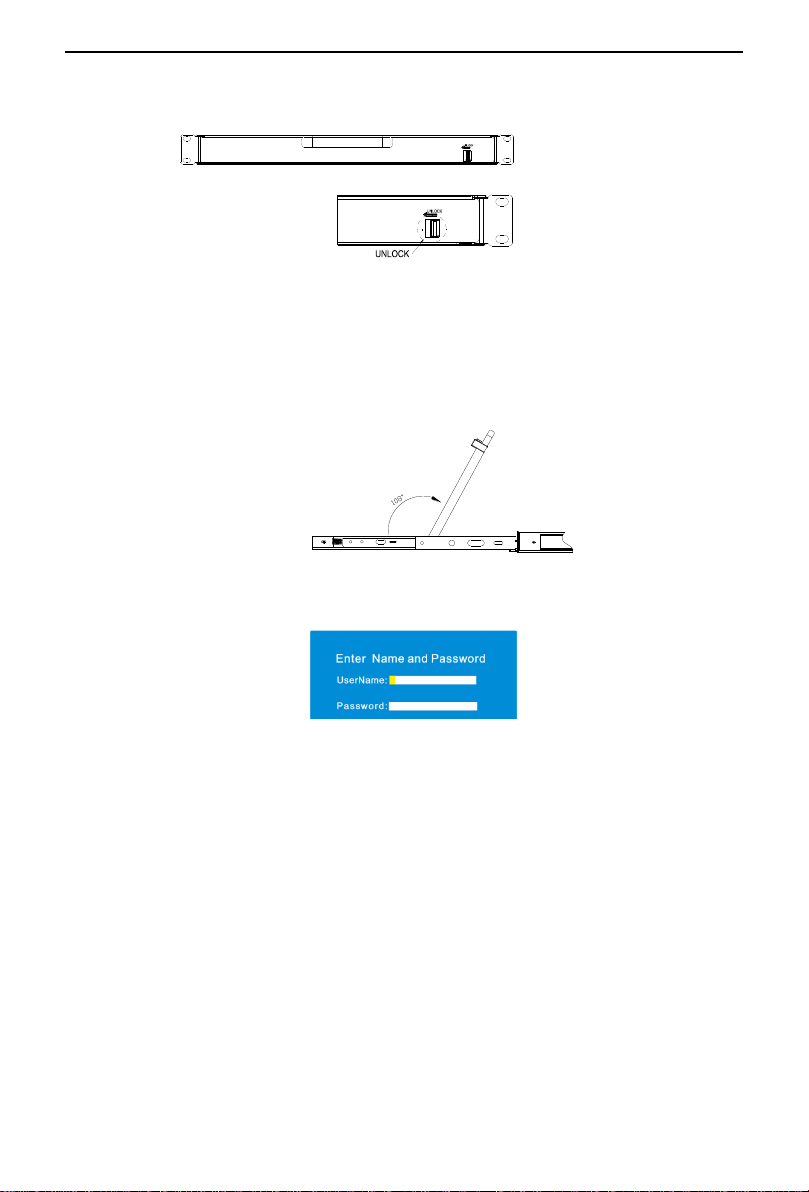
Opening the console .......................................................................................8
LED Instructions ........................................................................................ 9
LED OSD Configuration .......................................................................... 10
OSD Operation................................................................................................11
OSD Functions ........................................................................................ 12
F1-ADM................................................................................................ 13
F2-Scan................................................................................................ 16
F3-Set................................................................................................... 17
F4-Tool.................................................................................................. 19
F6-Edit port names............................................................................... 20
F7-Set quick view port(QV).................................................................. 20
F8-LOUT............................................................................................... 20
Appendix .........................................................................................................22
Specifications(17.3″).............................................................................. 22
Troubleshooting....................................................................................... 23

8 Port /16 Port User Manual
- 3-
Overview
Product Description
The KVM console integrates multiple port KVM switches in a 1U height console. It
can control multiple computers with one monitor, keyboard and mouse,
It is easy and fast to install the KVM console, you just need to connect corresponding
cables to the right ports of KVM and its module without software configuration.
The KVM console can control up to 8 or 16 computers, supports multiple hardware
platforms and multiple operating systems.
Product Features
17.3” TFT LCD monitor with high resolution.
1U height, suitable height for standard 19”rack mount, metal structure.
Ultra slim 99 keys keyboard with small numeric keyboard.
High resolution and high flexibility with touchpad with two function buttons and
scroll wheel.
Switch Functions
A single console controls up to 8/16 computers
Fully complied with HDCP
Complied with HDMI1.4a
No software required –select computers via push button, hotkey and OSD
User-friendly OSD human-computer interaction interface, call up OSD through
keyboard and mouse hotkeys
Broadcast mode –operations simultaneously performed on all selected
computers Easily choose servers with mouse
Multi-platform –Windows, Linux, Mac, Unix
Complete keyboard and mouse signal simulation to ensure that the booting and
switching are correct
Auto scan feature for monitoring user-selected computers
Hot pluggable - add or remove computers without having to power down the
switch
Support firmware upgrade

8 Port /16 Port User Manual
- 4-
Front view
1-1.1 front view
1.LED Module
6.Touchpad
2.Rear Bracket Slot
7.Handle
3.LED OSD Controls
8.Release Catch
4.Front Bracket
9.Display panel
5.Keyboard
10. Switch pushbutton

8 Port /16 Port User Manual
- 5-
Structure and Size (17.3″)
1-1.2
1-1.3 back view
1. Ground connection screw
2. HDMI Output
3. USB port
4. KVM port
5. Power input (AC)

8 Port /16 Port User Manual
- 6-
Hardware Installation
Rack Mounting
Astandard rack mounting kit is provided to mount the switch in a depth of 600-850mm
in a standard 19" rack.
For other mounting distance, the rear brackets need to be customized accordingly.
With one person hold the switch in place and the other person slides the L bracket
into the switch’s side mounting brackets from the front to the back, then screws the
brackets to the rack. (See below installation drawing)
1-2.1 rack mounting (1)
1-2.2 rack mounting (2)

8 Port /16 Port User Manual
- 7-
Installation instruction
1) Make sure the rack mounting KVM switch has been connected to the ground (①
in the diagram )
2) Connect power cable to KVM port as shown in(②in the diagram)
3) Connect KVM switch with the computer according to(④in the diagram)
4) Turn on the power, the KVM start to work after power supply(③in the diagram)
Note:1)Connect monitor, USB keyboard and mouse to Console port to connect
another console.(⑤ in the diagram)

8 Port /16 Port User Manual
- 8-
Opening the console
Release the release catch;
2-1.3 unlocking
*Note:The release lock can only do horizontal locking, it can’t bear any load.
Pull the LCD panel all the way out until it clicks into place.
Rotate the LCD module all the way back to expose the LCD screen, the LCD
module can be rotated up to108°.
Best Resolution :
1280x1024@60Hz
2-1.4 rotate angle of the console
Turn on power switch, KVM will beep twice The Port LEDs light flashes 4
times, System will prompt to enter username and password
2-1.5 password window
LCD panel is powered on when the power LED is green.
Power on computer or server then power on KVM and you will see green light
on each port.
The factory default password is blank, double click “Enter”.

8 Port /16 Port User Manual
- 9-
Closing the console
Close the LCD display panel and the power automatically will shut down.
Push the release catch in the direction of the arrow, push the LCD panel all the
way in until it automatically lock up.
Key
AUTO LOCK
2-1.6 open angle of the console
LED Instructions
3-1.1 front view
Table 3-1.1 LED instructions
No.
Components
Function
1
1-8 or
1-16
1) Switching freely from port 1 to port 8 /16
2
Port Selection
Buttons& LEDs
Indicator LEDs are built into the switches, the online
LED light is on the left and the selected LED light is on
the right.
1)An online LED light(green) indicates that the KVM
has connected to its corresponding computerand power
on.
2)A selected LED light(orange) indicates that the
computer attached to its corresponding port is up and
running.
3
Station ID
Display the current port

8 Port /16 Port User Manual
- 10 -
LED OSD Configuration
The LED OSD allows you to set up and configure the LCD display.
Buttons
Functions
MENU SELECT
Opens the menu function and brings up the main
menu.
EXIT/AUTO
Press this button exits the current menu and return to
the previous menu or press this button exits the LED
OSD.
Press AUTO for automatic configuration.
SL-/SL+
Moves your menu to make corresponding
adjustment.
LED state
Green :running
Red :power off or access nonstandard VESA signal
Flash green:energy saving mode or no signal
Table 3-1.2 LED OSD configuration instruction
Press AUTO if the screen migrates after power on or under other circumstances, then
the screen auto configure to its best display state. It might can’t be adjusted to its best
state if part of the display mode is not standard VESAmode, if so return back to OSD
menu to RESET, then it will back to normal.
We suggest our customers to set up the display mode at 1920x1080@60Hz, refresh
rate at 60Hz.

8 Port /16 Port User Manual
- 11 -
OSD Operation
Double click the right buttons of the mouse or double click hotkey【Scroll Lock】to
invoke below OSD main menu. You can customize the OSD hotkeys, find more
details in OSD function instructions.
Table 1.4:OSD interface
To access the OSD menu through keyboard:
1. In the submenus that appear, moving the highlight bar to your selected port
and then press Enter.
2. Press any key from 【0-9】to enter any port of current station
To access the OSD menu through keyboard:
Move:port selected
Click:port switch
Double click:display OSD menu
Click:exit OSD menu
Click:port switch
*Note: Operate via keyboard after invoke the OSD menu via the touchpad.
Headings
Explanation
SN
port number
It shows the computer port is
under monitoring.
$
The computers are power on
and are online
QV
"#": quick view the port
“BC”: Broadcast port
LK
“@ ”shows that the port is only
available for viewing
Name
Port name,
the maximum is 12 bytes

8 Port /16 Port User Manual
- 12 -
OSD Functions
Menus
Keys
Submenu/explanation
ADM
F1
Set User login: account and password
Set accessible: Set access permissions
BRC Mode: monitor multiple computers at the
same time
Load Default: reset the menu to the original factory
default settings
Scan
F2
All: Lists all the ports on the installation
Power On: lists only powered on ports that have
attached computers.
Quick View: Lists only the ports that have been
selected as Quick View ports
Set
F3
Auto Scan: set scanning time period
Port ID: set how long a port displays on the monitor
OSD Hotkey: set OSD hotkeys
Lout Time off: to set the time out value
Tool
F4
Reset KM: press Enter resets keyboard and touchpad
Beeper【On】: press Enter switch Bee sounds
Mouse Hot【On】: press Enter to shut down touchpad
operating on OSD.
Restore Values: press Enter restore the current user
default value.
About KVM: press Enter shows the KVM version
Edit
F6
Edits port names
QV
F7
Start or close Quick View
Lout
F8
Log out/blank the console screen
Exit
Esc
Press this key exits OSD menu
Scroll Lock
Press this key exits OSD menu
Num Lock
Press this key exits OSD menu
Table 1.5

8 Port /16 Port User Manual
- 13 -
F1-ADM
Menu overview
Menu explanation
1. Set User Login—Press 【Enter】and select Set User Login, a screen as below
diagram 4-1.1 appears:
One administrator and four users account can be set (the account and the
password are no more than 16 characters)
4-1.1 4-1.2
Note:You can set up an account and password according to diagram 4-1.2, then a
“User setup ok” pops up showing you have done your set, and
“Password Not Match” pops up, you need to type in your password again
as you did in your first type.
Operating instructions
1)Press【F1】or 【←】【→】enters
the F1 submenus.
2)Press 【↑】【 ↓】moves the highlight
bar to select the submenu.
3)Press【Enter】selects andexits ADM
menu.
4)Press【Esc】cancels the operation
and exits ADM menu.

8 Port /16 Port User Manual
- 14 -
2. Set accessible—press 【Enter】and select Set Access Permission, then below
menu appears: (diagram 4-1.3):
4-1.3
Menu
Explanation
FULL
Full access function to the station and can do any
operation to the ports
VIEW
View only function, you can only view the port but
you can’t operate it if set this function.
NULL
If you set this function, the port will be not displayed
on the user’s OSD menu
Note:The administrator always has full access to all the ports.
4-1.4 4-1.5
Eg.1). If you want to set access permission of [User1], press【Space】to
choose the permission options you need to set.
2). [User1] log in OSD menu, as shown in diagram 4-1.5.

8 Port /16 Port User Manual
- 15 -
3.BRC Mode - Press【Enter】to enter the BRC mode. Enter the main menu, press
【F7】to add or remove a port that need broadcast function. When BRC mode is
effect, a speaker symbol appears in QV column. (See below diagrams).
While BRC mode is in effect, we can operate multiple computer ports
simultaneously, but the mouse is not function normally.
4-1.6 4-1.7
1) Open BRC mode
【F1】->BRC Mode OFF->press【Enter】-> BRC Mode ON (see diagram 4-1.6)
2) Open the port that need broadcast function
Press【↑】【 ↓】key—>select the port thatneed broadcast function press【F7】
a “BC”symbol appears in the QV column which shows the port has entered
broadcast mode.
3) Close the broadcasting port
Press【↑】【↓】key—>select the portpress 【F7】exit BRC mode and the
“BC”symbol disappears
4) Exit BRC mode
Invoke OSD main menu 【F1】->BRC Mode ON ->press【Enter】--> BRC
Mode OFF, the KVM exits BRC mode(diagram 4-1.8)
4-1.8
4. Load Default--- press 【Enter】and select Load Default, all the set values are
restore to original factory default settings.
Press 【F1】->BRC Mode OFF
->press 【Enter】,enter the
main menu, all “#”symbols
turn into “BC” symbol(diagram
4-1.7 )

8 Port /16 Port User Manual
- 16 -
F2-Scan
Menu overview
Menu explanation
Submenu
Explanation
All
Use this function to scan all ports according to the set
scanning interval.
Power On
Use this function to scan all ports with“$”according to the set
scanning interval.
Quick View
Use this function to scan all ports with “#”quick view symbols
according to the set scanning interval.
Operating instructions
1)Press【F2】or 【←】【→】enters
the F2 submenus.
2)Press 【↑】【 ↓】moves the highlight
bar to select the submenu.
3)Press【Enter】selects and exits
Scan menu.
4)Press【Esc】cancels the operation
and exits SCAN menu.

8 Port /16 Port User Manual
- 17 -
F3-Set
Menu overview
Menu explanation
Submenu
Default value
Auto Scan
5S(effective range 5-99)
Port ID
0S:not display the port ID
1-98S: display the seconds, maximum 98s
99S: permanent display
OSD Hotkey
【Scroll Lock 】+ 【Scroll Lock 】
【Caps Lock】+【Caps Lock】
【F12】+【F12】
【Ctrl】+【Ctrl】+【KVM Hotkey】
Lout Time off
0: close the screen saver setting
01-99M: set the screen saver timeout
Note: It is automatically log out if the current operator
is no longer operate for a while, then the KVM will be
locked and you need to enter user name and
password to operate again:
Operating instructions
1)Press【F3】or 【←】【→】enters
the F3 submenus.
2)Press 【↑】【 ↓】moves the highlight
bar to select the submenu.
3)Press【Enter】selects and exits Set
menu.
4)Press【Esc】cancels the operation
and exits Set menu.

8 Port /16 Port User Manual
- 18 -
OSD Hotkey Operation
2.Select the“【Ctrl】【 Ctrl】+【KVM Hotkey】“and press【Enter】, and then the【Ctrl】
hotkey is availablein this hotkey mode, themouse hotkey can't enter the
OSD menu
Invoke hotkey:double click 【L_Ctrl】+ the corresponding function key
Function
Operating
Function description
Switching port
+ 1~8
Switch ports from 1~8,
E.g.: Double click【L_Ctrl】plus 2 to skip
to the second port of the current station.
+ F1~ F8
Switch ports from 9-16
+ ↑ / ↓
Switch to previous/next port
Auto scanning
+ S
1. Auto Scan automatically scan ports that
attached PC or server. Users can set the
scan interval in OSD menu and press any
key to exit scanning mode.
2. Move the mouse to extend scan
interval.
Invoke
OSD main
menu
+ “space” key
This allows you toinvoke OSD main menu
(see OSD menu operation)
Operating instruction
1. Press【F3】and move the highlight bar with【↓】to select “OSD Hotkey”
submenu . Press 【Enter】and below screen appears:
2. KVM default hotkey:【Scroll Lock】

8 Port /16 Port User Manual
- 19 -
F4-Tool
Menu overview
Menu explanation
Submenu
Instruction
Reset KM
Initialize the keyboard and mouse that connected to
KVM when they are break down.
Beeper【On】
The beeper can be turned on or off with this function.
Mouse Hot【On】
To open and close the mouse with this function.
We can’t operate the OSD when it is【Off】.
Restore Values
Restore to original factory default values.
About KVM
It shows the KVM version information.
Operating instructions
1)Press【F4】or 【←】【 →】enters theF4
submenus.
2)Press 【↑】【↓】moves the highlight bar
to select the submenu.
3)Press【Enter】selects and exits Tool menu.
4)Press【Esc】cancels the operation and
exits Tool menu.

8 Port /16 Port User Manual
- 20 -
F6-Edit port names
F7-Set quick view port (QV)
F8-LOUT
Press【F8】exits the OSD main menu and fully exits current port, then the log
in window appears:
Users must log in all over again to regain access to the OSD.
Select ports with【↑】【↓】keys;
Press 【F7】to include current port as
Quick View, then an arrowhead appears
in the QV column to indicate so.
Note:
Press【F7】to cancel the QV symbol is the
current port has already have a QV
arrowhead symbol in its QV column; If you
want to cancel all the QV function, press
Restore Values under F4: Tool. (The port
name restores to default setting at the same
time.)
Select the port with【↑】【↓】key;
Press F6 and key in the new name
or modify the old one, then press
Enter to save the name and exit
editing.
Press 【Esc】to cancel and exit the
editing.
Note:
The NAME characters include:
All alpha characters:A-Z
All numeric characters:0-9
Default value: SYSTEM
This manual suits for next models
1
Table of contents
Other KinAn Music Mixer manuals
Popular Music Mixer manuals by other brands

Linear Acoustic
Linear Acoustic UPMAX user guide

Rodec
Rodec MX180 MKIII operating instructions

ALLEN & HEATH
ALLEN & HEATH GL4800 Service information

Yamaha
Yamaha MG12XU Technical specifications

Mitsubishi Heavy Industries
Mitsubishi Heavy Industries SC-SL4-AE installation manual

A.N.T
A.N.T ANTMIX Series user manual