KJB DVR505 User manual

Split Type Mini Full HD DVR with 2.5"LCD
(the camera will be different if you choose a non-pinhole HD camera)


Getting Started
Identifying the parts of the recorder
Identifying the indicator on screen
Basic Operations
Installing the battery pack
Installing the SD card
Installing the camera
Start/Stop recording
EV adjustment
Record with wired controller
Using enhanced wired controller
Taking photos
Playback operations
Movie playback
Viewing Photos
Table of Contents
1
2
3
3
3
4
4
4
5
5
6
7
7
How to connect
Power supply connection
Computer connection
8
8
8
Using AV out cable to connect TV
Connecting external microphone
8
9
How to delete a file 6
How to lock a file 6
How to install the camera 2

System Setup
Resolution setup
Recording quality setup
White balance setup
Recording mode setup
External/Internal microphone setup
Record overwrite setup
Motion detection setup
TV type setup
Beep sound setup
Language
Time and date setup
Format SD Card
LCD Auto turn off
Split mode setup
Firmware
Specification
DVR specifications
Camera specifications
Accessories
10
11
11
12
12
13
13
13
14
14
14
14
15
16
16
17
18
Table of Contents
Video rotation setup 14
Default setting setup 15
Vibration setup 15
15
Time stamp setup

Getting started
1
Identifying the parts of the recorder
Mic in
AV OUT
DIGITAL
HDCAM in
CAM in
15
6
7
8
9
10
M ic
2
3
4
11
12
13
14
1. Extra camera in
2. External microphone in
3. USB port (2.0USB transfer/AV-OUT/wired control/DC-in)
4. HD camera in
5. Record
6. Play/OK
7. Up/Fast forward/EV +
8. Down/Fast backward/EV-
9. Return Menu/ Preview mode/playback mode
10. SD card slot
11. Tripod thread
12. Power/photo
13. Speaker
14. Built-in microphone

Getting started
2
LCD screen indicators
1. Recording resolution
2. Picture quality
3. Remaining time of memory
4. Motion detection symbol
5. Cycle recording symbol
6. Battery indicator
7. Date indicator (year/month/date)
8. Time indicator (hour/min/sec)
9. Remaining picture numbers
Other symbols
RecordingREC
5M Photograph/Pixels
How to install the camera
1. Use mini HDMI cable to connect the camera
2. Connect the cable to DVR
FULL HD30 H 00:00:50
2011/10/16 15:38:10
M C
123456
78
1500
9
1
2

Basic Operations
3
A. Installing the battery pack:
1: Open the back cover (refer to picture 1).
2: Insert the battery pack in the right direction (refer to picture 2).
3: Close the battery cover (refer to picture 3).
Remarks: If the recorder will not be used for a long time, please remove the battery.
B. Installing the SD card
1: Open the SD card slot cover.
C. Installing the camera
1: Insert the camera into recorder (refer to picture 2).
Basic Operations
picture 1
2: Insert SD card with the “ ”mark facing toward the SD slot as illustrated
(refer to picture 1).
picture 2
picture 1 picture 2 picture 3
M ic
M ic
!
M ic
Mic in
AV OUT
DIGIT AL
HDCA M in
CAM in
HD
CAM

Basic Operations
4
B: EV Adjustment
EV can be adjusted in record/preview mode
(as in the picture).
EV adjustment range:-1.7~+1.7
A: Star t/Stop Recording
C: Record with a wired controller
2: Press REC button on the wired control (hold for 2 seconds) to power DVR on.
3: Press REC start recording, indication light of recording bright (red),recording
(refer to picture 2).
4: In the process of recording, press REC on wired remote controller to stop recording,
till indication light off, recording stop (refer to picture 3).
1: Connect wired remote controller and device via DIGITAL port (refer to picture 1).
[ ]
[ ]
[ ]
to
Press button (hold on for 2 seconds) to switch on recorder.
Press button to start recording.
Press again button to stop recording and return to preview mode.
[ ]
[ ]
[ ]
picture 1 picture 2 picture 3
Mic in
AV OUT
DIGIT AL
HDCA M in
CAM in
Mic in
AV OUT
DIGIT AL
HDCA M in
CAM in
REC
Mic in
AV OUT
DIGIT AL
HDCA M in
CAM in
REC

Basic Operations
5
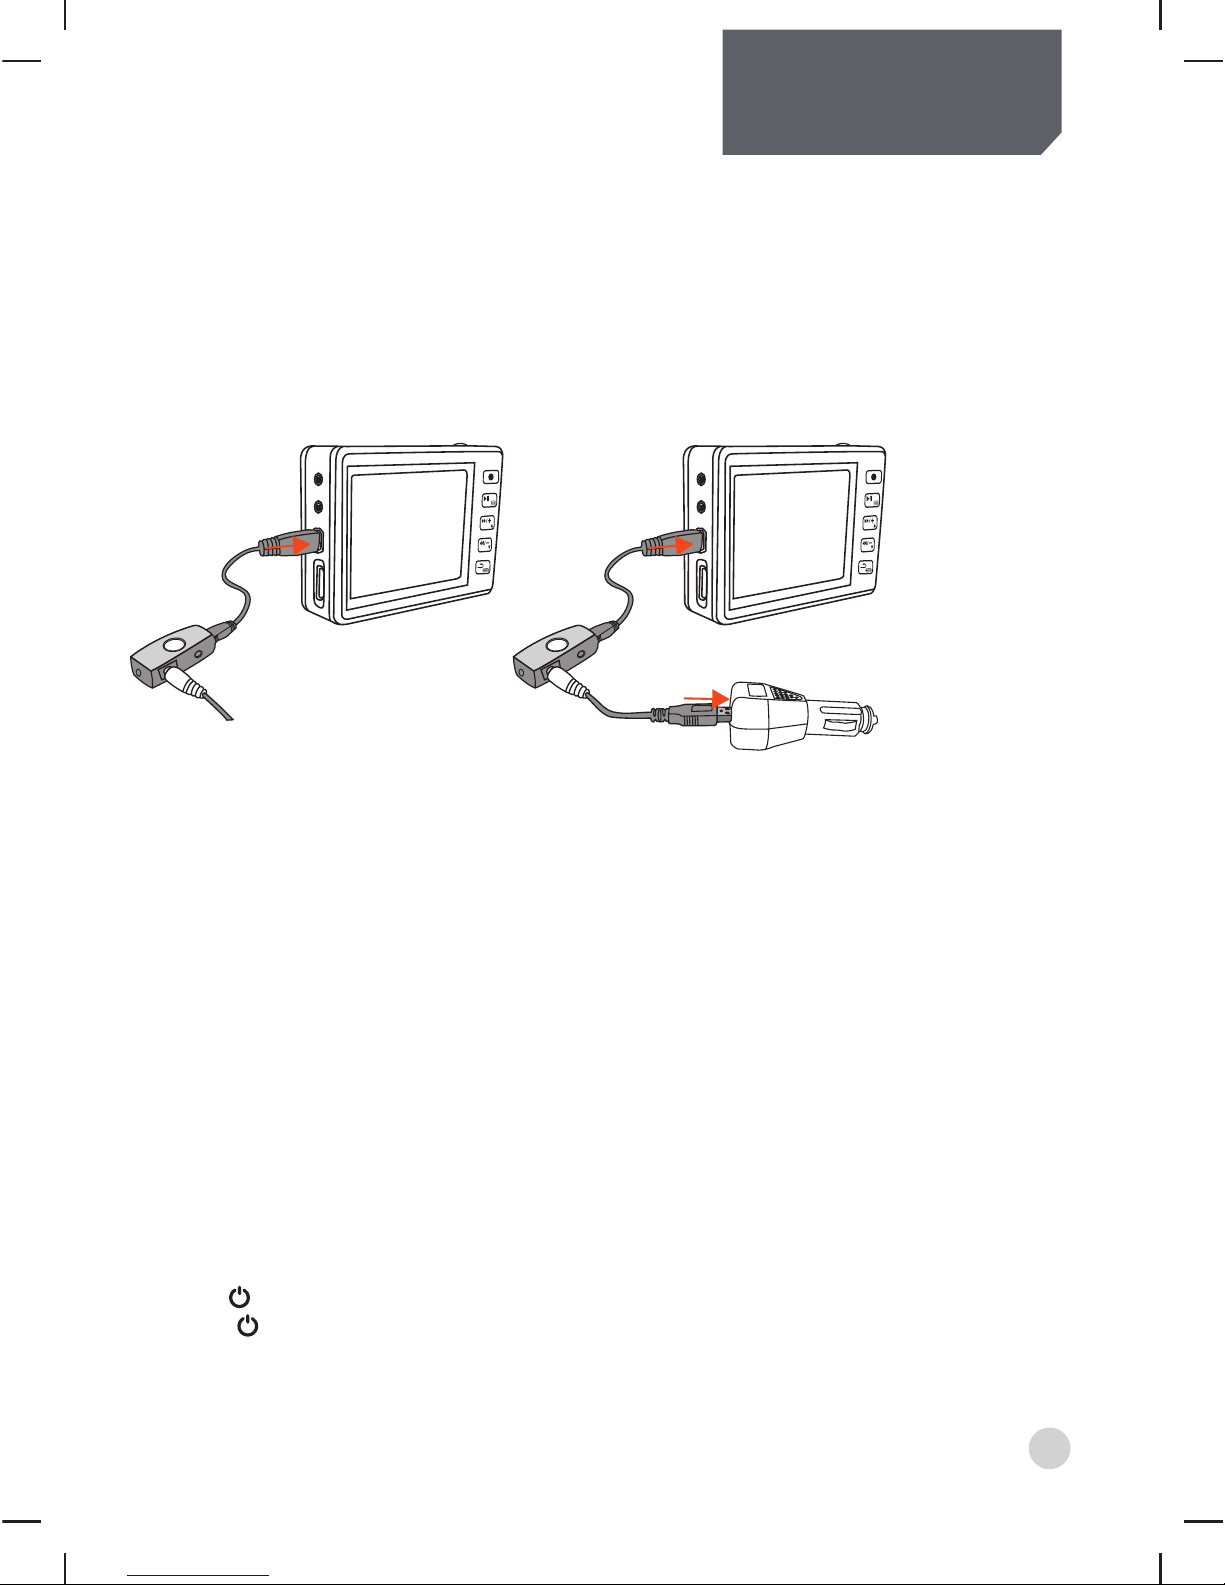
D: Using the Enhanced Wired Control (optional)
supports auto recording and stop recording on power
1: DC input: DC 10V~42V
2: Connect Enhanced Wired Controller to the DVR via USB port (refer to picture 1).
3: Connect Enhanced Wired Controller and DC 10V~42V power cable (refer to picture 2).
Once device detects DC 10V~42V power supply, it will start recording automatically.
While recording, if the power supply stops, the device will stop recording automatically.
The stop recording delay time can be set in the system setup.
Note:
1: This function will depend on the system having a charged battery.
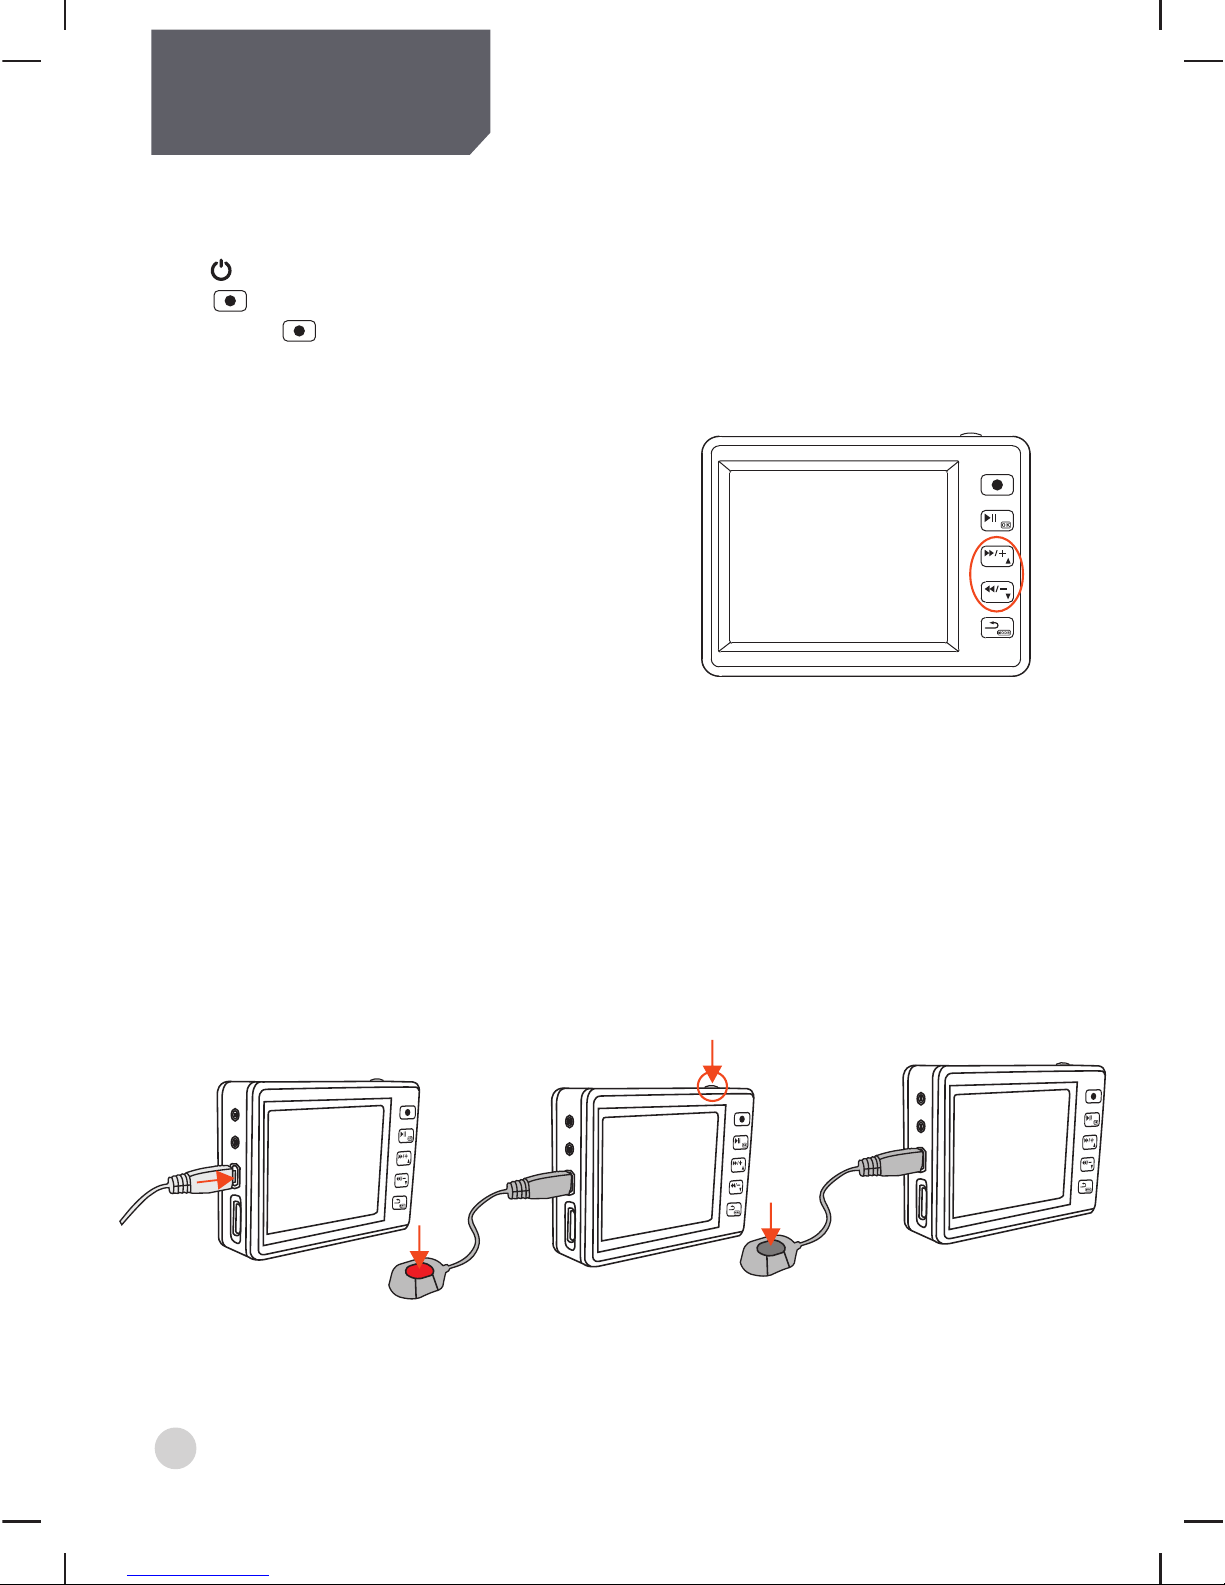
2: In stand by or recording mode, user can turn on LCD to preview.
3: In stand by or recording mode, user can connect device to another monitor to preview.
4: In recording mode, user can connect external MIC to device to enhance the audio quality.
Sound from internal MIC and external MIC will be recorded together.
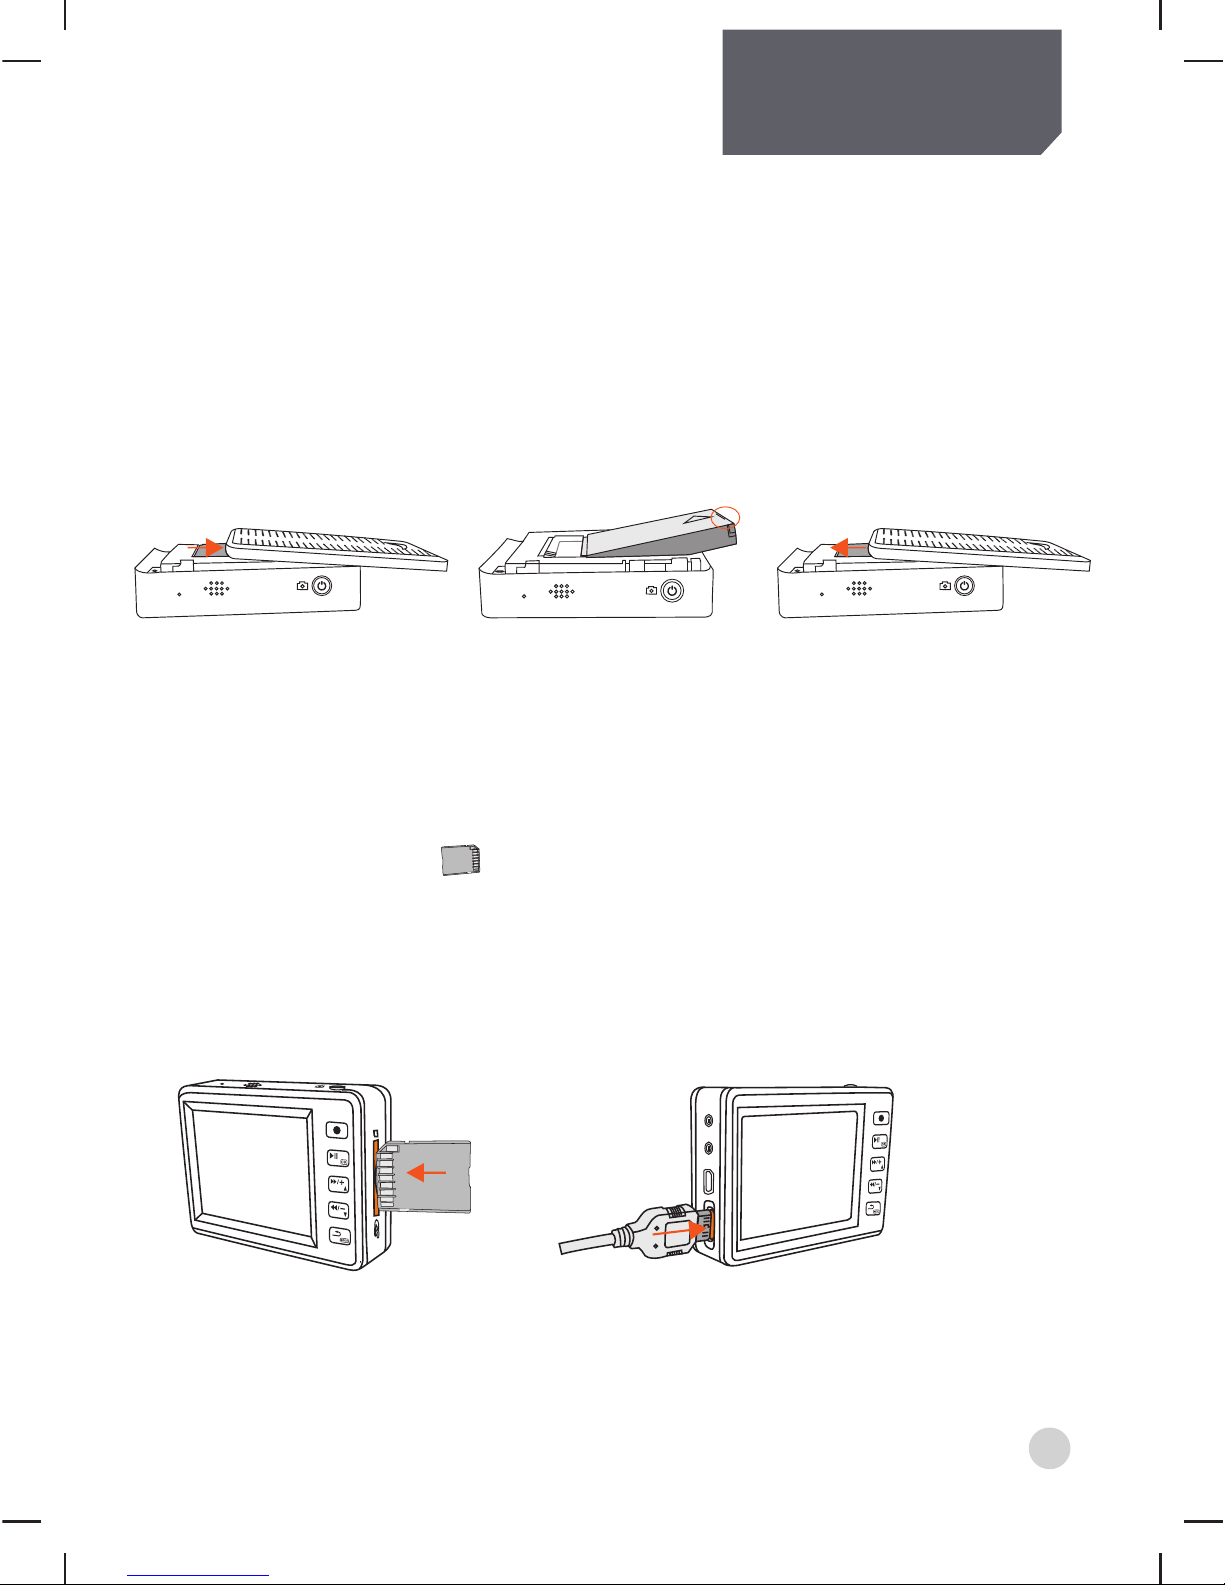
Taking Photos
1: Press (hold on for 2 seconds)to power on DVR.
3: Press to take photos.
*Photo Resolution: 5.0Mega Pixels; Photo Dimension: 2560x1920
[ ]
[ ]
picture 1 picture 2
Mic in
AV OUT
DIGIT AL
HDCA M in
CAM in
REC
Mic in
AV OUT
DIGIT AL
HDCA M in
CAM in
REC

Basic Operations
6
Press arrow keys to choose the file to be played.
During the playing back
Press Up and Down key to adjust volume.
Press left and right keys to fast forward or rewind.
picture 1
Press to start playing.[ ]
To Delete a File
Choose the file you want to delete. Press and hold the “ ” button for 2 seconds,
and then confirm to delete the selected file.
To Protect a File
Choose the file you want to protect. Press the “ ” button, and then
confirm to protect the selected file.
How To Playback
Only in standby mode the videos could be played back
Press to go to the playback list.
Press once again to shift the videos and photos
(refer to picture 1).
[ ]

Movie playback
Choose the movie and press OK[ ]
Press OK to play/pause;
Press Right / Left to fast forward
/ fast backward;
[ ]
[ ] [ ]
Press OK to enter into a picture slide show;
Press OK again to stop slide show;
Press Left / Right to choose previous
/next picture.
[ ]
[ ]
[ ] [ ]
Photo Playback
Choose the photo and
press OK to show the selected picture.[ ]
(Movie playback-1)
(Movie playback-2)
(Photo playback-1)
(Photo playback-2)
Basic Operations
7

Basic Operations
8
HOW TO CONNECT
A. Power supply Connection
Connect power supply to:DIGITAL jack on DVR
B. Connect to Computer via USB
Connect USB cable to: DIGITAL jack on DVR
USB jack on Computer
USB
DC IN
C. Connect to TV via AV / OUT
Connect AV / OUT cable to: AV / OUT jack on DVR
AV / IN jack on TV
AV OUT

Basic Operations
9
D:External MIC Connection (Optional)
Connect external MIC to take more and better audios
MIC-IN

10
System Setup
System Setup
1: Press [ ] times to enter system setup menu;
2: Use [UP] / [Down] to choose;
3: Press [OK] to confirm;
4: Press [ ] to quit.
Resolution Setup
Display
WVGA60P50
WVGA60P60
720P25
720P30
Discription
16:9
16:9
Definition
WVGA
848x480
720P
1280x720
fps
50
60
25
30
1080P25
1080P30
FULL HD25
FULL HD30
4:3
16:9
1080P
1440x1080
FULL HD
1920x1080
25
30
25
30

11
System Setup
Recording Quality Setup
Resolution Display Bitrate Resolution Display Bitrate
WVGA
848x480
H
M
L
8Mbps
6Mbps
4Mbps
720P30
720P25
(1280x720)
H
M
L
8Mbps
6Mbps
4Mbps
1080P
1440x1080
H
M
L
12Mbps
10Mbps
8Mbps
FULL HD
1920x1080
H
M
L
12Mbps
10Mbps
8Mbps
Record Mode Setup
Default Setting is PAL
PAL
NTSC
25 fps
50 fps
30 fps
60 fps

System Setup
12
White Balance Setup
Choose different white balance value under different conditions. Default is AUTO.
WHITE BALANCE
AUTO
Sunny
Cloudy
Fluorescent
Incandescent
External Microphone Volume Setup
Set the external microphone volume from 1 to 7; Default is 7.
When the external microphone is plugged in, audio from external
microphone and internal microphone will be recorded together.
Internal Microphone Volume Setup
Set the volume of internal microphone from 1 to 7. Default is 7.
When the external microphone is plugged in, audio from external
microphone and internal microphone will be recorded together.

System Setup
13
Record Overwrite Setup
When Record Setup is active, there will be C on the screen.
Recorder will save a new file every 5 minute; When the SD card is nearly full,
system will delete the oldest file and replace it with new file.
Recommend to use this option together with the power adaptor.
[ ]
Motion Detection Setup
When motion detection is active, there will be M on the screen.
If any motion is detected, the system will start recording in 2 seconds.
Recommend to use this option together with the power adaptor.
[ ]
OFF
30 SEC.
1 MIN.
3 MIN.
5 MIN.
No Motion Detection
Stop recording after 30sec, if no motion
Stop recording after 1min, if no motion
Stop recording after 3min, if no motion
Stop recording after 5min, if no motion
TV Type Setup (PAL/NTSC)
To choose PAL/NTSC based on different countries.

System Setup
14
Beep Sound Setup
Choose ON / OFF to turn on/off
the beep sound
[ ] [ ]
Time and Date Setup
Press On to enter into time and date setup;
use UP / Down to increase or decrease
the number and press OK to confirm.
[ ] [ ]
[ ]
Choose [standard]/[inverted] to
make the picture flip 180°
Video Rotation Setup Language Setup
Choose English/简体中文/繁體中文
Format SD Card
To format the entire SD card
Please note: any files will be deleted included the locked files.

System Setup
15
Default Setting Setup
Choose Yes, to restore the factory settings
Vibration Setup
Choose [ON]/[OFF] to turn on/off
the vibration indicator
Time Stamp Setup
If you choose the time stamp, then there will be a stamp showing the time on the video clip.
OFF
Date/Time
Date
Time
No time stamp
Date/Time format: 2011.01.01 21:21
Date format: 2011.01.01
Time format: 21:21
LCD Auto Turn OFF Setup
The LCD will enter into power-save mode after the set time
OFF
30sec
1min
5min
LCD will never turn OFF
LCD will turn OFF in 30sec
LCD will turn OFF in 1min
LCD will turn OFF in 5min

System Setup
16
Split Mode Setup
System will save files every set time.
Please note: if the SD card is full system will stop recording.
Default
Setting
2min
5min
15min
30min
System will save file only when stop
recording
System will save files every 2minutes
System will save files every 5minutes
System will save files every 15minutes
System will save files every 30minutes
Firmware
To check the firmware version
Table of contents
Other KJB Camcorder manuals