LaboGene SCANVAC CoolSafe100-9 PROSuperior XS User manual

Code 9 9.900.900.763 1/19
U:\QA\Manualer\Arkiv\Manuals- Labogene-Origio-GKO\Manualer-WORD\ScanVac\CoolSafe XS XL
Usermanual-Rev A5.docx
Instruction Manual
CoolSafe100-9 PRO Superior XS
CoolSafe 95-15 PRO Superior XL
© Copyright 2012
LaboGene ApS
Industrivej 6-8
Vassingerød
DK-3540 Lynge.
Tel: +45 3940 2566; Mobil: +45 3016 0990;
Fax: +45 4498 1741
Mail: info@labogene.com;
Internet: www.labogene.com ,
CVR-No.: DK32259154

Code 9 9.900.900.763 2/19
U:\QA\Manualer\Arkiv\Manuals- Labogene-Origio-GKO\Manualer-WORD\ScanVac\CoolSafe XS XL
Usermanual-Rev A5.docx
In case you have any comments about this manual we will appreciate receiving them at the address below.
Warranty and Liability
LaboGene ApS guarantees that the product delivered has been thoroughly tested to ensure that it meets its
published specifications. The warranty included in the conditions of delivery is valid only if the product has
been installed and used in accordance with the instructions supplied by LaboGene Aps..
LaboGene ApS shall in no event be liable for incidental or consequential damages, including without
limitation, loss of profits, loss of income, loss of business opportunities, loss of use, and other related
exposures, caused by incorrect or in appropriate use of the product.
Symbols used in this manual
WARNING Used in case of danger of a serious accident or when
documentation needs to be consulted.
NOTE Used to direct attention to a special item.

Code 9 9.900.900.763 3/19
U:\QA\Manualer\Arkiv\Manuals- Labogene-Origio-GKO\Manualer-WORD\ScanVac\CoolSafe XS
XL Usermanual-Rev A5.docx
Table of contents
1. Introduction -------------------------------------------------------------------- 4
2. Safety precautions-------------------------------------------------------------- 4
2.1. General information--------------------------------------------------------- 4
2.2. Safety --------------------------------------------------------------------------- 4
3. Installation ---------------------------------------------------------------------- 5
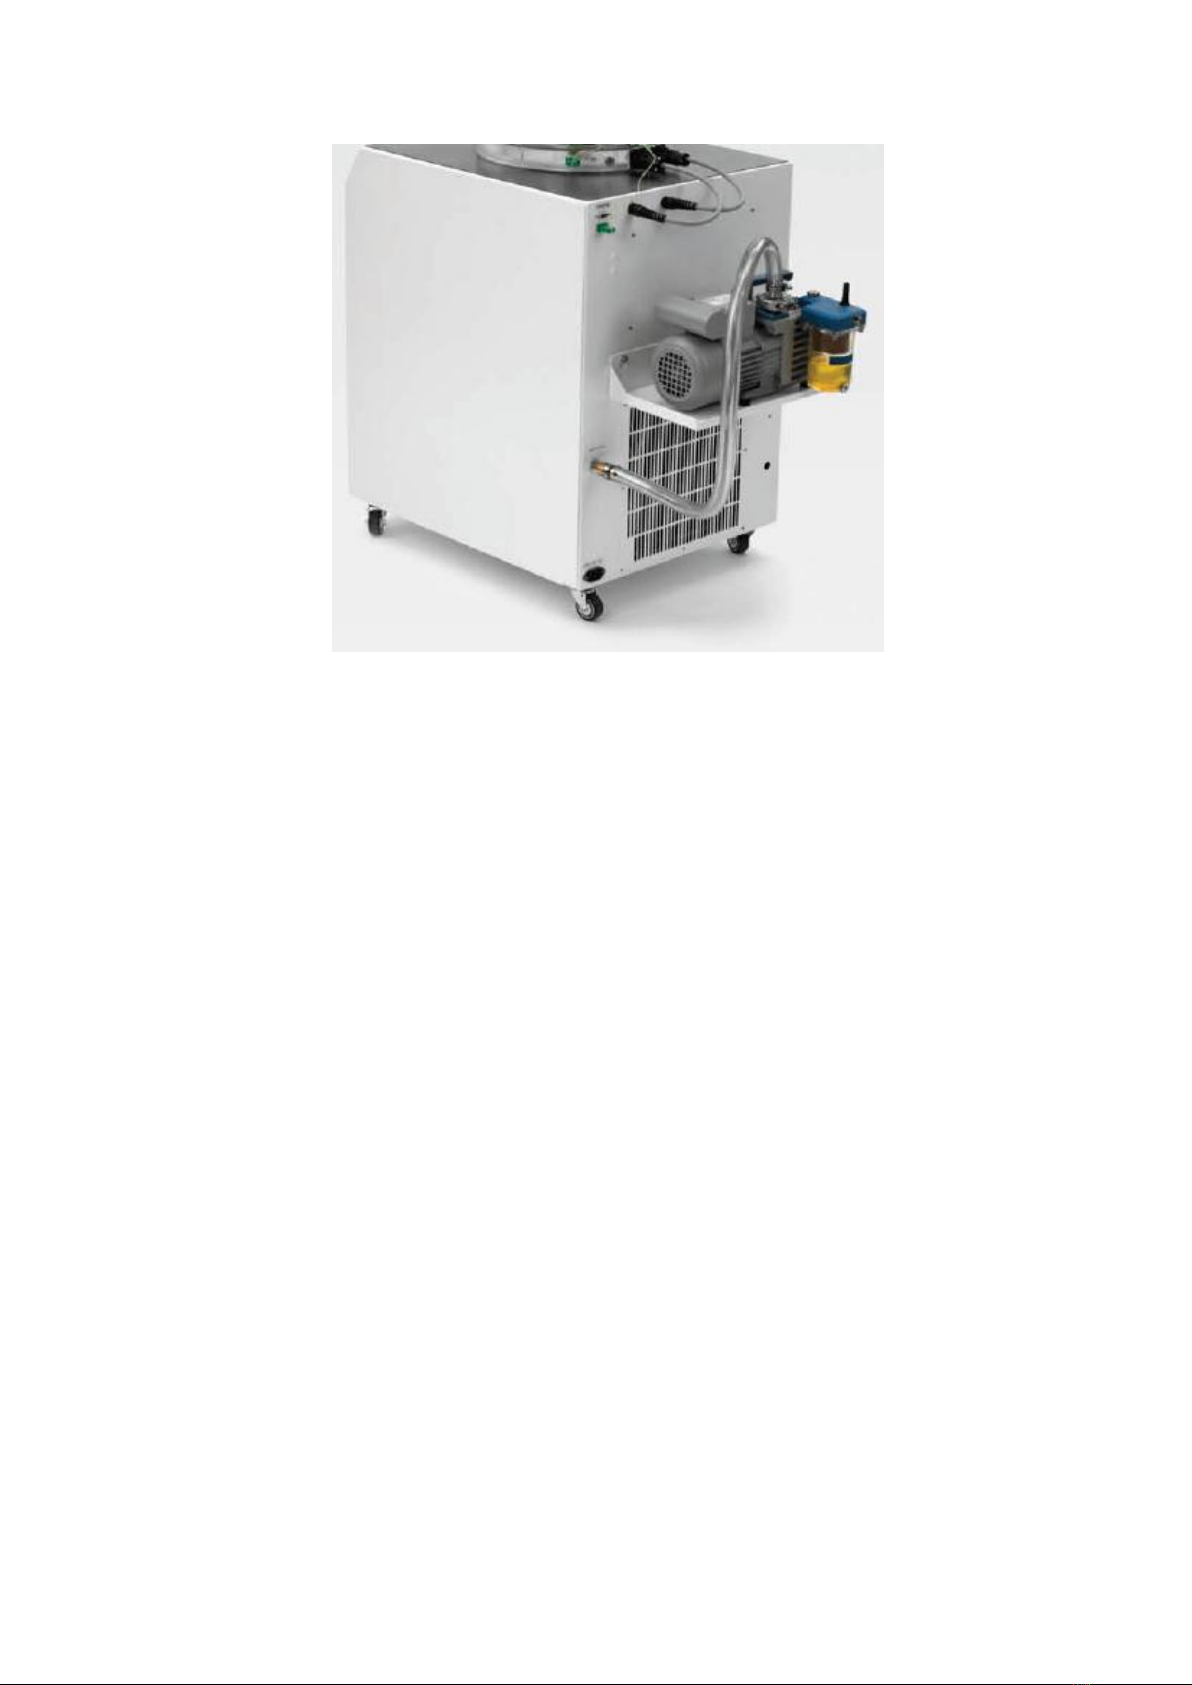
3.1. Installation of CoolSafe ----------------------------------------------------- 5
3.2. Installation of vacuum pump ---------------------------------------------- 5
3.3. Installation of Shelving module-------------------------------------------- 6
4. Functional description --------------------------------------------------------- 6
4.1. Mains----------------------------------------------------------------------------- 6
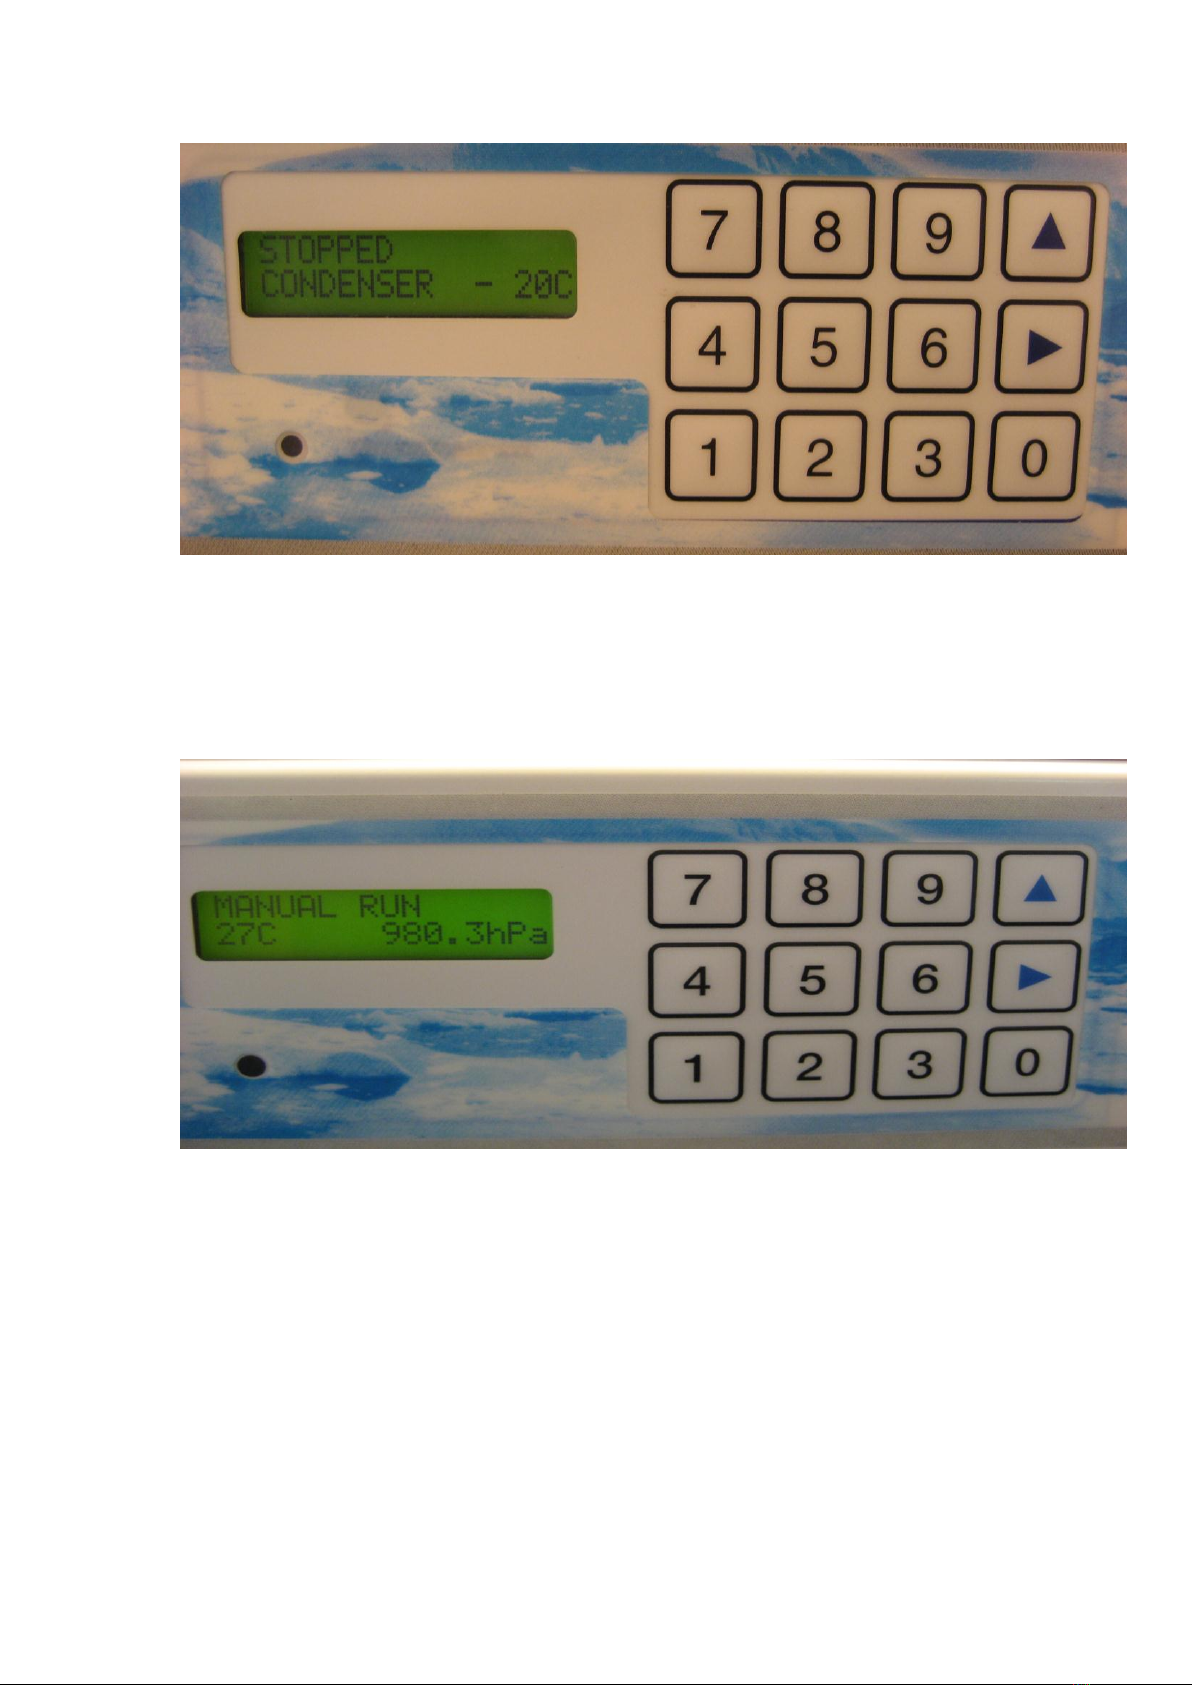
5.0. Control panel Pro ------------------------------------------------------------- 6-9
5.1. Operation --------------------------------------------------------------------- 9
5.2 Computer control option ---------------------------------------------------- 9
5.3 Preparation -------------------------------------------------------------------- 10
5.4.Pre-Freezing & Freeze Drying----------------------------------------------- 11
5.5 De-Icing--------------------------------------------------------------------------- 11
5.6 Stopping Vacuum pump---------------------------------------------------- 12
6. Alarms and errors------------------------------------------------------------- 12
7. Maintenance-------------------------------------------------------------------- 13
7.1 CoolSafe------------------------------------------------------------------------ 13
7.2. Vacuum pump -------------------------------------------------------------- 13
7.3. Cleaning ---------------------------------------------------------------------- 13
7.4 Checking for Leaks---------------------------------------------------------- 13
8. The Freeze-drying process--------------------------------------------------- 14
8.1 Hints & Tips------------------------------------------------------------------- 15
8.2 Bibliography------------------------------------------------------------------- 15
8.3 Pressure Table---------------------------------------------------------------- 17
9.0 Factory fitted options-------------------------------------------------------- 18
Enclosure: Declaration of conformity

Code 9 9.900.900.763 4/19
U:\QA\Manualer\Arkiv\Manuals- Labogene-Origio-GKO\Manualer-WORD\ScanVac\CoolSafe XS
XL Usermanual-Rev A5.docx
Introduction
The CoolSafe models XS & XL are complete Fully Automatic Freeze Dryers
designed for research and pilot scale production applications.
The unique chamber design that locates inside the condenser, offers
reproducible pre-freezing of the samples in incremental steps and a short
vapour pathway, without restrictions, giving uniform freeze drying
performance.
The CoolSafe 100-9PRO Superior XS has a 9litre condenser with lowest
temperature of -100 °C and comes complete with 3 shelf chamber that
locates inside the condenser.
The CoolSafe 95-15PRO Superior XL has a 15litre condenser with lowest
temperature of -95 °C and comes complete with a 5 shelf chamber that
locates inside the condenser.
Freeze-drying is often used for sample preparations and for preservation and
storage of biological and pharmaceuticals materials. Freeze-drying is also
ideally suitable for substances that are heat sensitive.
If you are not familiar with the freeze-drying process, please read Section 7,
which outlines the freeze-drying process.
2. Safety precautions
2.1. General information
Please read this entire manual to fully understand the safe and
effective use of this product. Should you have any comments about
this manual we will be pleased to receive them.
2.2. Safety
In case of overload, an automatic safety device stops the freeze dryer.
All CoolSafe models are electrically protected with an over current circuit
breaker.
All CoolSafe models utilize low temperature refrigeration to either -95°C or -
110°C and under no circumstances should the cold surfaces of the
condenser be touched whilst switched on, in operation or in the de-icing
process.
Do not handle, move or service the vacuum pump whilst in operation or if it
is switched Off, until has cooled down to ambient.(see 7.2 p 13 regarding
maintenance & changing of oil)

Code 9 9.900.900.763 5/19
U:\QA\Manualer\Arkiv\Manuals- Labogene-Origio-GKO\Manualer-WORD\ScanVac\CoolSafe XS
XL Usermanual-Rev A5.docx
It is advisable that Safety glasses and personal protective garments be worn
by all User’s of the equipment. CoolSafe XS & XL Models are fitted with
castors, the front pair being lockable. Once located in the position conducive
to both the safety of the laboratory environment and personnel, it is advised
that the castors be in the locked position.
The safety system is designed according to Safety requirements for electric
equipment, control and laboratory use (EN 61010-1), which assumes that
two separate faults do not occur simultaneously.
3. Installation
3.1. Installation of the CoolSafe
Make sure that the mains supply is according to the specifications on the
type label at the rear panel.
It is important that free air circulation is available at the air inlet and outlet
grills. If the CoolSafe is positioned against a wall, there must be at least 100
mm free space at the rear of the unit.
CoolSafe 100-9 PRO Superior XS & CoolSafe 95-15 PRO Superior XL are both
floor standing units fitted with castors, the front pair being lockable. Before
operating the system insure that the castors are in the locked position.
3.2. Installation of vacuum pump
A two stage vacuum pump (with 2-5 m3/hour capacity or greater) must be connected
to the CoolSafe via the connection on the rear of the CoolSafe in order to allow cryo
pumping.
The vacuum pump can be located on the rear panel of the CoolSafe by means of a
shelf support. This is located by using the thumb screws provided-see below.

Code 9 9.900.900.763 6/19
U:\QA\Manualer\Arkiv\Manuals- Labogene-Origio-GKO\Manualer-WORD\ScanVac\CoolSafe XS
XL Usermanual-Rev A5.docx
LaboGene recommends the VacuuBrand RZ2.5 rotary vane pump for which a variety
of protection accessories, against aggressive materials are available. If the pump
outlet/exhaust is not discharged via a fume hood, an oil mist filter should always be
connected. See accessories section for recommended rotary vane pump and oil mist
filter.
Check that the mains supply for the pump is according to the specifications
on the type label.
Connect the vacuum hose to the suction side of the pump.
Connect the pump to the vacuum connection pipe on the rear panel of the
CoolSafe.
Check the oil level on the pump and fill it if necessary. The oil level sight glass
should be 1/2 - 3/4 full.
LaboGene recommends that when the pump is running the gas ballast valve is in the
open position.
3.3 Installation of the Shelving Unit.
The shelving assemblies for the CoolSafe 100-9 Pro XS (3 electrically heated shelves)
and the CoolSafe 95-15 Pro XL (5 electrically heated shelves) are positioned inside
the condenser and the appropriate connections, via the cables supplied, are made to
the sockets on the rear of the CoolSafe unit.
Both assemblies can be adjusted to provide the required number of shelves
according to sample loading requirements as indicated.
NB. When loading the shelving units into the condenser wear suitable cryo-
protective gloves!
Samples may be loaded directly on to the shelves or by using the optional trays
(cat.no. 7.001.000264), these are particularly appropriate for “bulk samples”.

Code 9 9.900.900.763 7/19
U:\QA\Manualer\Arkiv\Manuals- Labogene-Origio-GKO\Manualer-WORD\ScanVac\CoolSafe XS
XL Usermanual-Rev A5.docx
4.00 Functional Description
For an overview refer pictures & layout at section 6.1; page 12
4.1 Mains connection
The mains cable connection is made on the rear of the CoolSafe and the mains
ON/OFF switch on the front panel. When switched on the switch is illuminated
green.
5.0 PRO Controller Type SL12a02 & Operation.
SL12a02 is a microprocessor control system for all CoolSafe Pro models. User inputs
and outputs are performed via a keyboard and visualised on the display unit,
SL01a03..
The operator can control the system in a simple menu-structured way as described
in the following text. Due to the many different ways to configure the CoolSafe Pro,
the following paragraphs are only examples.
The keyboard unit consists of a key pad with the keys 0-9, arrow UP and arrow
RIGHT, and a display with 2x16 characters. Operational parameters are entered or
changed via a series of sequential menus.
Generally, the RIGHT-key is the “Enter” key which then leads to the next menu and
the UP-key is for selecting between different possibilities or is used to reset values or
change their signs.
When in a menu, the red LED is on, except when the user is trying to input an out off
range value, causing the LED to “flash”. The LED is off when in NORMAL mode (when
not in a menu), except when an internal or external error is present, in which case
the LED blinks.
NORMAL display:
In accordance with the selected modes (see later):
The display will show the actual process on the first line, and for example a
temperature related to this on the second line. Browse between the possible
variables related to the actual process with the UP-key. The browser is reset to its
start position when pressing one of the numerical keys.

Code 9 9.900.900.763 8/19
U:\QA\Manualer\Arkiv\Manuals- Labogene-Origio-GKO\Manualer-WORD\ScanVac\CoolSafe XS
XL Usermanual-Rev A5.docx
MAIN menu:
From the main display, key in RIGHT and SELECT MODE between MANUAL,
AUTOMATIC, DE-ICE, RELEASE and STOP. (Note- that not all modes are present on all
models).Press the UP key the appropriate number of times until the desired menu is
shown then press the RIGHT key, and continue as described for each mode in the
following paragraphs.
MANUAL submenu:
Select between COOLING STOP and COOLING START with the UP-key and proceed
with the RIGHT-key.
(A number of other menus may follow depending on the actual CoolSafe model.)
Leaving the menu (common routine for all modes):
When the last menu is reached, select with the UP-key between END MENU WITH
LEAVE (no changes will be saved), END MENU WITH SAVE (all selections will be saved
for later use) and END MENU WITH SAVE AND START (all selections will be saved and
activated on start-up and all other modes will be automatically cancelled). Complete
the programming sequence by pressing the RIGHT-key.

Code 9 9.900.900.763 9/19
U:\QA\Manualer\Arkiv\Manuals- Labogene-Origio-GKO\Manualer-WORD\ScanVac\CoolSafe XS
XL Usermanual-Rev A5.docx
AUTOMATIC submenu:
Input PREFREEZE, TIME=XX:XX.
Input the max. pressure, PRESSURE, MAX=XXXX.XXX hpa.
In accordance with the configuration:
Input the first shelf-interval, STEP 1, TIME=XX:XX in hours and minutes.
Input the related STEP 1, SHELFTEMP.=XX in degrees C.
Input the related STEP 1, PRESS.=XXXX.XX hPa (the selected value should be <= 90%
off the earlier selected max-pressure).
These 3 steps are repeated a number of times.
Leave the menu as described under MANUAL submenu.
RELEASE submenu:
Leave the menu as described under MANUAL submenu.
DE-ICE submenu:
Input the DE-ICE, TIME =XX:XX in hour and minutes.
Leave the menu as described under MANUAL submenu.
STOP submenu:
Leave the menu as described under MANUAL submenu
5.1 Operation
The freeze drying process is a balance between the heat absorbed by the sample to
vaporize the ice, and the heat removed by the condenser to convert the water
vapour into ice.
It is important to remember following factors when trying to obtain efficient
utilization of the freeze dryer system.
The efficiency of the freeze drying process depends upon:

Code 9 9.900.900.763 10/19
U:\QA\Manualer\Arkiv\Manuals- Labogene-Origio-GKO\Manualer-WORD\ScanVac\CoolSafe XS
XL Usermanual-Rev A5.docx
The surface area and the thickness of the sample.
The temperature of the condenser and the vacuum obtained.
The eutectic point (melting temperature) and the concentration of the
sample solution.
5.2 Computer Control Option (option 7.001.800.096)
Once all connections have been made to the CoolSafe and software loaded the
screen display will show as below.
This enables the full programming of all the freeze drying parameters via the
computer/laptop and presentation/saving in Excel™ format.
Programmes may be saved for future use, insuring settings and values are the same
for similar samples.
The ability to change parameters easily makes the optimisation of any freeze drying
cycle
very quick and easy to perform.
From the schematic it can be seen that the “yellow” panel are for setting the mode
of operation, the “green” sections indicate current status of temperatures &
pressures. The tabular sections on the right are for entering your values for Pre
freeze (shelf temperature & time), Freeze Drying (temperature, pressure and time).
If you do not use all the freeze drying steps enter 0.00 for time, keeping the
temperature values the same. You must always enter values in “step 10” and
the CoolSafe will continue to operate until you end the cycle.
If you enter a pressure value the freeze dryer will regulate at the value set
but remember to adjust the value required with the Regulation Valve
Entering a zero value for pressure, no pressure regulation is applied, this can
be used in the secondary drying phase or if no regulation is required.
This protocol also applies when entering values using the PRO controller..

Code 9 9.900.900.763 11/19
U:\QA\Manualer\Arkiv\Manuals- Labogene-Origio-GKO\Manualer-WORD\ScanVac\CoolSafe XS
XL Usermanual-Rev A5.docx
5.3. Preparations
Check that the CoolSafe ice condenser is free from ice and water, and that all valves
i.e. the drain valve is closed. Check that there is no water in the drain valve.
Check that the gas ballast valve on the vacuum pump is open at all times.
Check the oil level in the pump and the oil mist filter. The filter should have
only a maximum 10-mm oil level (preferably it should be empty).
Switch on the CoolSafe and the vacuum pump. The CoolSafe Pro XS & XL after
switch on will display the actual software version and then all segments.(to
test the of display function) After a few seconds, the temperature
measurement is stabilized and the actual condenser temperature will be
displayed.
The lowest temperature (110°C with CoolSafe 110-9Pro XS and -95°C with
CoolSafe 95-15 Pro XL) should be achieved within 30-40mins.
The vacuum pump should now be allowed to run for at least 30 minutes to
achieve the lowest vacuum performance. In this “warm up” phase the gas
ballast control ideally should be open but closed during the primary and
secondary drying phases. Please note that vacuum will not be applied to the
condenser at this juncture. The electronic vacuum valve remains closed until
you enter the freeze drying modes (either opened via key pad in manual
mode or via programme sequence in automatic mode).

Code 9 9.900.900.763 12/19
U:\QA\Manualer\Arkiv\Manuals- Labogene-Origio-GKO\Manualer-WORD\ScanVac\CoolSafe XS
XL Usermanual-Rev A5.docx
5.4 Pre-Freezing & Freeze Drying
The CoolSafe 110-9 Pro XS & CoolSafe 95-15 Pro XL shelf modules are specifically
designed to locate inside the condenser chamber, to allow for Automatic pre-
freezing in 5 steps and freeze drying in 10 steps without recourse to any further
manipulations. However if choose to operate in the Manual mode via the Pro keypad
or Computer, then all values and time transitions for pre-freeze and freeze drying
must be made manually.
Load samples on trays or directly onto the shelves and located the unit into
the condenser.
Connect the cables from the shelving unit to the appropriate connections on
the rear of the CoolSafe.(incl. Product sensor if supplied)
Enter the values for pre-freezing, time and shelf temperature, 5 steps. If you
do not need 5 steps enter 0.00 in the steps not used.
In the pre-freeze mode vacuum is not applied
Enter the values for freeze drying, time, shelf temperature and maximum
pressure, in 10 steps. If you do not need all 10 steps enter 0.00 for time BUT
keep the temperature values the same. All 10 steps must have values
entered.
Pressure regulation (option 7.001.300.092 if fitted) allows programming and
regulation of the vacuum to set values in each of the 10 freeze drying steps.
Entering a zero value for pressure, no regulation is applied. This can be used
in the secondary drying phase of the cycle or if no regulation is required.
Possible in the last 4-5 steps of the freeze drying sequence.
5.5 De-Icing.
All CoolSafe models are offered with electric de-icing as an option (7.001.300.0010)
this facility gently warms the wall of the condenser and facilitates the release and
easy removal of the “ice-plug”.
NB. Always wear cryo-protective gloves when carrying out this procedure
If the electric de-icing option is not fitted :

Code 9 9.900.900.763 13/19
U:\QA\Manualer\Arkiv\Manuals- Labogene-Origio-GKO\Manualer-WORD\ScanVac\CoolSafe XS
XL Usermanual-Rev A5.docx
1. Ensure the CoolSafe is switched off and the vacuum has been released
2. Leave the condenser open to the atmosphere, introduce warm water into the
condenser until it is released from the walls of the condenser. Then remove the
ice
In both cases, with or without electric de-icing, once the ice has been removed, open
the drain valve to remove any remaining water. Thoroughly dry the condenser using
disposable tissues, spray with alcohol and wipe dry, ensuring there is no retention of
any liquid in the drain.
5.6. Stopping the vacuum pump
Close the (external) vacuum valve and let the pump run for a minimum of 45
minutes after the freeze-drying has ended. This is to avoid any possible condensates
remaining in the pump oil.
If the freeze dryer is used regularly during the day/ week, it is recommended that the
vacuum pump runs constantly with gas ballast valve open and the vacuum valve
closed.
6. Alarms and errors
In case of alarms or errors, an alarm/error code will be displayed.
E_1: Error indicating that the temperature sensor has a short circuit.
E_2: Alarm indicating that the temperature during freeze-drying is above -40 °C.
E_3: Error indicating that the temperature sensor is disconnected.
7. Maintenance
7.1. CoolSafe
The air-cooled condenser must be cleaned a minimum of twice a year. Use a vacuum
cleaner and remove any dust in the cooling grill on the front.
7.2. Vacuum pump
See the Instruction Manual for maintenance according to the manufacture’s
recommendations. Maintenance for a vacuum pump in general will be to:
Check the oil volume, colour and condition regularly. The oil should be
changed every 400-500 working hours, more often if the pump has been
exposed to aggressive vapours. This is best done when the pump/oil is warm
Keep a Log book of the usage periods.
Drain the oil mist filter if the oil level is more than 10 mm.
Drain, clean and eventually change the filter insert if vapours are emitted

Code 9 9.900.900.763 14/19
U:\QA\Manualer\Arkiv\Manuals- Labogene-Origio-GKO\Manualer-WORD\ScanVac\CoolSafe XS
XL Usermanual-Rev A5.docx
from the oil mist filter.
7.3. Cleaning
Cleaning of acrylic components use only mild detergents solutions NEVER
solvents.
Wipe stainless steel surfaces with alcohol and then dry, do not use abrasives.
The Condenser of the CoolSafe once drained, wipe dry and then lightly
cleaned with alcohol, ensure that the drain valve is open. Do not forget to
close the valve once the condenser has dried.
7.4 Checking for Leaks on Cool Safe Freezer Dryer
Always start from the vacuum pump and work forwards towards the chamber.
1. Check vacuum hose connection to the pump. If the pump is fitted with a
nozzle and if this is held in place with a clamp i) check that there is a centring
ring with seal fitted between the flange on the pump and the nozzle. Make
sure the clamp is tight and that the hose is pushed well onto the nozzle, and
that the clip on the hose is tight.
2. Check the other end of the vacuum hose where it connects to the CoolSafe ,
make sure the clip is tight.
3. The drain valve on the front of the Cool Safe also has to be checked for leaks.
First unscrew the drain valve (with black knob) all the way until its loose and
then pull towards you. The barrel of the valve then comes away from the
body. On the end of the barrel there is a white Teflon plug, make sure this is
clean and without any scratches, also wipe the inside of the valve body.
Replace the valve barrel into the body of the valve, push in and then screw
the valve completely to the fully closed position. When vacuum is applied
check that there is no leak from the drain-this can be done placing a finger
over the drain spigot, you will feel if there is a leak.
4. Check the seal on the acrylic plate of the chamber that interfaces with the
top s/steel part of the Cool Safe. This can be done by squirting or brushing
some frothy soap solution all around, if there is a leak this will be sucked in
towards the condenser.
5. If leak(s) are found on the seals, clean both the surface of the s/steel and the
seal, using a clean tissue slightly wetted with alcohol.
6. Check that the lid of the chamber is located correctly, again check that the
seal is OK as previous.
8. The Freeze-drying process

Code 9 9.900.900.763 15/19
U:\QA\Manualer\Arkiv\Manuals- Labogene-Origio-GKO\Manualer-WORD\ScanVac\CoolSafe XS
XL Usermanual-Rev A5.docx
To understand the freeze-drying process, this section describes the theory for the
process in short.
For more detailed information about freeze-drying please consult available literature
e.g. “An Introduction to Freeze Drying” by James M. Flink & Henning Knudsen, ISBN
87-872-0084-8.
All material in free form will
exist in one of three states:
Vapour, liquid or solid.
As shown in the diagram for
water, the physical state is
dependent on the
surrounding pressure and the
temperature. The point
where all three phases of
water co-exist is called the
triple point.
Freeze-drying is basically a
change in state and
properties of the
material,(water), that is to be
removed. In principle the
process is very simple, but in reality it also can be very complex as the product can
consist of many components, which interact with each other.
Moving from one state to another requires the supply or removal of energy to or
from the product. This energy flux will have an impact on the structure of the
material being dried.
Freeze-drying is achieved using equipment that controls temperature and pressure
in the environment of the product and is a 3-step process.
In the first step, the product is frozen solid so that the water present in the
material is converted to ice (pre-freeze).
In the second step, the ice formed in pre-freezing is removed from the
product by direct conversion from solid to vapour. This process is called
sublimation. In order to start removing moisture in the sublimation process,
the pressure surrounding the material has to be brought down to a value
below that of the triple point, whilst keeping the temperature of the product
below its freezing point. The condenser surface temperature must also be
down to a temperature lower than the temperature of the material handled.
When the product is heated it will theoretically place itself somewhere on
the transition line between the solid and vapour states. The heating will
initiate sublimation of the moisture from the product to the surrounding
environment. The vapour will move to the condenser surface because of the
lower vapour pressure in the condenser.

Code 9 9.900.900.763 16/19
U:\QA\Manualer\Arkiv\Manuals- Labogene-Origio-GKO\Manualer-WORD\ScanVac\CoolSafe XS
XL Usermanual-Rev A5.docx
In the third step, water that is strongly bound to the solids of the sample
(called sobbed water) is converted to vapour and removed from the product,
this process being referred to as de-sorption. Removing moisture in the de-
sorption phase or secondary drying phase, is done at a higher product
temperature and at the lowest possible pressure
8.1 Hints; Tips & Reminders
The selection of the appropriate sample container is important to ensure
samples are dried efficiently. Freeze drying emanates from the surface area of
the sample, so the larger the surface area in respect to its depth/thickness is a
determining factor in the speed of the drying cycle. “Never let the depth of
sample exceeds its diameter” especially in vials, flasks trays etc.
Maintain the vacuum pump regularly, oil changes must be made as per
manufacturer’s instructions. Poor vacuum performance could mean
contaminated oil.
Ensure all seals and surfaces are clean and properly seated to avoid vacuum
leaks.
Always start the freeze dryer and the vacuum pump 30-40minutes before use.
Keep the freeze dryer operational if you expect to use it more than once during
the day.
Bibliography
8.2 Articles, Books & Research papers on Freeze drying.
It should be noted that many of the earlier publications, books etc. are concerned
with the freeze drying of foods, this emphasis arose primarily because Freeze drying
was considered to be the major application for this technique. This has been borne
out by how the major food companies, world-wide, have continued to use this
process of preservation. However, today freeze drying has many applications not
least of which is in the production of pharmaceutics, biological active materials and
countless others from archaeology to human tissues.
Today many papers and articles on Freeze Drying are available via the internet and
the various search engines therein, Google etc. and by entering such titles as “Freeze
Drying research methodologies” etc. papers are available instantly.
Another source of information is via the publication “Drying Technology”, published
by Taylor & Francis, www.tandfonline.co.uk
Here is list of books & papers that may assist you in your work:
Books.
An Introduction to Freeze Drying by James M.Flink& Henning Knudsen (ISBN 87-872-
0084-8)1983
Freeze Drying of Food Products by J.C.Harper& A.L.Tappel- Advances in Food
Research Vol.7 Academic Press 1957.

Code 9 9.900.900.763 17/19
U:\QA\Manualer\Arkiv\Manuals- Labogene-Origio-GKO\Manualer-WORD\ScanVac\CoolSafe XS
XL Usermanual-Rev A5.docx
Freeze Drying of Biological Products by V.J.Cabasso&R.H.Regamey; Developments in
Biological Standardisation, Vol.36 S.Karger 1977.
Fundamentals of Freeze Drying by J.D.Mellor ; Academic Press, 1978.
Papers.
Freeze Drying of Biological Materials by G.D.J.Adams; Drying Technology Vol.9(4),
pages 891-925;1991.
Freeze Drying Characteristics of Strawberries; Drying Technology Vol.1; issue 1;
pages 131-145;November 2002
Freeze Drying Foodstuffs; CRC Critical Reviews; Food Technology; Vol.1 issue 3;
pages 379-451;September 1970.
Freeze Drying Velum Archival Materials; Journal of the Society of Archivists; Vol.14;
issue 2; pages 175-188; September 1993.

Code 9 9.900.900.763 18/19
U:\QA\Manualer\Arkiv\Manuals- Labogene-Origio-GKO\Manualer-WORD\ScanVac\CoolSafe XS
XL Usermanual-Rev A5.docx
8.3 Pressure of Aqueous Vapour

Code 9 9.900.900.763 19/19
U:\QA\Manualer\Arkiv\Manuals- Labogene-Origio-GKO\Manualer-WORD\ScanVac\CoolSafe XS
XL Usermanual-Rev A5.docx
9. 0 Factory Fitted Options for CoolSafe Pro models (cannot be fitted
retrospectively)
7.001.300.002 Teflon Coated Condenser. This is a “hard” Teflon™ coating applied to
all surfaces of the condenser to inhibit potential corrosion
possibilities. This coating does not impair the cooling performance of
the CoolSafe.
7.001.300.001 Electrical De-Ice. Allows the release of the ice core in the condenser,
enabling manual removal (Operator to wear cryogenic protective
gloves!). Alternatively, if switched on and left then all the ice will be
thawed and the resultant liquid can be drained off.
7.001.300.092. Pressure Regulation. This function permits the setting of a specific
vacuum value, and in conjunction with the microprocessor setting, a
fine tuning of the vacuum value can be set by using the control
(minimizing set value fluctuations) fitted on the front panel, adjacent
to the display window.
7.001.300.093 ConFitHS Connection kit/interface for connecting chambers with
electrically heated shelves. This allows temperature setting and
control of the shelves inside the chamber via the microprocessor.
7.001.300.096 PC Control. This includes Mini-PC and software for full control, visual
display and operation of the CoolSafe. Also enabling full documentary
presentation all the parameters of the freeze drying cycle, including
downloading and visualization in a Windows Excel™ .

\\Server1\data\QA\Manualer\Arkiv\Manuals- Labogene-Origio-GKO\Declarations\WORD-ex-
ScanLaf\Declaration-CoolSafe 110-9-95-15 XS & XL-rev.5.docx
Declaration of Conformity
We declare under our responsibility, that the following product
CoolSafe 110-9/95-15 XS & XL
to which this declaration relates is in conformity with the following standard(s)
directives or other normative document(s):
EN ISO 12100-1: 2003 Safety of machinery
(basic concepts –General principles)
EN ISO 12100-2: 2003 Safety of machinery
(Technical principles and specifications)
EN 60204-1: 2006 Safety of machinery
(Electrical equipment of machines –General requirements)
EN 61010-1: 2001 Safety requirements for electrical equipment for measurement,
control and laboratory use. General requirements
EN 61000-6-3: 2007, EN 61000-6-1: 2002
Electromagnetic compatibility
(Generic immunity/emission standard)
EN ISO 14121-1: 2007 Safety of machinery
Risk assessment - Part 1: Principles
EN ISO 11201 –Acoustics –Noise emitted by machinery and equipment
following the provisions of:
EU Medical Devices Directive 93/42/EEC
Directive 2006/42/CE Machinery safety
Directive 2006/95/EEC, per August 2007
(Electrical equipment designed for use within certain voltage limits)
Directive 2004/108/EEC EMC Electromagnetic compatibility
Lynge, December 2011
Finn Kokholm
Managing Director
LaboGene ApS, Industrivej 6-8, Vassingerød, 3540 Lynge, Denmark
This manual suits for next models
1
Table of contents
Other LaboGene Freezer manuals