LAVAMAT 981 SENSORTRONIC User manual

LAVAMAT
981
SENSORTRONIC
WASHING
MACHINE
Operating
Instructions

Please
read
and
follow
the
instructions
in
this
booklet
Separate
instructions
on
installation
and
connec-
Contents
tion
are
supplied
with
the
machine.
illustrations
(unfold
pages
for
easy
reference)
4-6
Important
Your
Lavamat
7
To
avoid
damage
during
transit
we
have
fitted
Check
list
—
What
to
do
before
transit
bars
to
the
machine
Please
remove
these
and
after
every
programme
7
before
installing
and
connecting
the
machine.
Sorting
the
laundry
7-8
You
will
find
details
how
to
do
this
in
the
installa-
Opening
and
closing
the
door
5+8
tion
instruction
supplied
with
the
machine
Load
sizes
8
Washing
powder,
conditioner
and
starch
9
Any
residue
of
water
in
the
machine
is
due
to
our
Explanation
of
controls
10-11
thorough
tests
before
the
machine
leaves
the
How
to
switch
the
machine
on
and
off
11
factory.
Programme
charts
12-15
How
to
look
after
your
Lavamat
16
Emergency
drain
16
If
you
think
your
machine
is
not
working
properly
16-17
Service/technical
data
18+19
...
Saves
water
A
new
rinse-spin
development
reduces
suds-
ing
in
the
cotton/linen
programmes
during
the
intermediate
spinning
cycles.
Each
spin
cycle
is
Started
at
slow
spin
speed
during
which
the
suds
are
monitored.
The
benefit
to
you
is
an
optimum
rinsing
result
while
saving
consider-
able
amounts
of
water.
The
machine
uses
only
80
litres
of
water
for
a
cotton
wash
including
a
prewash
and
only
75
litres
for
a
THE
NEW
DEVELOPMENT
FROM
AEG
main
wash
programme.
The
process
is
fully
automatic
and
can
be
recognised
by
the
frequent
change
in
the
spin
it
uses
20%
less
washing
powder
and
pro-
tects
the
environment
The
new
Dual
Eco
Lavamat
features
a
device
PPoegs.
which
uses
all
the
detergent
for
the
washing
In
cases
too
much
detergent
has
been
used,
cycle
without
losing
any
in
the
sump.
the
machine
automatically
introduces
an
See
further
advice
on
Page
9
additional
rinse
(see
programme
sequence
indicator,
page
11)
which
increases
the
over-
This
Lavamat
from
the
Dual
Eco
range
deve-
all
water
consuption
somewhat.
loped
by
AEG
important!
.
Saves
detergent
If
this
washing
machine
is
replaced
with
a
new
The
Eco
valve
closes
off
the
wash
tub
from
one,
ensure
that
the
door
lock
of
the
old
washing
the
drainage-system
and
all
the
detergent
is
machine
is
destroyed
to
prevent
children
from
available
for
the
washing
cycie
without
losing
locking
themselves
in
the
machine
and
endang-
any.
ering
their
tives.

Please
read
and
follow
the
instructions
in
this
booklet
This
is
a
domestic
washing
machine
for
dom-
estic
use
only.
It
must
only
be
used
for
washing
laundry
recom-
mended
by
the
manufacturer
for
machine
wash-
ing
carrying
the
relevant
International
Textile
Care
Labelling
Code
following
the
instructions
contained
in
this
booklet.
The
machine
must
be
installed
and
cared
for
and
maintained
as
instructed
in
this
instruction
book-
let
and
in
the
instailation
instructions.
Any
other
use,
installation,
maintenance
may
lead
to
damage
to
the
machine,
persons
or
prop-
erty.

CDE
FGH
JK


6
Opening
the
loading
door
—
before
the
machine
is
connected.
1.
Turn
rotary
control
for
emergency
drain
(A)
a
quarter
turn
anti-clockwise
to
the
stop
posi-
tion.
2.
Using
a
coin
turn
disc
(B)
anti-clockwise
until
the
loading
door
springs
open.
3.
Turn
rotary
control
for
emergency
drain
(A)
in
clockwise
direction.
7
Opening
the
loading
door
—
after
the
machine
has
been
connected
to
the
power
supply.
Press
button.

Your
Lavamat
Fig.
1/A
Washprogramme
selector
and
pro-
gramme
progression
indicator
Fig.
1/B
Fig.
1/C
Fig.
1/D
Fig.
1/E
Temperature
selector
On/Off
button
with
indicator
light
Door
release
button
Button
for
easy-care
fabrics
and
quick
wash/mixed
loads
Fig.
1/F
Fig.
1/G
Button
for
delicates
Button
for
wool
Fig.
1/H
Button
for
small
loads
Fig.
1/!
Button
for
energy
saving
programmes
Fig.
1/K
VARIOMATIC
spin
button
Fig.
1/L
Button
for
lower
spin
speed
Fig.
1/M
Detergent
dispenser
(with
double-sided
programme
chart*),
removable,
rating
plate
under
dispenser.
Fig.
1/N
Drain
pump
with
emergency
drain,
and
emergency
door
release
to
the
left
*)Replacement
programme
charts
are
availlable
from
AEG
Service-Department.
Check
list
—
what
to
do
before
and
after
every
programme
If
the
machine
is
not
permanently
connected:
@
Plug
in
the
machine
and
switch
on
at
the
power
socket.
E
Make
sure
that
the
drain
hose
is
not
kinked.
To
hook
the
hose
securely
over
the
sink
edge
use
the
hose
holder
provided
(figure
2).
If
the
sink
edge
is
too
wide
thread
a
piece
of
string
through
the
hole
in
the
hose
holder
(see
figure
2/arrow)
and
secure
on
the
wall
or
the
tap
over
the
sink.
Make
sure
that
the
drain
hose
is
not
submerged
in
the
pumped
off
water.
@
Connect
the
water
inlet
hoses
to
the
taps.
Before
you
select
a
programme:
M@
Open
the
water
taps.
M
Open
the
door
(press
door
release
button
9).
E
Distribute
the
laundry
in
the
drum,
close
the
door.
Sorting
the
laundry
Sorting
the
laundry
Check
the
manufacturer's
instructions
or
the
care
label
inside
each
garment
(see
the
International
Textile
Care
Labelling
Code
in
the
programme
chart).
The
laundry
should
be
sorted
into:
M
Pull
open
the
detergent
dispenser
(figure
3)
and
pour
washing
powder
and
fabric
condi-
tioner
into
the
relevant
compartments.
Close
the
dispenser
carefully.
E
Select
the
wash
programme
(see
programme
chart
in
this
book
and
in
the
dispenser
drawer).
press
the
on/off
button
to
start
the
programme.
End
of
programme:
Open
door
and
remove
laundry
from
the
drum.
If
nothing
else
is
to
be
washed,
E
press
the
on/off
button
E
return
the
temperature
selector
to
the
“off”
position
@
turn
off
the
water
taps
and
switch
off
at
the
power
socket
and
remove
the
plug.
Cottons
and
linens
(whites
and
coloureds)
Easy-care
fabrics
Delicate
synthetics
Woollens
Sorting
the
laundry
Practical
Hints
E
Do
not
mix
whites
and
coloureds
as
the
whites
will
become
grey.
E
New
items
tend
to
lose
some
of
their
colour
when
washed
for
the
first
time.
It
is
therefore
advisable
to
wash
them
separately
the
first
time
E
Woollen
items
which
carry
the
wool
symbol
must
also
bear
the
description
"machine
washable”.
Woollen
items
which
only
bear
the
wool
symbol
cannot
be
washed
in
washing
machines.
@
Make
sure
that
no
metal
items
(e
g
paper-
clips,
coins,
safety
pins,
pins)
are
left
in
the
laundry.
Fasten
buttons.
zips
hooks
and
eyes.
tie
loose
belts.
long
apron
strings
etc
E
Remove
stubborn
stains
prior
to
washing
Opening
and
closing
the
door
To
open:
Press
door
release
button
T
and
the
door
springs
open
To
close:
Close
the
door
firmly
to
engage
the
lock
The
door
is
locked
throughout
the
wash
pro-
gramme
It
can
be
opened
after
the
programme
has
finished.
Useful
advice
How
to
open
the
door
during
a
power
cut.
see
page
16.
@
Synthetic
curtains
should
be
handled
carefully
as
they
snag
easily.
Remove
the
hooks
or
rollers
and
place
the
curtains
in
a
pillowcase
or
washbag,
to
wash.
We
accept
no
responsi-
bility
for
any
damage
through
incorrect
handling.
Small
or
delicate
items
(e.
g.
baby
socks,
ladies
tights}
can
be
washed
in
an
old
pillowcase
con-
verted
into
a
washbag
by
closing
it
with
a
drawstring.
Important
it
is
vital
that
laundry
treated
with
inflammable
liquids
is
NOT
washed
in
the
washing
machine
until
these
liquids
have
totally
evaporated.
Furthermore,
only
water
from
the
water
tap
must
be
used
for
washing
and
no
other
liquids
must
be
used
to
wash
clothes
in
a
washing
machine.
Load
sizes
You
will
find
details
as
to
how
much
laundry
you
can
wash
in
your
machine
in
the
programme
chart
but
you
may
find
the
following
general
information
useful:
@
When
washing
cottons
and
linens
fill
the
drum
with
dry
laundry
leaving
a
space
of
a
hand's
breadth
between
laundry
and
the
top
of
the
drum.
i
A
i0-litre
(2'4
gallon)
bucket
will
take
approxi-
mately
2.5
kg
of
tightly
packed
dry
laundry
{cottons
and
linens).
How
to
open
the
door
if
the
machine
is
not
connected:
1
Turn
rotary
control
for
emergency
drain
(A)
(fig.
4/1)
a
quarter
turn
anti-clockwise
to
the
stop
position.
2.
Using
a
coin
turn
disc
(B)
anti-clockwise
until
the
loading
door
springs
open.
3.
Turn
rotary
control
for
emergency
drain
(A)
in
clockwise
direction.
W
Distribute
the
laundry
in
the
drum
as
loosely
as
possible.
Single
or
large
items
can
cause
vibration:
If
you
are
washing
a
single
large
item,
eg:
a
towelling
dressing
gown
or
bath
mat
this
may
cause
vibration
and
instability
of
the
machine.
It
does
not
affect
the
operation
of
the
machine.

ansa
amar
an
ekaa
o.
namical
arana
hraban
ana
TR
oo
Bete
sis
seater,
Washing
powder,
conditioner
and
starch
E
In
an
automatic
washing
machine
you
need
to
use
a
low
lather
washing
powder.
We
recom-
mend
Ariel
automatic
which
has
been
spe-
cially
formulated
for
automatics.
@
To
soft
rinse
or
starch
laundry
be
sure
to
use
liquid
fabric
conditioner
(we
recommend
Lenor)
or
starch.
If,
however,
you
wish
to
use
powder
starch,
then
dissolve
the
starch
according
to
the
manufacturer's
instructions
and
pour
the
dissolved
starch
straight
into
the
drum
after
the
wash
programme
has
fin-
ished
and
select
the
separate
starching
pro-
gramme.
E
How
much
washing
powder
you
use
depends
on
the
water
hardness
(soft,
medium,
hard,
very
hard),
the
quantity
of
laundry
and
the
degree
of
soiling.
Your
local
Water
Board
will
advise
you
on
the
hardness
of
the
water
in
your
area.
On
the
washing
powder
packet
you
will
find
instructions
as
to
how
much
powder
to
use
(according
to
water
hardness).
PLEASE
NOTE:
E
Your
machine
is
equipped
with
a
device,
Eco
Valve,
which
utilises
all
the
detergent
you
add
for
the
wash
without
losing
any.
E
For
this
reason
you
can
reduce
the
amount
of
detergent
recommended
on
the
packet
by
20%
(4).
Before
selecting
a
programme,
pour
washing
powder
and
fabric
conditioner
into
the
relevant
compartments
of
the
dispenser.
To do
this
pull
open
the
dispenser
drawer.
You
will
find
3
compartments
(figure
3):
Compartment
Ly
(right):
washing
powder
T
for
the
pre-wash
Compartment
yy
(centre):
washing
powder
for
the
main
wash
liquid
fabric
con-
ditioner
or
starch.
Compartment
\
83
|
(left):
M
This
feature
means
you
save
money
but
maintain
excellent
wash
results
and
you
con-
tribute
towards
protecting
the
environment.
E
Do
not
fill
any
measuring
beakers
supplied
with
the
detergents
to
the
levels
marked
but
follow
our
recommendations
avove.
E
Overdosing
of
detergent
can
lead
to
poorer
wash
results
due
to
oversudsing
and
the
machine
may
introduce
an
additional
rinse
if
unusually
large
quantities
of
suds
are
detected.
HM
When
washing
lightly
soiled
laundry
reduce
the
amount
of
detergent
even
further
or
eli-
minate
the
pre-wash.
WE
When
wash
small
loads
with
@2)
load
button
--
reduce
the
amount
of
power
by
1/3.
Important!
Do
not
use
any
bleaching
agents
containing
chlorine
or
sulphur
or
acidiferous
des-
calers.
Information
for
Test
institutes:
Tests
should
be
conducted
with
80%
of
the
quantity
quoted
in
standard
DIN
44983
as
this
machine
utilises
all
the
detergent
for
the
washing
cycle
without
losing
any
Do
not
fill
above
"MAX"
indicator
level
as
otherwise
the
liquid
may
drain
immediately.
Liquid
detergents
can
be
used
in
accordance
with
the
manufacturers
instructions.
Insert
for
the
detergent
dispenser
are
available
for
your
AEG
stockist
under
the
number
E
605898
823
as
optional
extras.
Carefully
close
the
dispenser
completely.
The
dispenser
can
be
removed
from
the
machine
for
cleaning
(see
page
16).

Explanation
of
controls
For
normally
soiled
laundry
use
a
programme
without
pre-wash
(select
programme
number
2).
For
more
heavily
soiled
jaundry
use
a
pre-wash
and
a
main
wash
(select
programme
number
1}
with
the
exception
of
wool.
To
select
a
wash
programme
set
the
programme
selector
(figure
1/A)
to
the
required
programme
number,
the
temperature
selector
(figure
1/B)
to
the
required
temperature
and
press
any
selector
button
(Ss)
required
(figure
1/E
to
L).
Programme
selector
The
programme
selector
has
7
settings
for
the
main
and
the
additional
programmes.
The
pro-
grammes
are
indicated
by
numbers
(see
pro-
1
2
3
co
o)
o
s
£
/
©
/
"Information
re
Additional
rinse
see
page
2
and
10
Temperature
selector
The
temperature
selector
is
variable.
If
the
selector
is
set
to
“®`
the
machine
will
carry
out
a
gramme
chart)
and
below
the
numbers
you
will
find
the
programme
progression.
The
programme
selector
must
be
turned
clockwise
and
only
when
the
machine
is
switched
off.
wv Q%
5
E//
&
fèl
Se
G1
&
jgj
Sf
ae
Py
Z
et
SA
S
È
|e)
=
TERE.
F
of
TT
Bali
t
/
gli
a
fi
cold
wash.
During
a
hot
wash
the
glass
of
the
door
may
get
hot,
please
take
care
and
do
not
touch.
Selector
Buttons
\
|
Button
for
easy-care
fabrics
===
(figure
1/E)
y
Button
for
delicate
synthetics
———ee
(figure
1/F)
Button
for
wool
(figure
1/G)
You
will
find
further
details
regarding
these
buttons
under
“programme
cycle”
in
the
programme
chart.
Button
for
quick
wash
or
multi-fabric
wash
(In
connection
with
programme
“3”)
L
Press
this
button
in
addition
to
the
selected
pro-
gramme
number
“3“
when
washing
lightly
soiled
laundry
(cottons,
linens
and
easy-care
fabrics).
Depending
on
the
temperature
selected
the
pro-
gramme
may
take
up
to
45minutes.
When
mixing
laundry
with
different
wash
labels,
e.
g.
\©9
and
Ey
you
need
to
select
the
lower
temperature.
This
programme
is
not
to
be
combined
with but-
tons
@
or
È.
Button
for
small
loads
(figure
1/H)
Press
this
button
in
addition
to
a
selected
pro-
gramme
if
you
want
to
wash
smaller
loads.
Cot-
tons
and
linens
up
to
2.5 kg,
easy-care
fabrics
up
to
1
kg.
Reduce
amount
of
washing
powder
by
'4.
Do
not
press
this
button
when
washing
woollens.
Although
the
half
ioad
button
is
very
valuable
for
the
smaller
loads
as
the
amount
of
water
used
for
a
wash
programme
is
reduced
we
would
like
to
point
out
that
the
most
economical
wash
is
still
the
full
capacity
one.
Button
for
energy
saving
programme
(figure
1/1)
Press
this
button
in
addition
to
the
selected
pro-
gramme
if
you
want
to
wash
lightly
to
normally
soiled
cottons
and
linens
and
easy-care
fabrics.

Explanation
of
controls
By
selecting
E
in
conjunction
with
a
programme
at
\©°f
or
\95{
you
will
save
energy
as
the
machine
will
carry
out
a
somewhat
longer
wash
at
40
°C
instead
of
60
°C
or
at
60
°C
instead
of
95
°C.
&
T
Press
both
buttons
for
a
very
a3
economical
wash
of
small
loads
of
lightly
soiled
cottons
and
linens
and
easy-care
fabrics.
Button
for
VARIOMATIC
Spinning
(figure
1/K)
1.
Press
this
button
if
you
want
a
VARIOMATIC
spin
instead
of
the
normal
spin
at
the
end
of
a
cotton/linen
programme.
The
VARIOMATIC
spin
is
a
sequence
of
spins
with
loosening
of
the
laundry
in
between
each
spin.
This
reduces
tangling
and
creasing
of
the
laundry.
However,
it
increases
the
length
of
the
pro-
gramme
by
approx.
20
mins.
If
you
do
not
select
this
button
the
normal
spin
follows
automatically
after
the
last
rinse.
2
Tocancel
the
rinse
hold”
when
washing
easy-care
fabrics,
delicates
and
woollens,
press
this
button
The
laundry
is
then
auto-
matically
spun
with
gentle
VARIOMATIC.
If
you
do
not
select
this
button
the
laundry
is
left
in
the
last
rinse
water
or
soak
solution
(Soak
programme).
For
pump
out
and
spin
select
programme
5
+
button
ted
+
X.
For
pump
out
only
select
programme
7.
Press
one
of
these
button
if
you
wish
to
reduce
the
spin
speed
from
1200
r.p
m.
to
a
lower
one.
If
you
do
not
select
one
of
these
buttons
the
laun-
dry
will
be
spun
at
1200
r.p
m.
Buttons
for
lower
spin
speeds
(figure
1/L.)
If
faundry
is
to
be
dried
in
a
tumble
dryer
use
the
1200
r.p
m.
spin
speed
for
maximum
water
extraction
Easy-care
fabrics,
delicates
and
woollens
are
automatically
spun
at
only
850
r.p
m
to
minimise
creasing
How
to
switch
the
machine
on
and
off
How
to
start
the
machine
1.
Turn
the
programme
selector
clockwise
to
the
required
programme,
select
the
required
temperature
and
press
any
buttons
as
required
(see
programme
chart).
2.
Press
the
on/off
button.
The
indicator
light
will
come
on
and
the
programme
will
begin.
The
programme
selector
will
rotate
during
the
programme.
stopping
temporarily
during
the
heating
up
period.
How
to
switch
off
the
machine
At
the
end
of
the
programme
press
the
door
release
button
to
open
the
door.
Remove
the
laundry.
If
the
programme
selector
has
stopped
on
“rinse
hold”,
turn
the
programme
selector
to
5/7
—
see
programme
charts,
to
pump
out
the
water.
You
can
now
open
the
door
and
remove
the
laundry.
If
nothing
else
is
to
be
washed:
E
Press
the
on/off
button
—
the
indicator
light
`
will
go
out,
@
return
the
temperature
control
to
the
“off”
position,
release
any
depressed
buttons,
E
close
the
water
taps
and
switch
off
at
the
power
socket
and
remove
the
plug.
44

Main
programmes
International
|
Fabrics
Type
of
laundry
Pro-
Textile
Care
gramme
Labelling
Code
White
cotton
and
linen
articles
Bed
and
table
linen,
towels,
Hot
wash
without
special
finishes
underwear,
white
or
colourfast
Cotton,
linen
or
rayon
articles
without
special
finishes
where
colours
are
fast
at
60
°C
Coloured
blouses,
Coloureds
aprons,
overalls,
bed
linen,
shirts,
towels
Cotton,
linen
or
rayon
articles
Deep
coloured
laundry
Coloureds
colours
are
fast
at
40
°C
but
not
at
60
°C
White
cotton
articles
with
special
Shirts,
bed
linen,
finishes
capable
of
being
boiled
but
nappies,
requiring
drip
drying
or
delicate
baby
clothes
white
cottons
and
linens
Easy-care
White
nylon;
white
polyester/cotton
mixtures
Blouses,
shirts,
overalls
Easy-care
Coloured
nylon;
polyester:
cotton
and
rayon
articles
with
special
finishes;
acrylic/cotton
mixtures;
coloured
polyester/cotton
Sheets,
pillow
cases,
duvet
covers,
shirts,
blouses,
skirts,
trousers,
underwear
Easy-care
Delicate
synthetics
Delicates
Jumpers,
blouses,
dresses,
curtains
Wool,
including
blankets
and
wool
mixtures
with
cotton
or
rayon;
silk
Machine
washable
woollens
Wool
Cottons,
linens,
easy-care
fabrics
except
delicates
and
wool
Quick
wash
Lightly
soited
laundry
Note:
To
cancel
Rinse
Hold
Please
turn
to
page
7
for
information
on
what
Press
button
Q
as
part
of
the
programme
to
do
before
starting
a
wash
programme.
selection
for
easy-care
fabrics,
delicate
ae
synthetics
or
wool.
The
programme
finishes
)RinseHold
——
.
with
a
gentle
VARIOMATIC
spin.
The
laundry
is
left
in
the
last
rinse
water.
Turn
the
programme
selector
to
setting
5+
but-
**)
Load
size
for
ton
ke
+
$)
{pump
out
and
gentle
VARIO-
E
Lightly
and
normally
soiled
laundry
5
kg
MATIC
spin)
or
to
setting
7
(pump
out
only).
@
Heavily
soiled
laundry
3.5
kg
12

Load
Programme
Selection
Buttons
Programme
Cycle
©
=
0
()
|
Pre-wash
—
main
wash
—
3
rinses
with
GRO)
intermediate
spinning
—
final
spin
D
Pre-wash
—
main
wash
—
3
rinses
with
©
©
intermediate
spinning
—
final
spin
Pre-wash
—
main
wash
—
3
rinses
with
intermediate
spinning
—
final
spin
Pre-wash
—
main
wash
~-
3
rinses
—
rinse
hoid*)
ta
CD)
|
Pre-wash
—
main
wash
—
rinses
—
size
Pro-
Tempe-
gramme
rature
Selector
Selector
up
to
lee!
5
kg**)
Energy
saving
programme
1or2
E
\/
up
to
„69
5
kg**)
Energy
saving
programme
Tor2
Ee
(oy
up
to
1or2
Fare
ld
5
kg**)
up
to
1or2
sie
A
ke
2
kg
Energy
saving
pioa
omp
1or2
E
ï
up
to
1or2
. .
(80s
2kg
Energy
saving
programme
1
or
2
E
69)
up
to
1or2
Bae
tai
2
kg
up
to
1or2
ey...
uy
2
kg
up
to
2
za
GOJ
t
kg
+
up
to
3
oy...
EQ
2.5
kg
1
with
pre-wash
2
without
pre-wash
ta
ii
tw
ED
©
rinse
hold*)
Pre-wash
-~
main
wash
—
3
rinses
—
rinse
hoid*)
Pre-wash
—
main
wash
—
filis
to
high
water
level
—
3
rinses
—
rinse
hold*)
Main
wash
—
fills
to
high
water
level
—
gentle
wash
action
***)
—
3
rinses
—
rinse
hold*)
Shortened
main
wash
—
3
rinses
—
rinse
hold*)
***)
During
the
wash
the
machine
is
stationary
for
25
minutes
so
do
not
move
on
the
pro-
gramme
control.
13

Additional
programmes
a
een
ie
S
sis
are
f
Programme
Laundry
Load
size
|
i
aa
erat
e
T
e
E
e
e
A
Jisten
a
Soft
rinsing
—
starching
—
Cottons
and
upto
5kg
spinning
linens
í
se
Sk
ATA
Ta
y
ee
Pe
ee,
bees
a
aah
(ha
aes
yo
Boe
+
Parnes
fence
Soo
Seat
Bayes,
Soft
rinsing
—
Easy-care
fabrics
and
up
to
2
kg
starching
delicate
synthetics,
poets,
atts
a
set
op
eens
Eee
Spinning
Cottons
and
up
to
5kg
linens
Pump
out
—
gentle
VARIOMATIC
spin
Easy-care
fabrics,
up
to
2
kg
delicate
synthetics
woollens
Soak
programme
Cottons
and
up
to
5
kg
*)
|
(prior
to
main
wash
cycle)
linens,
i
heavily
soiled
up
to
3.5
kg
paneer
ae
Sie
ease
See
eee
ayaa
eer
ae
5
a
Pump
out
|
For
laundry
-
which
should
not
be
spun
Se
Ae
Tae
A
e
Sande
ct
eee
te
Note:
Please
turn
to
page
7
for
information
on
what
to
do
before
starting
a
programme.
*)
Rinse
Hold
The
laundry
is
left
in
the
last
rinse
water.
Turn
the
programme
selector
to
setting
5
+
button
ted
+
G
(pump
out
and
gentle
VARIOMATIC
spin)
or
setting
7
(pump
out
only).
To
cancel
Rinse
Hold
Press
button
G
as
part
of
the
programme
selection
for
easy-care
fabrics,
delicate
synthetics
and
wool.
`
The
programme
finishes
with
a
gentle
VARIOMATIC
spin.
14
Programme
selection
|
Programme
Cycle
Programme
Temperature
Buttons
|
Selector
Selector
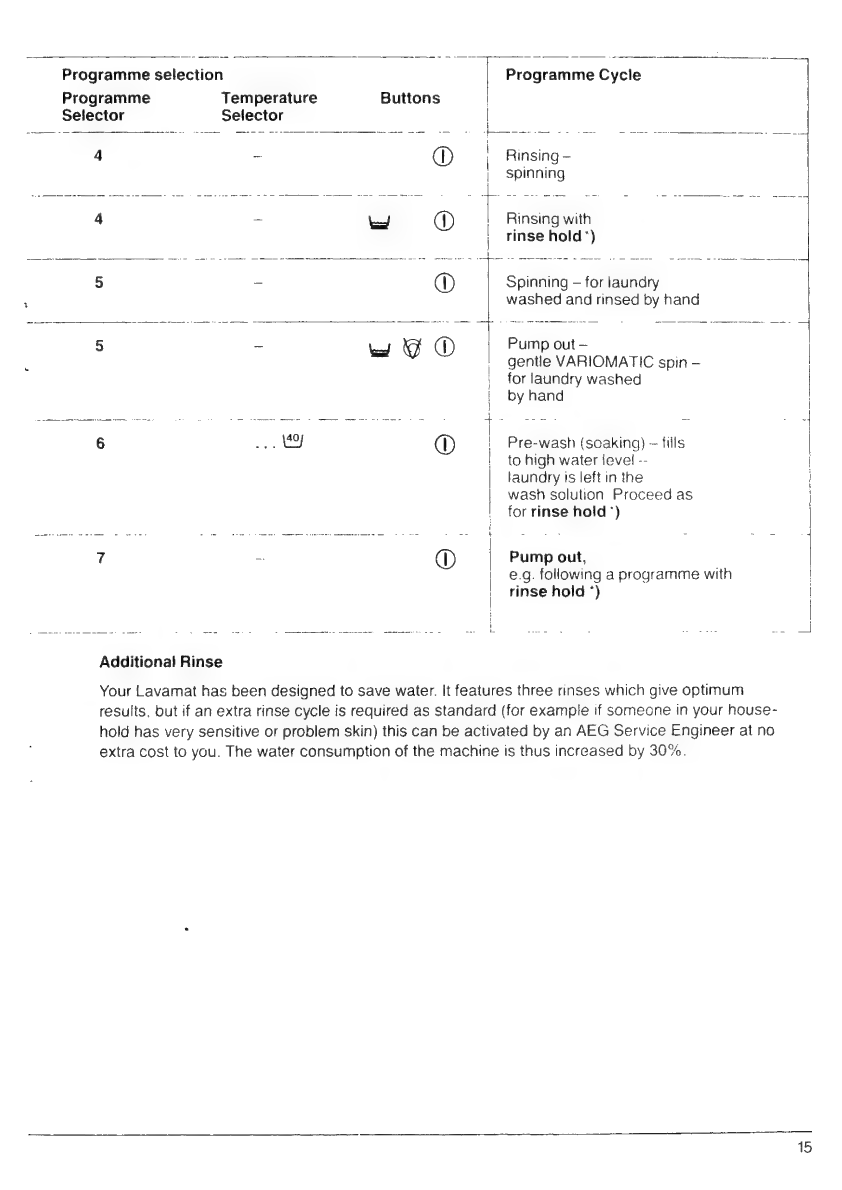
4
x
O
|
Rinsing
-
spinning
4
—
eed
A
Rinsing
with
:
rinse
hold’)
i
5
-
@
Spinning
—
for
laundry
washed
and
rinsed
by
hand
TA
eat
att
OR
ENE
SP
a
AED
2
a
m
E
ere
ere
air
eer
ee
eee
oe
ae
a
5
-
Pump
out
—
hed
g
©
gentle
VARIOMATIC
spin
—
,
for
laundry
washed
|
by
hand
aa
ea
ase,
hee
“Stee,
bee
meee
wap
eee
cuore
4
ee
a
+
6
sar
9
O
|
Pre-wash
(soaking)
~
tills
|
to
high
water
ievel
--
laundry
is
left
in
the
wash
solution
Proceed
as
for
rinse
hold
*)
7
a
M
Pump
out,
e.g.
following
a
programme
with
|
rinse
hold
*)
Additional
Rinse
Your
Lavamat
has
been
designed
to
save
water.
It
features
three
rinses
which
give
optimum
results,
but
if
an
extra
rinse
cycle
is
required
as
standard
(for
example
if
someone
in
your
house-
hold
has
very
sensitive
or
problem
skin)
this
can
be
activated
by
an
AEG
Service
Engineer
at
no
extra
cost
to
you.
The
water
consumption
of
the
machine
is
thus
increased
by
30%.
15

How
to
look
after
your
Lavamat
Protecting
the
machine
against
frost
Any
damage
due
to
frost
is
not
covered
by
”Emergency
drain“
below)
as
well
as
from
the
warranty.
If
the
machine
is
situated
in
a
room
water
inlet
hoses
(disconnect
the
inlet
hoses
which
might
be
affected
by
frost,
any
water
from
the
water
taps
and
drain).
must
be
removed
from
the
drain
pump
(see
Emergency
drain
If
you
wish
to
remove
your
laundry
during
a
2.
To
open
the
loading
door,
turn
the
disc
B
anti-
power
cut
or
if
the
machine
is
defective
use
the
clockwise
(in
direction
of
the
arrow
to
the
left)
emergency
drain
facility
to
empty
the
water.
until
the
door
springs
open.
1.
Turn
control
A
to
the
left
of
the
drain
pump
3.
Replace
rotary
control
on
emergency
drain
(fig.
4/1)
a
quarter
turn
anti-clockwise
to
the
tube.
Push
in
emergency
drain
tube
and
stop
position.
Pull
emergency
drain
tube
for-
secure
rotary
control
by
turning
a
quarter
turn
ward
(fig.
4/2)
and
remove
rotary
control.
clockwise.
Drain
residual
water
into
container
(place
a
Take
care
when
draining
any
hot
wash
solution.
cloth
under
the
container).
Care
and
maintenance
The
drum
of
your
machine
is
made
of
stainless
steel
and
cannot
rust.
However,
rust
may
be
introduced
with
the
laundry
(zips,
paper-clips,
hair
pins,
tacking
or
safety
pins).
Remove
such
Stains
with
a
stainless
steel
cleaner.
The
detergent
dispenser
requires
cleaning
from
time
to
time.
To
do
this
remove
the
drawer
completely
by
pulling
it
out.
Clean
the
dispenser.
Siot
it
into
the
guide
rails
and
push
to
close.
Do
not
use
any
abrasives.
Do
not
use
any
Before
replacing
the
detergent
dispenser,
clean
scouring
pads.
the
roof
of
the
aperture
over
the
detergent
com-
partments
with
a
brush.
From
time
to
check
and
clean
any
reside
from
the
rubber
gasket
in
the
loading
door.
Do
not
use
furniture
polish
or
abrasive
cleaning
agents
to
clean
the
fascia
panel
of
the
machine.
To
clean
the
fascia
panel
use
lukewarm
water
only.
if
you
think
your
machine
is
not
working
properly
Non
functioning
of
your
washing
machine
is
please
check
through
the
following
fault
finding
mostly
due
to
minor
causes
which
you
can
rectify
chart.
yourself.
Before
you
cail
out
a
service
engineer
The
door
cannot
be
opened
The
machine
does
not
fill
with
water
M@
Before
a
programme:
Have
you
pressed
the
W
Have
you
turned
on
the
taps?
door
release
button?
E
Are
the
filters
(where
fitted)
in
the
water
inlet
The
programme
does
not
start
hoses
blocked?
The
filter
is
located
where
the
hose
attaches
to
the
tap.
A
further
filter
is
located
in
the
hose
connection
to
the
machine.
Unscrew
the
hose
@
Have
you
closed
the
door
properly?
and
clean
the
filters
under
running
water.
E
Have
you
pressed
the
on/off
button?
M@
Have
you
turned
on
the
taps?
E
Is
the
machine
plugged
in?
W
Are
the
fuses
in
working
order?
The
machine
vibrates
or
moves
E
If
there
is
too
little
laundry
in
the
drum
this
may
lead
to
vibration.
Therefore,
wash
more
items.
16

if
you
think
your
machine
is
not
working
properly
However,
movement
may
also
result
from:
Blocked
drain
pump.
Kinked
or
twisted
drain
hose.
Transit
bars
have
not
been
removed.
The
machine
is
not
installed
properly
(see
installation
instructions
supplied).
The
machine
is
oversudsing
E
Have
you
used
too
much
washing
powder?
Use
less
powder
for
the
next
wash
or
omit
the
pre-wash.
E
Have
you
used
a
low
lather
powder?
Water
is
leaking
from
underneath
the
machine
E
Check
the
water
inlet
hose
connections
to
the
taps
and
to
the
machine.
Check
the
drain
hose
connection
to
the
machine.
E
Check
the
water
inlet
and
outlet
hoses
for
leaks.
@
Check
that
the
cover
to
the
pump
is
closed
properly.
(See
“Cleaning
the
drain
pump”,
point
5).
.
The
spin
speed
varies
and
is
irregular
If
suds
are
detected
the
spin
speed
is
reduced
until
sudsing
is
reduced
and
spinning
can
begin
again.
This
spinning
pattern
is
an
indication
of
this
most
modern
of
rinse/spin
technologies.
.
Spin
cycle
is
delayed
This
is
normal
if
the
load
is
unbalanced.
In
this
case
the
electronic
out-of-balance
control
system
has
been
activated
and
the
drum
will
turn
in
both
directions
loosening
the
clothes
to
distribute
them
more
evenly
in
the
drum.
This
can
happen
several
times
until
the
clothes
are
distributed
well
enough
for
the
machine
to
commence
the
spin
cycle.
...
Washed
laundry
shows
grey
residues,
so
called
grease
balls
Laundry
soiled
with
grease,
oil,
medical
creams,
body
grease
was
washed
with
too
little
washing
powder
so
that
the
washing
powder
was
unable
to
dissolve
the
grease.
Use
more
washing
powder
.
Suds
and
foam
is
visible
after
the
last
rinse
Modern
washing
detergents
incorporate
ten-
sides
which
reduce
the
greying
effect
particu-
larly
on
easy-care
fabrics.
These
tensides
create
a
type
of
foam
on
the
last
rinse
water
which
is
not
a
negative
reflection
on
the
rins-
ing
efficiency
of
the
washing
machine.
The
machine
did
not
spin
properly
or
pump
out
completely
E
isthe
water
drain
hose
kinked
or
twisted?
In
this
case
the
drain
pump
cannot
pump
out
sufficient
water
WE
isthe
drain
pump
blocked?
(See
“Cleaning
the
drain
pump’).
The
machine
does
not
pump
out
any
water
This
means
the
drain
pump
may
be
blocked
and
would
require
cleaning
as
follows.
Cleaning
the
drain
pump
1.
Switch
off
at
the
power
socket
and
remove
the
plug.
2.
Empty
drain
pump
(see
“Emergency
drain”
on
page
16).
3
Push
and
unscrew
cover
to
pump
anti-
clockwise
(fig.
5)
and
pull
out
to
remove.
Place
cloth
on
floor
to
absorb
any
moisture.
4.
Remove
the
obstructions
blocking
the
pump
and
make
Sure
that
the
pump
impeller
(fig.
7)
is
rotating
fully
and
not
impeded
by
any
parti-
cles
lodged
behind
the
impeller.
5.
Replace
pump
cover,
giving
it
a
slight
push
and
close
it
by
turning
it
clockwise.
Make
sure
it
is
closed
properly
otherwise
water
will
leak
from
the
pump.
6.
Close
emergency
drain
tube
with
rotary
con-
trol
and
push
back
into
the
machine.
Secure
rotary
control
to
the
machine
by
giving
it
a
quarter
turn
clockwise.
Note
Piease
use
the
fault-finding
chart
“If
you
think
your
machine
is
not
working
properly”
as
a
check
list
for
the
proper
performance
of
your
machine.
If
you
call
a
service
engineer
in
connection
with
one
of
the
aforementioned
problems
please
note
that
the
cost
involved
for
this
call
will
have
to
be
passed
on
to
you
even
during
the
warranty
period.
17

Service
Should
you
be
unable
to
locate
the
cause
of
the
problem
in
spite
of
the
check
list
“If
you
think
your
machine
is
not
working
properly”,
then
please
contact
your
AEG
Service
Department.
If
you
require
to
have
your
machine
serviced
you
will
assist
the
Service
Department
by
quoting
the
F
and
E
numbers
which
you
will
find
on
the
rating
plate
under
the
detergent
dispenser.
These
num-
bers
enable
the
Service
Dept.
to
order
any
parts
to
complete
the
repair
on
first
call,
if
at
all
possi-
ble.
18
For
easy
reference
we
would
recommend
that
you
transfer
these
numbers
in
the
space
provided
below:
Product
number
(E-No.)
Serial
number
(F-No.)
These
numbers
enable
the
Service
Department
to
allocate
spare
parts
so
that
the
machine
is
repaired
on
first
call,
wherever
possible.
Our
appliances
comply
with
the
relevant
safety
regulations.
Repairs
of
electrical
appliances
must
only
be
carried
out
by
specialists.
Repairs
carried
out
by
any
other
personal
present
con-
siderable
safety
hazards
to
the
user.

Technical
Data
Dimensions:
With
worktop
(where
fitted):
Height
85.0
cm
Width
60.0
cm
Depth
60.0
cm
Without
worktop:
Height
82.0
cm
Width
59.5
cm
Depth
57
0
cm
Electrical
connection:
Please
see
information
on
the
rating
plate
of
the
appliance.
Capacity:
Depending
on
the
programme
up
to
5
kg
Energy
consumption:
(on
cold
fill)
2.1
kWh
Drum
speed:
Washing
Spinning
or
950/850/650
r
p
m
50r
p
m./25r.p.m.
wool
1200rpm
Water
pressure:
1
--
10
bar
cold
water
supply
0 3
—
10
bar
hot
water
supply
Weight:
approx.
85
kg
The
appliance
complies
with
the
radio
interference
requirements
laid
out
in
the
EEC
Directive
82/499
and
the
standard
EN
60555
part
1—3/DIN
VDE
0838
Part
1
—
3,
June,
1987
19

AEG
Domestic
Appliances
Ltd
Customer
Care
Department
55-77
High
Street
Slough
Berkshire
SL1
1DZ
Telephone:
08705
350350
Table of contents
Other LAVAMAT Washer manuals

LAVAMAT
LAVAMAT 70850A User manual

LAVAMAT
LAVAMAT 74952A3 User manual

LAVAMAT
LAVAMAT 52810 Operation manual

LAVAMAT
LAVAMAT 5220 Operation manual

LAVAMAT
LAVAMAT LS 84840 User manual

LAVAMAT
LAVAMAT LAVALOGIC 1820 Operation manual

LAVAMAT
LAVAMAT 86850 User manual

LAVAMAT
LAVAMAT 74950A3 User manual

LAVAMAT
LAVAMAT 52665 Operation manual

LAVAMAT
LAVAMAT LAVALOGIC 1620 Operation manual


