Lavry Latency Killer LK-SOLO User manual

With Latency KillerTM Technology
Model LK-Solo
HP Amp| 2x2 Loop Thru Mixer

2
Lavry Engineering, Inc.
P.O. Box 4602
Rolling Bay, WA 98061
www.lavryengineering.com
February 12,
2014
Rev
1.0
Warning
3
Warning
Table of Contents
Warning................................................................................................................................................... 3
Introduction............................................................................................................................................. 5
Layout ..................................................................................................................................................... 6
Front Panel........................................................................................................................................................6
Headphone Output .......................................................................................................................................6
CH1/Mono Input...........................................................................................................................................7
CH2 Input ......................................................................................................................................................7
Selection Indicator LEDs................................................................................................................................7
Select Button.................................................................................................................................................7
Resolution Button .........................................................................................................................................7
Volume Display .............................................................................................................................................7
Rotary Encoder Volume Control Knob..........................................................................................................7
Rear Panel.........................................................................................................................................................8
Stereo Input Left ...........................................................................................................................................8
Stereo Output Left ........................................................................................................................................8
Stereo Input Right......................................................................................................................................... 8
Stereo Output Right......................................................................................................................................8
CH1 Output ...................................................................................................................................................8
CH2 Output ...................................................................................................................................................8
DO NOT OPEN THE LK-SOLO: Attempting to open the enclosure may result in damage to the unit.
There are no user-serviceable parts inside.
AVOID HEARING & HEADPHONE DAMAGE: It is strongly recommended that you REDUCE THE
VOLUME TO A LOW LEVEL BEFORE CONNECTING YOUR HEADPHONES. This is especially important for
headphones designed for portable battery powered devices including ear buds. Failure to do so can
result in DAMAGE TO THE HEADPHONES and possible HEARING DAMAGE if the user has them on/in
their ears at that time. Even if your headphones are not very efficient, it is still recommended that the
Volume be reduced prior to connection, and that the headphones be disconnected when not in use.

Table of Contents
4
Power Switch ................................................................................................................................................8
AC Power Connector.....................................................................................................................................8
Setup and Use.......................................................................................................................................... 9
Setup for Playback Listening.............................................................................................................................9
SOURCE SIGNAL ROUTING AND CONTROL .....................................................................................................10
PANNING.....................................................................................................................................................10
Setup for Mono Recording..............................................................................................................................10
Setup for Recording Two Sources...................................................................................................................11
Setup for Stereo Recording.............................................................................................................................11
Recording with the LK-Solo.............................................................................................................................12
Input Monitoring In Record ........................................................................................................................12
Specifications......................................................................................................................................... 13
Input Signals....................................................................................................................................................13
Output Signals.................................................................................................................................................13
Headphone Output.........................................................................................................................................13
AC Power.........................................................................................................................................................13
Physical ...........................................................................................................................................................13
Appendix 1 –Connection Diagram .......................................................................................................... 14
Limited Warranty –Lavry LK-Solo ........................................................................................................... 15

Introduction
5
Introduction
The Lavry Latency Killer –Solo (LK-Solo) is an extremely high-quality headphone amplifier capable of
effortlessly driving a wide range of headphones from a stereo source, with precise and resettable control of
the volume in half dB steps.
In addition, the LK-Solo can provide a latency-free mix of previously recorded material and “live” signals
during recording and overdubbing with any computer-based Digital Audio Workstation (DAW). The musician
can adjust the DAW and his/her own sound levels separately, a useful tool for real-time applications.
By mixing signals in Analog rather than Digital, the unit negates delay from conversion and digital processing
while using the included high-
quality headphone outputs.
By employing a passive hard-
wired signal path from the
analog source inputs to the
outputs used to feed the DAW,
the LK-Solo accomplishes this
without introducing any
audible or measurable
distortion, coloration, or noise
to the recorded signal. This
also means that the LK-Solo
Volume settings only impact
the headphone Cue-Mix, and
thus have no effect on the
recorded signal.
All digital audio recording systems introduce time delay between signal arrival and playback. In computer
based DAW systems this can be a combination of converter delay, and computer processing.
To reduce latency, some systems utilize a digital mixer between the ADC output and the DAC input and mute
the recorded signals in the DAW. This effectively bypasses the computer’s contribution to the latency.
However, the converter delay remains.
Unlike these “low latency” systems, the Lavry LK-Solo completely bypasses the entire latency problem (both
the converter delay and the computer delay). It does so by mixing the live sound signal (prior to conversion)
with the DAW output.
In this manual, the term “live signal” refers to the signal to be recorded. This signal is fed to the LK-Solo, and
then from LK-Solo to the recording input normally used for this purpose. The LK-Solo is compatible with both
line and professional signal levels.
Figure 1 –Headphone Latency in Digital Recording

The Front Panel
6
Headphones with 1/8” mini plugs can be connected to this output using an adapter.
Layout
This section gives an overview of the controls and connectors of the LK-Solo. More detailed information is
available in later chapters of this manual.
The Lavry LK-Solo has a simple user interface that consists of 2 pushbuttons, one column of LEDs, one
rotary knob, and a numerical LED display.
Figure 2- Front Panel Layout
1. Headphone Output
2. CH1/ Mono Input
3. CH2 Input
4. Selection Indicator LEDs
5. Select Button
6. Resolution Button
7. Volume Level Display (dB)
8. Rotary Encoder Volume Control Knob
HEA D P H O NE OUTPU T
This ¼” headphone output works with a wide range of headphones. The unit provides protection against
“pops” or “thumps” when the unit is turned on or off.
The stereo inputs can accept “+4” as well as “-10” level signals.

The Front Panel
7
CH1/MO N O INPU T
This ¼” input receives CH1when recording two channels. When nothing is connected to the CH2 Input, CH1
is routed to both CH1 and CH2 of the headphone mix as a MONO input.
CH2INPUT
This ¼” input receives CH2when recording two channels.
SEL ECTION IND I C A T O R LEDS
Each LED in this group of 4 indicates a possible selection for the Rotary Knob, and has an adjacent label
printed to the left of each LED. Only 1 LED will ever be illuminated at a time. The LEDs correspond (from top
to bottom) to the following Volume control selections: STEREO,CH1,CH2,CH1+2.
SEL ECT BUTTON
This button selects which of the 4 Volume settings the Rotary Knob currently controls. This button also
selects the corresponding Selection Indicator LED to be illuminated.
RES O L U T I O N BU TTO N
This button toggles the Volume adjustment step size of the Rotary Knob between 3dB and ½dB.
VOLUME DIS P L AY
This 3 digit display reads out the relative Volume level (dB) of the current selection. The minimum level is
“00.0” and the signal is Muted. The maximum level is “66.0”.
ROTARY EN C OD ER VO L U M E CO NT R O L KNOB
Rotation of the Rotary Knob adjusts the Volume of the selected signal in the Headphone Cue mix, as
indicated by the Volume Display. Clockwise rotation increases the selected Volume, and Counterclockwise
rotation decreases the selected Volume. The size of the Volume adjustment of a rotational step is controlled
by the Resolution Button.
LK-Solo Volume settings do not affect the recorded signal. They only control the headphone cue mix.
Once the Volume reaches the top or bottom of the range, the knob may continue to be turned, but no
further Volume adjustments are made.
The Volume setting does not change until the Rotary Knob is turned. This allows the user to “step through”
the other Volume settings by repeatedly pressing the Select Button.

The Rear Panel
8
Figure 3- Rear Panel Layout
9. Stereo Input Left
10. Stereo Output Left
11. Stereo Input Right
12. Stereo Output Right
13. CH1 Output
14. CH2 Output
15. Power Switch
16. AC Power Connector
STEREO IN P UT LEFT
This ¼” input receives the left analog output of the DAW or of any stereo source.
STEREO OU T P U T LE F T
This ¼” output is hardwired to Stereo Input Left, allowing an unbroken connection from the left analog
output of the DAW to the destination (i.e. monitor controller, mixer, etc.).
STEREO IN P UT RIGH T
This ¼” input receives the right analog output of the DAW or of any stereo source.
STEREO OU T P U T RI GHT
This ¼” output is hardwired to Stereo Input Right, allowing an unbroken connection from the right analog
output of the DAW to the destination (i.e. monitor controller, mixer, etc.).
CH1 OU T P UT
This ¼” output is hardwired to the CH1/Mono Input on the front panel, allowing an unbroken connection
from the CH1 /Mono Source to the analog input of the DAW.
CH2 OU T P UT
This ¼” output is hardwired to the CH2 Input on the front panel, allowing an unbroken connection from the
CH2 source to the analog input of the DAW.
POWE R SW I T C H
The power switch is a two position rocker switch.
AC POWE R CO N NECTOR
This unit accepts AC Power in the range of 93-264 Volts at 47-63 Hertz. Adjustment to AC power input
in this range is automatic; there are no settings to change.

Setup and Use
9
Setup and Use
This section assumes that you have read the Layout section of the manual, and are familiar with the basic
operation of the front panel controls as well as the input and output connections.
This simple set-up allows the LK-Solo to function as a headphone amplifier.
1. Connect the AC power plug to the LK-Solo and to your AC power socket.
2. Power on the LK-Solo.
3. Select STEREO and set the Volume to zero.
4. Select CH1 and set the Volume to zero.
5. Select CH2 and set the Volume to zero.
6. Select CH1+2 and set the Volume to zero.
7. Connect the DAW main stereo monitor outputs to Stereo Input Left and Stereo Input Right.
8. Connect headphones to the Headphone Output.
9. Select STEREO.
10. Play a track and raise the STEREO Volume level of the LK-Solo to comfort.
(Optional) Adding External Monitoring: Connect the Stereo Output Left and Stereo Output
Right of the LK-Solo to a monitor system. This signal is not affected by the LK-Solo Volume settings and is
the same (un-attenuated) level as the DAW main stereo output.
The LK-Solo must be powered on when the system that it is connected to is in use. Distortion may result
to signals passing through the LK-Solo when it is not powered.
Muting unused inputs will minimize headphone noise.
While connected to the LK-Solo, it is important that the external monitoring controller be powered on,
even when it is not in use.
The connection between the output of the DAW and the input of the monitor system is uninterrupted. If
the output of the DAW uses balanced cables, then the output of the LK-Solo must also be connected to
the monitor system with balanced cables. Conversely, if the output of the DAW uses unbalanced cables,
then the output of the LK-Solo must also be connected to the monitor system with unbalanced cables.

Setup and Use
10
The LK-Solo has two front panel inputs for recording source connection: CH1/MONO and CH2.
The CH1/MONO Input can serve as a MONO input when only one source is to be recorded. When there is
nothing plugged into the front panel CH2 input, the signal is routed from the CH1/MONO input to both the
CH1 and CH2 inputs. Due to the direct connection between the front and rear panel jacks, when a mono
signal is routed to both CH1 and CH2 inputs, the same signal will appear on both CH1 and CH2 outputs.
PANNING
The source signal or signals in the headphone mix are automatically distributed in the following manner:
1.) When only one source is connected to the front panel CH1/MONO input, the signal is routed to CH1 and
CH2, resulting in the signal appearing in the headphone mix with CENTER panning when the Volume is
adjusted using the CH1+2 setting.
2.) When either two separate sources or one stereo source are connected to the front panel CH1/MONO and
CH2 inputs, the CH1 signal will appear in the headphone mix with LEFT panning and the CH2 signal will
appear with RIGHT panning. With individual sources, the individual CH1 and CH2 settings would typically be
used to control the Volume. For stereo sources, the CH1+2 setting allows easy adjustment of both channels
at the same time.
1. First, complete all steps listed in the section titled Setup for Playback Listening included
previously in this chapter of the manual.
2. Select CH1+CH2, and lower the Volume to zero.
3. Connect live signal source to CH1 Input/ Mono Input.
4. Connect CH1 Output to the analog record input of your DAW. Use balanced cables for balanced
signals or unbalanced cables for unbalanced signals.
5. Raise the Volume of CH1+2 to the optimal level.
CH1+2, CH1, and CH2 are three completely independent Volume settings. Changing the Volume of CH1
or CH2 does not affect the Volume of CH1+2, or vice versa. By selecting either CH1 or CH2 and rotating
the knob, the unit will suddenly switch to stereo mode Volume settings. If CH1 or CH2 are set to a much
higher Volume setting than CH1+2, a sudden increase in loudness will be heard, and damage to
hearing/headphones may result. To prevent damage in case of accidentally switching to stereo mode, it
is highly recommended to make sure that CH1 and CH2 are both muted during setup.

Setup and Use
11
1. First, complete all steps listed in the section titled Setup for Playback Listening included
previously in this chapter of the manual.
2. Select CH1 and lower the Volume to zero.
3. Select CH2and lower the Volume to zero.
4. Connect one live signal source to CH1/Mono Input.
5. Connect the 2nd live signal source to CH2 Input.
6. Select CH1 and raise the Volume to the optimal level.
7. Select CH2 and raise the Volume to the optimal level.
1. First, complete all steps listed in the section titled Setup for Playback Listening included
previously in this chapter of the manual.
2. Select CH1+2 and lower the Volume to zero.
3. Connect a live stereo signal source to the CH1/Mono Input and to the CH2 Input. Use balanced
cables for balanced signals or unbalanced cables for unbalanced signals.
4. Connect CH1 Output and CH2 Output to the analog record inputs of your DAW. Use balanced
cables for balanced signals or unbalanced cables for unbalanced signals.
5. Select CH1+2 and raise the Volume to the optimal level.
CH1+2, CH1, and CH2 are three completely independent Volume settings. Changing the Volume of CH1
or CH2 does not affect the Volume of CH1+2, or vice versa. By selecting either CH1 or CH2 and rotating
the knob, the unit will suddenly switch to stereo mode Volume settings. If CH1 or CH2 are set to a much
higher Volume setting than CH1+2, a sudden increase in loudness will be heard, and damage to
hearing/headphones may result. To prevent damage in case of accidentally switching to stereo mode, it
is highly recommended to make sure that CH1 and CH2 are both muted during setup.
CH1+2, CH1, and CH2 are three completely independent Volume settings. Changing the Volume of CH1
or CH2 does not affect the Volume of CH1+2, or vice versa. By selecting CH1+CH2 and rotating the knob,
the unit will suddenly switch to mono mode Volume settings. If CH1+2is set to a Volume much higher
than CH1 or CH2, a sudden increase in loudness will be heard, and damage to hearing/headphones may
result. To prevent damage to in case of accidentally switching to mono mode, it is highly recommended
to make sure that CH1+2 is muted during setup.

Recording with the LK-Solo
12
Recording with the LK-Solo requires the same operational techniques used with “low latency” overdubbing
systems. The performer will not monitor their “live” signal through the DAW.
The recording software input channels must be set to remain in “playback mode” and NOT switch to “input
monitor” when the channels enter RECORD. Otherwise; an “echo” or “flange” effect will be heard when the
“live” and input monitor signals mix in the LK-Solo headphone cue mix.
When performing a punch-in, it is recommended that the previously recorded track segment be trimmed to
end either at the punch-in point or shortly thereafter. This will prevent the performer from hearing the
previously recorded track beyond the punch-in point. If a section is being replaced, the section can also
simply be muted, if the software allows.
INP U T MO NITORING IN RECORD
Some programs such as ProTools do not offer the option of disabling Input Monitoring during record. In this
case a second track can be used as the “record” track, with the fader all the way down or the “mute”
enabled. After recording, “time locking” the newly recorded segment allows it to be moved to the “playback”
channel before the next take. For more information, please visit the following URL:
http://lavryengineering.com/pdfs/lavry-working-with-protools-and-the-lavry-latency-killer.pdf.
Cakewalk- Turn off “Input Echo” to mute input monitoring.
Reaper- Turn off Input Monitoring (Right-clicking on Input Monitor button of Mixer channel strip will show
“Monitor track media when recording” checked).
Nuendo- Set Input Monitoring mode to “Manual” in Preferences VST page. Use button with speaker symbol
to turn off input monitoring on channel strip.
Logic-
To disable “Auto Software Monitoring;” do one of the following:
1.) Choose Options > Audio > De-select Auto Input Monitoring from the main menu bar (or use the Toggle
Auto Input Monitoring key command).
2.) Control-click (or right-click) the Record button in the Transport bar, and de-select the Auto Input
Monitoring setting from the pop-up menu.
For other Digital Audio Workstation software, please consult your software’s manual.

Specifications
13
Specifications
The LK-Solo inputs accept both “+4” professional line level and
“-10” (consumer) line level signals. Inputs may be either balanced or unbalanced.
With the exception of the Headphone output, each of the outputs of the LK-Solo is hard-wired to an input.
As such, the output signals are identical to their respective input signals. Therefore, the levels are un-
attenuated, and the balance/unbalanced wiring of the output cables should be the same as that of their
respective input cables.
The headphone output is designed for a maximum output level of +18 dBu. An appropriate adapter can be
used to connect headphones with a 1/8” (mini) plug.
The unit automatically adjusts to power inputs in the range of 83-265VAC, 47-63Hertz. No change of settings
is necessary.
Dimensions: 8”W x 1.75”H x 10.75” D (front panel to rear panel connectors; front panel knob adds 5/8”)
An optional Rack Mount Kit is available which can be used to mount any combination of two LavryBlack
1/2 rack units in a 1U 19” rack space. Please note that this kit cannot be used to rack mount a single LK-
Solo. Weight: Unit ~5lbs.
Shipping weight: ~6 lbs.
When an input signal is not in use, it is advisable to mute the Volume for that signal to prevent additional
noise from entering the headphone mix.
Appendix 1
14
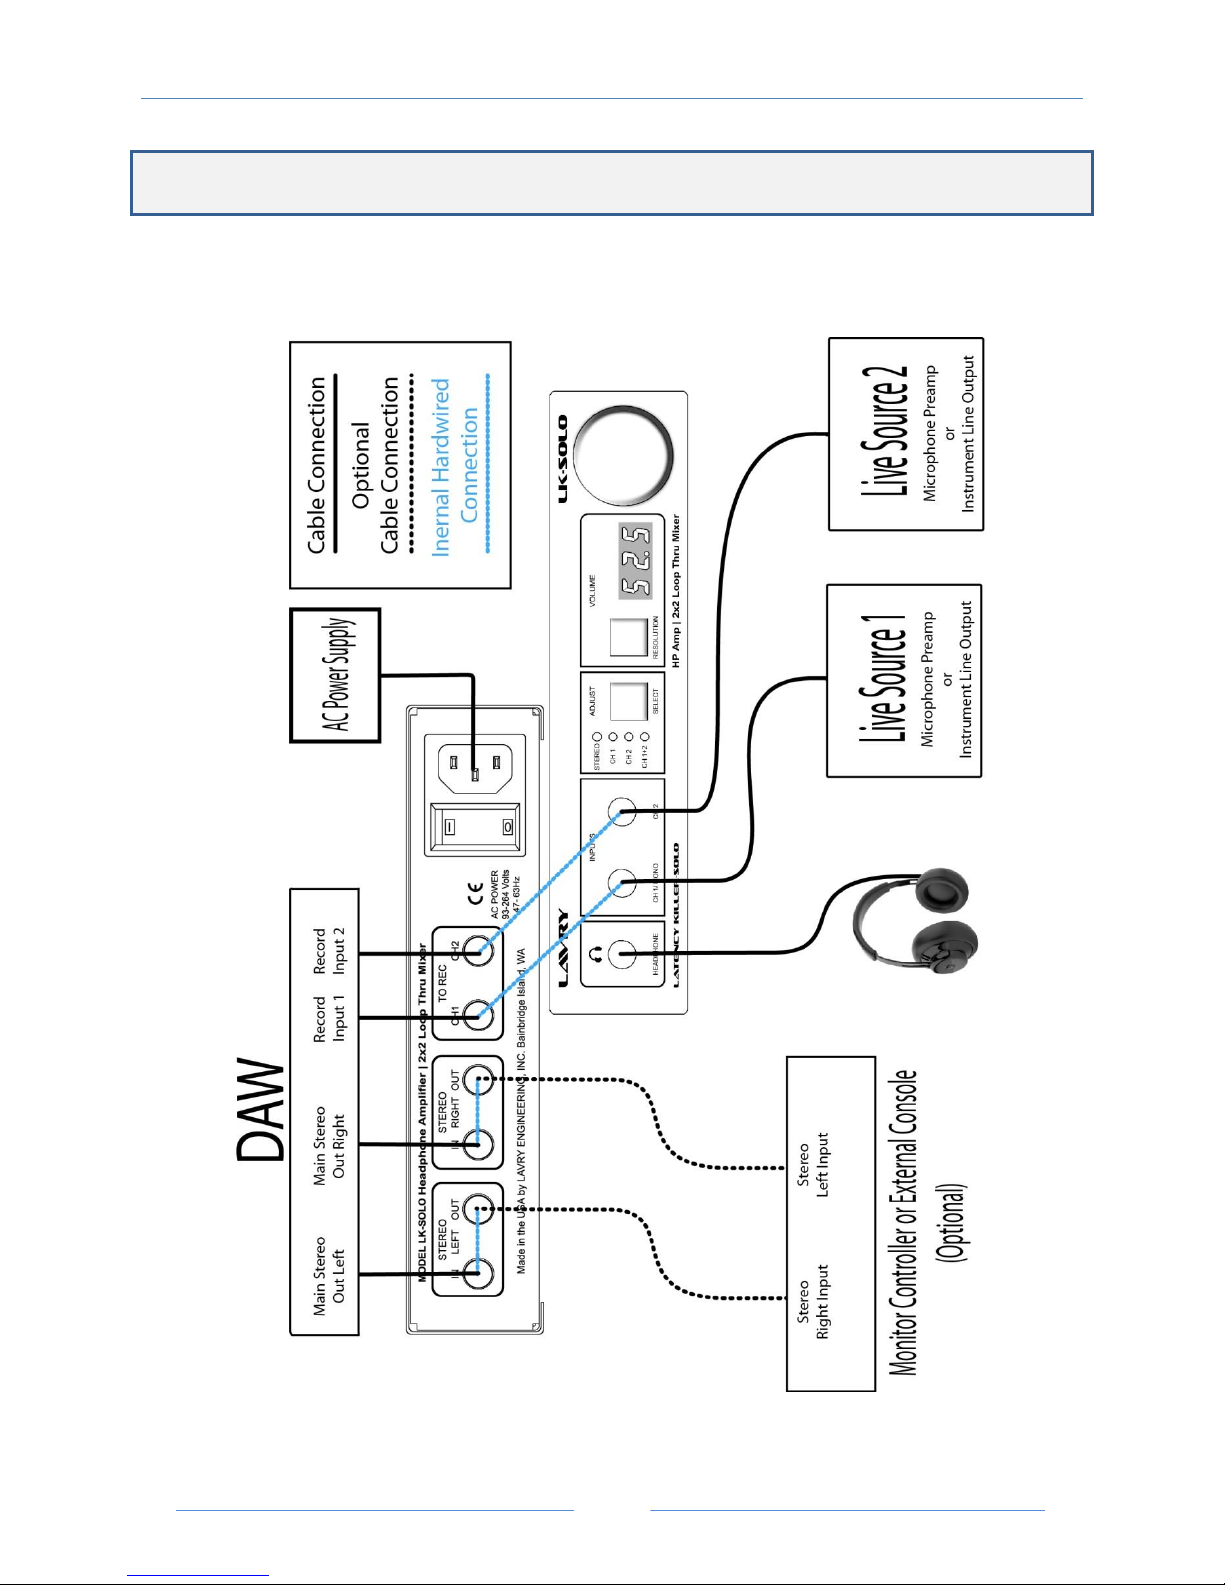
Appendix 1 –Connection Diagram

Warranty
15
Limited Warranty –Lavry LK-Solo
Subject to the conditions set forth below, for one year after the original purchase date of the product, Lavry
Engineering will repair the product free of charge in the United States in the event of a defect in materials or
workmanship.
Lavry Engineering may exchange new or rebuilt parts for defective parts. Please call the factory for an RMA
number prior to shipment. No product will be accepted for warranty service without a pre-issued RMA number.
This warranty is extended only to an original purchaser of the product from Lavry Engineering, or an authorized
reseller of Lavry Engineering. Products that are purchased from unauthorized resellers do not have any warranty
coverage. A valid purchase receipt or other valid proof of purchase will be required before warranty service is
provided. This warranty only covers failures due to defects in materials or workmanship and does not cover
damages which occur in shipment or failures resulting from accident, misuse, line power surges, mishandling,
maintenance, alterations and modifications of the product, or service by an unauthorized service center or personnel.
Lavry Engineering reserves the right to deny warranty service to products that have been used in rental, service
bureau, or similar businesses.
This limited warranty gives you specific legal rights. You may have others which vary from state/jurisdiction to
state/jurisdiction.
LIMITS AND EXCLUSIONS
LAVRY ENGINEERING DOES NOT, BY VIRTUE OF THIS AGREEMENT, OR BY ANY COURSE OF PERFORMANCE,
COURSE OF DEALING, OR USAGE OF TRADE, MAKE ANY OTHER WARRANTIES, EXPRESS OR IMPLIED,
INCLUDING, WITHOUT LIMITATION, ANY WARRANTY OF MERCHANTABILITY, FITNESS FOR A PARTICULAR
PURPOSE, TITLE OR NONINFRINGEMENT, AND ALL SUCH WARRANTIES ARE HEREBY EXPRESSLY
DISCLAIMED. LAVRY ENGINEERING EXPRESSLY DISCLAIMS ANY IMPLIED INDEMNITIES. LAVRY
ENGINEERING SHALL NOT BE LIABLE FOR ANY INDIRECT, INCIDENTAL, CONSEQUENTIAL, PUNITIVE,
SPECIAL OR EXEMPLARY LOSSES OR DAMAGES, INCLUDING, WITHOUT LIMITATION, DAMAGES TO
RECORDINGS, TAPES OR DISKS, DAMAGES FOR LOSS OF BUSINESS PROFITS, BUSINESS INTERRUPTION, LOSS
OF BUSINESS INFORMATION, LOSS OF GOODWILL, COVER, OR OTHER PECUNIARY LOSS, ARISING OUT OF OR
RELATING TO THE USE OF THE PRODUCT, OR ARISING FROM BREACH OF WARRANTY OR CONTRACT,
NEGLIGENCE, OR ANY OTHER LEGAL THEORY, EVEN IF LAVRY ENGINEERING HAS BEEN ADVISED OF THE
POSSIBILITY OF SUCH LOSSES OR DAMAGES. ANY DAMAGES THAT Lavry ENGINEERING IS REQUIRED TO
PAY FOR ANY PURPOSE WHATSOEVER SHALL NOT EXCEED THE ORIGINAL COST PAID TO LAVRY
ENGINEERING FOR THE APPLICABLE PRODUCT. BECAUSE SOME STATES/JURISDICTIONS DO NOT ALLOW
THE EXCLUSION OR LIMITATION OF LIABILITY FOR CONSEQUENTIAL OR INCIDENTAL DAMAGES, THE
FOREGOING LIMITATION MAY NOT APPLY TO YOU.
Table of contents
Other Lavry Amplifier manuals


