LG MFL31245144 User manual

WashingMachine
OWNER°S MANUAL
WD(M)-1227(0,-,9)RD(K)
machine.
manualcarefully,it provides
lation,useand maintenance.
ofyourwashing

[] Direct Drive System
The advanced Brushless DC motor directly drives the drum without
belt and pulley.
[] Tilted Drum and Extra Large Door Opening
Tilted drum and extra large opening make it possible to load
and unload clothing more easily.
[] Water Circulation
Spray detergent solution and water onto the load over and over.
Clothes are soaked more quickly and thoroughly during wash cycle.
The detergent suds can be removed more easily by the water shower
during rinse cycle. The water circulation system uses both water and
detergent more efficiently.
[] Ro|lerJets
Washing ball enhances the wash performance and reduces damage
to the clothing. The jets spray and help tumble clothes to enhance
washing performance while maintaining fabric care.
[] Built-in Heater
Internal heater automatically heats the water to the best temperature
on selected cycles.
[] Child Lock
The Child lock prevents children from pressing any button to change
the settings during operation.
Warnings ............................................................................................... 3
Specification .......................................................................................... 5
Installation ............................................................................................. 6
Care before washing ........................................................................... 12
Adding detergent ................................................................................. 13
Function .............................................................................................. 15
How to use washer ............................................................................. 16
Maintenance ....................................................................................... 24
Troubleshooting guide ........................................................................ 28
Terms of Warranty .............................................................................. 31

READALL INSTRUCTIONS AND EXPLANATION OF THE INSTALLATION BEFORE USE
For your safety, the information in this manual must be followed to minimize
the risk of fire or explosion, electric shock, or to prevent property damage,
personal injury, or loss of life.
iMPORTANTSAFETYiNSTRUCTiONS
WARNING : To reduce the risk of fire, electric shock, or injury to persons when using
the washer, follow basic precautions, including the following:
• Before installation, check exterior damages. Ifit has,
do not install.
• Donot install or storethe washer where itwill
beexposed to the weather.
• Do nottamper with controls.
• Donot repair or replaceany part ofthe washer
or attempt any servicingunless specifically
recommendedin the user-maintenance instructions
or publisheduser-repair instructions that you
understandand have theskills to carry out.
• Keepthe area underneath and aroundyour
appliances free ofcombustible materials suchas
lint, paper,rags, chemicals, etc.
• Close supervision is necessary if this appliance is
used by or near children or infirm persons.
Do not allow them to play on, with, or inside this
or any other appliance.
• Keep washer away from fire.
• Donot leavethe washerdoor open.
An open door could entice children to hang onthe
door or crawl insidethe washer.
• Never reach into washer while it is moving. Wait
untilthe drum has completely stopped.
•The laundry process can reduce theflame retardant
of fabrics.
•To avoid such a result,carefully follow the garment
manufacturer'swash and care instructions.
• Donot wash or dry articles that have been cleaned
in, washed in, soaked in, or spottedwith
combustible or explosive substances (such as wax,
oil, paint, gasoline,degreasers, dry-cleaning
solvents,kerosene, etc.)which may igniteor
explode. Oil may remain in thetub after a whole
cycle resulting in fire during drying. So, do not load
oiledclothes.
• Do notslam the washer door closed or try to force
thedoor openwhen locked. This could result in
damageto the washer.
• When the machine runshigh temperature, the front
door may bevery hot.Don't touch it.
• To minimizethe possibility of electric shock, unplug
this appliancefrom the powersupply or disconnect
thewasher atthe household distribution panel by
removingthe fuse or switching offthe circuit breaker
beforeattempting any maintenance or cleaning.
• When unplugging power cord,do not pullout by
graspingthe cord. Otherwise, the power cord may
bedamaged.
• Never attempt to operatethis appliance if it is
damaged, malfunctioning, partiallydisassembled, or
has missingor broken parts, includinga damaged
cordor plug.
• Before discarding anold machine unplug it. Render
the plug useless.Cut offthe cabledirectly behind
theappliance to prevent misuse.
• When a product was under water, Please call
service center. The risk ofelectric shock and fire.
!s Do not push down the door excessively, when washer door open.
This could topple over the washer.
SAVE THESEiNSTRUCTIONS
GROUNDING iNSTRUCTiONS
Thisappliancemustbegrounded.Intheeventofmalfunctionorbreakdown,groundingwillreducetheriskofelectricshockbyprovidingapath
ofleastresistanceforelectriccurrent.Thisapplianceisequippedwithacordhavinganequipment-groundingconductorandgroundingplug.
Theplugmustbepluggedintoanappropriateoutletthatisproperlyinstalledandgroundedinaccordancewithalllocalcodesandordinance.
• Donot use an adapteror otherwise defeatthe grounding plug.
• Ifyou don't havethe proper outlet, consult anelectrician.
WARNING : Improperconnectionoftheequipment-groundingconductorcanresultin riskofelectricshock.Checkwith
a qualifiedelectricianor servicemanif you arein doubtas to whethertheapplianceisproperlygrounded.Do notmodify
theplugprovidedwiththeappliance- if it doesnotfit the outlet,haveaproperoutletinstalledby aqualifiedelectrician.
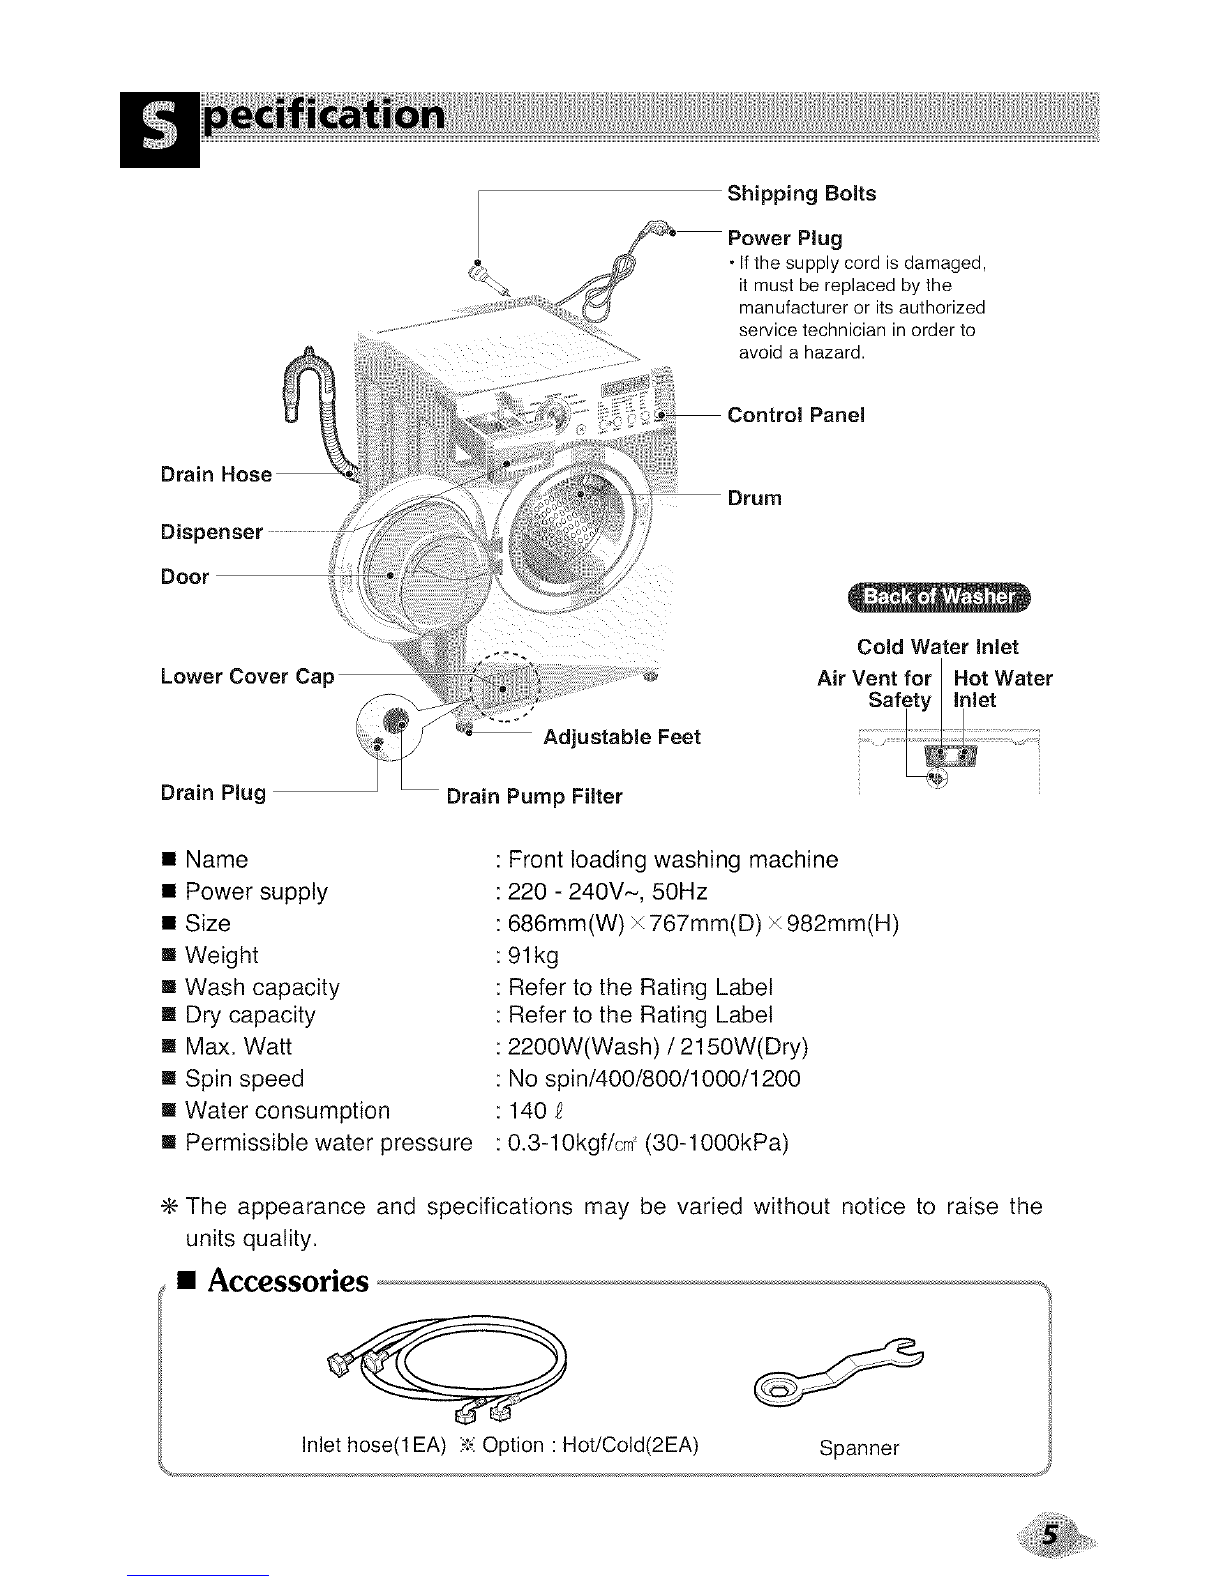
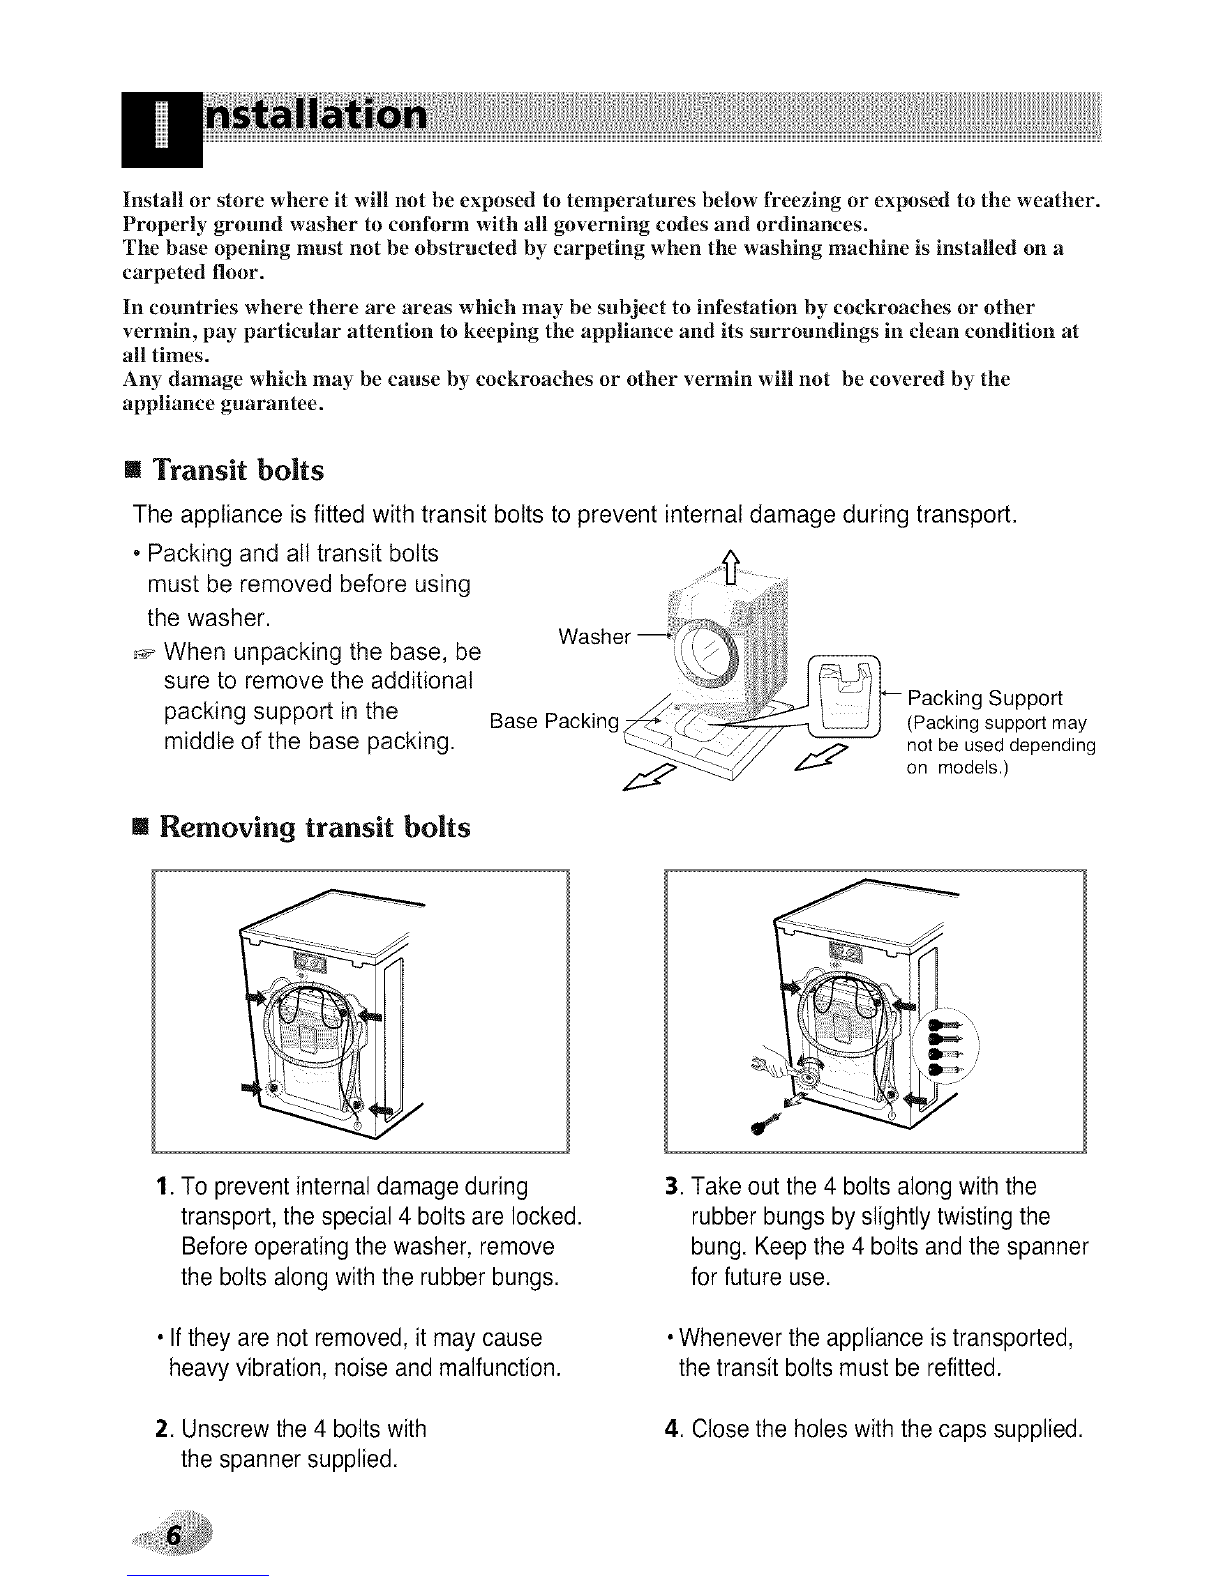
To minimize the risk of fire in a tumble dryer, the following should be observed:
• Items that have been spotted or soaked with vegetable or cooking oil constitute a fire
hazard and should not be placed in a tumble dryer.
Oil-affected items can ignite spontaneously, especially when exposed to heat
sources Such as in a tumble dryer. The items become warm, causing an oxidation
reaction in the oil. Oxidation creates heat. If the heat cannot escape, the items can
become hot enought to catch fire. Piling, stacking or storing oil-affected items can
prevent heat from escaping and so create a fire hazard.
If it is unavoidable that fabrics that contain vegetable or cooking oil or have been
contaminated by hair care products be placed in a tumble dryer they should first be
washed in hot water with extra detergent-this wilt reduce, but not eliminate, the
hazard. Washed in hot water with extra detergent-this wilt reduce, but not
eliminate, the hazard. The 'coot down' cycle of tumble dryers should be used to
reduce the temperature of the items. They should not be removed from the tumble
dryer or piled or stacked while hot.
• Items that have been previously cleaned in, washed in, soaked in or spotted with
petro/gasoline, dry-cleaning solvents or other flammable or explosive substances
should not be placed in a tumble dryer.
Highly flammable substances commonly used in domestic environments include
acetone, denatured alcohol, petrol/gasoline, kerosene, spot removers (some brands),
turpentine, waxes and was removers.
• Items containing foam rubber (also known as latex foam) or similarly testured rubber.
like materials should not be dried in a tumble dryer on a heat setting.
Foam rubber materials can, when heated, produce fire by spontaneous combustion.
• Fabric softeners or similar products should not be used in a tumble dryer to eliminate
the effects of static electricity unless this practice is specifically recommended by the
manufacturer of the fabric softener or product.
• Undergarments that contain metal reinforcements should not be placed in a tumble
dryer.
Damage to the tumble dryer can result if metal reinforcements come loose during
drying. When available a drying rack could be used for such items.
• Plastic articles such as shower caps or babies waterproof napkin covers should not
be placed in a tumble dryer.
• Rubber-backed articles, clothes fitted with foam rubber pads, pillows, galoshes and
rubber-coated tennis shoes should not be placed in a tumble dryer.

Shipping Bolts
Plug
•If the supply cord is damaged,
it must be replaced by the
manufacturer or its authorized
service technician in order to
avoid a hazard.
Control Panel
Drain F
Dispenser
Doo_
Lower Cover Ca
Drum
Cold Water Inlet
-- Adjustable Feet
Drain Plug Drain Pump Filter
[] Name
[] Power supply
[] Size
[] Weight
[] Wash capacity
I Dry capacity
[] Max. Watt
[] Spin speed
[] Water consumption
[] Permissible water pressure
: Front loading washing machine
: 220 - 240V~, 50Hz
: 686mm(W) x 767mm(D) x 982mm(H)
•91kg
Refer to the Rating Label
2200W(Wash) /2150W(Dry)
No spin/400/800/1000/1200
140
0.3-10kgf/cm_(30-1000kPa)
÷ The appearance and specifications may be varied without notice to raise the
units qua{ity.
Spanner

Install or store where it will not be exposed to temperatures below freezing or exposed to the weather.
Properly ground washer to conform with all governing codes and ordinances.
The base opening must not be obstructed by carpeting when the washing machine is installed on a
carpeted floor.
In countries where there are areas which may be subject to infestation by cockroaches or other
vermin, pay particular attention to keeping the appliance and its surroundings in clean condition at
all times.
Any damage which may be cause by cockroaches or other vermin will not be covered by the
appliance guarantee.
mTransit belts
The appliance is fitted with transit bolts to prevent internal damage during transport.
,Packing and all transit bolts
must be removed before using
the washer.
:_ When unpacking the base, be
sure to remove the additional
packing support in the
middle of the base packing. on models.)
mRemoving transit belts
1. To prevent internal damage during
transport, the special 4 bolts are locked.
Before operating the washer, remove
the bolts along with the rubber bungs.
•Ifthey are not removed, it may cause
heavy vibration, noise and malfunction.
2. Unscrew the 4 bolts with
the spanner supplied.
3. Take out the 4 bolts along with the
rubber bungs by slightly twisting the
bung. Keep the 4 bolts and the spanner
for future use.
• Whenever the appliance is transported,
the transit bolts must be refitted.
4. Close the holes with the caps supplied.

• Installation place requirement
Drain Hose Level floor :
Allowable slope under entire washer is 1°
Power outlet •
Must be within 1.5 meters of either side of location of
washer. Do not overload the outlet with more than one
appliance.
Additional Clearance :
For wall, door and floor modeling is required.
(10cm : rear/2cm:right & left side)
Do not place or store laundry products on top of washer
at any times.
They can damage the finish or controls.
• Positioning
Install the washer on a flat hard floor.
Make sure that air circulation around the washer is not impeded by carpets,rug etc.
• Never try to correct any unevenness in the floor with pieces of wood, cardboard or similar
materials under the washer.
• If it is impossible to avoid positioning the washer next to a gas cooker or coal burning stove,an
insulating(686x767x982mm) covered with aluminum foil on the side facing the cooker or
stove,must be inserted between the two appliance.
•The washer must not be installed in rooms where the temperature can drop below 0°C.
• Please ensure that when the washer is installed, it is easily accessible for the engineer in the
event of a breakdown.
•With the washer installed adjust all four feet using the transit bolt spanner provided ensuring the
appliance is stable, and a clearance of approximately 20mm is left between the top of the washer
and the underside of the work-top.

m Electrical connection
1. Do not use an extension cord or double adapter.
2. If the supply cord is damaged, it must be replaced by the manufacturer or its service agents or similarly
qualified person in order to avoid a hazard.
3. Always unplug the machine and turn off the water supply after use.
4. Connect the machine to an earthed socket in accordance with current wiring regulations.
5. The appliance must be positioned so that the plug is easily accessible.
• Repairs to the washing machine must only be carried out qualified personnel. Repairs carried out by
inexperienced persons may cause injury or serious malfunctioning. Contact your local service center
• Do not install your washing machine in rooms where temperatures below freezing may occur. Frozen
hoses may burst under pressure. The reliability of the electronic control unit may be impaired at
temperatures below freezing point.
• If the appliance is delivered in the winter months and temperatures are below freezing : Store the washing
machine at room temperature for a few hours before putting it into operation.
[] Washing Machine is to be connected to the water mains using new hose-sets and that old
hose-sets should not be used.
[] Connecting water supply hose
•Waters_qfl_Ivpressure must be between 30kPu and lO00kPu
(0.3-lOkgFcm +)
•Don't strip oi crossthread _ahenconnecting hdet hose to the _uhe.
•If the _uter sHpplvpressure is more than lO00kPa, a decompression de_ice
should be installed.
• Two rubber seals are supplied with the water inlet hosesthese are in
order to prevent water leaks.
• Check water tightness of washing machine connections by turning
the tap completely on,
• Periodically check the condition of the hose and replace the hose if
necessary,
• Make sure that there is no kink onthe hose and that it is not crushed.
•When)oiir _usher has t++o_uhes,
• Ifthe washer has two valves, the energy is saved by using hot valve.
washer
Aftercompletingconnection,if waterleaksfromthe hose,repeatthesamesteps.Usethe mostconventionaltype
offaucetforwatersupply.Incasethefaucetissquareortoobig,removethespacingringbeforeinsertingthe
faucetintotheadaptor.

• Normal Tap without thread & screw type inlet hose
1. Unscrew the fixing screw to
attach the tap.
Upper
Connector Rubber
Fixing screw
2. Push the connector uptill the
rubber packing is in tight contact
with the tap. Then tighten the 4
screws.
Rubber packing
Upper Connector - --. '_,/ _--
3. Push the water supply hose
vertically upwards so that the
rubber packing within in the
hose can adhere completely to
the tap and then tighten it by
screwing it to the right.
Upper ff:_ _
Connector _
Plate _-'_
Water supply hose _:_ "_
• Normal Tap without thread & one touch type inlet hose
1. Untighten the upper connector
screw. 2. Pushthe upper connector uptill 3o Connect the water supply hose to
the rubber packing is in tight the middle connector, pushing
contact with the tap. Then tighten the plate down.
Upper Rubber the 4 screws.
Conn_ packing
/_connector Rubber pac_ng__:_g_A,, _&-- Upper i1,_ plate
FixingJe"_ Middle Upper Conn_ ___fi Connector
Mid__ Water supply ....
• Incase the diameter ofthe tap connector_E_ hose
is large remove the guide plate.
Guide_e _ctor
Used the horizontal tap
•Turn the middle connector not
to have water leaked.
•Make sure that the rubber seal
is inside the hose connector.
Hose conn,@
bber seal
• To separate the water supply
hose from the middle connector
shut offthe tap. Then pull the
inlet hose down, pushing the
plate down.
• Your machine comes with only
cold water connection.
• Make surethat there are no
kinks in the hose andthat it is
not crushed.

This equipment is not designed for maritime use or for use mobile installations such as
caravans, aircraft etc.
Turn off the stopcock if the machine is to be left for any length of time (e.g. holiday),
especially if there is no floor drain(gully) in the immediate vicinity.
When disposing of the appliance, cut off the mains cable, and destroy the plug Disable the
door lock to prevent young children being trapped inside.
Packaging material (e.g. Films, Styrofoam) can be dangerous for children. There is a risk of
suffocation ) Keep all packaging well away from children
• Installation of drain hose
• When installing the drain hose sink,
secure it tightly with a string.
• Proper securing of the drain hose wilt
protect the floor from damage due to
water leakage.
a
i
• The drain hose should not be placed higher
than 100 cm above the floor. Water in the
washer does not drain or drains slowly.
• Proper securing of the drain hose will protect
the floor from damage due to water leakage.
• When the drain hose is too long, do not force
back into the washer. This will cause
abnormal noise.
Laundry tub
Hose
Retainer _

• Level adjustment
igher __ _LLower
Adjustablefeet Adjustablefeet
Adjusting the washing machine level properly prevents excessive
noise and vibration.
Install the appliance on asolid and level floor surface, preferably in a
corner of the room.
Timber or suspendedtype flooring may contribute to
excessivevibration and unblance errors.
2. If the floor is uneven, adjust the adjustable feet as required. (do not
insert pieces of wood etc. under the feet)
Make sure that all four feet are stable and resting on the floor and
then check that the appliance is perfectly level. (use a spirit level)
After the washer is level, tighten the lock nuts up towards of the base of
the washer. All lock nuts" must be tightened.
In the casethat the washing machine is installed on a raised
platform, it must be securely fastened in order
to eliminate the risk that it might fall off.
I" Diagonal Cheek
Whenpushing down the edgesof the washing machine topplate diagonally, the machine
should not move upaM down at all. (Please,check both of two _dreetiom)
If machine rocks whenpushing the machine topplate diagonally, adjust thefeet again.
[] Concrete floors
• Theinstallationsurface mustbeclean, dry andlevel.
•Installwasheron a flathard floor.
[] Tile floors (Slippery floors)
•Positioneach footon theTread Mateand levelthe machinetosuit.(CutTreadMate into 70x70 mm
sectionsand stickthe pieceson tothe dry tilewhere machineisto be placed.)
_, TreadMate isaserfadhesivematerial usedon ladders & stepsthat preventsslipping.
[] Wooden floors (Suspended floors) Rubber Cup
• Wooden floors are particularly susceptible to vibration.
•To prevent vibration we recommend you place rubber cups under each foot,
at least ]Smm thick under the washer, secured to at least 2 floor beams with screws.
•If possible install the washer in one of the corners of the room, where the floor is more stable.
_._Insert the rubber cups to reduce vibration.
You can obtain the rubber cups (p/no.4620ER4002B) j_om the LG spares dept.
* Proper placement and levelling of the washer ensurelong,regular and reliable operation.
* Thewasher mustbe absolutely horizontal and standfirmly in position.
* Itmust not "Seesaw" acrosscorners under load.
* The installation surface must be clean, free from floor wax and other lubricant coatings.
* Do not let the feet of the washer get wet. Iffeetof the washer get wet, slipping may occur.

• Before the first washing
Select a cycle (COTTON 60°C, add a half load of detergent) allow the unit to wash
without clothing. This will remove residues and water from the drum that may have been left
during manufacturing.
• Caring before washing
1. Care Labels
Look for a care label on your clothes. This will tell you about the fabric content of your garment and
how it should be washed.
2. Sorting
To get the best results, Sort clothes into loads that can be washed with the same wash cycle.
Water temperature and spin speed and different fabrics need to be washed in different ways.
Always sort dark colors from pale colors and whites. Wash separately as dye and lint transfer can
occur causing discoloration of white etc. If possible, do not wash heavily soiled items with lightly
soiled one.
Soil (Heavy, Normal, Light) Separate clothes according to amount of soil.
Color (White, Lights, Darks) Separate white fabrics from colored fabrics.
Lint (Lint producers, Collectors) Wash lint producers and lint collectors
separately.
3. Caring before loading
•Combine large and small items in a load. Load large items first. Large items should not be more than half"
the total wash load.
Do not wash single items. This may cause an out-of:balance load. Add one or two similar items.
• Check all pockets to make sure that they are
empty. Items such as nails, hair clip, matches,
pens, coins and keys can damage both your
washer and your clothes.
• Close zippers, hooks and strings to make sure
that these items don't snag on other clothes.
• Pretreat dirt and stains by brushing a little
detergent dissolved in water onto stains like
collars and cuffs to help shift dirt.
• Check the folds of the flexible gasket (gray) and
remove any small articles,if any.
• Check inside of the drum and remove any left
items in it for next wash cycle.
• Remove any clothing or items on the flexible
gasket to prevent clothing andthe gasket
damages.

• Adding detergent and fabric softener
1. The Dispenser Drawer
Detergent for Detergent Fabric
mainwash for prewash softener
(_) (__/) (_)
• Main wash only -.> IL.LL/
• Pre Wash + Main Wash -.> _. ILUJ
2. Adding Fabric Softener
• Do not exceed the maximum fill line.
Close the dispenser drawer slowly.
Overfilling can cause early dispensing
of the fabric softener which could stain
clothes.
• Do not leave the fabric softener in the
detergent drawer for more than 2 days.
(Fabric softener could harden)
•Softener will automatically be added
during the last rinse cycle.
•Donotopenthe drawerwhenwateris
supplied.
•Solvents(benzene, etc) are not
allowable.
Do not pour fabric softener
directly on the cloths

3. Detergent dosage
•The detergent should be used according to the
instruction of the detergent manufacture.
• If too much detel\qent is used, too many suds
can o( (ur and this will decrease the washing
result or cause heavy load to the motor.
• Use powder detergent only for thejiont
loading washer.
-_I_If suds occur too much pleas reduce the
detergent amount.
•Detergent usage may need to be adjusted
for water temperature, water hardness,
size and soil level of the load. For best
results, avoid oversudsing.
4. Water softener
÷ Tips
Fullload :according to
manufacturer's recommendation.
Partload : 3/4of the normal
amount,
Minimum load : 112of full load,
• Detergent is flushed from the dispenser
at the beginning of the cycle.
5. Using the Tablets
1) Open the door and Tablets into the
drum.
•A water softener, such as Anti limescale
(Clagon) can be used to cut down on the
use of detergent in extremely hard water
areas. Dispense according to the amount
specified on the packaging.
First add detergent and then the water
softener.
•Use the quantity of detergent as for soft
water.
2) Load the laundry into the drum.
3) Close the door.

• Recommended courses according to the laundry type
Cotton
Cotton-
Eco
Synthetic
Delicate
Wool/Silk
Hand
Wash
Color fast garments
(shirts, night dresses,
pajamas...)and lightly soiled
white cotton (underwear...)
Laundrytype is the
same in Cotton.
Polyamide,Acrylic,
Polyester.
Delicatelaundry easily
damaged.
Machine washable woolens
with pure newwool only.
"Hand Wash" marked
delicate and wool laundry.
60°C
(Cold,
30°C, 40°C,
95°0)
60°C
(40°C)
40°C
(Cold,
30°C,60°C)
30°C
(Cold, 40°C)
30°C
(Cold, 40°C)
Cold
(30°C,40°C)
- Soak
- Pre Wash
- Rinse+Spin
- Spin Only
- Dry Only
- Rinse+Spin
- Spin Only
Rating
Rating
5.0kg
4.0kg
3.0kg
3.0kg
Colored Landry which 30oc - Rinse+Spin
Quick 30 islightely soiledfast. (Cold, 40°C) - Spin Only 5.0kg
- Dry Only
Cotton bedding with filling, 30°C - Rinse+Spin 1 kingsize
Duvet duvet, pillow, blanket, sofa (Cold, 40°C) - Spin Only (9 Tog)
cover with light filling.
÷ Water Temperature : Select the water temperature to the wash cycles.
Always follow garment manufacture's care label or instructions when
laundering.

Wool/Silk
Dell,
Synthetic. , Quick 30
Cotton-Eco. , Duvet
Cotton. Drain
li Cotton automatically
selected upon power on.
• Press the Power((_) button to start.
• Press the Start/Pause(_) button.
• Initial condition
-Wash :Main wash
-Rinse : 3 times
-Spin : 800 tpm
-Water temperature : 60°C
-Program : Cotton
2: Manual Selecting
• Press the Power(Q¢) button to start.
• Select the conditions which you want to
use, by pressing each button.
For selecting the each conditions, please refer
to the page 17~page 23
• Press the Start/Pause button.

Synthetic *
CotomEco,
Coffon"
_!iiiiiiiiii_i_ii_ii_ii_iil_i!iiiiiiiiiiiiiiiiii!i!l_i!;_il_i_!_i!_!_i_!!iiiiiiiiiiiii_i!i!_i!ili!!_!!i_i!!_!_ii_iiii_iiii_i!_iiii_i!_iiiiiiiiiiii!iii!_!i_i_ii_ii_
0) (2) (3)
(1) Button : Power (5) Child lock
(2) Dial: Program (6) Button : Rinse
(3) Button : Start/Pause (7) Button : Spin
(4) Button :Option (8) Button :Temperature
(4) (s) (6) (7) (8) (9) (lo)(I I)
(9) Button : Dry
(10) Button :Time Save
(11) Button :Time Delay
i! !!! !!i !!!!!!!!!!!!!!!!!!!1i
1iil;i
• Press the Power((_)) button to turn power
on and off.
• To cancel the Time Delay function, the
Power(_) button should be pressed.
2;Initial Program
• When the Power(_) button is pressed, the
washer is ready for Cotton program. And the
other initial conditions as follows.
• So, if you want to advance into the washing
cycle without changing the program, just
press Start/Pause(_) button and then the
washer will proceed.
mInitial program
-Cotton Program / Main Wash /
Nmmal Rinse / 800 q_m / 60°C
Wool/SIk
^ nlh Dt:IOG_ ",N: nd ,Was_^0
coLL
Coton'_ ..... ..... _+ Drain
(Program)
•9 programs are available according to the
laundry type.
-Cotton -Hand Wash
-Cotton-Eco -Quick 30
-Synthetic -Duvet
-Delicate -Drain
-Wool/Silk
•Lamp will light up to indicate selected
program.
•When Start/Pause(_) button is pressed,
the Cotton program is automatically
selected.
-By turning the Program dial, the program is
selected in order of "Cotton - Cotton-Eco -
Synthetic - Delicate - Wool/Silk -
Hand Wash - Quick 30 -Duvet -Drain".
Regarding to the laundry type for each program
Please refer to the page 15.

!! !
• This Start/Pause button is used to start
wash cycle or pause the wash cycle.
C} Soak
'_} Pre Wash
t) Rinse+Spin
() Spin Only
{.i Dry Only
Option
• By pressing the option
button, only one option
functions may be selected.
• If temporary stop of wash cycle is needed,
press "Start/Pause" button.
• When in Pause, the power is turned off
automatically after 4 minutes.
• NB, The door will not open before 1 to
2 minutes when Pause is selected,
or at the end of the wash cycle.
Time Left
• Lights whenever the door of the washer is
locked.
•The door can be unlocked by pressing the
Start/Pause button to stop the washer.
•The door can be opened after a short delay.
Tin'_eLeft
• Use this mode to wash normal clothes or
think and heavy clothes which are
excessively dirty.
•Available in Cotton, Cotton-Eco and
Synthetic.
• Use this option for load that need
pretreatment. Adds 17 minutes pre wash
and drain.
-When using Pre Wash option, do not use
liquid detergent in the main wash
comportment. Use powered for the main
wash.
•Available in Cotton, Cotton-Eco and
Synthetic.
3, Rinse÷Spin
• Use this option to rinse and then spin.
•While the "Detecting" is shown in the display
the machine rotates slowly and detects how
many laundries are loaded in the drum.
Itwill take a few seconds.
• Available in Cotton, Cotton-Eco and Synthetic.
iiiil
•When you want spin only, select the this
option.
5: Dry Only
•When you want Dry only, select the this
option.
The required lamp will light up jbr identification.

i!i !!!!!!!!!!!!!! i !1II
Option Rinse
• If you choose to lock the buttons on the
control assembly to prevent tampering, this
function may be selected.
• Child lock can be set by pressing and
holding the Option and Rinse button
simultaneously. (About three seconds)
•When child lock is set, all buttons are
inoperable.
• To deactivate Child lock system, press and
hold the Option and Rinse button
simultaneously again.
(About three seconds)
Rinse
• To change to the desired program, whilst in
child lock mode.
1. Press and hold both Option and Rinse
button together once again.
(About three seconds)
2. Press the Start/Pause button.
3. Select the desired program and press the
Start/Pause button again.
0 Rinse++Hold
O Nolmal+ Hold
(._ Rinse++
0 Rinse+
C)Normal
Rinse
• By pressing the Rinse
button, the Rinse type can
be selected.
1! Normal
•Cotton-Eco / Cotton / Synthetic petfotwzs 3
Rinses
•Wool/Silk / Hand Wash/Quick 30 / Delicate /
Duvet / performs 2 Rinses
iiiii
• Used to additional rinse, which may assist in
removing traces of detergent residue.
• By selecting Rinse+ or Rinse++ function, the
Rinse Time and the Rinse water are
increased.
•Is selected by pressing the Rinse button
repeatedly this function leaves clothes in the
washer; suspended in the water after a rinse
without entering into spin.
•To proceed through to a drain or spin, once
the rinse hold function is completed using to
program dial scroll to the required program.
z=> The required lamp will light tip for
identification.
• The child lock can be set at any time and it
is automatically canceled when operational
errors occur.

Tr_ _I_ _ Time Delay I
Preparing washing before starting "Time Delay"
- Turn on the water tap.
- Load laundry and close the door.
- Place the detergent and fabric softener in
the drawer.
• How to set "Time Delay"
- Press Power(_)) button.
- Turn the Program dial to select
the program you require.
- Press Time Delay button and set the
desired time.
- Press the Start/Pause(_) button.
(" "blinks)
• IfTime Delay button is pressed, "3:00" is
displayed. The maximum delayed time is
19:00 hours and the minimum time is 3:00
hours.
• Each pressing of the button advances time
delay by one hour.
• To cancel the time delay, press the
Power((_) button.
•Time Delay is 'expected time' fromthe
present to the completion ofwashing cycle
or selected process (Wash, Rinse, Spin).
•According to the condition of water sttpply and
temperature, the delayed time and the actual
washing time may vary.
01200
01000
0800
O 400
O No Spin
Spin
• By pressing the Spin button,
the spin speed can be
chosen.
• Spin speed is available according to the
program as follows.
- Cotton & Cotton-Eco & Quick 30
No Spin-400-800-1000-1200
- Synthetic & Wool/Silk & Hand Wash &
Duvet
No Spin-400-800-1000
- Delicate
No Spin-400-800
• If"No Spin" is selected, the washer stops
after draining water.
The reqtdred lamp will light up,for
identification.
This manual suits for next models
20
Table of contents
Other LG Washer manuals
Popular Washer manuals by other brands

Sharp
Sharp ES-HFA9143WD-EE user manual

Bosch
Bosch WAN24292BY User manual and installation instructions

Brandt
Brandt wt08735e Instructions for use

Alliance Laundry Systems
Alliance Laundry Systems Home laundry Automatic Clothes Washers installation instructions

Electrolux
Electrolux EWF 1408 WDL user manual

Heinner
Heinner HSWM-63SL manual